Deploying software through Group Policy Objects (GPOs) is one of the most efficient ways to distribute applications across an organization without requiring manual installation on individual machines. Administrators can use GPOs to silently push MSI packages to users and computers in specific organizational units (OUs), ensuring consistent software environments and reducing IT overhead.
You must have Domain Administrator privileges to create and edit GPOs.
The MSI installer must be placed on a UNC network share (e.g., \fileserver\software\) readable by all target computers.
Decide if you want to assign or publish your software to install via GPO.
How to create a UNC network share to deploy software via GPO
Pick a server that everyone can access to configure the shared folder.
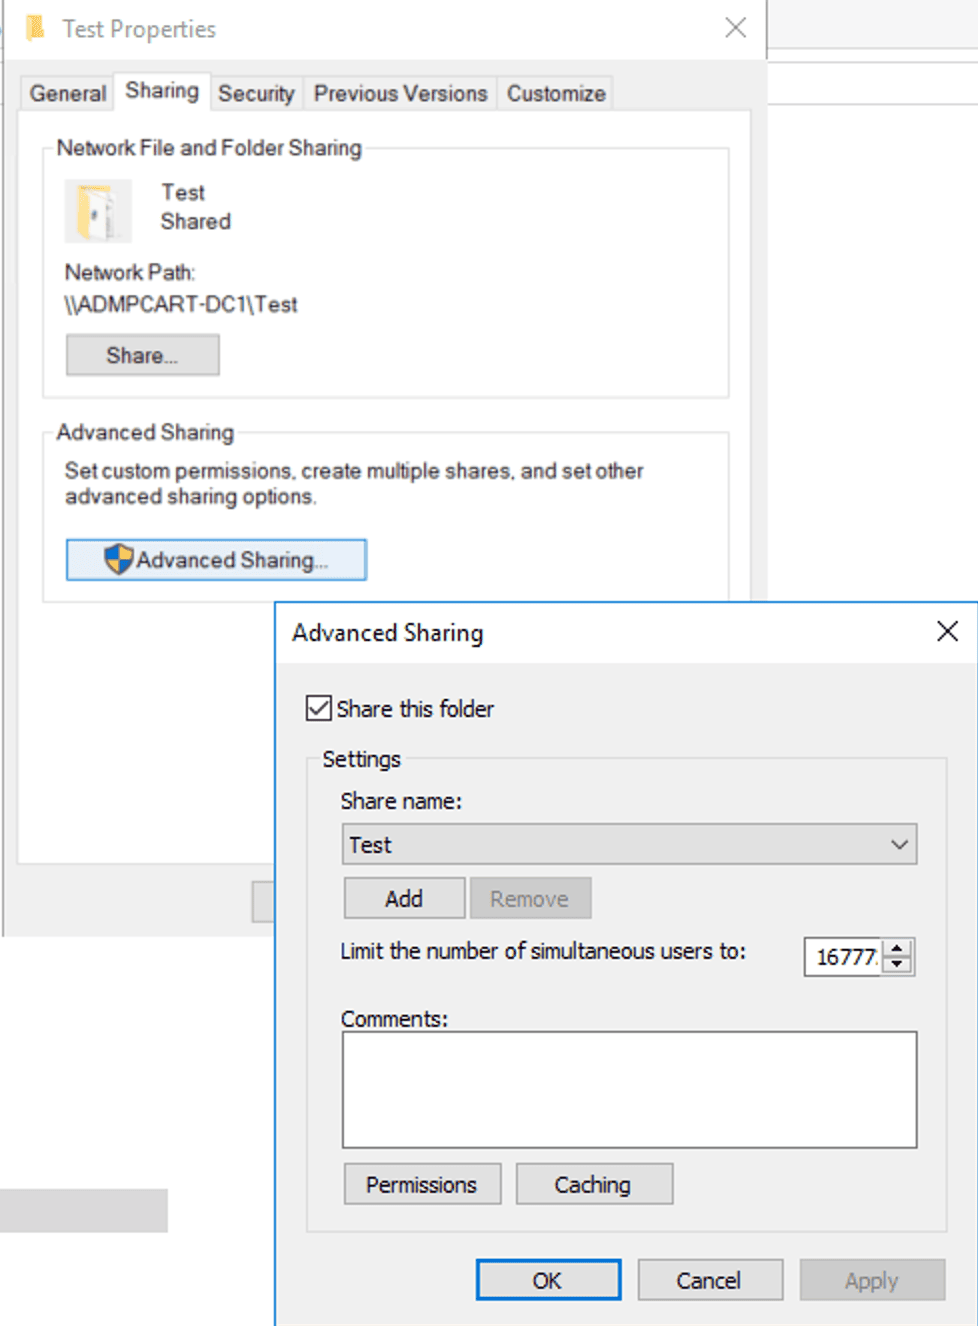
Right-click a folder, then click the Sharing tab and select Advanced Sharing.
On the Advanced Sharing screen, check Share this folder.
Set a share name and click Permissions.
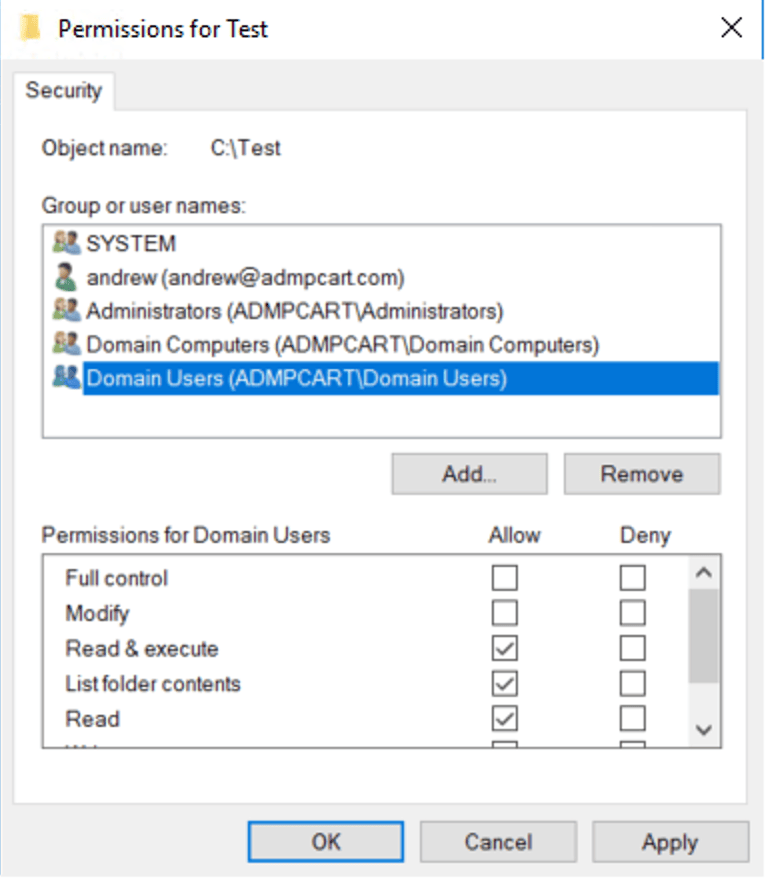
On the Share Permissions screen, remove Everyone, add Domain Computers and Domain Users, and set their permissions to Read. Click OK to return to the folder properties page
Click the Security tab. Verify that Everyone is not listed under the Security tab. If it is present, remove it.
Add Domain Users and Domain Computers and grant them Read & Execute, List Folder Contents, and Read permissions. Click OK and exit the Properties menu.
Copy the MSI install files to the shared folder you just created.
Test access from a remote computer by typing the UNC path in the search box: \hostname\sharename.
How to decide on assigned vs. published software deployment via GPO
There are two ways you can choose to install software via GPO for your users on your domain machines: assigned and published deployment.
Assigned deployment installs the software on the target machine without any involvement from the user. This is useful when you want to mandate the deployment of security solutions on your AD endpoints.
Published deployment, on the other hand, adds the software in the Add/Remove Programs section of the Control Panel or the Settings app, ready for the user to voluntarily install if they want to. This is great for deploying applications that AD users might need that they cannot install themselves due to limitations like blocked internet access.
GPMC
PowerShell
Native tools limitations
ADManager Plus
How to verify
Troubleshooting
FAQ
GPO software installation using the GPMC
When you deploy software via GPO using the GPMC, you can use assigned or published deployment by following the appropriate methods.
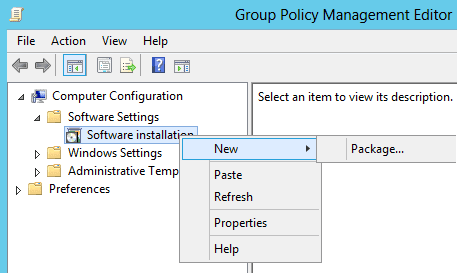
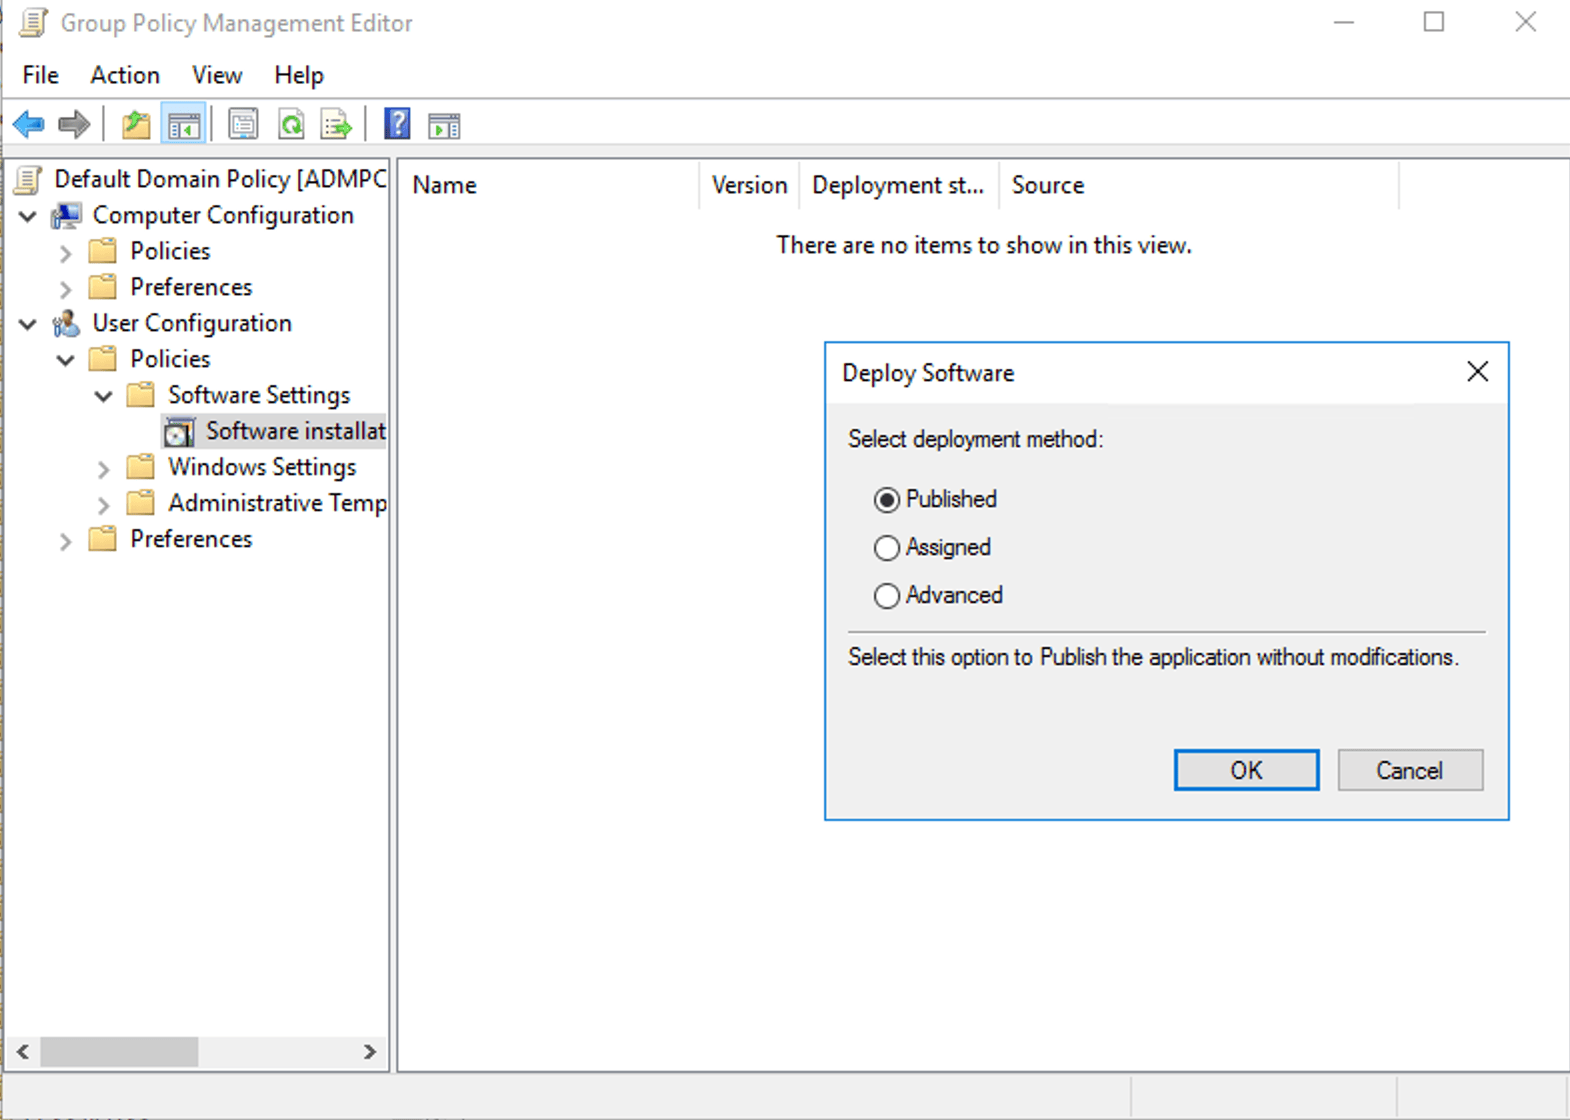
Right-click in the right pane and select New > Package.
Browse to the UNC path of your MSI file and click Open.
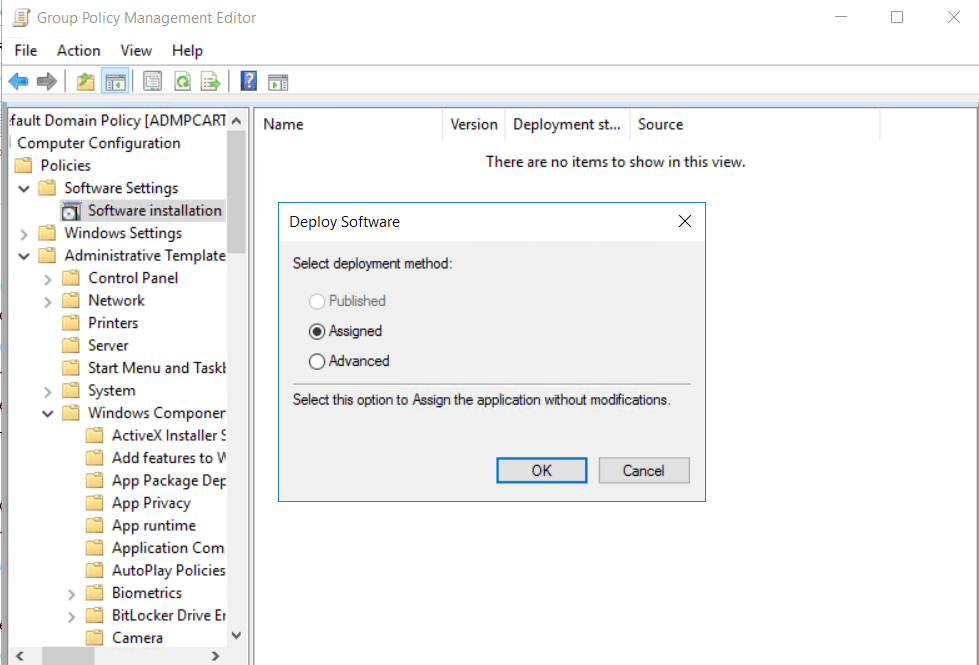
Select Assigned as the deployment method and click OK.
Install software via GPO using published deployment
Open the GPMC.
Right-click the target OU and select Create a GPO in this domain, and Link it here...
Name the GPO (e.g., Deploy Application) and click OK.
Right-click the new GPO and select Edit.
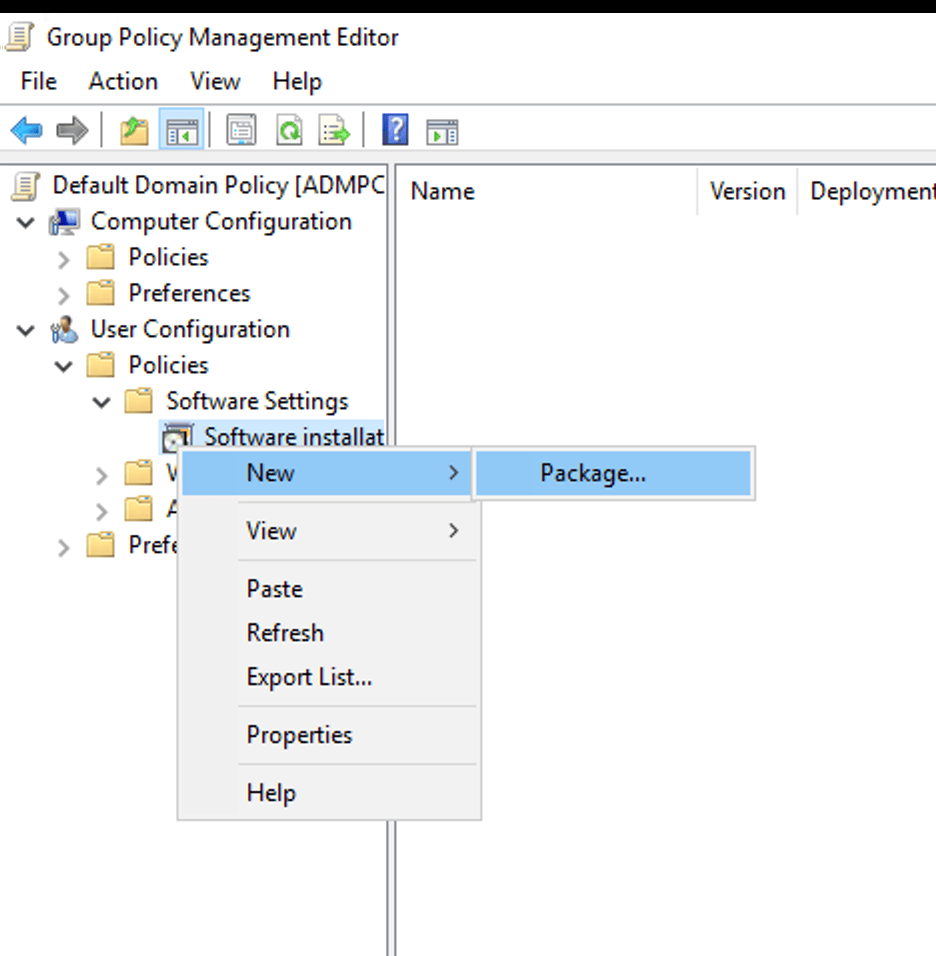
Navigate to User Configuration > Policies > Software Settings > Software Installation.
Right-click in the right pane and select New > Package.
Browse to the UNC path of your MSI file and click Open.
Select Publised as the deployment method and click OK.
Note: You can also select Assigned as the deployment method if you wish to force install the software for your users.
How to update software using a GPO with the GPMC
Follow steps one through seven as you would when installing software with a GPO.
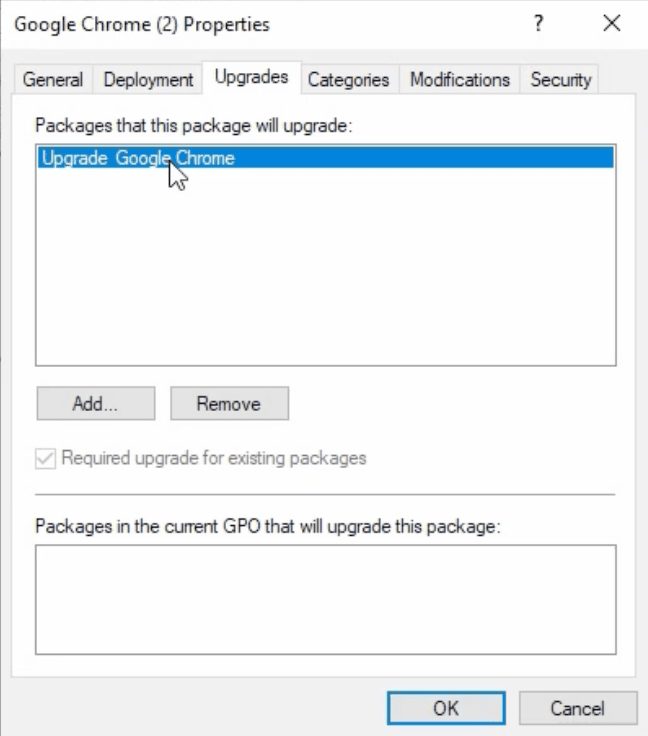
Select Advanced instead of Assigned or Published.
In the package's Properties window, select the Upgrades tab and click Add.
Select the original package from the list and choose an upgrade method:
Uninstall the existing package, then install the upgrade: Recommended for major version changes; performs a clean replacement.
Package can upgrade over the existing package: In-place upgrade; use only if the new MSI explicitly supports it.
Check Required upgrade for existing packages to make the upgrade mandatory and automatic on the next reboot.
Click OK to save, then close the Group Policy Management Editor. The upgrade will apply on the next computer restart.
How to redeploy an application with a GPO using the GPMC
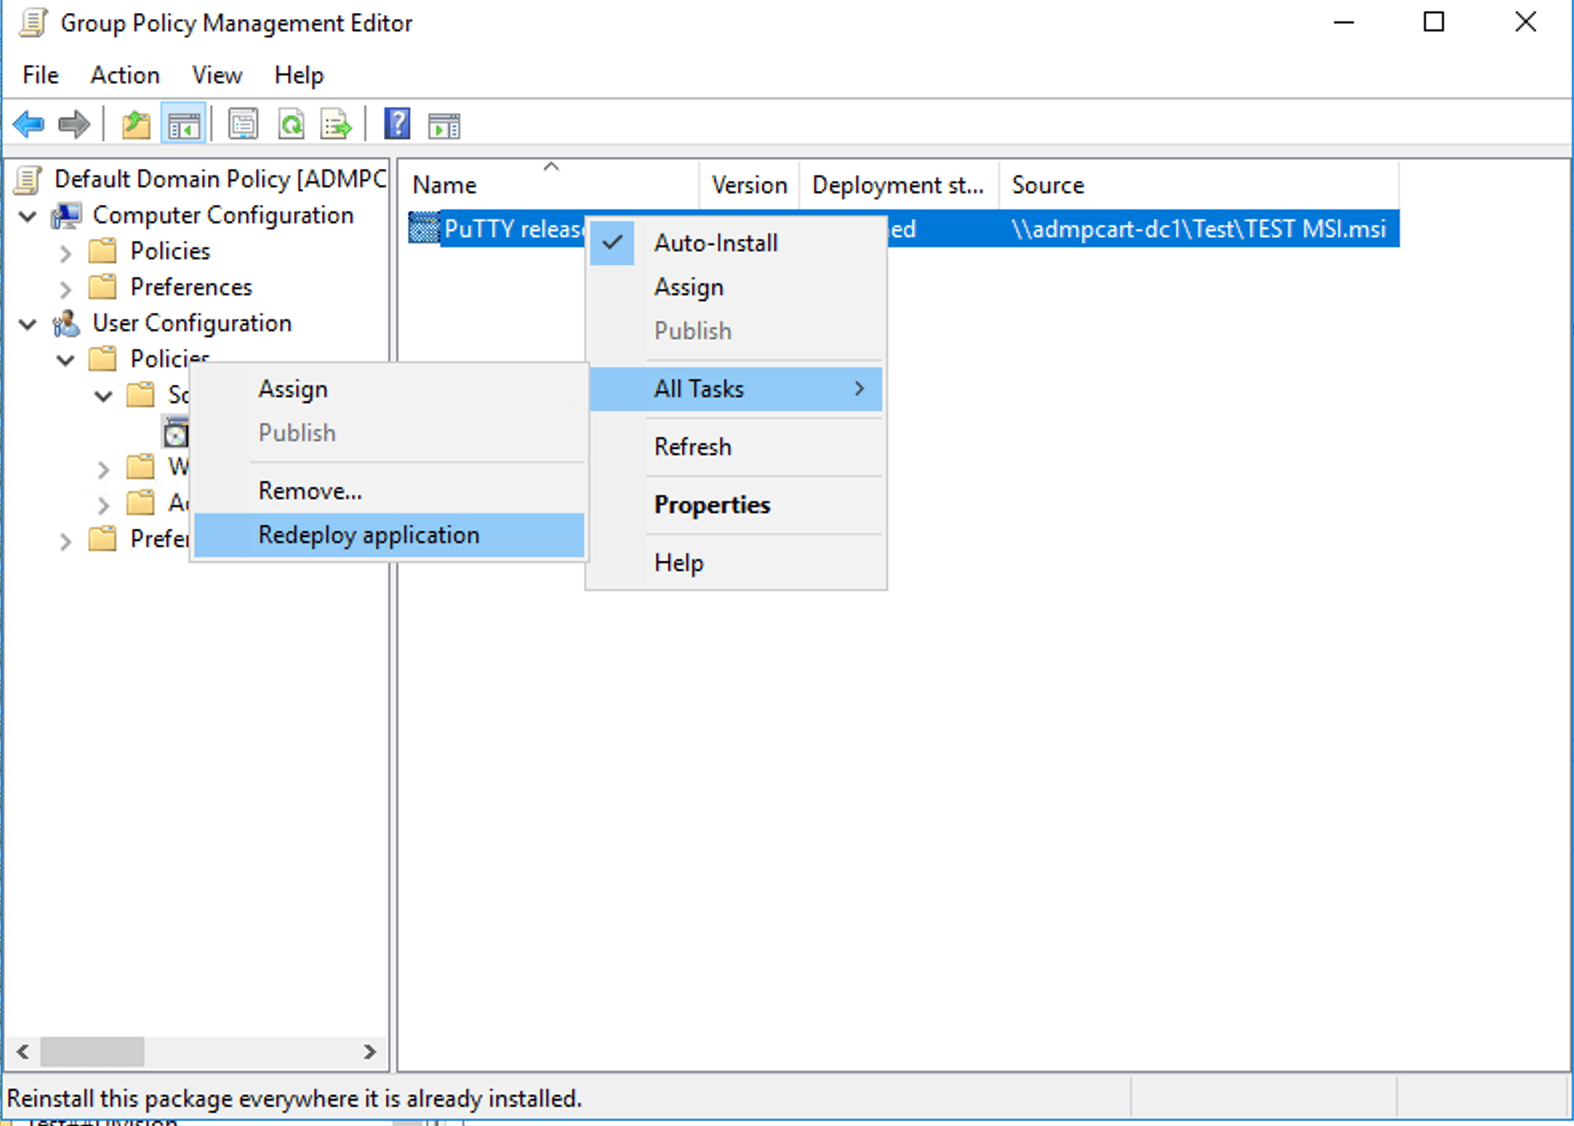
Navigate to User Configuration > Policies > Software Settings > Software Installation.
Right-click the application you want to redeploy, hover over All tasks, and click Redeploy application.
You will receive a confirmation prompt: Redeploying this application will reinstall the application everywhere it is already installed. Do you want to continue? Click Yes.
In the right pane, right-click the package you want to remove and select All Tasks > Remove.
You will be prompted with two removal options:
Immediately uninstall the software from users and computers: The package is removed from all targeted machines on the next reboot. Use this when you want to fully retire the software.
Allow users to continue to use the software, but prevent new installations: The package is removed from the GPO but stays installed on machines that already have it. No new installs will occur. Use this for a soft retirement.
Select the appropriate option and click OK.
Close the Group Policy Management Editor. The change takes effect on the next computer restart.
How to deploy software with a GPO using PowerShell
There is no native PowerShell cmdlet to directly create a software Installation package using GPOs. However, you can deploy the software installation GPOs that you have already created to multiple OUs using a single PowerShell script.
Prerequisites
Ensure the Remote Server Administration Tools and the GroupPolicy PowerShell module are installed on your admin workstation.
Run PowerShell as an administrator when logged in to Windows Server as a Domain Administrator.
Import the GroupPolicy module by running:Import-Module GroupPolicy
How to link a software installation GPO using PowerShell
Use the following PowerShell script to link your software installation GPO to a target OU.
While PowerShell and the GPMC are powerful tools, relying on them for editing GPOs across your management can present several challenges.
The GPMC does not provide strong bulk editing capabilities; changing the same setting across many GPOs requires repetitive manual effort.
PowerShell requires familiarity with the GroupPolicy module and scripting; mistakes in New-GPO or New-GPLink usage can result in GPOs being created in the wrong domain or linked incorrectly.
Native tools require specific admin privileges to edit GPOs, which can restrict delegation and increase reliance on privileged accounts.
Scripted changes must be carefully tested; mistakes in Set-GPRegistryValue or link operations can introduce misconfiguration at scale.
How to verify if a GPO software installation is applied
After configuring your GPO, verify that the settings have successfully propagated to target machines.
Force a policy update: On a client machine, open Command Prompt as an administrator and run gpupdate /force.
Use Resultant Set of Policy (RSOP): Run rsop.msc on the client machine. This provides a graphical view of all policies currently applied to that computer and user. Navigate to Software Installation under Computer Configuration to confirm the package is listed.
Generate a GPResult report: Run gpresult /r for a detailed command-line report of applied GPOs. Check under Applied Group Policy Objects to confirm your software deployment GPO is listed.
Troubleshooting
When a GPO software installation fails, the Windows System Event Log is your first stop. Below are the most common event IDs you will encounter under the Application Management Group Policy source along with their causes and fixes.
Event ID 101: Application assignment failed
What it means: The assignment of an application from a GPO policy failed. This is typically the first error you'll see when a deployment goes wrong.
Common error codes:
%74: The network was not ready when Group Policy tried to run at startup.
%%2: The MSI source file or path could not be found.
How to fix it:
Enable Always wait for the network at computer startup and logon via Group Policy (Computer Configuration > Administrative Templates > System > Logon).
Verify the UNC path to the MSI is correct and accessible from the client machine.
Confirm the Domain Computers group has Read access on both the share and NTFS permissions.
Event ID 103: Application removal or unassignment failed
What it means: The GPO tried to clean up or roll back a previous assignment and failed. It nearly always appears alongside event ID 101.
Common error codes:
%%2: File not found during cleanup.
%74: Network not ready.
How to fix it:
This is usually a secondary error caused by the same root issue as event ID 101, so resolve that first.
Check that the MSI source path hasn't changed or been moved since the policy was created.
Event ID 108: Software installation settings not applied
What it means: Group Policy could not apply software installation changes. The installation is deferred to the next logon because it requires synchronous (foreground) processing.
Common error codes:
%74: Synchronous processing required but network not ready.
%03: Indicates a general MSI installer failure.
How to fix it:
Reboot the machine (do not just run gpupdate /force—software installation via GPO requires a full restart).
Enable the Always wait for the network policy as mentioned above.
Check the application and system event logs for a more specific upstream error.
Event ID 1085 or 1112: Client-side extension processing failure
What it means: The Group Policy Software Installation client-side extension (CSE) could not process one or more settings.
Event 1085 with error code 2147746153 and message There is no software installation data object in the Active Directory indicates a corrupt GPO—one that references the Software Installation CSE GUID but has no actual deployment configured in the GPMC.
Event 1112 means the CSE needs to run during startup or logon (foreground) but couldn't.
How to fix it (for error 2147746153):
Open ADSIEDIT.MSC and navigate to CN=Policies,CN=System,DC=yourdomain.
Use PowerShell to find GPOs referencing the MAM CSE GUID {C6DC5466-785A-11D2-84D0-00C04FB169F7}:
Identify any GPO that appears in the results but shows no software installation settings in the GPMC—that is the corrupt GPO.
In ADSIEDIT, remove the MAM CSE GUID from its gPCMachineExtensionNames attribute.
Run gpupdate on client machines.
Event ID 7016: Software installation extension failure (operational log)
What it means: Found in Applications and Services Logs > Microsoft > Windows > GroupPolicy > Operational. This indicates the Software Installation CSE encountered a critical failure during policy processing.
Common cause: The client can only reach a Read-Only Domain Controller (RODC) and cannot contact a writable domain controller (DC).
How to fix it:
Verify network connectivity to a writable DC.
Check that the DNS is resolving to the correct DC.
Review site topology in Active Directory Sites and Services to ensure the client is assigned to the right site.
Best practices for software installation via GPO
Wait for the network at startup and logon: If software installations are failing, the machine may be reaching the desktop before the network share is reachable. Navigate to Computer Configuration > Policies > Administrative Templates > System > Logon and enable Always wait for the network at computer startup and logon to resolve this.
Scope with OUs and security filtering: Link GPOs to specific OUs rather than the domain root, and use security filtering for finer control over which machines or users receive the package
Never modify a package in-place: Always add a new package and use the Upgrades tab to supersede the old one. Deleting and re-adding a package creates a new deployment record and can cause reinstalls or conflicts.
FAQ
Native GPO software installation only supports MSI packages. To deploy an EXE installer, you must either repackage it as an MSI or use a startup or logon script to run the installer silently.
Assigned software installs automatically at startup (for computers) or login (for users) without any user interaction. Published software appears in the Add/Remove Programs list and lets users choose whether to install it. Only user-based GPOs support the published option.
Yes. GPO software installation is supported on all domain-joined Windows machines, including Windows 10 and Windows 11. The target computers must be able to reach the UNC file share hosting the MSI at startup.
Software installation policies under Computer Configuration only apply at computer startup, not at policy refresh. To trigger immediate deployment, run gpupdate /force and then restart the target computer.
Yes. Instead of using Computer Configuration, configure the software package under User Configuration > Policies > Software Settings > Software Installation. You can further target specific users using security filtering on the GPO.
Take the complexity out of GPO management using ADManager Plus