Applications Manager Enterprise Edition Installation
Business organizations that have data centers distributed across various geographical locations comprise of a multitude of resources that host thousands of servers, Virtual Machines (VMs), applications, and databases. These organizations might expand dynamically over time based on business requirements, which in turn multiplies their resources as well. Managing and monitoring all those servers individually can be tedious and can sometimes cause slowdown due to dynamic increase in loads on these data centers, hindering the efficiency of the business operations overall.
The Enterprise Edition allows you to monitor multiple servers and applications hosted across data centers in a distributed setup, wherein you can configure independent Applications Manager installations (Probe Server) to monitor resources across data centers and collectively manage them from a single central installation (Central Server). It helps you in managing multiple NOCs and data centers located across various geographic locations and constantly monitors them from a single centralized console, thereby facilitating proper load distribution, reducing network latency and ensuring high availability. Learn more about Enterprise Edition
Browse through the following topics to learn how you can install Applications Manager Enterprise Edition on various OS platforms:
- Installing Applications Manager Enterprise Edition on Windows
- Installing Applications Manager Enterprise Edition on Linux
- Installing Applications Manager Enterprise Edition using Console mode/Command Line
- In Enterprise setup, you must first configure the Central Server and then configure the Probe Server separately.
- Before installing the Probe Server, make sure the build numbers of the Central Server as well as the Probe Server are the same. In case of mismatch, the new Probe Server will not start and a build mismatch error will appear in the Wrapper.log file located under the logs folder.
- The Probe server installation process involves accessing the Central server information directly from the installation panel. To experience an uninterrupted installation process, ensure that the Central server is operational and reachable from the Probe server while it is being installed.
- To know your build number, check the stderr or StartUpLogs_out file(s) located under logs folder in the Applications Manager parent folder.
Installing Applications Manager Enterprise Edition on Windows
To install Applications Manager Enterprise Edition on Windows, follow the steps given below:
Central Server
- Download and execute the ManageEngine Applications Manager (.exe) installation file.
- The Installation Wizard is displayed and will guide you through the setup process. Click Next on the welcome screen to begin the installation process.
- Read the license agreement and click Yes if you accept the terms.
- Select the language in which you wish to install Applications Manager and click Next.
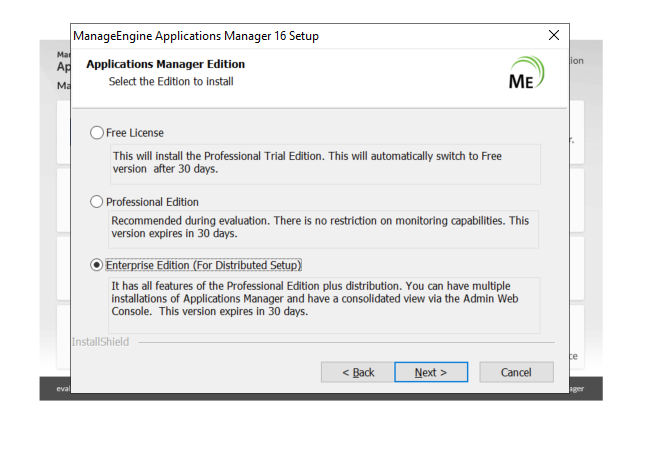
- You will be asked to select the edition that is required to be installed in your system. Choose Enterprise Edition and click Next. Click here to compare editions
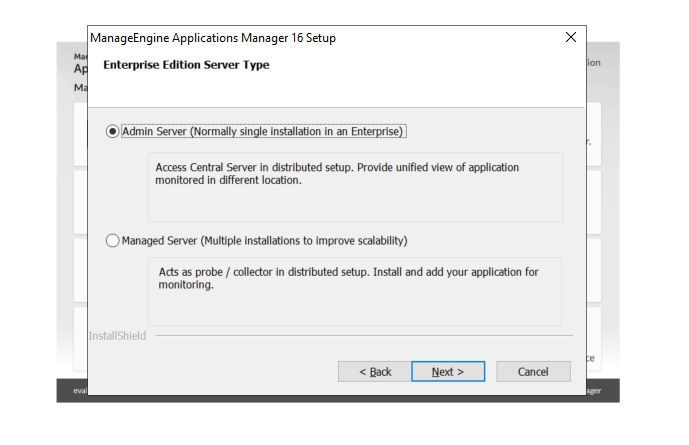
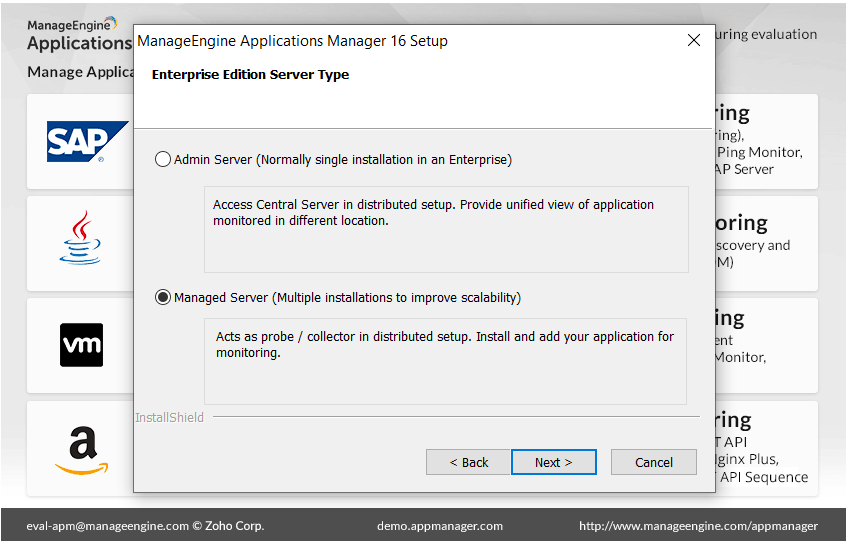
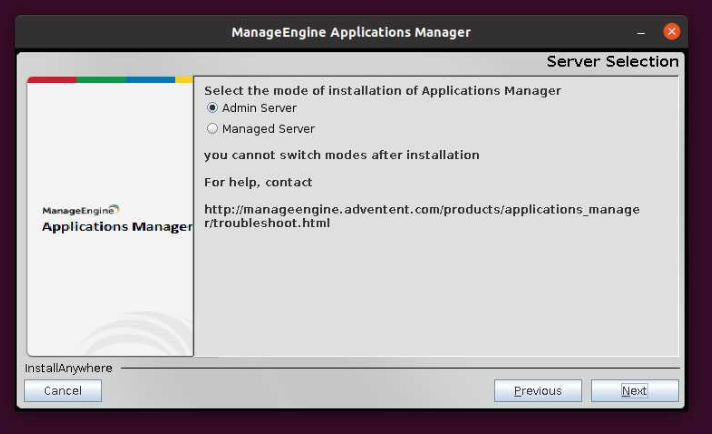
- You will be asked to select the Enterprise Edition Server Type for which the installation needs to be performed. Choose Central Server and click Next.
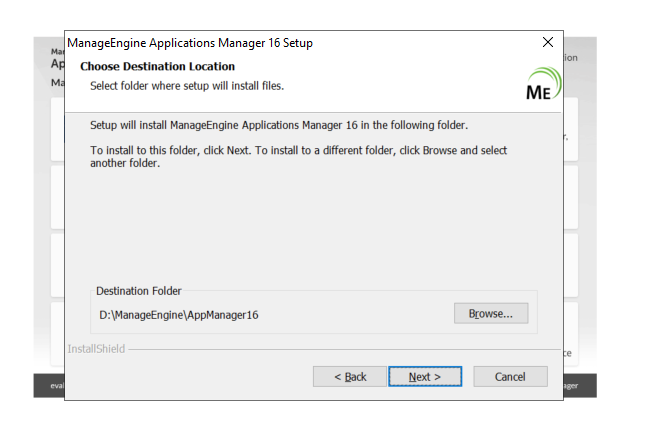
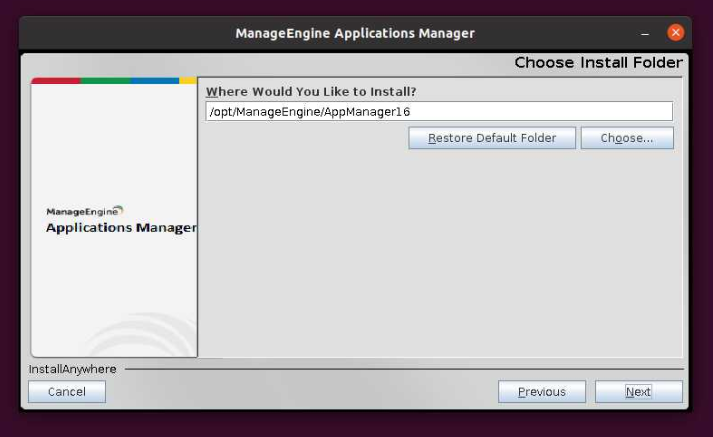
- Provide the location where Applications Manager should be installed on your machine. Also, specify the name of the new Applications Manager folder in the installation location. Click Next.
Note: The folder name should not contain the special character [ # ] where Applications Manager is to be installed.
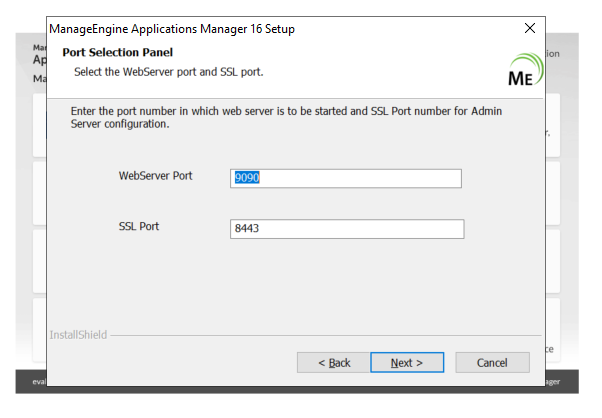
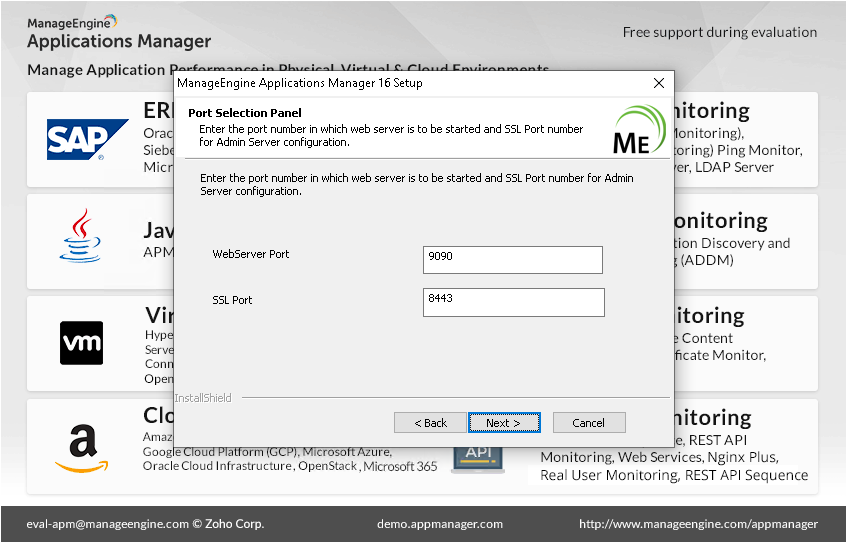
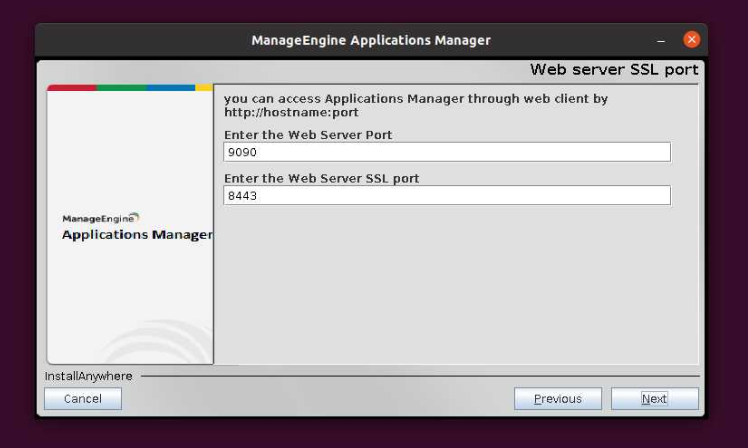
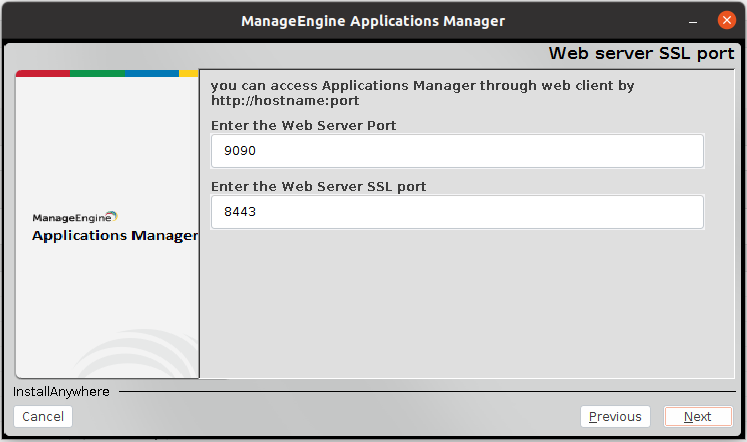
- For Central server configuration, enter the WebServer Port number (9090, by default) at which the web server is to be started and SSL Port number (8443, by default) of the web server. Click Nextto proceed.
- Enter the required details to register for technical support and click Next. However, this is an optional step and can be skipped.
- For Enterprise Edition of Applications Manager, you will be asked to choose the user type with which you wish to be created—30 day Trial or Registered User. If Registered User is chosen, select and upload the registered license file from your system and click Next.
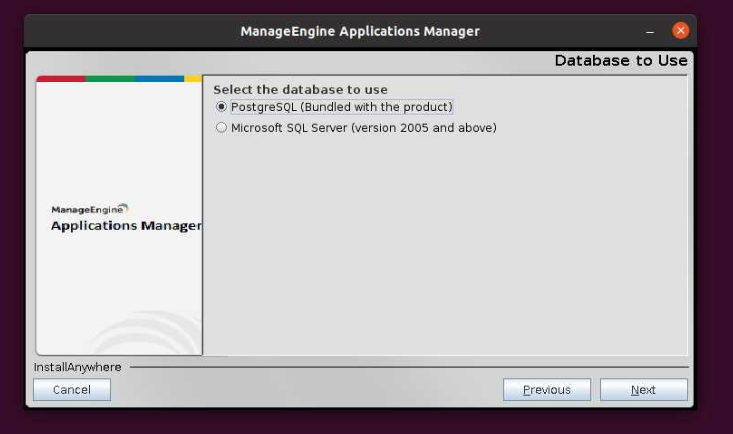
- Select the required database backend support to use (PostgreSQL or Microsoft SQL Server) and click Next.
Note: Make sure to implement the prerequisites that are required for setting up MS SQL server as database backend. Learn more
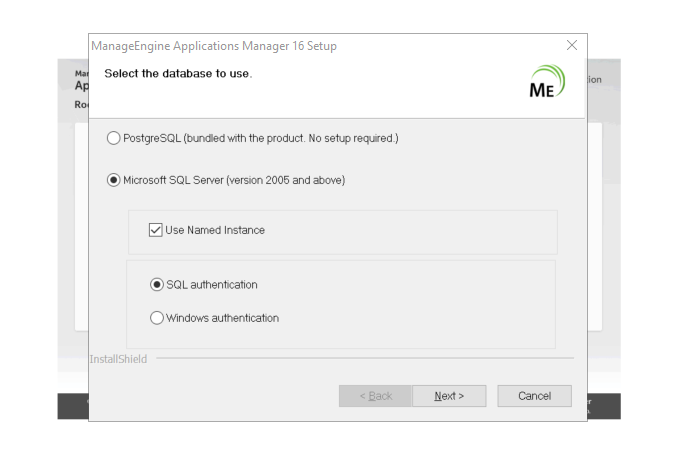
- PostgreSQL - PostgreSQL comes bundled with your download of Applications Manager, therefore no setup is required.
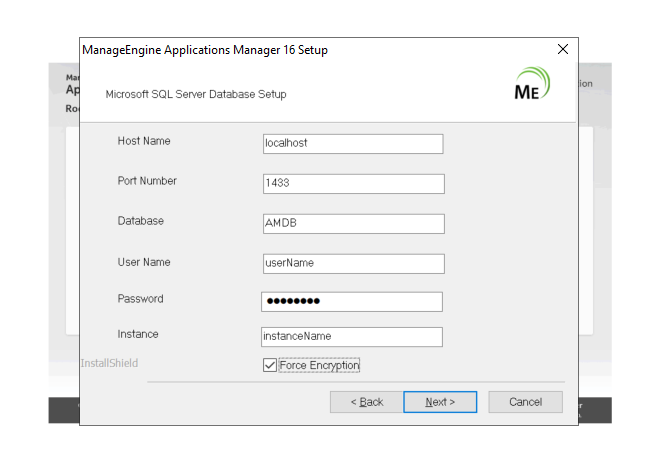
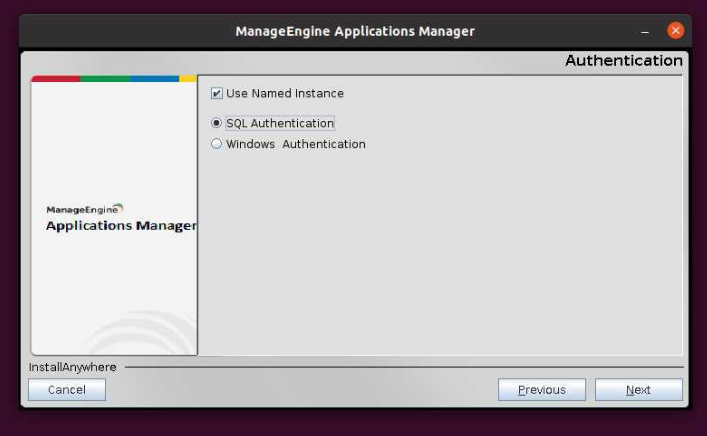
- Microsoft SQL Server (version 2012 and above): Enter the following details based on the type of authentication selected (SQL Authentication or Windows Authentication). Select the Use Named Instancecheckbox if you wish to specify the named instance for the SQL server along with the following details:
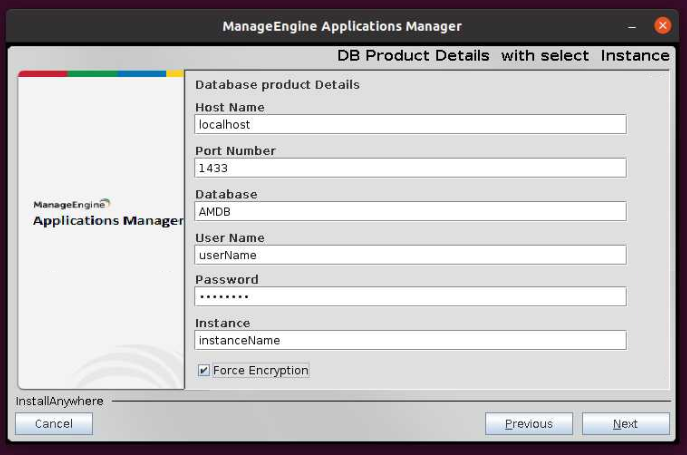
- If it is based on SQL Authentication, enter the Host Name, Port Number, Database Name, User Name, Password of the SQL Server. You can also enable Force Encryption, if required.
- If it is based on Windows Authentication, enter the Host Name, Port Number, Database Name of the SQL Server and the User Name, Password of the Windows machine on which SQL Server is running. You can also enable Force Encryption, if required.
 Note:
Note:- Access to the master database is required for the backend database.
- Password field should not contain the special character [ \ ] for MS SQL backend database.
- Verify the installation details and click Next to proceed.
- Click Finish to complete the installation process.
Once the installation wizard is complete, the Applications Manager setup can be found under <Applications Manager Home> directory.
Learn how to start ManageEngine Applications Manager
Probe Server
- Download and execute the ManageEngine Applications Manager (.exe) installation file.
- The Installation Wizard is displayed and will guide you through the setup process. Click Next on the welcome screen to begin the installation process.
- Read the license agreement and click Yes if you accept the terms.
- Select the language in which you wish to install Applications Manager and click Next.
- You will be asked to select the edition that is required to be installed in your system. Choose Enterprise Edition and click Next. Click here to compare editions
- You will be asked to select the Enterprise Edition Server Type for which the installation needs to be performed. Choose Probe Server and click Next.
- Provide the location where Applications Manager should be installed on your machine. Also, specify the name of the new Applications Manager folder in the installation location. Click Next.
Note: The folder name should not contain the special character [ # ] where Applications Manager is to be installed.
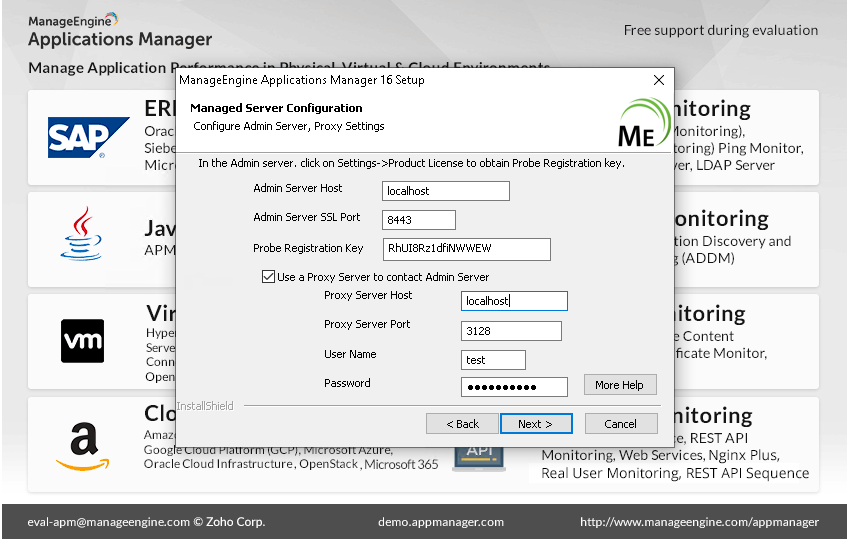
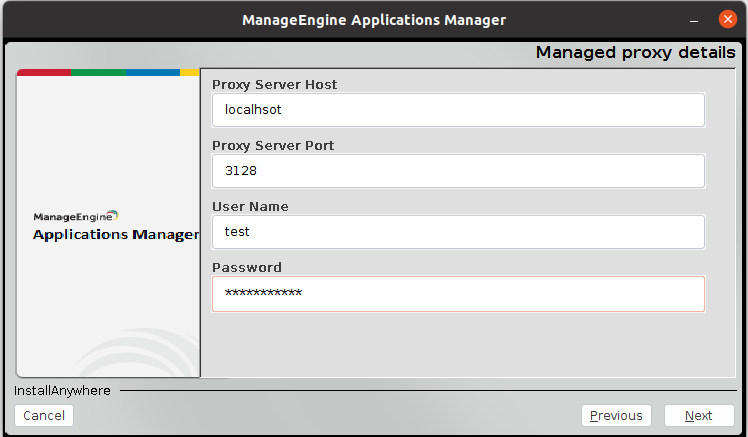
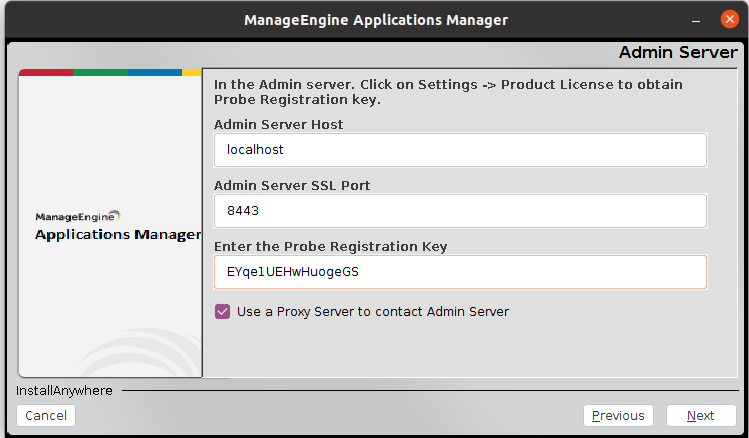
- For the Probe server configuration, enter the Host, SSL Port (8443, by default) of the Central server, and the Probe Registration Key, which is automatically regenerated every 24 hours and at every startup. The Probe Registration Key can be found under the Probe Servers tab. Select the Proxy Settings needed to contact the Central Server (optional) and specify details such as Host, Port, User Name, and Password of the proxy server. Then, specify the WebServer Port and click Next to proceed.
- Enter the required details to register for technical support and click Next. However, this is an optional step and can be skipped.
- For Enterprise Edition of Applications Manager, you will be asked to choose the user type with which you wish to be created—30 day Trial or Registered User. If Registered User is chosen, select and upload the registered license file from your system and click Next.
- Select the required database backend support to use (PostgreSQL or Microsoft SQL Server) and click Next.
Note: Make sure to implement the prerequisites that are required for setting up MS SQL server as database backend. Learn more
- PostgreSQL - PostgreSQL comes bundled with your download of Applications Manager, therefore no setup is required.
- Microsoft SQL Server (version 2012 and above): Enter the following details based on the type of authentication selected (SQL Authentication or Windows Authentication). Select the Use Named Instancecheckbox if you wish to specify the named instance for the SQL server along with the following details:
- If it is based on SQL Authentication, enter the Host Name, Port Number, Database Name, User Name, Password of the SQL Server. You can also enable Force Encryption, if required.
- If it is based on Windows Authentication, enter the Host Name, Port Number, Database Name of the SQL Server and the User Name, Password of the Windows machine on which SQL Server is running. You can also enable Force Encryption, if required.
Note:- Access to the master database is required for the backend database.
- Password field should not contain the special character [ \ ] for MS SQL backend database.
- Verify the installation details and click Next to proceed.
- Click Finish to complete the installation process.
Once the installation wizard is complete, the Applications Manager setup can be found under <Applications Manager Home> directory.
Learn how to start ManageEngine Applications Manager
Installing Applications Manager on Linux
To install Applications Manager Enterprise Edition on Linux, follow the steps given below:
Note: When installing Applications Manager in a Linux machine, make sure that the installation is done using a root user account with admin privileges.
Central Server
- Download the ManageEngine Applications Manager (.bin) installation file.
- Open the command terminal and navigate to the directory where the Applications Manager installation file is downloaded.
- Assign executable permission to the downloaded file using the following command:
sudo chmod a+x ManageEngine_ApplicationsManager_64bit.bin - Now execute the downloaded Applications Manager installation file using the following command:
sudo ./ManageEngine_ApplicationsManager_64bit.bin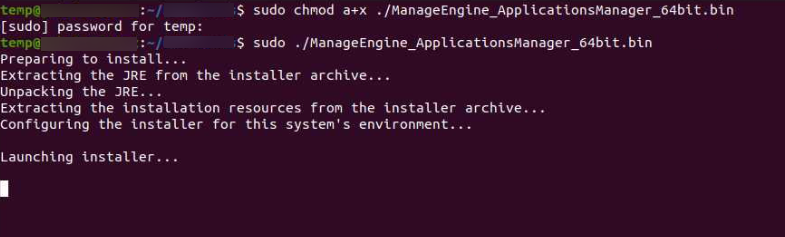
- The Installation Wizard is displayed and will guide you through the setup process. Click Next on the welcome screen to begin the installation process.
- Read the license agreement, accept the terms of the license agreement and click Next.
- You will be asked to select the edition that is required to be installed in your system. Choose Enterprise Edition and click Next. Click here to compare editions
- Select the language in which you wish to install Applications Manager and click Next.
- You will be asked to select the Enterprise Edition Server Type for which the installation needs to be performed. Choose Central Server and click Next.

- For Enterprise Edition of Applications Manager, you will be asked to choose the user type with which you wish to be created—Trial User or Registered User. If Registered User is chosen, select and upload the registered license file from your system and click Next.
- For Central server configuration, enter the WebServer Port number (9090, by default) at which the web server is to be started and SSL Port number (8443, by default) of the web server. Click Nextto proceed.
- Select the required database backend support to use (PostgreSQL or Microsoft SQL Server) and click Next.
Note: Make sure to implement the prerequisites that are required for setting up MS SQL server as database backend. Learn more
- PostgreSQL - PostgreSQL comes bundled with your download of Applications Manager, therefore no setup is required.
- Microsoft SQL Server (version 2012 and above): Enter the following details based on the type of authentication selected (SQL Authentication or Windows Authentication). Select the Use Named Instancecheckbox if you wish to specify the named instance for the SQL server along with the following details:
- If it is based on SQL Authentication, enter the Host Name, Port Number, Database Name, User Name, Password of the SQL Server. You can also enable Force Encryption, if required.
- If it is based on Windows Authentication, enter the Host Name, Port Number, Database Name of the SQL Server and the User Name, Password of the Windows machine on which SQL Server is running. You can also enable Force Encryption, if required.
 Note:
Note:- Access to the master database is required for the backend database.
- DB Name, Username and Passwordfields should not contain any special characters for MS SQL backend database, except the following:
- DB Name - [ @ . , _ = ^ # - ]
- User Name - [ @ . , _ = * ^ # - \ ]
- Password - [ @ . , _ = * ^ # - ]
- Specify the location where Applications Manager should be installed on your machine (Default directory location is /opt/ManageEngine/AppManager) and click Next.
Note: The folder name should not contain the special character [ # ] where Applications Manager is to be installed.
- Enter the required details to register for technical support and click Next. However, this is an optional step and can be skipped.
- Click Done to complete the installation process.
Once the installation process is complete, the Applications Manager setup can be found under <Applications Manager Home> directory.
Learn how to start ManageEngine Applications Manager
Probe Server
- Download the ManageEngine Applications Manager (.bin) installation file.
- Open the command terminal and navigate to the directory where the Applications Manager installation file is downloaded.
- Assign executable permission to the downloaded file using the following command:
sudo chmod a+x ManageEngine_ApplicationsManager_64bit.bin - Now execute the downloaded Applications Manager installation file using the following command:
sudo ./ManageEngine_ApplicationsManager_64bit.bin - The Installation Wizard is displayed and will guide you through the setup process. Click Next on the welcome screen to begin the installation process.
- Read the license agreement, accept the terms of the license agreement and click Next.
- You will be asked to select the edition that is required to be installed in your system. Choose Enterprise Edition and click Next. Click here to compare editions
- Select the language in which you wish to install Applications Manager and click Next.
- You will be asked to select the Enterprise Edition Server Type for which the installation needs to be performed. Choose Probe Server and click Next.
- For Enterprise Edition of Applications Manager, you will be asked to choose the user type with which you wish to be created—Trial User or Registered User. If Registered User is chosen, select and upload the registered license file from your system and click Next.
- For the Probe server configuration, enter the Host, SSL Port (8443, by default) of the Central server, and the Probe Registration Key, which is automatically regenerated every 24 hours and at every startup. The Probe Registration Key can be found under the Probe Servers tab. Select the Proxy Settings needed to contact the Central Server (optional) and specify details such as Host, Port, User Name, and Password of the proxy server. Then, specify the WebServer Port and click Next to proceed.
- Select the required database backend support to use (PostgreSQL or Microsoft SQL Server) and click Next.
Note: Make sure to implement the prerequisites that are required for setting up MS SQL server as database backend. Learn more
- PostgreSQL - PostgreSQL comes bundled with your download of Applications Manager, therefore no setup is required.
- Microsoft SQL Server (version 2012 and above): Enter the following details based on the type of authentication selected (SQL Authentication or Windows Authentication). Select the Use Named Instancecheckbox if you wish to specify the named instance for the SQL server along with the following details:
- If it is based on SQL Authentication, enter the Host Name, Port Number, Database Name, User Name, Password of the SQL Server. You can also enable Force Encryption, if required.
- If it is based on Windows Authentication, enter the Host Name, Port Number, Database Name of the SQL Server and the User Name, Password of the Windows machine on which SQL Server is running. You can also enable Force Encryption, if required.
Note:- Access to the master database is required for the backend database.
- DB Name, Username and Passwordfields should not contain any special characters for MS SQL backend database, except the following:
- DB Name - [ @ . , _ = ^ # - ]
- User Name - [ @ . , _ = * ^ # - \ ]
- Password - [ @ . , _ = * ^ # - ]
- Specify the location where Applications Manager should be installed on your machine (Default directory location is /opt/ManageEngine/AppManager) and click Next.
Note: The folder name should not contain the special character [ # ] where Applications Manager is to be installed.
- Enter the required details to register for technical support and click Next. However, this is an optional step and can be skipped.
- Click Done to complete the installation process.
Once the installation process is complete, the Applications Manager setup can be found under <Applications Manager Home> directory.
Learn how to start ManageEngine Applications Manager
Installing Applications Manager Enterprise Edition using Console mode/Command Line
In case you are working on a non-GUI based Linux setup or are working on a Windows box and want to install on a remote Linux system without a user interface, you can choose to install Applications Manager through command line/console mode of installation. The steps would be similar to that of the Linux installation steps for Enterprise Edition, except that they are shown as I/O commands in the console terminal. To install Applications Manager using console mode/command line, follow the steps given below:
Central Server
- Download the ManageEngine Applications Manager (.bin) installation file.
- Open the command terminal and navigate to the directory where the Applications Manager installation file is downloaded.
- Assign executable permission to the downloaded file using the following command:
sudo chmod a+x ManageEngine_ApplicationsManager_64bit.bin - Now execute the downloaded Applications Manager installation file using the following command:
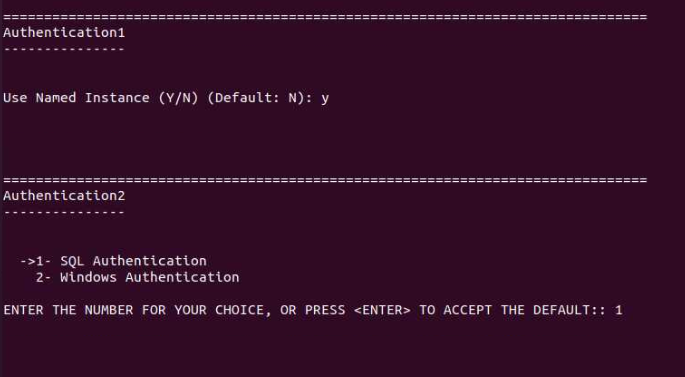
sudo ./ManageEngine_ApplicationsManager_64bit.bin -i console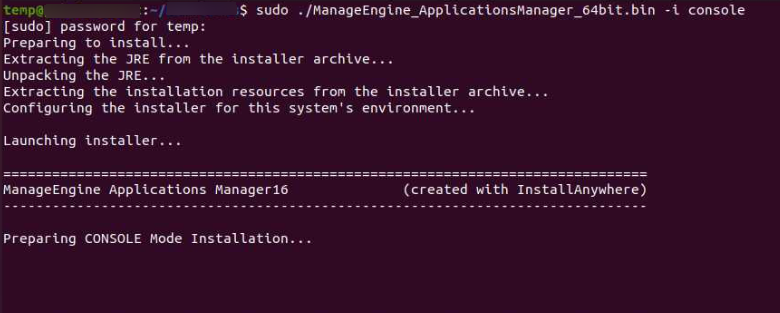
- The Installation Wizard is displayed as command output in the console and will guide you through the setup process. Press Enter to begin the installation process.
- Read the license agreement, accept the terms of the license agreement and press Enter.
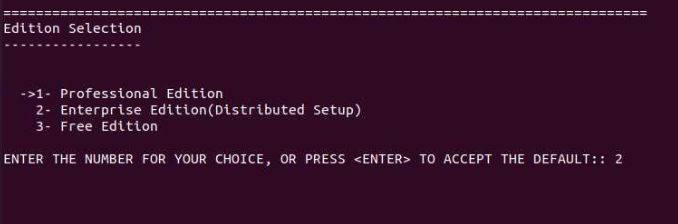
- You will be asked to select the edition that is required to be installed in your system. Choose Enterprise Edition and press Enter. Click here to compare editions
- Select the language in which you wish to install Applications Manager and press Enter.
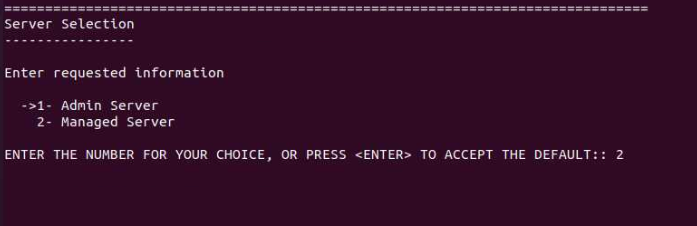
- You will be asked to select the Enterprise Edition Server Type for which the installation needs to be performed. Choose Central Server and press Enter.
- Specify the user type with which you wish to be created—trial user or registered user. If registered, specify the location of the registered license file from your system.
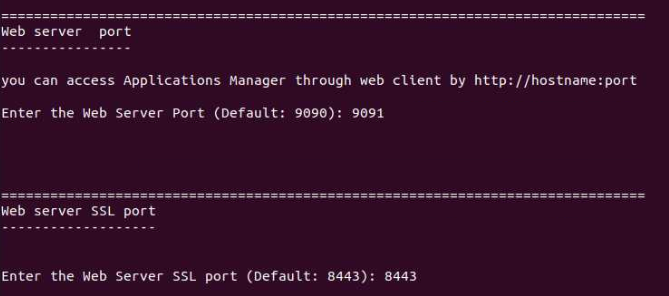
- For Central server configuration, enter the WebServer Port number (9090, by default) at which the web server is to be started and SSL Port number (8443, by default) of the web server. Press Enterto proceed.
- Select the required database backend support to use (PostgreSQL or Microsoft SQL Server) and press Enter.
Note: Make sure to implement the prerequisites that are required for setting up MS SQL server as database backend. Learn more
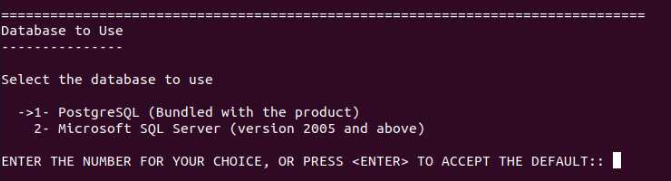
- PostgreSQL - PostgreSQL comes bundled with your download of Applications Manager, therefore no setup is required.
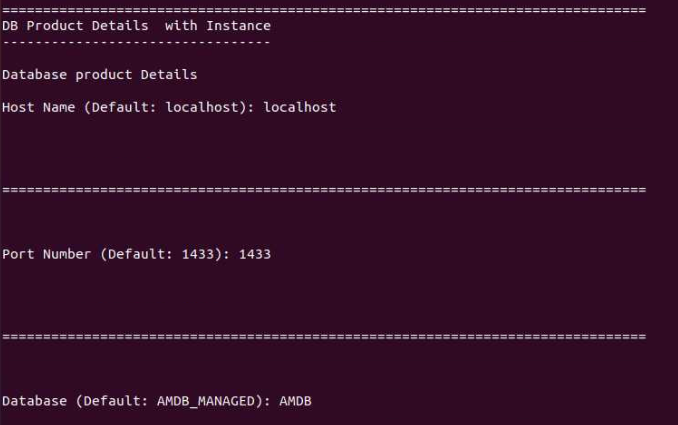
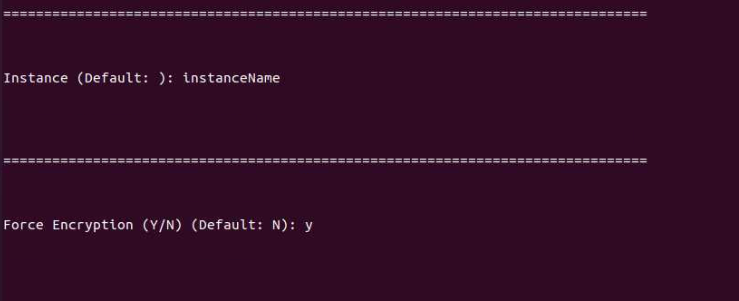
- Microsoft SQL Server (version 2012 and above): Enter the following details based on the type of authentication selected (SQL Authentication or Windows Authentication). Enable Use Named Instanceif you wish to specify the named instance for the SQL server along with the following details:
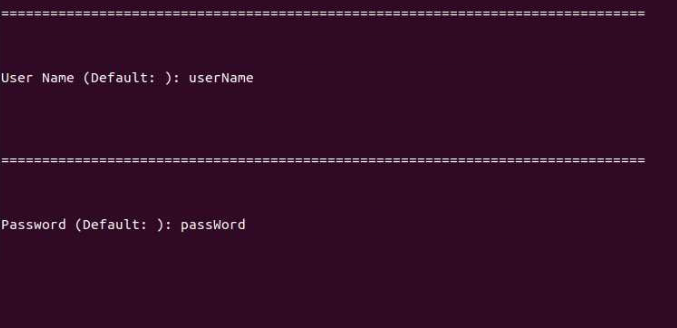
- If it is based on SQL Authentication, enter the Host Name, Port Number, Database Name, User Name, Password of the SQL Server. You can also enable Force Encryption, if required.
- If it is based on Windows Authentication, enter the Host Name, Port Number, Database Name of the SQL Server and the User Name, Password of the Windows machine on which SQL Server is running. You can also enable Force Encryption, if required.
 Note:
Note:- Access to the master database is required for the backend database.
- DB Name, Username and Passwordfields should not contain any special characters for MS SQL backend database, except the following:
- DB Name - [ @ . , _ = ^ # - ]
- User Name - [ @ . , _ = * ^ # - \ ]
- Password - [ @ . , _ = * ^ # - ]
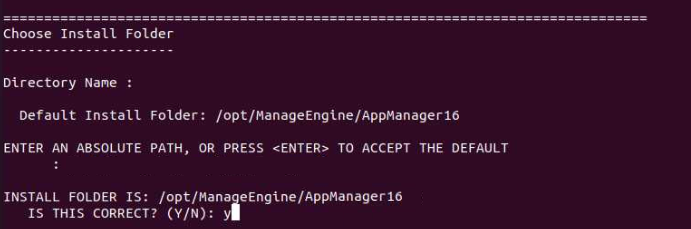
- Specify the location where Applications Manager should be installed on your machine (Default directory location is /opt/ManageEngine/AppManager) and click Next.
Note: The folder name should not contain the special character [ # ] where Applications Manager is to be installed.
- Enter the required details to register for technical support and press Enter. However, this is an optional step and can be skipped.
- Verify the installation details and press Enter to proceed with the installation.
- Once the installation is complete, press Enter.
Once the installation process is complete, the Applications Manager setup can be found under <Applications Manager Home> directory.
Learn how to start ManageEngine Applications Manager
Probe Server
- Download the ManageEngine Applications Manager (.bin) installation file.
- Open the command terminal and navigate to the directory where the Applications Manager installation file is downloaded.
- Assign executable permission to the downloaded file using the following command:
sudo chmod a+x ManageEngine_ApplicationsManager_64bit.bin - Now execute the downloaded Applications Manager installation file using the following command:
sudo ./ManageEngine_ApplicationsManager_64bit.bin -i console - The Installation Wizard is displayed as command output in the console and will guide you through the setup process. Press Enter to begin the installation process.
- Read the license agreement, accept the terms of the license agreement and press Enter.
- You will be asked to select the edition that is required to be installed in your system. Choose Enterprise Edition and press Enter. Click here to compare editions
- Select the language in which you wish to install Applications Manager and press Enter.
- You will be asked to select the Enterprise Edition Server Type for which the installation needs to be performed. Choose Probe Server and press Enter.
- Specify the user type with which you wish to be created—trial user or registered user. If registered, specify the location of the registered license file from your system.
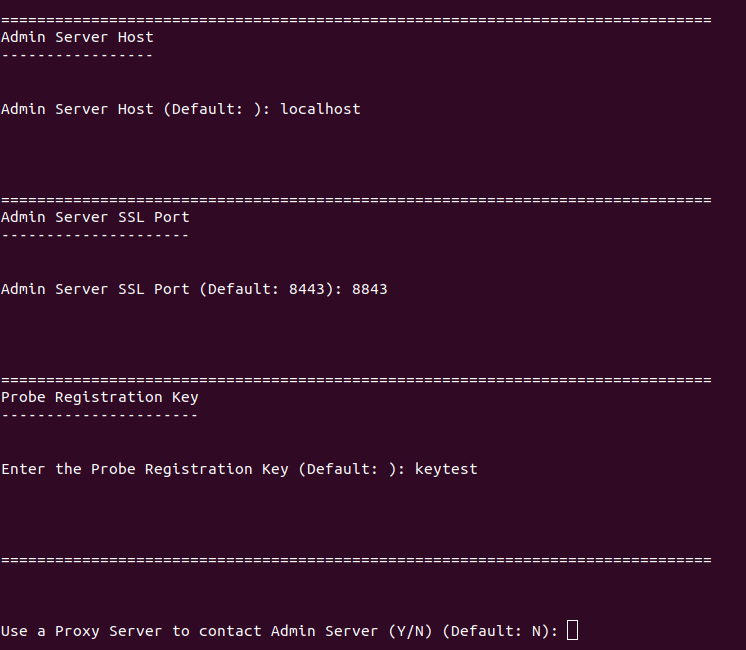
- For the Probe server configuration, enter the Host, SSL Port (8443, by default) of the Central server, and the Probe Registration Key, which is automatically regenerated every 24 hours and at every startup. The Probe Registration Key can be found under the Probe Servers tab. Select the Proxy Settings needed to contact the Central Server (optional) and specify details such as Host, Port, User Name, and Password of the proxy server. Then, specify the WebServer Port and click Enter to proceed.
- Select the required database backend support to use (PostgreSQL or Microsoft SQL Server) and press Enter.
Note: Make sure to implement the prerequisites that are required for setting up MS SQL server as database backend. Learn more
- PostgreSQL - PostgreSQL comes bundled with your download of Applications Manager, therefore no setup is required.
- Microsoft SQL Server (version 2012 and above): Enter the following details based on the type of authentication selected (SQL Authentication or Windows Authentication). Enable Use Named Instanceif you wish to specify the named instance for the SQL server along with the following details:
- If it is based on SQL Authentication, enter the Host Name, Port Number, Database Name, User Name, Password of the SQL Server. You can also enable Force Encryption, if required.
- If it is based on Windows Authentication, enter the Host Name, Port Number, Database Name of the SQL Server and the User Name, Password of the Windows machine on which SQL Server is running. You can also enable Force Encryption, if required.
Note:- Access to the master database is required for the backend database.
- DB Name, Username and Passwordfields should not contain any special characters for MS SQL backend database, except the following:
- DB Name - [ @ . , _ = ^ # - ]
- User Name - [ @ . , _ = * ^ # - \ ]
- Password - [ @ . , _ = * ^ # - ]
- Specify the location where Applications Manager should be installed on your machine (Default directory location is /opt/ManageEngine/AppManager) and click Next.
Note: The folder name should not contain the special character [ # ] where Applications Manager is to be installed.
- Enter the required details to register for technical support and press Enter. However, this is an optional step and can be skipped.
- Verify the installation details and press Enter to proceed with the installation.
- Once the installation is complete, press Enter.
Once the installation process is complete, the Applications Manager setup can be found under <Applications Manager Home> directory.
