Applications Manager Free/Professional Edition Installation
Browse through the following topics to learn how you can install Applications Manager Free/Professional Edition on various OS platforms:
- Installing Applications Manager on Windows
- Installing Applications Manager on Linux
- Installing Applications Manager using Console mode/Command Line
- Installing Applications Manager on CIS Hardened server
Installing Applications Manager on Windows
To install Applications Manager on Windows, follow the steps given below:
- Download and execute the ManageEngine Applications Manager (.exe) installation file.
- The Installation Wizard is displayed and will guide you through the setup process. Click Next on the welcome screen to begin the installation process.
- Read the license agreement and click Yes if you accept the terms.
- Select the language in which you wish to install Applications Manager and click Next.
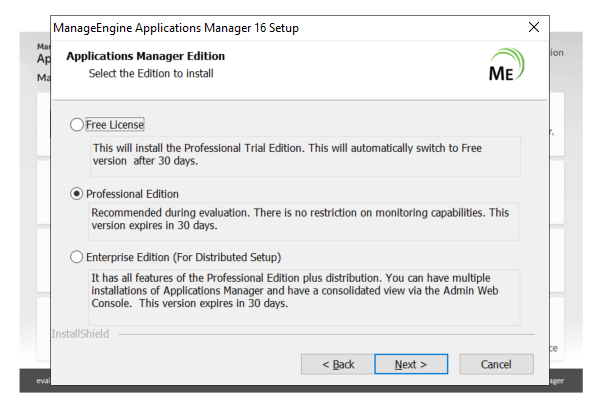
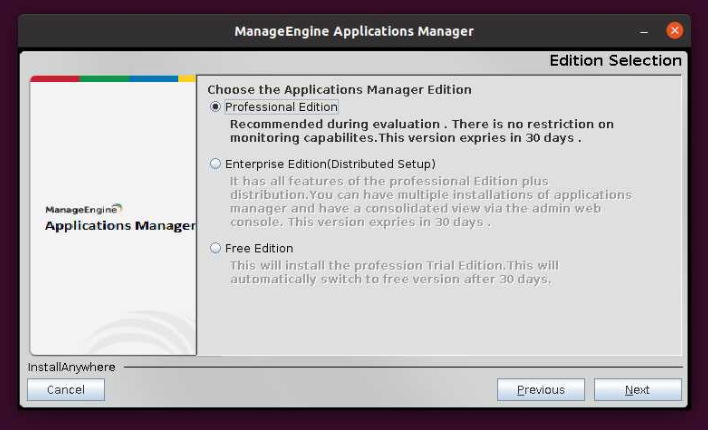
- You will be asked to select the edition that is required to be installed in your system. Choose Free License or Professional Edition and click Next. View edition comparison
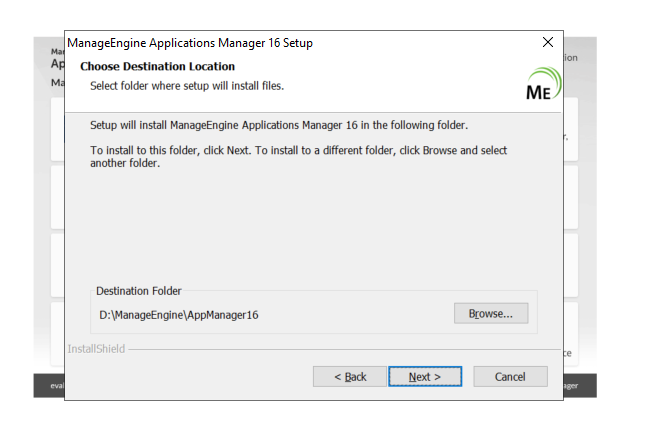
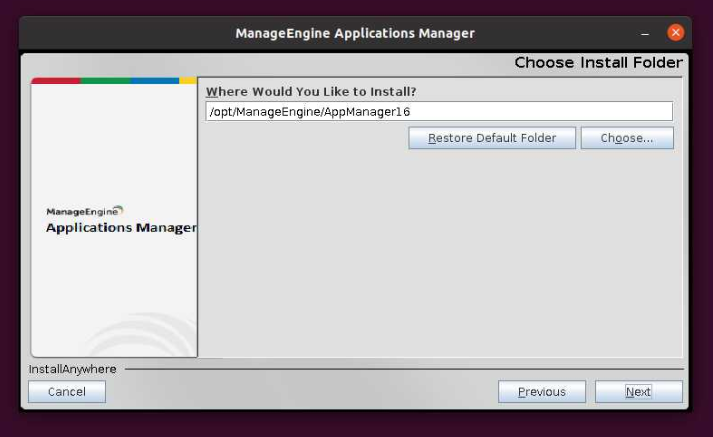
- Provide the directory location where Applications Manager should be installed on your machine and click Next.
Note: The folder name should not contain the special character [ # ] where Applications Manager is to be installed.
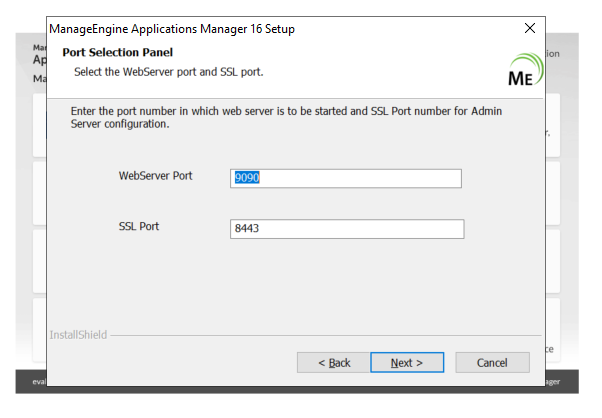
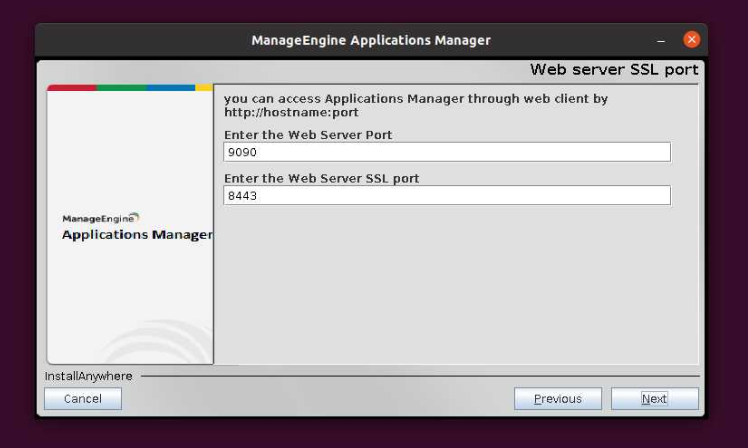
- Enter the WebServer Port number (9090, by default) at which the web server is to be started and SSL Port number (8443, by default) of the web server. Click Next to proceed.
- Enter the required details to register for technical support and click Next. However, this is an optional step and can be skipped.
- Verify the installation details and click Next to proceed.
- For Professional Edition of Applications Manager, you will be asked to choose the user type with which you wish to be created—30 day Trial or Registered User. If Registered User is chosen, select and upload the registered license file from your system and click Next.
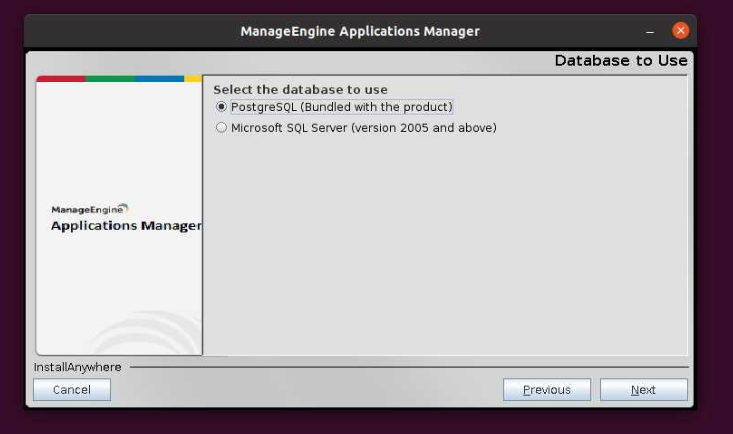
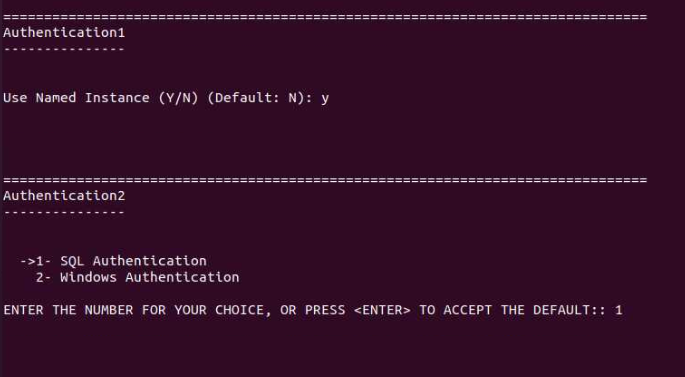
- Select the required database backend support to use (PostgreSQL or Microsoft SQL Server) and click Next.
Note: Make sure to implement the prerequisites that are required for setting up MS SQL server as database backend. Learn more
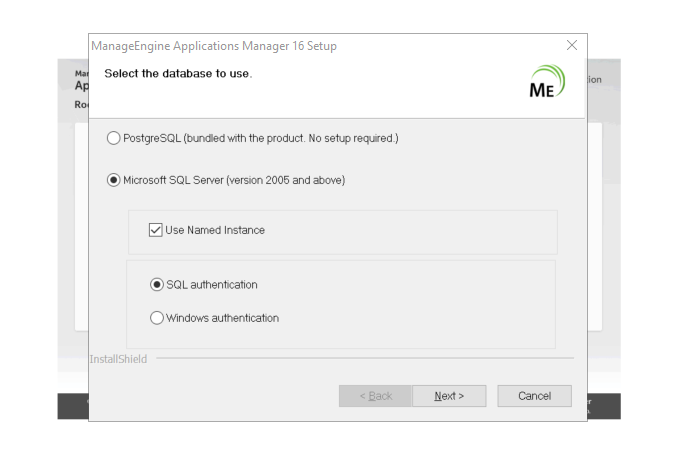
- PostgreSQL - PostgreSQL comes bundled with your download of Applications Manager, therefore no setup is required.
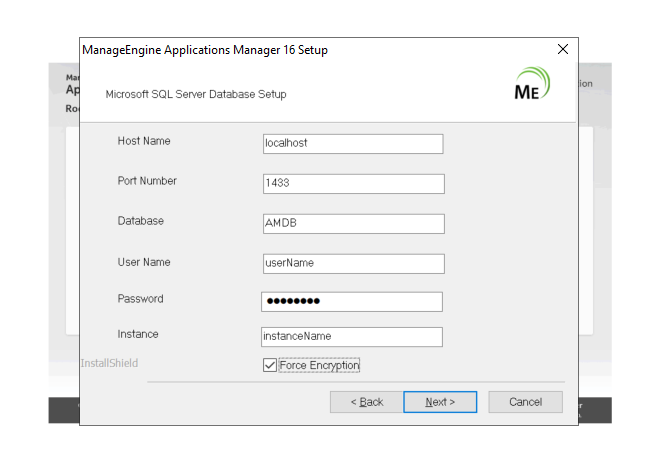
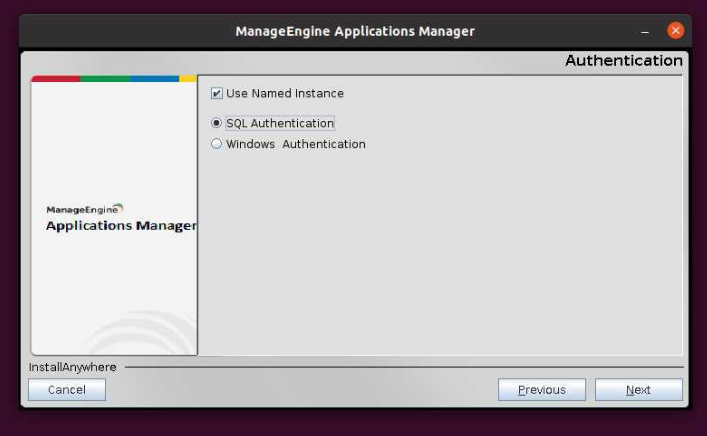
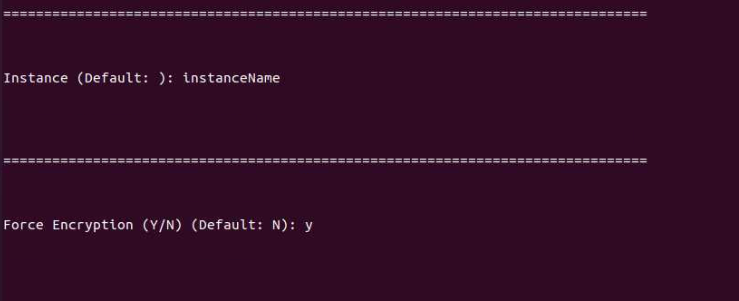
- Microsoft SQL Server (version 2012 and above): Enter the following details based on the type of authentication selected (SQL Authentication or Windows Authentication). Select the Use Named Instance checkbox if you wish to specify the named instance for the SQL server along with the following details:
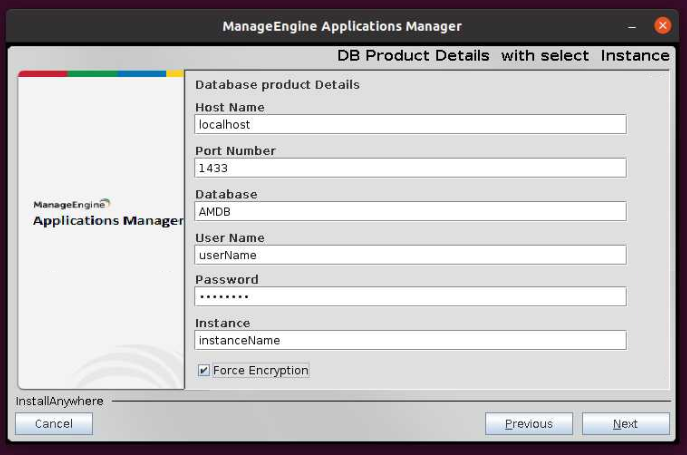
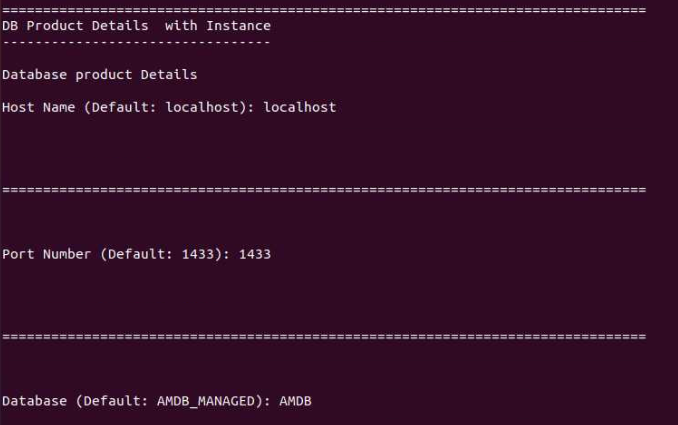
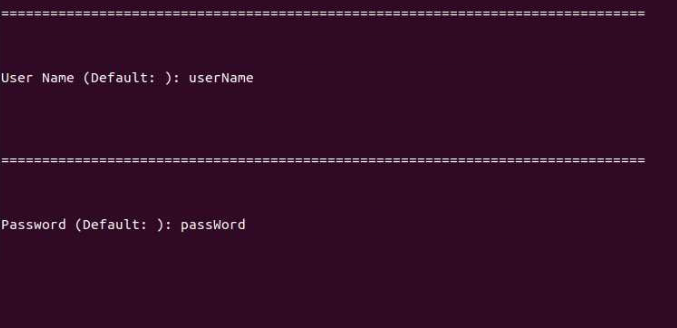
- If it is based on SQL Authentication, enter the Host Name, Port Number, Database Name, User Name, Password of the SQL Server. You can also enable Force Encryption, if required.
- If it is based on Windows Authentication, enter the Host Name, Port Number, Database Name of the SQL Server and the User Name, Password of the Windows machine on which SQL Server is running. You can also enable Force Encryption, if required.
 Note:
Note:- Access to the master database is required for the backend database.
- Password field should not contain the special character [ \ ] for MS SQL backend database.
- Click Finish to complete the installation process.
Once the installation wizard is complete, the Applications Manager setup can be found under <Applications Manager Home> directory.
Learn how to start ManageEngine Applications Manager
Installing Applications Manager on Linux
To install Applications Manager on Linux, follow the steps given below:
Note: When installing Applications Manager in a Linux machine, make sure that the installation is done using a root user account with admin privileges.
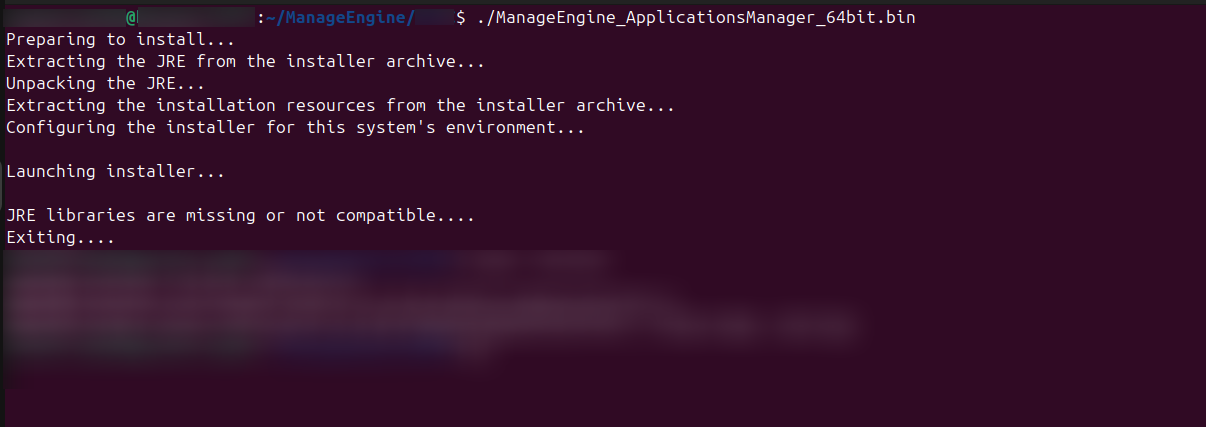
- Download the ManageEngine Applications Manager (.bin) installation file.
- Open the command terminal and navigate to the directory where the Applications Manager installation file is downloaded.
- Assign executable permission to the downloaded file using the following command:
sudo chmod a+x ManageEngine_ApplicationsManager_64bit.bin - Now execute the downloaded Applications Manager installation file using the following command:
sudo ./ManageEngine_ApplicationsManager_64bit.bin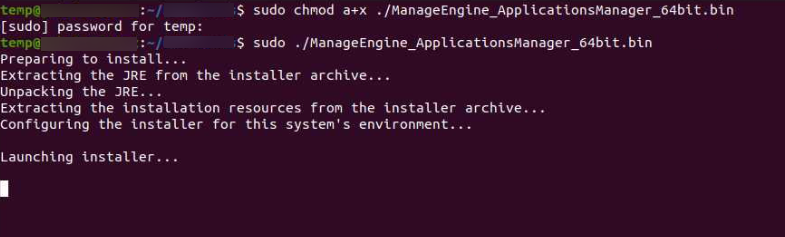
- The Installation Wizard is displayed and will guide you through the setup process. Click Next on the welcome screen to begin the installation process.
- Read the license agreement, accept the terms of the license agreement and click Next.
- You will be asked to select the edition that is required to be installed in your system. Choose Free or Professional Edition and click Next. View edition comparison
- Select the language in which you wish to install Applications Manager and click Next.
- For Professional Edition of Applications Manager, you will be asked to choose the user type with which you wish to be created—Trial User or Registered User. If Registered User is chosen, select and upload the registered license file from your system and click Next.
- Enter the WebServer Port number (9090, by default) at which the web server is to be started and SSL Port number (8443, by default) of the web server. Click Next to proceed.
- Select the required database backend support to use (PostgreSQL or Microsoft SQL Server) and click Next.
Note: Make sure to implement the prerequisites that are required for setting up MS SQL server as database backend. Learn more
- PostgreSQL - PostgreSQL comes bundled with your download of Applications Manager, therefore no setup is required.
- Microsoft SQL Server (version 2012 and above): Enter the following details based on the type of authentication selected (SQL Authentication or Windows Authentication). Select the Use Named Instance checkbox if you wish to specify the named instance for the SQL server along with the following details:
- If it is based on SQL Authentication, enter the Host Name, Port Number, Database Name, User Name, Password of the SQL Server. You can also enable Force Encryption, if required.
- If it is based on Windows Authentication, enter the Host Name, Port Number, Database Name of the SQL Server and the User Name, Password of the Windows machine on which SQL Server is running. You can also enable Force Encryption, if required.
 Note:
Note:- Access to the master database is required for the backend database.
- DB Name, Username and Password fields should not contain any special characters for MS SQL backend database, except the following:
- DB Name - [ @ . , _ = ^ # - ]
- User Name - [ @ . , _ = * ^ # - \ ]
- Password - [ @ . , _ = * ^ # - ]
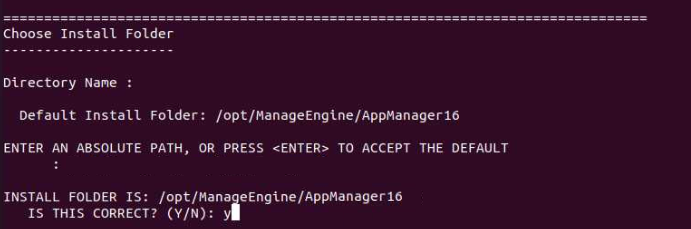
- Specify the directory location where Applications Manager should be installed on your machine (Default directory location is /opt/ManageEngine/AppManager) and click Next.
Note: The folder name should not contain the special character [ # ] where Applications Manager is to be installed.
- Enter the required details to register for technical support and click Next. However, this is an optional step and can be skipped.
- Click Done to complete the installation process.
Once the installation process is complete, the Applications Manager setup can be found under <Applications Manager Home> directory.
Learn how to start ManageEngine Applications Manager
Installing Applications Manager using Console mode/Command Line
In case you are working on a non-GUI based Linux setup or are working on a Windows box and want to install on a remote Linux system without a user interface, you can choose to install Applications Manager through command line/console mode of installation. The steps would be similar to that of the Linux installation steps for Free/Professional Edition, except that they are shown as I/O commands in the console terminal. To install Applications Manager using console mode/command line, follow the steps given below:
- Download the ManageEngine Applications Manager (.bin) installation file.
- Open the command terminal and navigate to the directory where the Applications Manager installation file is downloaded.
- Assign executable permission to the downloaded file using the following command:
sudo chmod a+x ManageEngine_ApplicationsManager_64bit.bin - Now execute the downloaded Applications Manager installation file using the following command:
sudo ./ManageEngine_ApplicationsManager_64bit.bin -i console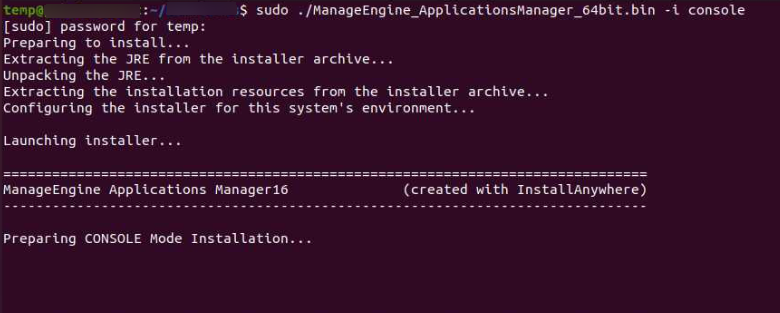
- The Installation Wizard is displayed as command output in the console and will guide you through the setup process. Press Enter to begin the installation process.
- Read the license agreement, accept the terms of the license agreement and press Enter.
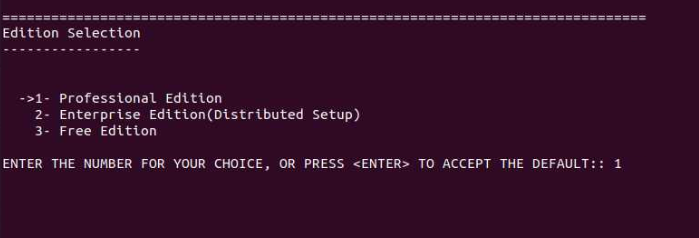
- You will be asked to select the edition that is required to be installed in your system. Choose Free Edition or Professional Edition and press Enter. View edition comparison
- Select the language in which you wish to install Applications Manager and press Enter.
- For Professional Edition, you will be asked to specify the user type with which you wish to be created—trial user or registered user. If registered, specify the directory location of the registered license file from your system.
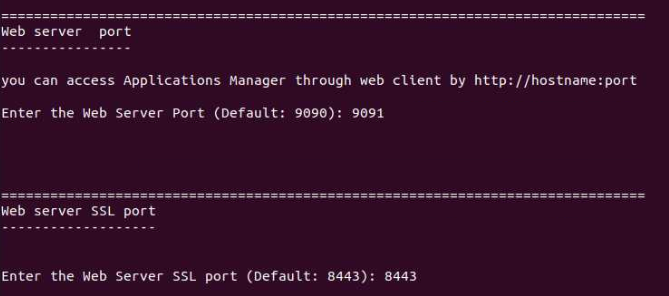
- Enter the WebServer Port number (9090, by default) at which the web server is to be started and SSL Port number (8443, by default) of the web server. Press Enter to proceed.
- Select the required database backend support to use (PostgreSQL or Microsoft SQL Server) and press Enter.
Note: Make sure to implement the prerequisites that are required for setting up MS SQL server as database backend. Learn more
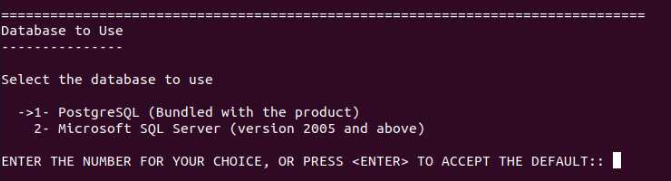
- PostgreSQL - PostgreSQL comes bundled with your download of Applications Manager, therefore no setup is required.
- Microsoft SQL Server (version 2012 and above): Enter the following details based on the type of authentication selected (SQL Authentication or Windows Authentication). Enable Use Named Instance if you wish to specify the named instance for the SQL server along with the following details:
- If it is based on SQL Authentication, enter the Host Name, Port Number, Database Name, User Name, Password of the SQL Server. You can also enable Force Encryption, if required.
- If it is based on Windows Authentication, enter the Host Name, Port Number, Database Name of the SQL Server and the User Name, Password of the Windows machine on which SQL Server is running. You can also enable Force Encryption, if required.
 Note:
Note:- Access to the master database is required for the backend database.
- DB Name, Username and Password fields should not contain any special characters for MS SQL backend database, except the following:
- DB Name - [ @ . , _ = ^ # - ]
- User Name - [ @ . , _ = * ^ # - \ ]
- Password - [ @ . , _ = * ^ # - ]
- Specify the directory location where Applications Manager should be installed on your machine (Default directory location is /opt/ManageEngine/AppManager) and click Next.
Note: The folder name should not contain the special character [ # ] where Applications Manager is to be installed.
- Enter the required details to register for technical support and press Enter. However, this is an optional step and can be skipped.
- Verify the installation details and press Enter to proceed with the installation.
- Once the installation is complete, press Enter.
Once the installation process is complete, the Applications Manager setup can be found under <Applications Manager Home> directory.
Learn how to start ManageEngine Applications Manager
Installing Applications Manager on CIS hardened server
Before installing the product, please check for the execute permission in the /tmp directory with the mount command. If the command returns the line containing /tmp as 'noexec' as highlighted below, it depicts that we are not allowed to execute any file under the /tmp directory [even if the /tmp directory has 777 permission (i.e. rwxrwxrw)] due to which our installation might throw errors.
[root@ip-172-31-44-74 /]# mount | grep /tmp
tmpfs on /tmp type tmpfs (rw,nosuid,nodev,noexec,seclabel)
In such a case, we can go ahead with one of the following approaches:
- Modify the
noexecpermission in the /tmp directory toexec:To modify the permission in the /tmp directory, we would have to remount the directory with
execpermission with the below command:mount -o remount,exec /tmpNote: When following the first approach, it is advisable to remount the tmp directory with thenoexecpermission after a successful installation and verification of the product's functionality. Allowing the tmp directory to be executable could pose a security risk, as the directory typically has worldwide access (777 - rwxrwxrw) by default. To revoke this permission, use the following command:mount -o remount,noexec /tmp - Use another directory as temp directory for installation :
To use another directory as temp directory for the installation, we would have to create a tmp directory under any directory (preferably /opt since it would have full access) and then mark it as temp before installing the product with the below commands:
mkdir /opt/tmp
 export IATEMPDIR=/opt/tmp
Regarding the second approach, it is important to note that the
IATEMPDIRis simply an environmental variable, and any changes made to it will be reverted once the particular terminal session is closed.
After performing the above, please proceed with the installation of Applications Manager.
Note: The above mentioned steps have been carried out in Red Hat Enterprise Linux 7 OS with hardening level of CIS Benchmark - Level 1 machine.
