Integrating with ServiceNow
- Overview
- Configuring ServiceNow in Applications Manager
- Integration options in Applications Manager
- Configuring Event Preferences
- Ticket Settings
- Configuration Item Details in CMDB
- CMDB Reports
- APIs used in APM for incident management in ServiceNow
Overview
ServiceNow is a web-based Help Desk and Asset Management software. With ServiceNow, you can automatically log trouble tickets for specific alarms and manage incidents from Applications Manager.
Logging trouble tickets
Applications Manager has the ability to automatically log trouble tickets for specific alarms and to notify the concerned technician when a particular process exceeds the set threshold point. Along with the provision to send emails, SMS messages, and other notifications, alarms can also be tracked by automatically logging trouble tickets in a help desk software.
Applications Manager takes care of two-way synchronization of Alerts and Ticket statuses with ServiceNow. For example, you can automatically log a ticket when an alarm is raised, reopen the ticket whenever an alarm reoccurs, or close the ticket if the alarm is cleared. Additionally, the alerts under the Alarms tab include a Ticket Icon that loads the ticket raised when clicked on. Learn more
Configuring ServiceNow in Applications Manager
This section describes the method in which ServiceNow the settings are to be configured in Applications Manager:
Prerequisites
The ServiceNow user should have the following roles required for the corresponding options for successful integration in Applications Manager:
- Incident management : itil, itil_admin and personalize_choices
- CI Sync : itil, itil_admin, personalize_choices and personalize_dictionary
- Event sync : evt_mgmt_integration
Log in to ServiceNow as an admin user and perform the following steps:
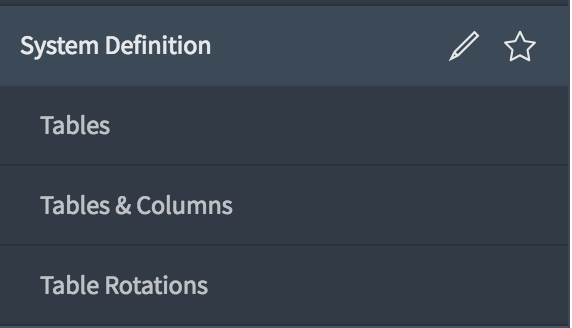
- Go to System Definition and then Tables.
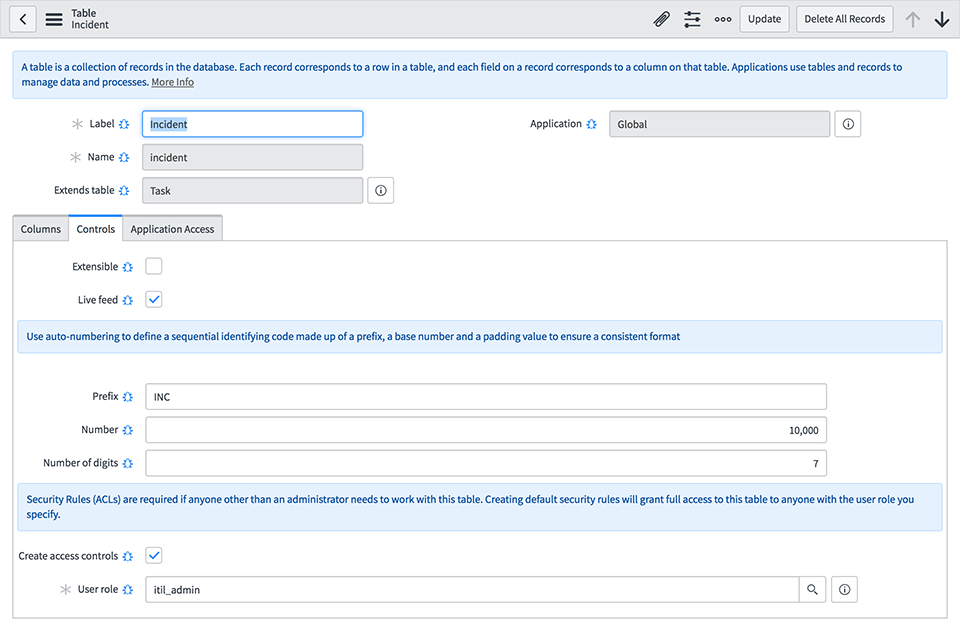
- Search for "Incident".
- Click on the entry that has the Label as "Incident". This will load the Incident table.
- Now, select Controls tab. Enable "Create access controls" and type itil_admin in the "User role" field.
- Save this table.
Steps to configure
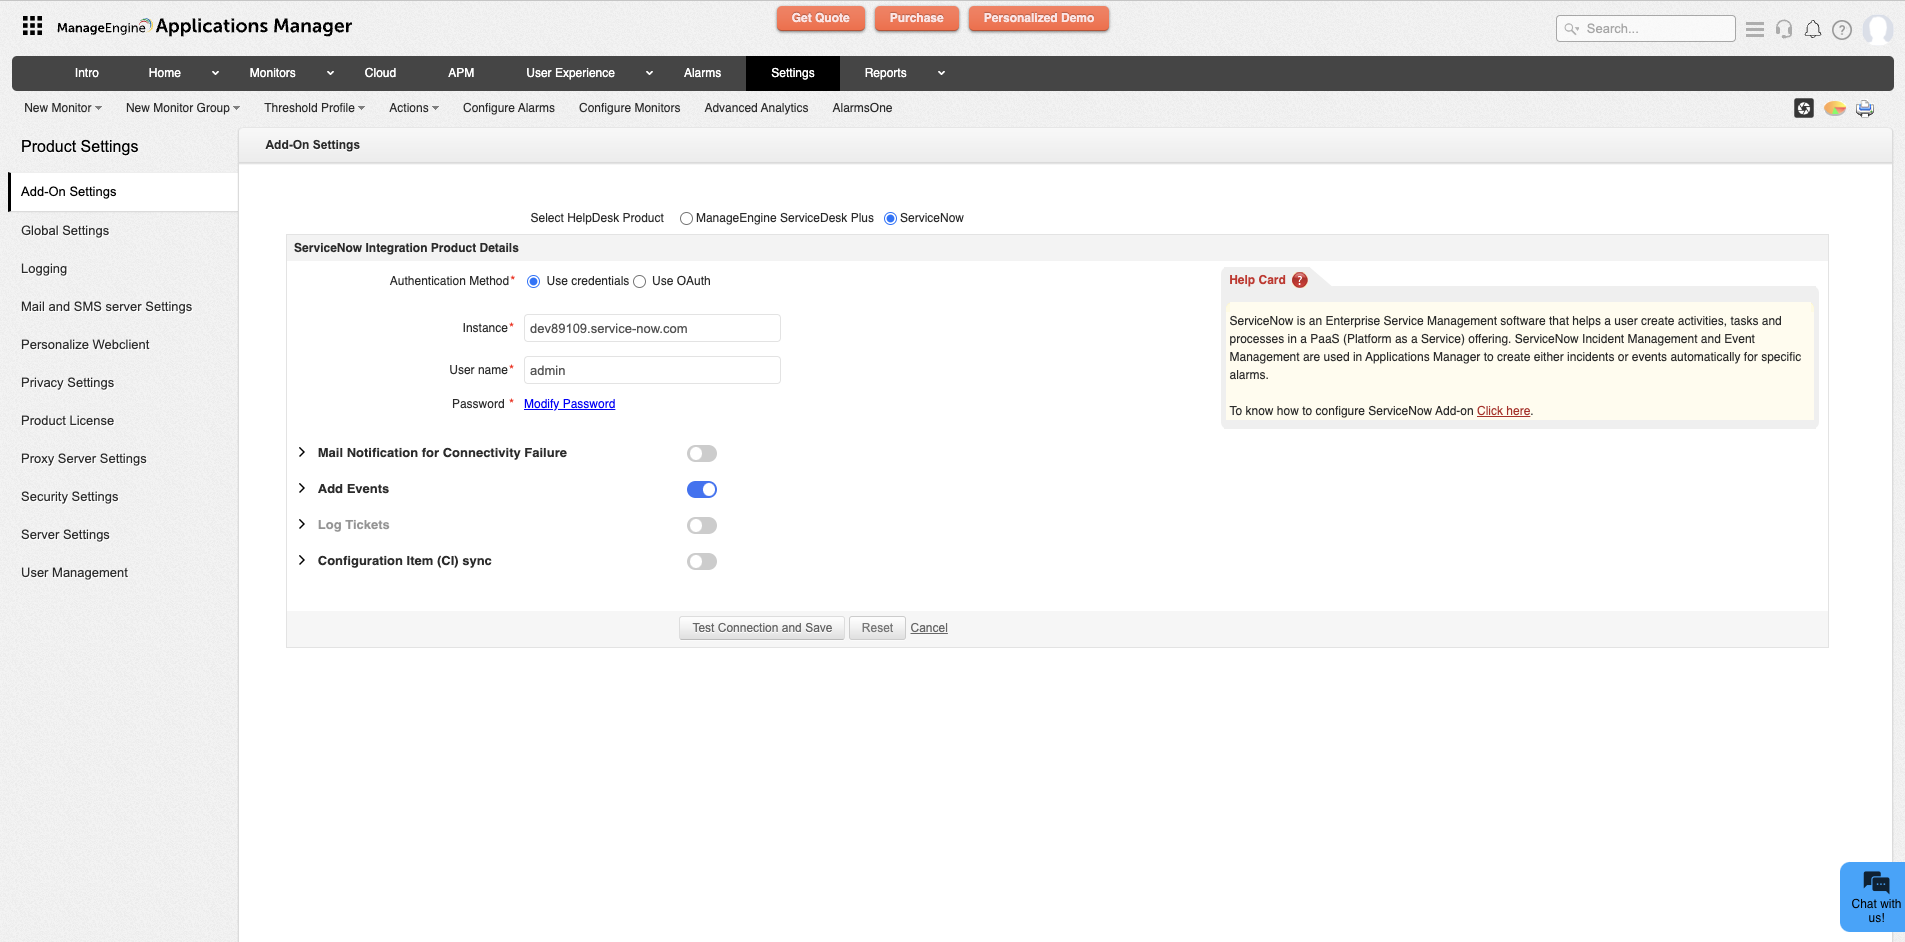
- Under Settings tab, click on Add-On Settings under Product Settings.
- An Add-on Settings table is displayed.
- Click on Add action for HelpDesk. This takes you to the ManageEngine ServiceDesk Plus Server Details page with a choice to Select HelpDesk Product. Choose ServiceNow.
- Provide the Instance name (e.g.: [instancename].service-now.com), Username and Password. Secure connection will be used by default while connecting to ServiceNow and so the protocol must not be specified in the Instance field.
- Enable the Mail Notification for Connectivity Failuretoggle button if you wish to trigger mail notifications in case of connectivity failures. After enabling this option, enter the following details:
- Configure the email to which the notification has to be sent. You can configure either by choosing Admin email (Mail address configured for the admin user or the mail address in SMTP configuration) or by selecting email actions to be triggered for the selected email from the dropdown.
- Enable the Append Custom Message checkbox if you want to append customized text messages along with the mail notifcation.
- Enable the Repeat mails until successful connection checkbox to repeat mail notifications until connection is established successfully. After enabling, specify the Repeat Interval (in minutes) after which mail notification has to be repeated.
- Enable the Add Events toggle button to configure events. Enabling this option will automatically disable Log Tickets. Either Events or Ticketing can be enabled at a time.
- By enabling Log tickets toggle button you have the option to configure Ticket Settings.
- Enable Configuration Item (CI) sync toggle button to configure Configuration Item Settings .
- Test if the connection is working and save the settings.
Note: The connectivity status of the ServiceNow will be notified through In-app notifications (product bell icon).
Integration options in Applications Manager
Applications Manager allows users to choose their preferred method of authentication, enabling them to opt to Use credentials or Use OAuth based on their security and integration requirements. Users can seamlessly switch between the authentication methods, ensuring compatibility with existing setups while accommodating more secure and modern integration options.
If your chosen method of authentication is using credentials, provide instance name, username and password to integrate with ServiceNow.
To integrate with ServiceNow using the OAuth method of authentication, follow the steps given below.
Creating an endpoint for external clients
- Log in to ServiceNow.
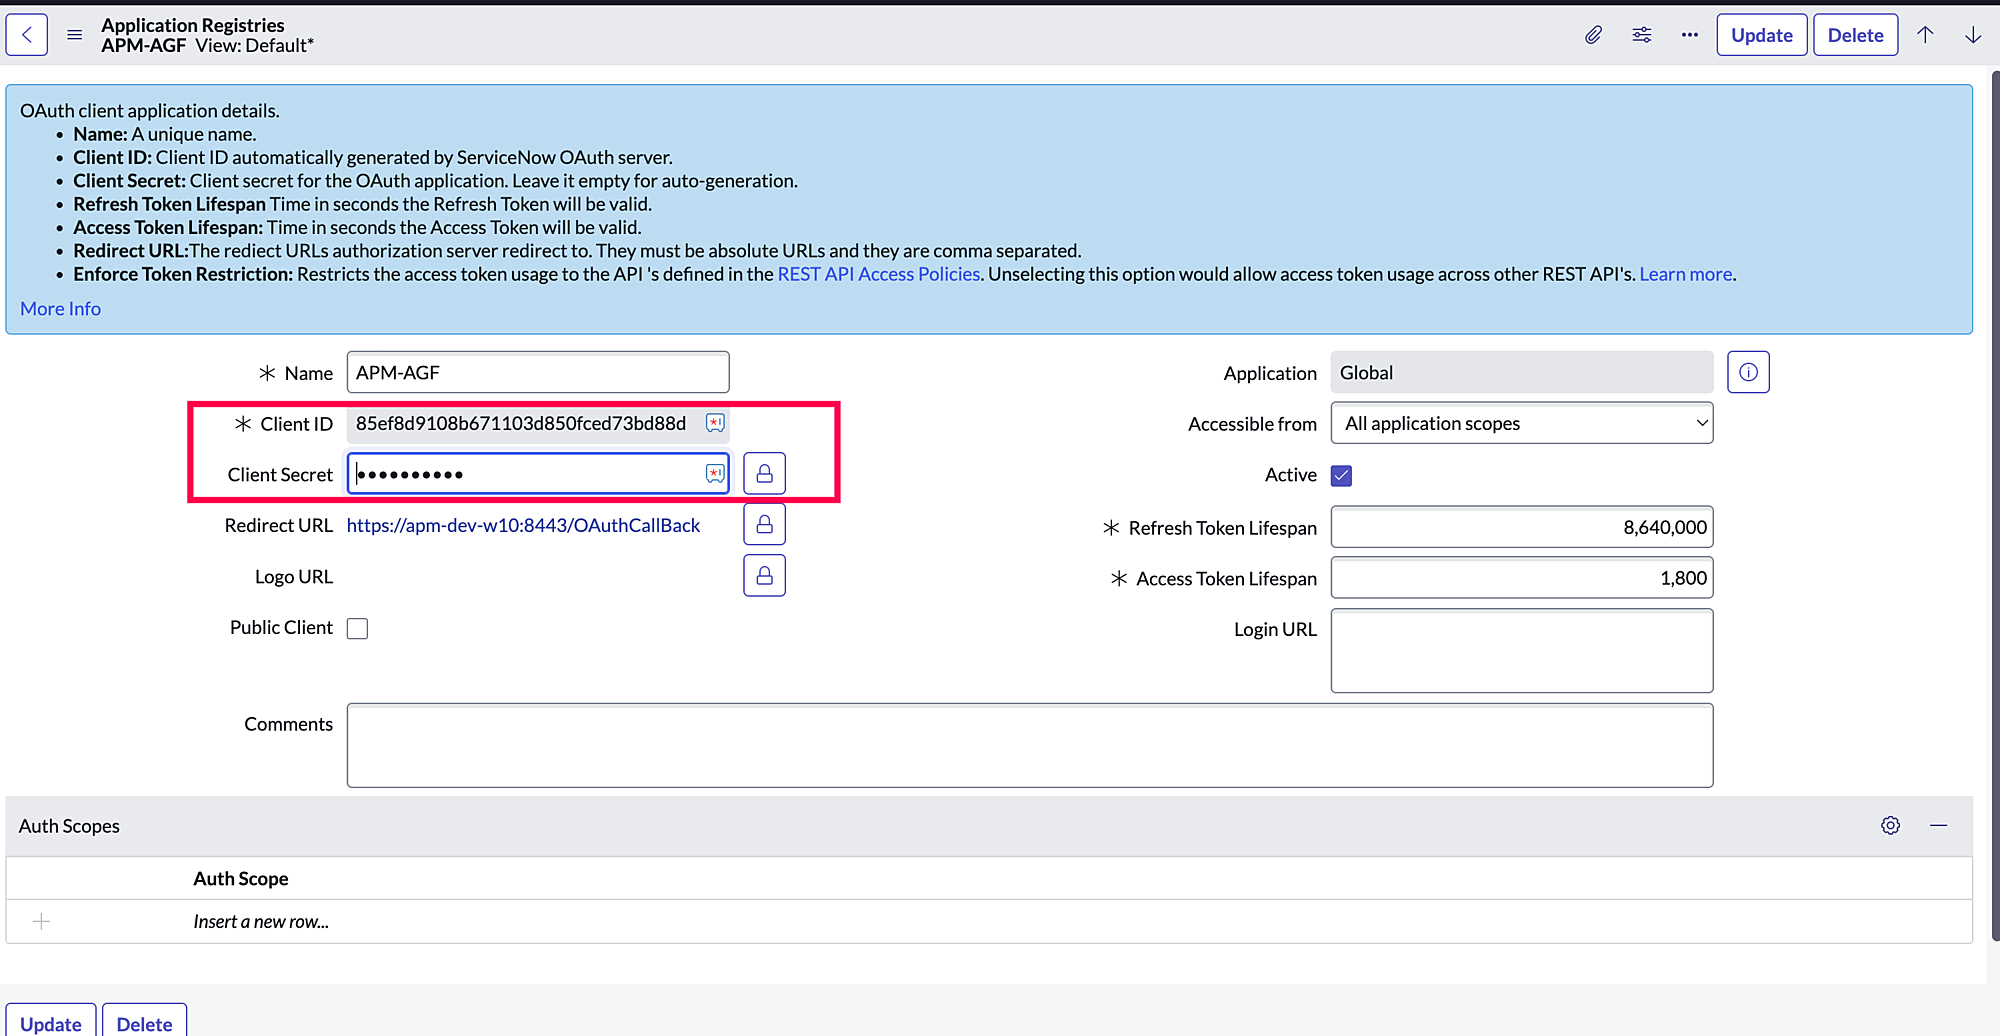
- Navigate to All → System OAuth → Application Registry and click New.
- Click on Create an OAuth API endpoint for external clients and fill in the required details.
- Provide a name (like a Display name to remember this configuration) for the profile.
- Copy the Redirect URL from the Add OAuth provider page in Applications Manager and paste it in the Redirect URL field.
Eg: https://apm-dev-w10:8443/OAuthCallBack Click Submit. Refer to the below image for the resultant page.
Configuring OAuth in Applications Manager
Users can choose between following the follwoing methods to configure OAuth in Applications Manager:
Authorization Code grant type
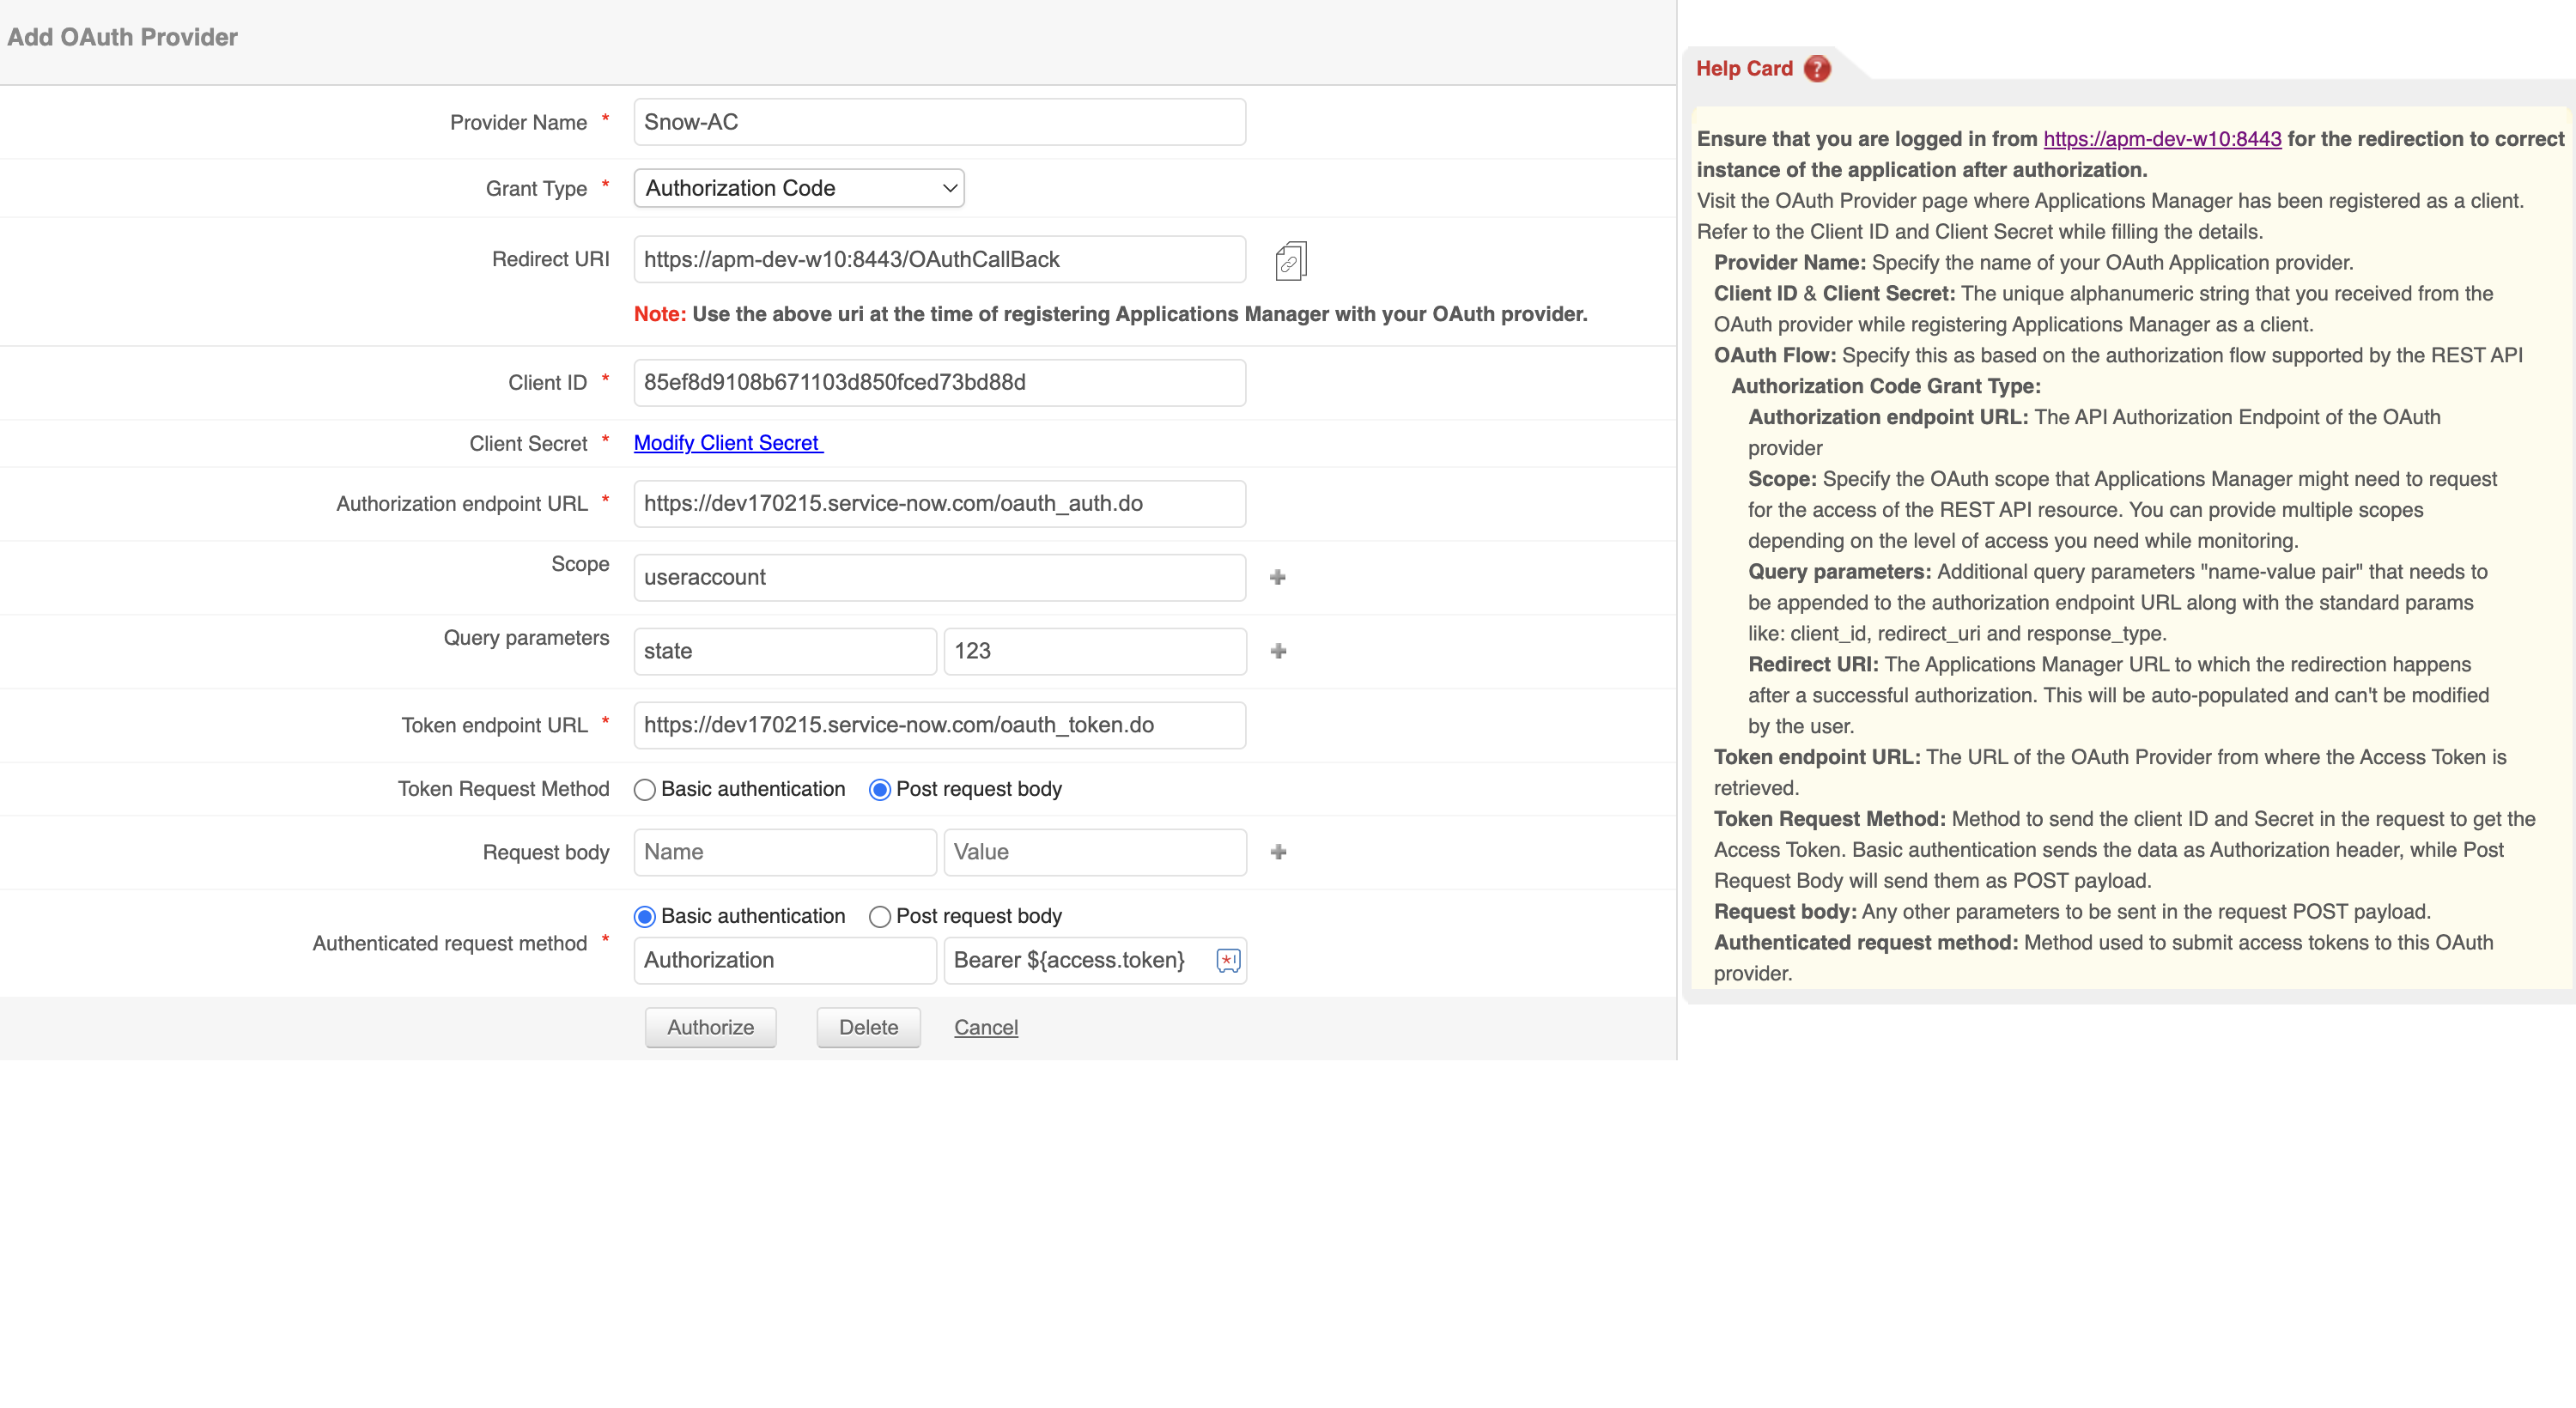
- Go to the Add OAuth provider page in Applications Manager.
- Add a Provider Name (Display name) to remember this configuration.
- Choose Authorization Code in the Grant type field.
- Copy and paste the Client ID and Client Secret from ServiceNow and paste them in their respective fields.
- Enter the Authorization endpoint URL of the OAuth Provider. Eg: https://dev*****.service-now.com/oauth_auth.do
- Enter 'useraccount' as the OAuth Scope the Applications Manager will need to request the access the of the REST API resource.
- Add state:123 as the Query parameters to be appended to the authorization endpoint URL along with the standard params.
- Enter the Token endpoint URL of the OAuth Provider from where the Access Token is retrieved. Eg: https://dev*****.service-now.com/oauth_token.do
- Select Post request body in the Token Request Method field.
- Add any other parameters to be sent in the request POST payload to the Request body field.
- Choose the Authenticated request method used to submit access tokens to this OAuth provider.
Click Authorize and accept the authorization page in ServiceNow.
Resource Owner Credentials grant type
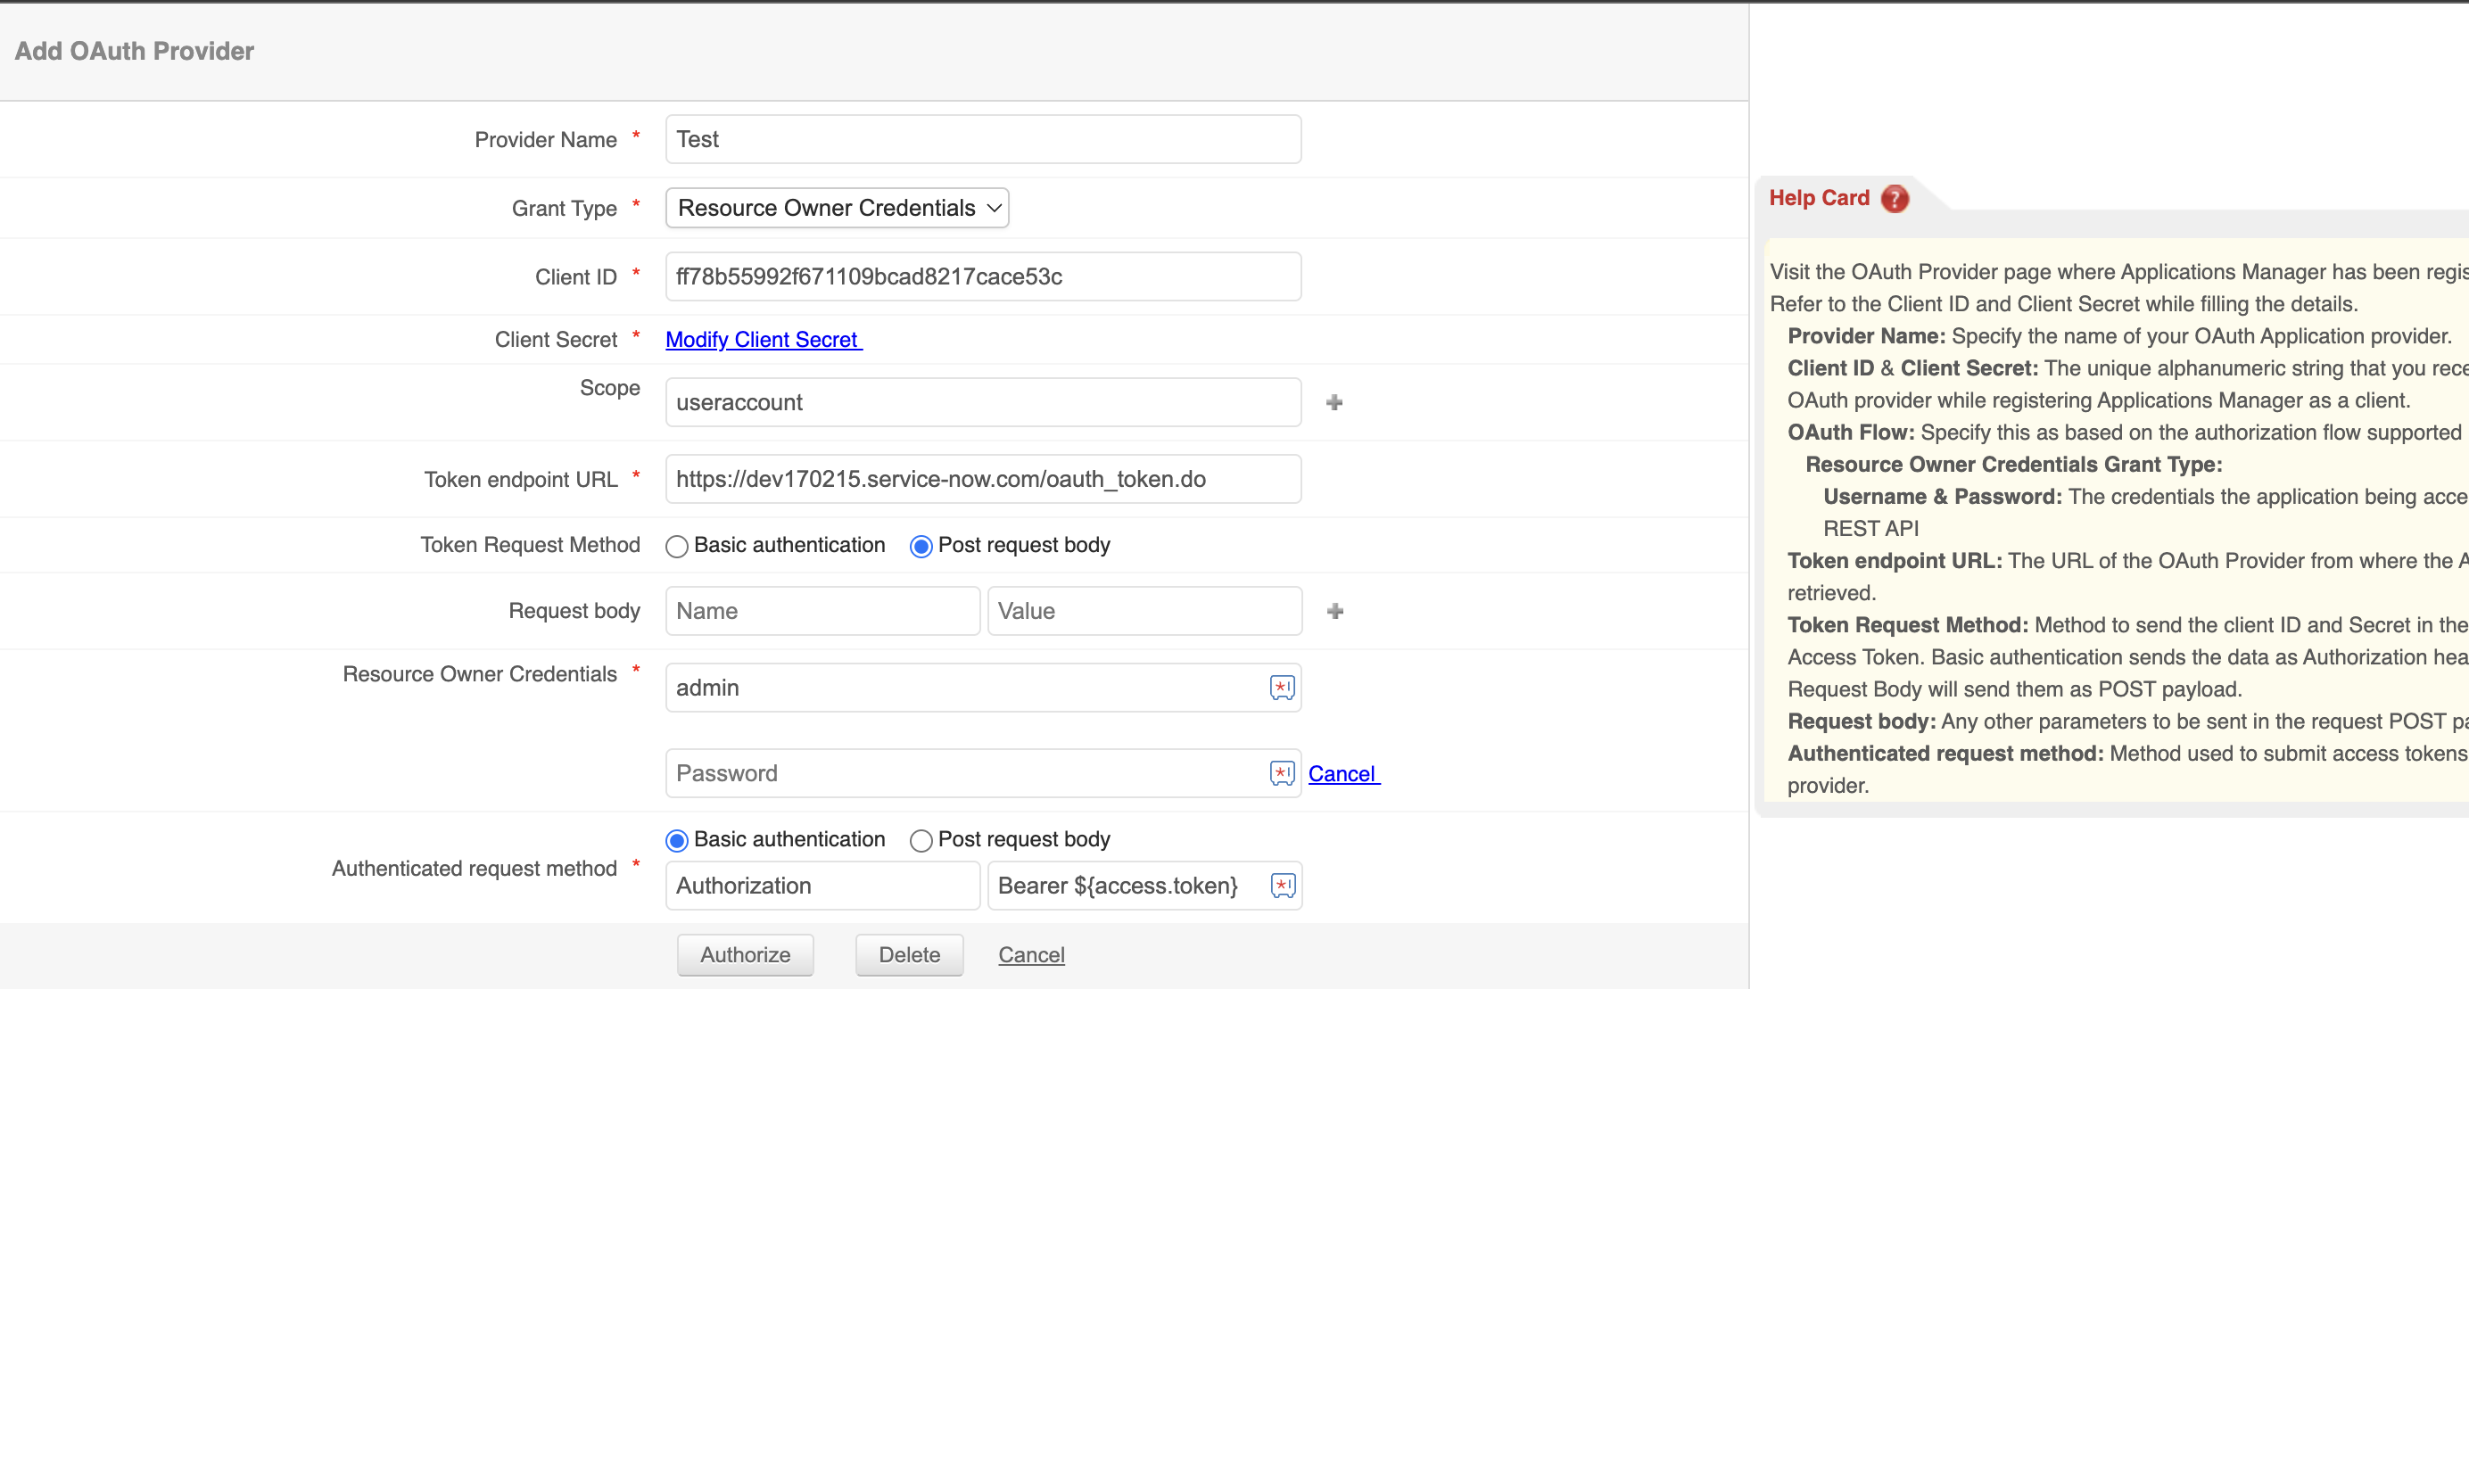
- Go to the Add OAuth provider page in Applications Manager.
- Add a Provider Name (Display name) to remember this configuration.
- Choose Resource Owner Credentials in the Grant type field.
- Copy and paste the Client ID and Client Secret from ServiceNow and paste them in their respective fields.
- Add 'useraccount' as the OAuth Scope the Applications Manager will need to request the access the of the REST API resource.
- Enter the Token endpoint URL of the OAuth Provider. Eg: https://dev*****.service-now.com/oauth_token.do
- Select Post request body in the Token Request Method field.
- Add any other parameters to be sent in the request POST payload to the Request body field.
- Provide the username and password of the ServiceNow user that you used to log in and create an OAuth client in the Resource Owner Credentials field.
- Click Authorize and accept the authorization page in ServiceNow.
Configuring Event Preferences
For ServiceNow integration, Add Events option is provided to choose between adding events and logging tickets. To configure Events in ServiceNow, enable the Add Events toggle button. This option creates events for configured alarms automatically.
- The Event Management plugin should be activated in your ServiceNow instance.
- To create an event in ServiceNow from Applications Manager, the Log a Ticket action must be configured newly after opting the Add Event option and associate it to the alarm threshold configured.
Ticket Settings
Users can configure the following settings:
Reopen Settings
- Set Applications Manager to perform one of the following actions when an alarm is raised again for a closed ticket:
- To reopen the ticket whenever an alarm re-occurrs.
- To reopen the ticket within a certain number of days from the closed time. If the ticket cannot reopened, a new ticket is automatically created.
- To create a new ticket or to open a new ticket whenever an alarm has re-occurred.
- Set Applications Manager to perform one of the following actions when an alarm is raised again for a resolved ticket:
- To reopen the ticket whenever an alarm is re-occured.
- To reopen the ticket within a certain number of days from the closed time. If the ticket is not reopened, a new ticket is automatically created. (To reopen the ticket whenever an alarm is reoccured within a certain number of days, else open a new ticket)
- To create a new ticket or to open a new ticket whenever an alarm has re-occured.
- Set Applications Manager to perform one of the following actions when an alarm is raised for an entity that was previously clear and if the existing ticket in HelpDesk is not closed/resolved:
- To update the existing ticket whenever an alarm is re-occured.
- To update the existing ticket within a certain number of days from the clear alert. If the ticket is not updated, a new ticket is automatically created. (To update the existing ticket whenever an alarm is reoccured within a certain number of days, else open a new ticket.)
- To update the notes associated with that ticket.
- To create a new ticket or to open a new ticket whenever an alarm has re-occured.
- Enable on-demand ticket generation using :
- Raise a ticket action, so that you can raise a ticket on demand using a ticket action from alarms page. The new on-demand tickets are mapped to the respective configuration items.
- Request Form, so that you can raise a ticket on demand using the request form from alarms page. The new on-demand tickets are mapped to the respective configuration items.
Update Settings
- Set Applications Manager to perform one of the following actions when the severity of an alarm is changed / RCA of the alarm is updated for an already created ticket:
- To update the ticket.
- To update the notes associated with that ticket.
- Set Applications Manager to perform one of the following actions when an alarm is cleared for a ticket:
- To close the ticket.
- To update the notes associated with that ticket.
- Set Applications Manager to perform one of the following actions when a monitor or a ticket action or a metric is deleted for a ticket:
- To close the ticket.
- To update the notes associated with that ticket.
- Update the ticket only if there is a status change in the alarm
- If enabled, action is triggered only when there is a status change in alarm
- Add notes for the ticket whenever an annotation is made for the alarm.
Accessing from Applications Manager
- Access ticket details from Application Manager. User can access the ticket details from the ticket details link in the alert details page
- Launch Read-only ticket. When selected, the ticket details launched from Applications Manager would be read only
Configuration Item Details in CMDB
Once the ServiceNow Settings are configured, Applications Manager identifies all the monitors which are considered as valid Configuration Items (unless you have configured to exclude a selected monitor type(s)) and adds them as Configuration Items in ServiceNow CMDB.
You can change the following Configuration Item Settings by enabling the Configuration Item (CI) sync option under the Add-On Settings tab. The CI Settings include the following:
- Delete the CI if the corresponding monitor is deleted.
- Exclude the monitor(s) of the selected monitor type(s).
- Access CI and relationship details from Applications Manager.
- Users can access configuration item from Application Manager in the monitor snapshot page.
To view the details of a Configuration Item:
- Go to the Monitors tab.
- From the Select View list, choose the Bulk Configuration View.
- Open the List View which will give you a list of all the monitors.
- In the list, click on the
 icon near a monitor to view the CI Details.
CMDB Reports
The CMDB Reports section provides a detailed summary of all resources from Applications Manager that are synchronized with ServiceNow CMDB. This report allows you to track synchronization attempts, verify data consistency, and troubleshoot failures with ease. Each entry in the report includes key details such as:
- Display Name - Resource name as identified in Applications Manager.
- Resource Type - Type of the monitored resource (e.g., Network, Linux, PostgreSQL, Tomcat Server).
- CI Name / CI Type / CI ID — The corresponding Configuration Item details in ServiceNow CMDB.
- Operation — The synchronization action performed (for example, Add or Update).
- Last Successful Attempt / Last Attempt — Timestamps of the latest sync activities.
- Status — Indicates whether the sync was successful or failed.
- Message — Displays additional information or error codes to help troubleshoot issues.
Customizing the Report
Use the column selector to add or remove fields and tailor the report to your needs (for example, display CI ID or Resource Name). Apply search and filter options across columns to quickly locate specific records (e.g., filter by status to view only failed syncs).
Exporting Reports
For offline analysis or audit purposes, the report can be exported in multiple formats. This helps in maintaining a record of all CMDB synchronization activities.
- CSV
- Excel
APIs used in APM for incident management in ServiceNow
| Purpose | Method | URL with Input data |
|---|---|---|
| Fetching Category | GET | https://instance.service-now.com/api/now/table/sys_choice?sysparm_fields=label,value&element=category&name=incident |
| Fetching Subcategory | GET | https://instance.service-now.com/api/now/table/sys_choice?sysparm_fields=label,value&element=subcategory&name=incident&dependent_value=[category name] |
| Fetching Urgency | https://instance.service-now.com/api/now/table/sys_choice?sysparm_fields=label,value&element=urgency&name=incident From Applications Manager 13410, the Urgency API has been changed to: https://instance.service-now.com/api/now/table/sys_choice?sysparm_fields=label,value&sysparm_querynameINtask^element=urgency | |
| Fetching Assignment Groups | GET | https://instance.service-now.com/api/now/v1/table/sys_user_group?sysparm_fields=sys_id,name |
| Fetching all Technicians | GET | https://instance.service-now.com/api/now/v1/table/sys_user?sysparm_fields=roles,user_name,name&roles=itil |
| Fetching technicians of a Support Group | GET | https://instance.service-now.com/api/now/v1/table/sys_user_grmember?sysparm_fields=user.name&group=[sys_id of support group chosen] |
| Adding an incident | POST | https://instance.service-now.com/api/now/table/incident?&sysparm_fields=short_description,sys_id,description |
| Editing incident details | POST | https://instance.service-now.com/api/now/table/incident/[sys_id of ticket created]?&sysparm_fields=short_description,sys_id,description |
