Restrict users
The Restrict Users option under License Management lets administrators free up licenses by restricting user accounts that do not require self-service access. Restricting an account revokes and frees the ADSelfService Plus license the account consumed, deletes the account's enrollment data, and blocks the account from logging in to the self-service portal. The product manages restrictions for both Active Directory and Microsoft Entra ID directories from the same page, and you can restrict or reinstate accounts manually or on a schedule.
The account categories you can restrict depend on the directory. For Active Directory (AD), you can scope restrictions to organizational units (OUs). For Microsoft Entra ID, you can scope restrictions to domains. The following table lists each account category and shows whether you can restrict it in Active Directory and Microsoft Entra ID.
| Account category | What it covers | Active Directory | Microsoft Entra ID |
|---|---|---|---|
| Disabled accounts | Accounts that an administrator has disabled, such as when an employee leaves the organization. | Yes | Yes |
| Expired accounts | Accounts created for a limited period, such as a temporary employee, that have now expired. | Yes | No |
| Inactive accounts | Accounts with no activity for a set number of days. | Yes | No |
| Deleted accounts | Accounts deleted from the directory. For Microsoft Entra ID, deleted-user reports cover a maximum of 30 days. | Yes | Yes |
| Smart card users | Accounts that authenticate with a smart card. | Yes | No |
| Service accounts | Accounts that grant services the permissions they need to run. Resetting a service account password stops the service, so restricting these accounts prevents accidental disruption. | Yes | No |
| Unowned licenses | Accounts that were permanently (hard) deleted in the directory but are not synced to the product flagged, leaving their licenses flagged as unowned licenses. | Yes | Yes |
| All users | Every account in the selected scope. | Yes | Yes |
Prerequisites
To configure the Restrict Users feature in ADSelfService Plus, you need the following:
Permissions: Administrator access to ADSelfService Plus.
Email notification (optional): To email the restricted accounts' list from a scheduler, configure a mail server in Mail / SMS Settings. For more details, see configuring mail server settings.
Limitations
The Restrict Users feature in ADSelfService Plus has the following limitations.
| Note: Restricting an account deletes its enrollment data automatically. After an account is reinstated, the user must enroll again before using self-service features. For Microsoft Entra ID deleted users, ADSelfService Plus can generate reports for a maximum of 30 days. |
|---|
Configuration instructions
In ADSelfService Plus, you restrict and reinstate accounts manually from the Restricted Users page or automatically with schedulers.
Restrict accounts manually
To restrict accounts in either directory:
- Navigate to Admin > License Management > Restrict Users.
- Click + Restrict Users.
- From Select Directory, choose the directory: a domain under Active Directory or a tenant under Microsoft Entra ID.
- Set the scope (optional):
- For Active Directory: The scope shows All OU. Click Add, select the OUs in the Select Filters dialog. You can switch between Tree view and List view, and optionally select Don't inherit child OU(s). Click OK.
- For Microsoft Entra ID: The scope shows All Domains. Click Add, select the domains in the Select Filters dialog, then click OK.
- From Account Type, select the category to restrict:
- For Active Directory: Account Expired, Account Disabled, Inactive, Deleted Accounts, Smart Card Users, Service Accounts, UnOwned Licenses, or All Users.
- For Microsoft Entra ID: Account Disabled, Deleted Users, UnOwned Licenses, or All Users.
- Click Generate. ADSelfService Plus lists the matching accounts with their Display Name, User Principal Name, and Created Time. To stop a generation in progress, click Stop.
- Select the accounts to restrict. To select every account in the list, select the checkbox in the column header.
- Click Restrict Access.
- In the Confirm Action dialog, click Yes.
ADSelfService Plus deletes the selected accounts' enrollment data, frees their Endpoint MFA licenses, and blocks them from logging in to the self-service portal.
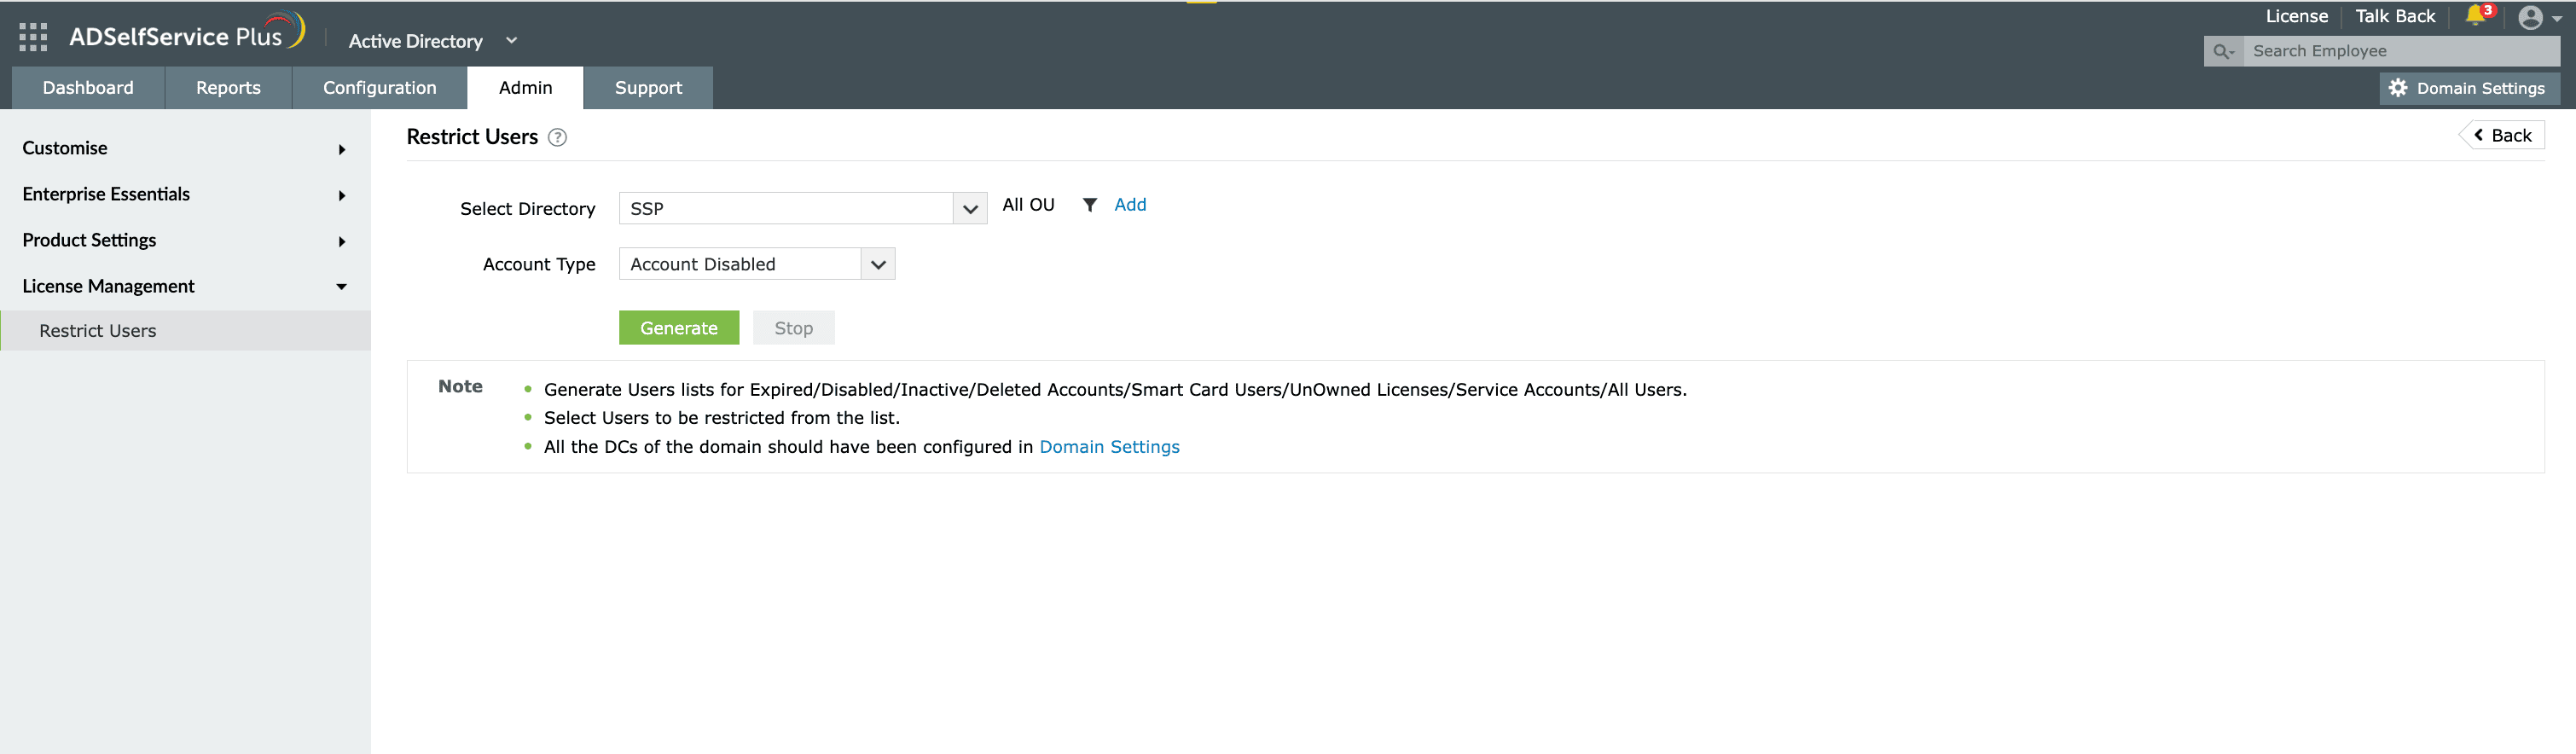
Fig.1: Restricting user accounts in ADSelfService Plus.
Reinstate accounts manually
Reinstating an account restores its self-service access. To reinstate accounts manually:
- Go to Admin > License Management > Restrict Users. The Restricted Users page lists the accounts that are currently restricted.
- From Select Organization, choose the directory whose restricted accounts you want to reinstate.
- Select the accounts to reinstate.
- Click Derestrict Users.
Because restriction deleted the accounts' enrollment data, reinstated users must enroll again before they can use self-service features.
Schedule automatic restriction
Use a scheduler to restrict matching accounts on a recurring basis. To create a restriction scheduler:
- Go to Admin > License Management > Restrict Users.
- Click Schedule to Restrict/Derestrict in the top-right corner.
- On the Restrict Users tab, click + Add New Scheduler. The Scheduler to Restrict Users page opens.
- Enter a name in the Scheduler Name field. To add a description, click Add Description.
- For Select Directory Type, select Active Directory or Microsoft Entra ID.
- Set the scope:
- For Active Directory: Under Select Domain, select the domain. To limit the scope to specific OUs, click Add and select them in the Select Filters dialog.
- For Microsoft Entra ID: Under Select Tenant, select the domain.
- Under Select Account Type, select the categories to restrict:
- For Active Directory: Account Disabled, Account Expired, Smart Card Users, Service Accounts, Inactive user for ... days, or Deleted user for ... days. For the inactive and deleted options, enter the number of days in the field (the default is 7). For service accounts, choose the object type with the Computers link.
- For Microsoft Entra ID: Account Disabled or Deleted user for ... days. Enter the number of days in the field (the default is 7).
- Under Select Duration, set the frequency (for example, Daily) and the run time using the hrs and mins lists.
- To email the restricted accounts' list, select Specify the e-mail address under Mail admin the restricted users' list and enter an address. A mail server is required; if prompted, click Yes to open Mail Settings. For more details, see configuring mail server settings.
- Click Create.
Schedule automatic reinstatement
Use a scheduler to reinstate accounts automatically when they meet the conditions you set. To create a reinstatement scheduler:
- Go to Admin > License Management > Restrict Users.
- Click Schedule to Restrict/Derestrict in the top-right corner.
- Click the Derestrict Users tab.
- From Select Directory, choose the directory: a domain under Active Directory or a tenant under Microsoft Entra ID.
- Select Enable scheduler to unrestrict users.
- Select the conditions under which accounts are reinstated:
- For Active Directory: When account is enabled, When smart card access is disabled, When account expiration is changed, or When the user has logged on in the last ... days.
- For Microsoft Entra ID: When account is enabled.
- Click Save.
The Active Directory reinstatement scheduler runs during the AD Synchronizer scheduler; the Microsoft Entra ID reinstatement scheduler runs during the Entra ID Synchronizer scheduler. To change how often it runs, use the Click here link in the on-screen note.
Tips
- Pair a restriction scheduler with a reinstatement scheduler so accounts regain access automatically when they become active again, for example when a disabled account is re-enabled. This reduces manual cleanup after temporary restrictions.
- Because restricting an account deletes its enrollment data, confirm that an account no longer needs self-service access before you restrict it, and plan for re-enrollment if you later reinstate it.