
Installing SSL Certificate
ServiceDesk Plus MSP can run as a HTTPS service. But it requires a SSL (Secure Socket Layer) Certificate signed by a valid Certificate Authority (CA).
By default, on first time start-up, it creates a self-signed certificate. This self-signed certificate will not be trusted by the user browsers. Thus, while connecting to ServiceDesk Plus MSP, you need to manually verify the certificate information and the hostname of ServiceDesk Plus MSP server carefully and should force the browser to accept the certificate.
To make ServiceDesk Plus MSP server identify itself correctly to the web browser and the user, you need to obtain a new signed certificate from a CA for the ServiceDesk Plus MSP host. You can use keytool (bundled with Java) to create your certificates, get them signed by a CA and use them with ServiceDesk Plus MSP.
Steps to install SSL in ServiceDesk Plus MSP
The steps involved in configuring ServiceDesk Plus MSP to use the SSL are as given below.
Step 1: Create a Keystore file
Step 2: Create .CSR (Certificate Signing Request) file
Step 3a: Install the SSL Certificate from the ServiceDesk Plus UI
Step 3b: Install Your SSL Certificate
NOTE: In all the images, replace the highlighted text with the alias name you want to use for ServiceDesk Plus MSP.
Step 1: Create a Keystore file
Before requesting for a certificate from a CA, you need to create tomcat specific ".keystore" file and ".csr" file. The .keystore file and .csr file will include information provided by the individual who creates the .keystore and .csr files.
To create the .keystore file follow the below steps,
-
Open the Command Prompt.
-
From the location <installation directory> \ jre \ bin execute the command
keytool -genkey -alias <your_alias_name> or [Domain Name] -keyalg RSA -keystore sdp.keystore

-
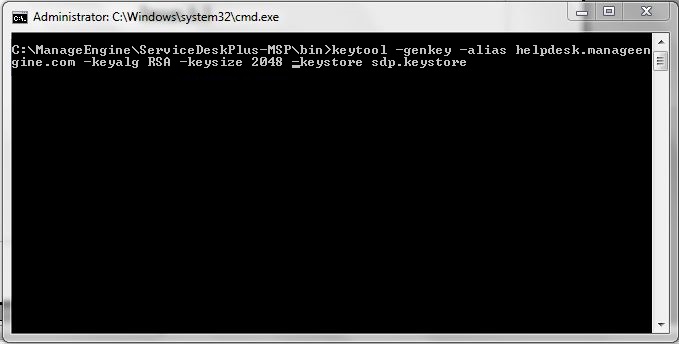
If your vendor requires a CSR of size 2048 please use the command given below.
keytool -genkey -alias <your_alias_name> or [Domain Name] -keyalg RSA -keysize 2048 -keystore sdp.keystore
-
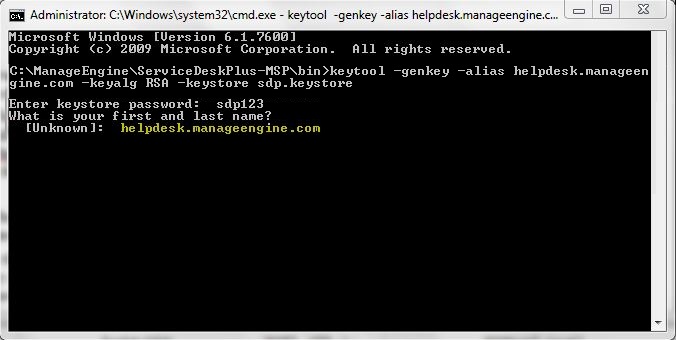
You will then be prompted to choose a password for your keystore.
NOTE: Please note that the Password should not contain $ symbol.
-
When it asks for first and last name, this is NOT your first and last name, but rather it is your Fully Qualified Domain Name for the site you are securing.
-
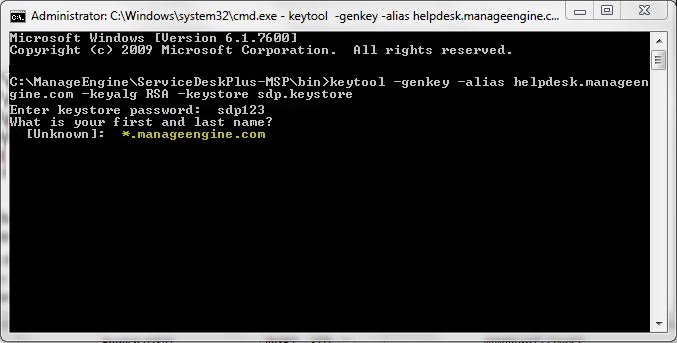
If you are ordering a Wildcard Certificate, the command must begin with the * character.
-
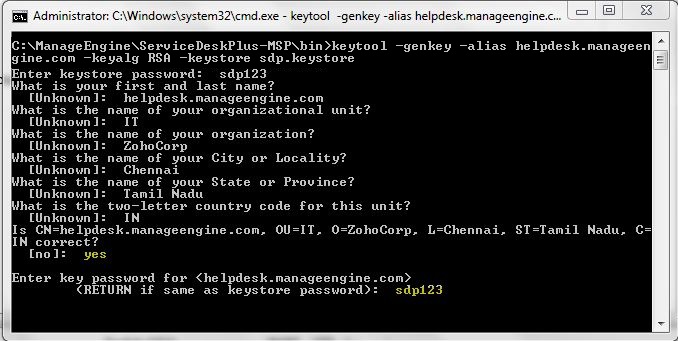
On entering the required information, confirm that the information is correct by entering 'y' or 'yes' when prompted.
-
At the end of executing the above command, you will be prompted to enter keystore password. Try giving the password same as your key password. Make sure to remember the password you choose.
-
Your keystore file named sdp.keystore is now created in your current working directory.
NOTE: We request you to make a backup copy of the sdp.keystore file before installing the Certs. This backed up keystore can be used if the certificate installation goes wrong or when you renew your certificates the next year.
Step 2: Creating .CSR (Certificate Signing Request) file
The .CSR (Certificate Signing Request) file is temporary and should be submitted to a CA to receive CA-Signed Certificate files.
Please follow the steps given below to create the CSR file.
-
Open the Command Prompt
-
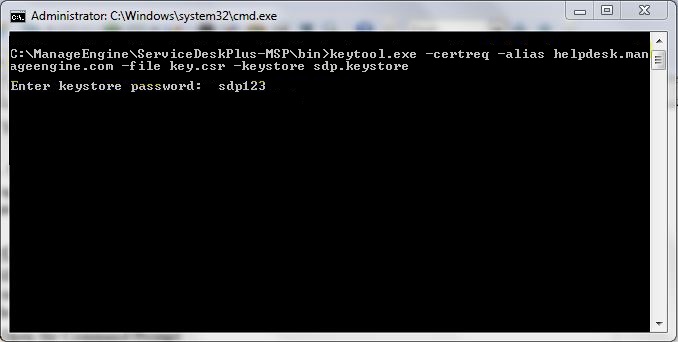
From the location <installation directory> \ jre \ bin execute the below command.
keytool -certreq -alias <your_alias_name> -file key.csr -keystore sdp.keystore
In the above command <your_alias_name> is the alias name provided when creating the keystore, key.csr is the name of the CSR file that will be created after the command is executed.
NOTE: You can install the SSL certificate either from the UI or manually.
Step 3a: Install the SSL Certificate from the ServiceDesk Plus MSP UI
- Download the certificate files from the CA to the location of your keystore (sdp.keystore).
- Go to Admin > General Settings > Import SSL Settings.
- On the screen displayed, browse to the certificate files and select the primary or domain certificate file. Note that you can select only files that have the .cer, .crt, .p7b, .pfx, .keystore, or .jks extension.
- For .pfx, .keystore, or.jks files, provide the keystore password and click the Import button for the SSL certificate to be installed.
- For .cer or .crt files, provide the keystore file and the password and select the upload method for the intermediate/root certificate. Then, click the Import button for the SSL certificate to be installed.
- For the .p7b file, just provide the keystore file and the password and click the Import button for the SSL certificate to be installed.
- Restart the application for the changes to take effect.
Note: If you have the Private Key as a .key file, you do not have to enter any password.
The following screenshot describes the process for a .cer/.crt file where the intermediate/root certificates are uploaded manually.

Note: You can upload a maximum of four Intermediate/Root Certificates.
Step 3b: Install your SSL Certificate
Download the certificate files received from the CA via e-mail to the directory where your keystore (sdp.keystore) was saved during the CSR creation process. The certificates must be installed to this exact keystore. If you try to install it to a different keystore it will not work.
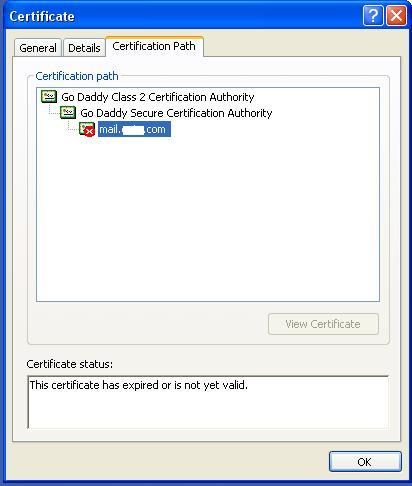
The certificates you had downloaded must be installed to your keystore in the correct order for your certificate to be trusted. If the certificates are not installed in the correct order, then the certificate will not authenticate properly. To find the correct order, double click on the domain certificate and then go to ‘Certification Path’.
These certificates are usually in the format .cer or .crt. If your certificate is with the extension .p7b please follow the instructions given in Installing a .P7b Certificate to export the certs to a .cer or .crt format.
Looking at the above certification path we can infer that we need to import two other certificates before the domain certificate. First is the Root, next the Intermediate and finally the Domain Certificate. Some CAs may also use another certificate called Cross Intermediate. These certificates can be downloaded from the vendor’s website.
Installing the Root Certificate file
Each time you install a certificate to your keystore you will be prompted for the keystore password, which you chose while generating your CSR. Type the following command to install the Root certificate file:
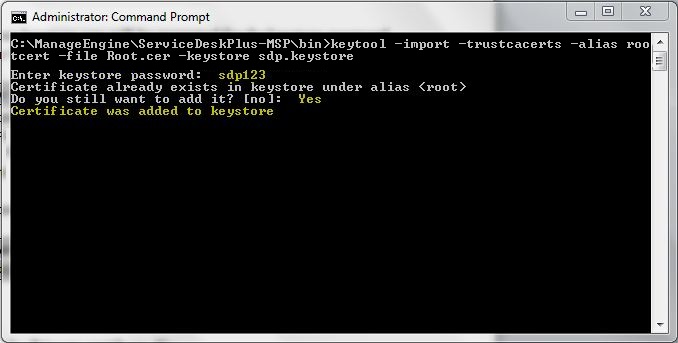
keytool -import -trustcacerts -alias root -file <File_Name>.crt -keystore sdp.keystore
NOTE: Choose ‘Yes’ if you get prompted with a message that says "Certificate already exists in system-wide CA keystore under alias <Alias Name> Do you still want to add it to your own keystore? [no]:"
You will get a confirmation stating that the "Certificate was added to keystore".
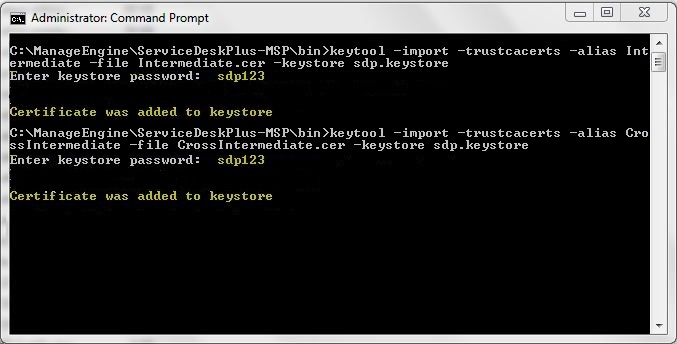
Install the Intermediate Certificates and Cross Intermediate Certificates (if any).
Follow the instructions provided by the CA.
keytool -import -trustcacerts –alias intermediate -file <File_Name>.crt -keystore sdp.keystore
keytool -import -trustcacerts –alias cross -file <File_Name>.crt -keystore sdp.keystore
You will get a confirmation stating that the "Certificate was added to keystore".
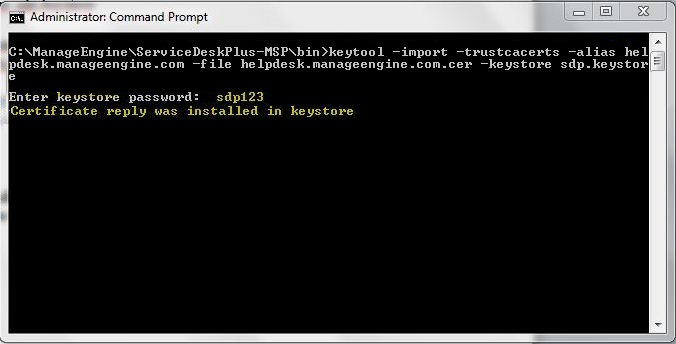
Install the Primary or the Domain Certificate file
Type the following command to install the Primary certificate file:
keytool -import -trustcacerts -alias <your_alias_name or [Domain Name]> -file your_domain_name.crt -keystore sdp.keystore
Please note that <your_alias_name or [Domain Name]> should be replaced with the alias name provided when creating the keystore (as discussed in Step 1). This time you will get a different confirmation stating that the "Certificate reply was installed in keystore”.
If you want to trust the certificate, then choose y or yes. Your Certificates are now installed to your keystore file (sdp.keystore).
Configuring the Server (in version 9400 and above)
-
Copy the sdp.keystore file from <ServiceDeskMSP_Home>\jre\bin to <ServiceDeskMSP_Home>\conf
-
From the command prompt, execute changeWebServerPort.bat script to change the connection mode to HTTPS.
Cmd>[ServiceDesk Plus MSP Home]\bin> changeWebServerPort.bat <WEBSERVER_PORT> https
-
Finally, update the name of the keystore and the password, you gave in Step 1, while generating sdp.keystore in the file server.xml present under <ServiceDesk_Home>\conf
-
Restart the service ManageEngine ServiceDesk Plus MSP for the changes to take effect.
Configuring the Server (in versions below 9400)
-
Copy the sdp.keystore file from <ServiceDeskMSP_Home>\jre\bin to <ServiceDeskMSP_Home>\server\default\conf
-
From the command prompt, execute changeWebServerPort.bat script to change the connection mode to HTTPS.
Cmd>[ServiceDesk Plus MSP Home]\bin> changeWebServerPort.bat <WEBSERVER_PORT> https 
-
Finally, update the name of the keystore and the password, you gave in Step 1, while generating sdp.keystore in the file server.xml present under <ServiceDeskMSP_Home>\server\default\deploy\jbossweb-tomcat50.sar
-
Restart the service ManageEngine ServiceDesk Plus MSP for the changes to take effect.
Some CA will provide the certificates with an extension .p7b. In such a case you can double click on this file to open a console which will list all the required certificates. You can export these certificates to Base-64 encoded X.509 (.cer) files.
These certs can then be installed onto the keystore file using the instructions given in Step 3.
To export the certificate,
- Go to [ServiceDesk Plus MSP Home] \ jre \ bin \ domain.P7B.
- Right click on the certificate and select All Tasks -> Export option.
- The Certificate Export Wizard dialog pops up. Click Next button to proceed.
- Select the export file format as Base-64 encoded X.509 (.cer). Click Next.
- Specify the name of the file you want to export. Click Next.
- The certificate export wizard is completed successfully. You can check for the settings you have specified. Click Finish.
- A success message appears in a dialog box. Click OK.
Commands to install certificates of some common vendors
Please find below the commands you need to use to install certificates of some common vendors.
NOTE: These instructions might change depending on the Certificates issued by the CA.
GoDaddy
If your CA is "GoDaddy", then the steps to follow will be:
keytool -import -alias root -keystore <Keystore_Name>.keystore -trustcacerts -file gd_bundle.crt
keytool -import -alias cross -keystore <Keystore_Name>.keystore -trustcacerts -file gd_cross_intermediate.crt
keytool -import -alias intermediate -keystore <Keystore_Name>.keystore -trustcacerts -file gd_intermediate.crt
keytool -import -alias <Alias Specified when creating the Keystore> -keystore <Keystore_Name>.keystore -trustcacerts -file <CertificateName>.crt
Verisign
If your CA is "Verisign", then the steps to follow will be:
keytool -import -alias intermediateCA -keystore <Keystore_Name>.keystore -trustcacerts -file <your_intermediate_certificate_name>.cer
keytool -import -alias <Alias Specified when creating the Keystore> -keystore < Keystore_Name>.keystore -trustcacerts -file <CertificateName>.cer
Comodo
If your CA is "Comodo", then the steps to follow will be:
keytool -import -trustcacerts -alias root -file AddTrustExternalCARoot.crt -keystore <Keystore_Name>.keystore
keytool -import -trustcacerts -alias addtrust -file UTNAddTrustServerCA.crt -keystore <Keystore_Name>.keystore
keytool -import -trustcacerts -alias ComodoUTNServer -file ComodoUTNServerCA.crt -keystore <Keystore_Name>.keystore
keytool -import -trustcacerts -alias essentialSSL -file essentialSSLCA.crt -keystore <Keystore_Name>.keystore
keytool -import -trustcacerts -alias <Alias Specified when creating the Keystore> -file <Certificate-Name>.crt -keystore <Keystore_Name>.keystore
Common Errors/Troubleshooting Tips
-
Pre-validation fails even when the certificate is not corrupted and the password is correct. The importssl0 log file has the exception trace given below:
| Caused by: java.io.IOException: exception unwrapping private key - java.security.spec.InvalidKeySpecException: Invalid KeySpec: unknown PRF algorithm 1.2.840.113549.2.9 |
Answer: This could be because the Java version used in the application does not support the algorithm used to encrypt the password in the .pfx file. Follow the steps given below for the suggested workaround:
-
Import the SSL certificate to your machine as instructed here.
-
Export the same using Microsoft Management Console as .pfx including the private key, all certificates in the certificate path, and all extended properties. Make sure that the password encryption is TripleDES-SHA1 instead of AES256-SHA256. Learn how to do this here.
-
Use the new .pfx file and import the SSL certificate into the application.
-
When importing domain certificate in keytool, an error stating Failed to establish chain from reply occurs as shown below:

Answer: Check if the keytool in the Java version used in the application supports the signature algorithm used in the certificates(root, intermediate, and domain). For example, Java 8 does not support RSASSA-PSS algorithm.
The suggested workaround is to get new root, intermediate, and domain certificates that use algorithms supported by the Java version used in the application.
If you cannot get new certificates, use the same keystore and certificate (with a keytool provided by a Java version that supports the signature algorithm) to import the domain certificate. Manually place the keystore in {PRODUCT_HOME}/conf and configure the server as given here.
UI import of the keystore generated using a Java version different from that of the application would fail.
Click here for steps to create and import the SSL certificate to the keystore.
-
Importing the .pfx certificate from the UI fails stating an error Illegal Key Size. The following exception trace was found in importssl0 log file:
| Caused by: java.io.IOException: exception unwrapping private key - java.security.InvalidKeyException: Illegal key size |
Answer: This could be because the java version used in the product does not support the key size. In other words, the certificate could have been generated from a different java version of a different key size.
A suggested workaround is to get a new certificate of the appropriate key size (or) to replace the policy files in {PRODUCT_HOME }\jre\lib\security with the policy files of the different Java version.
Download the policy files for ServiceDesk Plus MSP from the below links: