
ServiceDesk Plus MSP iPhone App
Introduction
The ServiceDesk Plus MSP iPhone App is intended to help you interact with ServiceDesk Plus MSP more quickly and efficiently. After installing the iPhone App, you will be able to:
- Add requests
- Edit requests
- Assign requests to Technicians
- Reply to requests
- Add resolutions and work logs
- Approve/reject requests
- Close completed requests.
- Approve/reject changes
Features
-
The iPhone App helps you access tickets from any location.
-
It supports implementation of various Request management features, such as creating and modifying requests, adding resolution to requests, adding work logs, etc.
The following topics are discussed in this section:
Downloading the ServiceDesk Plus MSP iPhone App
Download the ServiceDesk Plus MSP iPhone App from the iPhone App Store. Search for 'SDP MSP' and you will find the ServiceDesk Plus MSP iPhone App in the search results displayed. It is a free App and does not require any license to be purchased. Proceed installing the App in your iPhone.
Logging into ServiceDesk Plus MSP iPhone App
After installing the App, a ServiceDesk Plus MSP icon is displayed in the Home screen of your iPhone. Tap that icon to view the Take a tour screen. You can view the tutorials if you wish, or Skip directly to the Server Details screen (shown in the below image), where you need to enter the Server Address for the ServiceDesk Plus MSP iPhone App. By default, the address 'http://demo.servicedeskplusmsp.com:80' is shown. You can change the URL if required . Click Save.
)")
Once you click Save, the Login screen is displayed. Enter the Username and Password and tap Login.
)")
NOTE:
- Please note that the Technician should be enabled with login permissions.
- If AD Authentication is enabled in ServiceDesk Plus MSP, then the technician should login to the ServiceDesk Plus iPhone App using his AD credentials.
Request List view
1. The Request List view displays the Open or Unassigned requests by default. There are also other views, such as My Open Requests, All My Requests, My Overdue Requests, etc.
)")
2. The Request List view displays a maximum of 250 requests and each page displays a total of 50 requests.
)")
3. From this page, you can also Add New Requests by clicking the + icon. The Add Request form is displayed. Enter the below details:
- Enter the name of the Requester in the field provided.
- Enter a Title for the request.
- Select a Site.
- Write a Description.
- You can also add attachments, if required.
)")
4. Tap the tick icon at the top. The Request is saved and displayed in the Request list view along with the Requesters Name and the Due by Date.
Viewing Request Details
1. From the Request List view click an individual request to view the relevant details of the request. The details include Request Title, Status, Requester Name, Due by Date, Priority and Description.
)")
2. Click the  icon to view the list of operations that can be performed on the request.
)")
Request related Operations
1. Edit:
You can edit all the available details of the request. To edit a request:
-
Tap Edit. The Edit Request form is displayed.
-
Edit the request fields in the form and tap the tick icon at the top to save the changes.
-
2. Pick up:
You can self-pickup requests from the Request details view. To pick up requests, tap Pick up. The request will be assigned to you.
3. Assign:
To assign technician to a request:
-
Tap Assign. The Technician Groups are listed.
-
Select a Technician Group that lists all the technicians associated with that group.
-
Choose the Technician you want to assign the request. Tap the tick icon at the top.
-
A message appears stating the request is successfully assigned to the selected technician.
-
4. Reply:
You can reply to Requesters. To reply:
-
Tap Reply.
-
Enter the To address of the requester.
-
If you want to send the same information to multiple persons then enter the relevant e-mail addresses in the CC field with commas as a separator.
-
The Subject is pre-populated. You can edit the subject if required.
-
Enter a Description.
-
Tap the tick icon at the top. The e-mail is sent to the requester.
-
5. Close:
When a requester is completely satisfied with the support provided and the reported problem has been perfectly resolved, the request can be moved to closed status. To close a request:
-
Tap Close.
- Enter Comments.
-
If the requester has acknowledges the resolution, enable the checkbox. Tap the tick icon at the top.
-
NOTE: In ServiceDesk Plus MSP Server:
-
- If you have enabled user’s acknowledgement in ServiceDesk Plus MSP server, then the Close Request page is displayed.
-
If you have selected the mandatory fields to be filled while closing the request in Request Closing Rules, then enter the mandatory field and close the request. Else an error message appears and the request cannot be closed unless the field value is entered.
-
If you have enabled the option "Yes, prompt a message" to confirm a user’s acknowledgement in Request Closing Rule, then a Close Request page appears.
6. Delete:
-
Tap Delete.
-
Tap Delete Request. The request is deleted from the list.
-
and configure Request Settings ![]() .
.
Settings help you consolidate your request views by displaying only selected Request Filters in the request list view and selected Request Fields in the request details page. Apart from this, you can select Logout Options to automatically logout of the application; know more about ServiceDesk Plus MSP and a Logout button to manually logout of the application.
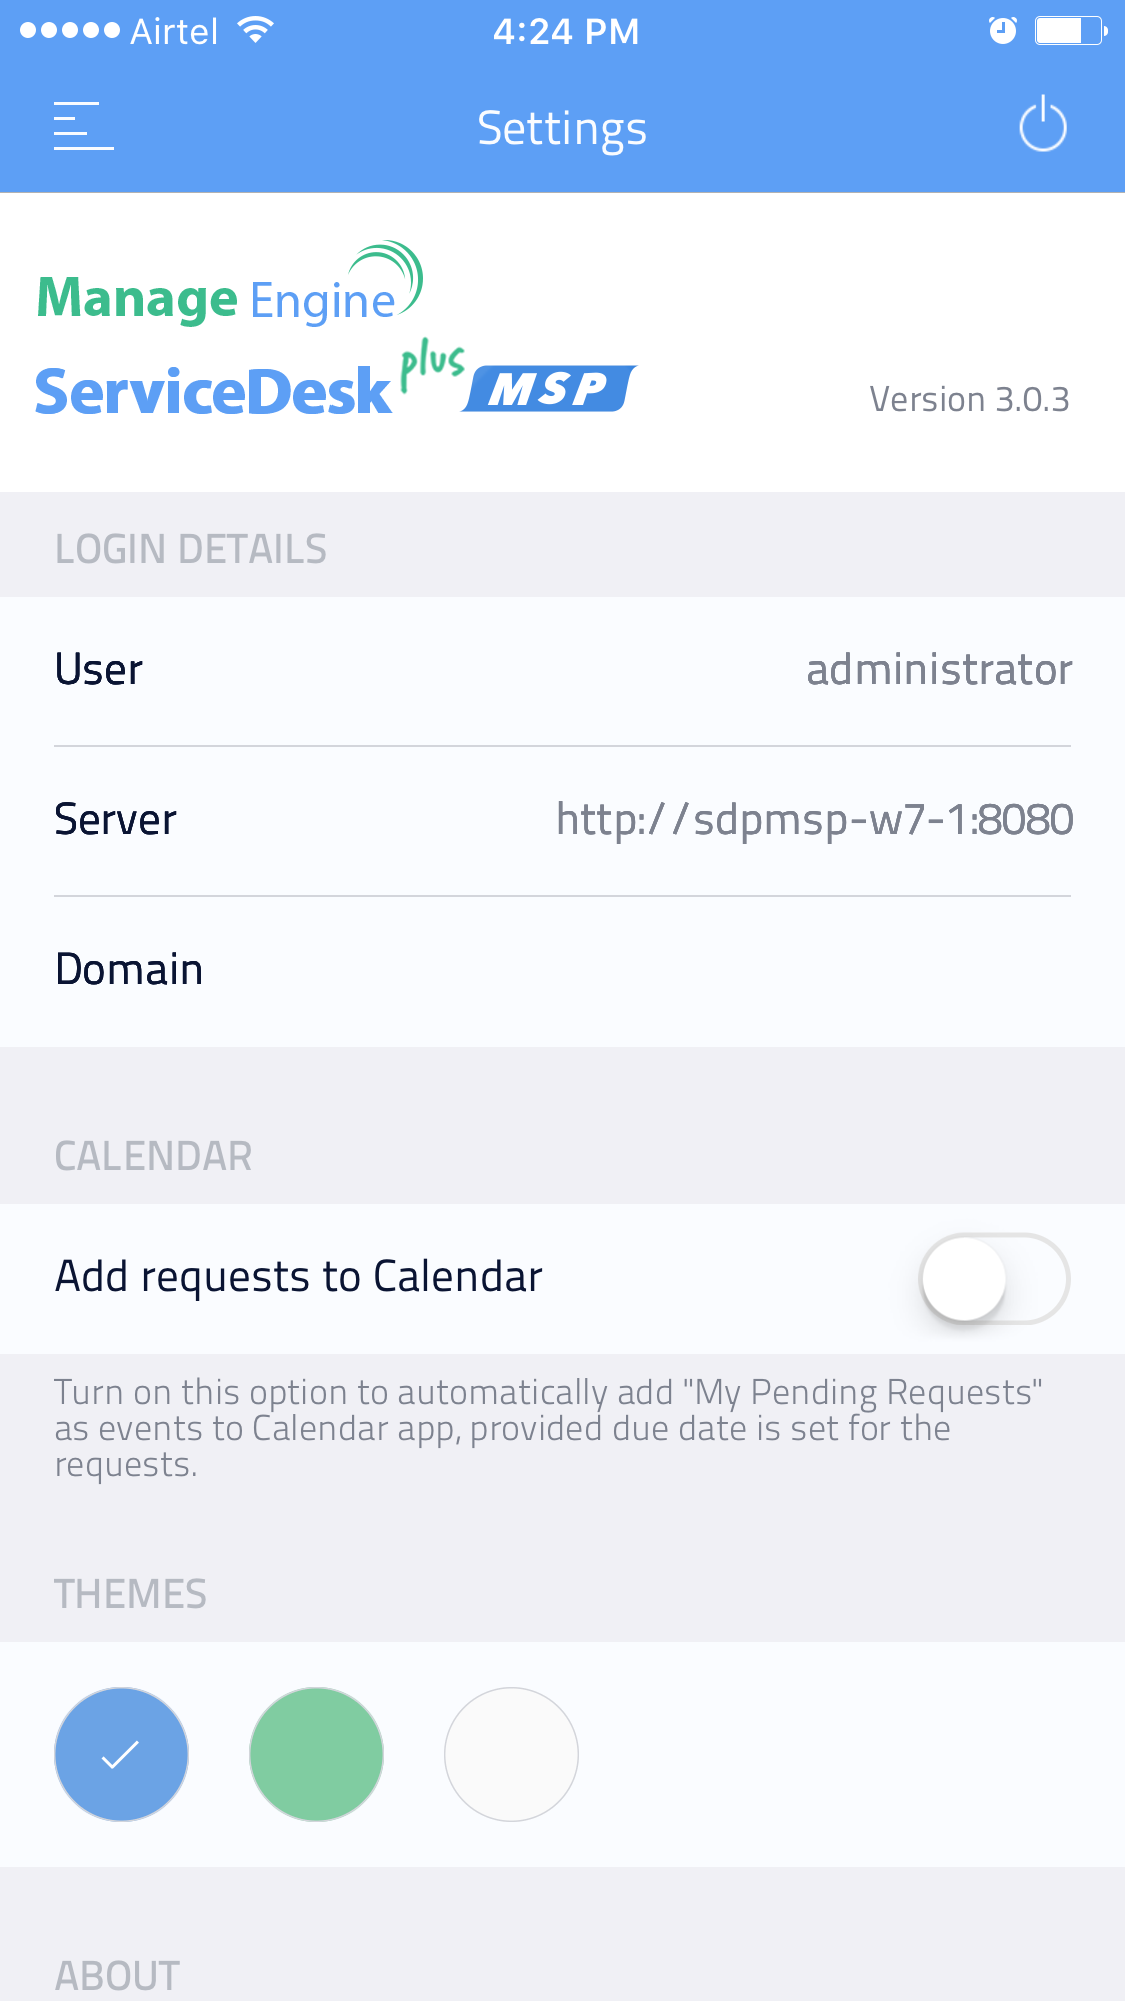
Log Out
You can set the logout options to automatically logout of the ServiceDesk Plus MSP application when the application is closed, or logout every 7 days or never logout of the application. Select the Logout Options.
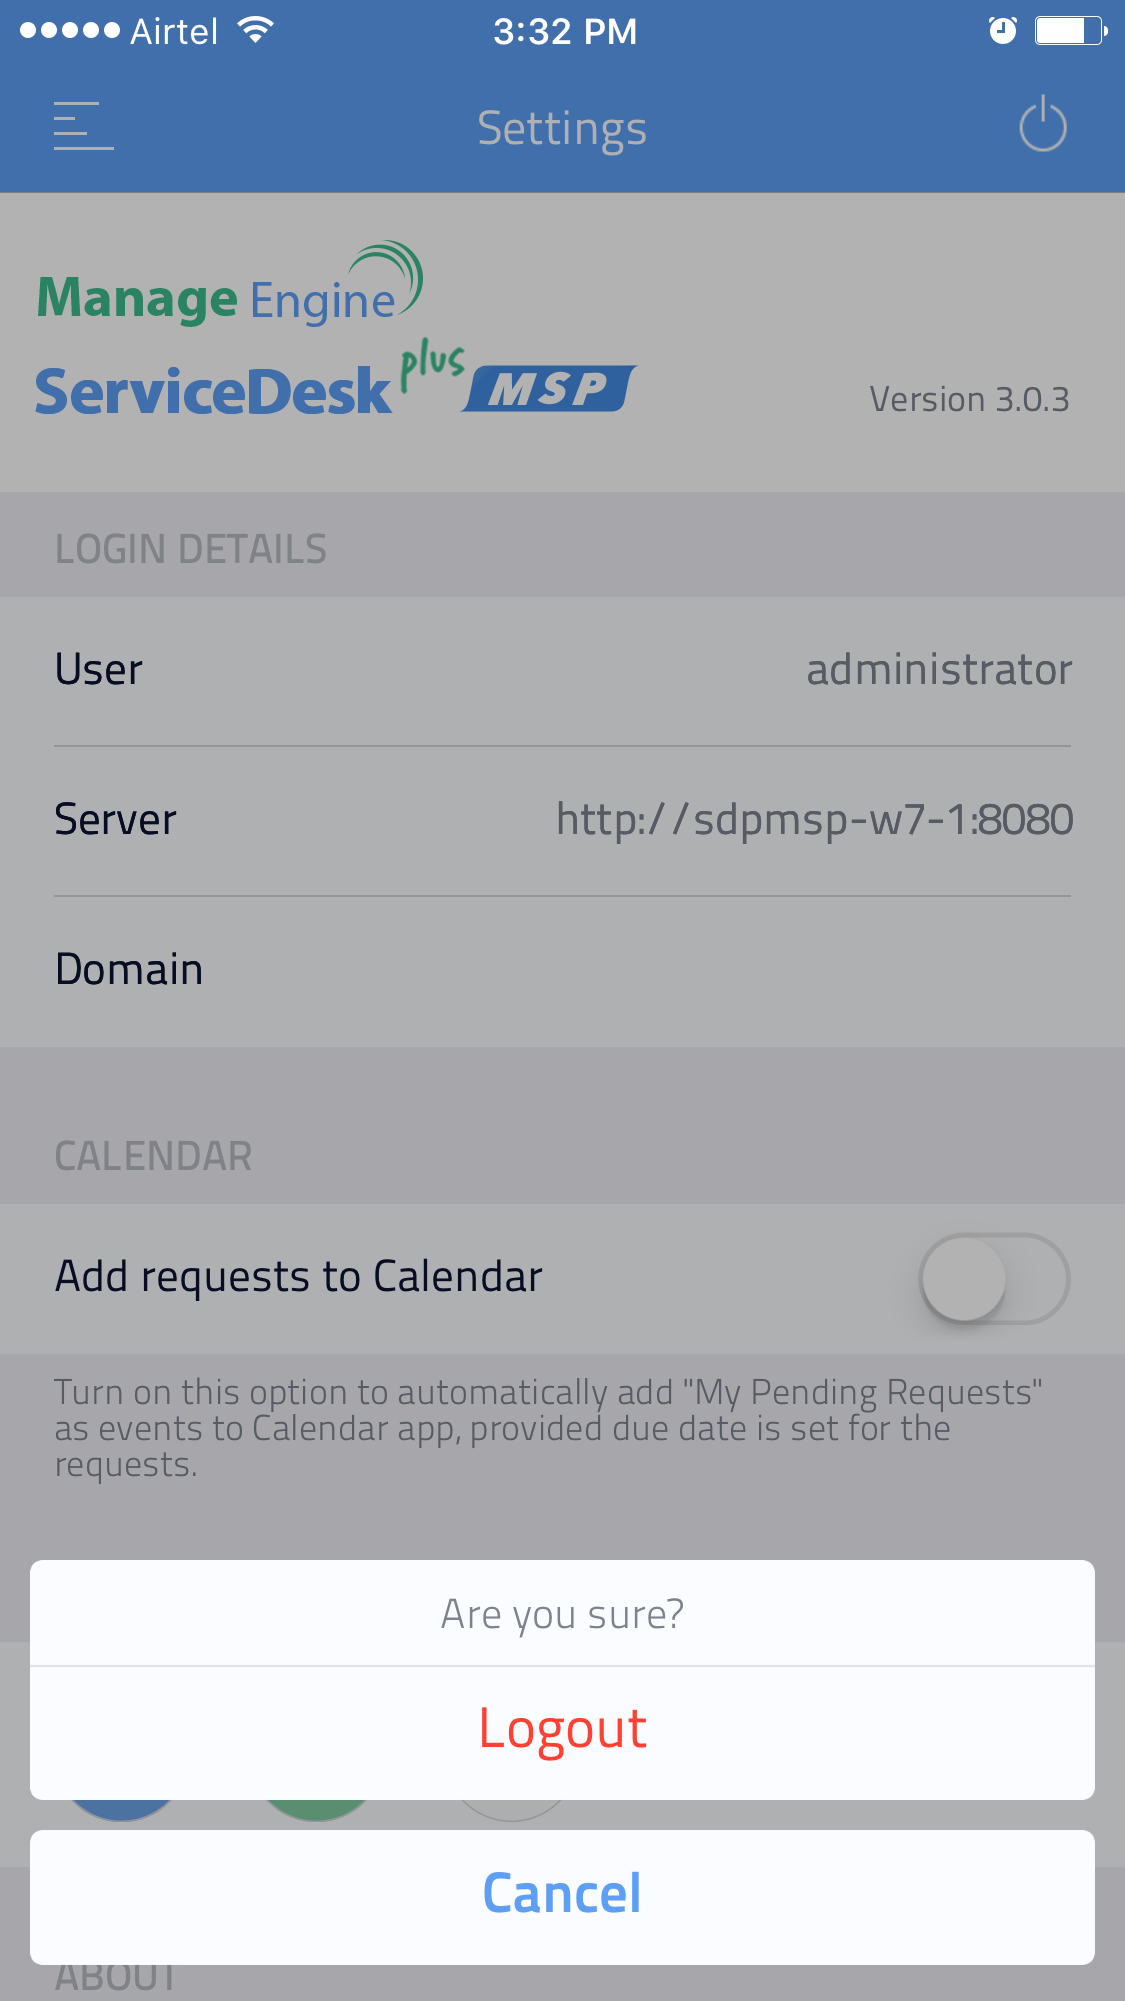
If you want to manually logout of the application, tap Logout.
You can edit the Subject, Description, Requester Name, Status, Priority, Due By Date of the request and the Technician handling the request.
Using Resolution option, you can enter resolution for a request, view existing resolution and edit them if required.
NOTE:
-
Resolutions cannot be created through resolution templates though the templates are configured in the server.
-
Resolutions cannot be searched from Solutions module.
Adding Resolution
-
In the Request Details page, tap Resolution.
-
Enter the Resolution in the field provided.
-
Tap Save.
-
A message appears stating that the resolution is saved successfully. Tap OK.
-
Tap Close to go back to Request Details page.
Editing Resolution
-
In the Request Details page, tap Resolution.
-
Tap Edit. The Edit option is available only if a resolution is added to the request.
-
Edit the resolution and tap Save.
-
A message appears stating that the resolution is saved successfully. Tap OK.
-
Tap Close to go back to Request Details page.
Using Work Log option, you can record the total time spent on resolving a request. In ServiceDesk Plus MSP iPhone App, you can Add Work Log, Edit Work Log and Delete Work Log.
Adding Work Log for a request
-
In the request details page, tap Work Log. The All Work Logs List view is displayed listing all the Work Logs added for the request. If no Work Logs are added to the request, then a No Work Log Found message is displayed.
-
From this page, tap the Add Work Log icon
 . The Add Work Log form is displayed along with the Request ID.
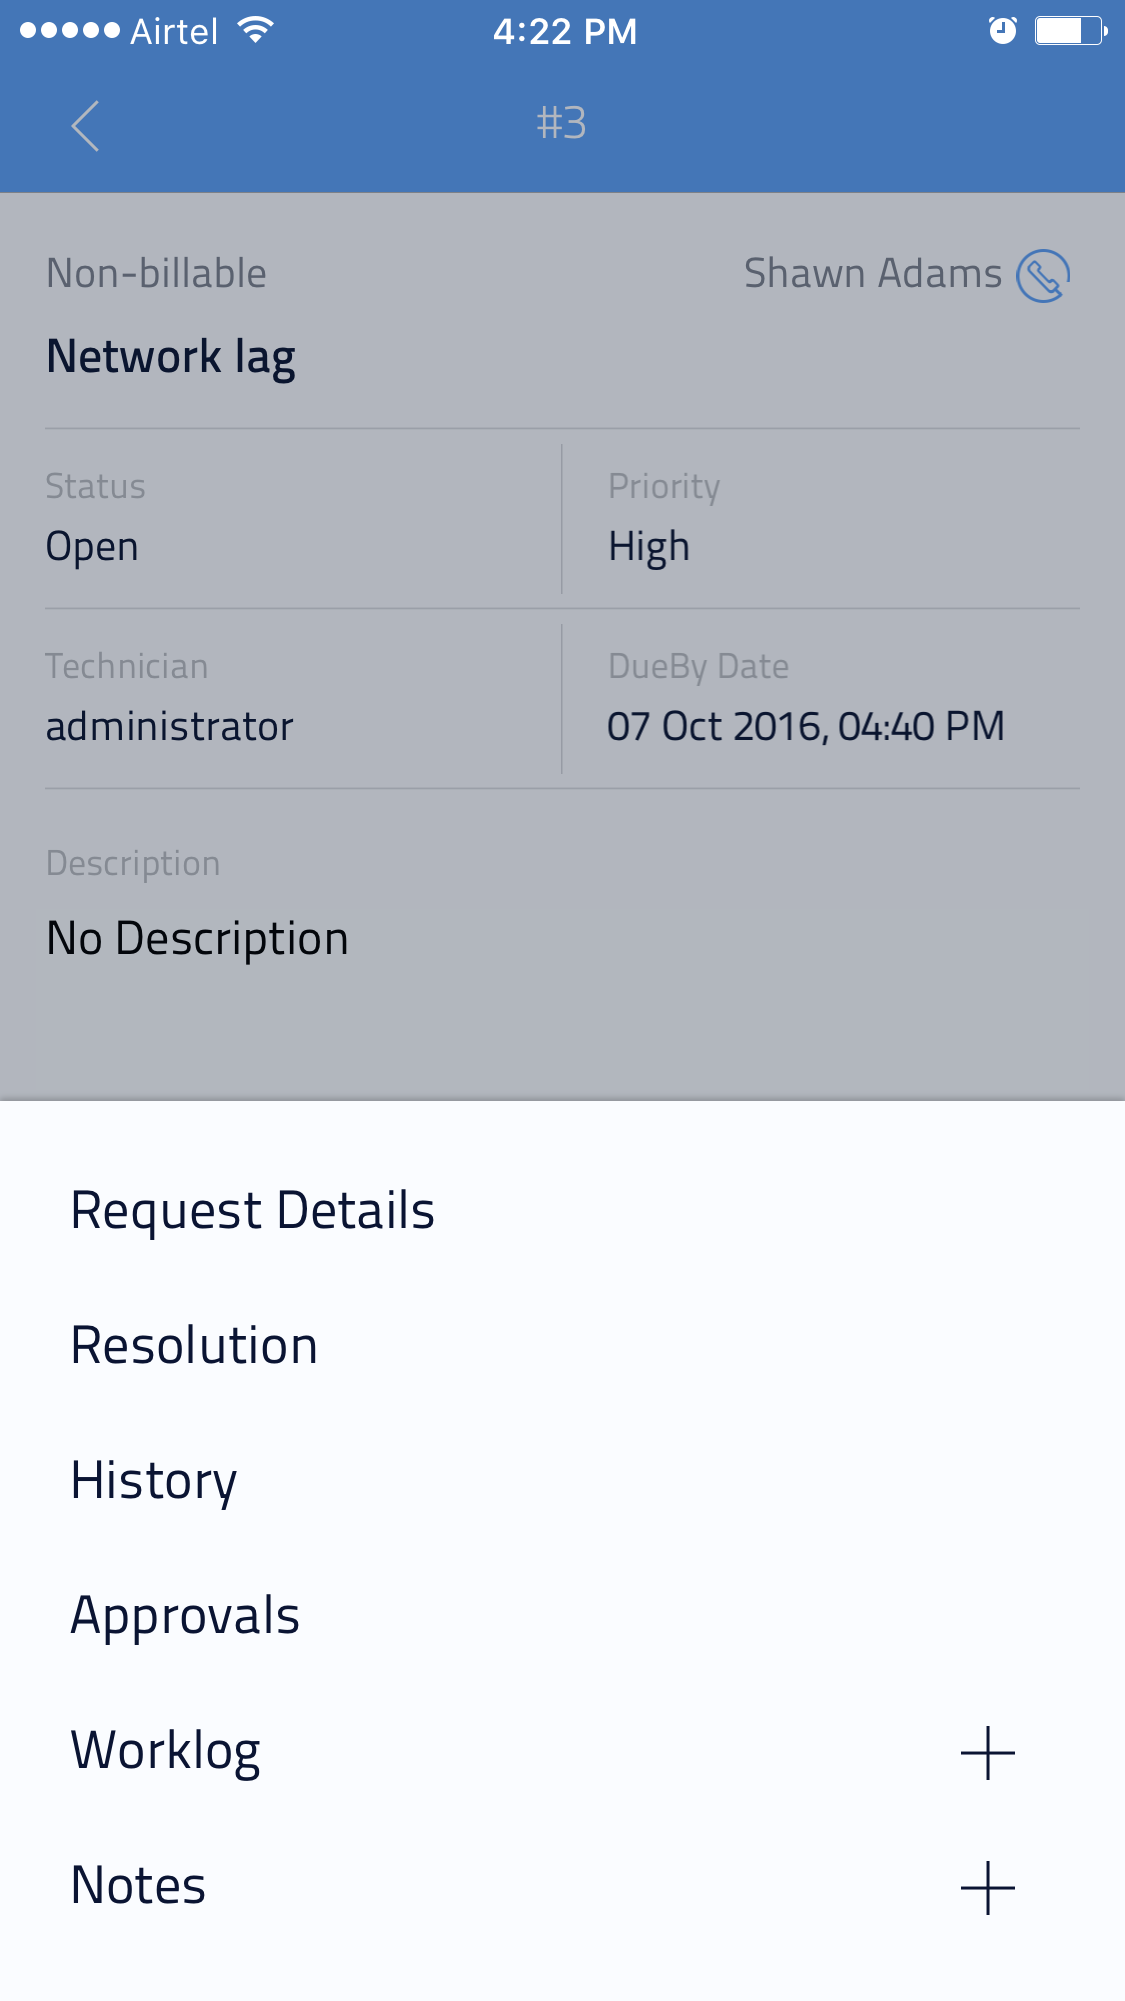
-
Tap Select Technician and select the Technician who had resolved the request.
-
Enter the Time Taken to Resolve the request in Hours and Minutes.
-
Enter the Incident Cost of the request.
-
Select the Time (Date and Time) taken to Execute the request using the calendar. Tap Done once you select the date and time.
-
Enter any relevant information about the time spent in the Description field.
-
Tap Save. The Work Log is added in the All Work Logs List view.
-
Tap Close to close the Work Log window.
Viewing Work Logs for a request
-
In the request details page, tap Work Log button. The All Work Logs List view is displayed listing all the Work Logs added for the request.
-
The Work Logs are displayed along with the name of the Technician who had resolved the request and the Time taken to Execute the request.
-
Select a Work Log to view the details.
-
The Work Log details page displays the data entered while adding the Work Log.
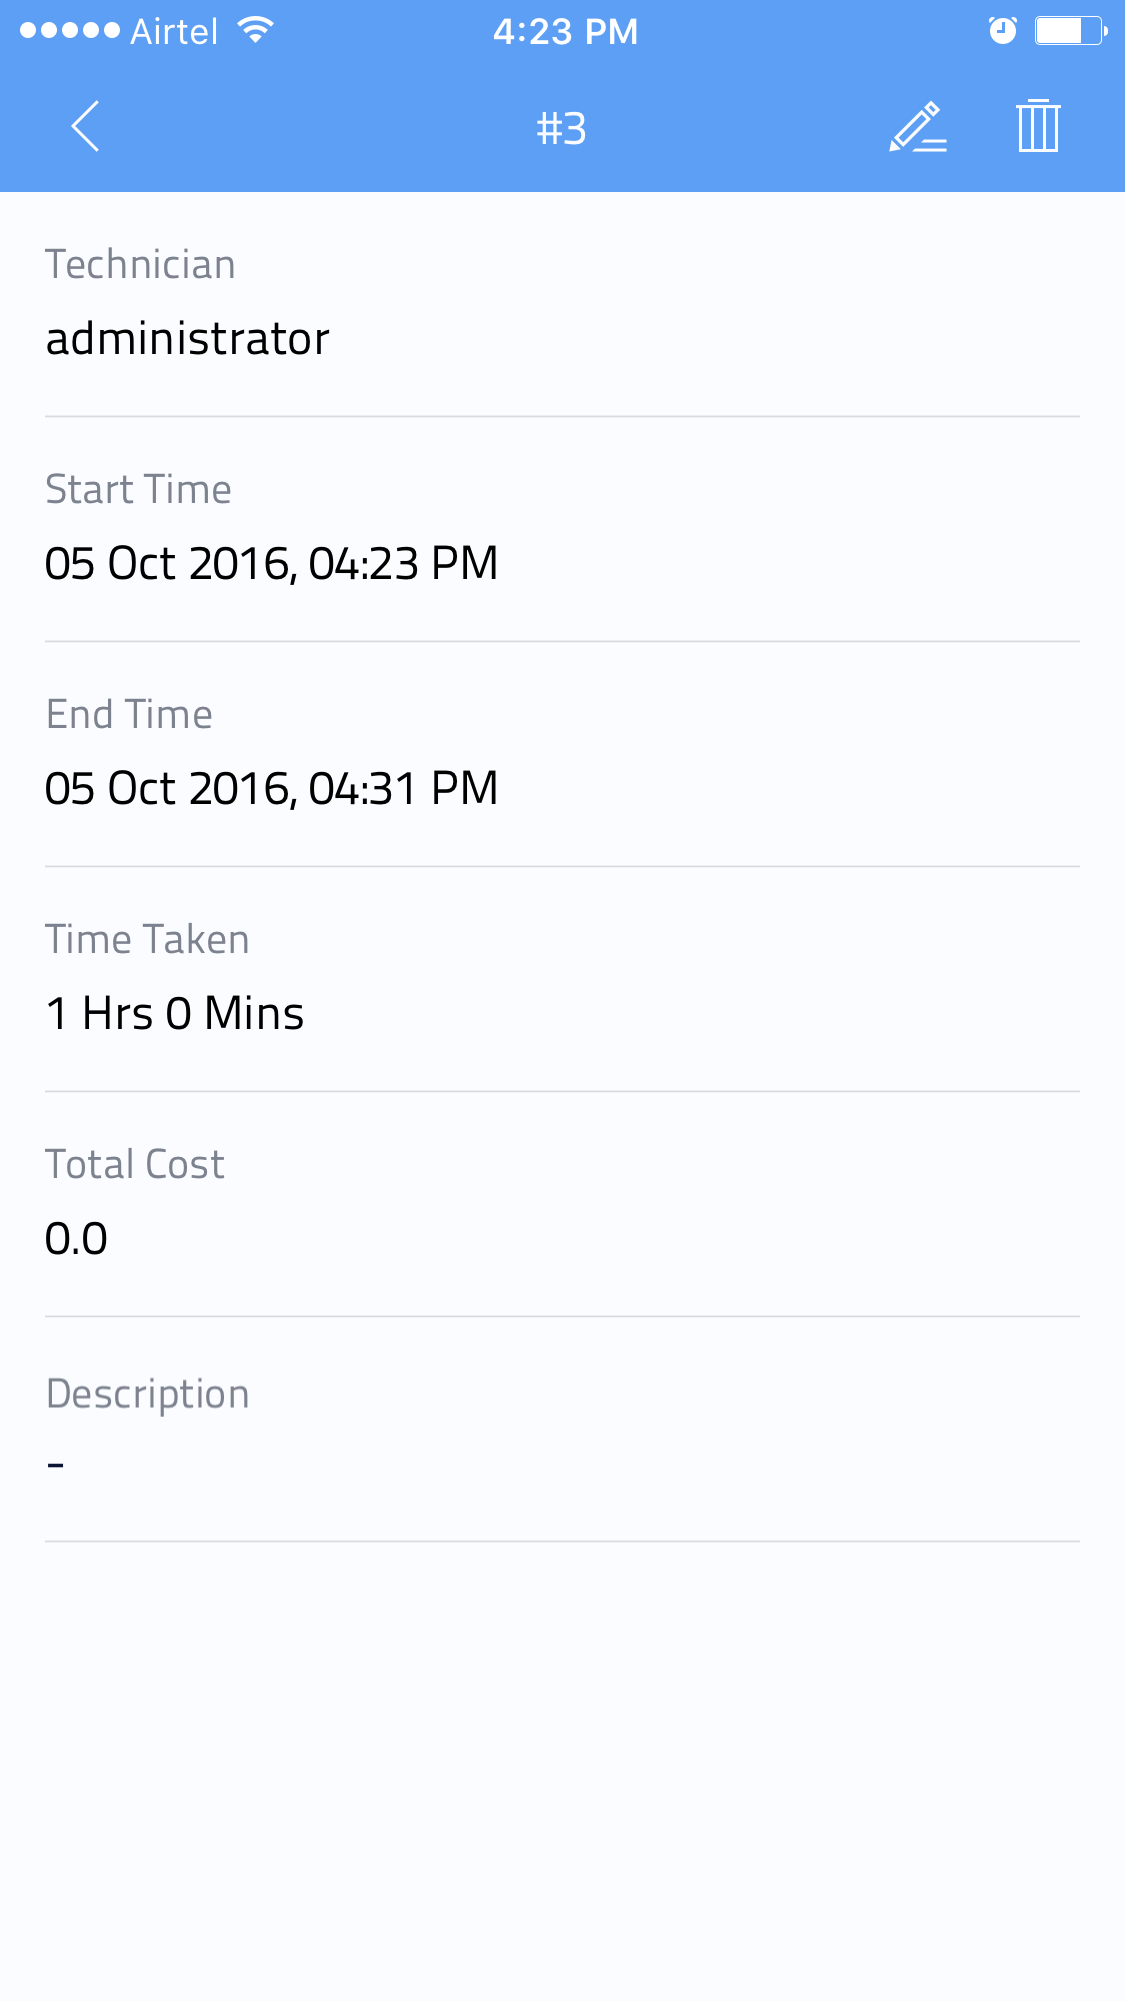
NOTE: From the Work Log details page, you can edit and delete the Work Log
Editing Work Log
-
In the Work Log details page, tap on the edit icon. The fields in the Work Log form turn editable.
-
All the fields in the form are editable. You can edit all the fields of the Work Log.
-
Tap Save. The details are saved and listed in the All Work Logs List view.
Deleting Work Log
-
In the Work Log details page, tap on the delete icon.
-
Tap DeleteWorklog. The Work Log is deleted from the All Work Log List view.
Approvals
As CAB members, you can now view and approve service requests and changes right in your mobile application.
Tap the Approvals icon. A list of your approval-pending requests and changes will be displayed.

Approving a request
Go to a request. Use the vertical ellipsis icon to view the request's conversations, notes, and attachments.
Tap the Take Action button, enter comments, and tap Approve or Reject.

Approving a change
Go to a change; the change details page will be displayed.
Use the vertical ellipsis icon to view the following:
- Change Roles — displays all the roles assigned to the change.
- Approvals — displays all pending-approvals within the change.
- Implementation — displays tasks added to the change request.
Tap the Take Action button, enter comments, and tap Approve or Reject.

Limitations of ServiceDesk Plus MSP iPhone App
Currently, the ServiceDesk Plus MSP iPhone App,
-
Supports only the Request module
-
Supports only Incident Requests and not Service Requests
-
Does not provide an option to view Archived Requests
-
Lists a maximum of 250 requests in the Request List view
-
Does not support to view the entire Description of a request
-
Inline edit for changing the status of a request to Closed is not supported.
-
While replying to a request, the e-mail address of the requester should be manually entered
-
Supports only the default values for all the Helpdesk Customizer fields
-
Renaming the default values for any Helpdesk Customizer field does not change the values in the iPhone App
-
Does not support Multiple domain login i.e., if two technicians have similar login names in two different domains, then the technician will not be able to login in the iPhone App since the option to select the Domain in the login screen will not appear.
-
Does not support LDAP login
-
Log on to drop-down menu does not appear in the login screen when Active Directory Authentication is enabled. If AD Authentication is enabled in ServiceDesk Plus, then the technician should login to the ServiceDesk Plus iPhone App using his AD credentials.