Requester as Team Leader
Implementing your Projects
Configuring milestones, adding tasks and establishing dependency between tasks form the core of project creation. In this section you look at how these things are done:
Configuring Tasks:
-
Click Tasks tab in the header pane.
-
Click Add New Button to open the New Task form. (Use 'Add New Link' while creating first Task)
-
Specify Task Title and Task Description.
-
Select Status and Priority from the drop down.
-
Specify Task Scheduled Start and Scheduled End date
Adding more details to Task(s):
To indicate Task's progress and to discuss about ways of bettering it, you are provided with the following fields:
-
% of completion that helps denote the extent to which the task has been completed (any value between 1 - 100)
-
Comments that lets project members communicate between themselves about the task as well as the project
-
Additional Cost, if any, can be recorded in this field.
Scheduling Tasks:
Task Scheduling not only helps you schedule the task but also determine whether the task is 'on-schedule', 'delayed' or 'ahead' by comparing it against real-time completion.
To schedule the task do the following:
-
Configure the Scheduled Start and Scheduled End Date
-
Fill in the Actual Start and Actual End Date (upon project completion)
-
Based on Scheduled/Actual Dates, task would be considered:
-
On Schedule if the Scheduled Date and Actual Date are the same.
-
Delayed if the Task (Actual Date) has past the Scheduled Date. (no of days by which project is delayed gets displayed on the project list view page)
-
Ahead if the Task (Actual Date) is completed before the Scheduled Date. (no of days by which project is ahead gets displayed on the project list view page)

Editing/Deleting Tasks:
-
Select the Milestone from the Milestone List View page and click on Edit Icon  in the Milestone pane.
-
Implement the necessary changes and click on Update Milestone
-
Bulk Delete: From Milestone List View, select Milestone to be deleted, and click on Delete Icon
-
Single Delete:Enter the Task to be deleted - by clicking on Task Title - and click on Delete Icon  in the project's pane.
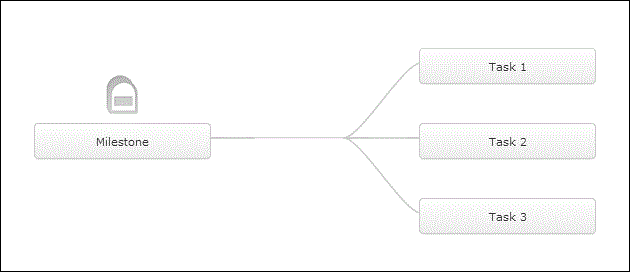
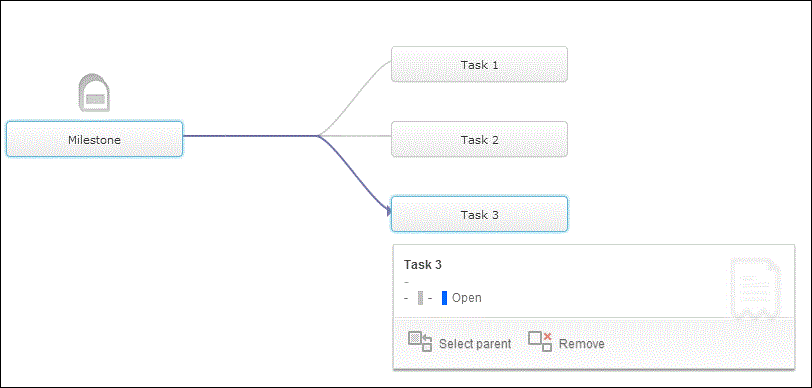
Configuring Task Dependency
Projects contain innumerable tasks which in some way would be connected to each other since they are working in unison towards the same goal. To clearly define such relationships between tasks and to distinguish parent tasks from child tasks you are presented with the option of configuring task dependencies.
To configure task dependency, click on Dependencies button and follows the steps mentioned below:
-
Select Tasks tab
-
Click Dependencies button
-
Dependency Chart displays all available Tasks
-
To configure Task Dependency, move mouse over a Task
-
Mouse Hover opens up Task Dependency Dialog box
-
Task Dependency Dialog box has two options: Select Parent & Remove buttons
-
Click on Select Parent button. All Tasks present would be highlighted from which the Parent Task can be chosen
-
Click Remove button to remove/reconfigure the established relationship
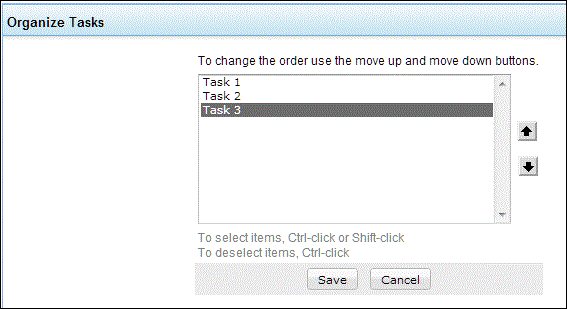
Configuring Task Order
Task dependency helps decide which task depends on what thus giving a structure to the project. But still it does not give a definite structue in the sense it does not decide the order in which these tasks would be executed. Task organization/ordering is very essential for a project's success and this can be brought about by clicking on Organize button.
To organize tasks follow the steps mentioned below:
-
Select Tasks tab
-
Click Organize button. The Organize Tasks pane opens up.
-
To reorganize a Task, Ctrl + Click (or) Shift + Click on the Task
-
Use 'Move Up' and 'Move Down' buttons to change Task's position
-
Click on 'Save'
-
To de-select a Task, click Ctrl + Click
What is Gantt Chart?
Gantt Chart is a bar chart that illustrates a project schedule. This chart also illustrates project elements - along with their schedule against the project calendar - and summarizes the entire project using the chart. It presents a clear picture of the different phases of the project and also of the various activities that occur in the project's work breakdown structure (WBS).
Advantages:
-
Provides bird's eye view of a project and also serves as a one stop solution for accessing the entire project module with all it projects (provided, the technician is assigned with Project Admin role).
-
Effective Resource Management as project constraints like time, manpower and amount of work remaining can be viewed and regulated as per situation demands.
-
Rescheduling of Milestones/Tasks and project member role change, if such a need arises, can also done via Gantt Chart.
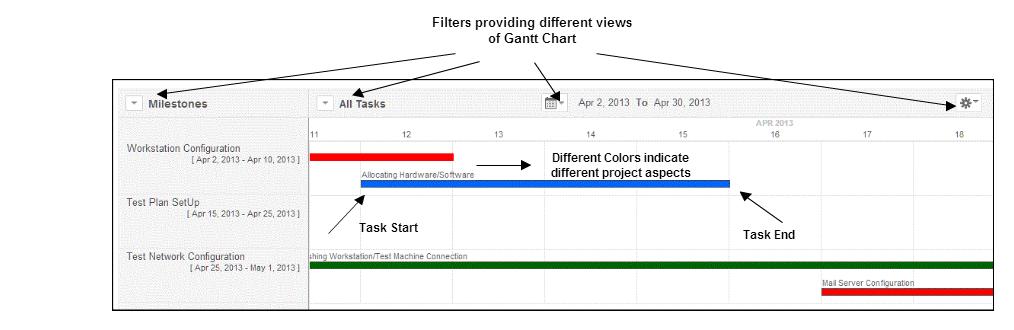
Viewing and Configuring Gantt View:
-
Click on Gantt View Tab
-
Gantt Chart with its default view will get displayed.
-
Configure Gantt Chart as per your requirement using
a. Gantt Row Type Filter: Available options are Members, Milestones and Tasks.
b. Gantt Column Type Filter: Available options are Tasks (Open, Closed and All) & Milestones (Open, Closed and All)
c. Project Calendar Filter: Available options are Hours, Day and Month &
d. More Settings Filter: Available options are Priority, Task Types and Status
-
Gantt Chart would be modified based on your requirements.
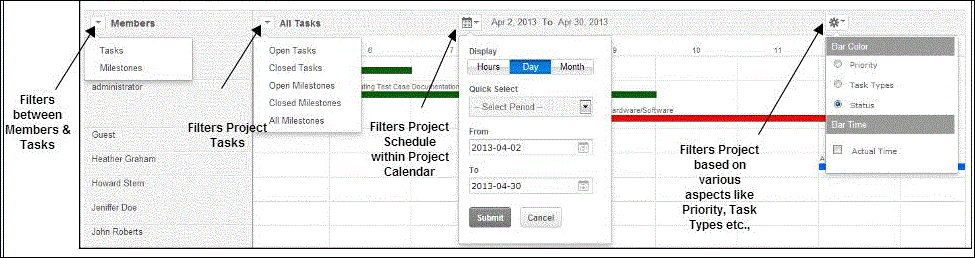
Accessing Projects via Gantt Box:
Gantt Box that appears on mouse over a "milestone/task" serves as a window through which the "milestone/task" can be accessed and edited according to the changes taking place within a project. An entire project can be accessed through Gantt Box if the project member has the rights to do so. This quick access enhances the effectiveness of Gantt Chart and is very useful in supervising the project.
Using Gantt Box the following can be done:
-
Rescheduling of Milestones (or) Tasks and Changing of Milestone/Task details
-
Reassigning of Milestones/Tasks to Project Members
-
Changing of Milestone/Task Status
-
Adding Worklogs and Comments

Gantt View Tab and Gantt View Across All Projects Button:
Gantt Chart can be accessed in two different ways:
-
By clicking on "Gantt View" Tab (in the project's pane) (or) by clicking on "Gantt View Across All Projects Button" 
-
As the name suggests, the latter presents the gantt view of all projects present in projects module
-
Gantt View Across All Projects Button present in the projects list view page is useful for project administrators
-
Using this button gantt chart can not only be filtered based on milestones and tasks but also based on project names and project status.
Note: Projects can be associated with Change using 'Associate Change' option (available under Actions button) 
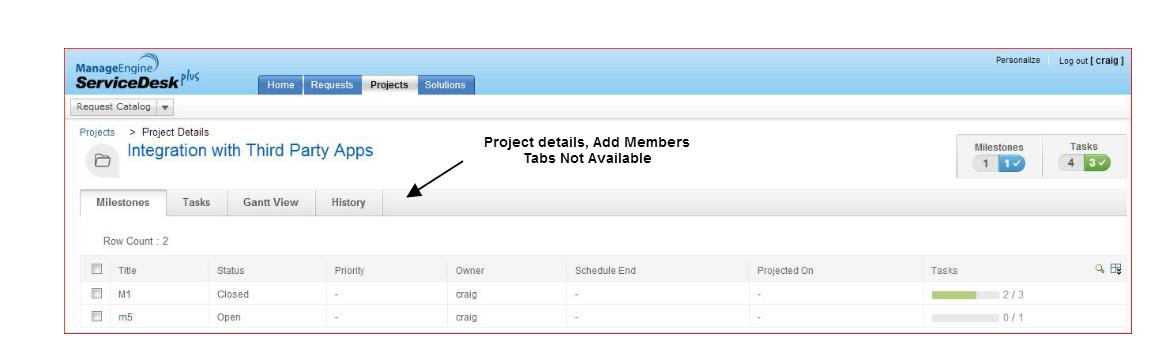
Project Screenshot
