General Module
- How do I manually back up data in ServiceDesk Plus?
- How do I back up only the database without the file attachments in ServiceDesk Plus?
- How do I restore backup data?
- How do I schedule an automatic backup in ServiceDesk Plus?
- How do I schedule a backup over a network share?
- Can I install the application under our Program Files(X86) or under the root directory?
- Should the backup-restore operations be done for DC separately?
- If the DC is installed only for scan purpose will the DC services be automatically started / stopped along with SDP ?
Support
Upgrading ServiceDesk Plus
- How do I upgrade to the latest Version and Build of ServiceDesk Plus?
- How do I upgrade ServiceDesk Plus in LINUX?
- Migration to be completed before upgrading to 9400
- How to identify and delete database table views and then upgrade to 9400
- Should DC be upgraded separately for subsequent service packs?
- How to upgrade the DC agent
- 13000 TLS support documentation
- How to upgrade missing entries in JRE native file?
- Who can initiate the upgrade process in ServiceDesk Plus's database configured as MSSQL DB with Windows Authentication?
LINUX
- How do I install ServiceDesk Plus on a Linux machine?
- How do I install ServiceDesk Plus on a Linux machine without GUI?
- How do I install ServiceDesk Plus as Linux Service?
- Is it possible to scan windows workstation if ServiceDesk Plus is installed on a Linux machine?
- Does ServiceDesk Plus scan the softwares installed in a Linux machines?
- How can I connect to MYSQL database on a Linux machine?
- Is it necessary to install additional packages/libraries in Linux to support ServiceDesk Plus? If yes, what are they?
- Is it possible to scan devices if ServiceDesk Plus is installed on a Linux machine?
Database
- How can I connect to Pgsql and MSSQL database of ServiceDesk Plus?
- How do I convert the database from MYSQL to MSSQL?
- How do I move the application from one version of MSSQL to another version of MSSQL.i.e., from MSSQL 2005 to MSSQL 2008?
- How do I change the account and password of the SQL server that connects ServiceDesk Plus?
- How to connect to PGSQL when application is running in a Linux Server
- How to move from Mysql database to PGSQL database
- How to change the Endpoint Central (formerly Desktop Central) database from Postgres to MSSQL?
HTTPS and SSL support for ServiceDesk Plus
- How do I make ServiceDesk Plus run on https?
- How do I setup redirection from HTTP to HTTPS?
- How do I disable weak and anonymous ciphers from being used in HTTPS connection?
- How do I install a .PFX Certificate?
- How do I install SSL certificate for ServiceDesk Plus?
- How do I renew SSL Certificate?
- Will DC be installed in HTTPS mode?
Moving ServiceDesk Plus
- How do I move ServiceDesk Plus from one server to another server?
- If I am using MSSQL as database how should I go about moving the application from one server to another but using the same database?
- How do I move ServiceDesk Plus installation to a different drive on the same server?
- How can I move ServiceDesk Plus from a Windows server to a Linux server?
- How can I build a test environment for ServiceDesk Plus?
- How to build a Test Setup with PGSQL Database
- How do I move ServiceDesk Plus from 32 bit server/application to 64-bit server/application?
Customizations
- How can I integrate ServiceDesk Plus to a personal homepage?
- How do I bind ServiceDesk Plus to a single IP address?
- How do I host ServiceDesk Plus on the internet?
- How do I change the URL on which ServiceDesk Plus is running?
- How do I modify the ServiceDesk Plus Logo?
- How can I change the port number on which ServiceDesk Plus runs?
- I want to add attachments with size more than 10 MB. Is it possible to increase the attachment size?
Others
- What is the Tomcat version bundled in ServiceDesk Plus?
- What is the Java version used in ServiceDesk Plus?
Backup and Restore
How do I manually back up data in ServiceDesk Plus?
The following instructions is to perform a manual backup in ServiceDesk Plus,
Step 1: Stop ServiceDesk Plus.
Step 2: Launch the command prompt, go to [ServiceDesk Plus-Home]\bin, and run backUpData.bat.
Note: ServiceDesk Plus-Home refers to C:\ManageEngine\ServiceDesk [ Screenshot ]
When the backup is complete, a folder containing the backup files (.data) is created and placed under the ServiceDesk Plus Home directory. The folder is named after the build number and contains information on the part number of the file and the date and time of the backup. When the file size exceeds 1 GB, the files are split and saved.
The naming convention followed for backup files is:
Backup_ ServiceDesk_ [Build number] _Month _date _ Year _ Hour _Minutes
For example, a backup taken in Version 7 and Build 7500 of ServiceDesk Plus will look like:
backup_servicedesk_7500_fullbackup_02_24_2009_07_51.data [ Screenshot ] How do I back up only the database, without the file attachments, in ServiceDesk Plus?
In ServiceDesk Plus, the file attachments are not stored in the database. They are stored in the file attachments folder in the installation directory (C:\ManageEngine\ServiceDesk). To back up only the database, follow these steps:
Step 1: Stop ServiceDesk Plus.
Step 2: Launch the command prompt, go to [ServiceDesk Plus-Home]\bin and run backUpData.bat --trimmed.
Note: ServiceDesk Plus Home refers to C:\ManageEngine\ServiceDesk [ Screenshot ]
When the backup is complete, a folder containing the backup files (.data) is created and placed in the under the ServiceDesk Plus Home directory. This backup file contains information such as the build number and date and time of the backup. The naming convention followed for these files is:
Backup_ ServiceDesk_ [Build number] _Month _date _ Year _ Hour _Minutes
For example, a trimmed backup taken in Version 7 and Build 7500 of ServiceDesk Plus looks like:
backup_servicedesk_7500_database_02_24_2009_08_30.dataHow do I restore backup data?
The following instructions is to restore the backup data.
Step 1: Launch the command prompt, go to [ServiceDesk Plus-Home]\bin directory, and run restoreData.bat. Choose the backup file with part no 1 and select OK. [ Screenshot ]
NOTE: When you restore backup data, the existing data will be overwritten; the restore process is not incremental and will not add information over the existing data.
Step 2: On the Java pop-up window that appears, click close and start the application. [ Screenshot ] How do I schedule an automatic backup in ServiceDesk Plus?
You can configure backup scheduling, to perform backup of all the files on a regular interval.- Click Admin -> Backup Scheduling under General block -> Edit Scheduling link on the right hand side of the page.
- Enable backup scheduling by clicking the enable button.
- Select the number of days from the combo box to schedule the backup process.
- Specify the Start Backup date using the calendar and also select the time in hours and minutes. This is a mandatory field.
- In case of backup failure, specify the notify email address in the given text field. This is a mandatory field.
- Select either or both the attachment files and database option for the backup. This is a mandatory field.
- Specify the Backup location in the given text field to store the backup data.
- Save the changes.
How do I schedule a backup over a network share?
You can configure a backup scheduling over a network share,- Click Admin -> Backup Scheduling under General block -> Edit Scheduling link on the right hand side of the page.
- Set the Backup location as \\Network server name\backup. NOTE: Please provide full access rights to the folder where you want to copy the backup.
Can I install the application under our Program Files(X86) or under the root directory?
ServiceDesk is built on a frame work where the installation path should not have any spaces in between them, If installed then it will not invoke any bat files. So please install the application under the root directory.
Should the backup-restore operations be done for DC separately?
Yes. It is recommended to take backup of DC and please refer the link for more details.
If the DC is installed only for scan purpose will the DC services be automatically started / stopped along with SDP ?
Yes, the DC service will automatically start and stop whenever the SDP/AE service starts or stops.
Support
Why are my requests for query reports/scripts delayed?
These requests could take three weeks or more, depending on the complexity of the issue. Do note that these requests are not covered by our support SLA. However, your database admins can write these queries using the data model or table schema of the application.
Follow these steps to access the table schema in the application:
Go to Reports >>New Query Report
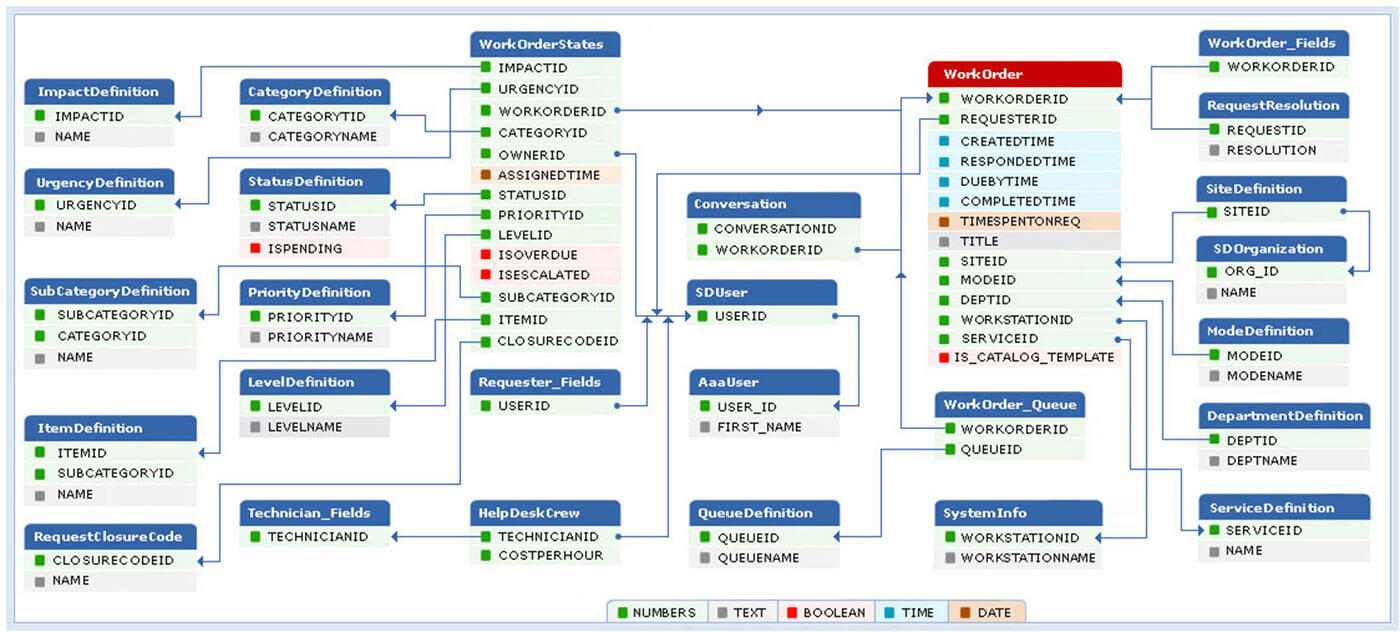
Under Table Schema, choose the module, and click the menu icon, as shown below:
The required table schema will be displayed:


Upgrading ServiceDesk Plus
How do I upgrade to the latest version and build of ServiceDesk Plus?
The following instructions is to upgrade ServiceDesk Plus.
Step 1: Stop ServiceDesk.
Step 2: Back up the existing build (recommended).
Launch the command prompt, go to [ServiceDesk Plus-Home]\bin directory, and run backUpData.bat. This will start the backup.
cmd>[ServiceDesk Plus Home]\bin
cmd>backUpData.bat
Note that ServiceDesk Plus Home refers to C:\ManageEngine\ServiceDesk
NOTE: The backup helps revert to the existing build without any data loss, if the upgrade were to fail due any reason. The backup is stored in the Backup folder in the ServiceDesk Plus Home directory.
Step 3: Download the hot fix or ppm file from the following link:
https://www.manageengine.com/products/service-desk/service-packs.html
Step 4: Go to [ServiceDesk Plus Home]\bin and execute the file UpdateManager.bat. Navigate to the location of the hot fix and click install to start the installation process.
cmd> UpdateManager.bat [ Screenshot ]
Step 5: A dialog box recommending that you to take a backup appears. If you have already taken a backup, skip this step. However, for a version-to-version upgrade, this is a mandatory step.
Note: For multiple upgrades, please start and stop the application once after successfully applying a service pack. Then, back up the upgraded version and proceed with the next service pack.How do I upgrade ServiceDesk Plus in LINUX?
Download the ppm files from this link and apply the service pack:
https://www.manageengine.com/products/service-desk/service-packs.html
Here are the detailed instructions for upgrade.
Step 1: Shut down Tthe ServiceDesk plus Server.
Step 2: Back up of the existing build (recommended).
To back up data in Linux:- Go to the installation folder. The default installation folder is /opt/ManageEngine/ServiceDesk/. The installation folder is referred to as ServiceDesk Plus-Home.
# cd [ServiceDesk Plus-Home]/bin - Invoke the backUpData.sh script
# sh backUpData.sh
This will back up the existing configuration and the back up data will be stored under
[ServiceDesk Plus-Home]/backup/BackUp_Version_MONdd_yyyy_hh_mm/
BackUp_Version_MONdd_yyyy_hh_mm.data
An example would be,
/opt/ManageEngine/ServiceDesk/BackUp_5501_AUG15_2006_17_32/
BackUp_sdp_5501_AUG15_2006_17_32.data
Step 3: Save the hotfix from the link mentioned below,
https://www.manageengine.com/products/service-desk/service-packs.html
Step 4: Run the script UpdateManager.sh in the <ServiceDesk_Plus_Home>/bin folder. From the Update Manager tool, click Browse to select the Service Pack file (ManageEngine_ServiceDesk_Plus__0_0_SP-x_0.ppm file that you had downloaded) and then click Install.... Follow the instructions to apply the Service Pack / Hotfix.
Step 5: After the upgrade is complete, start the ServiceDesk Plus Server.
Command-line option to apply a patch in Linux
To install a patch from console or command line,
Easiest option:
sh UpdateManager.sh -c
And it will guide the user through the steps.
Here are the other options:
sh UpdateManager.sh -u server/default/conf -c -option i -ppmPath <Patch file path including patch file name> -h <Product Home>
To un-install a patch: sh UpdateManager.sh -u server/default/conf -c -option u -h <Product Home> -version <Patch version>
To view installed patch versions: sh UpdateManager.sh -u server/default/conf -c -option v -h <Product Home>
To run UPDATEMANGER.bat from konsole mode: UpdateManager.sh -c -option i ppmPath <Path where PPM is downloaded> -h C:\ManageEngine\ServiceDesk- Go to the installation folder. The default installation folder is /opt/ManageEngine/ServiceDesk/. The installation folder is referred to as ServiceDesk Plus-Home.
Before you begin the upgrade to 9400, make sure the following migrations are completed:
Migration to be completed before upgrading to 9400
Workorder to CI:
- Go to the Reports tab and click New Query Report.
- In the Query Editor displayed, paste
select Globalconfigid,category,paramvalue from globalconfig where category like 'WoToCIMigration' and parameter like 'IsCompleted';
and click the Run Report button. - The result must display "true" under the paramvalue column.
Workorder to conversation:
- Go to the Reports tab and click New Query Report.
- In the Query Editor displayed, paste
select Globalconfigid,category,paramvalue from globalconfig where category like 'CONVERSATION_MIGRATION' and parameter like 'IS_CONVERSATION_MIGRATION_COMPLETED';
- The result must display "true" under the paramvalue column.
Based on the size of your data, these migrations can last anywhere between few hours and days.
Delete Database Table Views Before Upgrading to 9400
Table views created in the database must be removed before the upgrade. To find these table views in your database, run the following queries in the console:
PGSQL
- select schemaname, viewname as name from pg_catalog.pg_views where schemaname NOT IN ('pg_catalog', 'information_schema') order by schemaname, viewname
- MSSQL
- select * from sys.views;
- If you are unable to locate the table views, please send us an email at support@servicedeskplus.com; we'll help you right away
NOTE : Exercise caution before deleting the table views, and contact your database administrator to perform this operation.
You can delete these table views by specifying the viewname identified in the above query.
drop view viewname
Should DC be upgraded separately for subsequent service packs?
While upgrading SDP/AE to later versions, few upgrades might require DC also to be upgraded in order to be compatible. In such cases, post-upgrade a message would be displayed on the top banner in SDP/AE, that DC also has to be upgraded with the compatible build number and the service pack link. This upgrade has to be performed manually
How to upgrade the DC agent
The agent will get updated automatically by the application as soon as a new agent gets released.
13000 TLS support documentation
ServiceDesk Plus, from version 13000, will only support TLS protocol versions 1.3 and 1.2. The older protocols, such as TLSv1 and TLSv1.1 will not be supported going forward.
Mandatory configurations before moving to 13000:
- If you are on any version earlier than ServiceDesk Plus 13000, please select TLSv1.2 under Admin > Security Settings or ESM Directory > Security Settings.
- If you have integrated or configured SDP to communicate with any other application, check if it is working after configuring TLSv1.2 alone. Say for example, check if your incoming and outgoing mail server communications, mssql database communications , or other ME product integrations are working properly. Also for seamless functioning, make sure to enable TLSv1.2 in mail server or other integrated application servers as well.
Recommended configurations after upgrading to 13000:
- Go to Admin > Security Settings or ESM Directory -> Security Settings, and select TLSv1.3 and save to settings to enable TLSv1.3
Configuring Internet Settings for TLSv1.3 ( or TLSv1.2 ) in Server machine:
- Go to Start > Internet Options.
- Under Internet Properties, select Advanced
- Under Security, enable the following options
- Use TLS 1.2
- Use TLS 1.3
How to upgrade missing entries in JRE native file?
- Go to the following location: <SERVICEDESKPLUS HOME>\jre\lib\security.
- Open the file java.security.
- Add the entries TLSv1,TLSv1.1 in jdk.tls.disabledAlgorithms as mentioned in the below screenshot.

Who can initiate the upgrade process in ServiceDesk Plus's database configured as MSSQL DB with Windows Authentication?
Only the user configured under the services' Log on setting can initiate the upgrade process in ServiceDesk Plus with Windows Authentication.
Services.msc > ManageEngine ServiceDesk Plus > Properties > Log On > This account
LINUX
How do I install ServiceDesk Plus on a Linux machine?
Following are the steps given below to install and setup Manage Engine ServiceDesk Plus on a Linux machine.
Step 1: Download the ServiceDesk_Plus_Linux.bin file.
Step 2: Execute ServiceDesk_Plus_Linux.bin from the console and follow the on screen instructions.
./ServiceDesk_Plus_Linux.bin
NOTE: You require execute permissions for executing the .bin type files.
Manually start the ServiceDesk Plus application after the installation process:
Step 1: Go to/bin directory and execute run.sh file as given below,
$ sh run.sh
Step 2: To start the web client, open a web browser and type the following in the address field,
http://localhost:8080
Here, you need to replace the localhost with the corresponding server name where the ServiceDesk Plus web server is running and the port number 8080 should be replaced with the actual port where the server is running.How do I install ServiceDesk Plus on a Linux machine without GUI?
Download ManageEngine_ServiceDesk_Plus.bin.
To secure permission to execute the bin file, enter the following command on the terminal:
chmod +xManageEngine_ServiceDesk_Plus.bin
Execute the .bin file by using the command:
./ManageEngine_ServiceDesk_Plus.bin -i console
Follow the on-screen instructions to the end to complete the installation.
How do I install ServiceDesk Plus as Linux Service?
Get the servicedesk.txt file available here.
Create a file called servicedesk under /etc/init.d/ and copy the following script in it.
cp servicedesk.txt /etc/init.d/servicedesk
Edit the file and modify the MDIR variable to the bin folder in the product directory. For example, MDIR=/home/guest/ManageEngine/ServiceDesk/bin. To edit the file, type vi servicedesk.txt on the Vim editor.
Get the Execute permission for servicedesk startup script by using the command:
chmod +x servicedesk
Create a blank file servicedesk-plus.log under /var/log for application login purposes.
To add the script as a startup process, use the command: systemctl start servicedesk or service servicedesk start.
Is it possible to scan windows workstation if ServiceDesk Plus is installed on a Linux machine?
When Servicedesk is installed on a Linux machine, Windows machines can be scanned in 2 ways.Method 1 : You can download the agent from Admin-->Windows Agent configuration and you can deploy through GPO. Refer to the link for configuring GPO
https://www.youtube.com/watch?v=D-2M3RrlOsA
Method 2 : Using the Distributed Asset scan functionality of ServiceDesk Plus, you can install the Probe in a windows machine using which you can scan windows workstations, export the information in a zip format and import the information into ServiceDesk Plus Linux server.
Here is how Distributed Asset scan functionality works.ServiceDesk Plus helps you scan assets distributed across multiple sites (i.e.) assets which are not connected to the network (or) assets which are not reachable from the central ServiceDesk Plus server. This can be done with the help of Asset Explorer Probe which can be installed in the remote network which helps to scan the assets in the remote network, export the asset information into a zip file and then import the information into the Central ServiceDesk Plus server. [
Screenshot ]- In order to use Distributed Asset Scan feature we have to understand the following terms.Central Server: Your ServiceDesk Plus installation is the Central server where you have the Central Asset database.
- Remote server (or) Asset explorer Probe : You can install Asset explorer Probe as Remote server in your remote network where you would like to scan assets. You will be able to scan and export the Asset information from the Remote server and import it in your Central ServiceDesk Plus server.
https://www.manageengine.com/products/asset-explorer/download.html
After installation when you start the application and connect to the client for the first time, it will prompt you to run either as a Central server or Probe (Remote server). Choose Remote server. You will be able to scan assets and perform scan configuration in Remote server as you do in ServiceDesk Plus.
You can then export scanned Asset information from the Remote server under Admin -> Distributed Asset Scan. This will export the scanned Asset information as a zip file. These exported assets can be imported into your central ServiceDesk Plus server under Admin --> Distributed Asset Scan.
By doing this we have a track of all our Assets in the organization in one place which makes it easier for us the manage them. Also Distributed asset scan functionality helps to reduce the load in ServiceDesk Plus server.
Customers interested in using the Distributed scan feature can get the Asset Explorer Probe (Remote server) license from our licensing team (This license will be equivalent to the number of nodes purchased for ServiceDesk Plus) which can be applied in the Asset explorer Remote server installations.Does ServiceDesk Plus scan the softwares installed in a Linux machines?
From v 7.5 and above, ServiceDesk Plus does scan softwares installed in Linux machine. Enable the check box which says Scan Software in Linux Workstations under Admin -> Network scan. [ Screenshot ]How can I connect to MYSQL database on a Linux machine?
Install the MYSQL client which supports your Linux version. Once this is accomplished, make sure that the command "mysql" is in path. (Most often, mysql should be under path, if not, you may add the complete path to mysql command under PATH variable in the bashrc file.
Once this is done, you may try the following:
# cd [ServiceDesk-Home]/mysql/bin
# mysql -u root -S ../tmp/mysql.sock servicedesk -AIs it necessary to install additional packages/libraries in Linux to support ServiceDesk Plus? If yes, what are they?
Environments such as RHEL 8.1 require ncurses-compat-libs to be installed for loading shared libraries (for example, libtinfo.so.5) while starting the application database. If this package is not installed, the following error will be displayed:
error while loading shared libraries: libtinfo.so.5: cannot open shared object file: No such file or directory
Some environments require postgresql-client-common to create the 'servicedesk' database when the application is installed. If this package is not installed, an error stating 'Failed to create database' will be displayed.Is it possible to scan devices if ServiceDesk Plus is installed on a Linux machine?
If ServiceDesk Plus is installed in a Non - Windows server like say, Linux, then DC has to be installed manually in another Windows machine (as currently DC supports windows OS only). This DC installation has to be integrated with SDP under Admin >> Integrations >> Endpoint Central (formerly Desktop Central). Once integrated, agent deployment can be done from DC installation and refer the links below for more details.
DC for agent based scan

Database
What are the Databases supported by ServiceDesk Plus?
Pgsql and MSSQL?How can I connect to Pgsql and MSSQL database of ServiceDesk Plus?
Refer to the instruction given below to connect to the Database :
For environments running version 9.4
(To know the database used, check the file named databaseinfo under [SDP-Home]/conf folder)For environments running version 9.3 and below
(To know the database used, check the file named databaseinfo under [SDP-Home]/server/default/conf folder)For MSSQL database,connect to the query analyzer of the SQL server and execute the queries.
Open command prompt on the application server,connect to the folder ManageEngine\ServiceDesk\pgsql\bin> psql.exe -U postgres -p 65432 -d servicedesk -h 127.0.0.1
For environments running version 10.5 and above
Open command prompt on the application server, connect to the folder ManageEngine\ServiceDesk\pgsql\bin> psql.exe -U sdpadmin -p 65432 -d servicedesk -h 127.0.0.1
when prompted for password enter sdp@123 and connect to the database.
- How do I convert the database from MYSQL to MSSQL?
The following is the procedure to migrate your ServiceDesk Plus database from MYSQL to MSSQL.
Step 1: Stop ManageEngine ServiceDesk Plus service.
Step 2: Take a backup of the existing data and configuration under MYSQL database.
From command prompt, go to [ServiceDesk Plus-Home]\bin directory and execute backUpData.bat command to start the data backup.
cmd> [ServiceDesk Plus Home]\bin
cmd> backUpData.bat
where, ServiceDesk Plus Home -> C:\ManageEngine\ServiceDesk. This backup will be stored under the Backup folder in ServiceDesk Plus Home directory.
Step 3: Invoke ChangeDBServer.bat under [Service Desk-Home]\bin folder. [ Screenshot ]
Step 4: Provide the details of the SQL server (i.e.) Host name, username and password and click Test, By doing this, we will be able to check the connectivity with the SQL server. The message should say connection established as displayed above. Then click Save.
Step 5: Start and stop the ServiceDesk Plus service once.
NOTE: A database called ServiceDesk would be created in the SQL server.
Step 6: Now invoke restoreData.bat under [Service Desk-Home]\bin folder. The data should now be restored under your MSSQL server instance. Follow the on screen instructions to restore the latest backup data performed in step 2. [ Screenshot ]
Step 7: Start ManageEngine ServiceDesk Plus service once the restore process is complete. How do I move the application from one version of MSSQL to another version of MSSQL.i.e., from MSSQL 2005 to MSSQL 2008?
To migrate ServiceDesk Plus database from one version of MSSQL to another:
Step 1: Stop ManageEngine ServiceDesk Plus service.
Step 2: Take a backup of the existing data and configuration under MSSQL database. For example, assume your existing database is MSSQL 2005. To take a backup,
From the command prompt, go to [ServiceDesk Plus-Home]\bin directory and execute the command backUpData.bat to start the data backup.
cmd> [ServiceDesk Plus Home]\bin
cmd> backUpData.bat
This backup will be stored under the Backup folder in ServiceDesk Plus Home directory.
Step 3: Invoke ChangeDBServer.bat under [Service Desk-Home]\bin folder.
Step 4: Provide the details of the new SQL server. For example, assume your new SQL server is 2008 64-bit. Enter the Host Name, Username and Password. Click Test to check the connectivity with the SQL server. The message should say “Connection Established”. Click Save.
Step 5: Start and stop the ServiceDesk Plus service once.
NOTE: A database called ServiceDesk would be created in the New SQL server.
Step 6: Now invoke restoreData.bat under [Service Desk-Home]\bin folder. The data should be restored under your MSSQL server instance using the backup file that had been taken previously.
Step 7: Start ManageEngine ServiceDesk Plus service once the restore process is complete.How do I change the account and password of the SQL server that connects ServiceDesk Plus?
From the command prompt, execute the Changedbserver.bat file under C:\ManageEngine\ServiceDesk\bin directory. Enter the credentials and test the connection. [ Screenshot ]How to connect to PGSQL when application is running in a Linux Server
Connect to the database following the below steps and then execute the queries.
Open command prompt on the application server,connect to the folder ManageEngine\ServiceDesk\pgsql\bin> and use the command
SDP-home/pgsql/bin> ./psql -U postgres -p 65432 -d servicedeskHow to move from Mysql database to PGSQL database
The following is the procedure to migrate your ServiceDesk Plus database from MYSQL to PGSQL.
PGSQL Database support started from build 8121. If you are the previous builds, please upgrade to 8121 and the proceed with the following steps given below:
Step 1: Stop ManageEngine ServiceDesk Plus service.
Step 2: Take a backup of the existing data in the application
From the command prompt, go to [ServiceDesk Plus-Home]\bin directory and execute the backUpData.bat command to start the data backup.
cmd> [ServiceDesk Plus Home]\bin
cmd> backUpData.bat
This backup will be stored under the Backup folder in ServiceDesk Plus Home directory.
Step 3: Install a fresh version of Servicedesk of the same build. A fresh install will have PGSQL as a default database. You can download it from the below link:
http://archives.manageengine.com/service-desk/
Step 4: Start and stop the ServiceDesk Plus application once. Now you have a fresh PGSQL Database.
Step 5: Invoke the command restoreData.bat under [Service Desk-Home]\bin folder. The data should be restored under your PGSQL database.
Step 6: Start ManageEngine ServiceDesk Plus service once the restore process is complete.
How to change the Endpoint Central (formerly Desktop Central) database from Postgres to MSSQL?
By default, DC gets installed with bundled PGSQL. DC also supports MSSQL. Please check here for MSSQL versions supported by DC.
Click here for detailed instructins for moving DC to MSSQL.
HTTPS and SSL support for ServiceDesk Plus
How do I make ServiceDesk Plus run on https?
From a command prompt, execute the file changeWebServerPort.bat from [Service Desk Home]\bin folder as in
C:\ManageEngine\ServiceDesk\bin> changeWebServerPort.bat[port number] https
By doing so ServiceDesk Plus uses the default certificate but this default certificate is not a trusted one. In order to make it trusted you would have to purchase and install third-party SSL certificates with ServiceDesk Plus.How do I setup redirection from HTTP to HTTPS?
When you change the application protocol to HTTPS, every page will be linked to a new HTTPS URL. The existing URLs that are saved in notifications, bookmarks or emails will be broken because they are still linked to the HTTP address. These links will be useless unless they are redirected to the right HTTPS address.
To set up redirection, you need to be aware of:
- Your current HTTP port - The default HTTP port is 80.
- You HTTPS port - The default HTTPS port is 443. If you configure a different port, ensure it matches with the port configured in Admin >> Self-service portal settings >> Security settings.
Follow these steps to set up redirection from HTTP to HTTPS,
For versions 9.4 and above►Go to <installation_directory> \conf
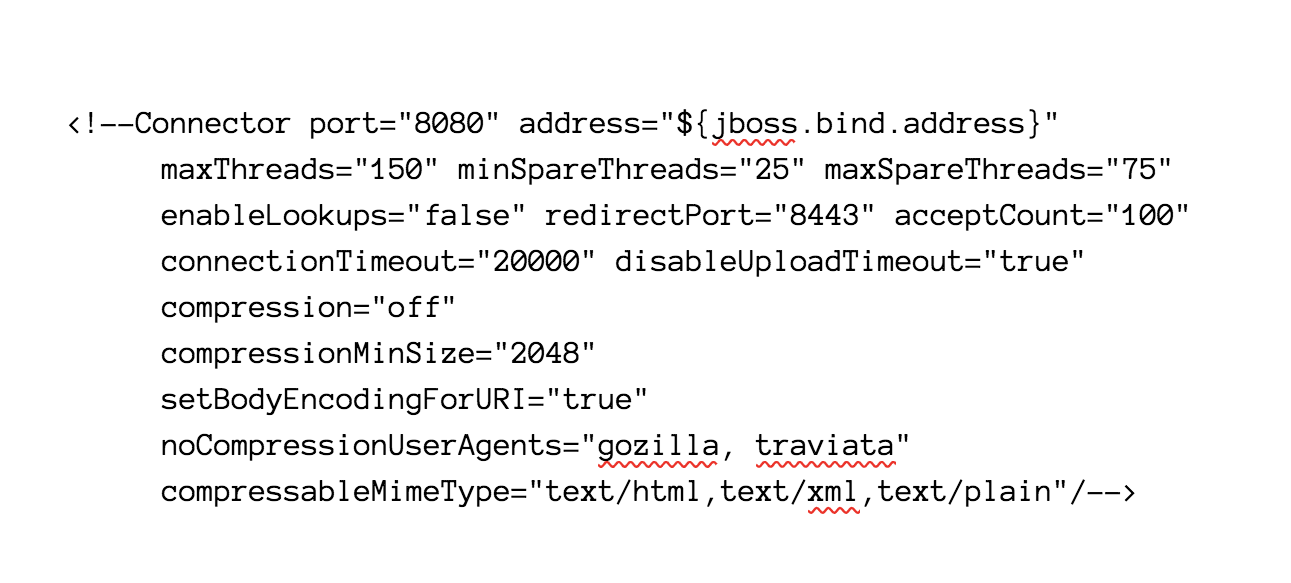
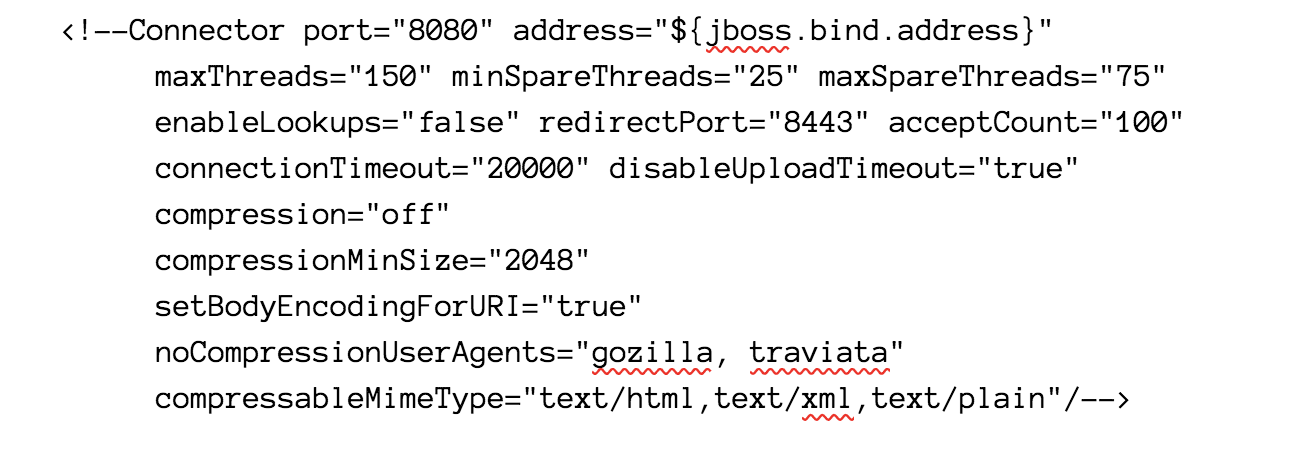
Open server.xml file in text editor.
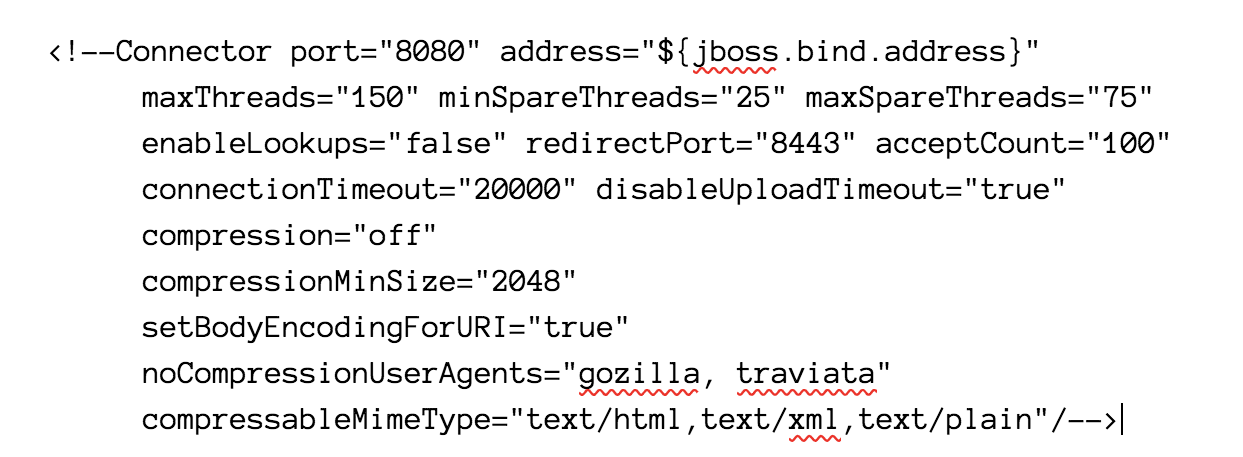
Locate the below entry in the file
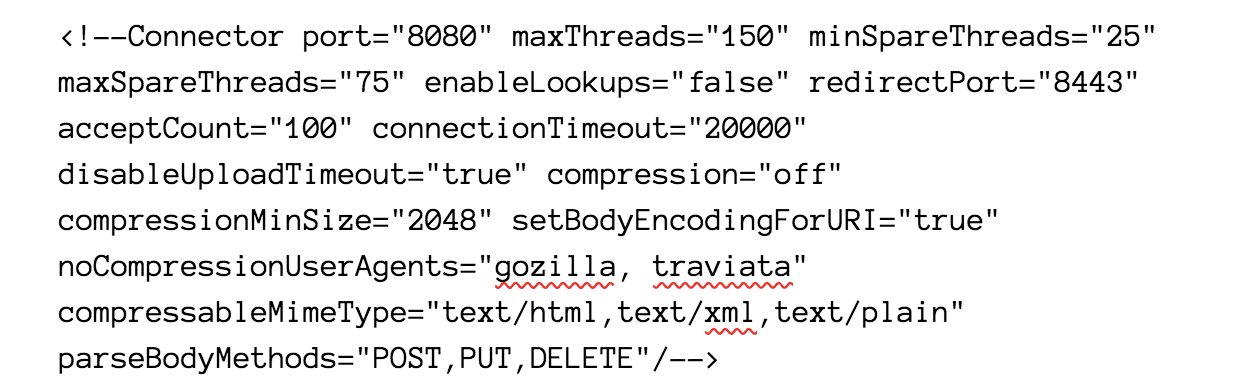
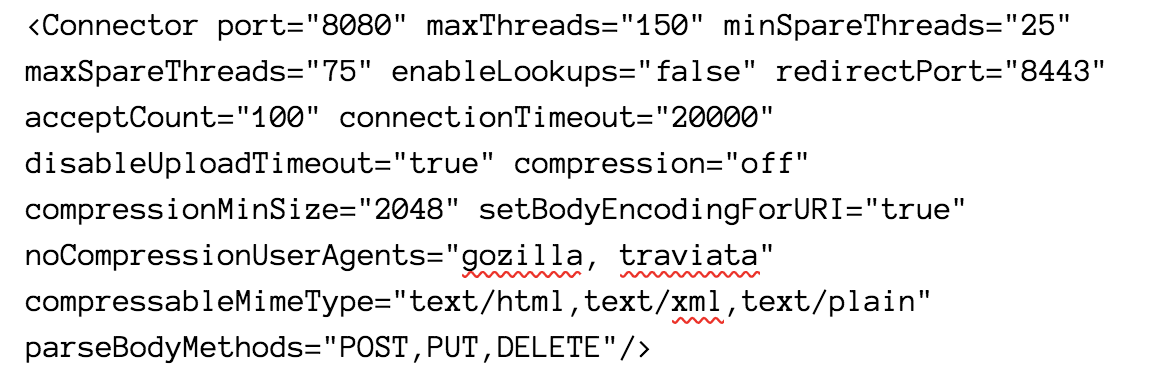
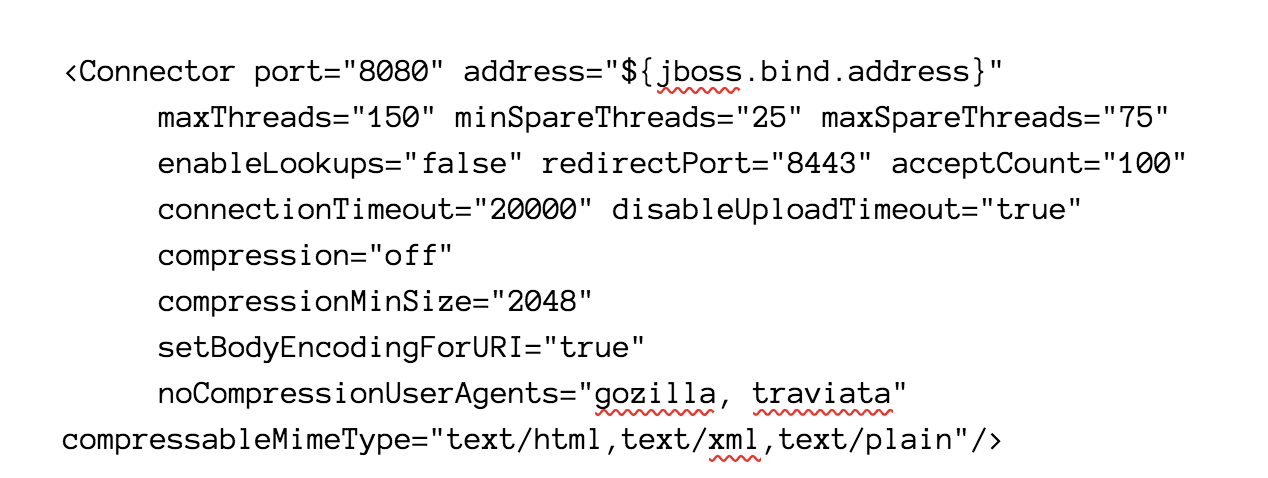
Remove !-- before Connector port="8080" and remove -- after
parseBodyMethods="POST,PUT,DELETE"/
Change the redirection port value. By default, the redirect port is set to 8443. You can set a different port number as per as your requirement.
Note - The connector port refers to the HTTP port while the redirection port refers to the HTTPS port.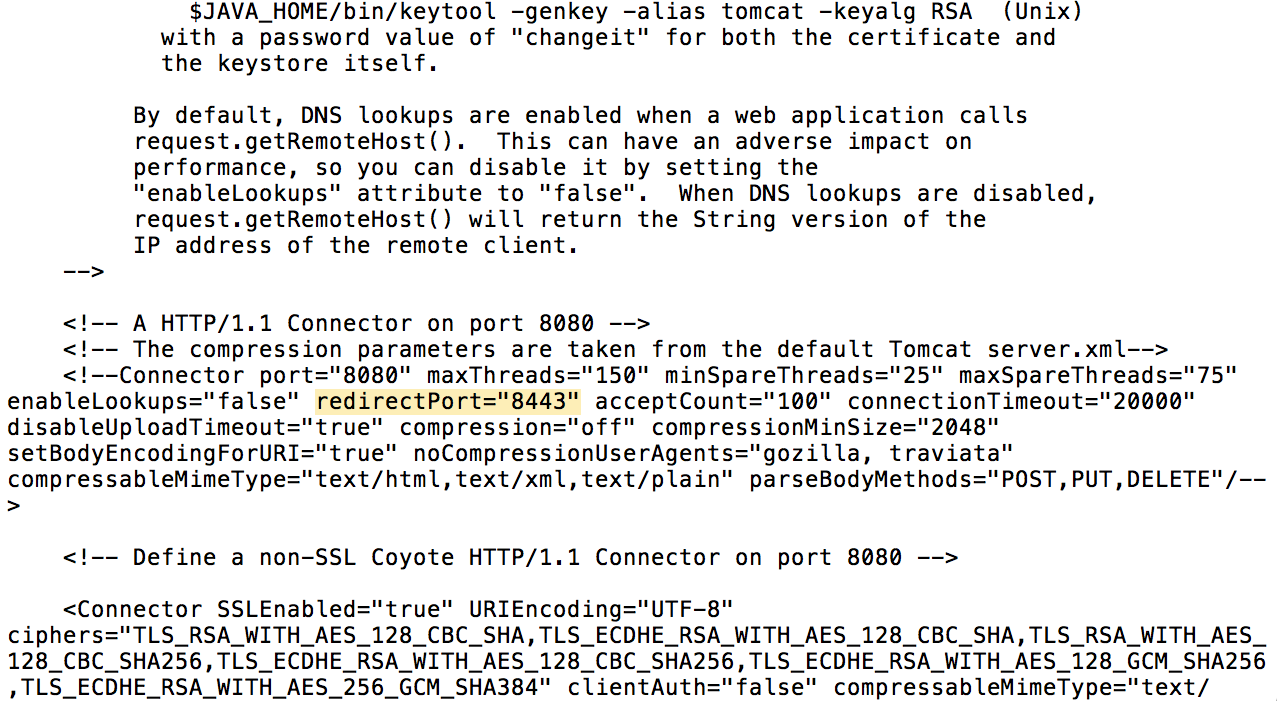
After the edits, the entry should appear as below
Save the file.
Go to <installation_directory> \webapps\ROOT\WEB-INF and open web.xml file.
Locate the below entry in the file and add the lines in bold or highlighted.
Restart ServiceDesk Plus.
For versions 9.2 and 9.3►For versions 9.1 and below►How do I disable weak and anonymous ciphers from being used in HTTPS connection?
- Go to the folder
For environments running version 9.4
<ServiceDesk_Home>\conf
[ Screenshot ]For environments running version 9.2 and 9.3
<ServiceDesk_Home>\server\default\deploy\jbossweb-tomcat70.sar
[ Screenshot ]For environments running version 9.1 and below
<ServiceDesk_Home>\\server\default\deploy\jbossweb-tomcat50.sar
[ Screenshot ]and openserver.xml file with a WordPad.
To disable weak and anonymous ciphers from being used in a HTTPS connection and to improve the security in connection, you can include certain parameter in server.xml file.
Parameter to be included
ciphers="TLS_RSA_WITH_AES_256_CBC_SHA256,
TLS_RSA_WITH_AES_256_CBC_SHA,
TLS_RSA_WITH_AES_128_CBC_SHA256,
TLS_RSA_WITH_AES_128_CBC_SHA,
TLS_RSA_WITH_3DES_EDE_CBC_SHA"- Search for <¡-- SSL/TLS Connector configuration using the admin devl guide keystore-->
[ Screenshot ] - Include the parameter after keystorePass="sdpsecured" sslProtocol = "TLS" and before />.
[ Screenshot ]
- Search for <¡-- SSL/TLS Connector configuration using the admin devl guide keystore-->
How do I install a .PFX Certificate?
A PKCS12 (.pfx) certificate stores the RSA keys and the SSL certificate in a single encrypted file.
Follow these steps to install the certificate:
- Stop the application.
- Copy the PKCS12 (.pfx) file to
\conf\. - Switch the application to the secure mode by changing the web server port to 443.
- Go to
\conf\ and open the server.xml file in a text editor. - Locate the Connector SSLEnabled="true" string, insert keystoreType="pkcs12" and replace the following attributes with values as shown:
- Restart the application. Note that the application will now run in the secure mode. The following screenshot displays the server.xml file after the required changes.
For versions earlier than 9400, copy the file to
\server\default\conf\ For versions 9.2 and 9.3, go to
\server\default\deploy\jbossweb-tomcat70.sar For versions earlier than 9.1, go to
\server\default\deploy\jbossweb-tomcat50.sar Attribute Value keystoreFile conf/ .pfx keystorePass For versions earlier than 10.0, type your plain text password as is. For versions 10.0 and later, paste the encrypted the password. How to encrypt your password in ServiceDesk Plus.
At the command prompt, change to
\bin For versions earlier than 10.5, run:
encrypt.bat "
" For versions 10.5 and later, run:
encrypt.bat -a aes256 -v "
" The encrypted password will be displayed in the next line.
How do I install SSL certificate for ServiceDesk Plus?
ServiceDesk Plus can run as a HTTPS service. But it requires a SSL (Secure Socket Layer) Certificate signed by a valid Certificate Authority (CA).
By default, on first time startup, it creates a self-signed certificate. This self-signed certificate will not be trusted by the user browsers. Thus, while connecting to ServiceDesk Plus, you need to manually verify the certificate information and the hostname of ServiceDesk Plus server carefully and should force the browser to accept the certificate.
To make ServiceDesk Plus server identify itself correctly to the web browser and the user, you need to obtain a new signed certificate from a CA for the ServiceDesk Plus host.
You can use keytool (bundled with Java) to create your certificates, get them signed by a CA and use them with ServiceDesk Plus.
The steps involved in configuring ServiceDesk Plus to use the SSL are as given below.
Step 1: Create a Keystore file
Step 2: Create .CSR (Certificate Signing Request) file
Step 3: Install your SSL Certificate
Step 4: Configuring the server
NOTE: In all the images, replace the highlighted text with the alias name you want to use for the SDP
Step 1: Create a Keystore file
Before requesting for a certificate from a CA, you need to create tomcat specific ".keystore" file and ".csr" file.
The .keystore file and .csr file will include information provided by the individual who creates the .keystore and .csr files.
To create the .keystore file follow the below steps,- Open the Command Prompt
- From the location <installation directory> \ jre \ bin execute the command
keytool -genkey -alias <your_alias_name> or [Domain Name] -keyalg RSA -keystore sdp.keystore
[ Screenshot ] - If your vendor requires a CSR of size 2048 please use the command given below.
keytool -genkey -alias <your_alias_name> or [Domain Name] -keyalg RSA -keysize 2048 -keystore sdp.keystore [ Screenshot ] - You will then be prompted to choose a password for your keystore.
For builds 11138 and older, the password should not contain $ symbol.
For builds 11139 and higher, the password should not contain " and \ symbols.
- When it asks for first and last name, this is NOT your first and last name, but rather it is your Fully Qualified Domain Name for the site you are securing. [ Screenshot ]
- If you are ordering a Wildcard Certificate this must begin with the * character. [ Screenshot ]
- On entering the required information, confirm that the information is correct by entering 'y' or 'yes' when prompted. (img5.jpg)
- At the end of executing the above command, you will be prompted to enter keystore password. Try giving the password same as your key password. Make sure to remember the password you choose.
[ Screenshot ] - Your keystore file named sdp.keystore is now created in your current working directory.
NOTE: We request you to make a backup copy of the sdp.keystore file before installing the Certs. This backed up keystore can be used if the certificate installation goes wrong or when you renew your certificates the next year.
Step 2: Creating .CSR (Certificate Signing Request) file
The .CSR (Certificate Signing Request) file is temporary and should be submitted to a CA to receive CA-Signed Certificate files.
Please follow the steps given below to create the CSR file.- Open the Command Prompt
- From the location <installation directory> \ jre \ bin execute the below command.
keytool -certreq -alias <your_alias_name> -file key.csr -keystore sdp.keystore In the above command <your_alias_name> is the alias name provided when creating the keystore, key.csr is the name of the CSR file that will be created after the command is executed. [ Screenshot ]
Step 3: Install your SSL Certificate
Download the Certificate files received from the CA via e-mail to the directory where your keystore (sdp.keystore) was saved during the CSR creation process. The certificates must be installed to this exact keystore. If you try to install it to a different keystore it will not work.
The certificates you had downloaded must be installed to your keystore in the correct order for your certificate to be trusted. If the certificates are not installed in the correct order, then the certificate will not authenticate properly. To find the correct order, double click on the domain certificate and then go to 'Certification Path'.
[ Screenshot ]
These certificates are usually in the format .cer or .crt. If your certificate is with the extension .p7b please follow the instructions given in Installing a .P7b Certificate to export the certs to a .cer or .crt format.
Looking at the above certification path we can infer that we need to import two other certificates before the domain certificate. First is the Root, next the Intermediate and finally the Domain Certificate. Some CAs may also use another certificate called Cross Intermediate. These certificates can be downloaded from the Vendor's website.
Installing the Root Certificate file
Each time you install a certificate to your keystore you will be prompted for the keystore password, which you chose while generating your CSR. Type the following command to install the Root certificate file:
keytool -import -trustcacerts -alias root -file <File_Name>.crt -keystore sdp.keystore
NOTE: Choose 'Yes' if you get prompted with a message that says "Certificate already exists in system-wide CA keystore under alias <Alias Name> Do you still want to add it to your own keystore? [no]:"
You will get a confirmation stating that the "Certificate was added to keystore". [ Screenshot ]
Install the Intermediate Certificates and Cross Intermediate Certificates (if any).
Follow the instructions provided by the CA.
keytool -import -trustcacerts –alias intermediate -file <File_Name>.crt -keystore sdp.keystore
keytool -import -trustcacerts –alias cross -file <File_Name>.crt -keystore sdp.keystore
You will get a confirmation stating that the "Certificate was added to keystore". [ Screenshot ]
Install the Primary or the Domain Certificate file
Type the following command to install the Primary certificate file:
keytool -import -trustcacerts -alias <your_alias_name or [Domain Name]> -file your_domain_name.crt -keystore sdp.keystore
Please note that <your_alias_name or [Domain Name]> should be replaced with the alias name provided when creating the keystore (as discussed in Step 1). This time you will get a different confirmation stating that the "Certificate reply was installed in keystore". [ Screenshot ]
If you want to trust the certificate, then choose y or yes. Your Certificates are now installed to your keystore file (sdp.keystore).
Step 4: Configuring the Server- Copy the sdp.keystore file from >ServiceDesk_Home<\jre\bin to
For environments running version 9.3 and below
\server\default\conf directory and For environments running version 9.4
\conf directory - From the command prompt, execute changeWebServerPort.bat script to change the connection mode to HTTPS. [ Screenshot ]
Cmd>[ServiceDesk Plus Home]\bin< changeWebServerPort.bat <WEBSERVER_PORT> https - Finally, update the name of the keystore and the password, you gave in Step 1, while generating sdp.keystore in the file server.xml, this xml file can be found in one of the below locations based on the current version you are running,
For environments running version 9.4
<ServiceDesk_Home>\conf
[ ScreenshotFor environments running version 9.2 and 9.3
For environments running version 9.1 and below
<ServiceDesk_Home>\server\default\deploy\jbossweb-tomcat70.sar
[ Screenshot
<ServiceDesk_Home>\server\default\deploy\jbossweb-tomcat50.sar
[ Screenshot ] - Restart the service ManageEngine ServiceDesk Plus for the changes to take effect.
Installing a .P7b Certificate
Some CA will provide the certificates with an extension .p7b. In such a case you can double click on this file to open a console which will list all the required certificates. You can export these certificates to Base-64 encoded X.509 (.cer) files. (Please refer to the Screenshots given below).
These certs can then be installed onto the keystore file using the instructions given in Step 3.
To export the certificate,- Go to [ServiceDesk Plus Home] \ jre \ bin \ domain.P7B. [ Screenshot ]
- Right click on the certificate and select All Tasks -> Export option. [ Screenshot ]
- The Certificate Export Wizard dialog pops up. Click Next button to proceed. [ Screenshot ]
- Select the export file format as Base-64 encoded X.509 (.cer). Click Next. [ Screenshot ]
- Specify the name of the file you want to export. Click Next. [ Screenshot ]
- The certificate export wizard is completed successfully. You can check for the settings you have specified. Click Finish. [ Screenshot ]
- A success message appears in a dialog box. Click OK. [ Screenshot ]
Please find below the commands you need to use to install certificates from a few common vendors
NOTE: These instructions might change depending on the Certificates issued by the CA.If your CA is "GoDaddy", then the steps to follow will be :
keytool -import -alias root -keystore <Keystore_Name>.keystore -trustcacerts -file gd_bundle.crt
keytool -import -alias cross -keystore <Keystore_Name>.keystore -trustcacerts -file gd_cross_intermediate.crt
keytool -import -alias intermediate -keystore <Keystore_Name>.keystore -trustcacerts -file gd_intermediate.crt
keytool -import -alias <Alias Specified when creating the Keystore> -keystore <Keystore_Name>.keystore -trustcacerts -file <CertificateName>.crtIf your CA is "Verisign", then the steps to follow will be :
keytool -import -alias intermediateCA -keystore <Keystore_Name>.keystore -trustcacerts -file <your_intermediate_certificate_name>.cer
keytool -import -alias <Alias Specified when creating the Keystore> -keystore < Keystore_Name>.keystore -trustcacerts -file <CertificateName>.cerIf your CA is "Comodo", then the steps to follow will be :
keytool -import -trustcacerts -alias root -file AddTrustExternalCARoot.crt -keystore <Keystore_Name>.keystore
keytool -import -trustcacerts -alias addtrust -file UTNAddTrustServerCA.crt -keystore <Keystore_Name>.keystore
keytool -import -trustcacerts -alias ComodoUTNServer -file ComodoUTNServerCA.crt -keystore <Keystore_Name>.keystore
keytool -import -trustcacerts -alias essentialSSL -file essentialSSLCA.crt -keystore <Keystore_Name>.keystore
keytool -import -trustcacerts -alias <Alias Specified when creating the Keystore> -file <Certificate-Name>.crt -keystore <Keystore_Name>.keystoreHow do I renew SSL Certificate?
In order to use the renewed certificate, you need to have taken a backup of the existing keystore file (created while configuring the SSL) which was taken before the installation of any certs. If this file is present, then you can replace this file in the [ServiceDesk Home]\jre\bin folder and follow the instructions from Step 3: Install your SSL Certificate. If you do not have a backup of the keystore file, then you need to start from scratch i.e., Step 1, and get the certificates reissued for the new CSR.
You can use the following command to get the list of certificates installed in the keystore.
Keytool.exe -list -keystore sdp.keystore
Below is an example of how a keystore looks before installing any Certificates. It will only have the keyEntry.
[ Screenshot ] Will DC be installed in HTTPS mode?
By default DC would be installed in both HTTP and HTTPS mode. But when DC is integrated with SDP, it uses HTTP mode. However, DC can be changed to the HTTPS mode. Refer the link for more details.


Moving ServiceDesk Plus
How do I move ServiceDesk Plus from one server to another server?
Following are the steps to move data from the existing server to a new server,
Step 1: Stop ManageEngine ServiceDesk Plus service.
Step 2: Kindly Upgrade ServiceDesk Plus if required. Refer to the link below to check if you are in the latest version;
https://www.manageengine.com/products/service-desk/service-packs.html
Refer to the section UPGRADING ServiceDesk Plus of FAQ for detailed instructions for upgrade.
Step 3: Now start and stop the ManageEngine ServiceDesk Plus service once after the upgrade process.
NOTE: If you are planning on performing multiple upgrades, please make sure you start and stop the application, and perform a backup before each and every upgrade.
Step 4: From command prompt, go to [ServiceDesk Plus-Home]\bin directory and execute backUpData.bat command to start the data backup.
Once the backup is complete, a backup file with .data extension is placed in the Backup folder under ServiceDesk Plus Home directory. This backup file contains information about the Build number of ServiceDesk Plus, and the date and time of when the backup was performed. Here is the format of the backup file.
Backup_ ServiceDesk_ [Build number] _Month _date _ Year _ Hour _Minutes
For example, a backup taken in Version 7 and Build 7500 of ServiceDesk Plus looks like this
backup_servicedesk_7500_fullbackup_02_24_2009_07_51.data
Step 5: Install ServiceDesk Plus on the new server.
Step 6: Start the application and check if the login page is displayed. Then, stop the application service. Step 7: Copy the backup folder from the old server to [ServiceDesk Plus-Home] in the new server.
Step 8: To restore the backed up data, Go to [ServiceDesk Plus-Home]\bin directory and execute restoreData.bat. Choose the backup file while prompted. See example below:
cmd> [ServiceDesk Plus Home]\bin
cmd> restoreData.bat
where, Service Desk Home -> C:\ManageEngine\ServiceDesk [ Screenshot ]
Step 9: Start the ServiceDesk Plus server once after restoring the data in the new server.
Step 10: Set the new server name under Admin -> Self Service Portal Settings -> Alias url.
NOTE: Data can be restored only across same builds of ServiceDesk Plus version. i.e. data backed up in 7500 build of ServiceDesk Plus can be restored only in 7500 build. Please check if the old build and new build are of same build versions.
Build version can be checked- By clicking on the About link in the application [OR]
For environments running version 9.4
From buildInfo.xml file under <Service Desk_Home>/confFor environments running version 9.3 and below
From buildInfo.xml file under <Service Desk_Home>/server/default/conf directory.
If the old build is a different build, then the same build needs to be installed in new server. You can download earlier builds of ServiceDesk Plus from our Archives website http://archives.manageengine.com/service-desk/- By clicking on the About link in the application [OR]
If I'm using MSSQL as database, how should I go about moving the application from one server to another but using the same database?
Since you are using MSSQL, the database remains on the SQL server. So all you have to do is install the same version and build of ServiceDesk Plus on the new server and point the database to the SQL server while installing the product.
You can check your current version and build of ServiceDesk Plus by- Clicking on the About link in the application [OR]
- Build version can be checked from buildInfo.xml file under
For environments running version 9.4
<Service Desk_Home>/confFor environments running version 9.3 and below
<Service Desk_Home>/server/default/conf directory.
The way ServiceDesk Plus is designed is that it does not store attachments in the database. They are stored in the file attachments folder of the installation directory (C:\ManageEngine\ServiceDesk)
You would have to copy the following folders to the new server from the existing server.- fileAttachments, zreports, app_relationships, scannedxmls, exportimport, LuceneIndex, inlineimages, custom, and archive under ServiceDesk[home]. sdparchive_dynamic.xml, SnmpConfgurations.xml files under
For environments running version 9.4
[your drive]: \ManageEngine\ServiceDesk\conf.For environments running version 9.3 and below
[your drive]: \ManageEngine\ServiceDesk\server\default\conf.If agent configurations are modified, move ManageEngineAssetExplorerAgent.msi file to
For environments running version 9.3 and below
[your drive]: \ManageEngine\ServiceDesk\applications\extracted\AdventNetAssetExplorer.eear\ AdventNetServiceDeskWC.ear\AdventNetServiceDesk.war\agentFor environments running version 9.4
[your drive]: \ManageEngine\ServiceDesk\webapps\ROOT\agentIf integrated with SCCM, move the sccmconnector folder under
[your drive]: \ManageEngine\ServiceDesk.
How do I move ServiceDesk Plus installation to a different drive on the same server?
Follow the instructions below to move ServiceDesk Plus installation to a different drive on the same server.
Note: After moving, you can start the application only from services.msc.
Step 1: Stop ManageEngine ServiceDesk Plus service.
For environments running version 9.3 and below
Step 2: De-Register Service: C:\ManageEngine\ServiceDesk\bin> sd_service.bat -r ..\server\default\conf\wrapper.conf
Step 3: Copy installation folder [ManageEngine\Servicedesk] to another drive say D:
Step 4: Re-Register service: D:\ManageEngine\ServiceDesk\bin> sd_service.bat -i ..\server\default\conf\wrapper.conf
For environments running version 9.4
Step 2: De-Register Service: C:\ManageEngine\ServiceDesk\bin> sd_service.bat -r ..\conf\wrapper.conf
Step 3: Copy installation folder [ManageEngine\Servicedesk] to another drive say D:
Step 4: Re-Register service: D:\ManageEngine\ServiceDesk\bin> sd_service.bat -i ..\conf\wrapper.conf
Step 5: Start the service.
NOTE: Make sure you have taken the backup first using backUpData.bat in ManageEngine\Service Desk\bin before you perform the procedure.
How can I move ServiceDesk Plus from a Windows server to a Linux server?
Following are the steps to move ServiceDesk Plus Windows server to Linux server.
Step 1: Take a trimmed backup using the commands below,
cmd> cd [ServiceDesk-Home]\bin
cmd> backupdata.bat --trimmed
The backup will now be created under [ServiceDesk-Home]\trimmedbackup
Step 2: Copy the following folders and replace them in the same location of the another server:
fileAttachments, zreports, app_relationships, scannedxmls, exportimport, LuceneIndex, inlineimages, custom, and archive under ServiceDesk[home]. sdparchive_dynamic.xml, SnmpConfgurations.xml files underFor environments running version 9.3 and below
[your drive]: \ManageEngine\ServiceDesk\server\default\conf.For environments running version 9.4
[your drive]: \ManageEngine\ServiceDesk\webapps\ROOT\agent.If agent configurations are modified, move ManageEngineAssetExplorerAgent.msi file to
For environments running version 9.3 and below
[your drive]: \ManageEngine\ServiceDesk\applications\extracted\AdventNetAssetExplorer.eear\ AdventNetServiceDeskWC.ear\AdventNetServiceDesk.war\agent.For environments running version 9.4
[your drive]: \ManageEngine\ServiceDesk\webapps\ROOT\agent.If integrated with SCCM, move the sccmconnector folder under [your drive]: \ManageEngine\ServiceDesk.
Step 3: To restore the backed up data, Go to [ServiceDeskPlus-Home]\bin directory and execute sh restoredata.sh. Choose the backup file while prompted.
Step 4: Start the ServiceDesk Plus server once after restoring the data in the new server.
Step 5: Connect to the database and execute the query below.
update sdeskattachment set ATTACHMENTPATH = replace(ATTACHMENTPATH, '\\', '/');How can I build a test environment for ServiceDesk Plus?
Building a test environment is very helpful while upgrading ServiceDesk Plus. When you are planning to upgrade ServiceDesk Plus to the latest version, it is highly advisable to try the upgrade on the test environment first so that you will be confident about the upgrade on the Production server.
Step 1: Stop Manage Engine Service Desk Plus service on the production server.
Step 2: From command prompt, go to [ServiceDesk Plus-Home]\bin directory and execute backUpData.bat command to start the data backup. Where, ServiceDesk Plus Home -> C:\ManageEngine\ServiceDesk
Once the backup is complete, a backup file with .data extension is placed in the Backup folder under ServiceDesk Plus Home directory. This backup file contains information such as, the Build number of ServiceDesk Plus, and the date and time of when the backup was performed. Here is the format of the backup file.
"Backup_ ServiceDesk_ [Build number] _Month _date _ Year _ Hour _Minutes"
For example, a backup taken in Version 7 and Build 7500 of ServiceDesk Plus looks like this
backup_servicedesk_7500_fullbackup_02_24_2009_07_51.data
Step 3: Install ServiceDesk Plus on the new server.
Data can be restored only across same builds of ServiceDesk Plus version. (i.e.) data backed up in 7500 build of ServiceDesk Plus can be restored only in 7500 build. Please check if the old build and new build are of same build versions.
Build version can be checked,- By clicking on the About link in the application. [OR]
- From buildInfo.xml file under
For environments running version 9.3 and below
/server/default/conf directory. For environments running version 9.4
If the old build is a different build, then the same build needs to be installed in new server. You can download earlier builds of ServiceDesk Plus from our Archives website http://archives.manageengine.com/service-desk//conf directory.
Step 5: To restore the backed up data, Go to [ServiceDesk Plus-Home]\bin directory and execute restoreData.bat. Choose the backup file while prompted as in the screen shot given below,
cmd> [ServiceDesk Plus Home]\bin
cmd> restoreData.bat [ Screenshot ]
Step 6: Start the ServiceDesk Plus server once after restoring the data in the Test server.
Step 7: Stop mail fetching immediately after applying production data to your test server. You don't want it stealing emails that should be going into your production system. (Admin --> Mail server settings --> Stop fetching).How to build a test setup with PGSQL Database
Step 1: Please download the existing version of Servicedesk Plus being used in the your production setup by using the archives link added below and install the application by completing the installation wizard.
http://archives.manageengine.com/service-desk
For Example: If you are using 9200 build in your existing server then you have to install the same build in your test setup.
Step 2: Install the application with Postgres database
Step 3: Once the installation is completed, copy the following folders from Manageengine/Servicedesk directory in Production server.
fileAttachments, zreports, app_relationships, scannedxmls, exportimport, LuceneIndex, inlineimages, custom, pgsql, and archive under ServiceDesk[home]. sdparchive_dynamic.xml, SnmpConfgurations.xml files underFor environments running version 9.4
[your drive]: \ManageEngine\ServiceDesk\conf.For environments running version 9.3 and below
[your drive]: \ManageEngine\ServiceDesk\server\default\conf.If agent configurations are modified, move ManageEngineAssetExplorerAgent.msi file to
For environments running version 9.3 and below
[your drive]: \ManageEngine\ServiceDesk\applications\extracted\AdventNetAssetExplorer.eear\ AdventNetServiceDeskWC.ear\AdventNetServiceDesk.war\agentFor environments running version 9.4
[your drive]: \ManageEngine\ServiceDesk\webapps\ROOT\agentIf integrated with SCCM, move the sccmconnector folder under [your drive]: \ManageEngine\ServiceDesk.
Step 4: After completing the above instructions, start the application by invoking run.bat from ManageEngine\ServiceDesk\bin directory and check if the application is working. Once the the application is started, please stop it by pressing CTRL+C and terminate the batch job.
Step 5: Now start Manageengine Servicedesk Plus service from services.msc.How do I move ServiceDesk Plus from 32-bit server/application to 64-bit server/application?
Following are the steps to move data from the existing server to a new server,
Step 1: Stop ManageEngine ServiceDesk Plus service.
Step 2: Kindly Upgrade ServiceDesk Plus if required. Refer to the link below to check if you are in the latest version;
https://www.manageengine.com/products/service-desk/service-packs.html
Refer to the section UPGRADING ServiceDesk Plus of FAQ for detailed instructions for upgrade.Step 3: Now start and stop the ManageEngine ServiceDesk Plus service once after the upgrade process.
NOTE: If you are planning on performing multiple upgrades, please make sure you start and stop the application, and perform a backup before each and every upgrade.Step 4: From command prompt, go to [ServiceDesk Plus-Home]\bin directory and executebackUpData.bat command to start the data backup.
Once the backup is complete, a backup file with .data extension is placed in the Backup folder under ServiceDesk Plus Home directory. This backup file contains information about the Build number of ServiceDesk Plus, and the date and time of when the backup was performed. Here is the format of the backup file.
Backup_ ServiceDesk_ [Build number] _Month _date _ Year _ Hour _MinutesStep 5: Install 64-bit version ServiceDesk Plus on the new server. Use this link to download the EXE file http://archives.manageengine.com/service-desk/
Step 6: Copy the backup folder from the old server to [ServiceDesk Plus-Home] in the new server.
Step 7: To restore the backed up data, Go to [ServiceDesk Plus-Home]\bin directory and execute restoreData.bat. Choose the backup file while prompted. See example below:
cmd> [ServiceDesk Plus Home]\bin
where, Service Desk Home -> C:\ManageEngine\ServiceDesk [ Screenshot ]Step 8: Start the ServiceDesk Plus server once after restoring the data in the new server.
Step 9: Set the new server name under Admin -> Self Service Portal Settings -> Alias url.
NOTE: Data can be restored only across same builds of ServiceDesk Plus version. i.e. data backed up in 7500 build of ServiceDesk Plus can be restored only in 7500 build. Please check if the old build and new build are of same build versions.
Build version can be checked- By clicking on the About link in the application [OR]
FrombuildInfo.xml file under
For environments running version 9.3 and below
<SDP-Home>/server/default/conf directory.For environments running version 9.4
<SDP-Home>/conf directory.- By clicking on the About link in the application [OR]
- If the old build is a different build, then the same build needs to be installed in new server. You can download earlier builds of ServiceDesk Plus from our Archives website http://archives.manageengine.com/service-desk/
- If I'm using as database, how should I go about moving the application from 32-bit server/application to 64-bit server/application but using the same database?
Since you are using MSSQL, the database remains on the SQL server. So all you have to do is install the same version and build of ServiceDesk Plus on the new server and point the database to the SQL server while installing the product.
You can check your current version and build of ServiceDesk Plus by
- Clicking on the About link in the application [OR]
- Build version can be checked from buildInfo.xml file under
For environments running version 9.3 and below
<SDP_Home>/server/default/conf directoryFor environments running version 9.4
<SDP_Home>/conf directory - You can download 64-bit versions of ServiceDesk Plus from our Archives website http://archives.manageengine.com/service-desk/ The way ServiceDesk Plus is designed is that it does not store attachments in the database. They are stored in the file attachments folder of the installation directory (C:\ManageEngine\ServiceDesk) You would have to copy the following folders to the new server from the existing server.
- fileAttachments, zreports, app_relationships, scannedxmls, exportimport, LuceneIndex, inlineimages, custom, and archive underServiceDesk[home]. sdparchive_dynamic.xml, SnmpConfgurations.xml files under
For environments running version 9.4
[your drive]: \ManageEngine\ServiceDesk\conf.
For environments running version 9.3 and below
[your drive]: \ManageEngine\ServiceDesk\server\default\conf.
If agent configurations are modified, move ManageEngineAssetExplorerAgent.msi file to
For environments running version 9.3 and below
[your drive]: \ManageEngine\ServiceDesk\applications\extracted\AdventNetAssetExplorer.eear\ AdventNetServiceDeskWC.ear\AdventNetServiceDesk.war\agent
For environments running version 9.4
[your drive]: \ManageEngine\ServiceDesk\webapps\ROOT\agent
If integrated with SCCM, move the sccmconnector folder under [your drive]: \ManageEngine\ServiceDesk.
Customizations
How can I integrate ServiceDesk Plus to a personal homepage?
You can integrate ServiceDesk Plus to your personnel homepage by using 2 methods:
First method: If service desk plus is hosted in the internet then in your personnel webpage you can create a hyperlink of ServiceDesk Plus url.
To use this method,
Add <a href="http://www.theurl.com">servicedesk </a> to the body of your personnel web page.
Second method: You can log into ServiceDesk Plus from your personnel webpage. That is UserName and password for ServiceDesk Plus can be entered from your personnel Web page.
To use the second method add the following tags to the body,
<form action="http://www.theurl.com/HomePage.do" method="post">
<input type="text field"
name="username"/>
<br><input type="password"
name="password"/>
<br><input type="submit" value="Go"/>
</form>How do I bind ServiceDesk Plus to a single IP Address?
Windows Server:
For environments running version 9.3 and below
Step 1: Goto[SDP-Home]\server\default\conf\TrayIconInfo.xml and add "ipToBind"
parameter to the following line:
<SDP-PROPERTIES RequestScheme="http" WebPort="8080"/>
Now the line would look like,
<SDP-PROPERTIES RequestScheme="http" WebPort="8080" ipToBind="xxx.yyy.www.zzz"/> [ xxx.yyy.www.zzz is the ip address of the server on which you intend to run ServiceDesk Plus]
Step 2: Uncomment the following line in the same file:Now the line would look like,
<ADDITIONALPARAMS ParamName="ipToBind" ParamValue="-bxxx.yyy.zzz.www"/>
Step 3: Save the changes and Restart the Service.In case, you want to start it from the command prompt, you can edit the run.bat file and add an argument to the AdventNetDeploymentSystem.jar as follows set ARGS=%ARGS% -LAdventNetDeploymentSystem.jar -b <hostname/IP> Save the file and stop the application to effect the changes and start the application again.
Step 4: Change the URL in mssql-ds.xml/mysql-ds.xml like,jdbc:mysql:// <host/IP:33366/servicedesk
Step 5: In case of mysql Configure the startDB.bat to append --bind-address=<host/IP>
For environments running version 9.4
Stop ServiceDesk plus
Open the file system_properties.conf using a text editor of your choice (take a backup of the file before editing it) which can be found in
[ServiceDesk-Home]/conf (By default: C:\ManageEngine\Servicedesk Plus\conf) and add the entry provided below:
bindaddress=<ip address>
E.g.: bindaddress=192.168.111.162
Save the file
Restart the application.
For Linux Users:
IP Binding on the Linux machine.- Stop the server.
- Open the <ServiceDesk Plus_Home>/bin/run.sh file
- Modify the line : org.jboss.Main "-LAdventNetDeploymentSystem.jar" to org.jboss.Main "-LAdventNetDeploymentSystem.jar" -b <hostname/IP>
- Start the server and you will find that ServiceDesk Plus binds to the specified IP.
- Change the URL in mssql-ds.xml/mysql-ds.xml like, jdbc:mysql:// <hostname/IP>:33366/servicedesk
- In case of mysql Configure the startDB.sh to append --bind-address=<hostname/IP>
How do I host ServiceDesk Plus on the internet?
In order to make ServiceDesk Plus available for users in Internet, let us assume the following scenarios.
Scenario 1: ServiceDesk Plus is installed in LAN and should be available in LAN and WAN:
Assume ServiceDesk Plus is installed on a server in the LAN with IP address 192.168.200.254 on port 80, and the hostname of the server is "servicedesk-lan".
For users within the LAN, the url will be http://servicedesk-lan/ or (http://192.168.200.254)
If ServiceDesk Plus has to be accessed in WAN, you should do the following:
Step 1: Register an IP address (say, 64.12.13.11) and a public hostname (like servicedesk.yourdomain.com) with your Service Provider.
Step 2: The IP address for "servicedesk.yourdomain.com"?should resolve to "64.12.13.11". (This will be predominantly handled by the Service Provider).
Step 3: Configure Firewall rules (or access-list in router) redirecting "http" requests on IP address "64.12.13.11" to the LAN ipaddress "192.168.200.254".
Step 4: Configure the alias URL settings in ServiceDesk Plus. [One point to note is that all notifications will now be sent with the Public URL. It is understood that the Public URL will also be reachable within the LAN].
Scenario 2: ServiceDesk Plus is installed in DMZ and should be available in LAN and WAN:
Installing ServiceDesk Plus on a server within the DMZ should help prevent the security risks in installing ServiceDesk Plus on a server in LAN/WAN.
Assume SDP is installed on a server within DMZ with a IP address 192.168.225.254 and the hostname is "servicedesk-dmz" on port 8080.MSSQL is the database and the database server is in LAN: You have to configure firewall rules in such a way that the application can reach the Database server in LAN on the MSSQL port ( Default Port : 1433 )Step 1: You have to configure firewall rules in such a way that users in LAN are able to access the application as http://servicedesk-dmz:80/ [ Note that the application is installed on port 8080, but users have to access it through port 80]. In such a case, you have to redirect "http" requests on port 80 to port 8080 on the ipaddress 192.168.225.254.
MSSQL is the database and the database server is in DMZ: Port 1433 should be reachable from the ServiceDesk Plus server in DMZ.
Pgsql is the database?: It is recommended that you use the Pgsql bundled with the software. In such a case, there are no additional configurations required.
Step 2: Register an IP address (say, 64.12.13.11) and a public hostname (like servicedesk.yourdomain.com) with your Service Provider.
Step 3: The IP address for "servicedesk.yourdomain.com"?should resolve to "64.12.13.11". (This will be predominantly handled by the Service Provider).
Step 4: Configure Firewall rules (or access-list in router) redirecting "http" requests on IP address "64.12.13.11" on port 80 to the LAN ipaddress "192.168.225.254" on port 8080.
Step 5: Configure Alias URL settings in the Application.
Scenario 3: ServiceDesk Plus is installed in a server in WAN without firewall rules:
This is highly not recommended due to security risks on Tomcat, JBOSS application server, MySQL (or) MSSQL, even though the hardware box may be hardened.How do I change the URL on which ServiceDesk Plus is running?
Click Admin --> Self Service Portal Settings and provide the URL in the Alias URL section. Please make the corresponding configuration in the Firewall/Router also.How do I modify the ServiceDesk Plus Logo?
You can customize the application by choosing to display your custom logo. You need to add the logo in two dimensions, one for the login page and the other for the header image that you see on the top left corner of the pages once you login. The login page image should be of the dimensions 252 px x 61 px (W x H), while the header image needs to be 166 px x 46 px.- Click Admin -> Self Service Portal settings.
- Click Import image ... button.
- Click Browse button.
- In the file chooser window, select the file that you wish to import and click Open.
- Click Import. The image that you just imported will be replaced instead of the login page image. Follow the same process for header image also.
- Click Save, to save the changes made in the settings.
How can I change the port number on which ServiceDesk Plus runs?
For changing the Web Server port, you need to run the file "changeWebServerPort.bat" from C:\ManageEngine\ServiceDesk\bin folder as in
# changeWebServerPort.bat [newportnumber] [Protocol http or https][ Screenshot ]I want to add attachments with size more than 10 MB. Is it possible to increase the attachment size?
You can increase the attachment size under Admin -->Self Service portal settings -->Maximum attachment size(MB)?
Step1: First connect to your database.
If your database is MYSQL, then access the below link to know how to connect to your MYSQL database,
https://www.manageengine.com/products/service-desk/faq-general-modules.html#database2
If your database is MSSQL, then execute the query from the SQL query editor under the ServiceDesk database.
Step 2: Execute the query
update globalconfig set paramvalue=15 where parameter='AttachmentSize';
Step 3: Restart the Manage Engine Servicedeskplus service.
How to skip the forced backup
We strongly recommend that you do NOT skip the forced backup process. We will not be able to recover any data loss because you skipped forced backup.
If you have other backup methods, such as VM snapshot or mssql.bak, you can skip taking a backup.
Follow these steps to skip the forced backup process.
| Operating System | Versions above 14840 | 14840 | 14600 and above | 14500 and above | 14300 and above | 13000 and above | 12000 and above | 11300 to 11309 | 11200 and above | 11100 and above | 10000 to 11010 | 9400 to 10000 | 9336 to 9400 | 9.24 to 9.36 | 9.24 and earlier | |
|---|---|---|---|---|---|---|---|---|---|---|---|---|---|---|---|---|
Windows |
*target_build_no = The version you are upgrading to. |
|
|
|
|
|
|
|
|
|
|
|
|
|
| |
Linux |
*target_build_no = The version you are upgrading to. |
|
|
|
|
|
|
|
|
|
|
|
|
| ||
Application Upgrade Error Codes and Solutions
Definition
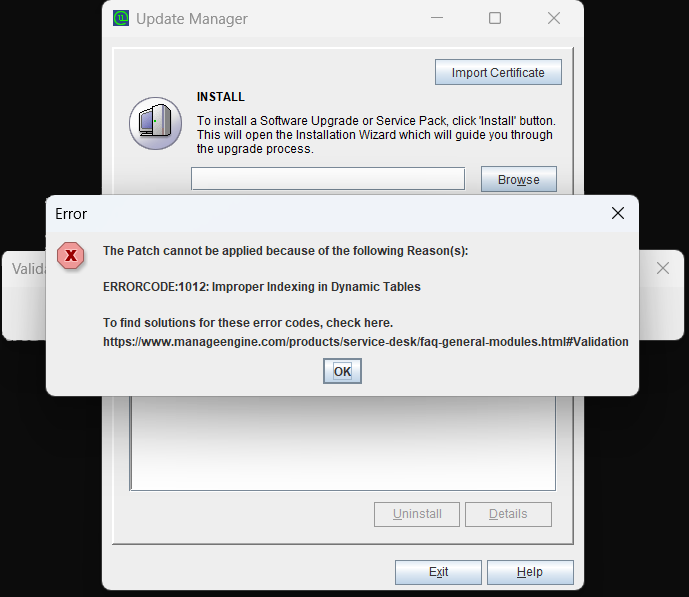
Inconsistency in Constraints
SolutionMigration will not proceed if there are inconsistencies in the ARC_ServiceReq_XXX and ServiceReq_XXX constraints. Contact support (support@servicedeskplus.com) with upgrade log files to resolve the inconsistency.
Definition
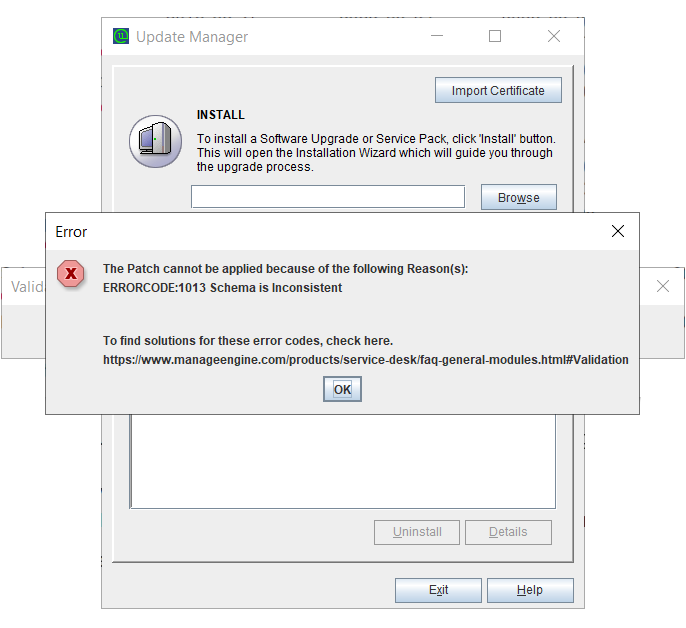
Schema inconsistencies in Database
SolutionMigration will not proceeded if there is any schema inconsistencies in the database. Contact support (support@servicedeskplus.com) with upgrade log files to resolve the inconsistency.
Definition
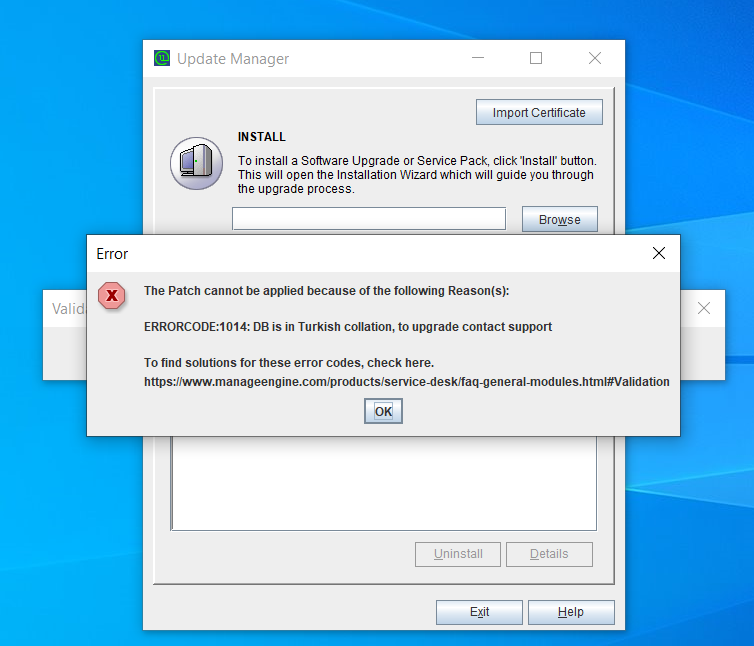
Unsupported Collation in Database
SolutionTurkish collation is not supported from AssetExplorer-7300/ServiceDeskPlus-14600 version to AssetExplorer-7540/ServiceDeskPlus-14840 version. For upgrade, please write to support@servicedeskplus.com.
Definition
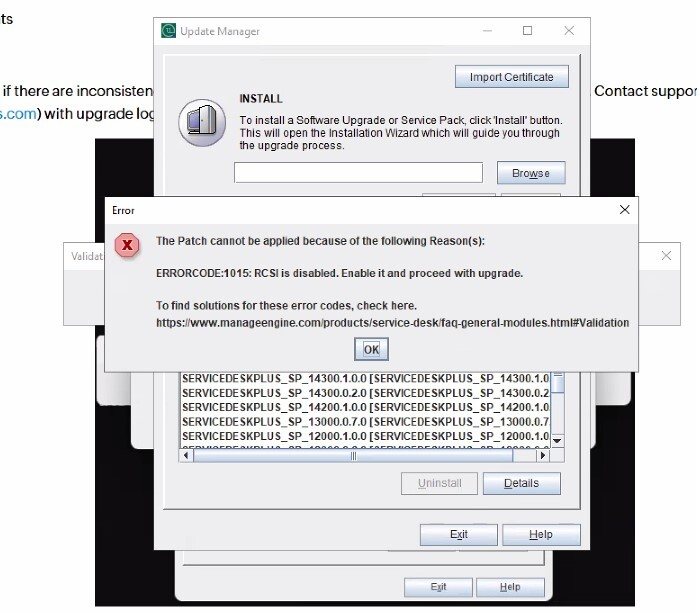
RCSI is disabled in MSSQL
SolutionEnable Read Committed Snapshot Isolation (RCSI) to proceed with the upgrade. Click here for steps to upgrade.
ERRORCODE:1016
Definition
Few jar files missing in the application.
Solution
Missing files have to be placed in the application. Contact support (support@servicedeskplus.com) with upgrade log files.

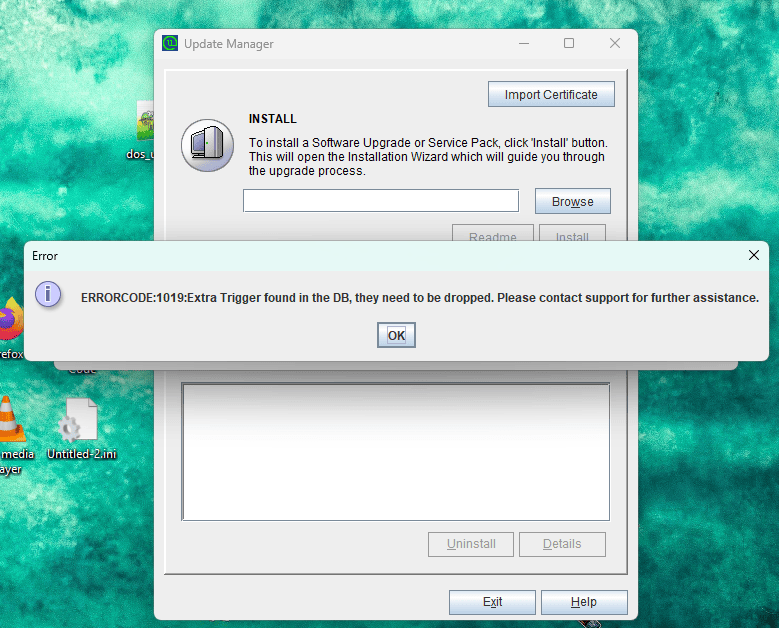
ERRORCODE:1019
Definition
Extra Triggers found in the application DB.
Solution
Extra trigger has to be dropped. Contact support (support@servicedeskplus.com) with upgrade log files to resolve the inconsistency.
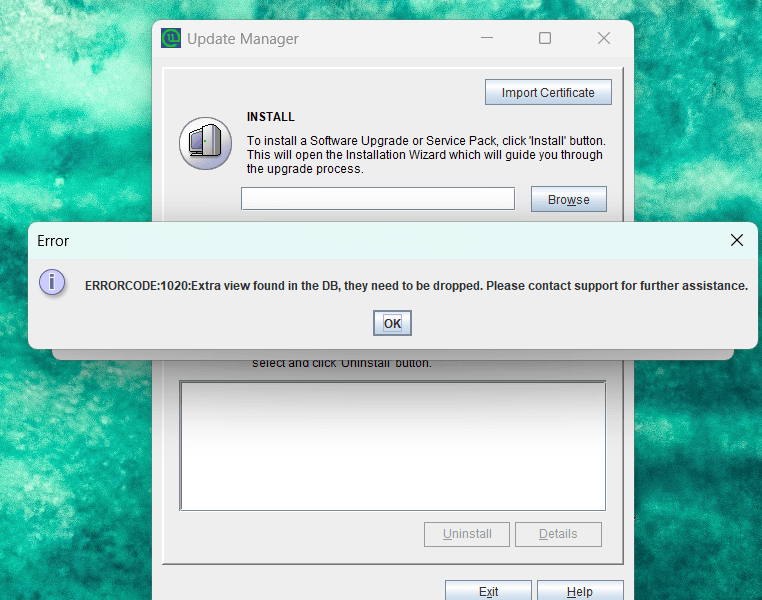
ERRORCODE:1020
Definition
Extra view found in the application DB.
Solution
Extra view has to be dropped. Contact support (support@servicedeskplus.com) with upgrade log files to resolve the inconsistency.
ERRORCODE:1021
Definition
Extra Index found in the application DB.
Solution
Extra index has to be dropped. Contact support (support@servicedeskplus.com) with upgrade log files to resolve the inconsistency.

ERRORCODE:1022
Definition
Statistics enabled in database.
Solution
Statistics need to be dropped. Contact support (support@servicedeskplus.com) with upgrade log files.
ERRORCODE:1023
Definition
Instance name is present in jdbc url.
Solution
Open ChangeDBServer, remove the instance name from the hostname, and save the changes to proceed with the upgrade.
ERRORCODE:1024

Definition
Upgrade command executed from the wrong path.
Solution
Check whether the upgrade command was executed from a path with incorrect letter casing.
Ensure the command is run from the correct installation directory with the exact case (C: instead of c:).
ERRORCODE:1001
DefinitionMicrosoft SQL Server 2005 is not supported.
SolutionMicrosoft SQL Server 2005 is not supported anymore. Hence, if you have Microsoft SQL Server 2005, your upgrade patch will fail. We recommend you update to a supported version.To upgrade to the latest MSSQL, click here
https://www.manageengine.com/products/service-desk/on-premises/faq/upgrade-installation-backup.html#SqlVersionERRORCODE:1002
DefinitionActive AMS missing.
SolutionIf you don't have an active AMS, the upgrade will not proceeded. Please contact sales@manageengine.com to get the new one by specifying your existing license details.
ERRORCODE:1003
DefinitionAMS file is in PDF.
SolutionIf you have the AMS file as a PDF, the upgrade will not proceeded. Please contact sales@manageengine.com to get the AMS in a XML file. And then apply the license file and then proceed with the upgrade.
ERRORCODE:1004
DefinitionAdditional disk space required for the upgrade.
SolutionIf there is a disk space crunch in your system, the upgrade will not proceeded. Make sure you create the necessary disk space in your system and proceed with the upgrade. Roughly 1.5 times the size of ServiceDesk\pgsql folder is required.
ERRORCODE:1005
DefinitionTable views are present in database
SolutionUpgrade cannot be performed if the directly created table views are present in your database. You may have to remove these table views to perform the upgrade. Refer to this link for more details.
https://www.manageengine.com/products/service-desk/faq-general-modules.html#DropTableviewERRORCODE:1006,1007,1008
DefinitionData inconsistency found in application tables.
SolutionIf there is any Data inconsistency in the application tables, then the migration will not be proceeded. Any inconsistency should be corrected before proceeding with the upgrade. Please contact support with log if there is any inconsistency during migration.
ERRORCODE:1009
DefinitionThe upgrade process is unable to access the file/s that are currently being used by another process.
SolutionThe file used by other processes will be listed in the logs (filename: updatemgrlog0.txt). Stop all the listed processes or restart the machine. This must successfully upgrade the application. If you face any difficulties or have any questions, contact our support engineers.
If the problem persists, contact support with the error code.
Follow these steps to upgrade the application
- The following screenshot displays the details of the PID that is captured in the logs:
- Open TaskManager>>Details>> Sort PID>>Identify the PID mentioned listed in the popup.
- Right-click the specified process and from the listed options, identify the process details and stop them.


ERRORCODE:1010
Definition
ErrorLog entries exceed the permitted level.
SolutionIf the number of entries in the ErrorLog table is too high for the machine's memory capacity, the upgrade fails. Kindly truncate the ErrorLog table and proceed with the upgrade.
To clean up all the SystemLog/ErrorLog entries, follow the steps given below:
- Shut down the application.
- Start the database by invoking the command StartDB.bat under
C:\Manageengine\ServiceDesk\bin - Connect to the database and execute the queries given below:
- For MSSQL database,
- For PGSQL database,
alter table UserMergeDetails drop constraint UserMergeDetails_FK1;
alter table UserOpNotification drop constraint UserOpNotification_FK1;
alter table ErrorLogOwner drop constraint ErrorLogOwner_FK1;
alter table ErrorLogAttachments drop constraint ErrorLogAttachments_FK1;
delete from UserMergeDetails where errorlogid in (select errorlogid from ErrorLog);
delete from UserOpNotification where errorlogid in (select errorlogid from ErrorLog);
delete from ErrorLogOwner where errorlogid in (select errorlogid from ErrorLog);
delete from ErrorLogAttachments where errorlogid in (select errorlogid from ErrorLog);
truncate table errorlog;
ALTER TABLE UserMergeDetails ADD CONSTRAINT UserMergeDetails_FK1 FOREIGN KEY (ERRORLOGID) REFERENCES ErrorLog (ERRORLOGID);
ALTER TABLE UserOpNotification ADD CONSTRAINT UserOpNotification_FK1 FOREIGN KEY (ERRORLOGID) REFERENCES ErrorLog (ERRORLOGID);
ALTER TABLE ErrorLogOwner ADD CONSTRAINT ErrorLogOwner_FK1 FOREIGN KEY (ERRORLOGID) REFERENCES ErrorLog (ERRORLOGID);
ALTER TABLE ErrorLogAttachments ADD CONSTRAINT ErrorLogAttachments_FK1 FOREIGN KEY (ERRORLOGID) REFERENCES ErrorLog (ERRORLOGID);
update seqgenstate set currentbatchend=1 where seqname='ErrorLog.ERRORLOGID';
truncate table errorlog cascade;
update seqgenstate set currentbatchend=1 where seqname='ErrorLog.ERRORLOGID';
Note:
- All the given queries can be executed at once.
- Make sure the application is down while performing the steps.
ERRORCODE:1011
Definition
Upgrade interrupted because the mandatory scheduled tasks are not completed.
Scheduled Tasks
- InlineImageMigrationSchedule
- RequestResolutionMigrationSchedule
- AntisamyNotificationSchedule
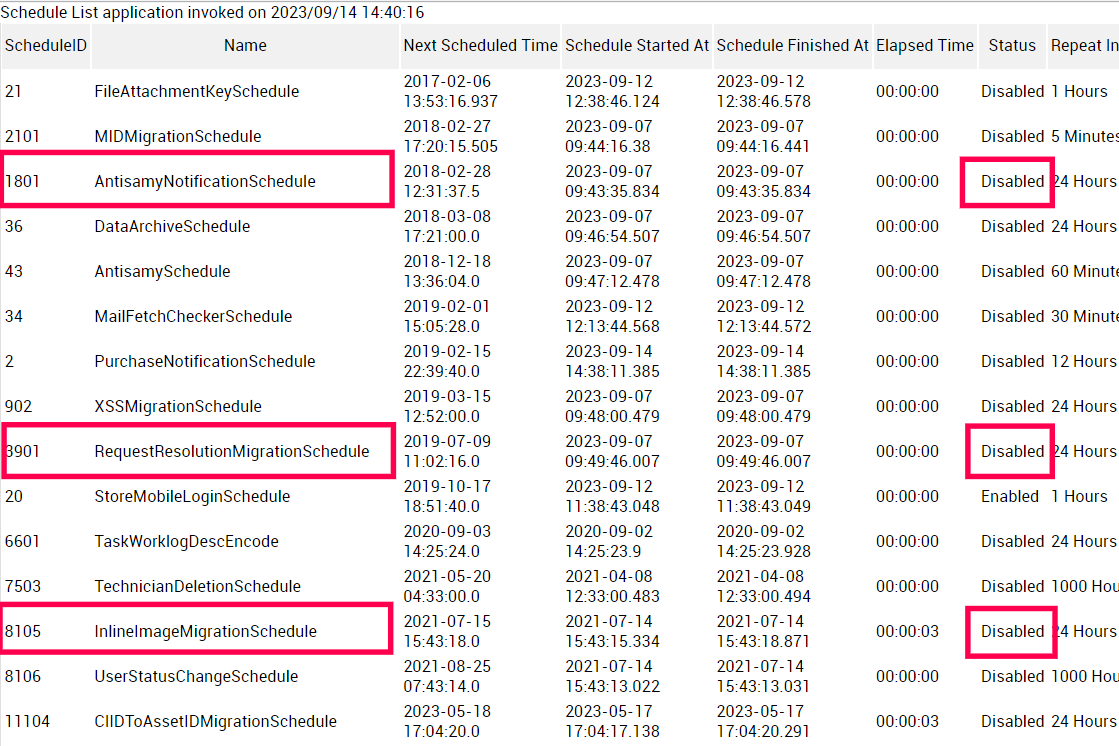
If any of these are Enabled under Community >> Scheduled activities, please contact support with following details.
- Connect to the database and execute the query given below for report
SELECT * from GlobalConfig WHERE CATEGORY IN ('InlineImageMigration','RequestResolutionMigration','AntisamyNotificationMigration') - Screenshot of the window Community >> Scheduled activities.
ERRORCODE:4001
Definition
Data inconsistency in database
Solution
Migration will not proceed due to data inconsistency in the database. Contact support (support@servicedeskplus.com) to resolve the inconsistency.
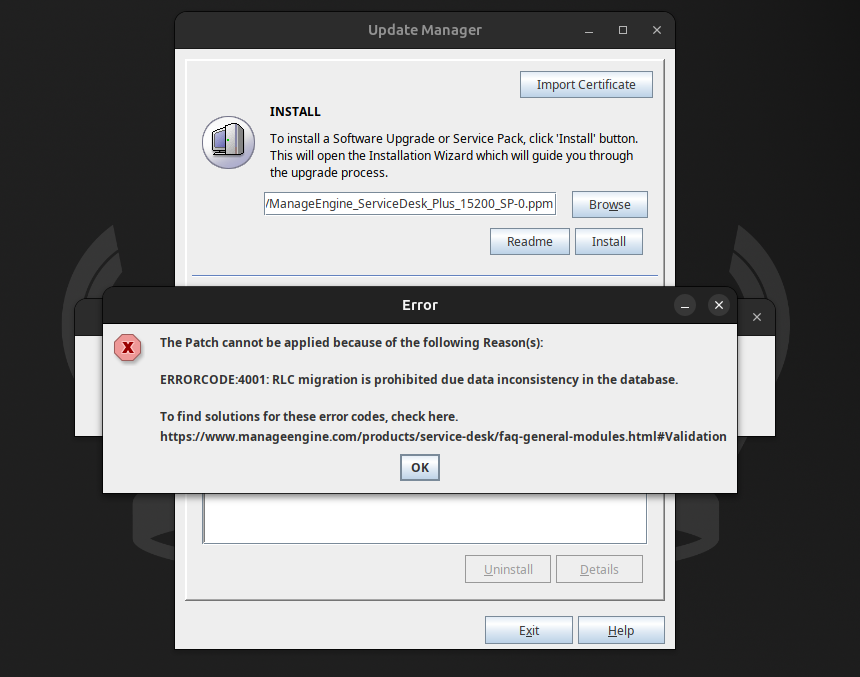
ERRORCODE:4002
Definition
Request Life Cycles in draft
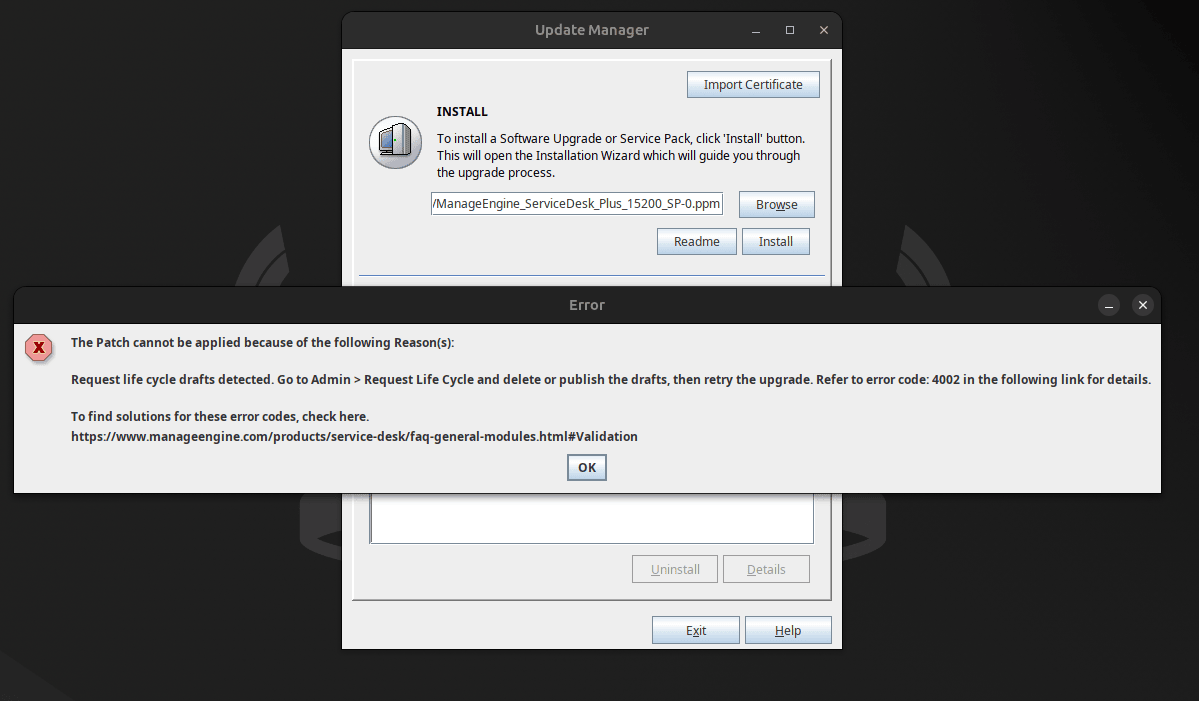
Solution
There are some request life cycles in draft. Delete or publish them before upgrading the application.
To do this,
Step 1 : Go to Admin > Automation > Request Life Cycle and check the Active Life Cycle and Inactive Life Cycle filters
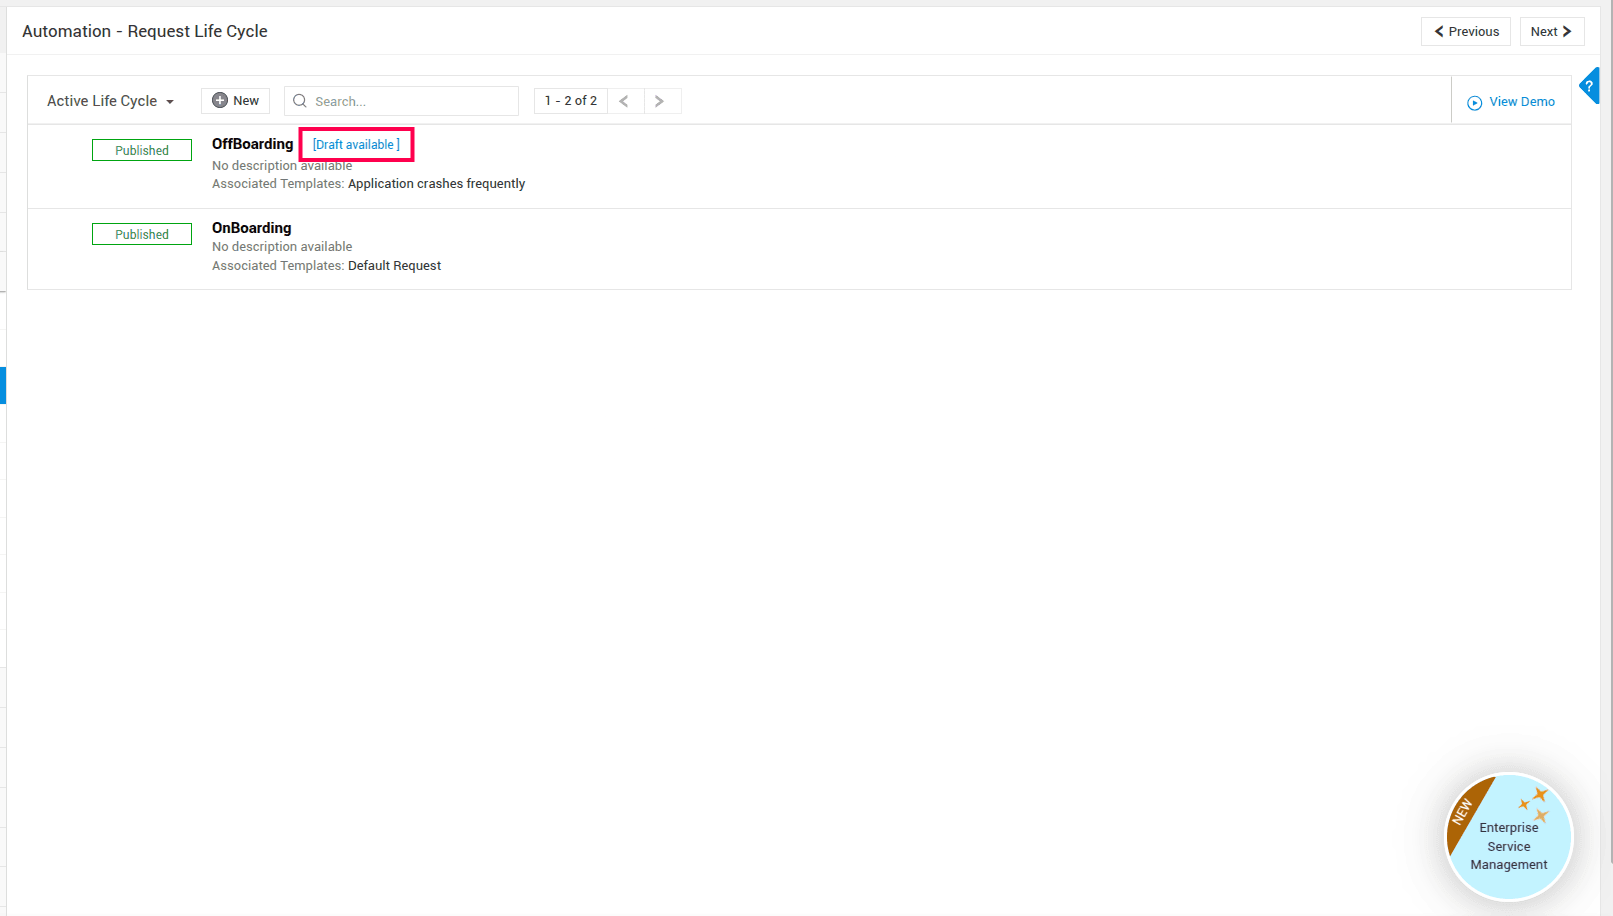
Step 2 : Delete or publish request life cycles that are in draft.
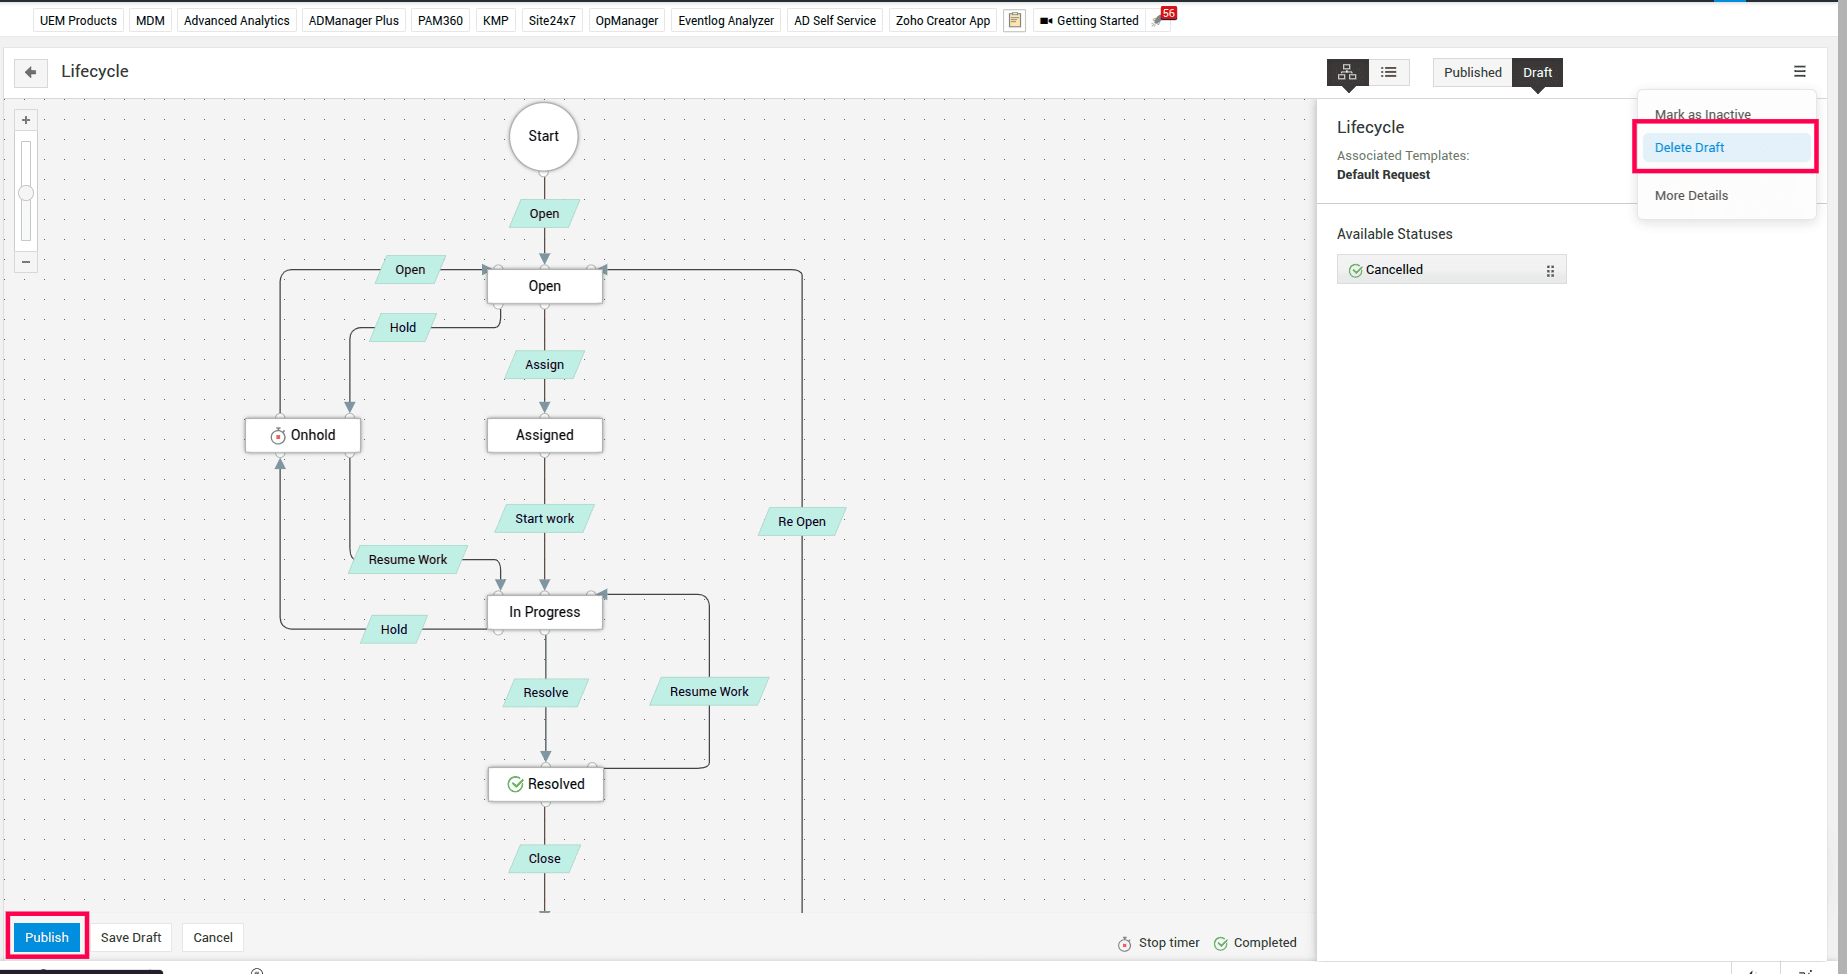
Upgrading to the latest MSSQL version
Some of the MSSQL versions are not supported anymore. Hence we recommend you upgrade to the latest MSSQL versions.
To upgrade,
Take a backup of the application Refer to this (https://help.servicedeskplus.com/general-features/back-up-servicedesk-plus.html).
- Execute the changeDBServer.bat [changeDBServer.sh for Linux] file present under the ServiceDesk Home\bin directory. This opens the Database Setup Wizard. Specify the new supported SQL server details and save it. To check supported MSSQL versions click here https://help.servicedeskplus.com/introduction/service-desk-system-requirements.html$sql
- Start and stop the application once before restoring the backup data. To know more about restoring the backup data click here https://help.servicedeskplus.com/general-features/restore-process.html
Once the restore process is complete you can proceed with the application upgrade.
Others
What is a version of Tomcat used in ServiceDesk Plus?
Tomcat Version currently used in the application is 9.037What is the current version of JRE used in ServiceDesk Plus?
The current JRE version used is openjdk "17.0.19". This is effective from version 15280
Was your question answered here?
Check the other FAQ modules or you can contact our support team at servicedeskplus-support@manageengine.com