

Last updated on: July 22, 2026
Most IT service management platforms, including ServiceDesk Plus, offer multiple features that service desk teams can leverage to deliver quicker resolutions, hold service quality steady, and lighten the operational load on technicians. But most service desks still operate in reactive mode, manually chasing approvals, firefighting SLA breaches, and spending hours on follow-ups that should have been automated long ago. This slowly degrades response times and erodes service quality—not because the platform falls short, but because the right features were never put to work.
This article explores a few key features in the on-premises version of ServiceDesk Plus, including request workflows and timer actions, that can significantly reduce manual effort, improve visibility, and streamline day-to-day service desk operations.
If you are a ServiceDesk Plus customer or evaluating the platform for your organization, here are five high-impact and surprisingly underused ServiceDesk Plus features worth turning on today.
Request Workflows:
Give every ticket a clear path forward

Let's be honest, many service desks still rely on tribal knowledge, technician's experience, and on-the-go coordination rather than on structured automation or clearly defined processes. The network team knows how to handle a VPN issue because they’ve done it a hundred times before and the application team already remembers every single step for software provisioning.
Everything works fine until someone’s out on leave, a new technician takes over the ticket, and makes one wrong assumption. Then, the whole process slows down.
Request Workflows in ServiceDesk Plus help you define exactly how a request should move from start to finish and who needs to approve it, which tasks can happen in parallel, and which teams need to step in at each stage.
What the process looks like in action
When HR or a hiring manager submits an onboarding request, tasks need to reach the IT assets team and the facilities team at the same time. Each team works out of their own portal, and every handoff has to happen in the right order.
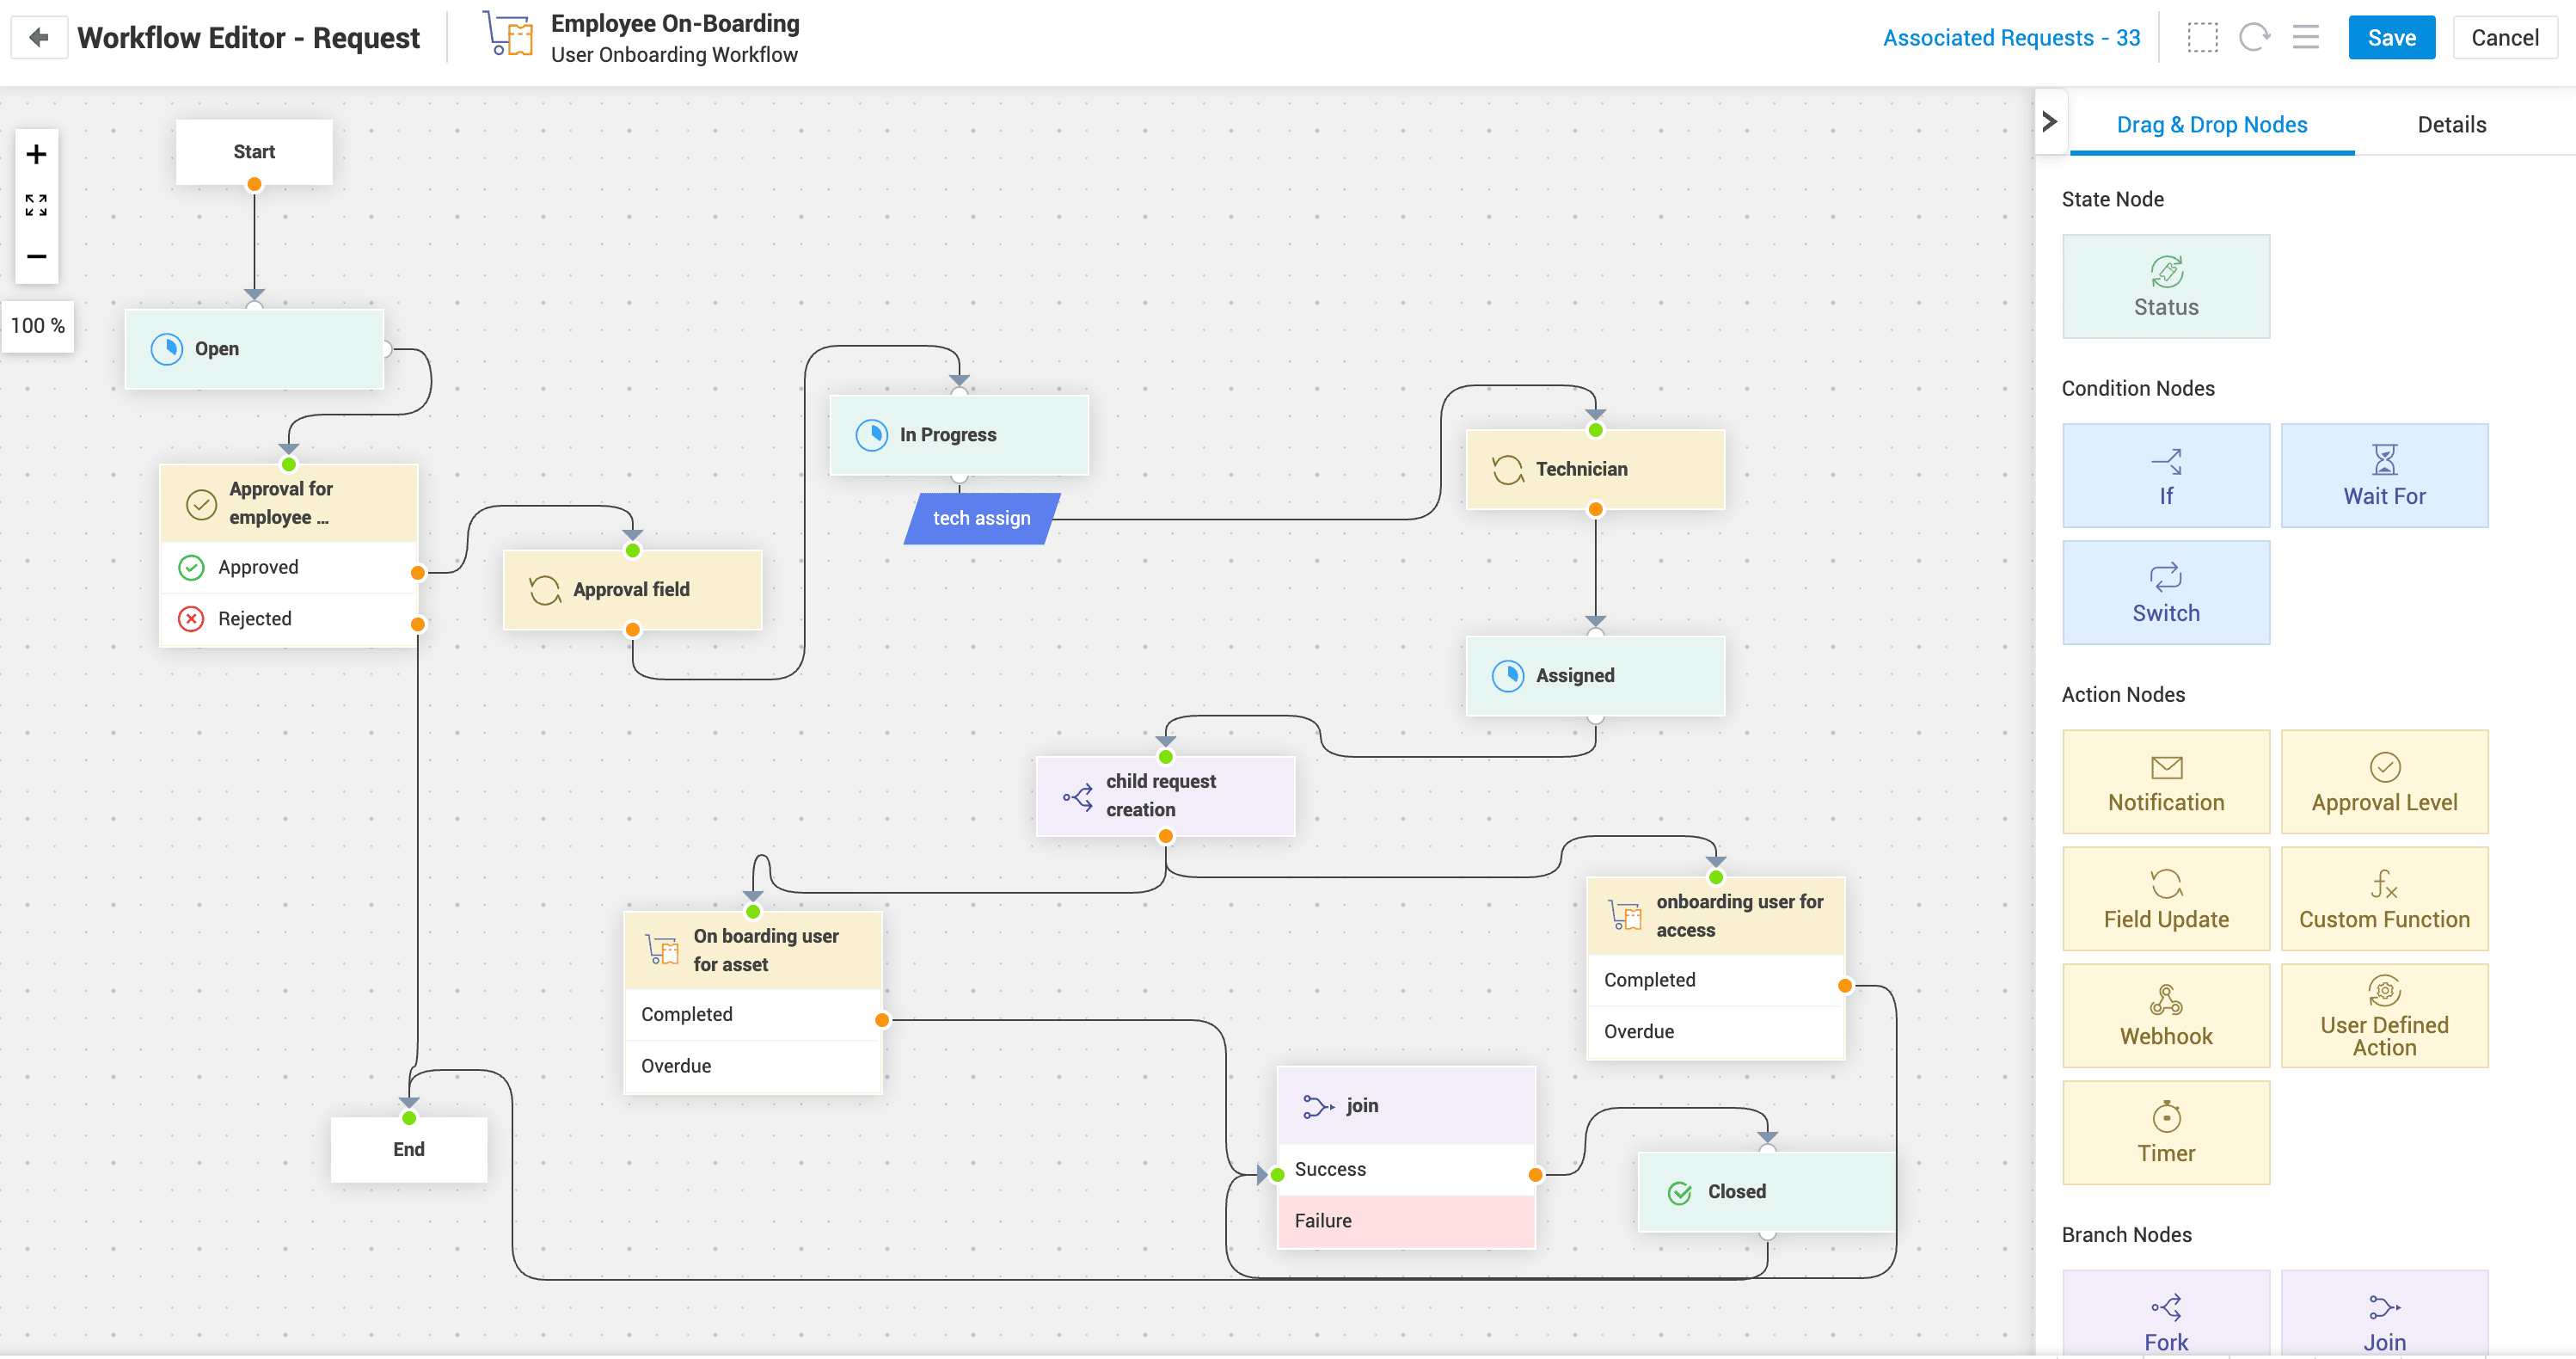
ServiceDesk Plus now handles this process natively through User Defined Actions in Request Workflows. When HR submits a single onboarding request from the HR portal, the onboarding workflow gets triggered automatically, and the Fork node uses a User Defined Action to spin up child tickets across the respective teams simultaneously.
Try it out: Build a new employee onboarding workflow end to end
Let's say HR submits an onboarding request. Here's how to use ServiceDesk Plus to ensure IT provisioning, access setup, and space allocation all happen in the right order.
- Go to Admin > Automation > Workflow. Click New Workflow and name it New Employee Onboarding.
- Add a State node with an open status, then drag in an Approval level and assign it to the Reporting Manager.
- Drag a Fork node from the Branch Nodes section to add multiple onboarding activities (i.e., Allocate resources) to run in parallel. In each branch, add a User Defined Action node set to Create Child Request, one for the IT Assets portal, one for Facilities. Both tickets will be created simultaneously.
- In the first branch, add an If Condition node for laptop and asset provisioning and assign it to the IT Assets Team.
- In the second branch, add another Condition Node for ID card issuance and space allocation and assign it to the Facilities Team. Connect both branches to a Join node to continue only after all tasks are completed.
- Finally, add a Notification Action node to send the welcome email and credentials, then connect it to the final state, Closed.
- To trigger this workflow automatically, go to Admin > Service Catalog > Templates and open the relevant template (e.g., New Employee Onboarding) In the Workflow section, and select the workflow you created.
CMDB Relationship Map: See what's connected before you touch anything
Most change management failures follow a familiar pattern. A server gets updated, an application suddenly goes down, and teams spend hours trying to identify the connection: a dependency that should have been known before the change was made. Eventually, the team discovers the application depended on that server all along.
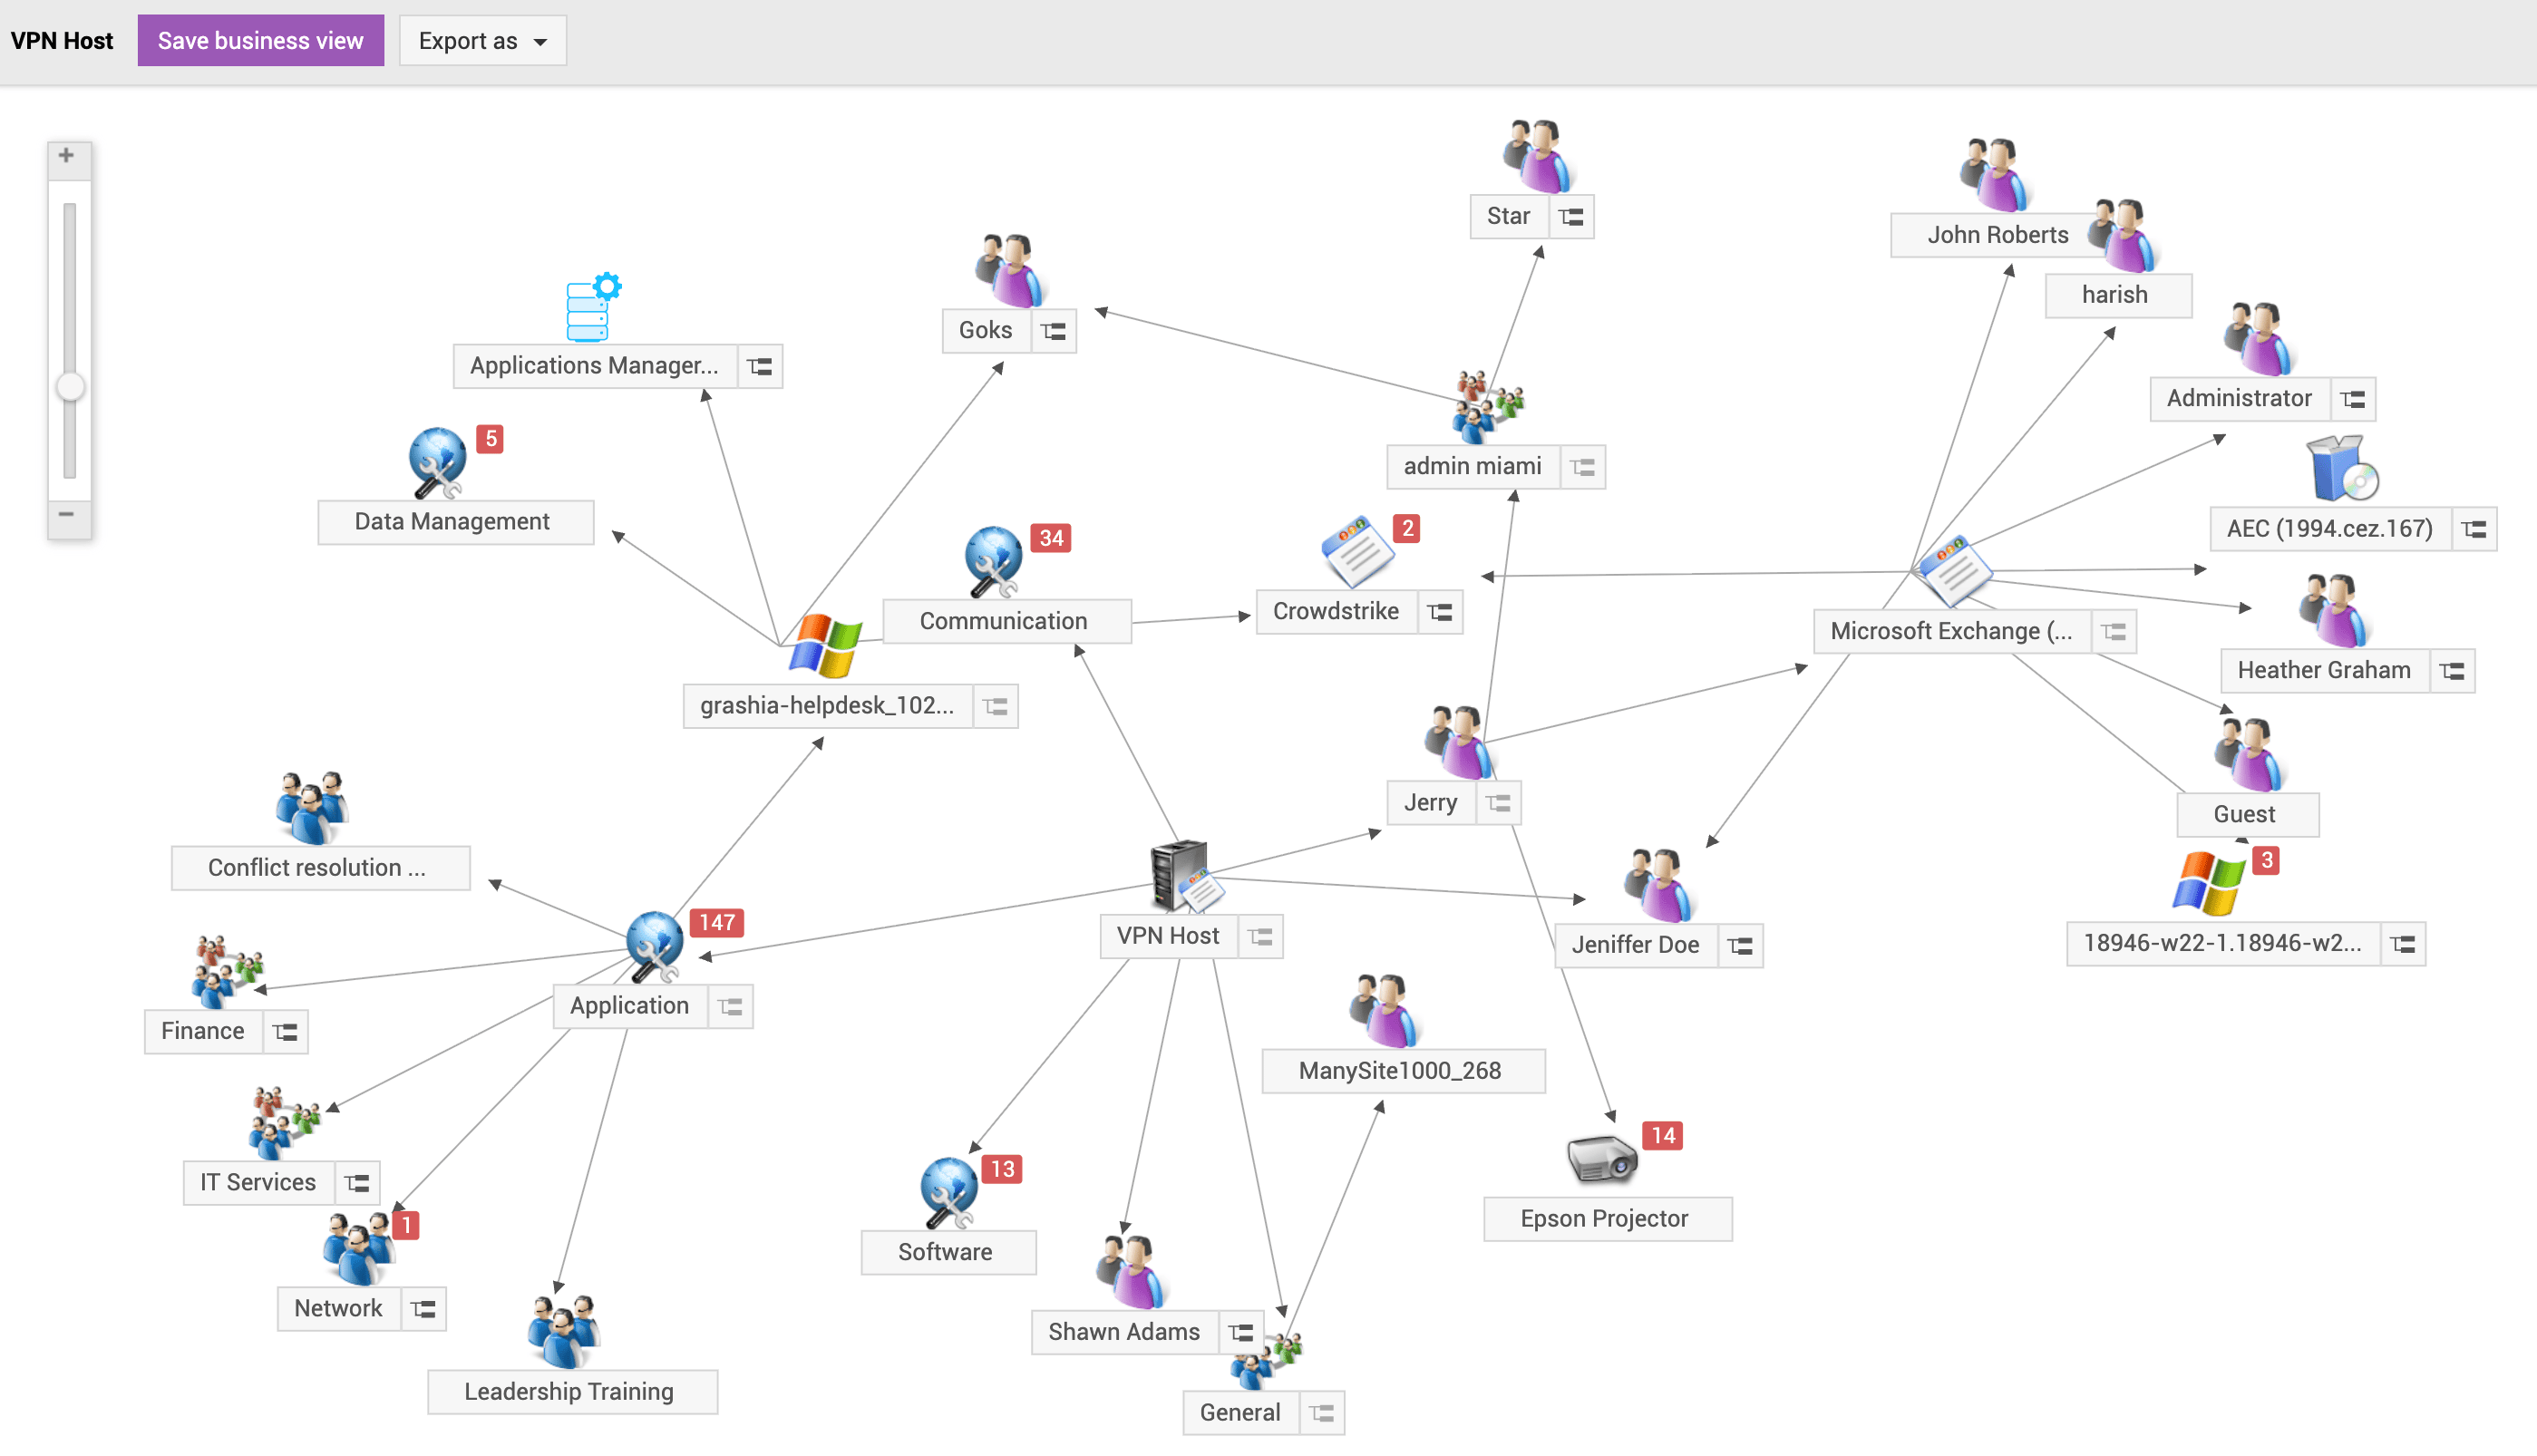
The CMDB Relationship Map in ServiceDesk Plus allows IT teams to visually map dependencies between configuration items such as servers, applications, network devices, and business services. Instead of viewing assets separately, teams can use the live relationship map to understand infrastructure dependencies and identify impacted services before approving a change.
From reactive troubleshooting to proactive impact analysis
If an application goes down, technicians can quickly trace related systems and identify where the issue might have originated. Organizations that actively use CMDB relationship mapping move away from reactive troubleshooting and toward proactive ITSM, shifting the conversation from "what broke?" to "what could break before we make this change?"
Try it out: Map the impact of a server change before your next CAB meeting
Let's say a patch is scheduled for your primary application server. You need to know every downstream CI that could be affected before the change advisory board (CAB) convenes. Here's how to do it with ServiceDesk Plus:
- Go to CMDB > CI List. Search for and open the target server CI.
- Click Relationship Map from the CI detail view. Expand the graph to two to three relationship levels.
- Identify all dependent applications, servers, and downstream CIs. Note any with active open tickets or recent incidents.
- If a CI is already linked to the change request, click CI/Assets within the change ticket to access its details and relationship map directly without leaving the change request.
Request Timer Actions: Automate what happens when time passes
Every service desk runs on approvals and follow-ups with the assumption that someone will respond in time. Often, that doesn't happen. Approvers might miss notifications, users forget to respond, and tickets sit idle in queues without moving forward. What service desks really need is automation that sends reminders before approval deadlines are missed and closes tickets that have been waiting too long without a response.
Request Timer Actions in ServiceDesk Plus let you define time-based rules that trigger automatically—no technician involvement, no manual monitoring required.
Pending approval that nobody followed up on
A new joiner raises a software access request. It moves to pending approval and stalls. The reporting manager is travelling and missed the notification. Nobody follows up. The new joiner waits. The ticket ages.
With Timer Actions configured:
- After 24 hours with no approval, the manager receives an automatic reminder.
- After another 12 hours with still no response, the request escalates to the department head.
The moment a decision is made, the ticket moves forward with zero manual intervention.
Try it out: Automate follow-up notifications for delayed approvals
Say your onboarding request has been waiting for manager approval for 24 hours. Instead of manually following up, here is how to handle it automatically in ServiceDesk Plus.
- Go to Admin > Automation > Timer Actions > New Timer Action. Enter a name and description, then select the Employee Onboarding request template under Action applies for.
- For Condition, set the following criteria:
- Request Template is Employee Onboarding.
- Status is Waiting for Approval.
- For Stage 1, set the initial delay to 24 hours. Click After Rules > Add New Rule, configure a notification action to send an email to the reporting manager with the following message: "Approval is pending for employee onboarding request. Kindly approve." Click Save and Associate.
- Click New Stage, set the wait time to 36 hours. Click During Rules > Add New Rule, configure a field update to assign the request to the department head and set the department. Click Save and Associate.
- Click After Rules > Add New Rule, configure a notification action to send an email to HR with the following message: "Approval escalation triggered due to inactivity." Click Save and Associate, then click Save.
Stage 1: Reminder to reporting manager
Stage 2: Escalation to department head
Custom Widgets:
Bring every tool into one unified workspace
Most service desk technicians work across a wide range of tasks, handling incidents, monitoring systems, managing endpoints, and coordinating with teams simultaneously. The problem is their tools are never in one place. A technician opens a ticket, then immediately has to switch between multiple tools—endpoint management in one tab, another window for collaboration. Even simple tasks become get slow when navigating tools takes longer than resolving the issue.
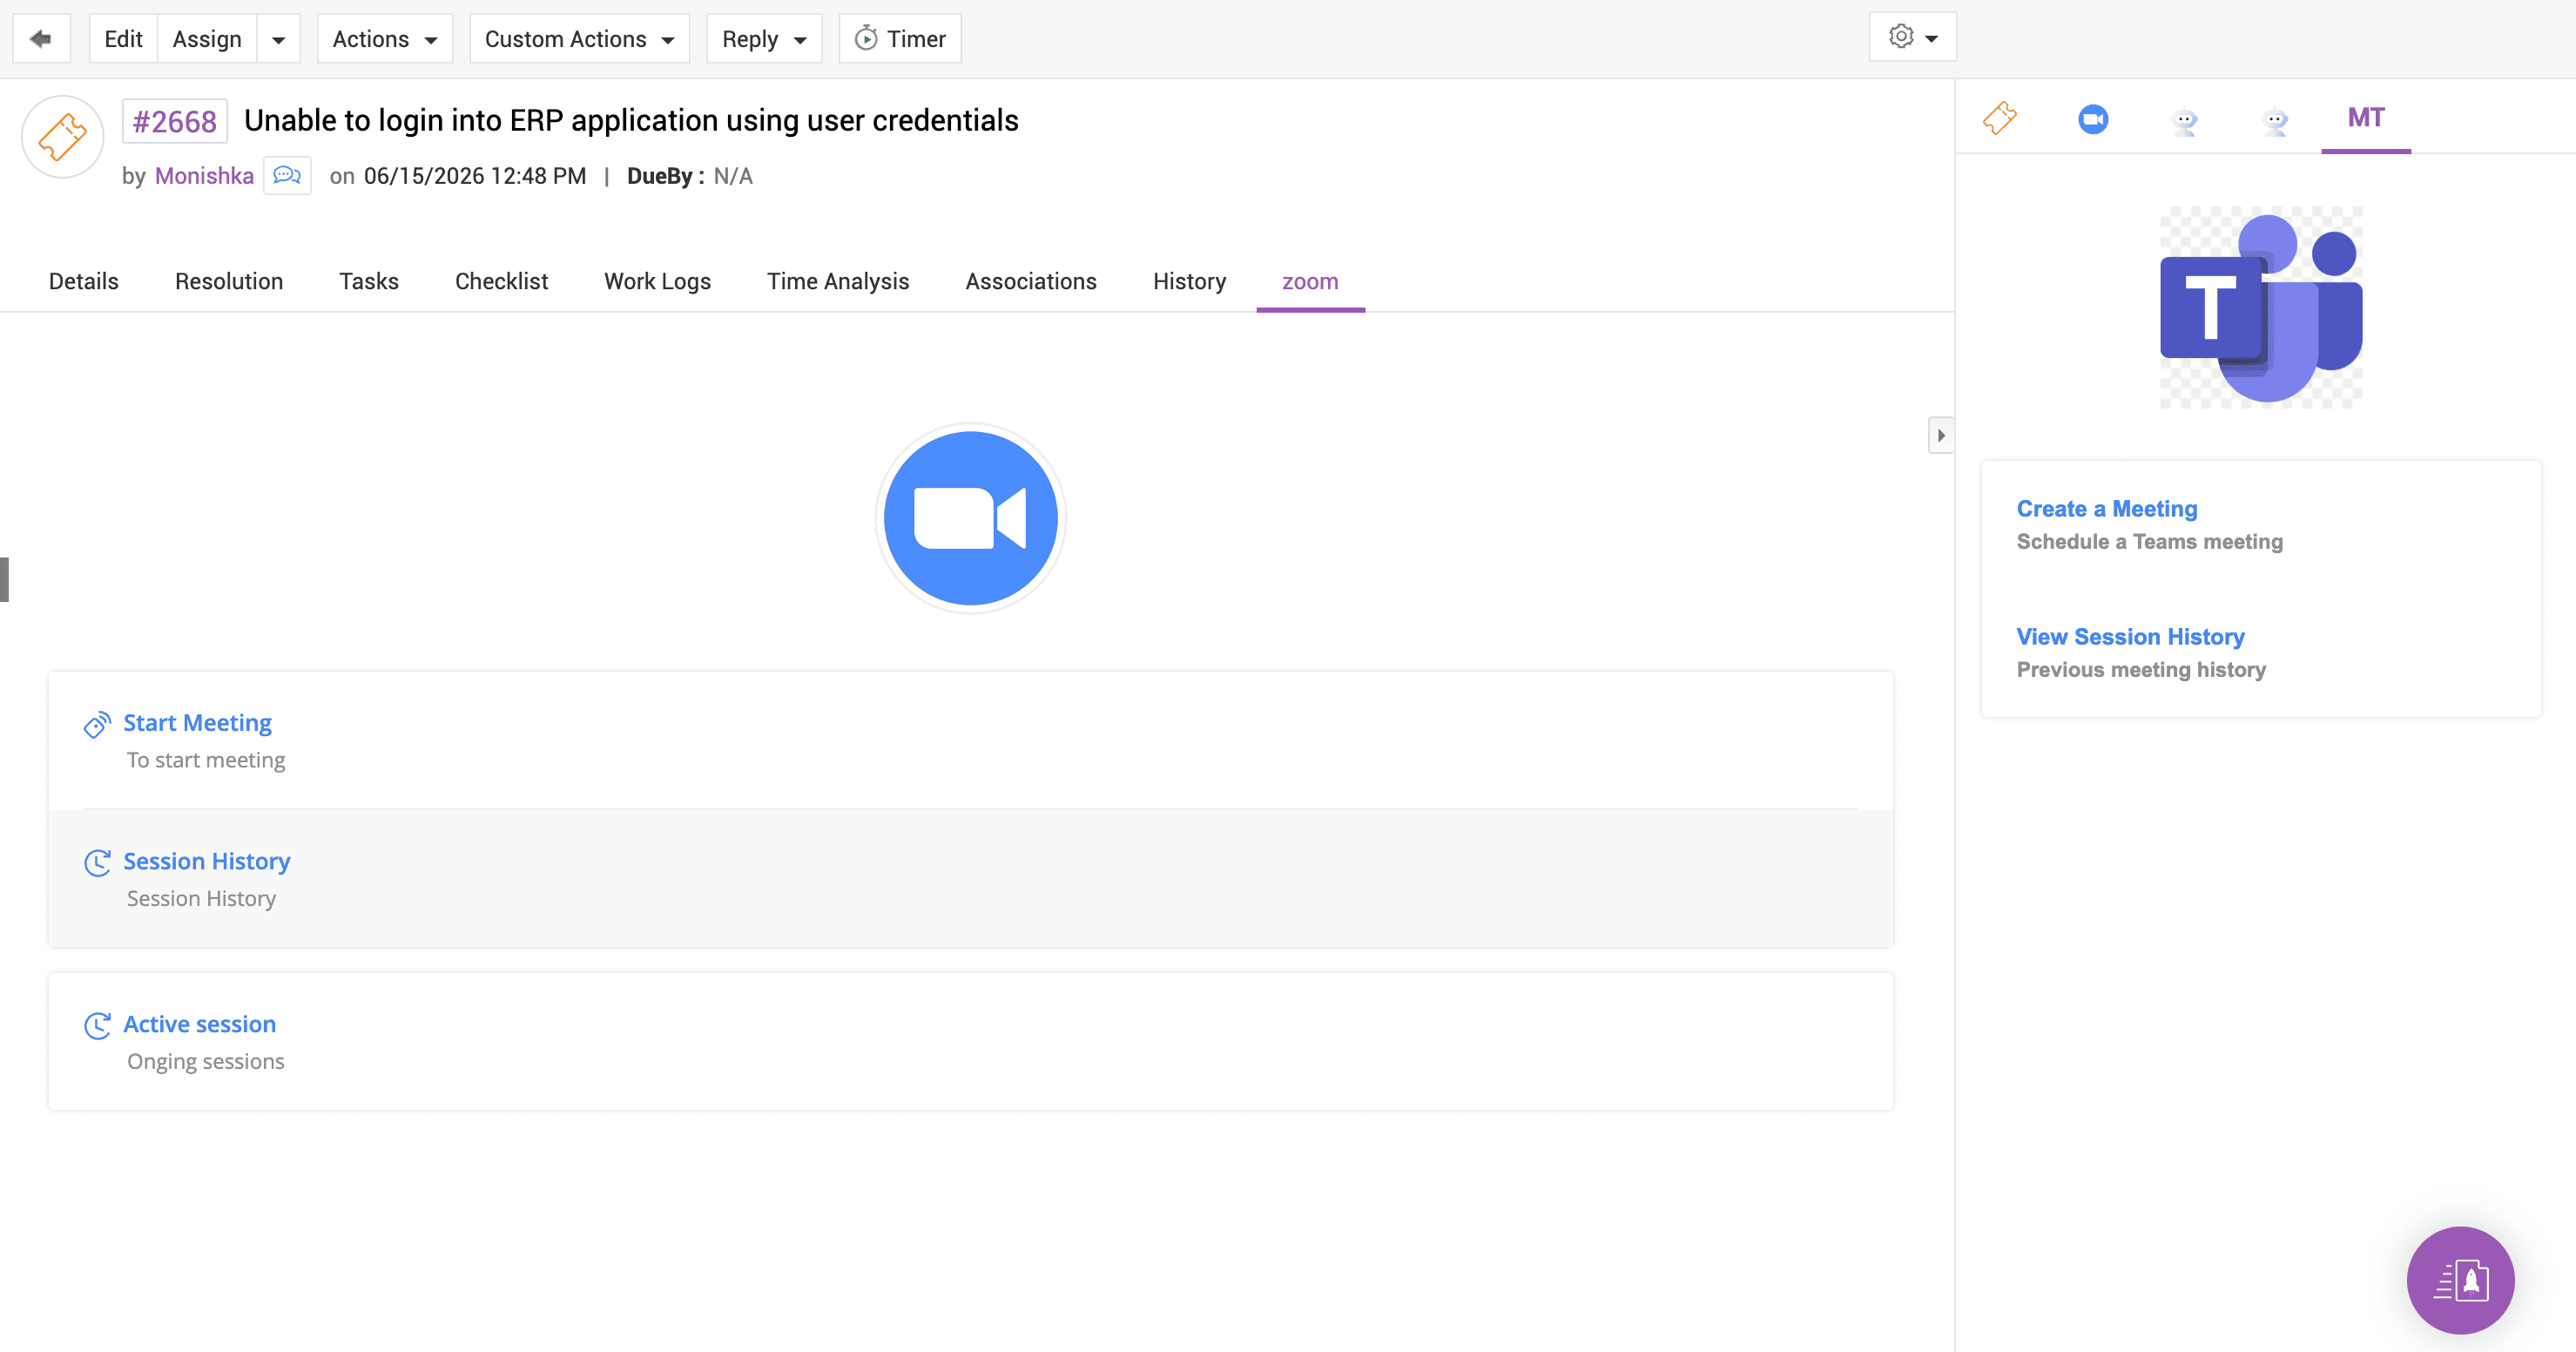
Custom Widgets are configurable panels that can be embedded directly inside the ticket workspace, letting teams bring external tools, dashboards, and actions into ServiceDesk Plus without leaving the interface. In a P1 incident, instead of switching between five different applications, the technician can check monitoring alarms, view endpoint details, start a Zoom call, or launch a remote TeamViewer session all from inside the ticket console. When teams stop switching between tools, responses get faster, troubleshooting gets smoother, and technicians stay focused on fixing the problem instead of managing the process.
Many of these tools are already available as ready-to-install extensions through the ManageEngine Marketplace.
Try it out: Bring external tools directly into ticket workspace
When an incident needs a quick discussion, don’t switch tools. Start the conversation right from the ticket details in ServiceDesk Plus.
- Go to Admin > Developer Space > Custom Widgets > Add Widget.
- Create a widget with a button. For example, use the Start Zoom call button and integrate it using the Zoom meeting link.
- Configure the widget to open a meeting.
- Place the widget inside the Request Details page so technicians can access it instantly during ticket handling.
Zia Agents:
Build smarter processes with autonomous agents

Think about how much time your technicians spend doing things that follow the same pattern every time: Ticket comes in, someone reads it, finds a solution, sends an email, closes it, and adds a resolution. This is exactly the kind of workflow Zia Agents are built to take off your team's hands. Zia Agents are AI-driven automation assistants built on the Model Context Protocol and powered by ChatGPT. The on-premises version of ServiceDesk Plus has three out-of-the-box agents ready to deploy.
The L1 Support Agent analyzes the subject and description of an incoming request and automatically communicates the most relevant solution to the requester via email. No technician involvement is needed for those routine, repetitive queries.
The Incident Review Summarizer analyzes the request and automatically generates a post-incident review, logging it directly as a note in the request. This means tasks that used to take 15 minutes now happen on their own.
The Request Resolution Agent analyzes the request details and adds the resolution directly to the ticket, keeping every record complete without anyone chasing it down manually.
Getting started with Zia Agents within your on-premises instance of ServiceDesk Plus is easy. If you have already integrated ServiceDesk Plus with ChatGPT, you're halfway there.
Try it out: Set up a Zia Agent
A user sends a simple email: "My VPN isn't working and I can't access any internal tools." No category. No priority. No template. Here's how to handle it using Zia Agents in ServiceDesk Plus.
Go to Admin > Zia > Zia Agents and enable agents based on your operational needs:
- L1 Support Agent: Classifies tickets and suggests first-level responses.
- Request Resolution Agent: Enriches ticket details with resolution context.
- IncidentReviewSummariser: Analyses the request and adds a post-incident review as a note to the request
Not sure where to begin?
We suggest starting where the pain is loudest: If tickets are falling through the cracks, start with Request Workflows. If change-related incidents keep catching you off guard, set up the CMDB Relationship Map. If your technicians are spending more time navigating tools than resolving tickets, use Custom Widgets. If your team is buried in repetitive requests that never needed a human in the first place, configure Zia Agents. If follow-ups are missed and tickets age without movement, use Timer Actions.
Every feature in this blog ships with your ServiceDesk Plus instance. None of them require additional licensing or a consultant. They only require a few hours of configuration and the willingness to define how your service desk actually works, not just how it has always worked.
New to ServiceDesk Plus? Get started with a free trial.
Already a customer? Get in touch with our ITSM experts.