JIRA Integration
Organizations that use JIRA for bug tracking can setup this integration to create JIRA issues from SupportCenter Plus (SCP).
This integration supports following operations,
-
Create JIRA issue from a SCP Request.
-
Update SCP fields with the current values of JIRA issue.
Setting Up SupportCenter Plus for JIRA
Step 1: Copy configuration files
-
Copy the 'jiraimpl.jar' file from "[SCP_Home]/actionplugins/jira/lib" directory to "[SCP_Home]/server/default/lib" directory.
-
Copy the Jira.xml file present in the "[SCP_Home]/actionplugins/jira/conf" directory to "[SCP_Home]/server/default/conf" directory.
Step 2: Configure Request Actions Menu and JIRA.xml
-
The action menu that have to invoked to create JIRA ticket from the SCP request can be configured under Admin --> Helpdesk Settings --> Menu Invocation.
-
JIRA specific parameters and field mappings will be configured in the Jira.xml file.
NOTE: The actual implementation class file (JiraActionImplementation.java) is available under the [SCP_Home]\actionplugins\jira\src\com\scp\jira directory. You can modify the file as per your requirement, compile it and update the jiraimpl.jar file (update the jar file in [SCP_Home]\server\default\lib directory). Finally restart the server.
Setting Up Request Actions Menu Configuration
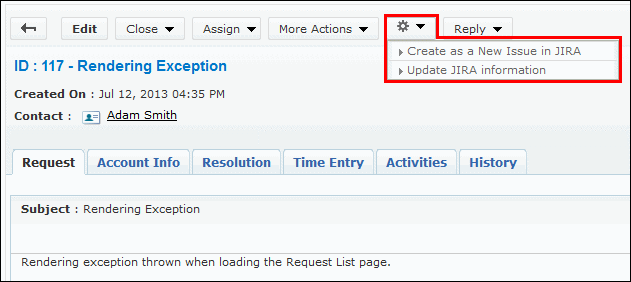
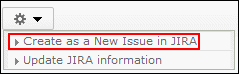
The Actions menu that has to be displayed in the Request Details page can be configured under Admin --> Helpdesk Settings --> Menu Invocation. [Refer "Menu Invocation" for more information.] After configuring the Actions menu under Admin module, open a request in SCP, you will have the Actions menu  as shown below. By clicking on the Actions menu option, you can create an issue in JIRA.
NOTE: While creating Action menu for JIRA Integration (under Menu Invocation page), the 'Menu Name' specified should match the name of the menu (<menu name="JiraIntegration">) specified under JIRA.xml file and the 'Executor Class' should be specified as "com.scp.jira.JiraActionImplementation".
Setting Up Jira.xml Configuration
-
Open the Jira.xml file copied under "[SCP_Home]/server/default/conf" directory.
-
Specify the URL, username and password of the JIRA instance on which you would like to create the issue.
|
<request>
<url>http://[Jira_server]:[Port_Number]/rest/api/2/issue/</url> <!-- Specify the URL of JIRA instance-->
<!-- Example, <url>http://atlassian-adam:8080/rest/api/2/issue/</url> -->
<username>[Jira_Username]</username> <!-- Specify the username of JIRA instance-->
<!-- Example, <username>administrator</username> -->
<password>[Jira_Password]</password><!-- Specify the password of JIRA instance-->
<!-- Example, <password>administrator</password> -->
|
-
Project, IssueType, Summary are mandatory fields when creating a JIRA issue. You can configure the values as shown below,
-
Project Key – A unique identifier of the specific project. (e.g. SCP) This should be mentioned in <value></value>.
-
Issue type – The type of issue. (e.g. Bug) This should be mentioned in <value></value>.
-
Summary – A brief description of the issue. You can map this field with the “Subject” field of SCP. This should be mentioned in <value></value> parameter prefixed with $ symbol.
|
<!-- Mandatory Fields -->
<param>
<name>project</name> <!-- JIRA field -->
<type>projectpicker</type> <!-- Specify the JIRA field type -->
<value>SCP</value> <!-- Specify the JIRA project key -->
</param>
<param>
<name>Issuetype</name><!-- JIRA field-->
<type>select</type> <!-- Specify the JIRA field type -->
<value>Bug</value> <!-- Specify the JIRA issuetype -->
<!-- Dynamic parameters can be specified by a $ prefix. In this case, the value for the variable will be taken from SCP and passed. -->
</param>
<param>
<name>summary</name> <!-- JIRA field-->
<type>textfield</type>
<value>$subject</value> <!-- SCP field-->
</param>
<!-- Mandatory Fields -->
|
- JIRA additional fields can be configured by specifying the custom field ID created for the custom fields by JIRA. The custom fields ID can be found by examining the source code. The custom field ID are prefixed by 'customfield_' followed by their ID. For example, 'customfield_10002'.
TIP: To find the custom field ID in JIRA, open "Create Issue" page, right click on the page, select 'View page source', search for the additional field and find the custom field ID beside it.
|
<!-- For Jira Additional Fields we need to provide which type Field it is Starts-->
<param>
<name>customfield_10002</name> <!-- URL Field --> <!-- specify the system defined custom field id -->
<type>url</type> <!-- JIRA Field type-->
<value>$Company Website</value> <!-- SCP Field prefixed with $ symbol -->
</param>
<!-- For Jira Additional Fields we need to provide which type Field it is Ends-->
</request>
|
|
Note

|
- The field type can be specified in type parameter <type></type>. This determines the type of the field.
- If any of the JIRA fields mapped with SCP field is incorrect or is not available in JIRA then an error message will be shown up in SCP when the action menu is invoked.
-
When update JIRA "SELECT" type values, ensure the value chosen at SCP request is available on the JIRA field value list.
- The JIRA field types supported by default in this integration are ProjectPicker, TextArea, TextField, DatePicker, Select, GroupPicker, Float, URL, UserPicker, MultiSelect, MultiGroupPicker, MultiUserPicker, MultiVersion, RadioButtons and Labels.
- While sending multiple values, separate them with comma.
|
- Custom messages can be set upon success or failure invocation. These messages will be shown up in SupportCenter Plus interface when the action menu is invoked.
|
<success>Ticket created in Jira with Jira id : $id</success>
<failure>Request creation failed in Jira</failure>
|
- Handling response from JIRA: JIRA returns the response in JSON format. Below is the sample response:
{
"id":"35",
"key":"SCP-3",
"self":"http://jira-server/rest/api/2/issue/35"
}
|
-
To update SCP with the JIRA response, create additional fields (For example, JIRA_ISSUE_URL, JIRA_ISSUE_ID and JIRA_ISSUE_KEY) in SCP under Admin --> Helpdesk Settings --> Request --> Additional Fields (See, Request - Additional Fields.) and include it in the Request template. And map the fields with the JSON object returned from JIRA as shown in the below table.
-
The response returned from JIRA can also to added as a note in SCP.
NOTE: If you are creating the additional fields in SCP with a different name, then the same name should be reflected in this xml.
|
<response>
<param>
<!-- name indicates the SCP field that should be updated with the response returned from JIRA (JSONObject) -->
<name>JIRA_ISSUE_ID</name> <!-- Specify the additional field created in SCP -->
<!-- value indicates the attribute in the return JSON object received from JIRA -->
<value>$id</value> <!-- Specify the JSON object returned from JIRA prefixed with $ symbol -->
</param>
<param>
<name>JIRA_ISSUE_KEY</name> <!-- Specify the additional field created in SCP -->
<value>$key</value><!-- Specify the JSON object returned from JIRA prefixed with $ symbol -->
</param>
<param>
<name>JIRA_ISSUE_URL</name> <!-- Specify the additional field created in SCP -->
<value>$self</value> <!-- Specify the JSON object returned from JIRA prefixed with $ symbol -->
</param>
<!-- If any note needs to be added at the end of the operation, then it needs to be specified here. $message will take the value from the JSONObject returned by JIRA. Hardcoded messages can also be given. -->
<notes>
<note>Ticket is created in jira with key : $key And with Id: $id</note>
</notes>
</response>
|
- Save Jira.xml file.
NOTE: Server restart is not required after editing and saving the Jira.xml file.
Create JIRA issue from SCP Request
Once the Request Action menu is configured, you will find the Actions menu in the Request Details page. Click the Actions menu to invoke issue creation in JIRA.
A success message appears, stating that the issue is created in JIRA with the issue key and issue ID. The issue key, issue ID and issue url are updated in the JIRA_ISSUE_KEY, JIRA_ISSUE_ID and JIRA_ISSUE_URL additional fields respectively.
Update SCP fields with current JIRA values
To update the existing SCP request with the current values on the JIRA issue, you need to configure JiraUpdateStatus in Jira.xml and you can invoke the Actions menu from SCP to get a response from JIRA.
NOTE: While creating Action menu for Update JIRA information (under Menu Invocation page), the 'Menu Name' specified should match the name of the menu (<menu name="JiraUpdateStatus">) specified under JIRA.xml file and the 'Executor Class' should be specified as "com.scp.jira.JiraActionImplementation".
Step 1: Configure JiraUpdateStatus
-
Open the Jira.xml file copied under "[SCP_Home]/server/default/conf" directory.
|
<menu name="JiraUpdateStatus">
<request>
<!-- Specifies the URL of JIRA instance -->
<url>http://[Jira_server]:[Port_Number]/rest/api/2/issue/$JIRA_ISSUE_ID</url>
<!-- Specifies the Username and password for jira instance-->
<username>[Jira_Username]</username>
<password>[Jira_Password]</password>
<request>
<success>Jira Results Fetched Successfully</success>
<failure>Failed to Fetch Jira Results</failure>
<response>
<param>
<name>JIRA_ISSUE_ID</name> <!-- Specify the SCP field.-->
<value>$id</value><!-- JIRA field-->
</param>
<param>
<name>update_URL</name> <!-- Specify the SCP field.-->
<value>$self</value><!-- JIRA field-->
</param>
<param>
<name>JIRA_ISSUE_TYPE</name> <!-- Specify the SCP field.-->
<value>$fields,$issuetype,$name</value><!-- JIRA field-->
</param>
<param>
<name>JIRA_ISSUE_STATUS</name> <!-- Specify the SCP field.-->
<value>$fields,$status,$name</value><!-- JIRA field-->
</param>
<param>
<name>JIRA_ISSUE_RESOLUTION</name> <!-- Specify the SCP field.-->
<value>$fields,$resolution,$description</value><!-- JIRA field-->
</param>
</response>
</menu>
|
-
Specify the URL, username and password of JIRA instance under the "<menu name="JiraUpdateStatus">" section of the xml.
- Configure the success and failure message that will be shown up in SupportCenter Plus interface when the actions menu (e.g. Update JIRA information) is invoked.
- Specify the SCP field names in the name parameter in which you would like to update the values of the JSON response from JIRA.
- Specify the field names returned from JSON response in the value parameter. The JSON response can be viewed using the URL updated earlier on the 'JIRA_ISSUE_URL' field of any of the SCP request (For example, JIRA_ISSUE_URL : http://atlassian-adam:8080/rest/api/2/issue/15007). Upon invoking the URL on the browser, you will get the JSON response with the request details. These details will be shown up in raw format in the browser, however the response can be copied to any online JSON parsers to see the proper JSON structure.
A sample response would be like below:

For example, if you would like to update the status field of JIRA in SCP, then you need to specify the status field in the correct hierarchy as mentioned in the JSON response (refer above image). The values should be separated with a comma and each value should be prefixed with a $ symbol (<value>$fields,$status,$name</value>).
- Save Jira.xml file.
Step 2 : Update SCP Request
Once the JiraUpdateStatus is configured, click the Actions menu in the Request Details page to update JIRA values in SCP fields.

A success message appears, stating that the JIRA results fetched successfully. The corresponding fields of SCP will be updated with the values of JIRA issue.
NOTE: Currently, the request operations such as adding notes and updating requests are supported in JIRA integration.