


|
|
When you access the Customer Portal, the welcome page of the Portal is displayed. You can use the Login section on the welcome page to login to the Portal and access the application. Based on the options enabled by the administrator under customer portal settings, the following are available in the Customer Portal welcome page:
You can use this page to search for solutions, submit a ticket, view announcements, recent solutions, popular solutions, register new user, and login to the portal.
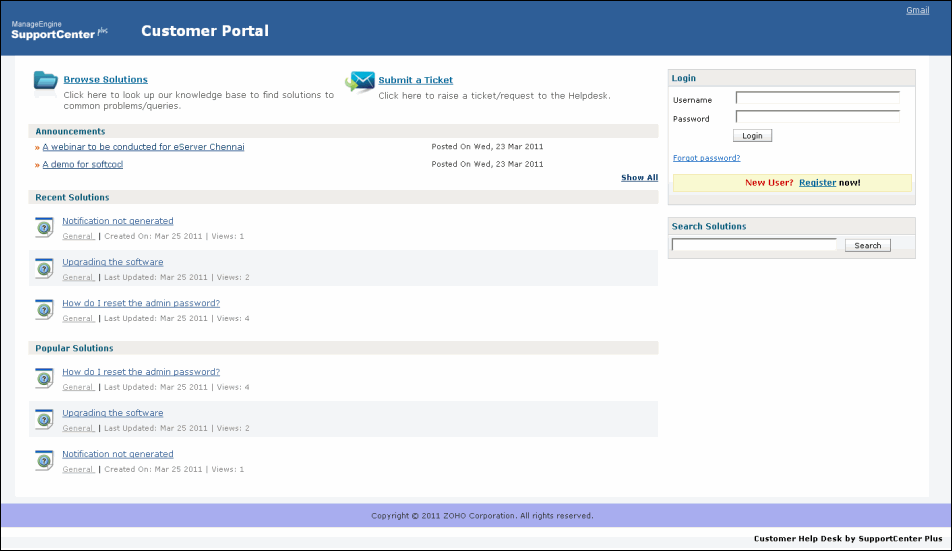
The recorded solutions in SupportCenter Plus serves as knowledge base of solutions. Browse Solutions option enables the contact to browse through the solution topics and find solutions to common queries. All the public and approved solutions under each topic of various Business Units can be searched and viewed here.
To browse through a solution topic:
Click Browse Solutions link. The Browse Solutions page opens listing all the solution topics.

Enter the keyword in the search field provided.
Click Search. All the solutions that match the keyword are displayed.
[Or] To search for solution
in a particular topic, select a topic from Browsing
drop down. The solutions of the selected topic are listed below.
Note: You can also click the name of the topic which is displayed
as hyperlink to view the solutions present under it.
A new ticket can be raised using the Customer Portal welcome page. A ticket can be submitted in a particular Business Unit or for a specific Product. The availability of Business Units or Products depends on the settings in the Customer Portal Settings page.
To submit a ticket:
Click Submit a Ticket link to open the Submit a Ticket page.
To submit a ticket in
a particular business unit, select a Business
Unit from the drop down. This is the mandatory field.
[OR]
To submit a request for a particular product, select a Product
from the drop down. This is the mandatory field.
Note: The Business Unit
or Product drop down is displayed
based on the Portal Options settings
in the Customer Portal Settings page.
Enter your Name and E-mail ID. The E-mail is the mandatory field.
Specify the Subject
of the ticket. This field is mandatory.
Note: If the ticket raised here has a solution already available
in SupportCenter Plus, the solutions for the raised ticket will be suggested
below this field. The solutions will be suggested, only when intelligent
response system is enabled by the administrator.
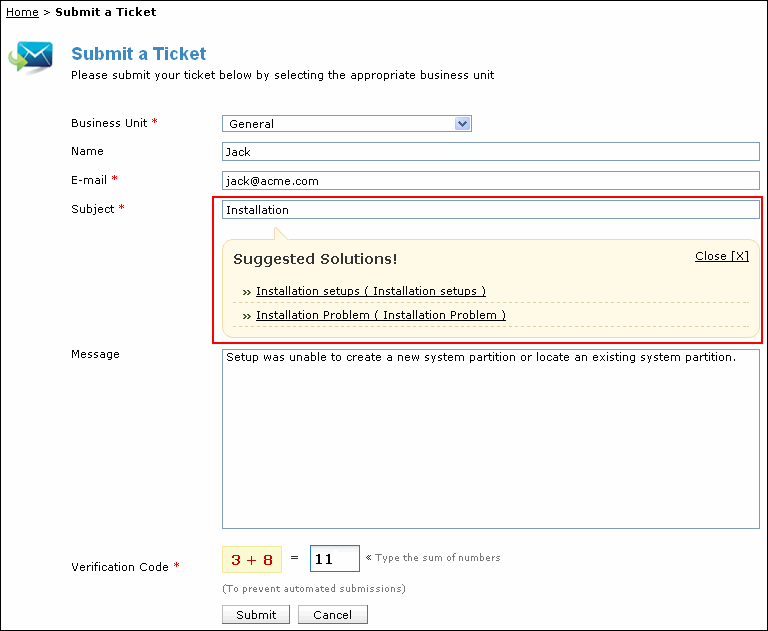
Provide a brief description about the ticket in the Message field.
Enter the Verification Code by adding the given numbers to prevent the automated submission of the ticket.
Click Submit. The ticket is submitted in SupportCenter Plus successfully and the Ticket Details are displayed.
In this section, you can view all the public announcements added in the SupportCenter Plus application. To view the announcement details, click the title of the announcement which is displayed as hyperlink.
The recently added solutions in the SupportCenter Plus application can be viewed in this section. Click the solution subject which is displayed as hyperlink to view the solution details.
The frequently viewed solutions in SupportCenter Plus are listed in this section. Click the solution subject which is displayed as hyperlink to view the solution details.
You can search for solutions based on the keywords, from the Search Solutions section.
To search for solutions:
Enter the keyword in the search field provided.
Click Search. All the solutions that match the keyword are displayed.
You can use the Login section on the Self-Service Portal welcome page to login to the portal. A unique user name and password are assigned to you by the administrator.
To log on to the portal:
Enter the Username and Password.
Click Login. The home page of the contact login is displayed.
If you have forgotten your login password and to retrieve your login password:
Click the Forgot password? hyperlink. The Forgot password page is displayed.
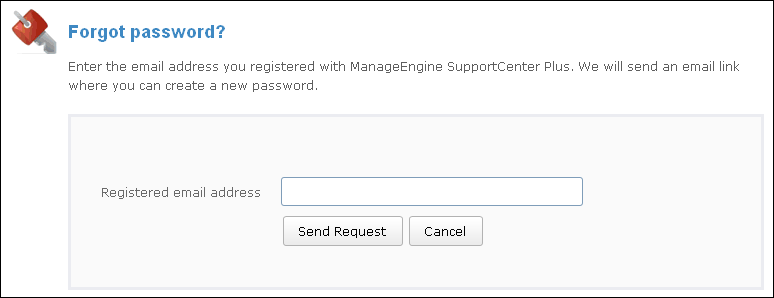
Enter the email address registered in the application in the Registered Email Address field
Click Send Request button. An email link will be sent to the specified address to reset the password.
Click on the link specified in the email. The Create a new password page appears.
Enter the New Password in the field provided.
Retype the password in the Confirm New Password field.
Click Change. A success message appears along with a link to take you back to the login screen.
Click Back to Login and enter your Username and the new Password to log into the Customer Portal.
The new contacts should be registered in SupportCenter Plus. You can register in a particular Business Unit or for a particular Product. The availability of Business Units or Products depends on the settings in the Customer Portal Setting page. If the new contact requires a formal approval from the support rep, on registering, these contacts are listed under Registered Contacts in the Contacts module from where the contacts have to be approved and provided login permissions to the customer portal. The new contact without approval process will be directly added to the Contacts module in SupportCenter Plus upon registering and the login details will be sent to the specified mail ID of the contact.
Note: The new user to follow a approval process in SupportCenter Plus is based on the Login settings under Customer Portal Settings.
To register in SupportCenter Plus:
Click the Register hyperlink.
To register in a particular
business unit, select a Business Unit
from the drop down. This is the mandatory field.
[OR]
To register for a particular product, select a Product
from the drop down. This is the mandatory field.
Note: The availability of Business
Unit or Product drop down
is based on the Portal Options
settings in the Customer Portal Settings page.
Enter your Name, E-mail id and Phone number. The Name and E-mail are mandatory fields.
Enter the Verification Code by adding the given numbers to prevent the automated registration.
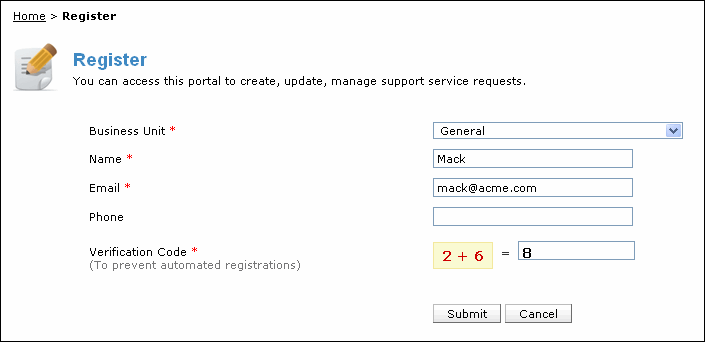
Click Submit. An email notification will be sent to the specified email ID. Click on the link in the mail to activate your account.
|
|