

- Free Edition
- Quick Links
- Active Directory Auditing
- Active Directory auditor
- Active Directory monitoring
- Account lockout analyzer
- Login monitoring software
- Active Directory change notifier
- User logon audit reports
- AD logon logoff tracker
- User logon failure auditing
- Login history tracking tool
- AD change auditor
- Insider threat detection software
- Permissions change auditing
- Entra ID reporting
- Privileged user monitoring
- User behavior analytics tool
- Active Directory security monitoring
- Group Policy auditing tool
- GPO change auditor
- Entra ID auditing
- Audit user account management
- OU change auditor
- Audit group membership changes
- Active Directory auditing and reporting tool
- GPO reporting tool
- Remote desktop monitoring software
- PowerShell logging and auditing
- Azure password protection auditing
- Azure sign-in risk detection
- File Server Auditing
- Windows Server Auditing
- Employee Tracking
- Workstations Auditing
- Compliance Auditing
- Other features
- SIEM Integration
- Windows DNS - Schema Auditing
- Windows security event log monitoring
- SIEM audit solution
- Schedule Active Directory change reports
- Reports from Archived Data
- Aggregated summary reports
- AD new/old attribute changes
- Audit trail
- Audit Active Directory LAPS
- Scheduled Reports & Alerts
- Account lockout examiner
- Industry
- Documents
- Success Stories
- Related Products
- Log360 (On-Premise | Cloud) Comprehensive SIEM and UEBA
- ADManager Plus Active Directory Management & Reporting
- EventLog Analyzer Real-time Log Analysis & Reporting
- ADSelfService Plus Identity security with MFA, SSO, and SSPR
- DataSecurity Plus File server auditing & data discovery
- Exchange Reporter Plus Exchange Server Auditing & Reporting
- M365 Manager Plus Microsoft 365 Management & Reporting Tool
- RecoveryManager Plus Enterprise backup and recovery tool
- SharePoint Manager Plus SharePoint Reporting and Auditing
- AD360 Integrated Identity & Access Management
- AD Free Tools Active Directory FREE Tools
How to manage failover clusters?
Written by Mahidhar Adarsh, IT security team, ManageEngine Updated on July 2026
Configure roles/features on nodes for high availability
- Server manager → Add roles and features.
- In the select installation type page, select Role based installation.
- Select destination server for this role.
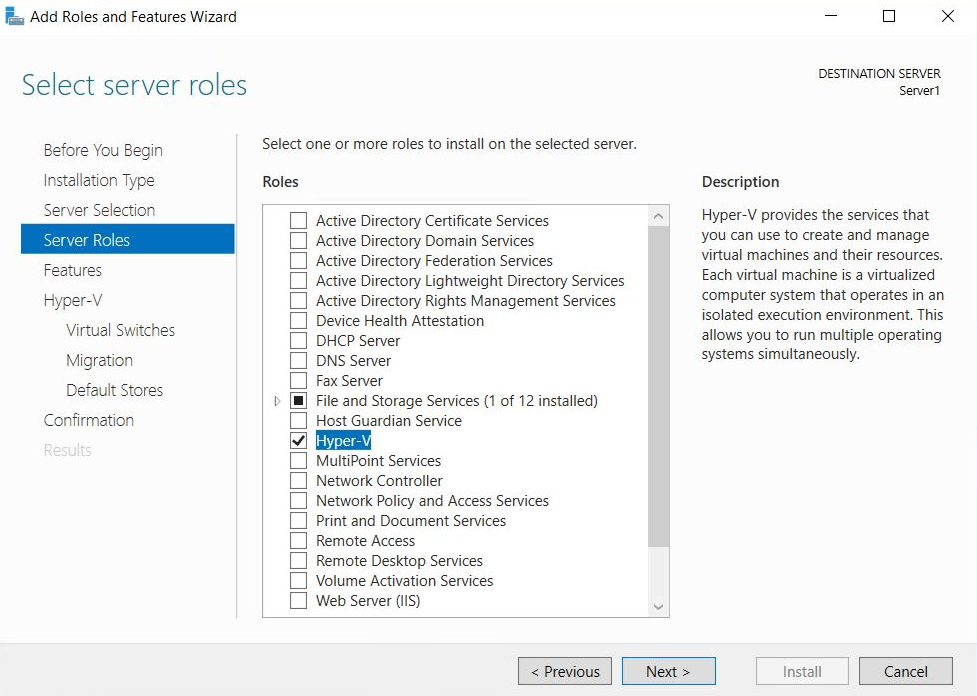
- In the list of roles displayed, select Hyper-v .The 'Add features that are required for Hyper-V window' is displayed. This window shows the dependencies that will be installed. Click Add features.
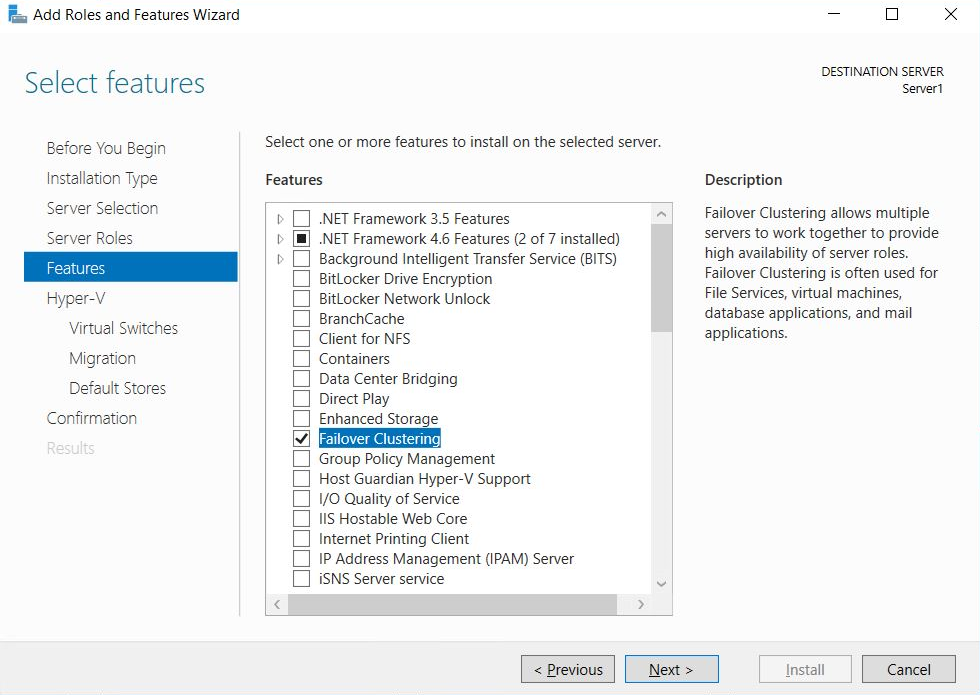
- The select features window is displayed next. Select Failover Clustering. The features that are required for Failover Clustering will pop up in the next window. This window shows the dependencies that will be installed with this feature. Click Add features.
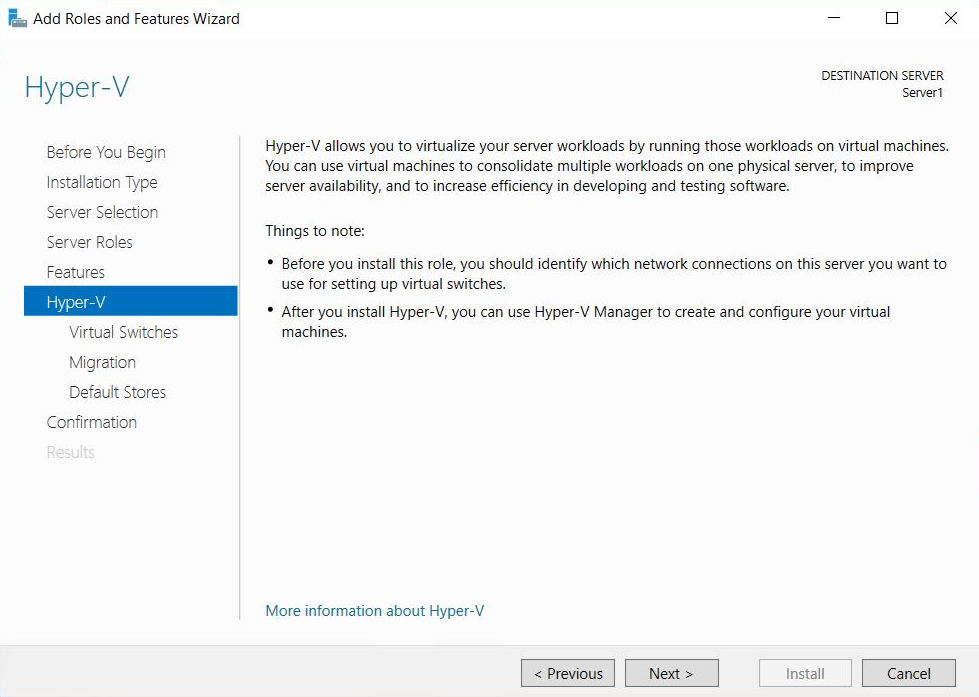
- Next, the Hyper-V window is displayed.
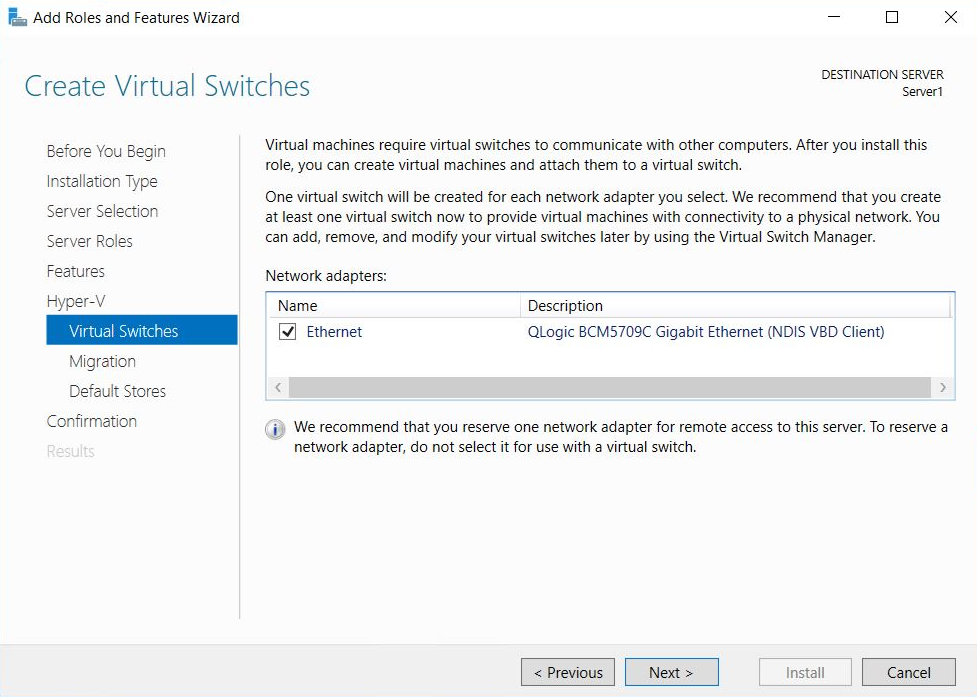
- The Create Virtual Switches window is displayed. In Network adapters, select the network that you want your virtual machine to use for the cluster. If you have multiple NIC’s listed here, choose the appropriate ones.
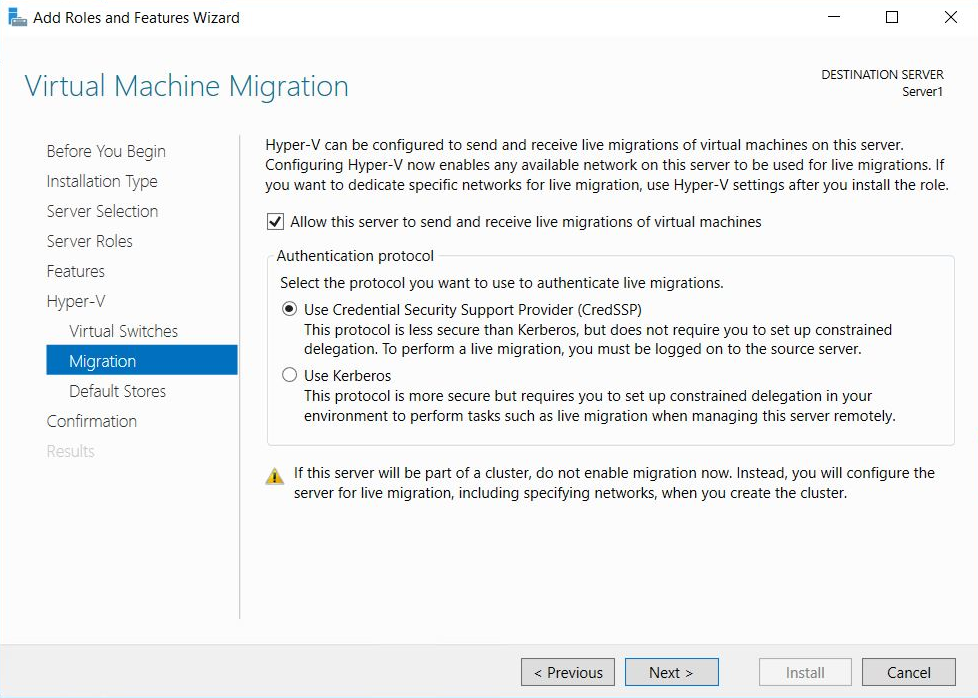
- The Virtual Machine Migration window is displayed.Select "Allow this server to send" and "Receive live migrations of virtual machines". This allows the VM to transfer between your nodes where required.
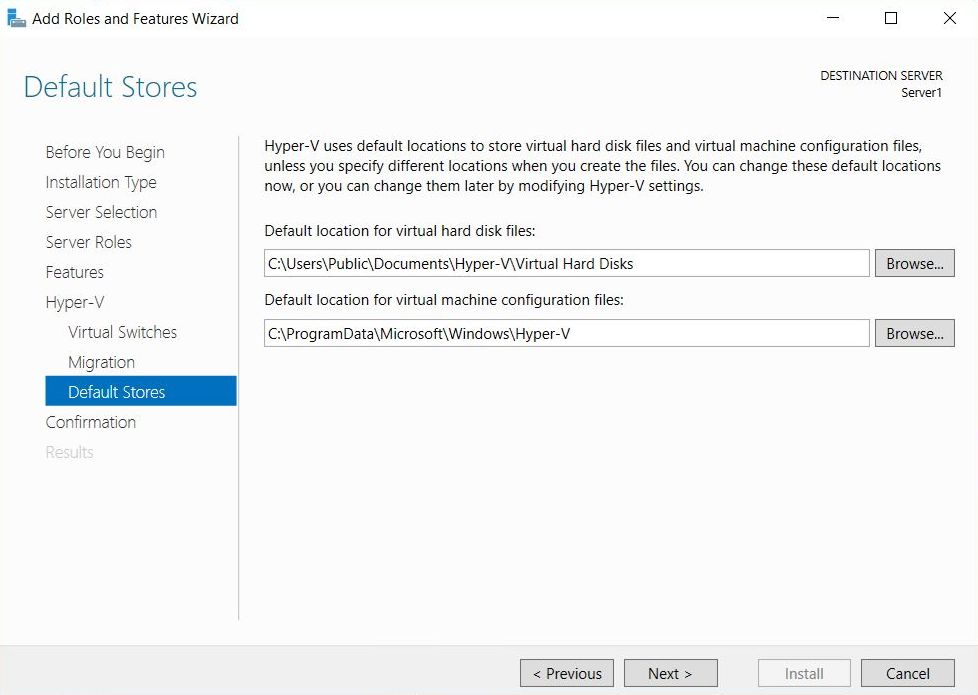
- The Default Stores window is displayed. Do not change the default stores.
- Confirm your installation selections and click Install.
Connecting to iSCI network drives
- Start the iSCI initiator and connect to your two SAN drives:
- Click Start → Windows Administrative Tools → iSCI Initiator.
- Ensure the drives are set to allow simultaneous connections. This is configured on your SAN. Make sure you have granted access to your two cluster servers.
- Connect to the SAN drives:
- Open the iSCI initiator → Targets tab→ Enter the IP address for the SAN.
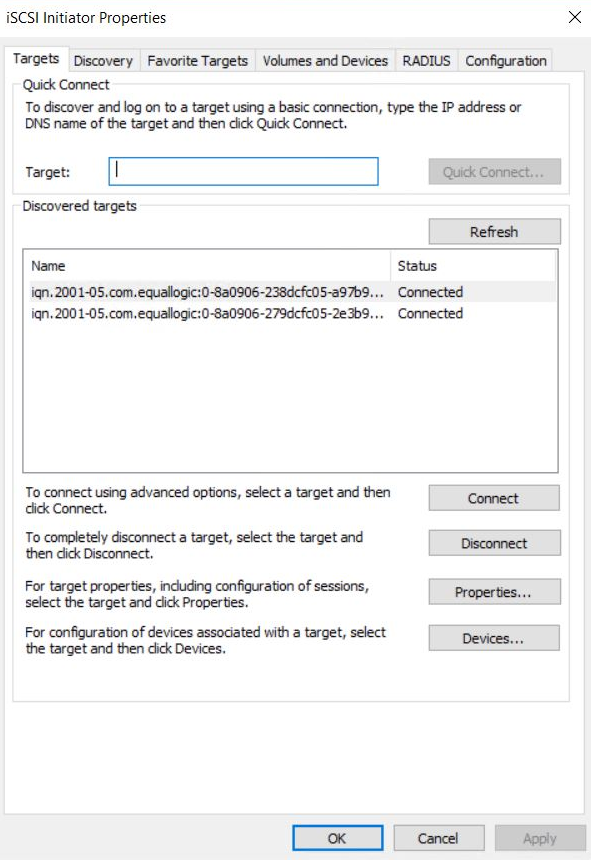
- Click Quick Connect.Your drives are displayed.
- Highlight a drive, then click connect to connect to each drive.
- When a drive is connected, click Done.
- Click the Volumes and Devices tab.
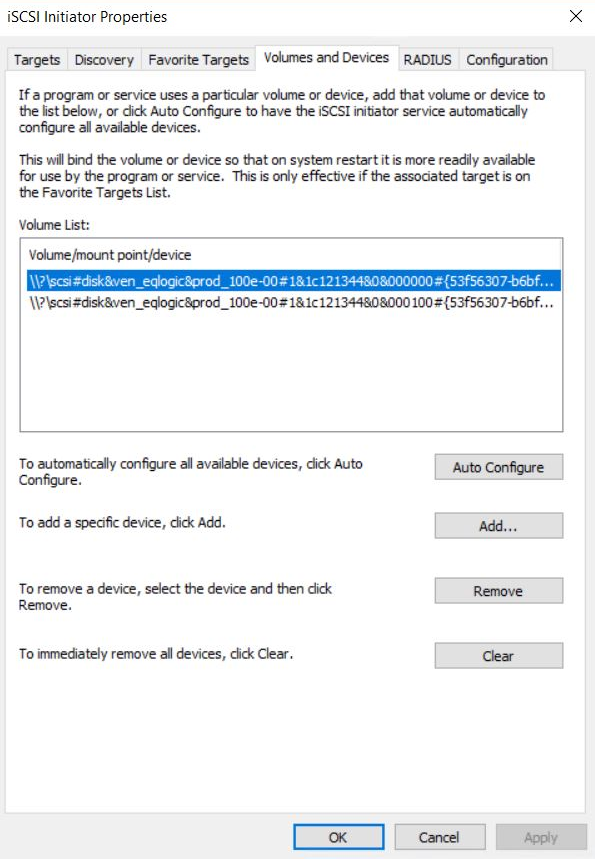
- Click Auto-configure → OK. When you are connected on the first machine, click Start → WIndows Administrative tools → Computer Management → Disk Management.
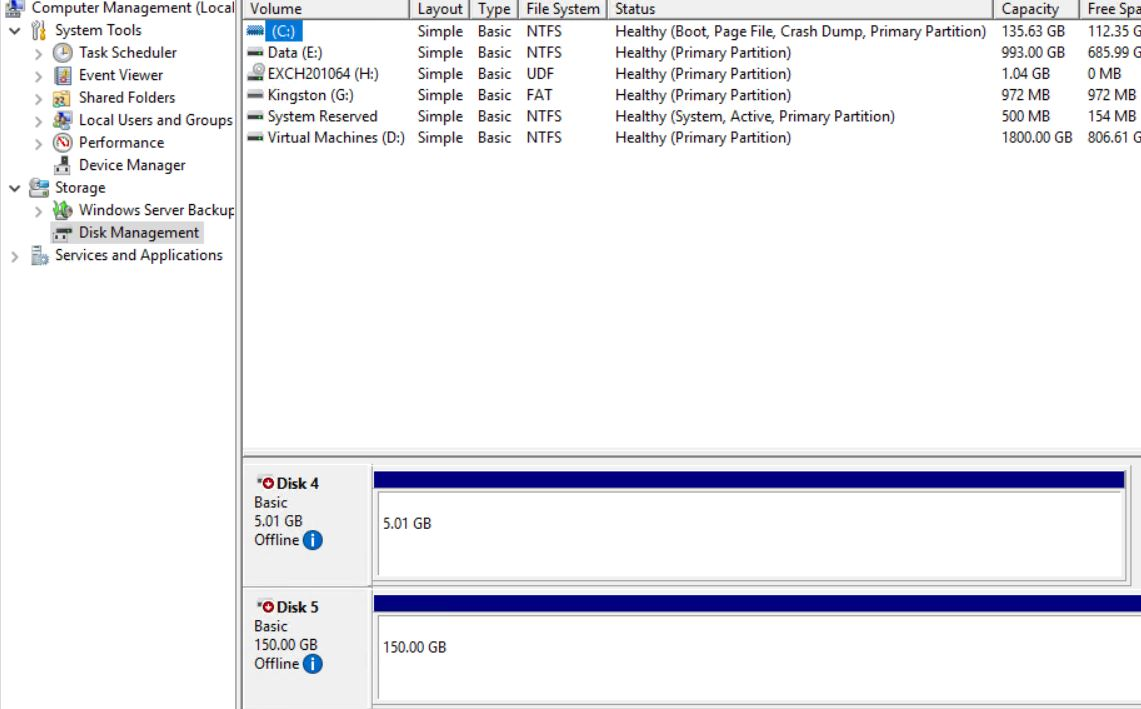
- Open the iSCI initiator → Targets tab→ Enter the IP address for the SAN.
- Bring the disks online
- Right-click the disk number.
- Select Online.
- Repeat the above step for the second drive.
- Initialize the disks:
- Right-click the disk number next to one of the new drives.
- Select Initialize disk.
- In the box that appears, ensure that both your new disks have a check mark next to them.
- Set as MBR.
- Click OK.
- Configure the new drive:
- Right-click the first drive.
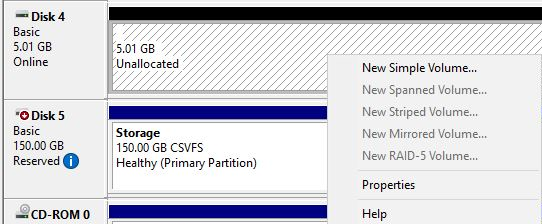
- Select Create New Simple Volume.
- Leave the defaults in place.
- Choose a drive letter to assign.
- Label your drives:
- 5GB drive—label the drive as Quorum
- 150GB (larger drive)—label it as ClusterStorage
- Right-click the first drive.
- Repeat the above steps for the second drive.
Create the failover cluster
From the OS of any of the nodes created in the above steps, do the following:
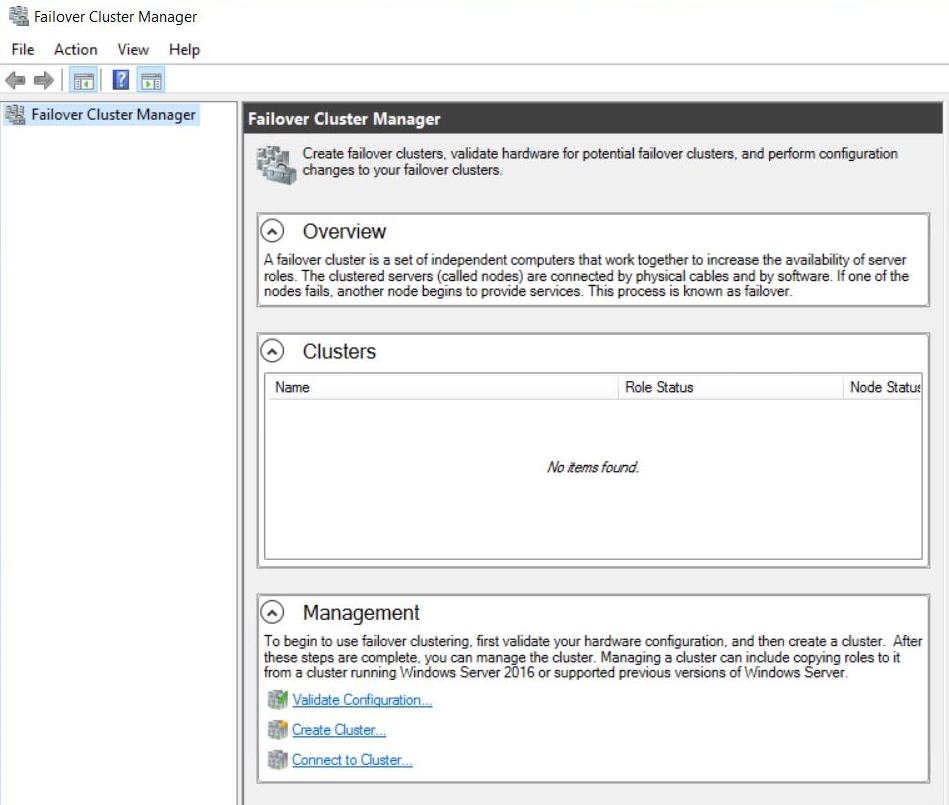
- Click Start → Windows Administrative tools → Failover Cluster Manager to launch the Failover Cluster Manager. Click "create cluster". Click Next on the 'Before you begin' window.
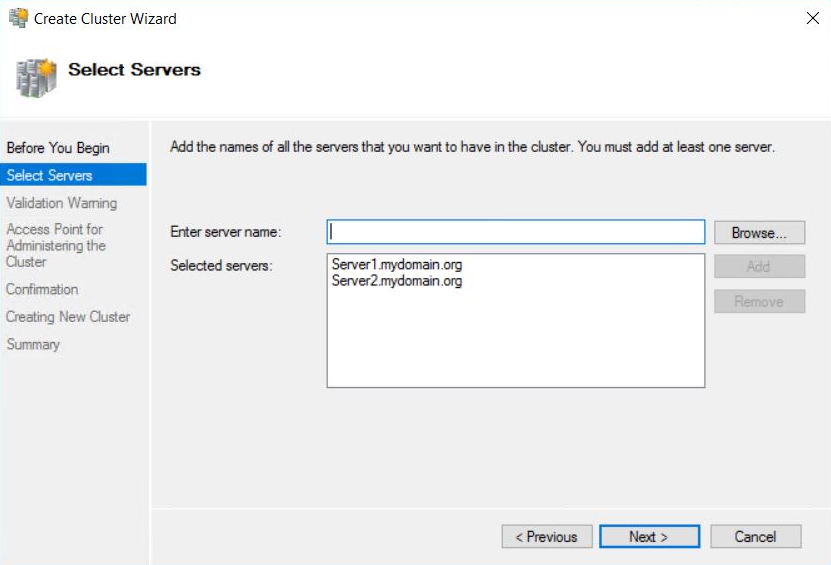
- In the next window, enter the server names that you want to add to the cluster. Alternatively, you can locate them via Browse. Click Add → next.
- Validation warning window is displayed. Select Yes to "allow verification of the cluster services".
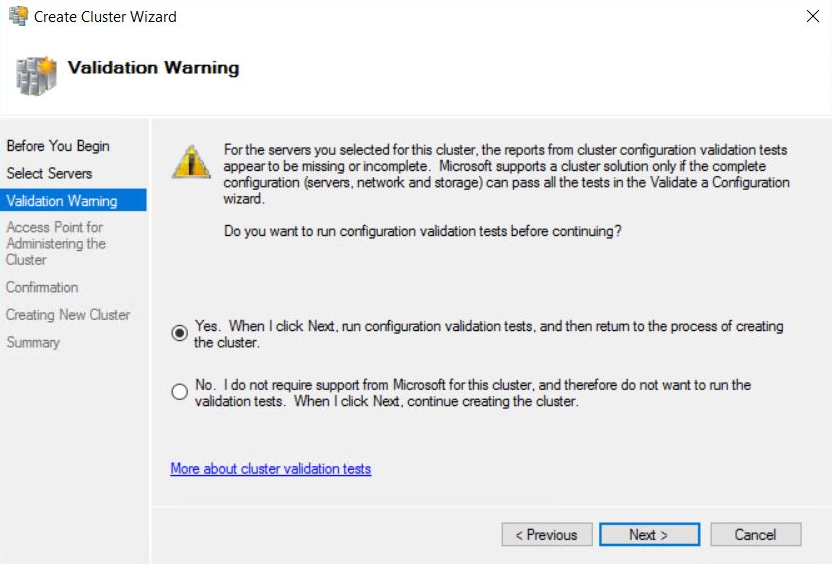
- When you click next, the Validate a Configuration wizard is displayed. Continue by clicking Next.
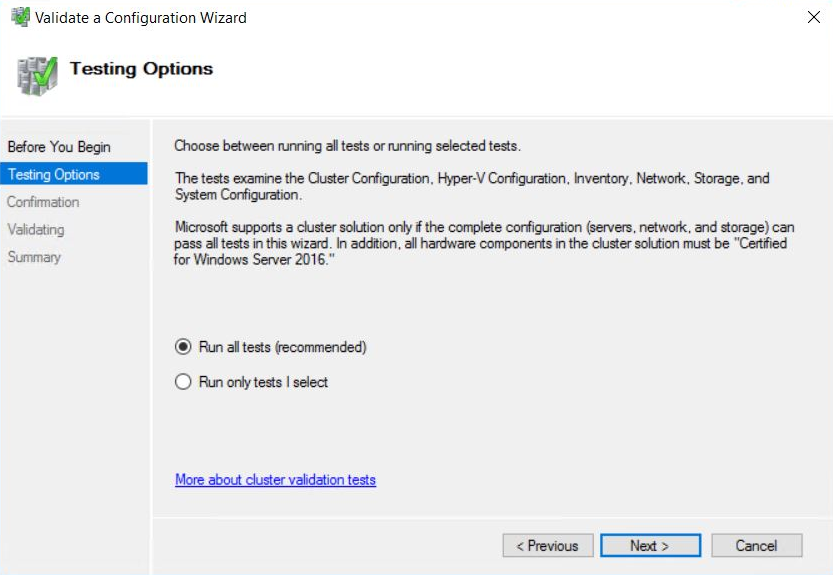
- In the testing options window, select "Run all tests" (recommended).The next window will let you confirm the list of tests that will be run by Windows.
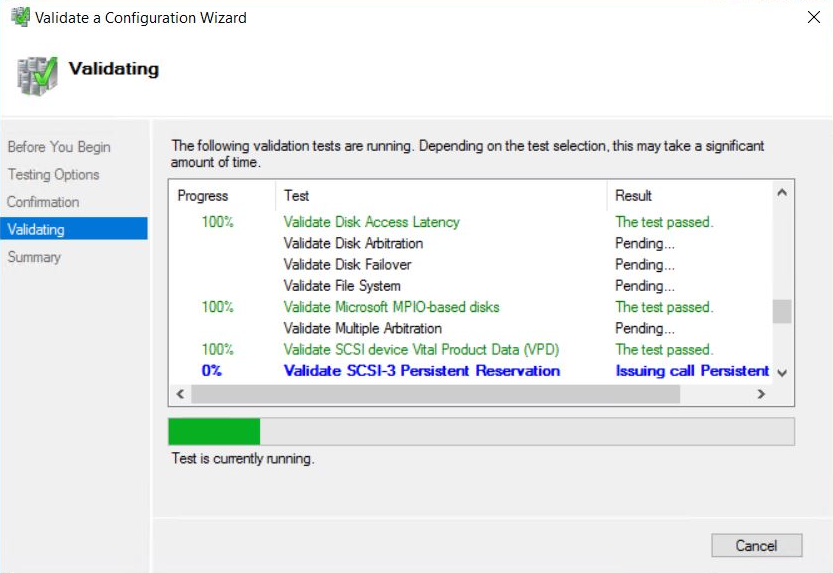
- The Validating window is displayed while all of the clustering tests are being run. This process may take several minutes depending on your network infrastructure and the number of nodes you have chosen to add to your cluster. When the tests are completed, check the report, and fix configuration errors, if any. The cluster setup will fail if any errors exist.
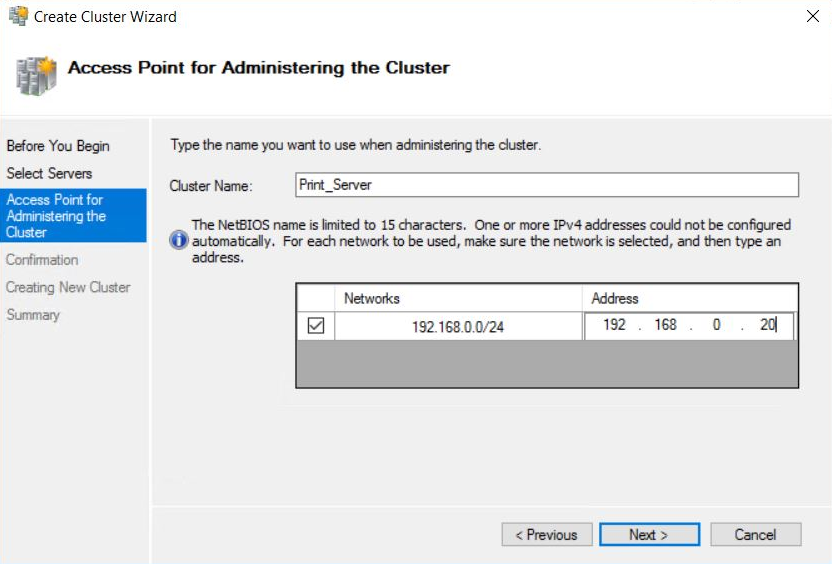
- The 'Access Point for Administering the Cluster' window in the Create Cluster wizard is displayed. In Cluster Name, enter a name for your cluster. In the available network provide an IP address for the cluster.
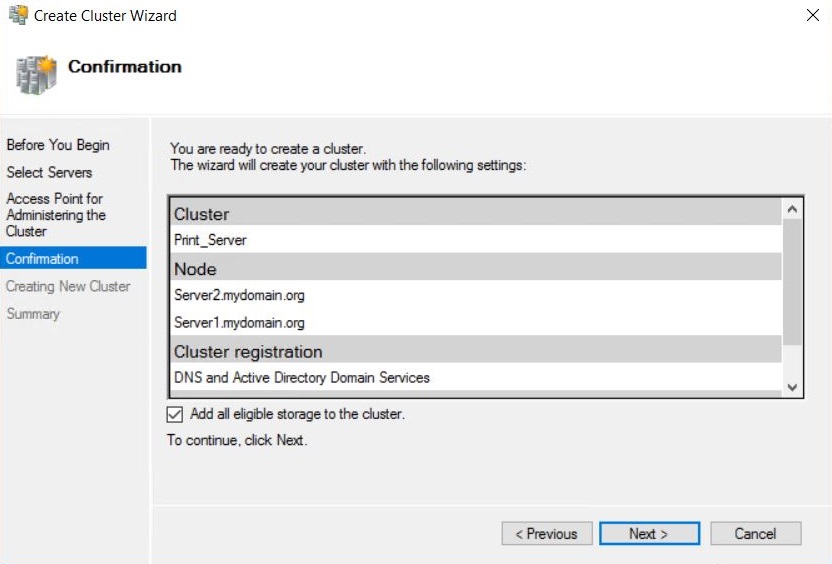
- After clicking next, the confirmation window is displayed. This window lists the settings to be applied to your new cluster.
- Select the "Add all eligible storage to the cluster" check box. The system will now try to assign any storage it can find. The system attempts to create the new cluster in your domain.
- This may take a while as there are several checks and tests are conducted while the system is configured.
- When the process is complete, the Summary window is displayed stating that the cluster wizard completed successfully.
- Check to confirm that the cluster is configured correctly
- In the Failover Cluster Manager, navigate to Nodes.
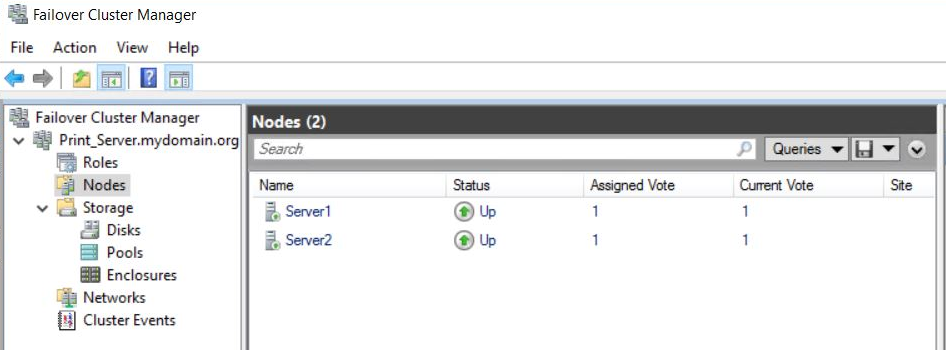
- Check that all nodes in the cluster are online. If they are not, go to the server that is offline and bring the system online to join the cluster.
- In the Failover Cluster Manager, navigate to Nodes.
- Navigate to Storage → Disks.
- a. The system detects the SCSI drives and displays them here. If you were setting this up with only two nodes, then the 5GB Quorum cluster would have been assigned as Disk Witness in Quorum.The configured storage space is assigned to Available Storage.
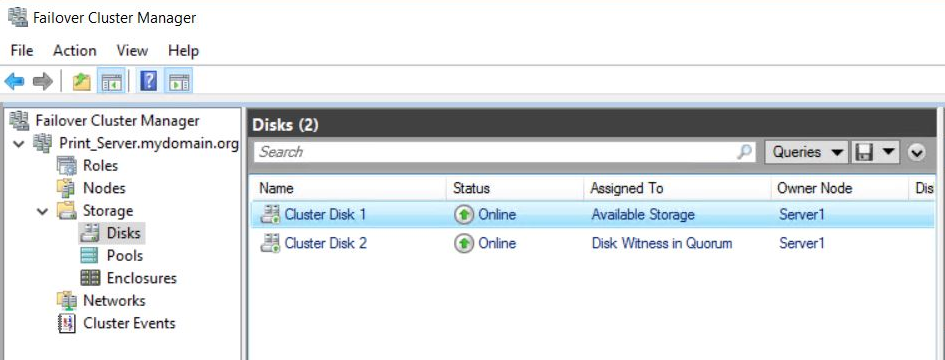
- a. The system detects the SCSI drives and displays them here. If you were setting this up with only two nodes, then the 5GB Quorum cluster would have been assigned as Disk Witness in Quorum.The configured storage space is assigned to Available Storage.
- Configure this storage to be part of the cluster.
- Right-click the disk assigned to available storage; then select "Add to Cluster Shared Volumes". The cluster is now assigned to Cluster Shared Volume.
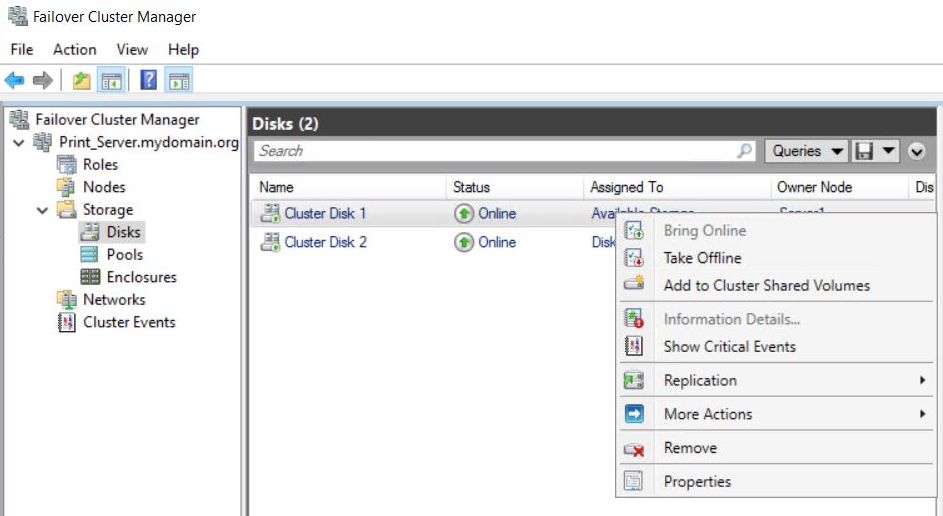
- Right-click the disk assigned to available storage; then select "Add to Cluster Shared Volumes". The cluster is now assigned to Cluster Shared Volume.
- Check the Cluster Events folder for any issues with the cluster. If there are no issues, you can configure your virtual machine in the cluster environment.