Mapping User, Host Name with IP Address using DHCP, Active Directory, Proxy Logs
Firewall Analyzer by default displays the IP addresses of the Source and Destination that participate in the conversation going through Firewall. It provides you with an option to associate the IP addresses to User Name or Host Name/ MAC address in the Firewall reports. The user name to IP address can be mapped using AD, Proxy server logs. The host name/MAC address to IP address can be mapped using DHCP server logs. You can do it by clicking User Name - IP Mapping link that is provided in the Settings page.
If authenticated connection through the firewall is enabled (typically it is not enabled), then the user name is displayed in the logs. If the logs contain the tag 'user', then it will show in the reports. Check the logs for 'user' tag under <Firewall Analyzer Home>\server\default\<Firewall DNS Name/IP address>\hot folder. If the logs do not contain the "user" attribute or field, the corresponding logs/hits are considered as "Unknown Users". Carry out the procedure given below to configure the User Name - IP Address Mapping:
- In the Firewall Analyzer web client, select the Settings tab.
- In Settings screen, select the Firewall > User Name-IP Mapping link. User Name - IP Mapping page appears.
- In the page, there are two options. Select an option as per your requirement. The options are:
DHCP
Click DHCP link available on top.
You can select this option to get Host Name/MAC Address instead of IP Address in all reports. Source & Destination IP Address of configured Firewalls will be replaced by Host Name/MAC Address got from the DHCP Servers.
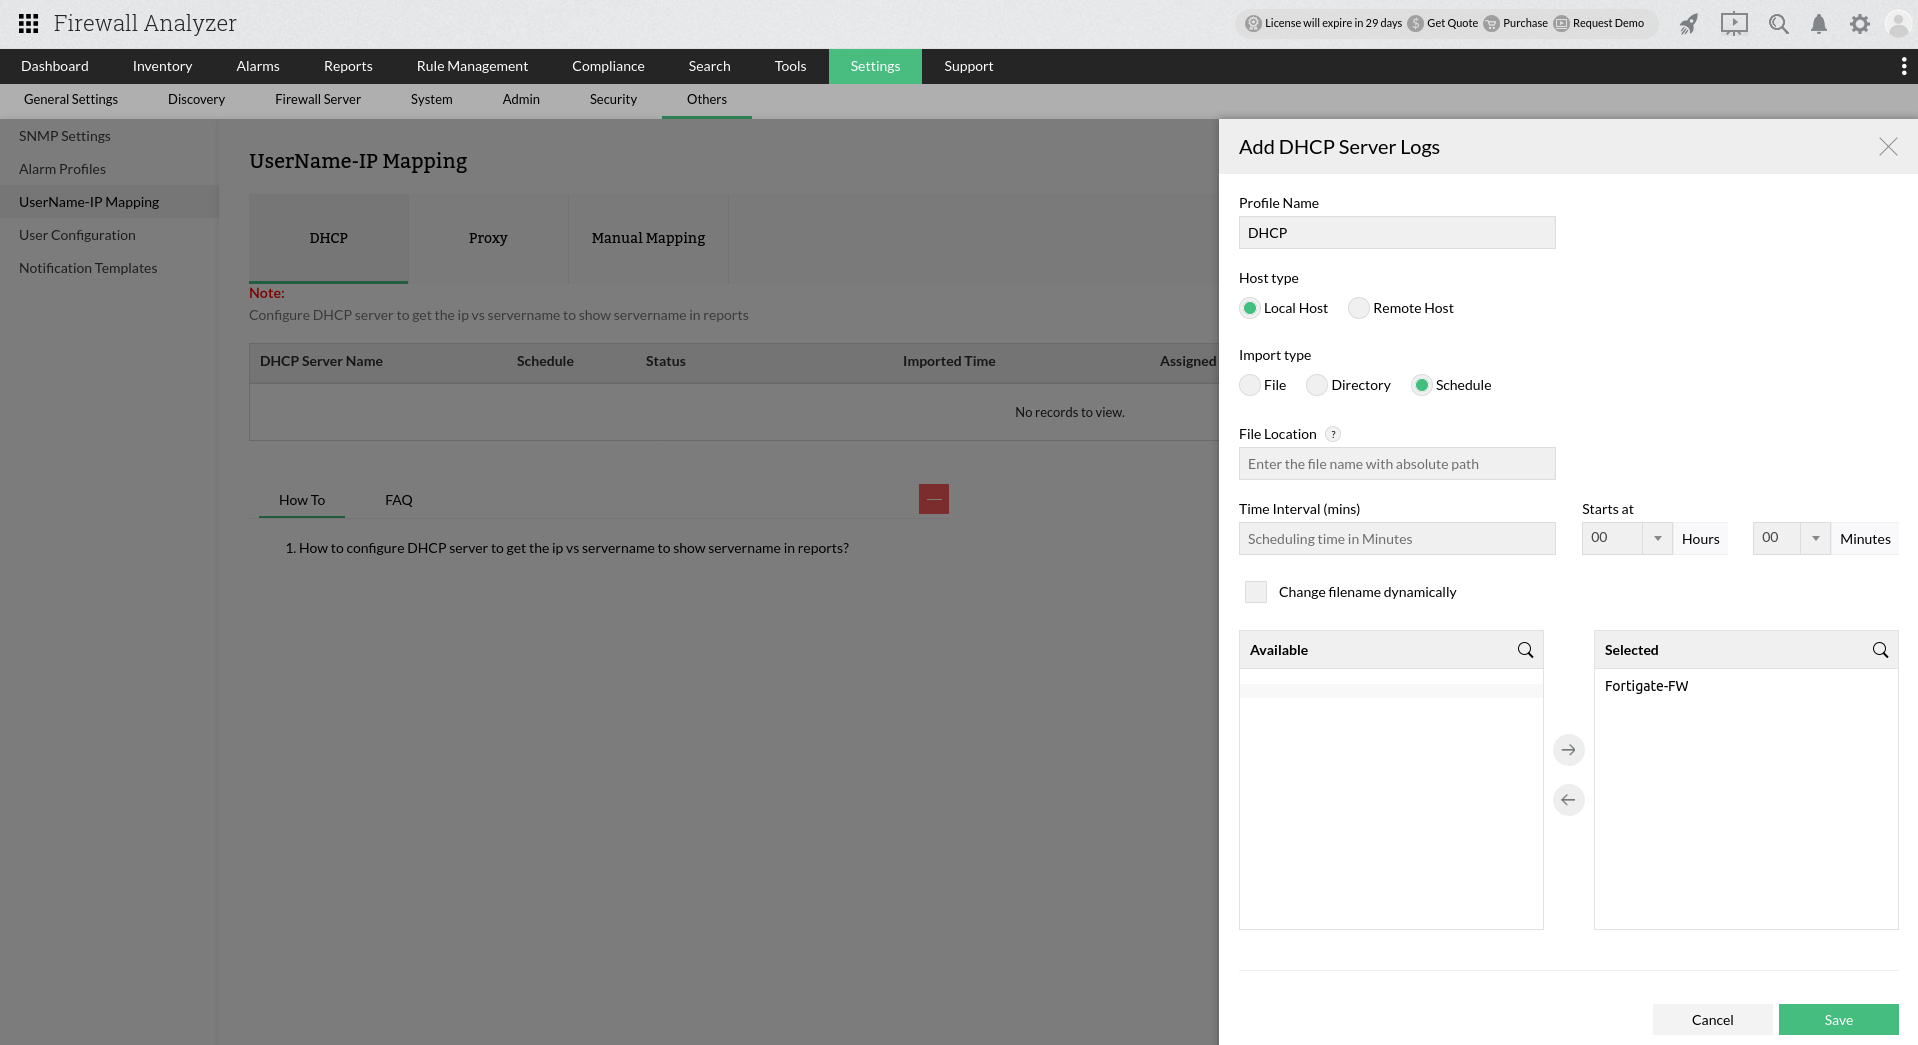
- To add DHCP server, Navigate to Settings > Others > UserName-IP Mapping > DHCP > Click "Import" option.
- Provide the DHCP server name in "Profile Name" field.
- Choose Schedule import for periodical update.
- Assign devices to DHCP server.
- Host Name from upcoming DHCP logs will be associated to the IP Addresses of upcoming associated firewall logs.
The details of the columns of thetable are given below:
| DHCP Server Details | Description |
|---|---|
| DHCP Server Name | The names of the DHCP server from which the Firewall Analyzer will associate MAC Address vs IP Address mapping with the Firewall log data. Click the DHCP server name to view the devices assigned to it and modify the devices assigned to it. If no device is assigned, you can assign devices to it. |
| Schedule | If Schedule added for the DHCP logs, It will show the Schedule details of DHCP log import. |
| Status | It shows the DHCP log import status. |
| Imported Time | It shows the log import time for DHCP logs. |
| Assigned Devices | The firewall devices assigned to the particular DHCP server. |
| Action | (1) Clear Devices - This option is used to clear the assigned Firewall device associated with the DHCP logs. (2) Edit - This option is used to edit and change the DHCP log import schedule and We can change the assigned devices as well. (3) Delete - We can delete the DHCP server completely. It will remove the MAC Address vs IP Address mapping from the database. |
| View List | Click View List to view the list of IP address and MAC address mapped with DHCP server. |
- Click the Assign/Edit Devices icon to assign devices to the DHCP server. The Assign Devices screen pops up.
- Select the devices, which you want to assign/re-assign to the selected DHCP server. All the available devices are listed in the Available Device(s) list. Select the devices and click right arrow. The selected devices are moved to the Selected Device(s) list. If you want to remove any device from the Selected Device(s) list, select the devices and click left arrow. The removed devices will be moved back to the Available Device(s) list. After associating the devices to DHCP server the proxy server and the assigned devices are listed in thetable.
- Click Save button to assign the selected devices to the selected DHCP server. Click Cancel to cancel the assigning devices to the DHCP server operation.
- Click Save button in the User-IP Mapping Configuration page to save the settings again.
Active Directory (AD)
Click Active Directory tab available on top
- To get User Names from Active Directory and associate with Firewall logs
Select this option to get User Name instead of IP Address, fetched from Active Directory (AD), in all reports.
- Select the Active Directory radio button to assign devices to a particular Proxy Server. Below the selected option, a table with proxy server and devices assigned to it, appears in the screen.
To enable, disable the AD server, select the required AD servers and click the Enable/Disable buttonThe details of the columns of thetable are:
Active Directory Details Description Server Name The names of the Active Directory servers from which the Firewall Analyzer will associate user name with the firewall log data. In this case, all the Active Directory servers added to the Firewall Analyzer will be listed. Assigned Devices The Firewall devices assigned to the particular Active Directory server Result The result of import from Active Directory Status The status of Active Directory server connection with Firewall Analyzer Action To delete the AD server click the respective Delete icon
To add a new AD server, click Add new link on the right side.
- Select the domain from the drop down list for the Domain Name field. You can rescan the network to get the domains available. You can also add new domains using Add new link.
- Enter the name of the Primary Domain Controller
- Enter the user name of the PDC
- Enter the password of the PDC
- Enter the names of the users to be excluded from the list
- To assign devices,
Select the devices, which you want to assign/re-assign to the selected AD server. All the available devices are listed in the Available Device(s) list. Select the devices and click right arrow. The selected devices are moved to the Selected Device(s) list. If you want to remove any device from the Selected Device(s) list, select the devices and click left arrow. The removed devices will be moved back to the Available Device(s) list.- Click Save button to assign the selected devices to the selected AD server. Click Cancel to cancel the assigning devices to the AD server operation.
After associating the devices to AD server, the AD server and the assigned devices are listed in thetable.
Click View List icon to view the list of IP address and Users mapped with AD server.
Proxy
Click Proxy tab available on top
- Below the selected option, a table with proxy server and devices assigned to it, appears in the screen.
The details of the columns of thetable are:
Proxy Server Details Description Proxy Server Name The names of the proxy server from which the Firewall Analyzer will associate user name with the Firewall log data. In this case, all the Proxy servers added to the Firewall Analyzer will be listed.
Click the proxy server name to view the devices assigned to the proxy server and modify the devices assigned to the proxy server. If no device is assigned, you can assign devices to the proxy server.
Assigned Devices The Firewall devices assigned to the particular proxy server. Clear Devices Delete the assigned devices to the proxy server for User-IP Mapping purpose. Click the Delete icon to delete the assigned devices.
- Click the Assign/Edit Devices icon to assign devices to the proxy server. The Assign Devices screen pops up.
- Select the devices, which you want to assign/re-assign to the selected proxy server. All the available devices are listed in the Available Device(s) list. Select the devices and click right arrow. The selected devices are moved to the Selected Device(s) list. If you want to remove any device from the Selected Device(s) list, select the devices and click left arrow. The removed devices will be moved back to the Available Device(s) list.
- Click Save button to assign the selected devices to the selected proxy server. Click Cancel to cancel the assigning devices to the proxy server operation.
After associating the devices to proxy server, the proxy server and the assigned devices are listed in thetable.
Click View List icon to view the list of IP address and Users mapped with Proxy server.
Manual Mapping
The provision of manual mapping of user name with IP address is available.
You can create the mapping file in two formats: .txt and .csv
The mapping format for .txt file is <IP address=user name> and the mapping format for .csv file is <IP address,user name>
Sample format
.txt file
192.168.222.74=mari
192.168.222.75=rev
192.168.222.76=dev
192.168.222.77=satyaSample format
.csv file
192.168.22.74,mari
192.168.22.75,rev
192.168.22.76,dev
192.168.22.77,satyaYou can create the mapping file in any one of the two formats and import it into Firewall Analyzer.
Click Manual Mapping tab available on top
To enable, disable the Manual Mapping, click the Enable/Disable button
Below the selected option, a table with mapping profile and devices assigned to it, appears in the screen.
The details of the columns of thetable are:
Mapping Details Description Mapping Profile Name The names of the mapping profiles from which the Firewall Analyzer will associate user name with the Firewall log data. In this case, all the mapping profiles added to the Firewall Analyzer will be listed.
Click the profile name to view the devices assigned and modify the devices assigned. If no device is assigned, you can assign devices to the proxy server.
Assigned Devices The Firewall devices assigned to the particular mapping profile. Clear Devices Delete the assigned devices to the mapping profile for User-IP Mapping purpose. Click the Delete icon to delete the assigned devices.
To add a new manual mapping profile, click Import link on the right side.
- Enter the name of the mapping profile
- To import the mapping file from the local host, click Browse button in the file location field.
- Select the file from the local machine (client machine) and click Open.
- The mapping file in .txt or .csv will be imported.
- To import the mapping file from the remote host, enter the host name or IP address of the remote machine, credentials (user name and password), port, protocol, time interval in minutes and time to start in hours and minutes for scheduled import
- Click Browse button in the file location field.
- Select the file from the local machine (client machine) and click Open.
- The mapping file in .txt or .csv will be imported.
- If the name of the file to be imported changes dynamically, select the Change file name dynamically option
Assign devices to the mapping profile
- Select the devices, which you want to assign/re-assign to the selected profile. All the available devices are listed in the Available Device(s) list. Select the devices and click right arrow. The selected devices are moved to the Selected Device(s) list. If you want to remove any device from the Selected Device(s) list, select the devices and click left arrow. The removed devices will be moved back to the Available Device(s) list.
- Click Save button to assign the selected devices to the selected profile. Click Cancel to cancel the assigning devices to the profile operation.
After associating the devices to mapping profile, the profile and the assigned devices are listed in thetable.
Click View List icon to view the list of IP address and Users mapped with Manual mapping profile.
")


