- Overview
- Configuration
Quickbase
Automate user provisioning and access control with Quickbase and ADManager Plus integration
Quickbase is a low-code application development platform that empowers organizations to create custom applications for various purposes without needing extensive coding expertise. Integrating Quickbase with ADManager Plus achieves automation and efficiency in user provisioning, deprovisioning, and access control. When creating, modifying, or deactivating user accounts, this integration ensures smoother workflows and reduces the administrative burden.
User provisioning and deprovisioning
Integrate Quickbase and ADManager Plus to automate user creation and deletion processes, saving you valuable time and reducing manual efforts.
Permissions and access control
Quickbase's access control and permissions settings for organizational users can be synchronized with ADManager Plus to effectively manage permissions.
How to integrate Quickbase with ADManager Plus
Prerequisites
Provide an API key with permissions to retrieve the desired information and perform tasks in Quickbase. Refer to Quickbase's API references for more details.
Privileges
- To import users from Quickbase (inbound action): Ensure the account used for authorization has permission to read all user accounts.
- To perform any action or query in Quickbase (outbound action): Ensure the account used for authorization has permission to perform the desired action.
Authorization configuration
- Log in to ADManager Plus and navigate to Directory/Application Settings.
- Go to Application Integrations, then search for and select Quickbase.
- Toggle the Enable Quickbase Integration button on.
- In the Quickbase Configuration page, click Authorization.
- Generate the API key and API token in Quickbase, then replace {QB-USER-TOKEN} in the Value field with the generated token.
- Click Configure.
Inbound webhook configuration
An inbound webhook enables you to fetch user data from Quickbase and send it to ADManager Plus. To configure an inbound webhook for Quickbase:
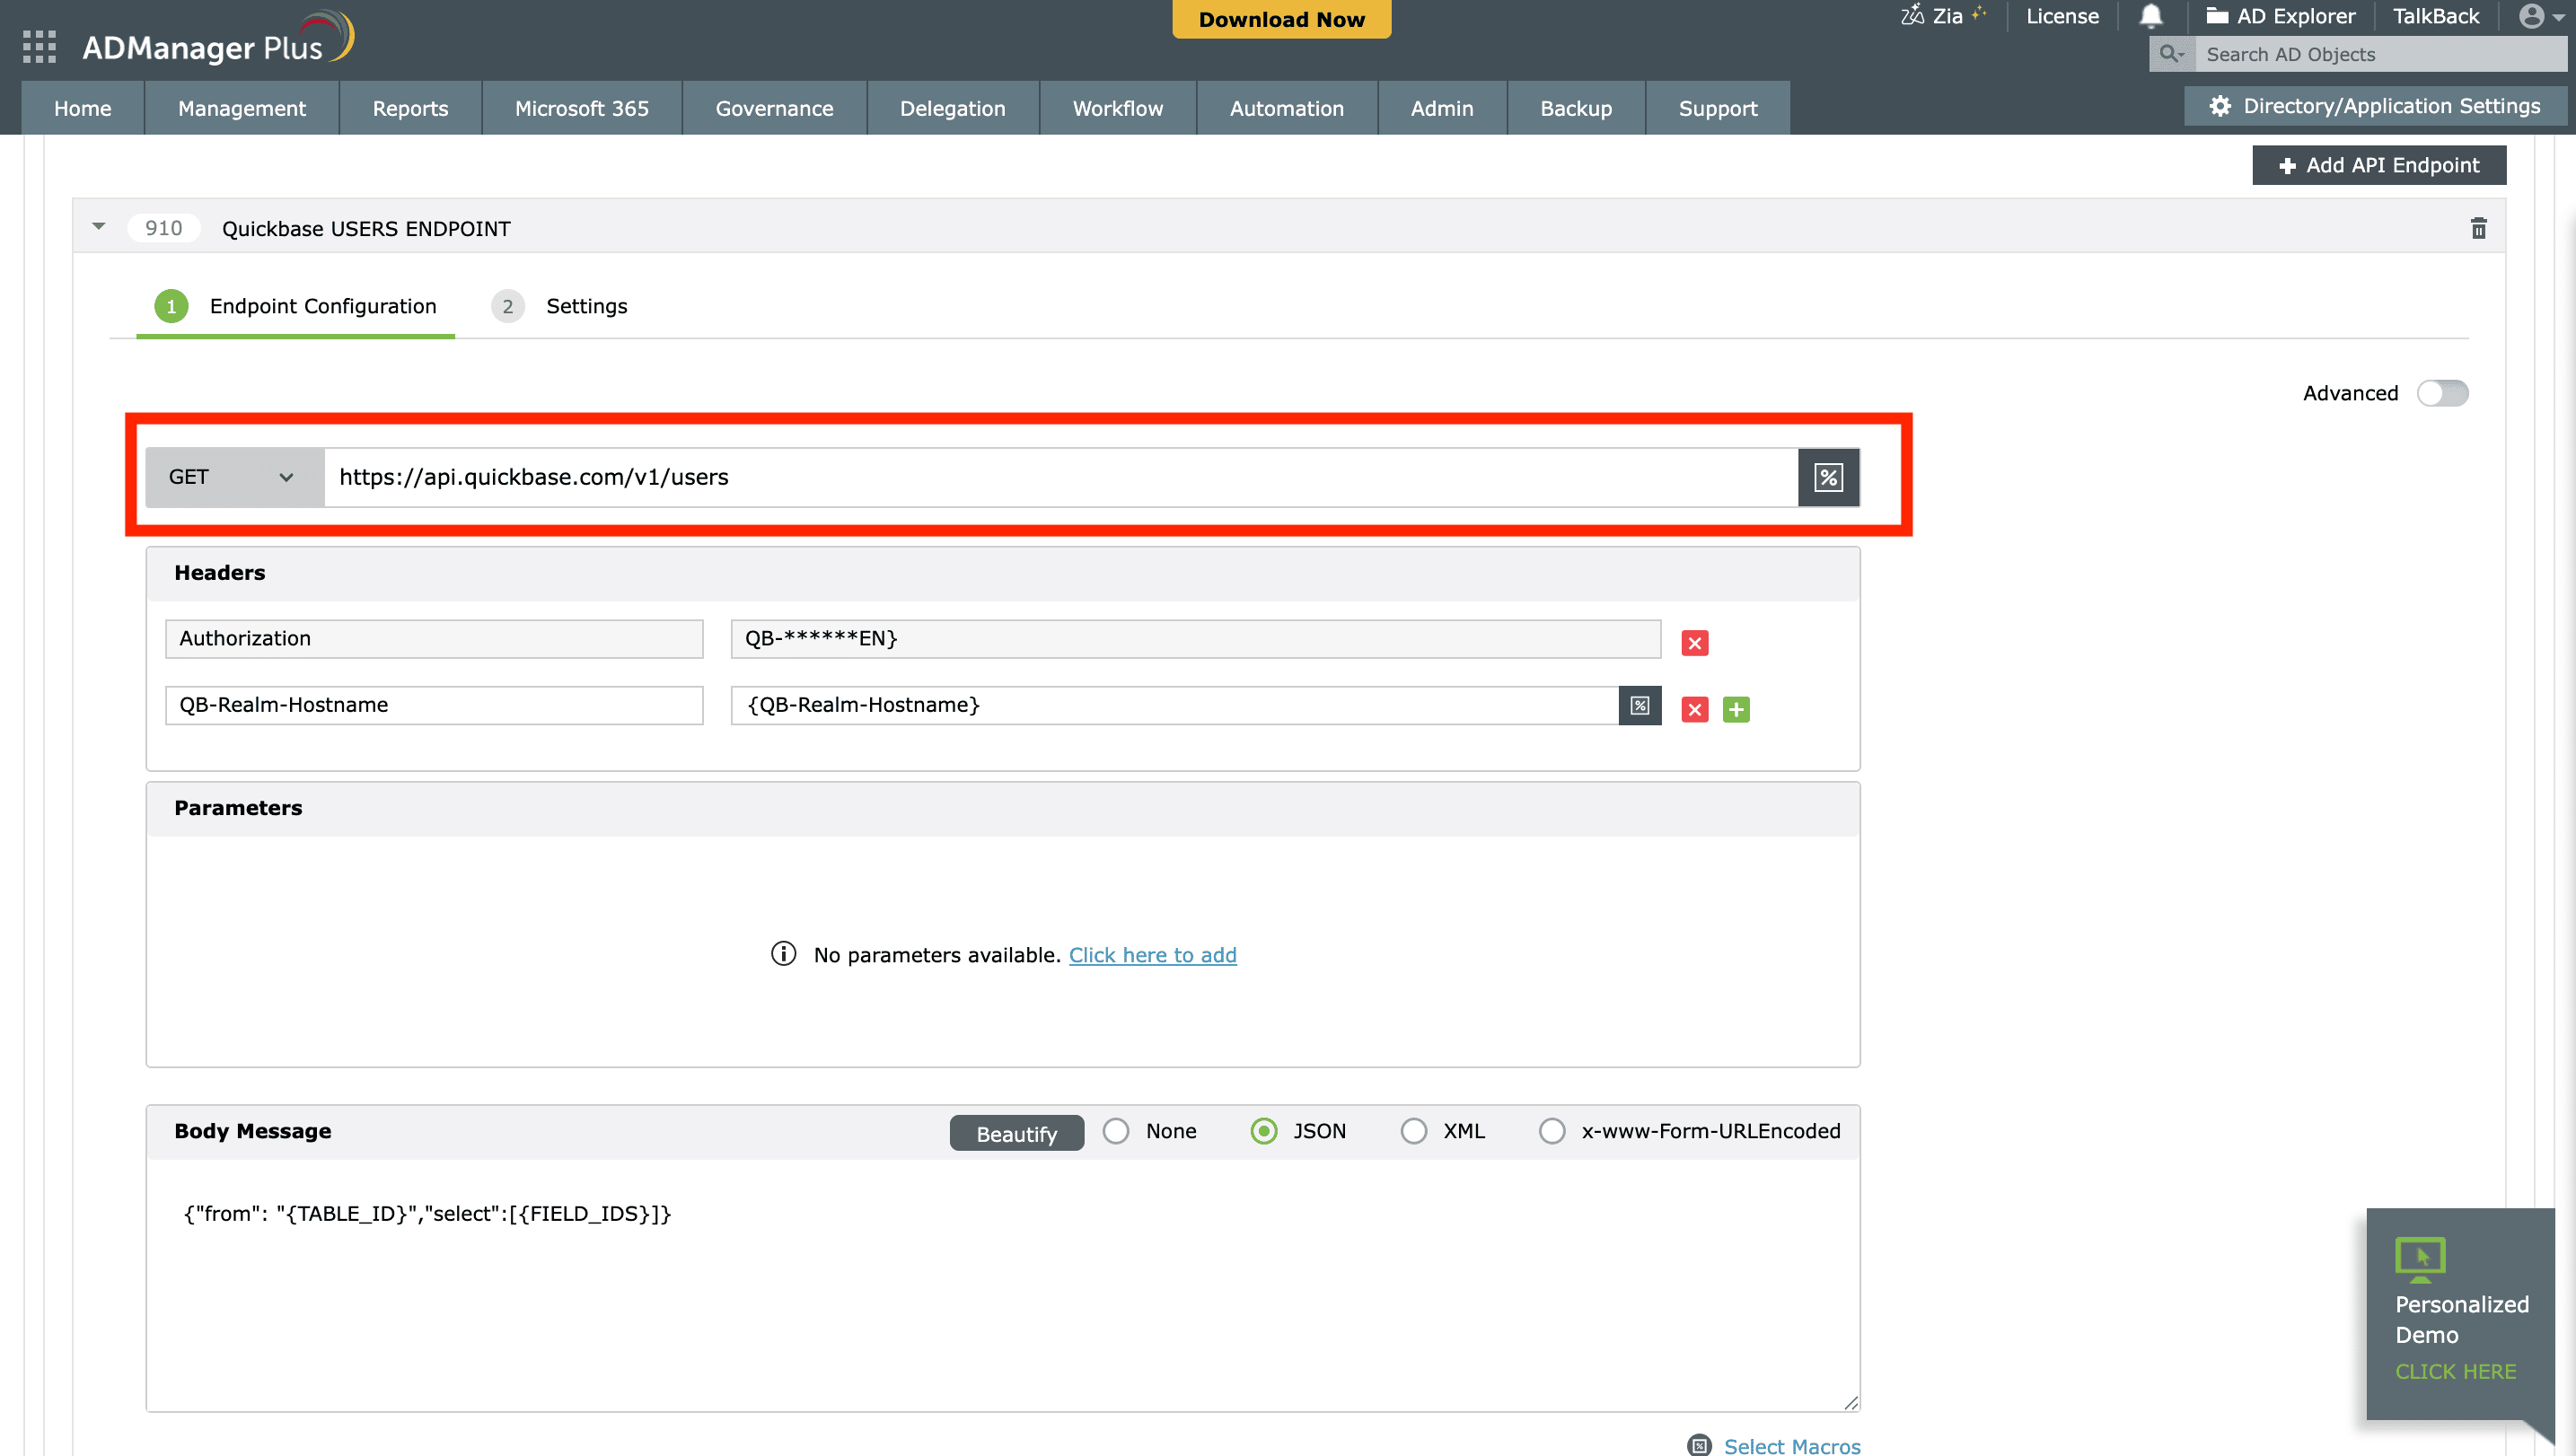
- Under Inbound Webhook, click Quickbase Endpoint Configuration.
- An endpoint, Quickbase USERS ENDPOINT, comes
preconfigured with Endpoint URL, HTTP Method, Headers, and Parameters
fields to fetch user accounts from Quickbase. To use the preconfigured
endpoint, in the Headers section, replace only the hostname
text {QB-Realm-Hostname} with the hostname of
your Quickbase instance. If you prefer to use a new endpoint to import
users, you can configure one by clicking + Add API
Endpoint and filling in the required fields according to Quickbase's
API references. Learn how here.
Note:
- The API key-value pair is preconfigured as a header for authenticating API requests as configured during authorization configuration.
- Refer to Quickbase's API references and configure additional headers and parameters, if needed.
- Macros can be added to the endpoint URL, headers, parameters, and message body to dynamically modify the configuration using the macro chooser.
- Once done, click Test & Save to validate and save
the endpoint, or click Save as Draft to store the
configuration as a draft without testing the endpoint. If you choose
Test & Save, a response window will be displayed.
This response window includes the following tabs:
- Response: Displays API response parameters in a
tree structure. You can set the datatype for each field:
- Text (default)
- Number
- Timestamp
- Array
- Response Details: Displays the complete response message in text format.
- Request: Displays the request headers, parameters, and message body.
- Response: Displays API response parameters in a
tree structure. You can set the datatype for each field:
- Click Save. Note: You can configure multiple endpoints for Quickbase using the + Add API Endpoint button. Learn how here.
- Click Data Source - LDAP Attribute Mapping to match endpoints and to map AD LDAP attributes with the respective attributes in Quickbase. ADManager Plus also lets you customize the attribute format from Quickbase.
- Click + Add New Configuration and:
- Enter the Configuration Name and Description, and select the Automation Category drop-down menu to choose a category.
- In the Select endpoint field, select the desired endpoint and a Primary Key that is unique to a user (e.g. employeeIdentifier). Note: When multiple endpoints are configured, this attribute must hold the same value in all the endpoints.
- In the Attribute Mapping field, select the attribute from the LDAP Attribute Name drop-down menu and map it to the corresponding column in Quickbase. Macros are also supported in attribute mapping. To create a new custom format, click Add New Format.
- Click Save.
Outbound webhook configuration
An outbound webhook enables you to update the changes made in AD using ADManager Plus in Quickbase. It also lets you fetch or forward required details from Quickbase and synchronize them with AD. To configure an outbound webhook for Quickbase:
- Under Outbound Webhook, click Quickbase Webhook Configuration.
- Click + Add Webhook.
- Enter a name and description for this webhook.
- Decide on the action that has to be performed and refer to Quickbase's API references for the API details, such as the URL, headers, parameters, and other requirements that will be needed. Enter the employee details value in the Parameter field.
- Select the HTTP method that will enable you to perform the desired action on the endpoint from the GET drop-down menu.
- Enter the endpoint URL.
Reference: The highlighted section is the drop-down and the text box next to it is the endpoint url text box.
- Configure the Headers, Parameters, and Message Type in the appropriate format based on the API call that you would like to perform. Note: Macros can be added to the endpoint URL, headers, parameters, and message body to dynamically modify the configuration using the macro chooser.
- Click Test & Save to validate and save the webhook, or click Save as Draft to store the webhook as a draft without testing.
- If you select Test & Save, a response window is
displayed. Choose the user or group on which the API request should be
tested and click OK. This triggers a real-time call to
the endpoint URL, allowing you to verify whether macros are applied
correctly. You may skip selecting a user or group. However, if you do
make a selection, the macros present in the webhook will be parsed using
the selected object’s values:
- Response: Displays API response parameters in a
tree structure. You can set the data type for each field:
- Text (default)
- Number
- Timestamp
- Response Details: Displays the complete response message in text format.
- Request: Displays the request headers, parameters, and message body.
- Response: Displays API response parameters in a
tree structure. You can set the data type for each field:
- Verify them for the expected API behavior and click Save.
Actions supported:
Upon integration of ADManager Plus with Quickbase, you can take these actions:
- Create user accounts
- Add users to groups
- Modify user attributes
- Remove users from groups
- Modify user accounts by template
- Create mailbox
- Reset passwords
- Disable or delete mailbox
- Unlock user accounts
- Move home folder
- Enable user accounts
- Delete home folder
- Disable user accounts
- Revoke Microsoft 365 licenses
- Delete user accounts
- Manage users' photos
- Run custom scripts
- Move users across groups
- Auto-reply settings
- Disable Skype for Business accounts