Creating a custom service
Last updated on:
In this page
Overview
A Custom Service in Log360 Cloud allows you to create secure connections to external services for data integrations, visualizations, and analytics. This feature is useful when you want to bring in log or event data from services that are not natively supported by Log360 Cloud. By defining a custom service, you can configure your own authentication type to communicate with the external system.
When setting up a custom service, you will also need to provide a Test Connection URL. This is an endpoint exposed by the external application, which can be found in the external application's API documentation. Log360 Cloud uses this URL to verify whether the credentials provided during the connection setup are valid. If the credentials are correct, the connection is established successfully. If not, the system will indicate that the connection has failed.
This page explains how to create a custom service for each authentication type.
Steps to create a custom service
- Log in to the product console
- Go to the Settings tab and select Admin.
- Navigate to Management and under Integrations, select Connections.
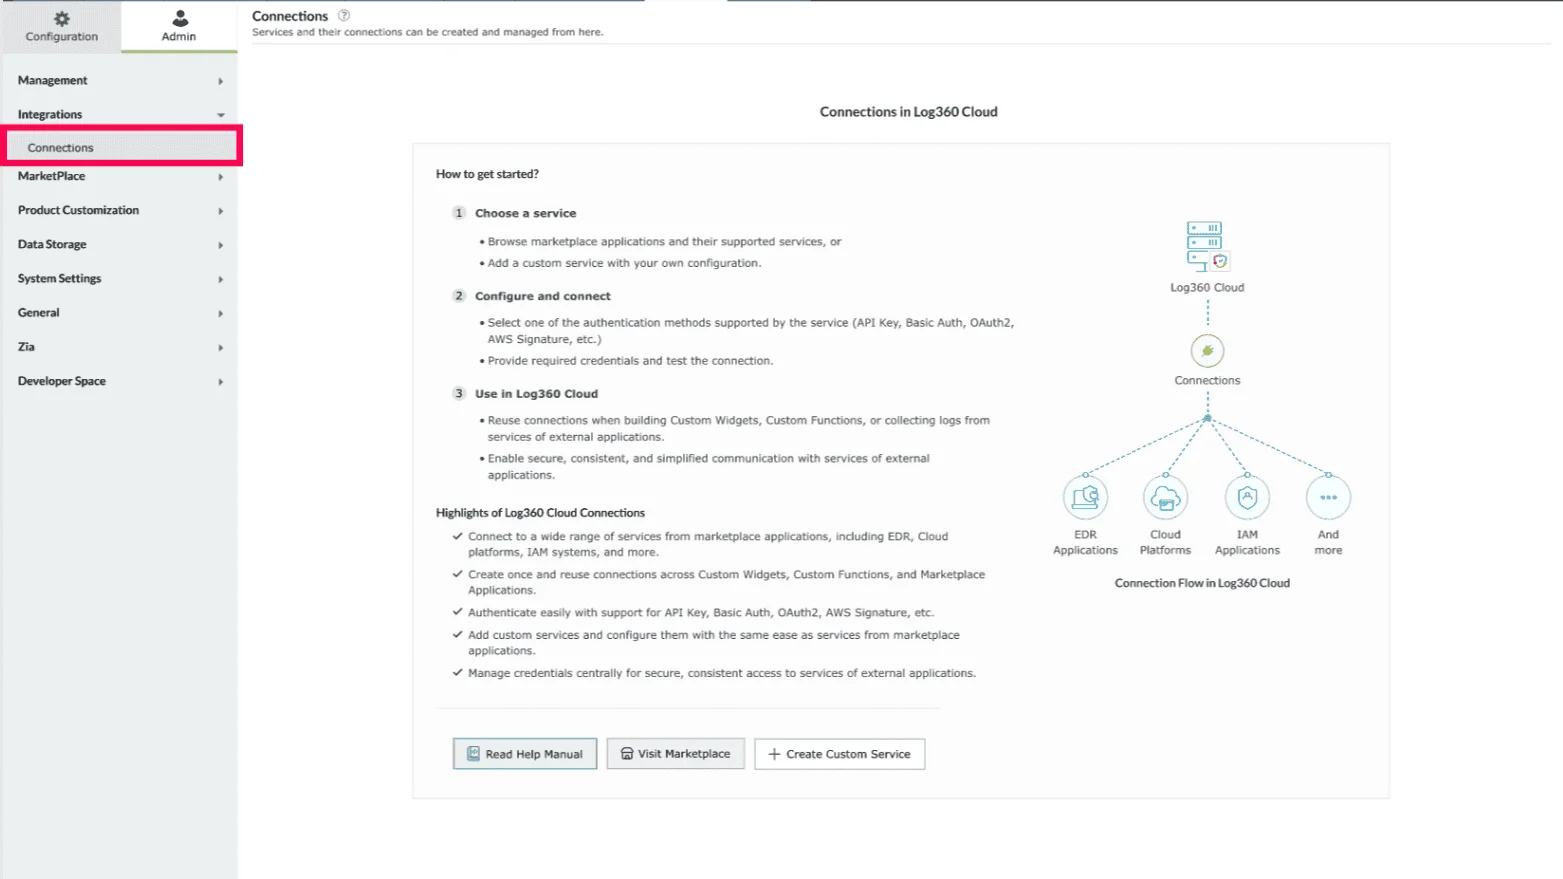
Figure 1: Navigating to connections - In the Connections page, click Create Custom Service.
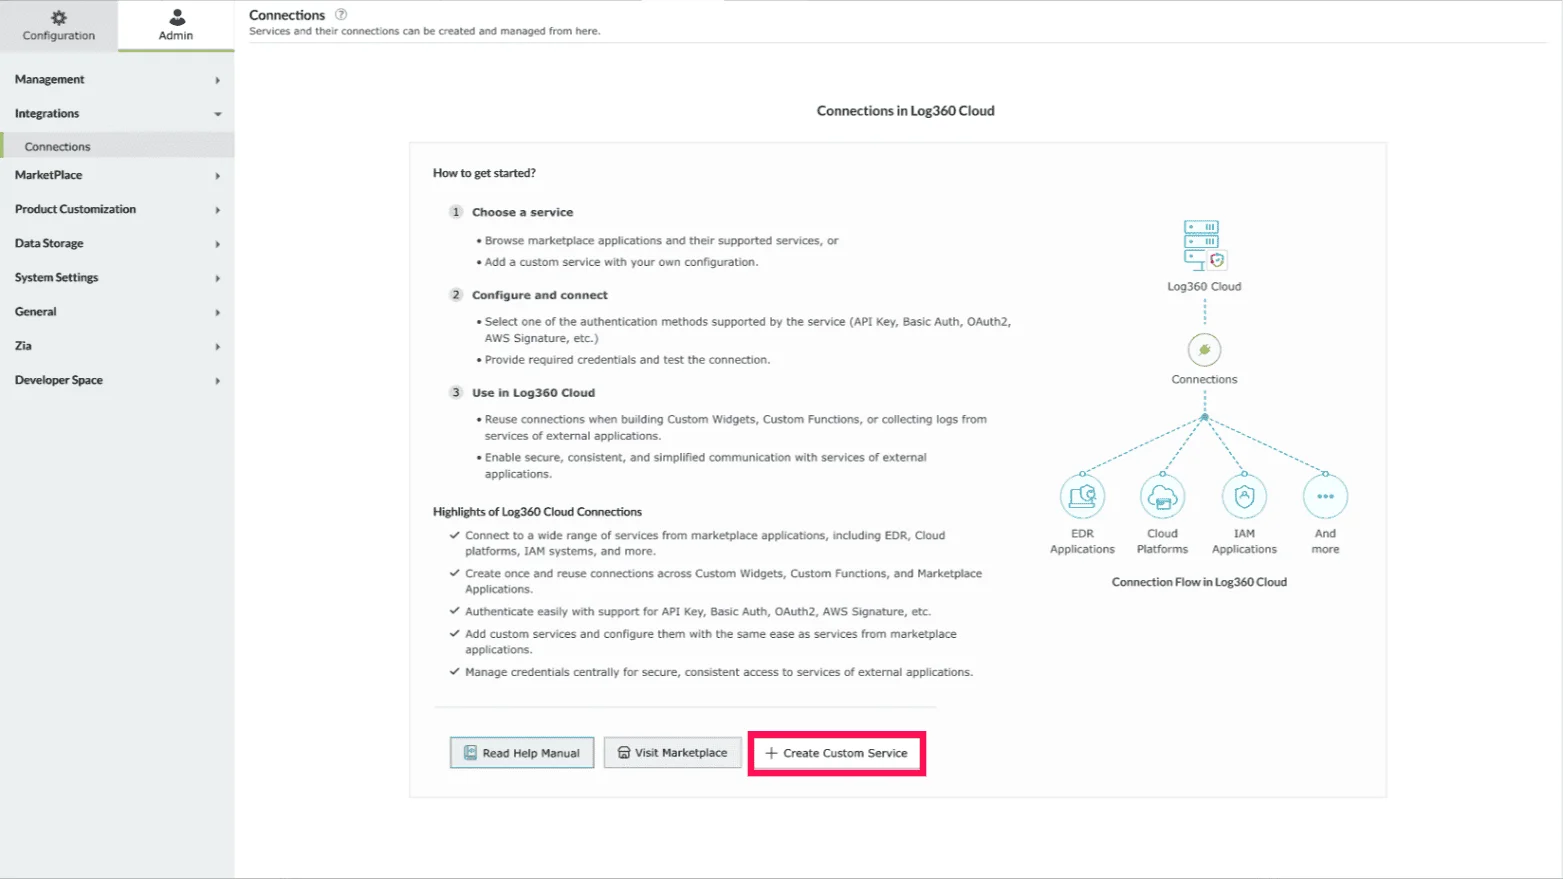
Figure 2: Creating a custom service - In the Create Custom Service window, enter a Service Name. It is the display name of the service that you want to create.
Note Display name can contain up to 50 characters.

Figure 3: Entering a service name - (Optional) Click Add Description to include details about the service. Click Save to add the description.
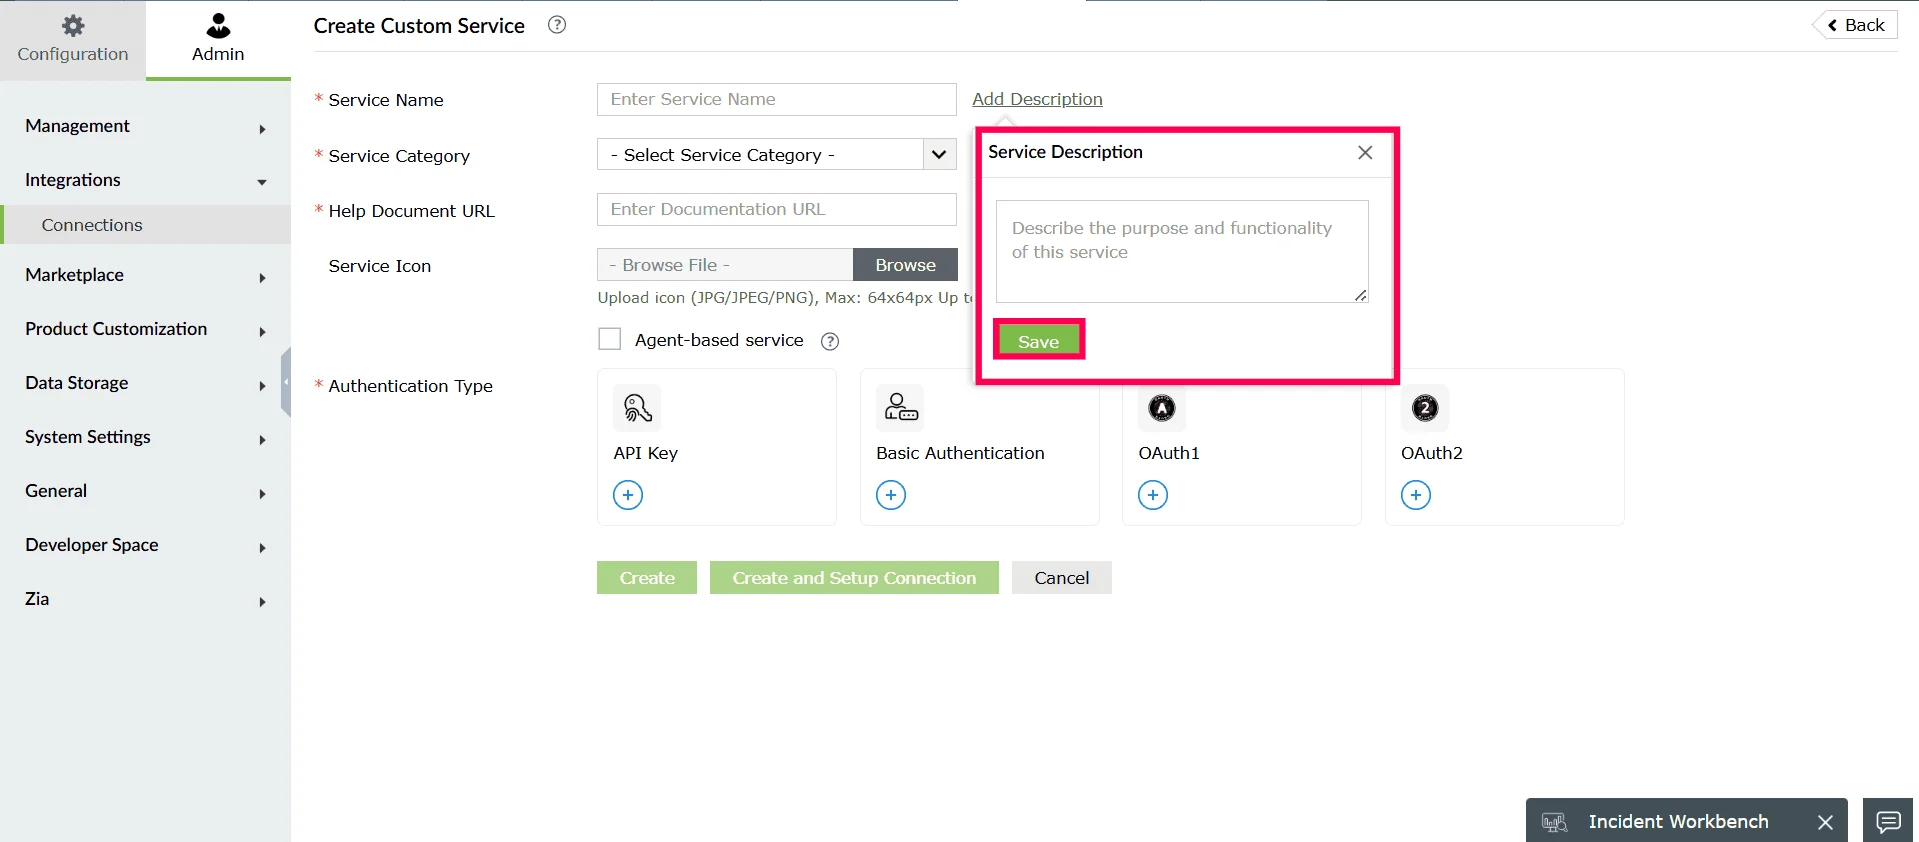
Figure 4: Adding a description - Select a Service Category from the dropdown.
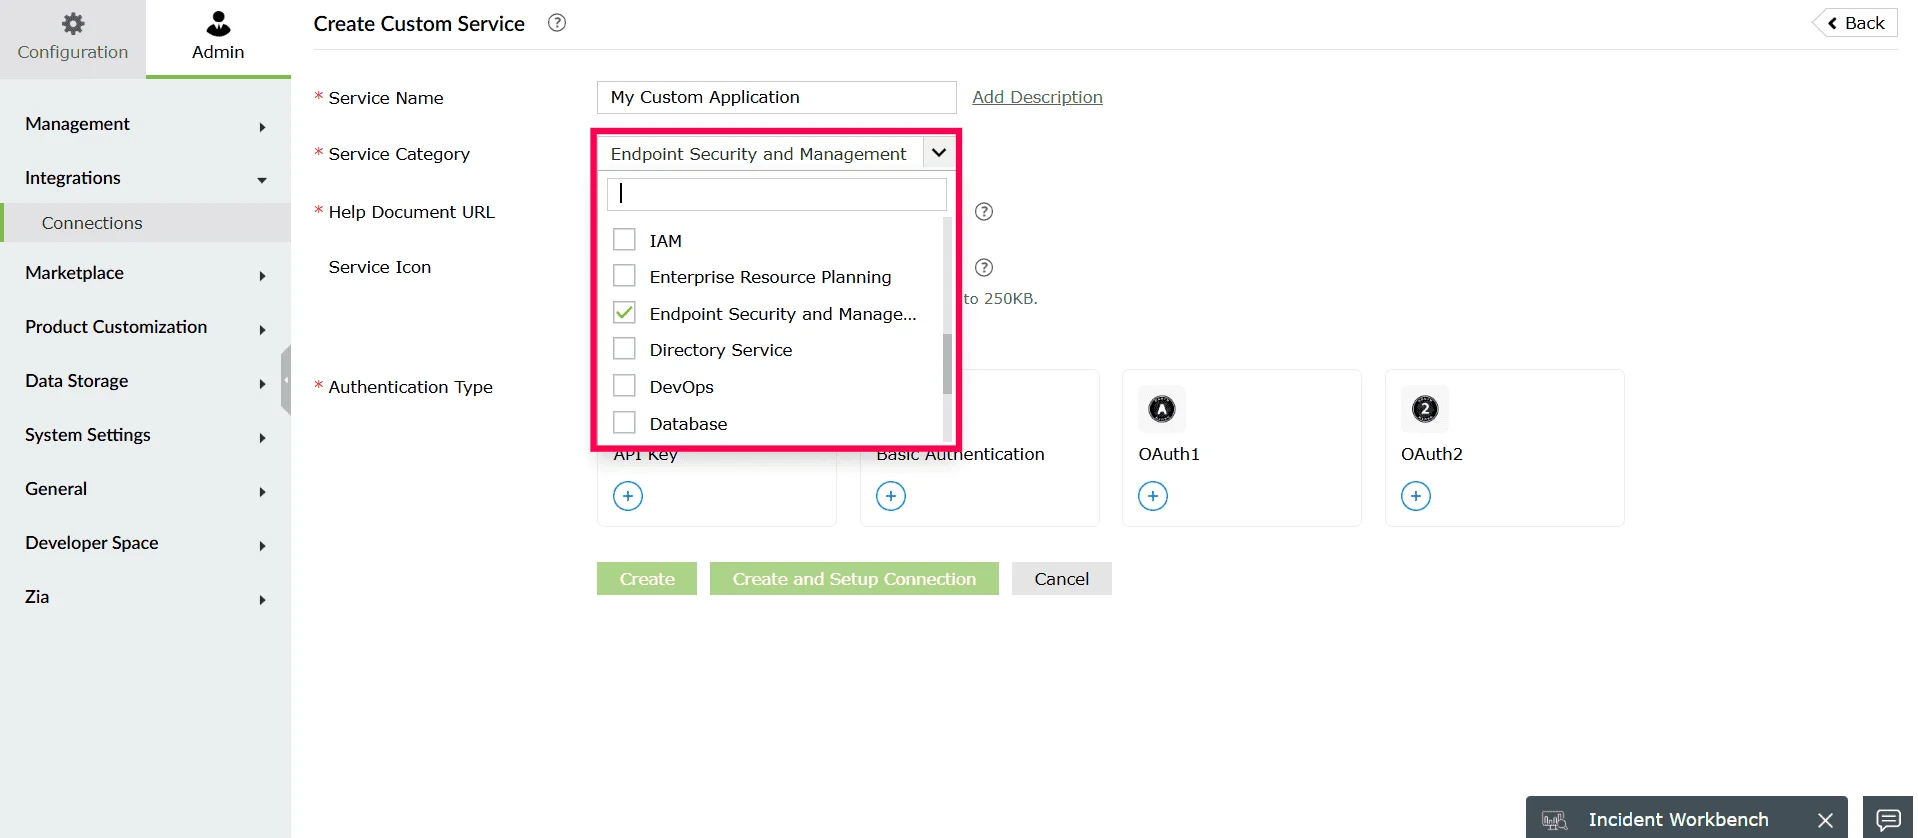
Figure 5: Selecting a service category - In the Help Document URL, specify the documentation link related to the external service.

Figure 6: Adding help document URL - (Optional) Click Browse to add a Service Icon to visually identify the custom service.
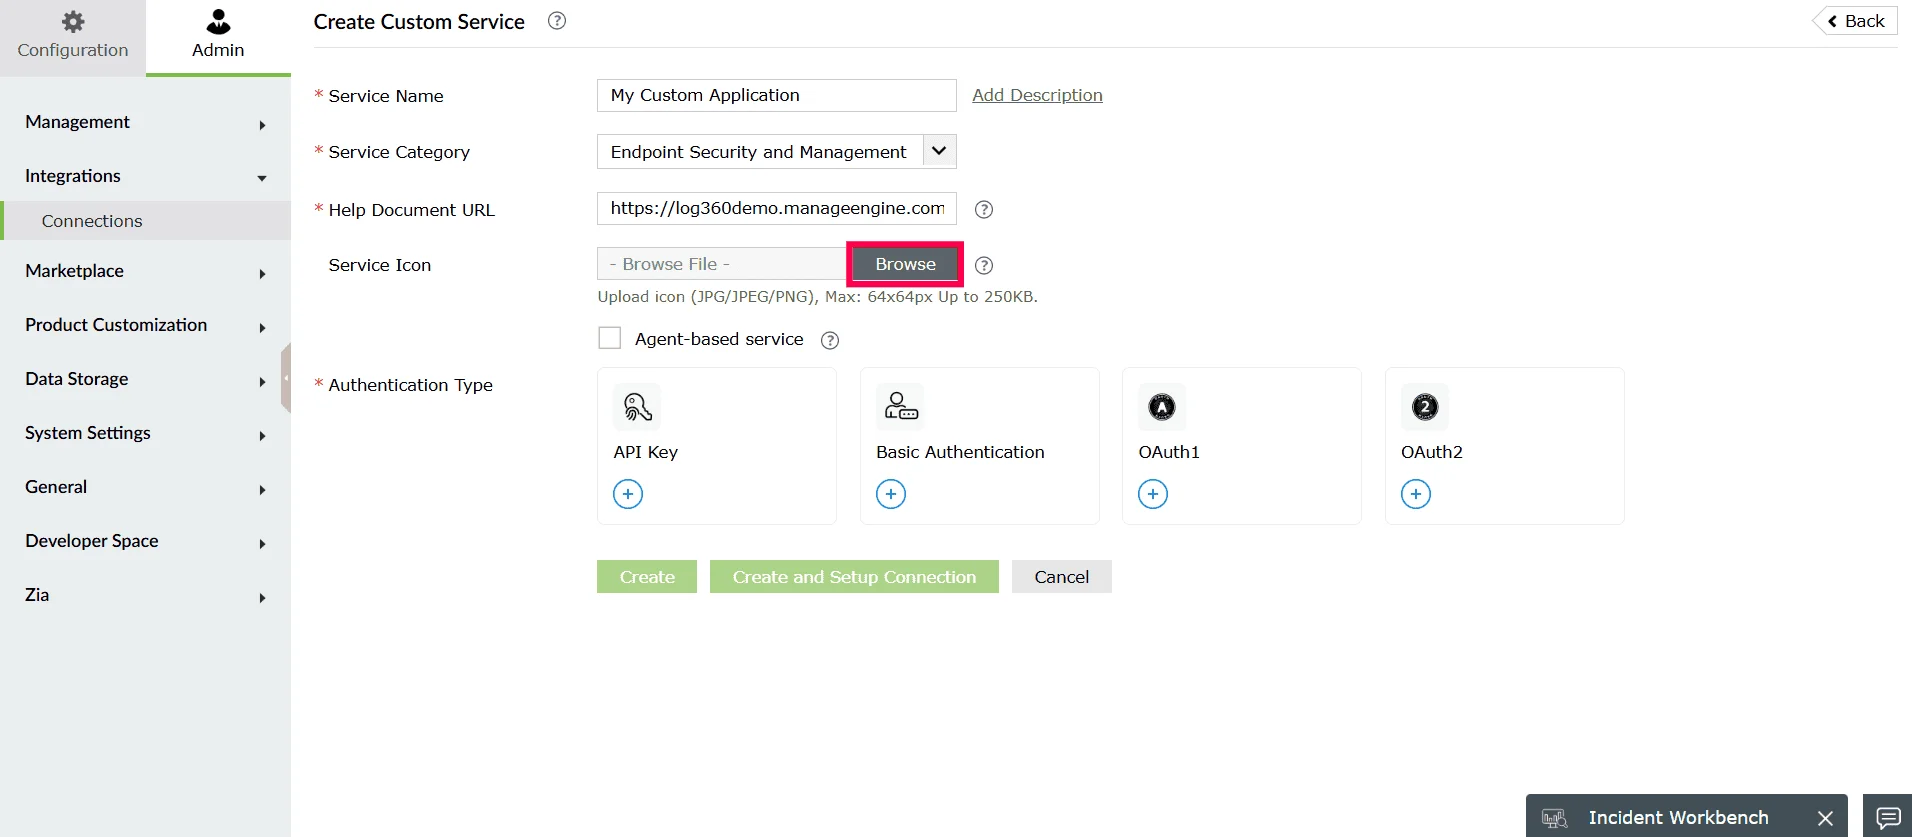
Figure 7: Adding a service icon - Select an image file from your system and click Open to add it.
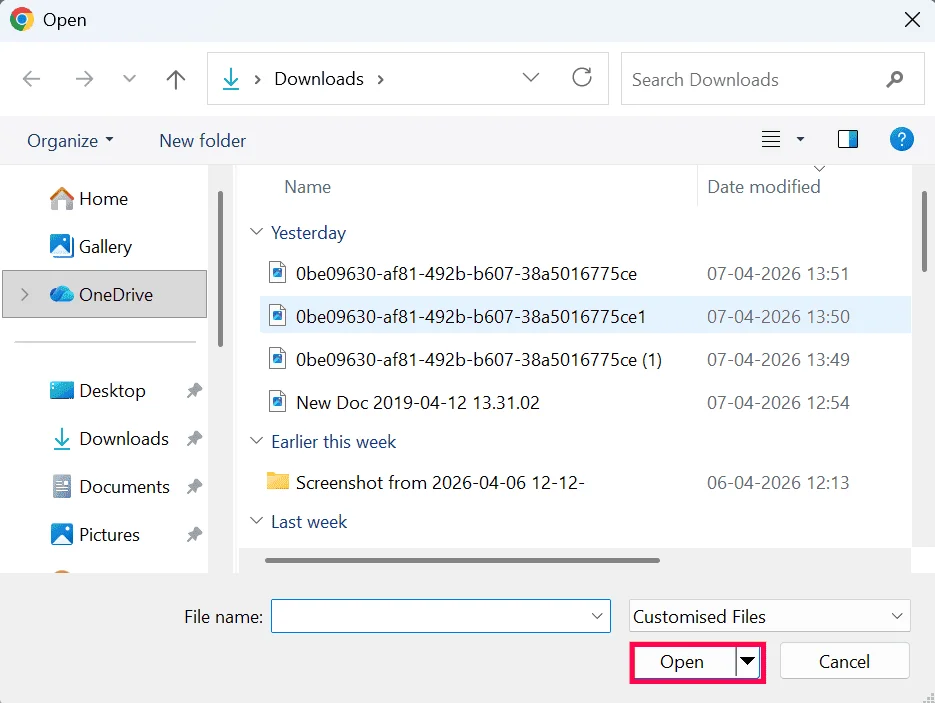
Figure 8: Adding a service icon - Enable the Agent-based service checkbox if the external application cannot be accessed directly over the internet and requires communication through an agent installed in your network.
Note If Agent-based service is enabled, only the following authentication types are supported:
- API Key
- Basic Authentication
- OAuth 2

Figure 9: Enabling agent-based service - Under Authentication Type, choose the required authentication method to connect to the external service:
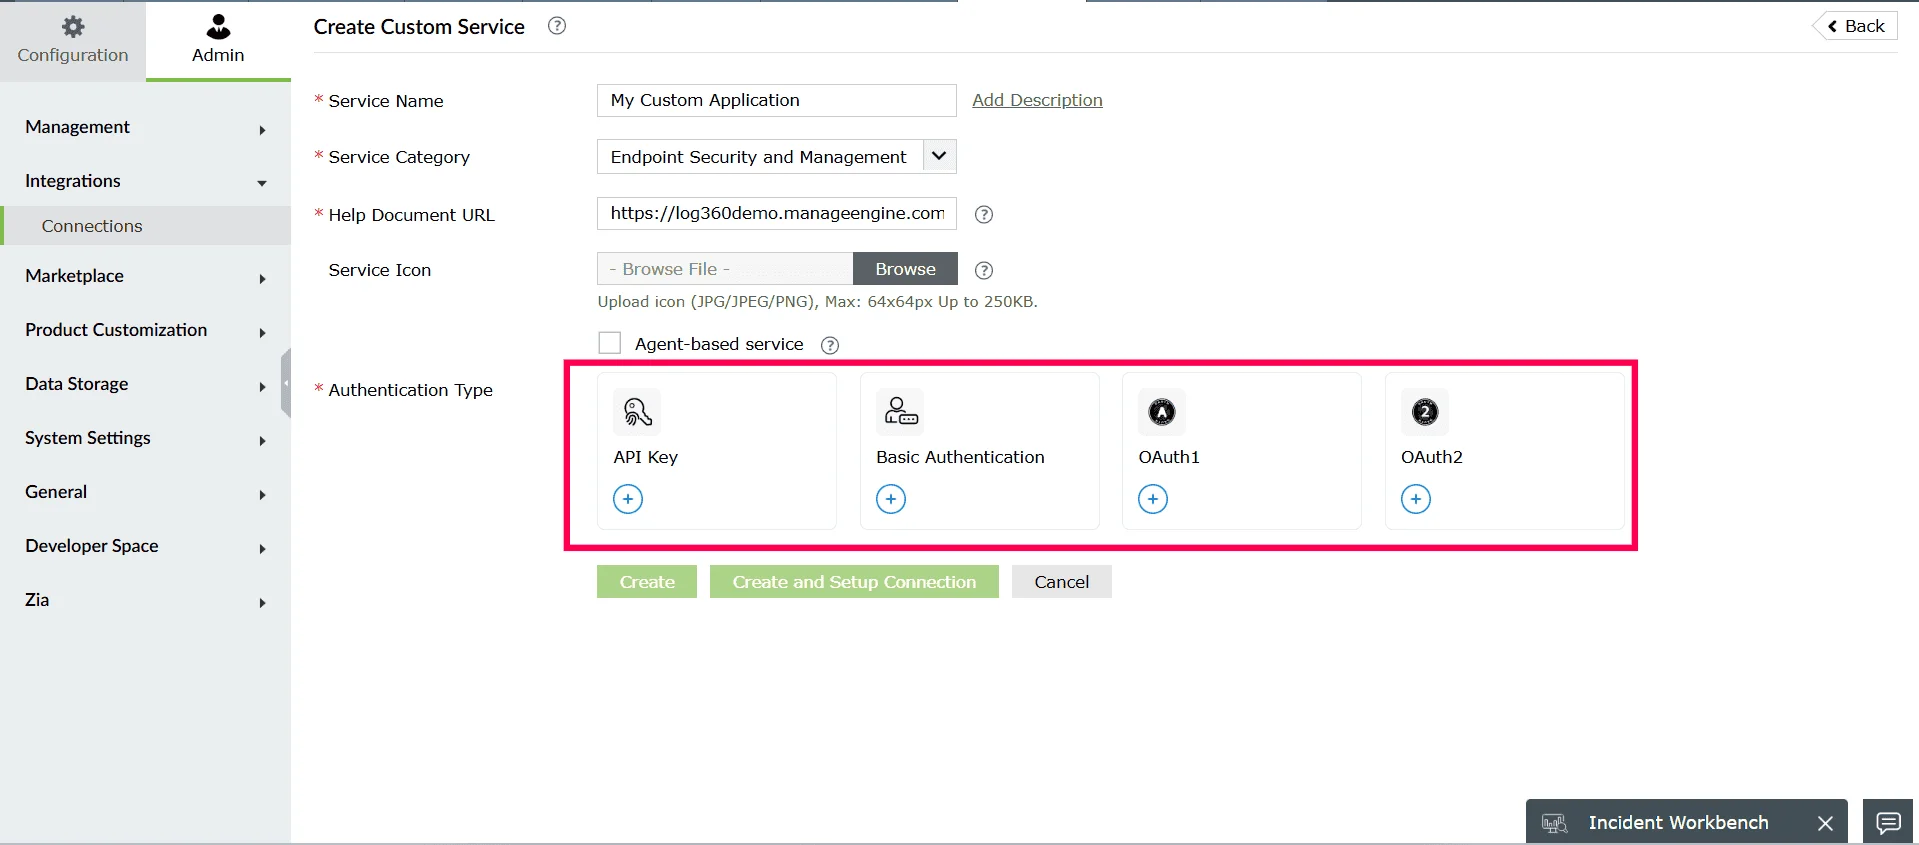
Figure 10: Selecting an Authentication type - Click Create or Create and Setup Connection.
Note The Create option creates only the Custom Service definition. This saves the service name, category, help document URL, icon, and the selected authentication type. This option does not establish a working connection with the external application.
The Create and Setup Connection option creates the Custom Service and then opens the authentication setup window. In this window, you can provide the connection name, enter authentication values (API Key, Basic Authentication, OAuth1 or OAuth2), fill in parameters and dynamic parameters, and complete authorization. Use this option to configure and activate the connection immediately.
Using API key
- In the Create Custom Service page, under Authentication Type, select API Key.
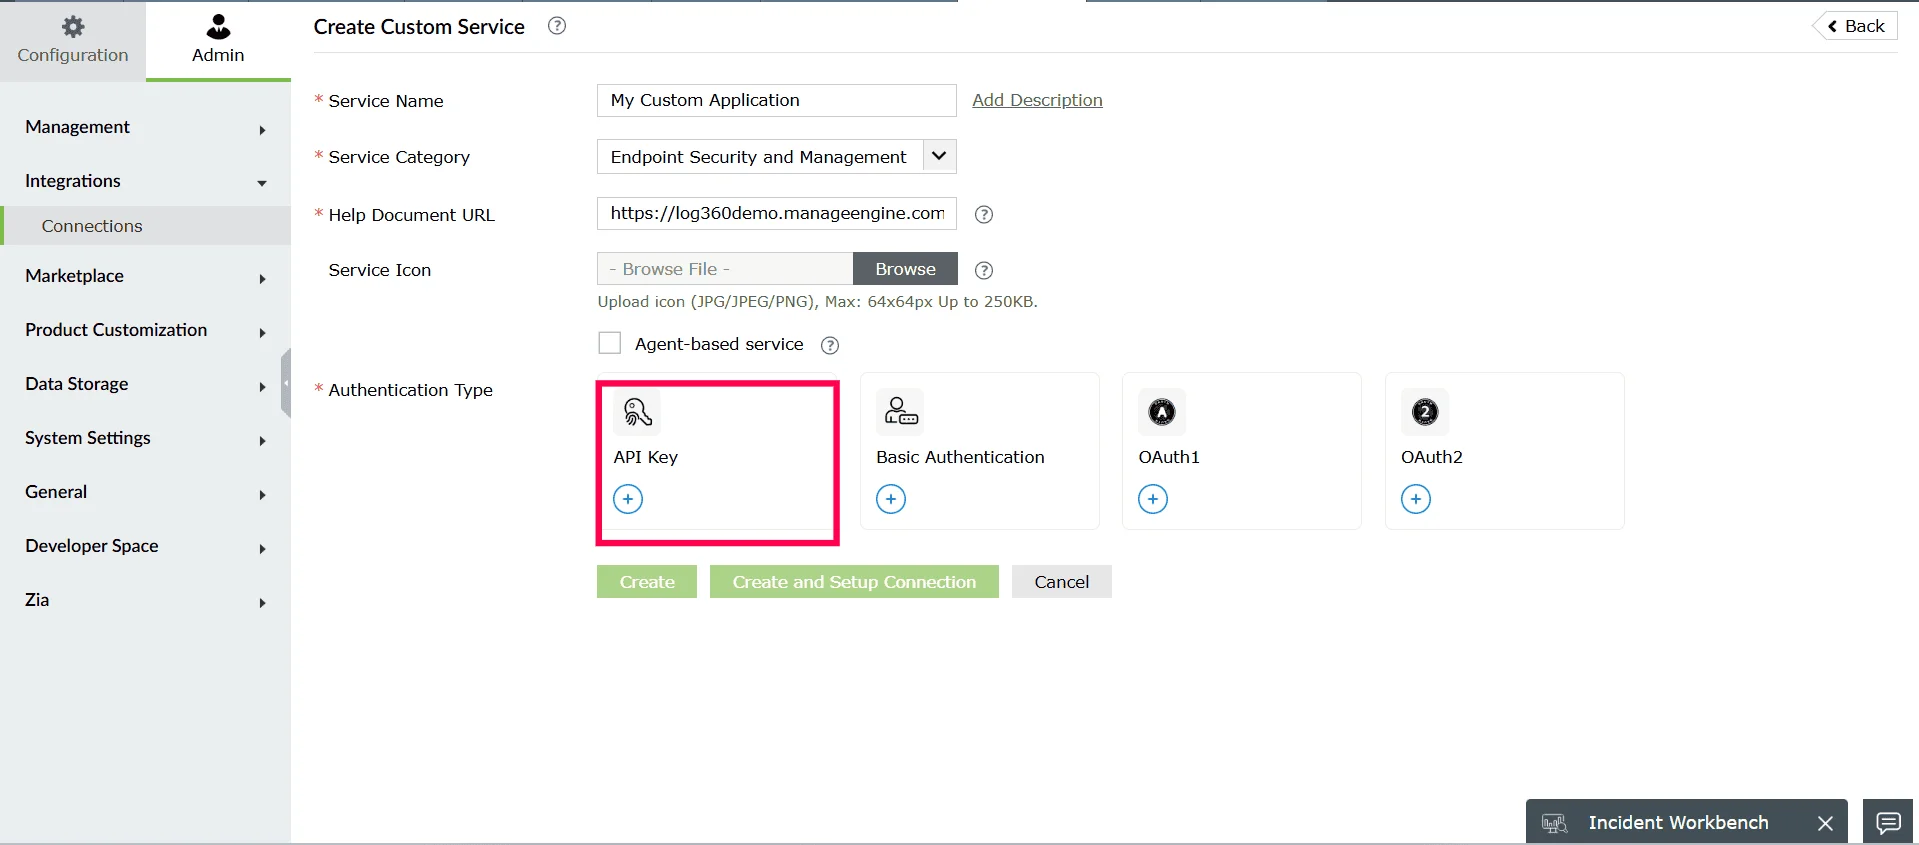
Figure 11: Selecting an authentication type - In the Add Authentication Setup window, window will be displayed.
- Under Authentication Configuration, choose the Parameter Type from the dropdown. This determines how the API key is sent to the external service.The available options are:
- Query String - Appends the API key as a query parameter in the URL.
- Header - Sends the API key as part of the request header.
- Body - Sends the API key in the request body.
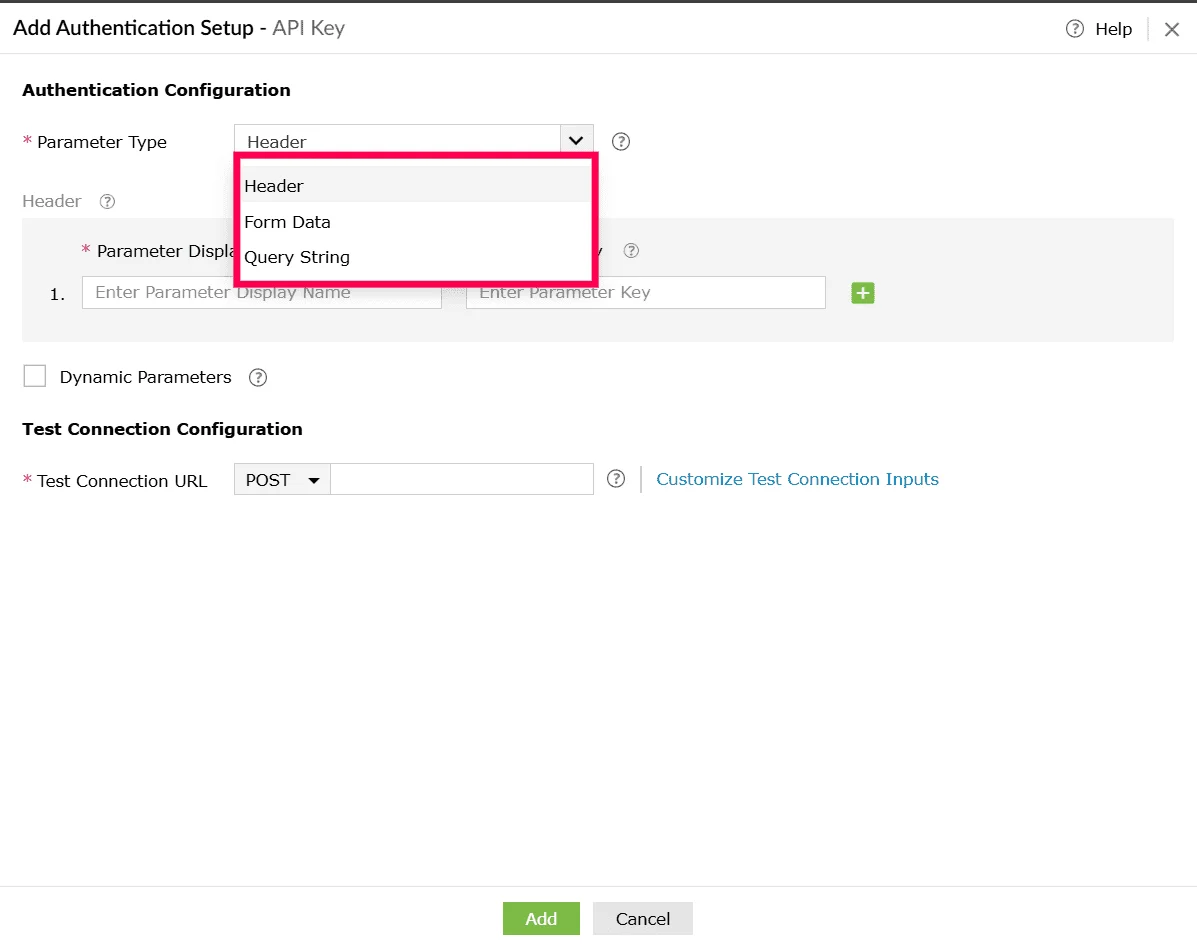
Figure 12: Selecting parameter type - Based on the selected parameter type, provide the following details:
- Parameter Display Name - A user-friendly name for the parameter.
- Parameter Key - The actual key used in the API request.
Note You can create up to 50 normal parameters.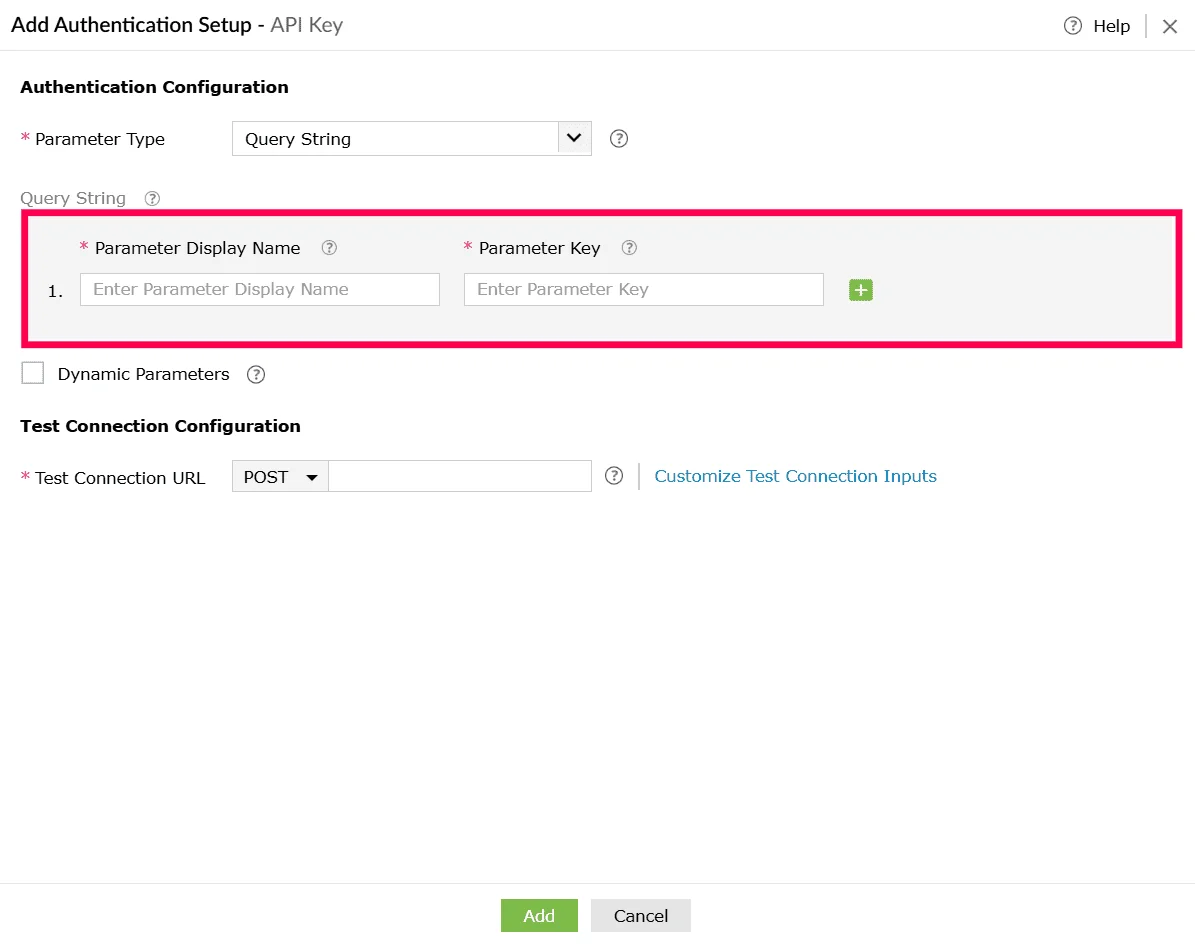
Figure 13: Configuring parameters - Use the
 icon next to each row to add a new parameter field, and the
  icon to remove a parameter you no longer need.
 - (Optional) Enable the checkbox next to Dynamic Parameters if the service requires parameters that change dynamically. Configure the following under Dynamic Parameters:
- Parameter Display Name - A readable name for the parameter.
- Parameter Key - The key used in the API call.
Note- Dynamic parameters allow you to use values that can change depending on the user, account, or environment. They act like placeholders in the URL or request.
- During execution, Log360 Cloud automatically replaces the placeholder with the value provided by the user. You can create up to 10 dynamic parameters.
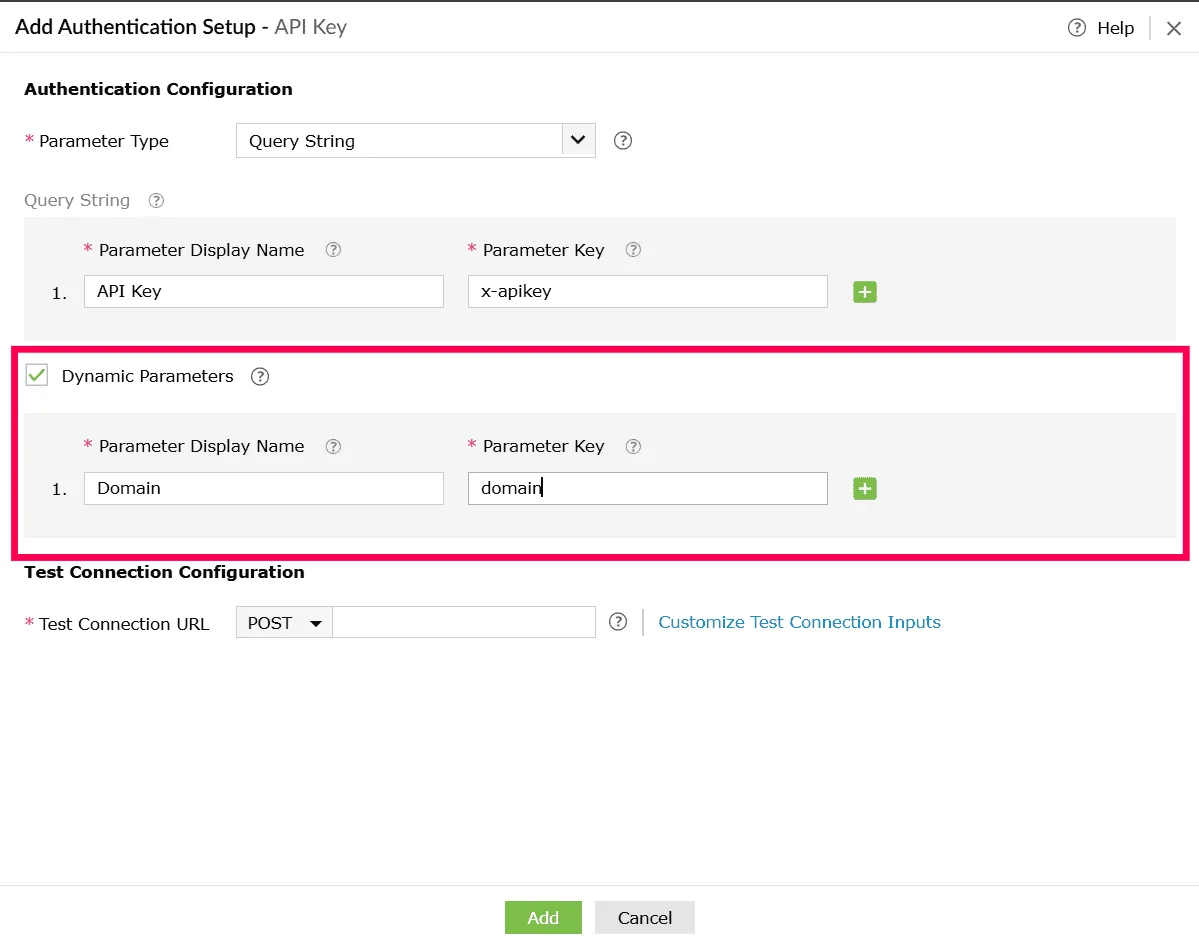
Figure 14: Enabling dynamic parameters - Use the icon next to each row to add a new parameter field, and the icon to remove a parameter you no longer need.
- Under Test Connection Configuration, provide the following details:
- Select the HTTP method (for example, POST or GET) from the dropdown.
- Enter the Test Connection URL, which is the API endpoint used to validate the connection with the external service.
Note This is used to include required headers, query parameters, or body values, ensuring that the test request matches the actual API requirements and validates the connection successfully.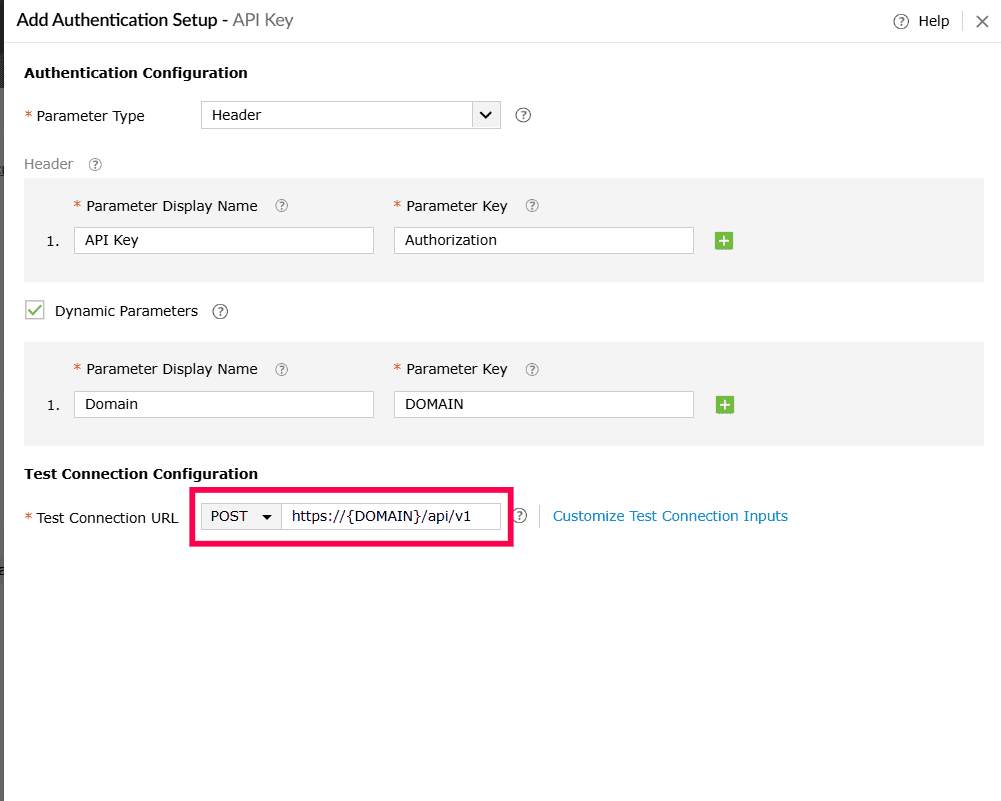
Figure 15: Configuring test connection 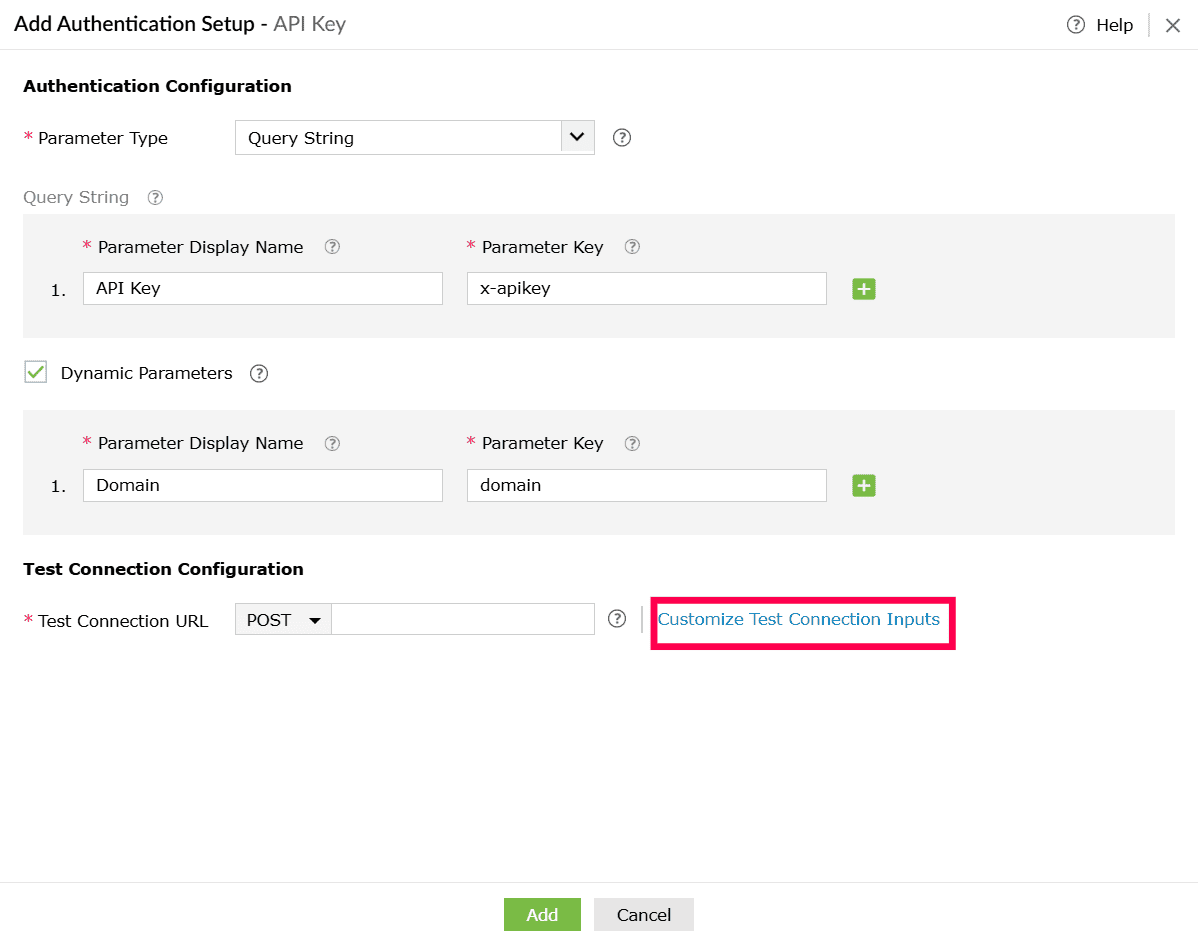
Figure 16: Customizing test connection inputs - Click Customize Test Connection Inputs to configure additional inputs required for testing the connection.
- In the Customize Test Connection Inputs window, configure request parameters as required:
- Navigate between Header, Query String, and Body tabs based on where parameters need to be added.
- Select Click Here to add parameters if none are present.
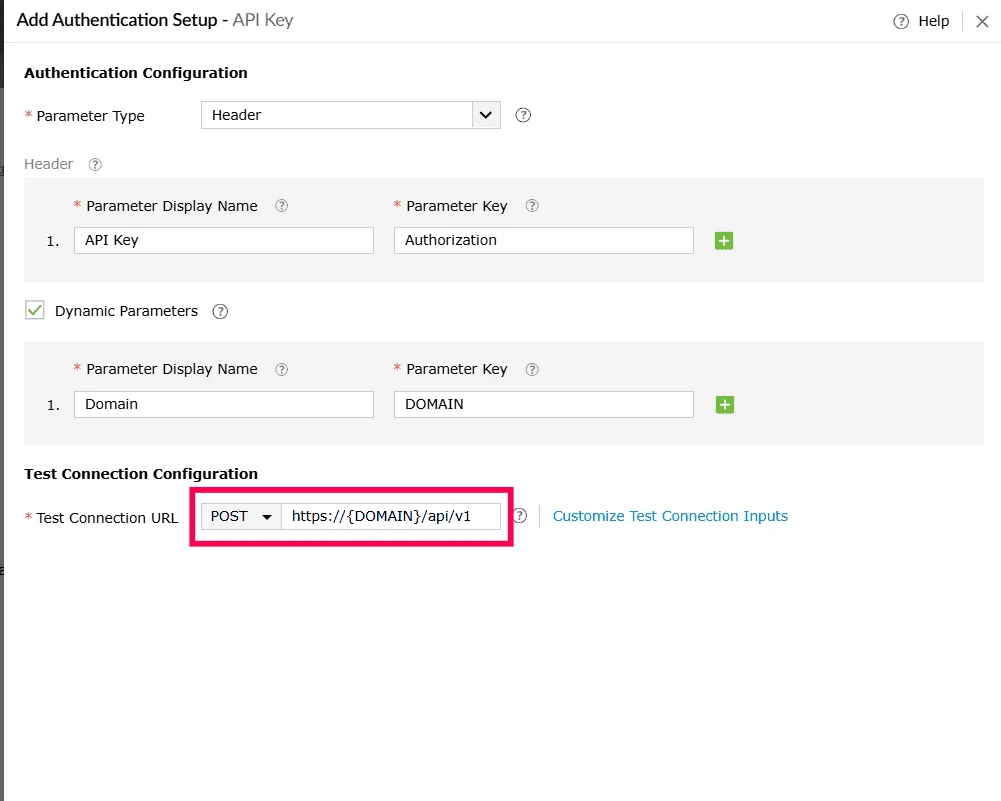
Figure 17: Adding parameters - Provide the following details:
- Parameter Key - The parameter name used in the request.
- Parameter Value - The value to be passed during the test connection.
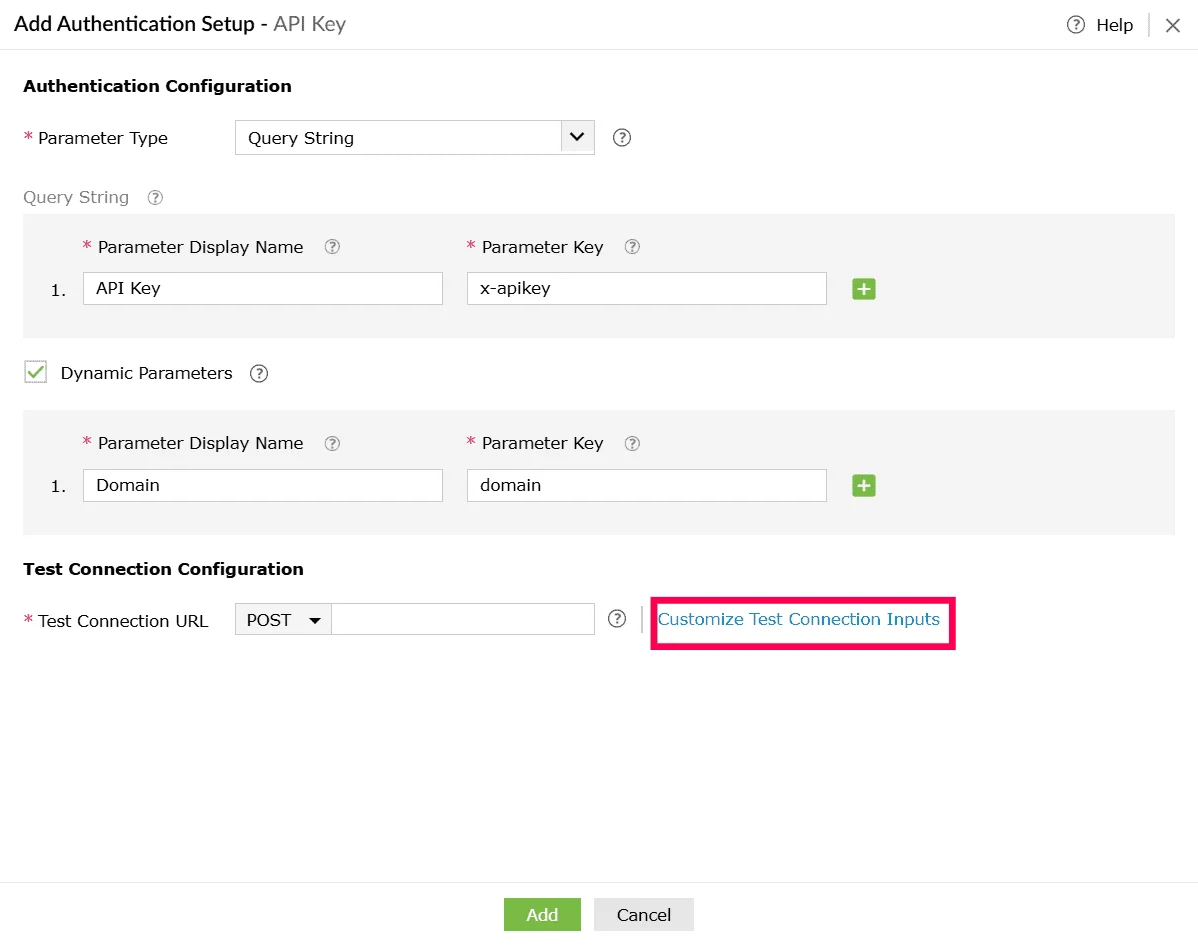
Figure 18: Configuring parameters - Use the icon next to each row to add a new parameter field, and the icon to remove a parameter you no longer need.
- Click Save to apply the changes.
- Click Add to save the authentication configuration.
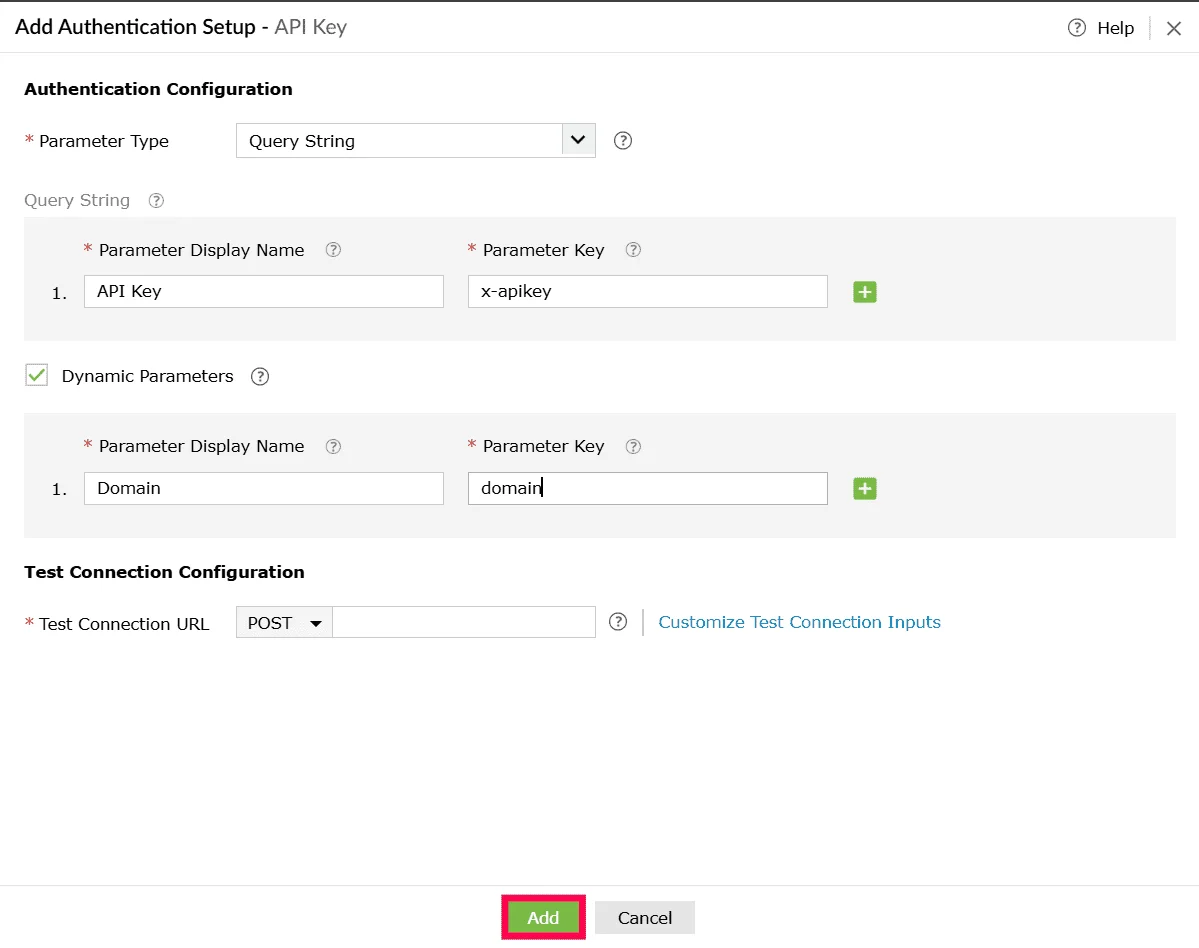
Figure 19: Adding the authentication - You can click Create to save the custom service profile or click Create and Setup Connection to proceed with establishing the actual connection using this service.
Using basic authentication
- In the Create Custom Service page, under Authentication Type, select Basic Authentication.
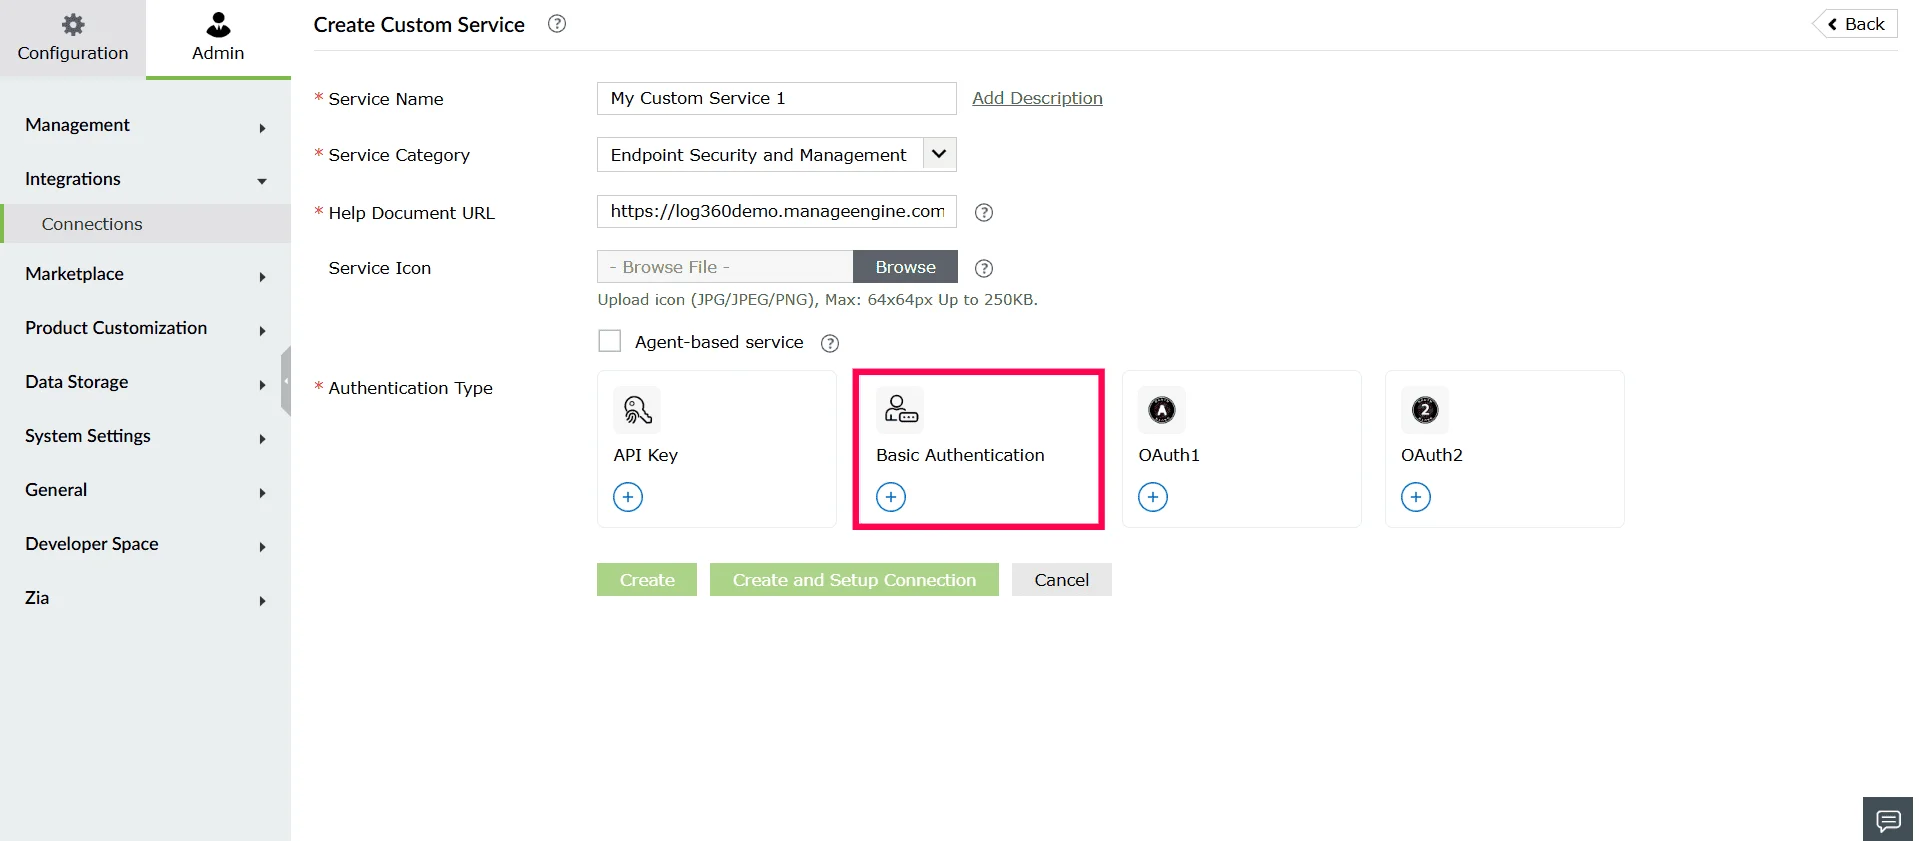
Figure 20: Selecting an authentication type - In the Add Authentication Setup - Basic Authentication window will be displayed.
- (Optional) Enable the checkbox next to Dynamic Parameters if the service requires parameters that change dynamically. Configure the following under Dynamic Parameters:
- Parameter Display Name - A readable name for the parameter.
- Parameter Key - The key used in the API call.
Note- Dynamic parameters allow you to use values that can change depending on the user, account, or environment. They act like placeholders in the URL or request.
- During execution, Log360 Cloud automatically replaces the placeholder with the value provided by the user. You can create up to 10 dynamic parameters.
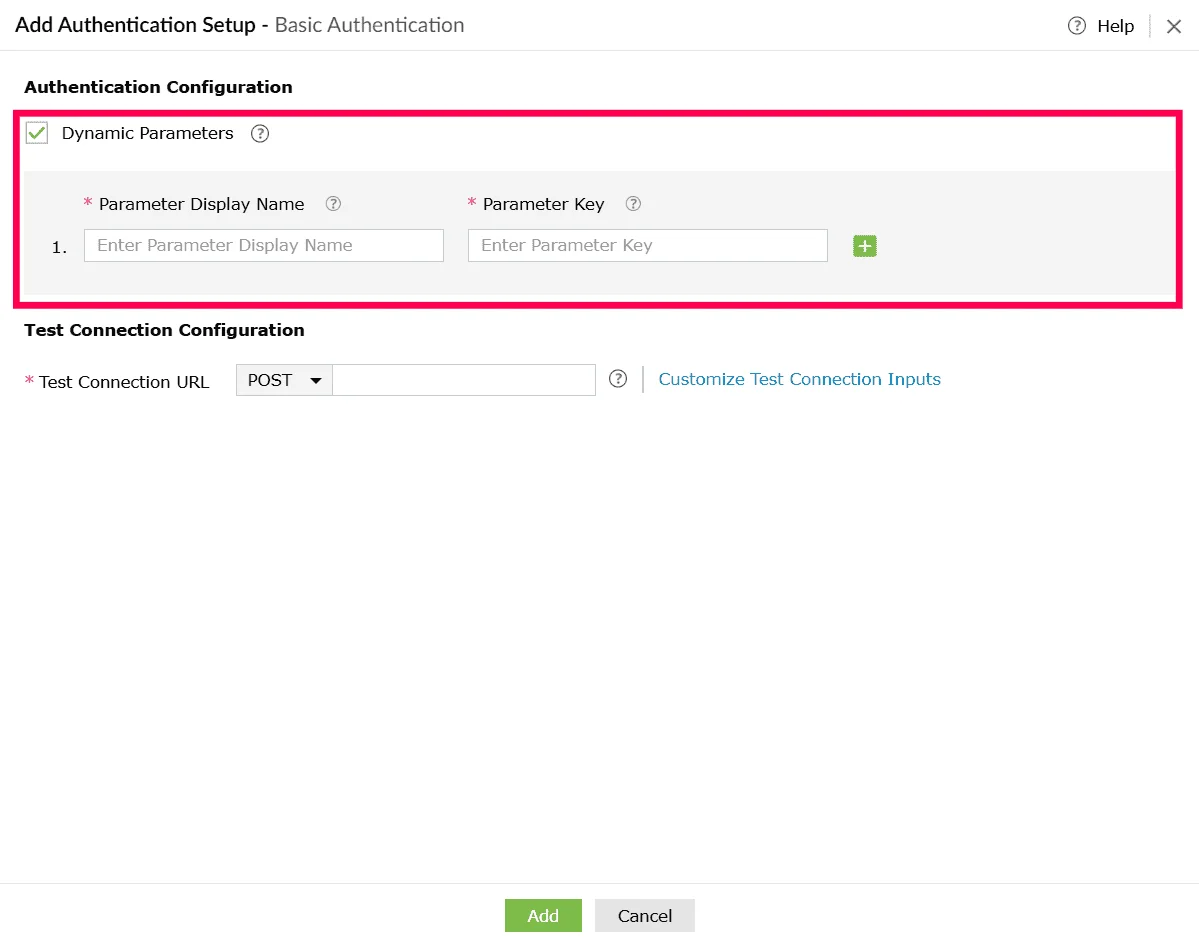
Figure 21: Enabling dynamic parameters - Use the icon next to each row to add a new parameter field, and the icon to remove a parameter you no longer need.
- Under Test Connection Configuration, provide the following:
- Select the HTTP method (for example, POST or GET) from the dropdown.
- Enter the Test Connection URL, which is the API endpoint used to validate the connection with the external service.
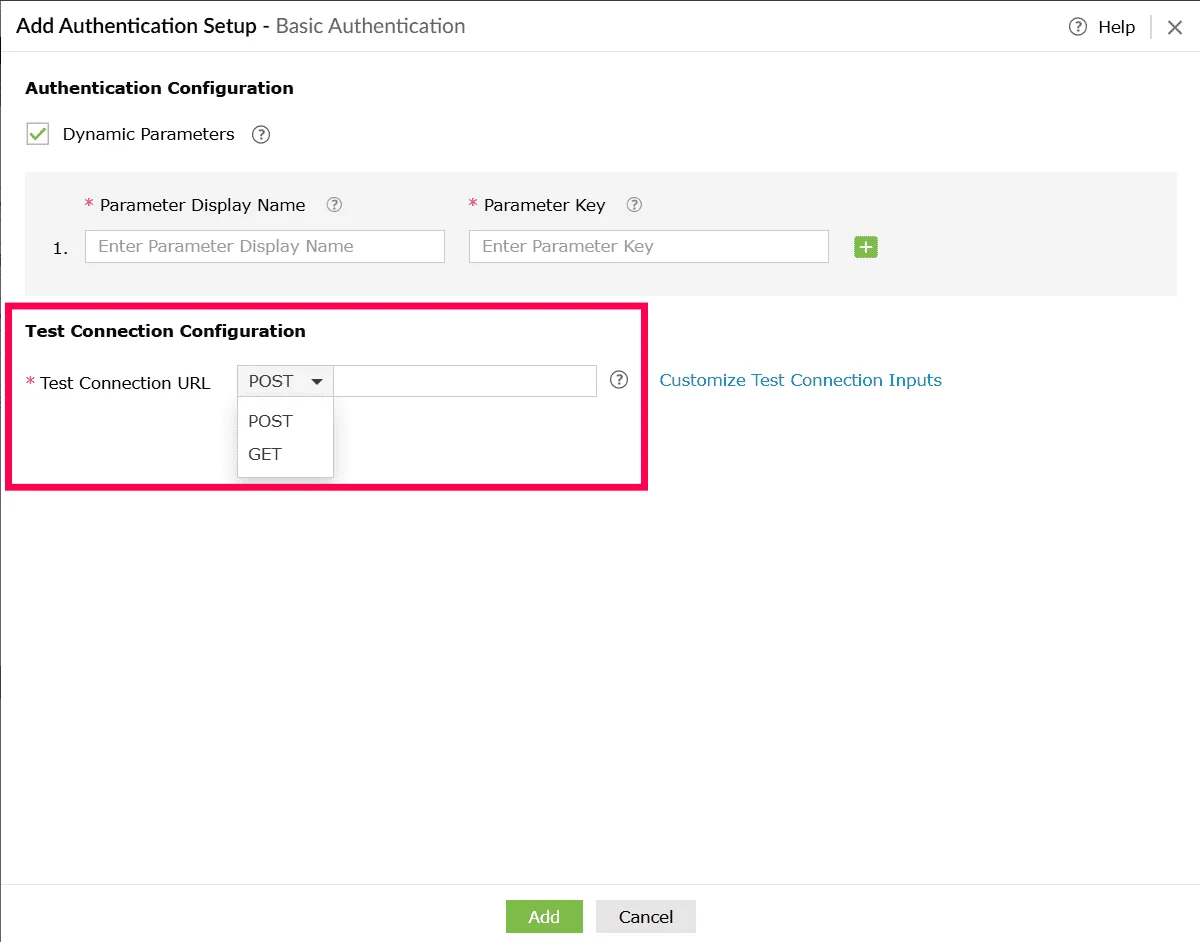
Figure 22: Configuring test connection - Click Customize Test Connection Inputs to configure additional inputs required for testing the connection.
Note This is used to include required headers, query parameters, or body values, ensuring that the test request matches the actual API requirements and validates the connection successfully.
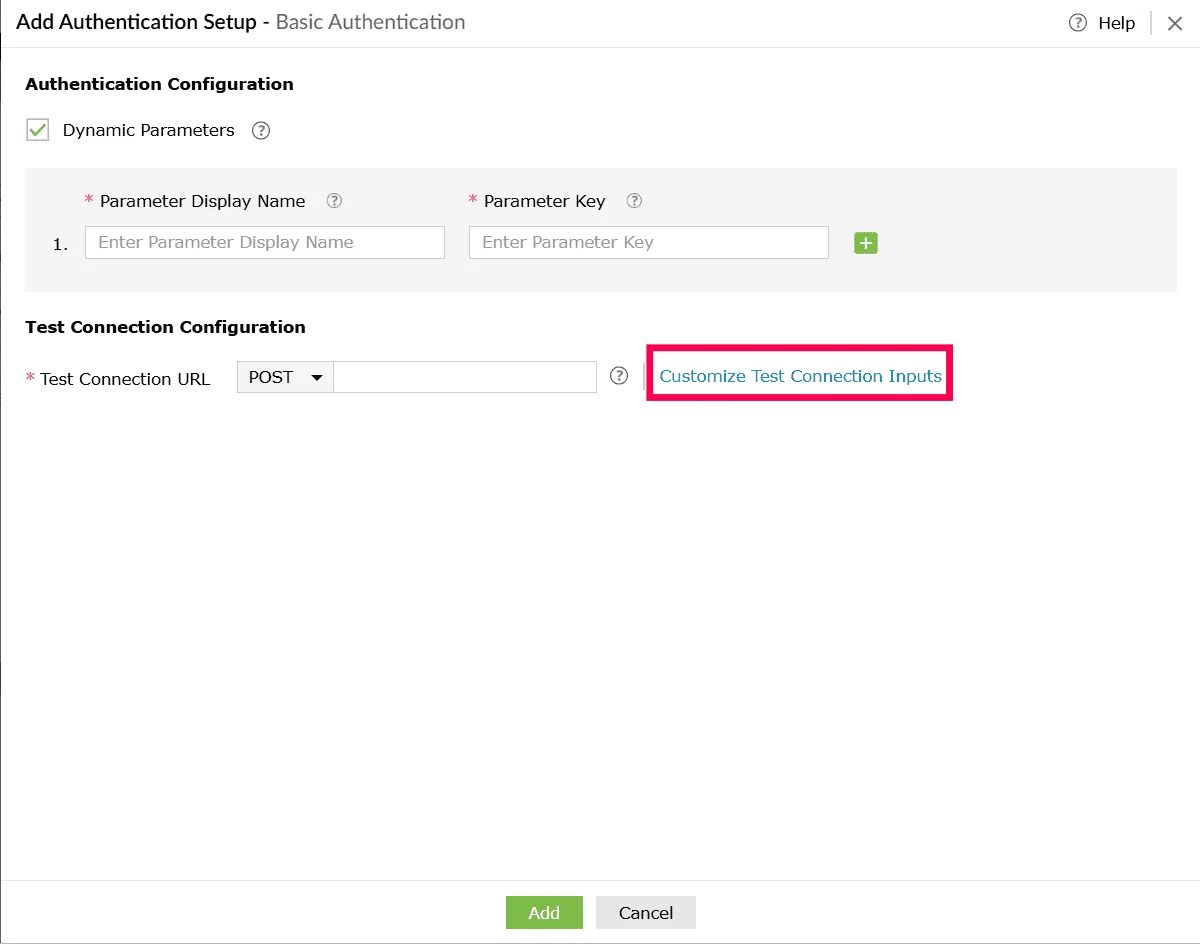
Figure 23: Customizing test connection inputs - In the Customize Test Connection Inputs window:
- Navigate between Header, Query String, and Body tabs.
- Select Click Here to add parameters if none are present.
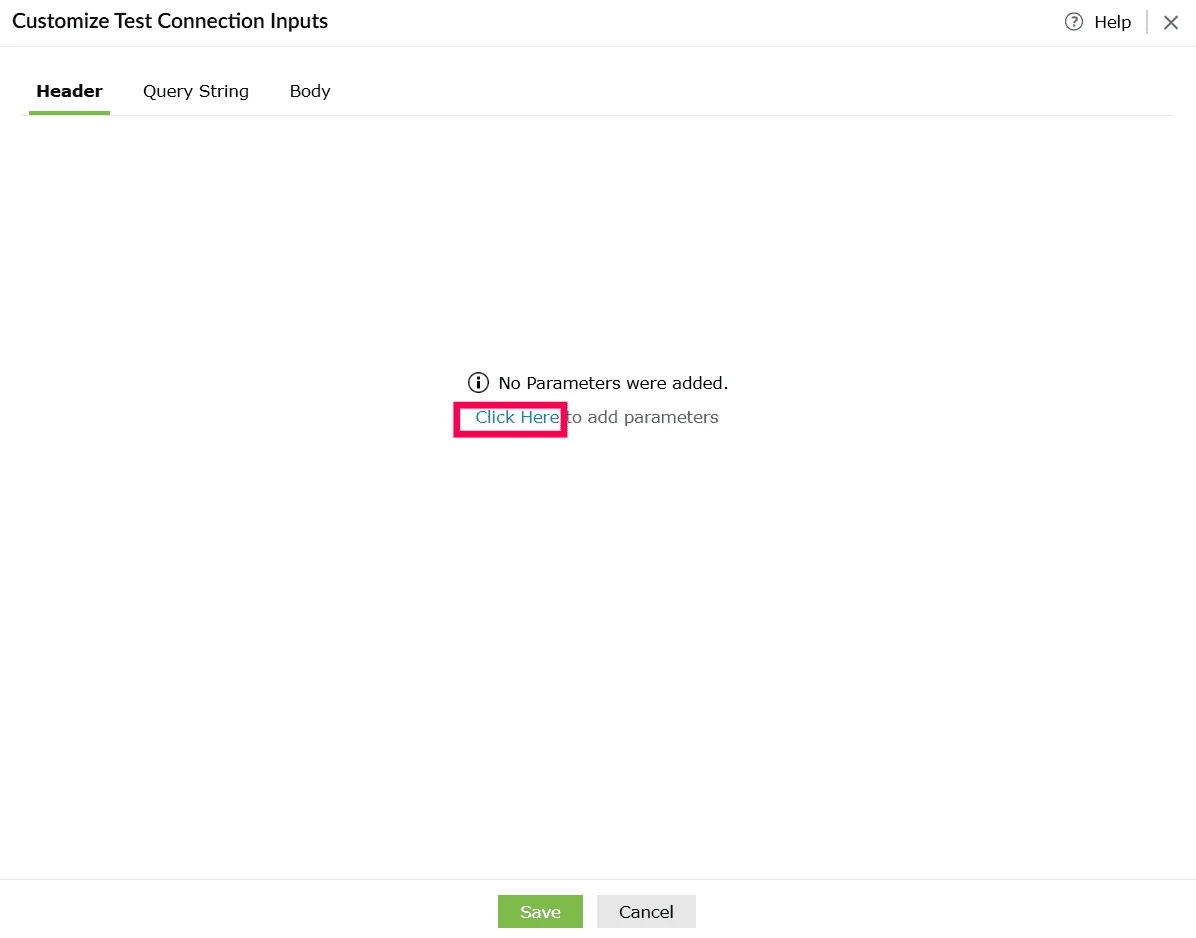
Figure 24: Adding parameters - Provide the following details:
- Parameter Key - The parameter name used in the request.
- Parameter Value - The value to be passed during the test connection.
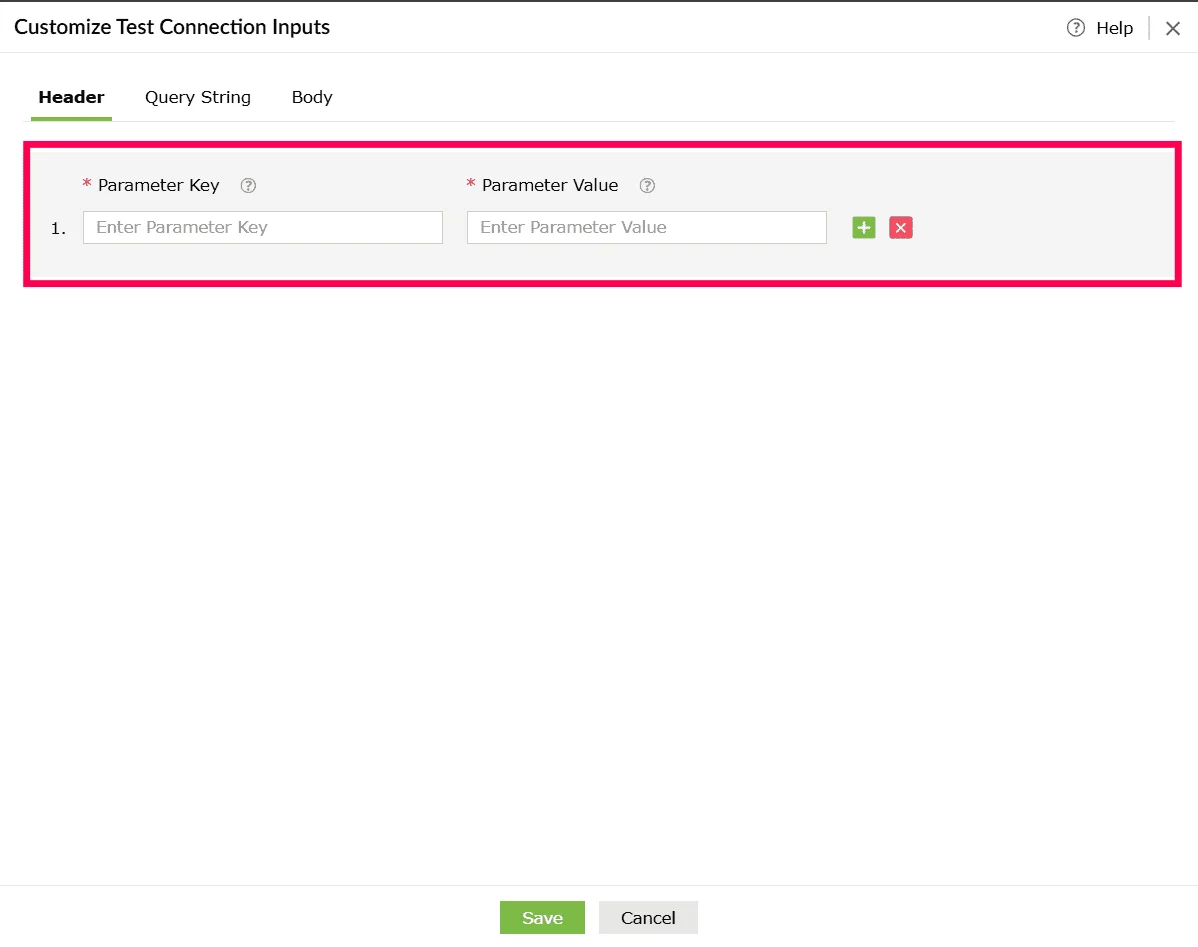
Figure 25: Configuring parameters - Use the icon next to each row to add a new parameter field, and the icon to remove a parameter you no longer need.
- Click Save to apply the changes.
- Click Add to save the authentication configuration for the custom service.
Figure 26: Adding the authentication - You can click Create to save the custom service profile or click Create and Setup Connection to proceed with establishing the actual connection using this service.
Using OAuth1
- In the Create Custom Service page, under Authentication Type, select OAuth1.
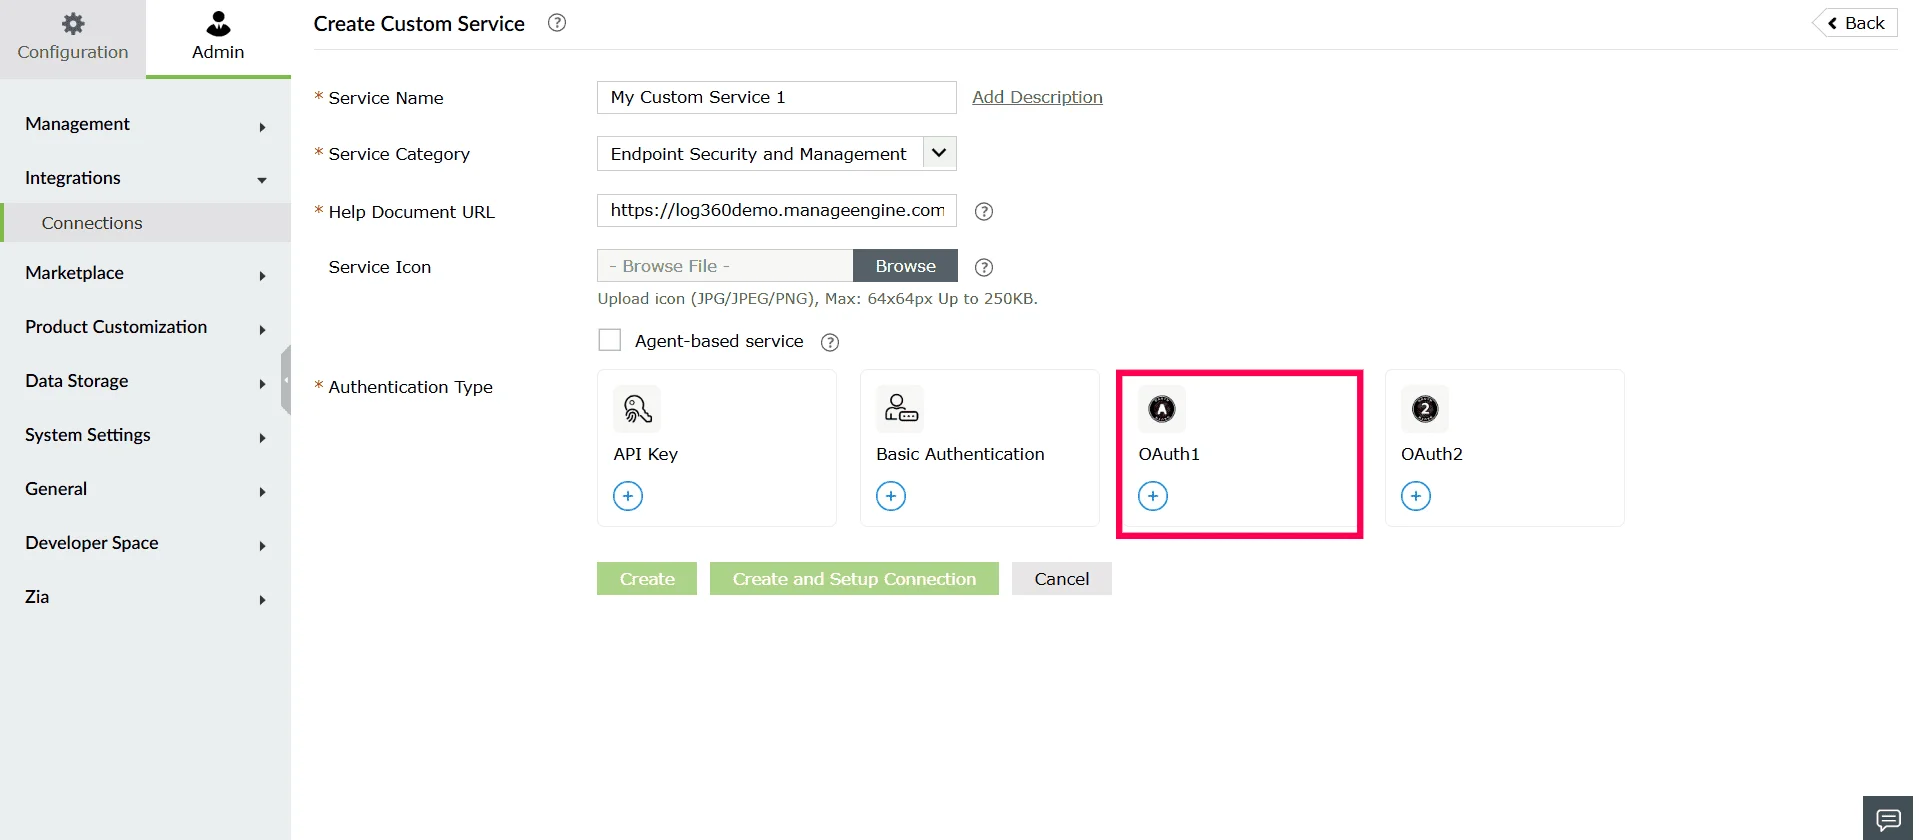
Figure 27: Selecting an authentication type - In the Add Authentication Setup window, provide the following fields as required by the external service:
Note The Parameter Type is set to Header by default for OAuth1. This cannot be modified because OAuth1 always passes authentication parameters through request headers.
- Consumer Key - A unique identifier issued by the external service to identify your application.
- Consumer Secret - A confidential key provided by the API service for secure communication.
- Request Token URL - The endpoint used to generate a temporary request token required to initiate authorization.
- Authorize URL - The authorization page where users grant permission for the application to access their data.
- Access Token URL - The endpoint used to exchange temporary credentials for a permanent access token.
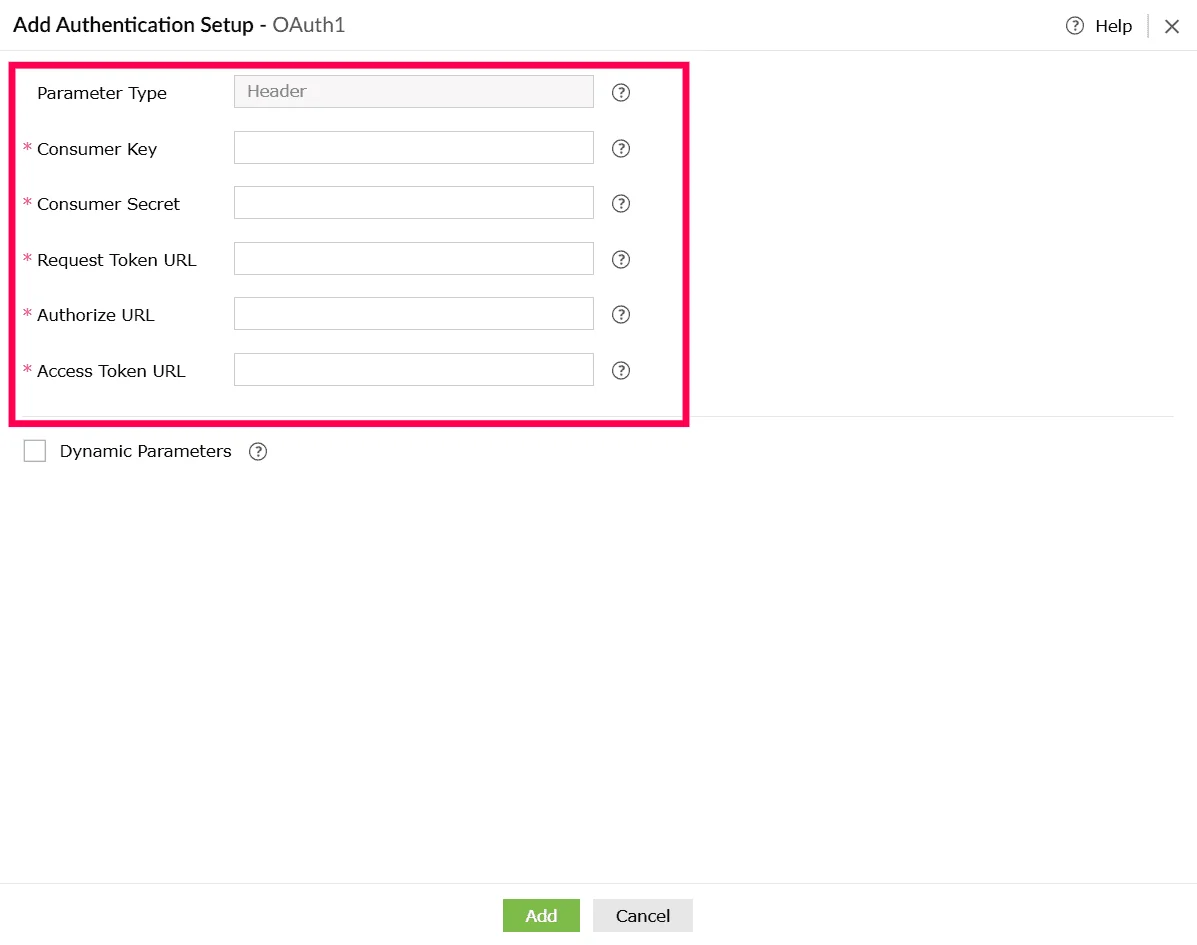
Figure 28: Configuring authentication setup - (Optional) Enable the checkbox next to Dynamic Parameters if the service requires parameters that change dynamically. Configure the following under Dynamic Parameters:
- Parameter Display Name - A readable name for the parameter.
- Parameter Key - The key used in the API call.
Note- Dynamic parameters allow you to use values that can change depending on the user, account, or environment. They act like placeholders in the URL or request.
- During execution, Log360 Cloud automatically replaces the placeholder with the value provided by the user. You can create up to 10 dynamic parameters.
- Use the icon next to each row to add a new parameter field, and the icon to remove a parameter you no longer need.
- Click Add to save the authentication configuration for the custom service.
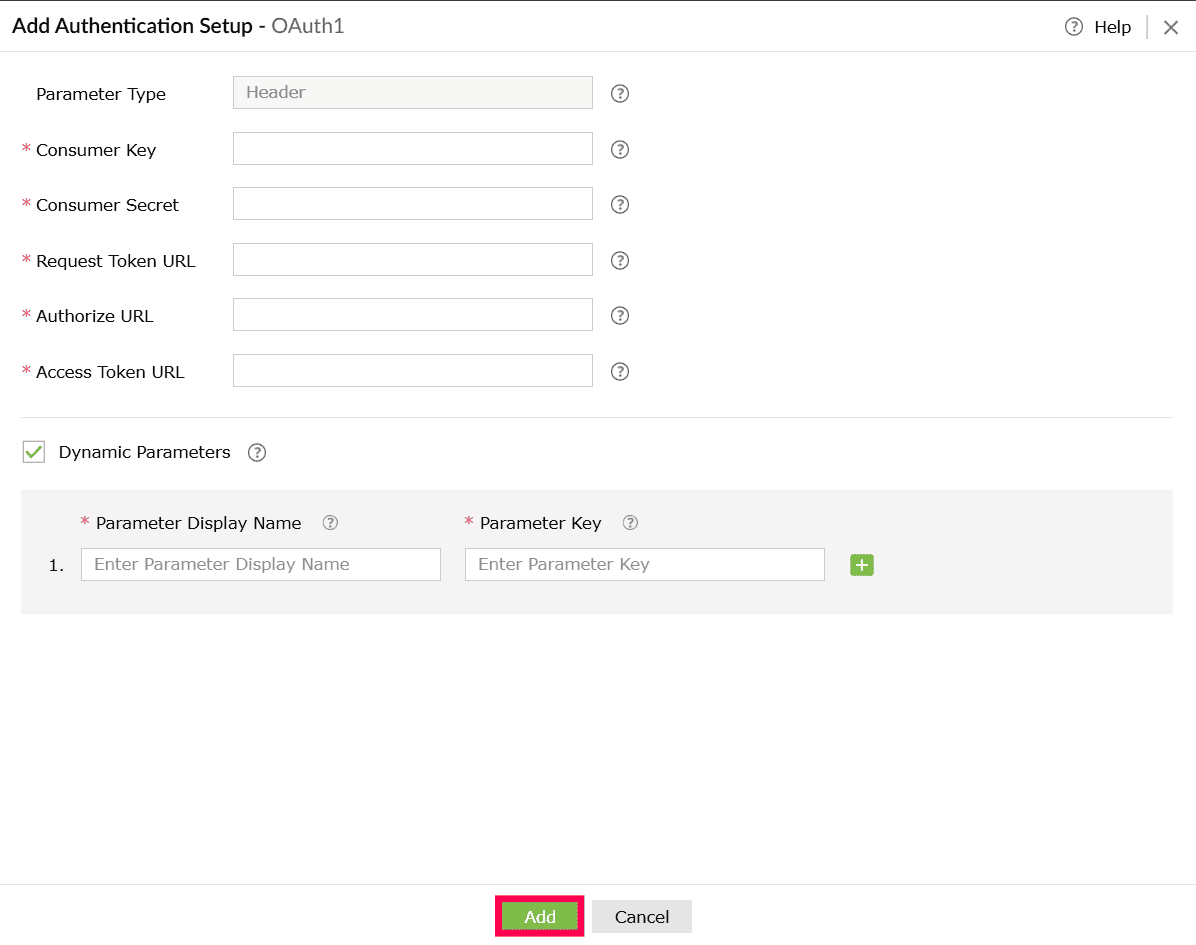
Figure 29: Adding the authentication - You can click Create to save the custom service profile or click Create and Setup Connection to proceed with establishing the actual connection using this service.
Using OAuth 2
OAuth 2 supports multiple grant types, and the setup steps vary depending on the method supported by the external service. The following are the available OAuth 2 configuration types:
- Automatic configuration support
- Manual configuration support
- Manual and automatic configuration support
- Authorization code with PKCE
- Client credentials
Using Authorization code with automatic configuration support
- In the Create Custom Service page, under Authentication Type, select OAuth 2.
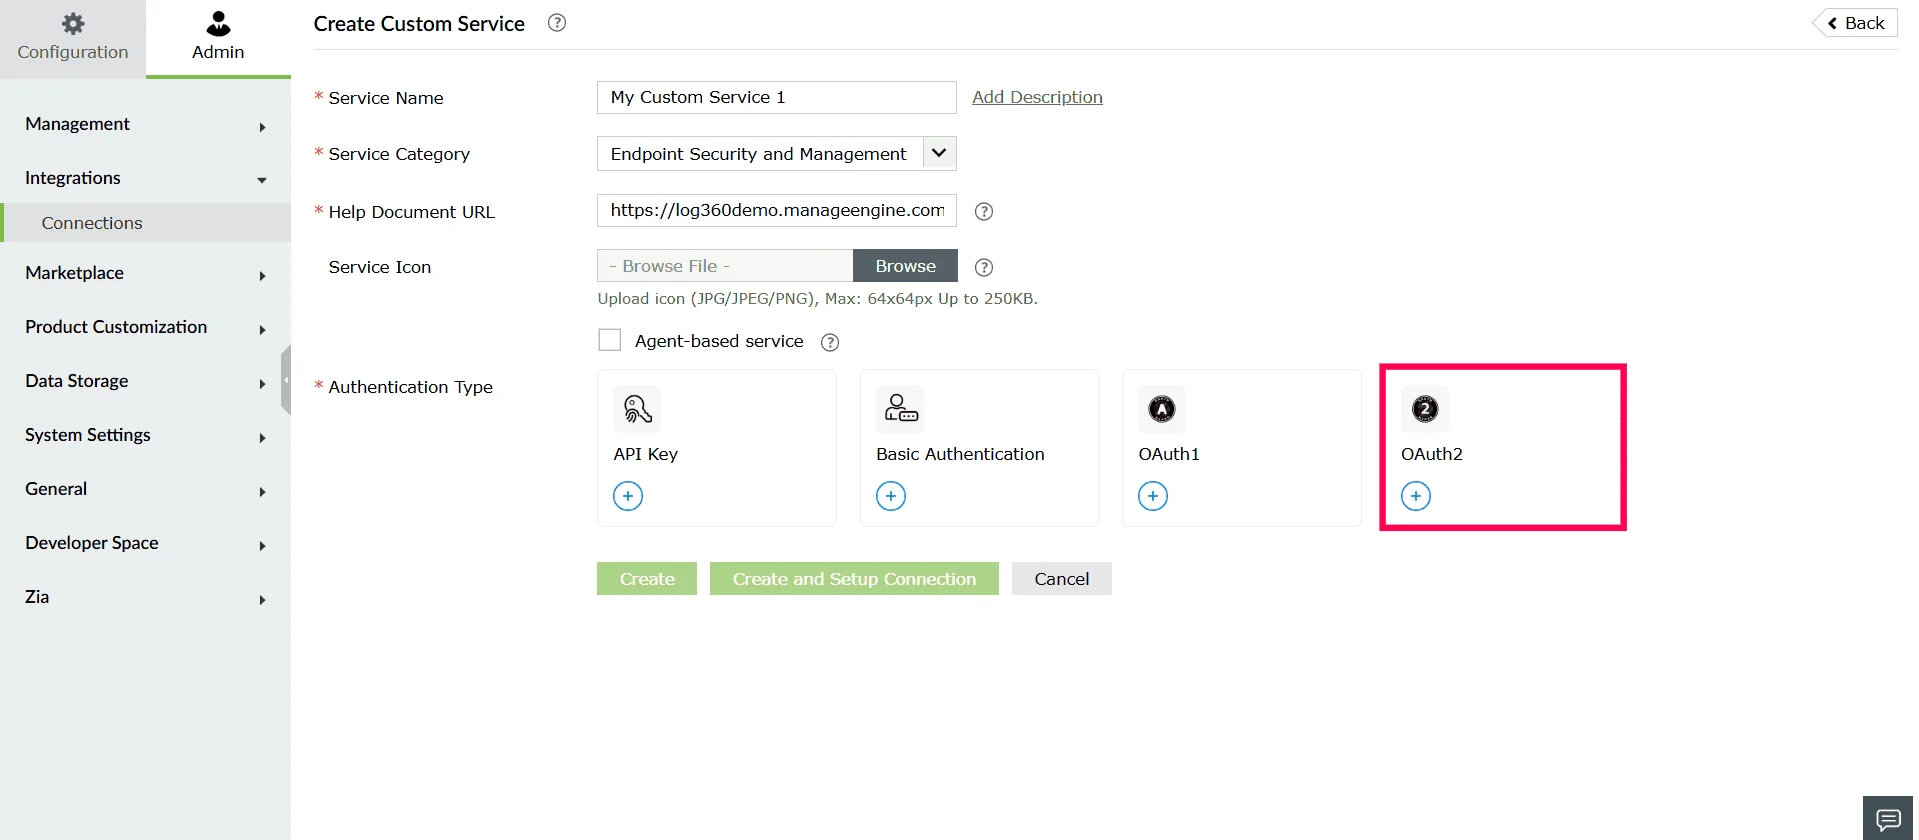
Figure 30: Selecting an authentication type - In the Add Authentication Setup window, choose how parameters should be passed from the Parameter Type dropdown. The available options are:
- Query String - Appends the access token as a query parameter in the URL.
- Header - Sends the access token as part of the request header.
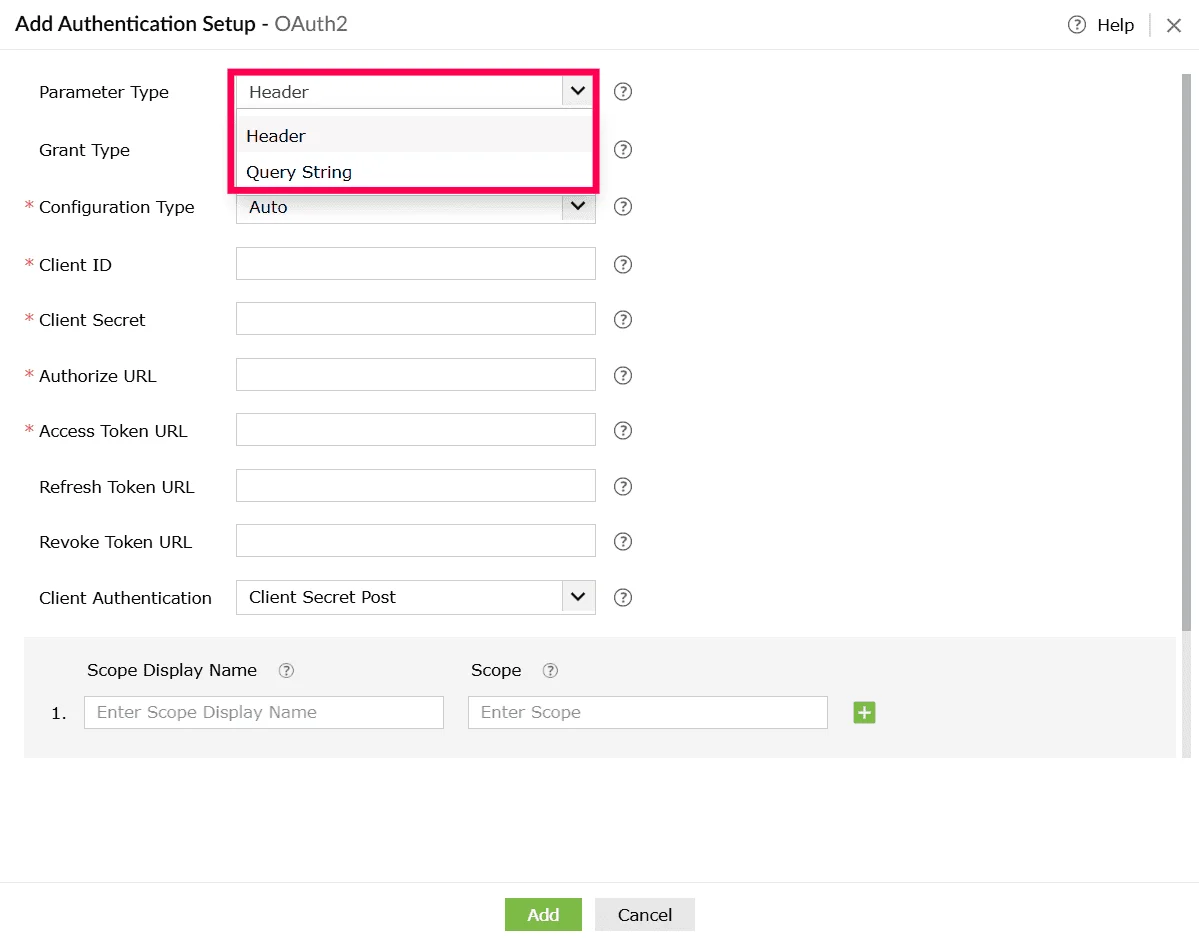
Figure 31: Selecting parameter type - From the Grant Type drop-down, select Authorization Code.
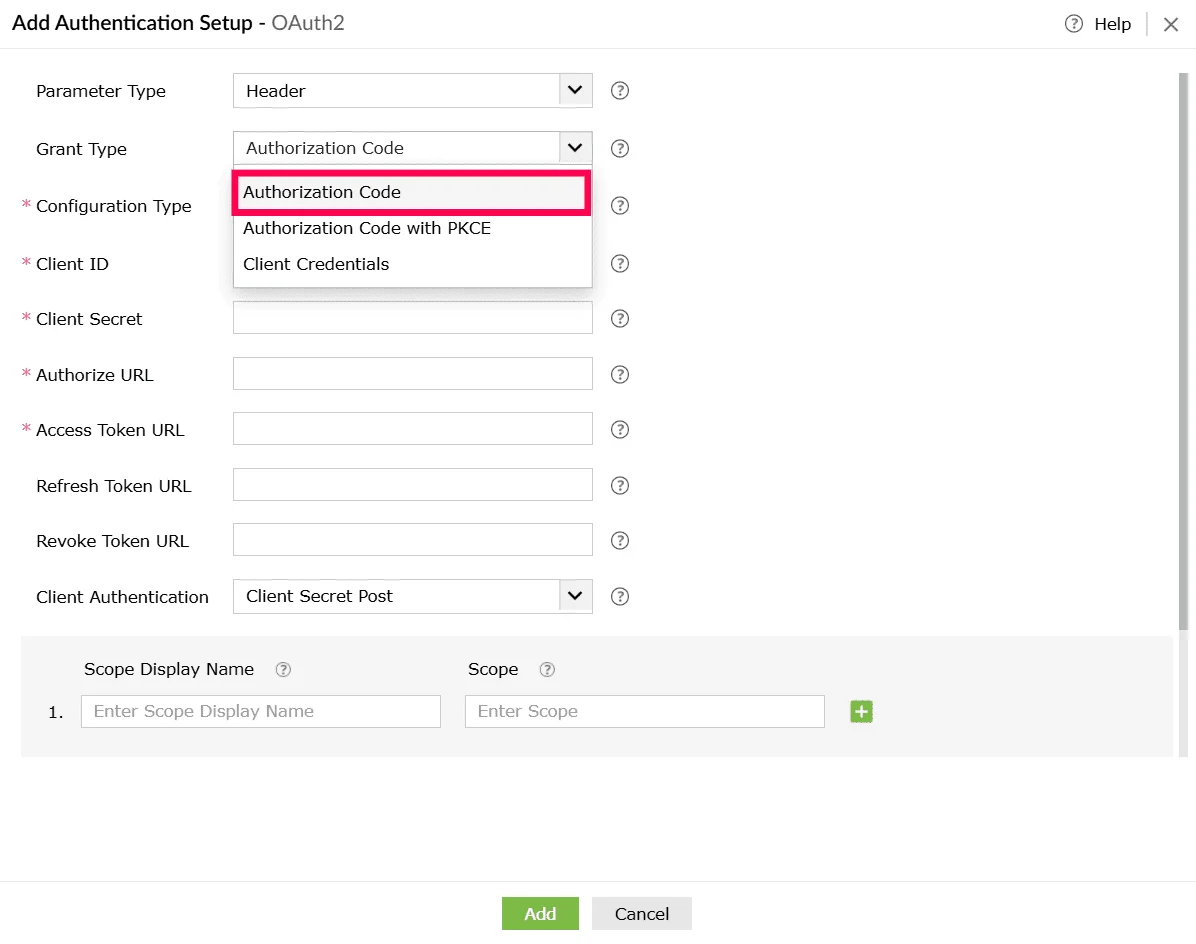
Figure 32: Selecting grant type - From the Configuration Type dropdown, select Auto, as this setup uses automatic configuration.
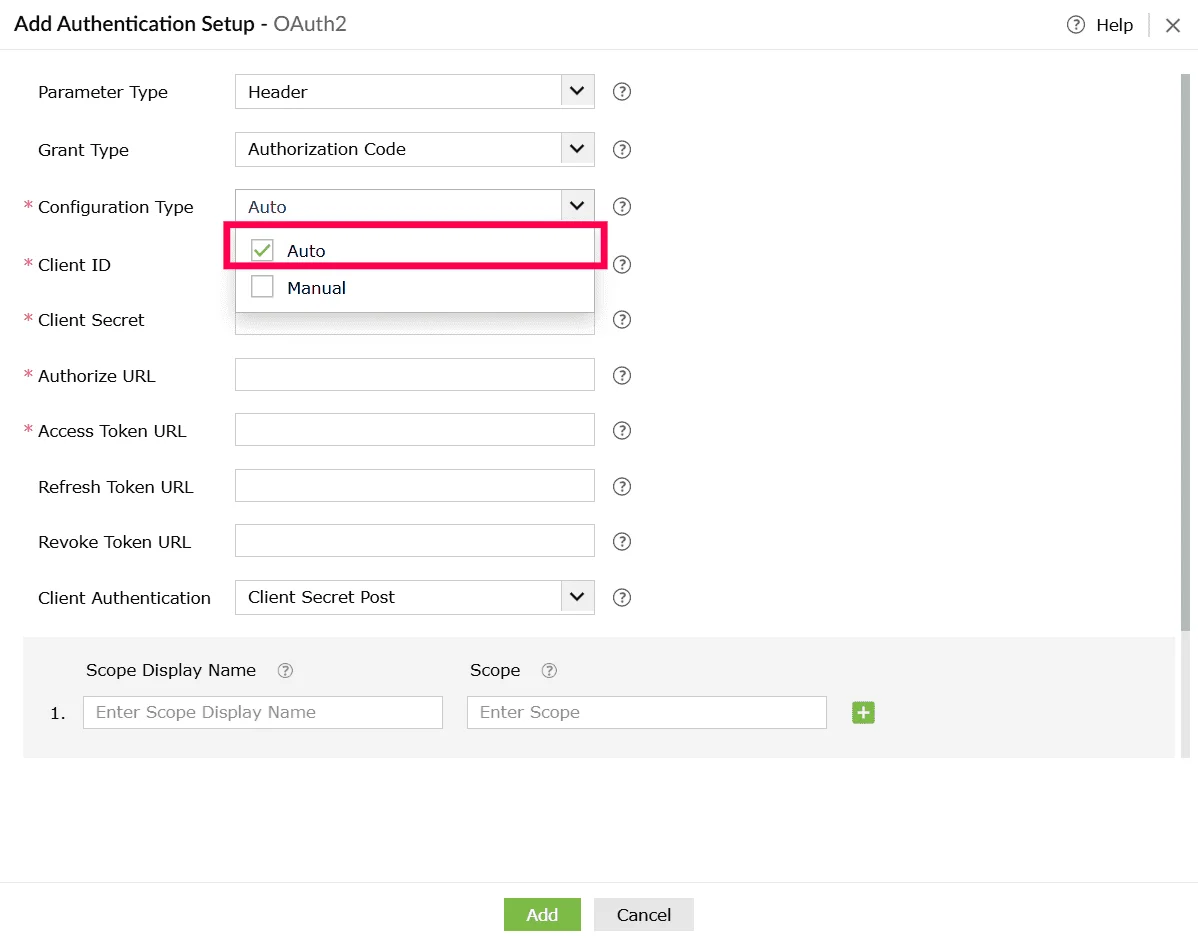
Figure 33: Selecting configuration type - Enter the following OAuth fields:
- Client ID - Unique identifier issued by the service provider.
- Client Secret - Secret key issued to your application.
- Authorize URL - Endpoint where users grant authorization.
- Access Token URL - Endpoint used to generate the access token.
- Refresh Token URL (Optional) - Endpoint used to renew an expired access token (if supported).
- Revoke Token URL (Optional) - Endpoint used to revoke issued tokens (if supported).
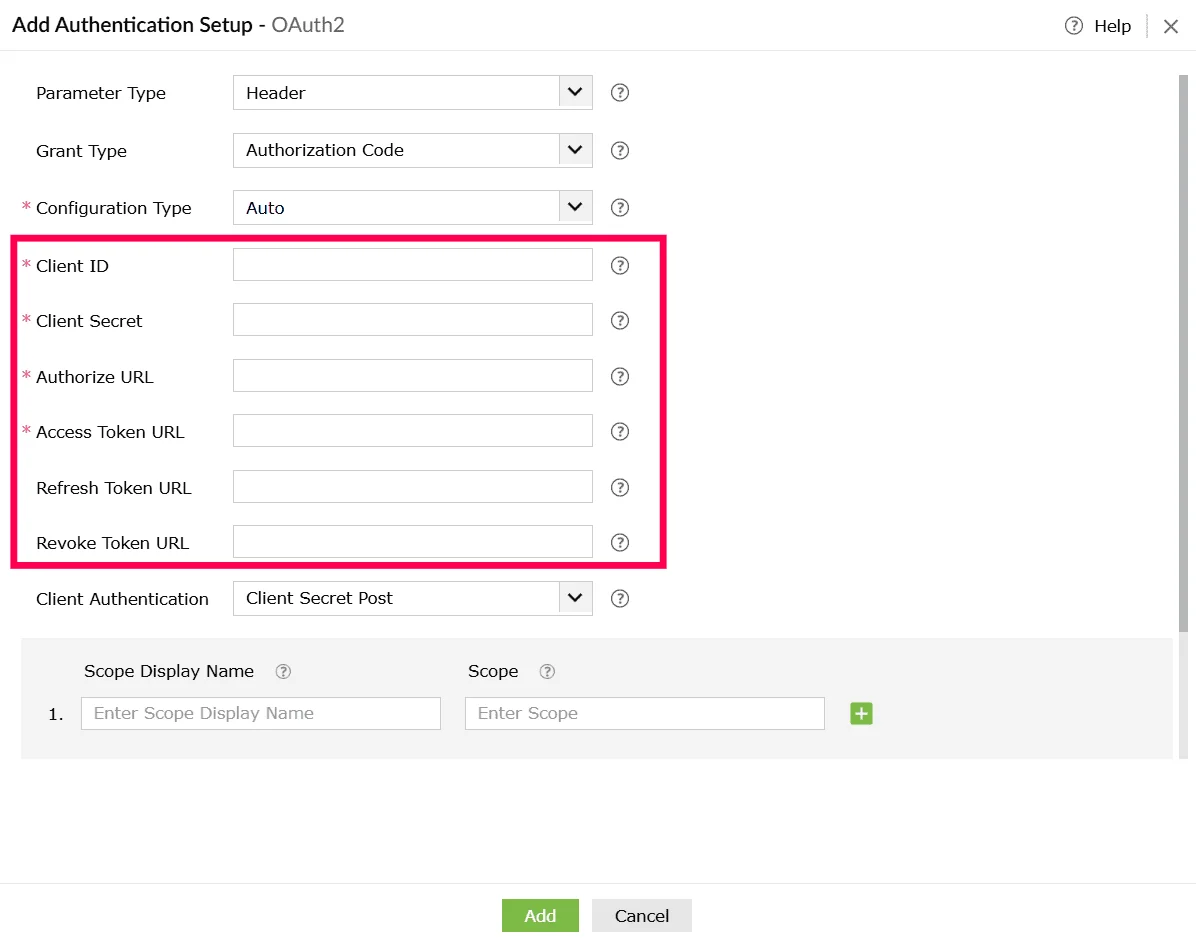
Figure 34: Configuring authentication setup - From Client Authentication drop-down, choose how the client credentials should be included.
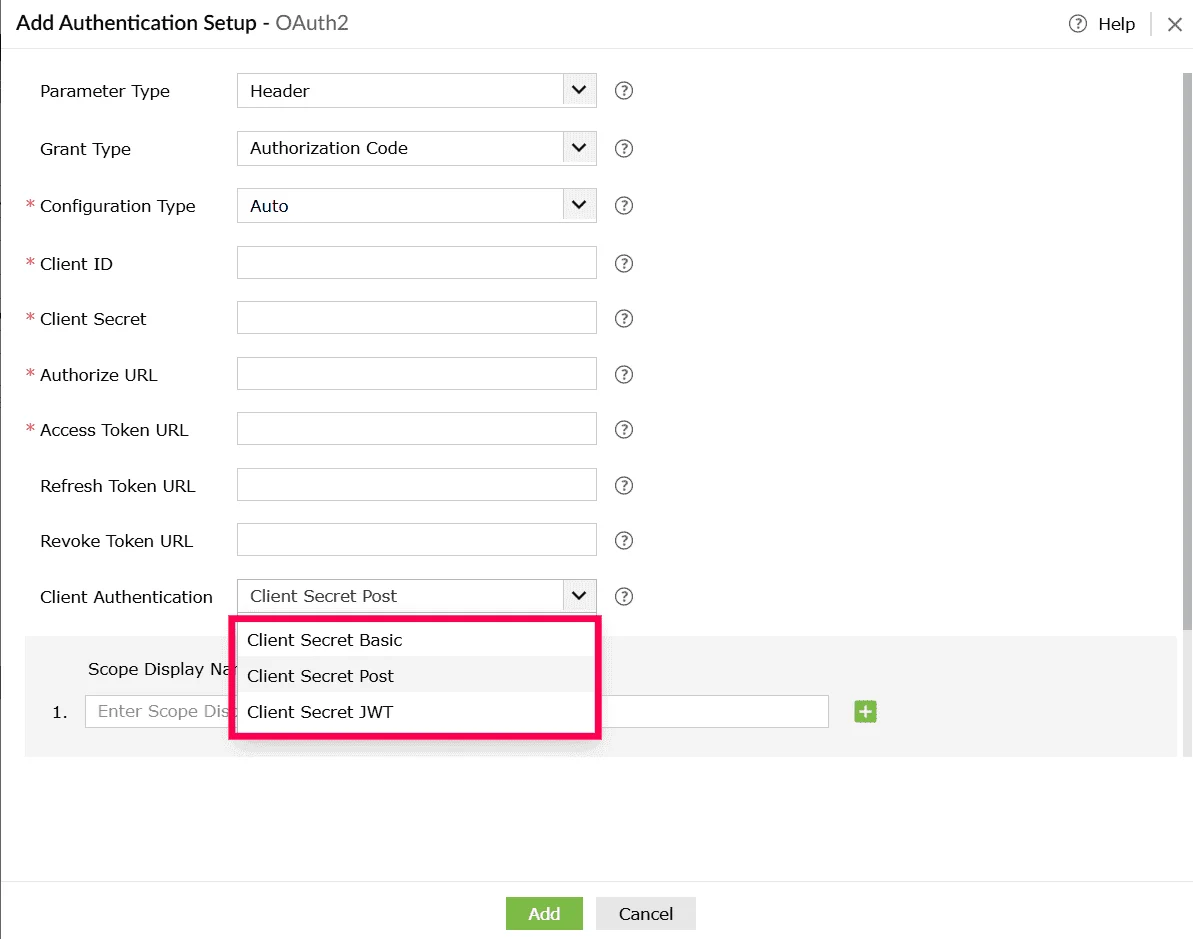
Figure 35: Selecting a client authentication method - (Optional) Enter a Scope Display Name for each permission you want to include and in the corresponding Scope field, enter the exact scope value required by the external service, such as read, write, or delete.

Figure 36: Configuring scopes - Click the icon to add more scope entries as needed.
- To remove an entry, click the icon beside that row.
- From Scope Delimiter drop-down, choose how multiple scopes should be separated such as comma, space, or plus.
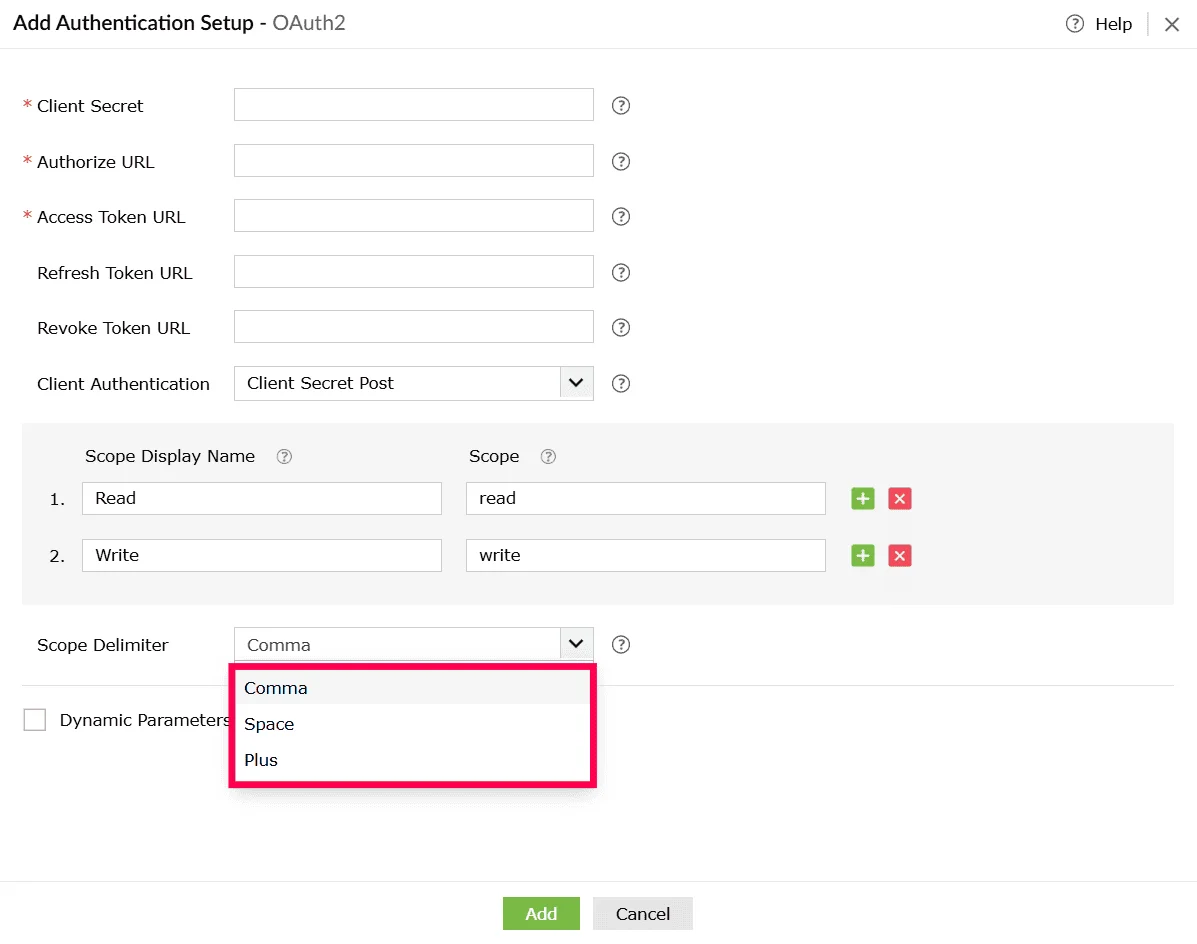
Figure 37: Selecting scope delimiters - (Optional) Enable Dynamic Parameters if the authentication flow requires values that change per user or environment. Configure the following under Dynamic Parameters:
- Parameter Display Name - A readable name for the parameter.
- Parameter Key - The key used in the API call.
Note Dynamic parameters act as placeholders and are replaced automatically during execution. You can configure up to 10 dynamic parameters. - Use the icon next to each row to add a new parameter field, and the icon to remove a parameter you no longer need.
- Click Add to save the OAuth 2 authentication configuration for the custom service.
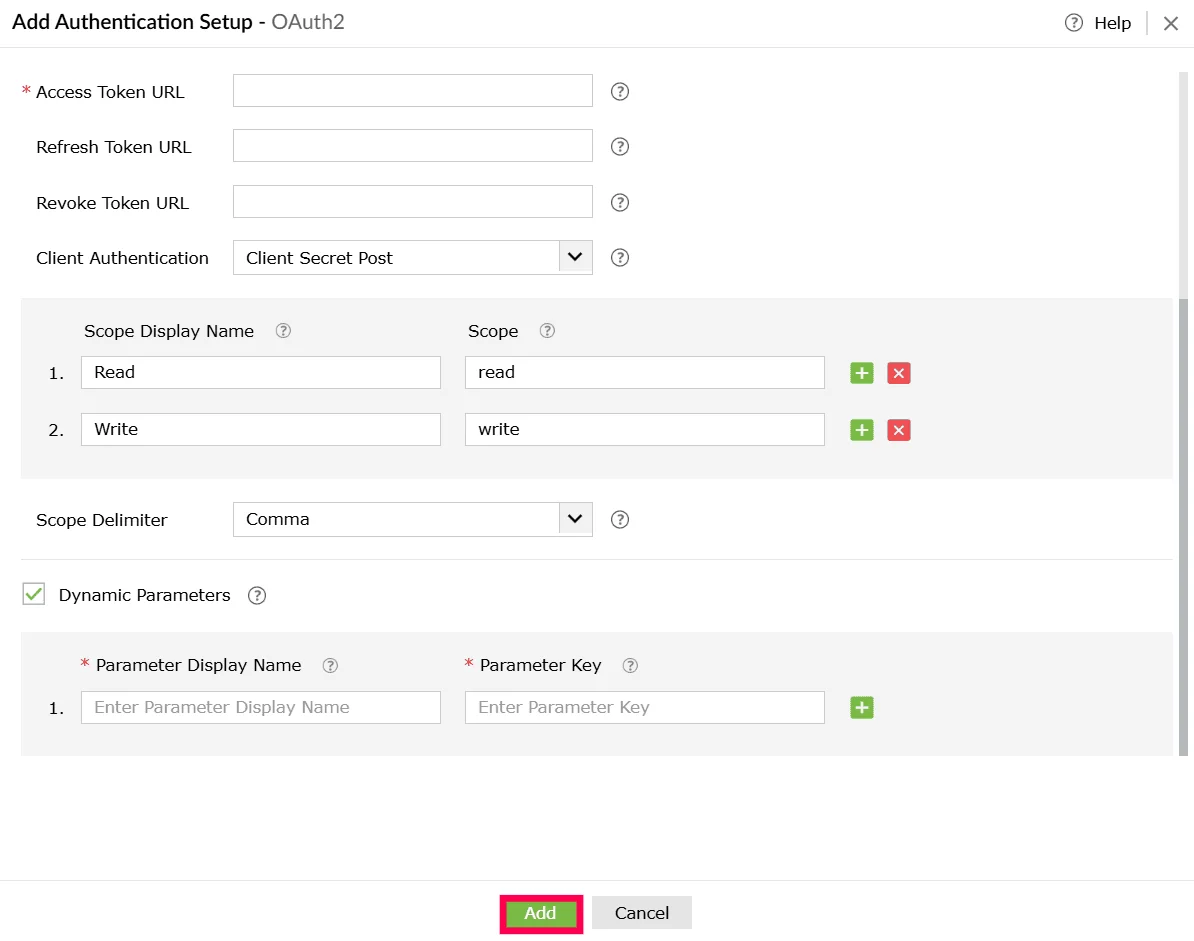
Figure 38: Adding the authentication - Click Create to save only the custom service profile or Click Create and Setup Connection to proceed with establishing the actual connection.
Using OAuth 2 with manual configuration support
- In the Create Custom Service page, under Authentication Type, select OAuth 2.
Figure 39: Selecting an authentication type - In the Add Authentication Setup window, choose how parameters should be passed from the Parameter Type dropdown. The available options are:
- Query String - Appends the access token as a query parameter in the URL.
- Header - Sends the access token as part of the request header.
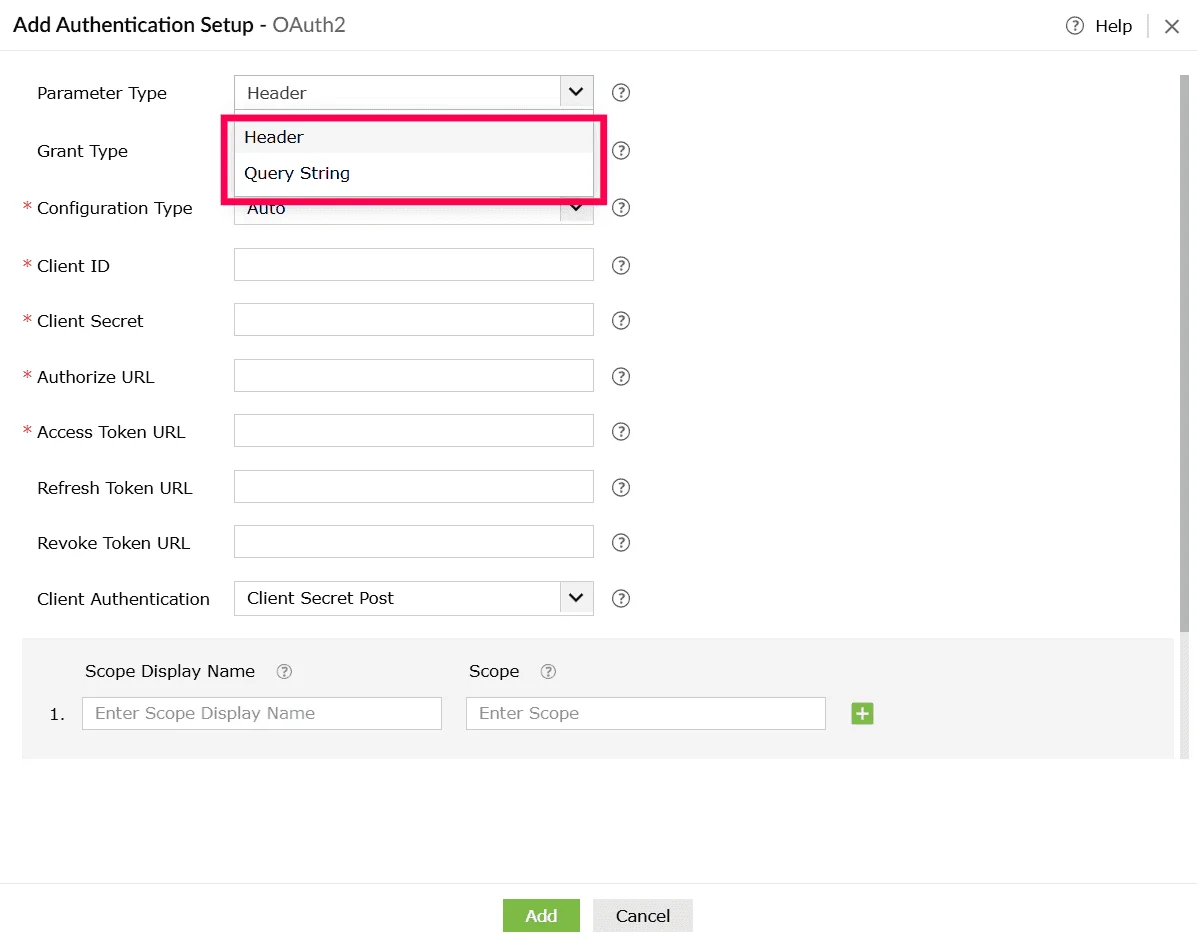
Figure 40: Selecting a parameter type - From the Grant Type drop-down, select Authorization Code.

Figure 41: Selecting grant type - From the Configuration Type dropdown, select Manual.
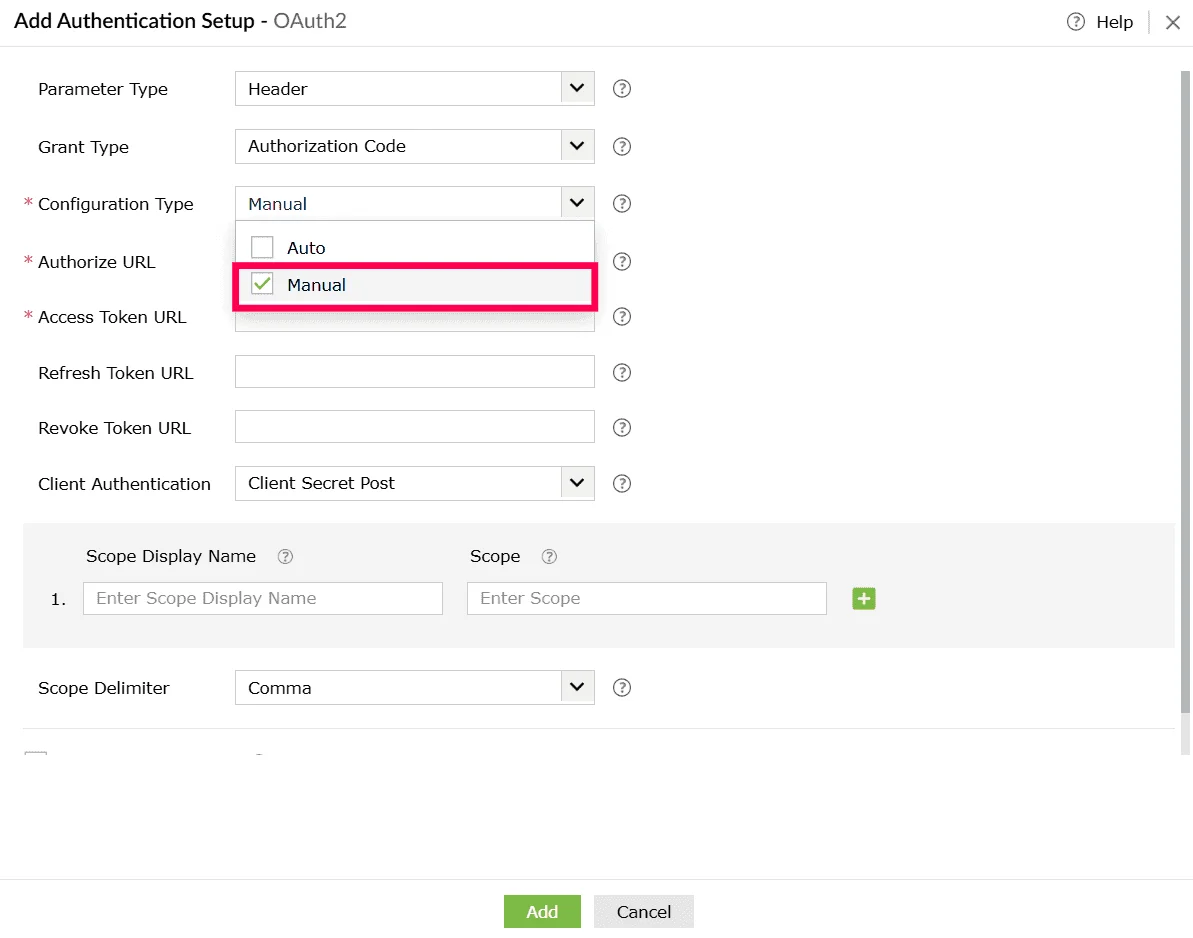
Figure 42: Selecting configuration type - Enter the following OAuth fields:
- Authorize URL - Endpoint where users grant authorization.
- Access Token URL - Endpoint used to generate the access token.
- Refresh Token URL (Optional) - Endpoint used to renew an expired access token (if supported).
- Revoke Token URL (Optional)- Endpoint used to revoke issued tokens (if supported).
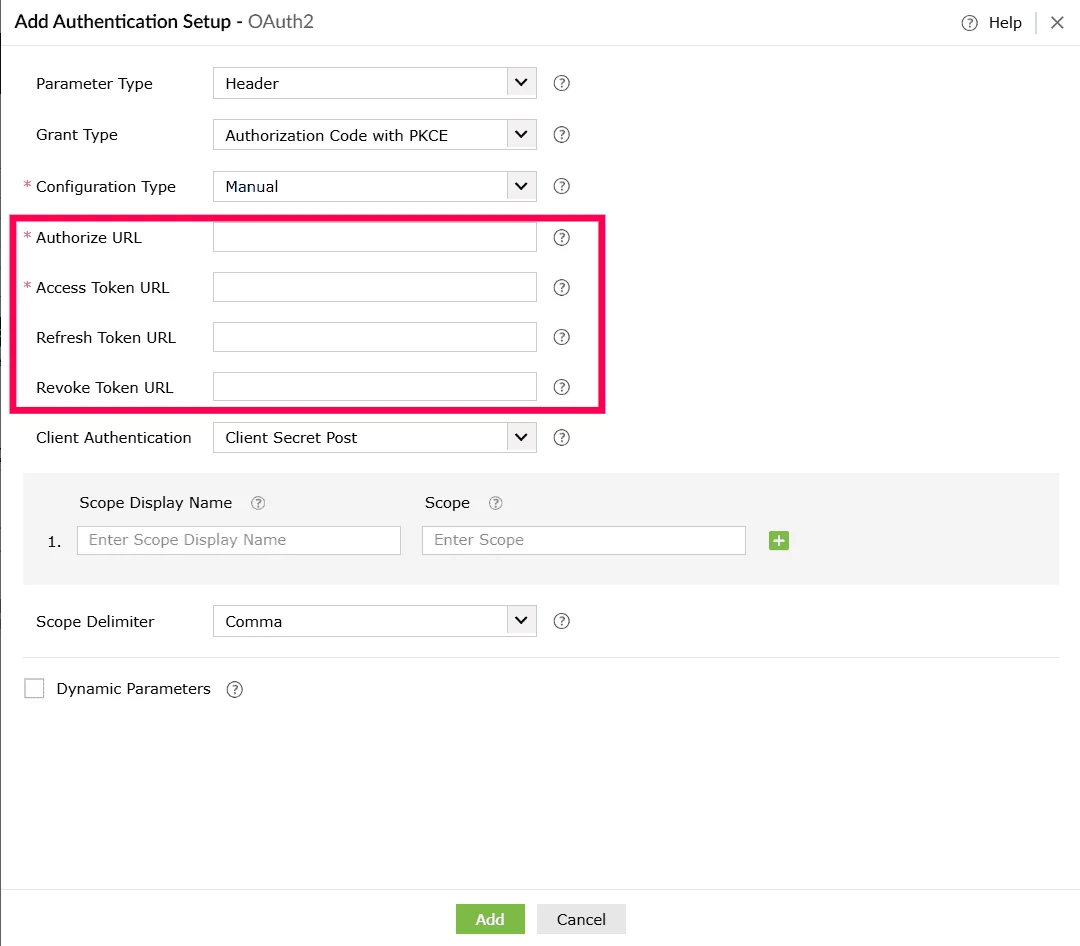
Figure 43: Configuring authentication setup - From Client Authentication drop-down, choose how the client credentials should be included.
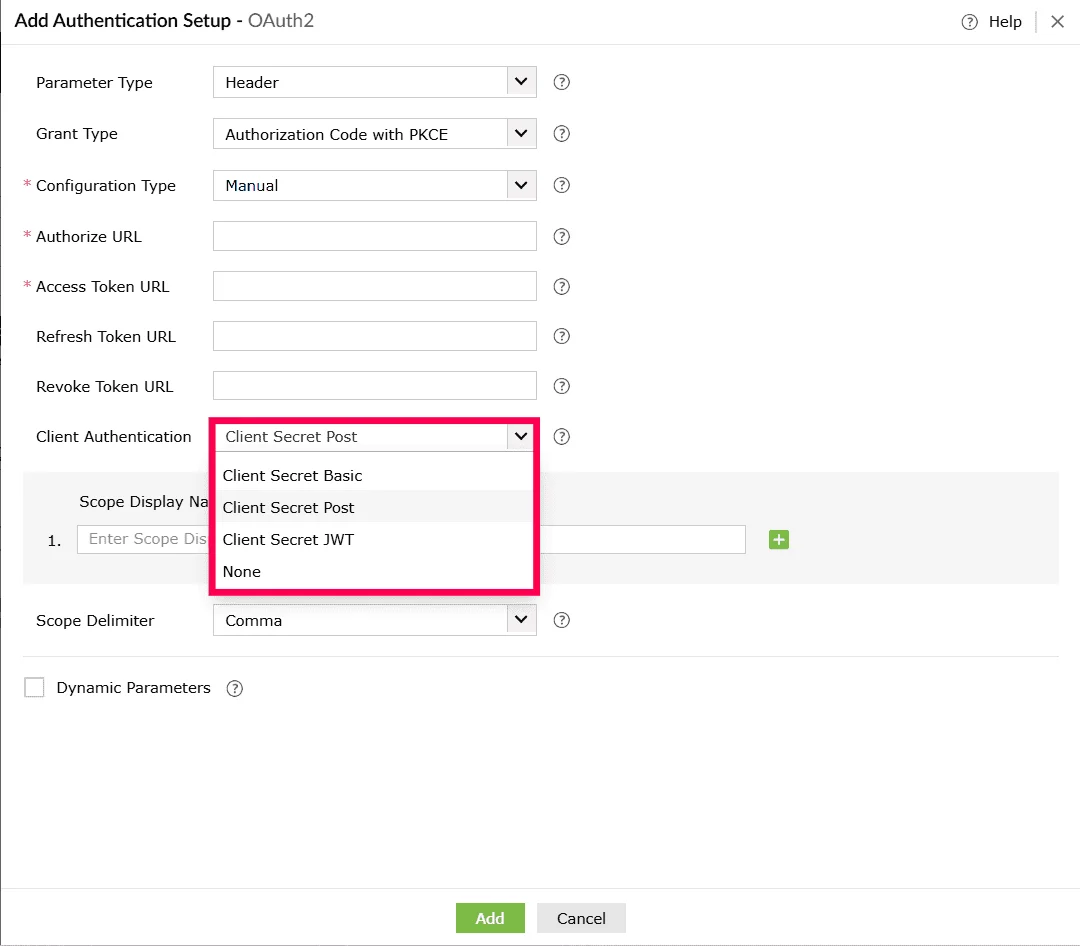
Figure 44: Selecting a client authentication method - (Optional) Enter a Scope Display Name for each permission you want to include and in the corresponding Scope field, enter the exact scope value required by the external service, such as read, write, or delete.
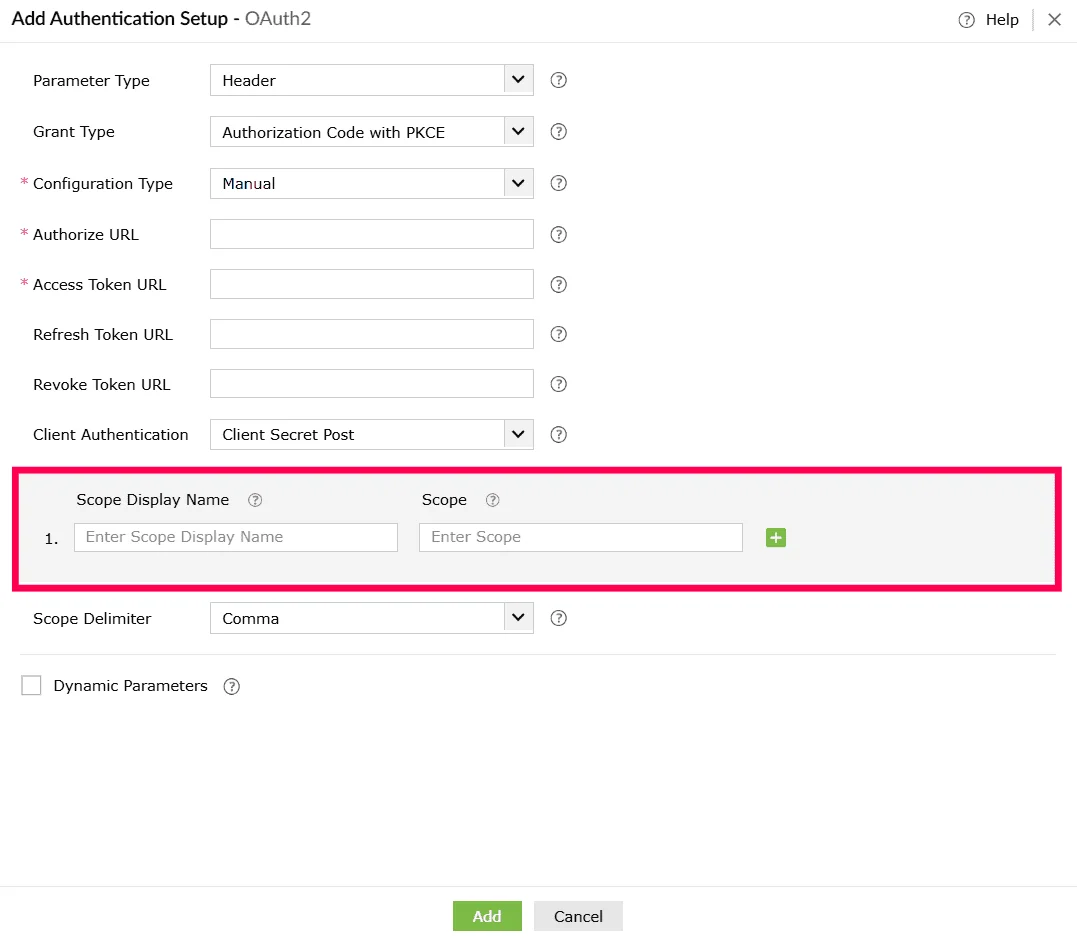
Figure 45: Configuring scopes - Click the icon to add more scope entries as needed.
- To remove an entry, click the icon beside that row.
- From Scope Delimiter drop-down, choose how multiple scopes should be separated such as comma, space, or plus.
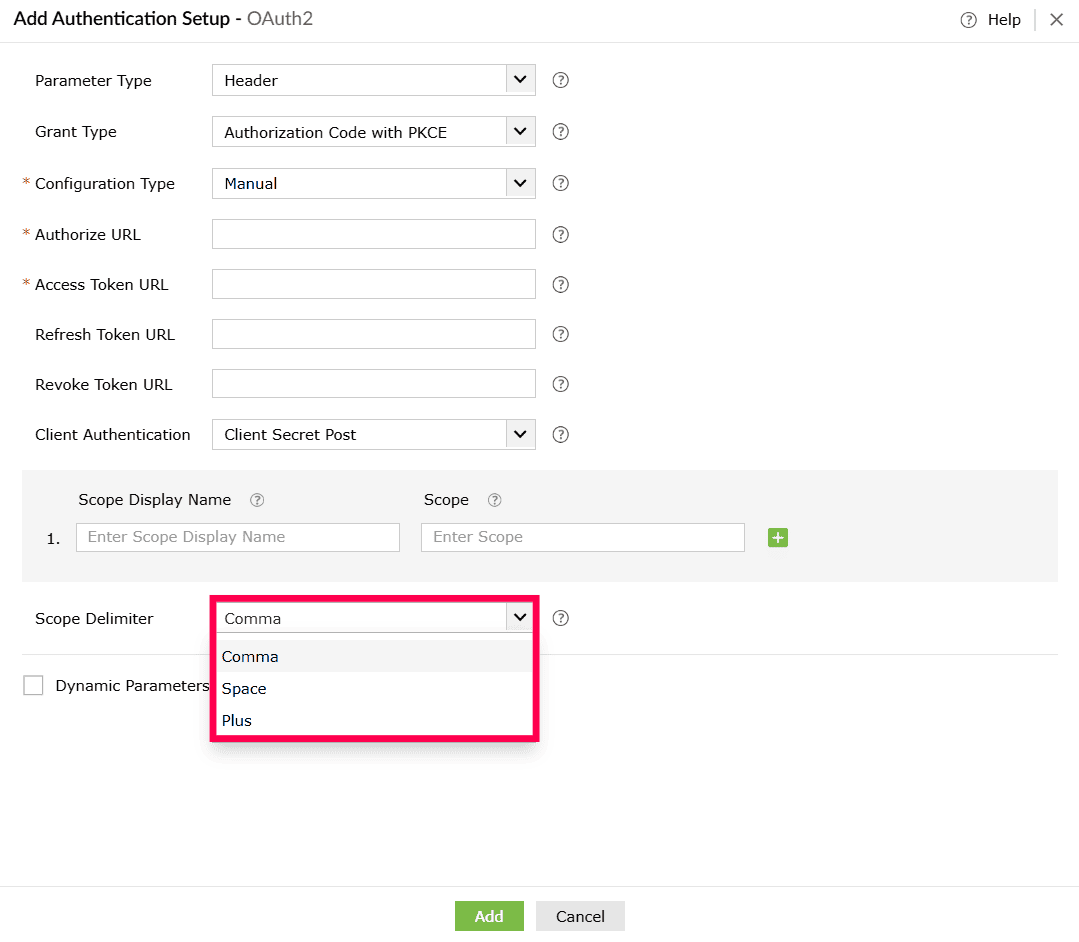
Figure 46: Selecting scope delimiters - (Optional) Enable Dynamic Parameters if the authentication flow requires values that change per user or environment. Configure the following under Dynamic Parameters:
- Parameter Display Name - A readable name for the parameter.
- Parameter Key - The key used in the API call.
Note Dynamic parameters act as placeholders and are replaced automatically during execution. You can configure up to 10 dynamic parameters. - Use the icon next to each row to add a new parameter field, and the icon to remove a parameter you no longer need.
- Click Add to save the OAuth 2 authentication configuration for the custom service.
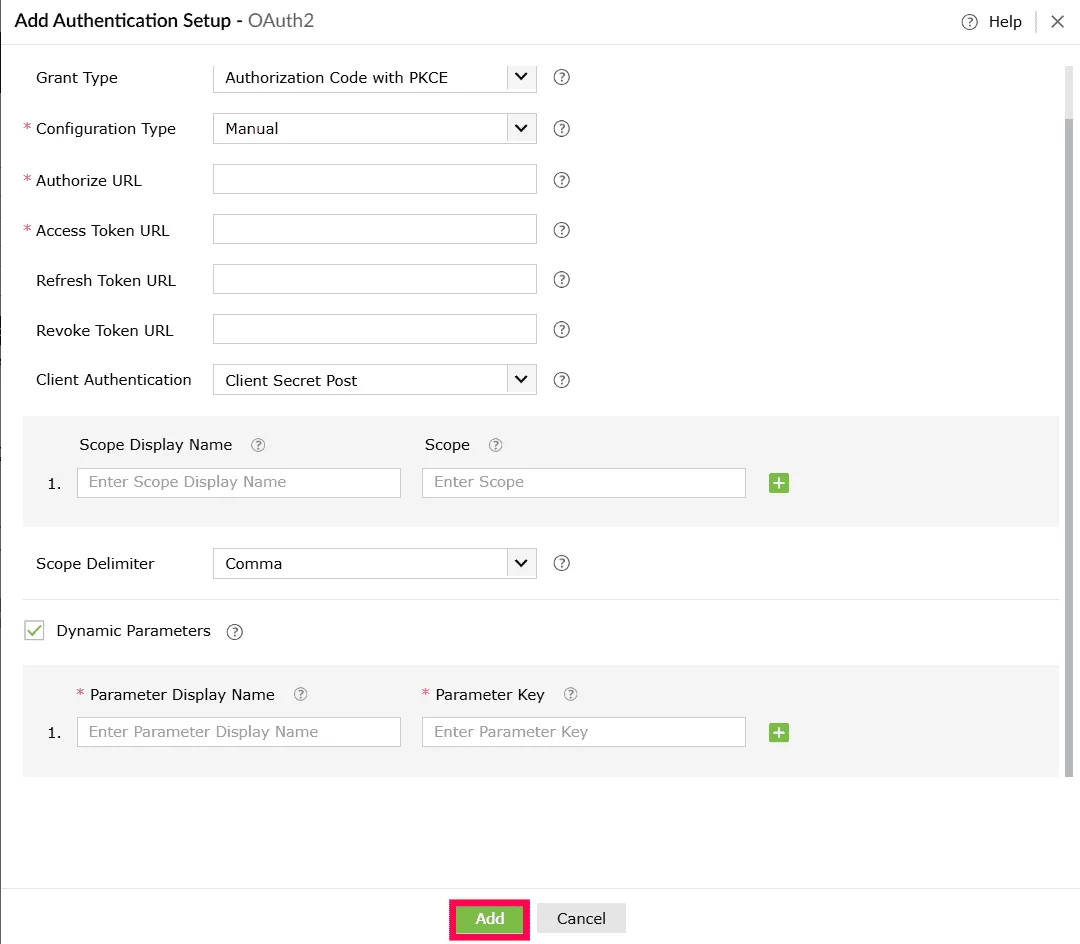
Figure 47: Adding the authentication - Click Create to save only the custom service profile or click Create and Setup Connection to proceed with establishing the actual connection.
Using OAuth 2 with manual and automatic configuration support
- In the Create Custom Service page, under Authentication Type, select OAuth 2.
Figure 48: Selecting an authentication type - In the Add Authentication Setup window, choose how parameters should be passed from the Parameter Type dropdown. The available options are:
- Query String - Appends the access token as a query parameter in the URL.
- Header - Sends the access token as part of the request header.
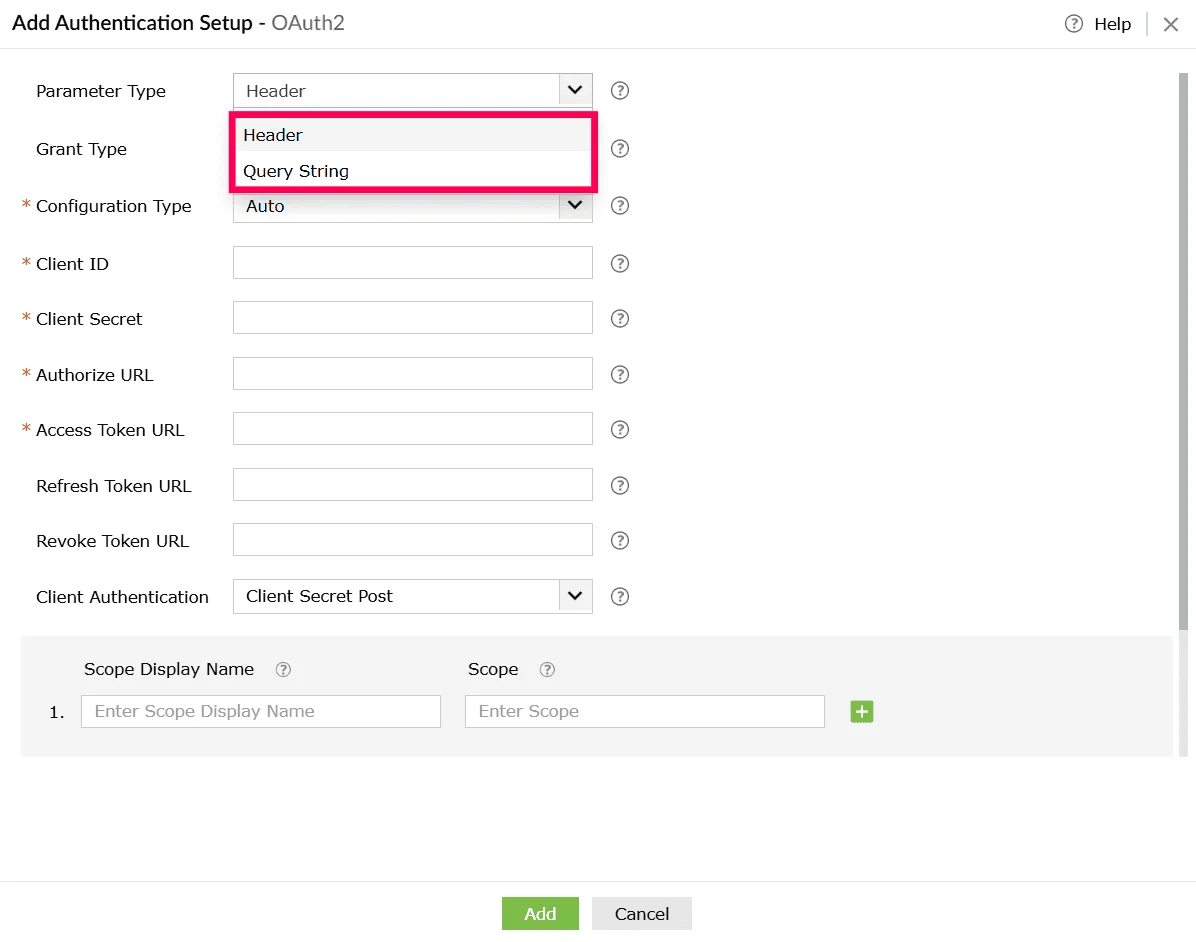
Figure 49: Selecting a parameter type - From the Grant Type drop-down, select Authorization Code.
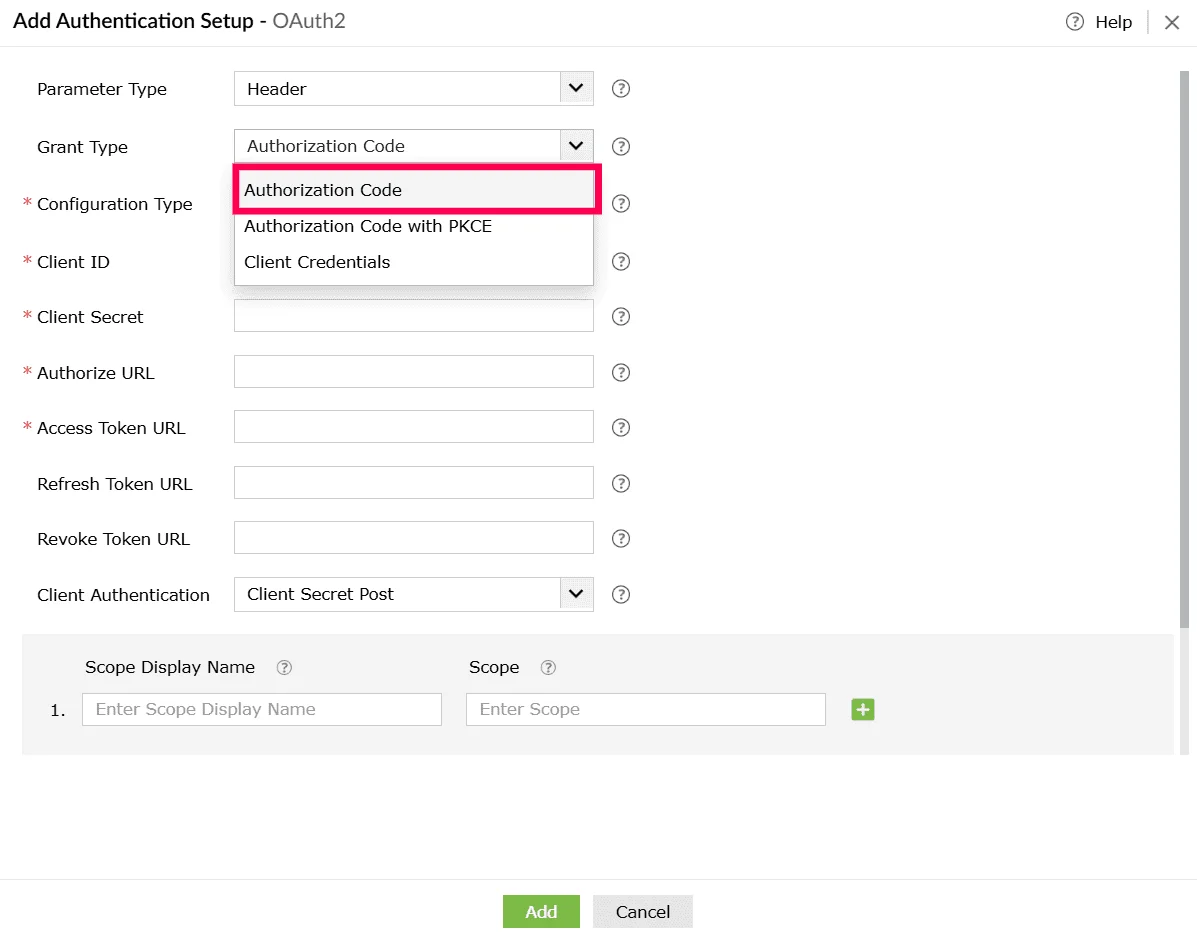
Figure 50: Selecting grant type - From the Configuration Type dropdown, select Manual and Automatic.
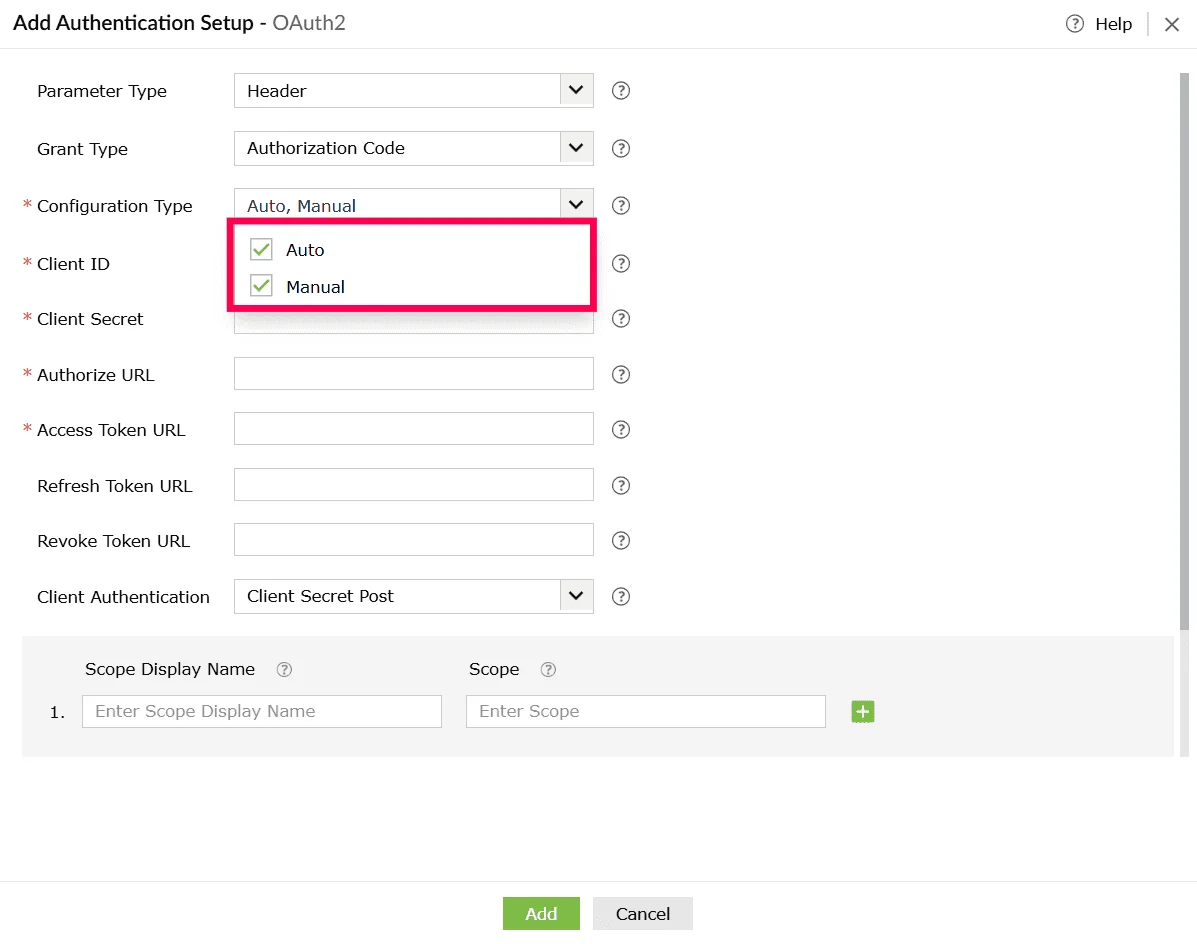
Figure 51: Selecting configuration type
Using Authorization code with Proof Key for Code Exchange (PKCE)
- In the Create Custom Service page, under Authentication Type, select OAuth 2.
Figure 52: Selecting an authentication type - In the Add Authentication Setup window, choose how parameters should be passed from the Parameter Type dropdown. The available options are:
- Query String - Appends the access token as a query parameter in the URL.
- Header - Sends the access token as part of the request header.
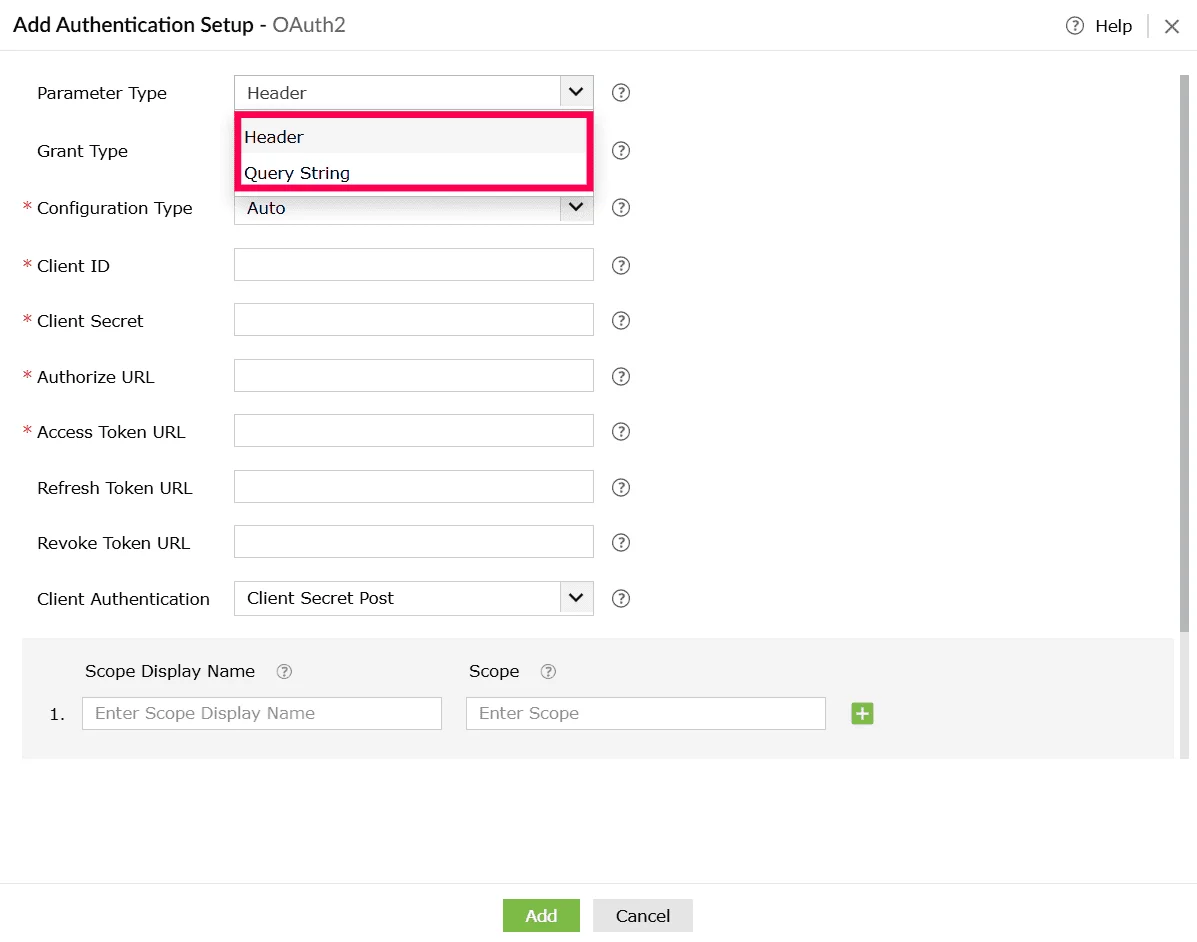
Figure 53: Selecting parameter type - From the Grant Type drop-down, select Authorization Code with PKCE.
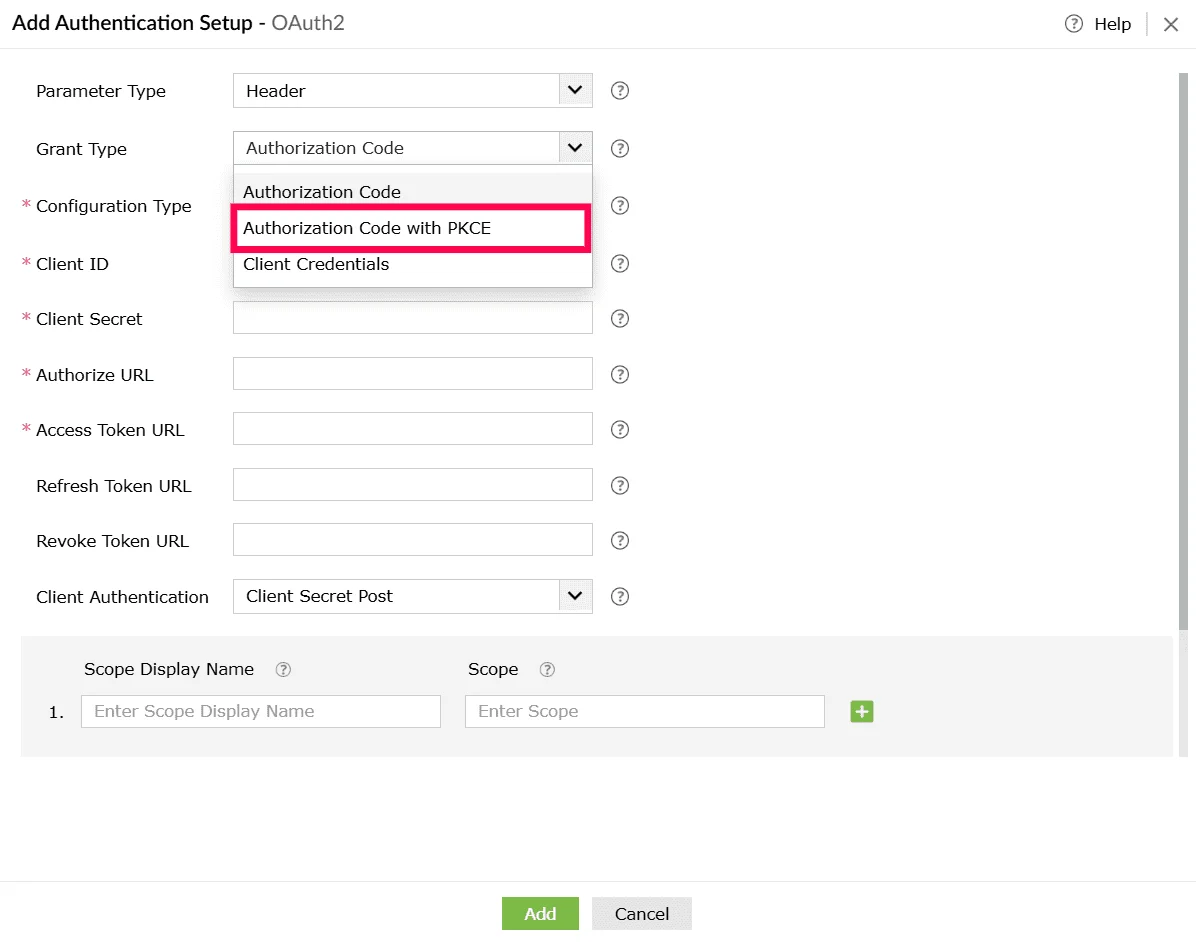
Figure 54: Selecting grant type - From the Configuration Type dropdown, select the configuration method supported by the external service and follow the corresponding steps below:
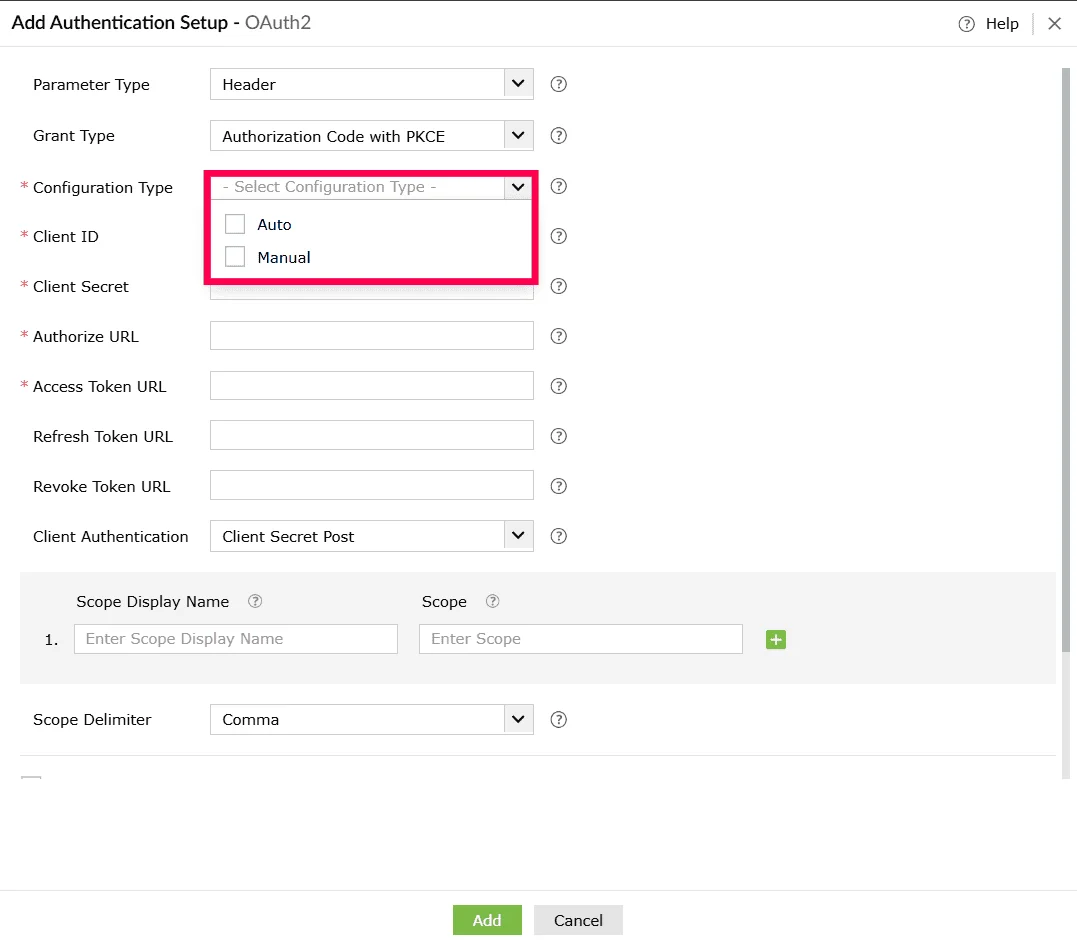
Figure 55: Selecting configuration type
Using Authorization code with client credentials
- In the Create Custom Service page, under Authentication Type, select OAuth 2.
Figure 56: Selecting an authentication type - In the Add Authentication Setup window, choose how parameters should be passed from the Parameter Type dropdown. The available options are:
- Query String - Appends the access token as a query parameter in the URL.
- Header - Sends the access token as part of the request header.
Figure 57: Selecting a parameter type - From the Grant Type drop-down, select Client Credentials.
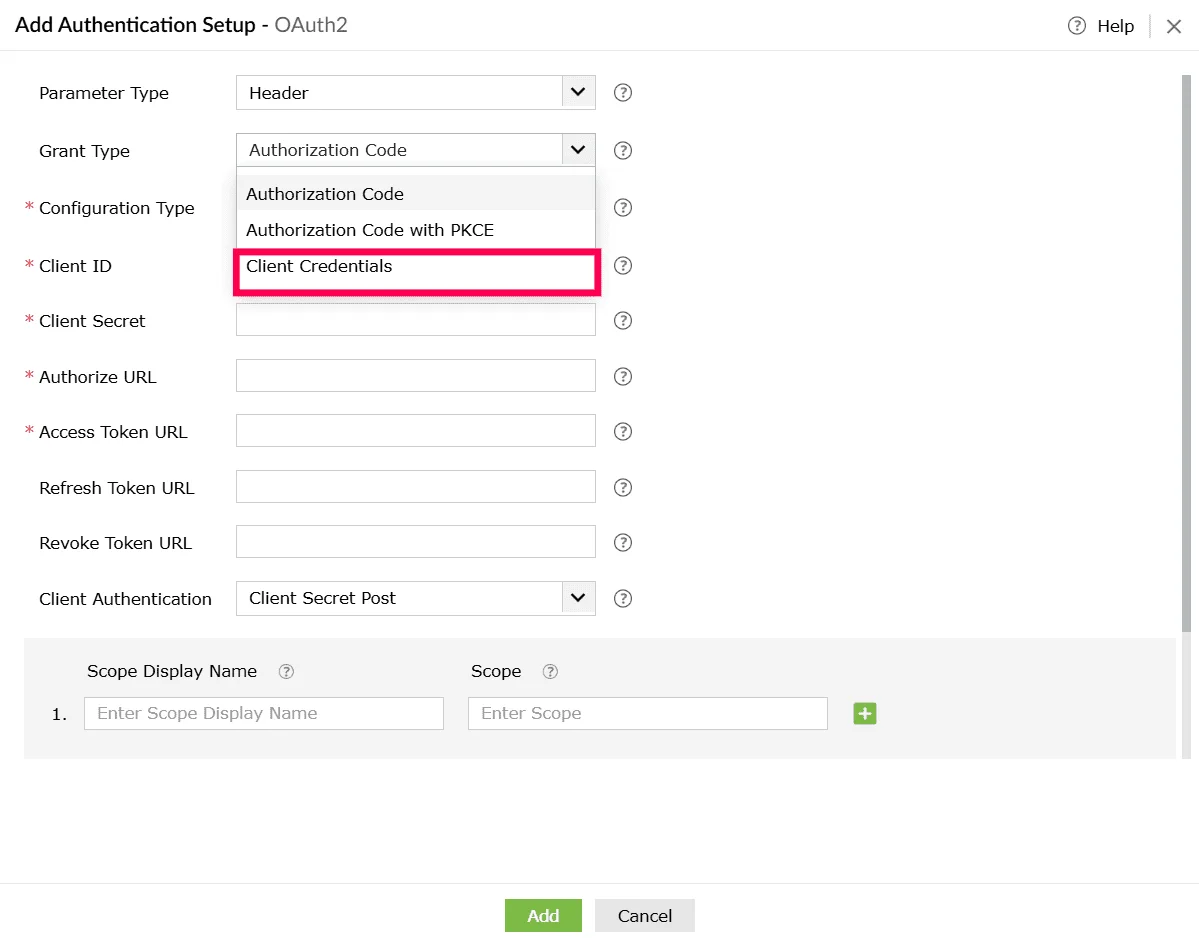
Figure 58: Selecting grant type - Enter the Access Token URL.
- From Client Authentication drop-down, choose how the client credentials should be included.
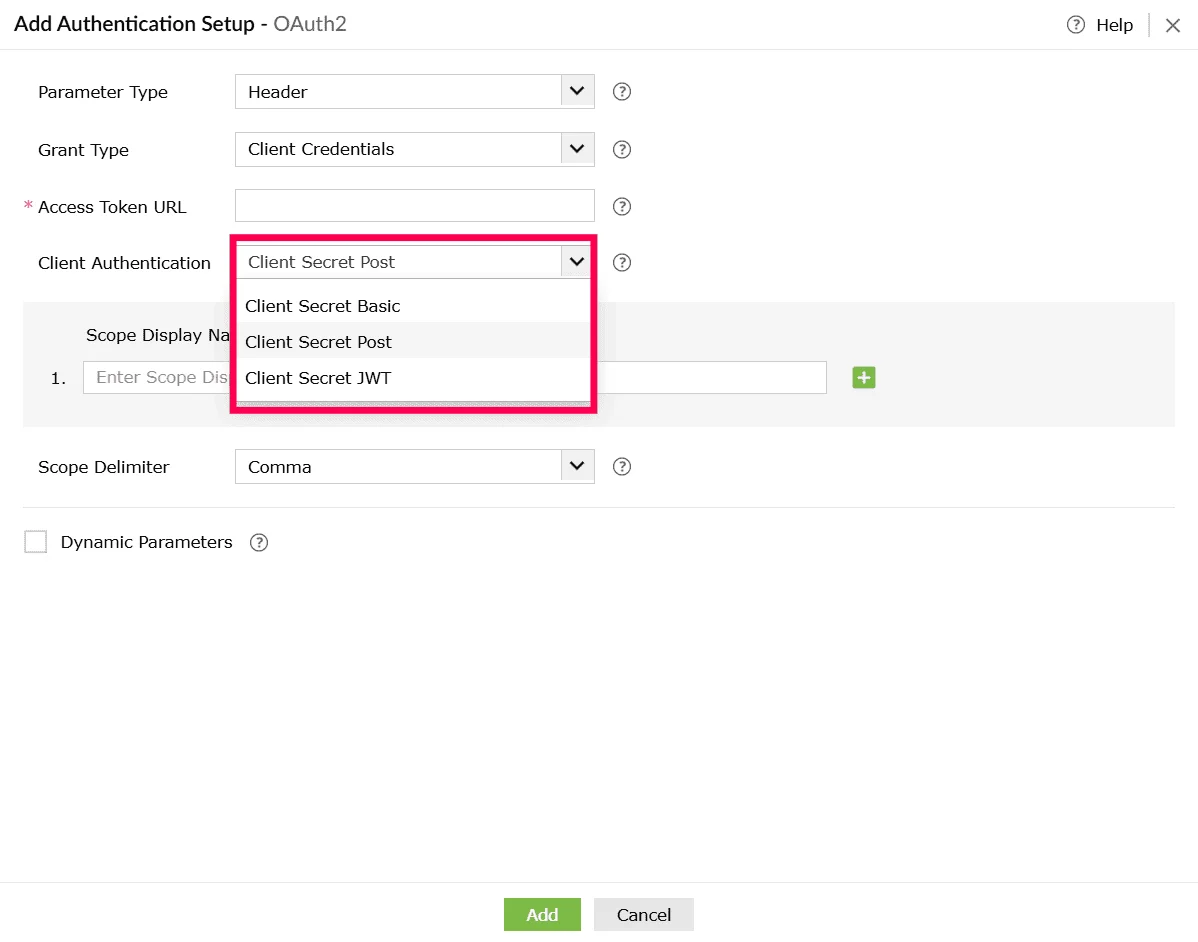
Figure 59: Selecting a client authentication method - (Optional) Enter a Scope Display Name for each permission you want to include and in the corresponding Scope field, enter the exact scope value required by the external service, such as read, write, or delete.
- Click the icon to add more scope entries as needed.
- To remove an entry, click the icon beside that row.
- From Scope Delimiter drop-down, choose how multiple scopes should be separated such as comma, space, or plus.
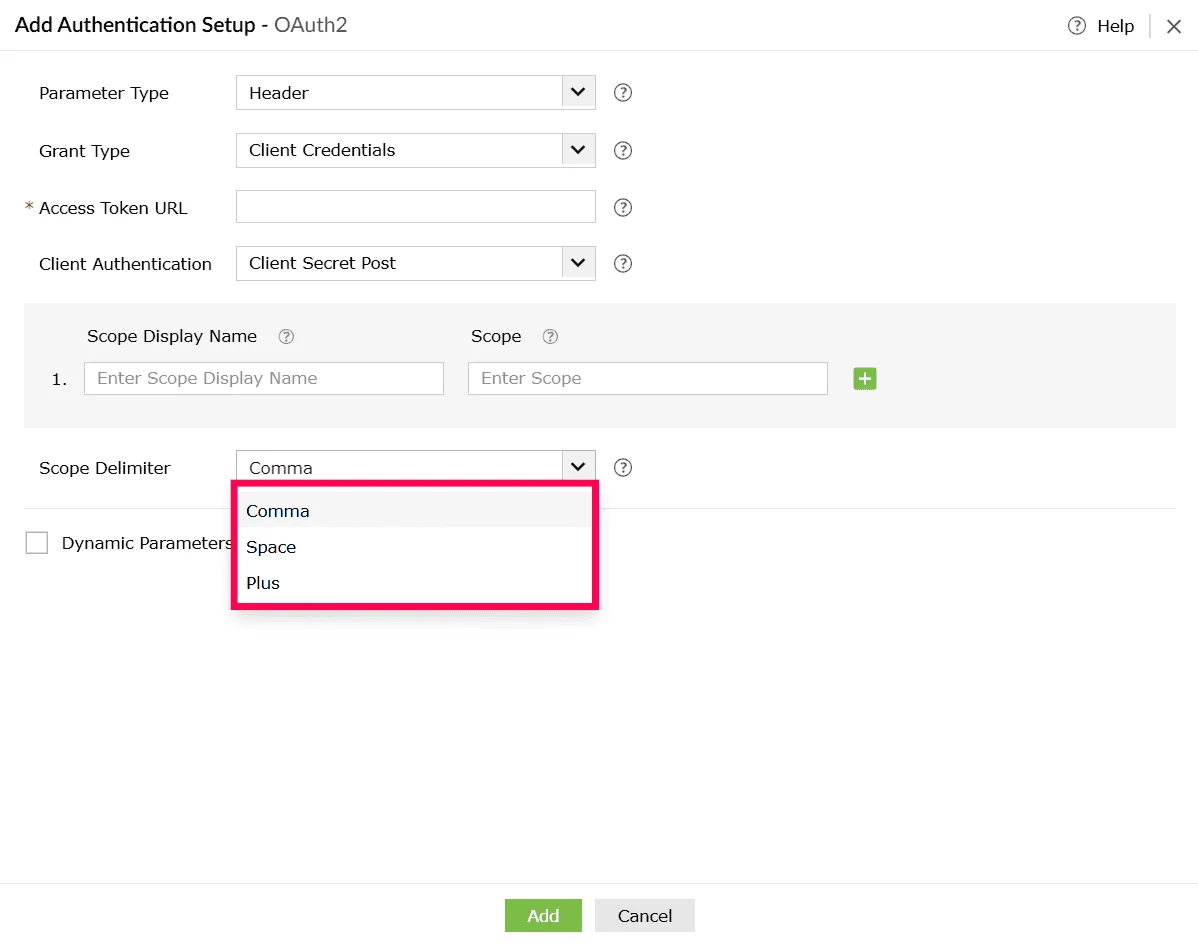
Figure 60: Selecting a scope delimiter - (Optional) Select the checkbox next to Dynamic Parameters if the authentication flow requires values that change per user or environment. Configure the following under Dynamic Parameters:
- Parameter Display Name - A readable name for the parameter.
- Parameter Key - The key used in the API call.
Note Dynamic parameters act as placeholders and are replaced automatically during execution. You can configure up to 10 dynamic parameters.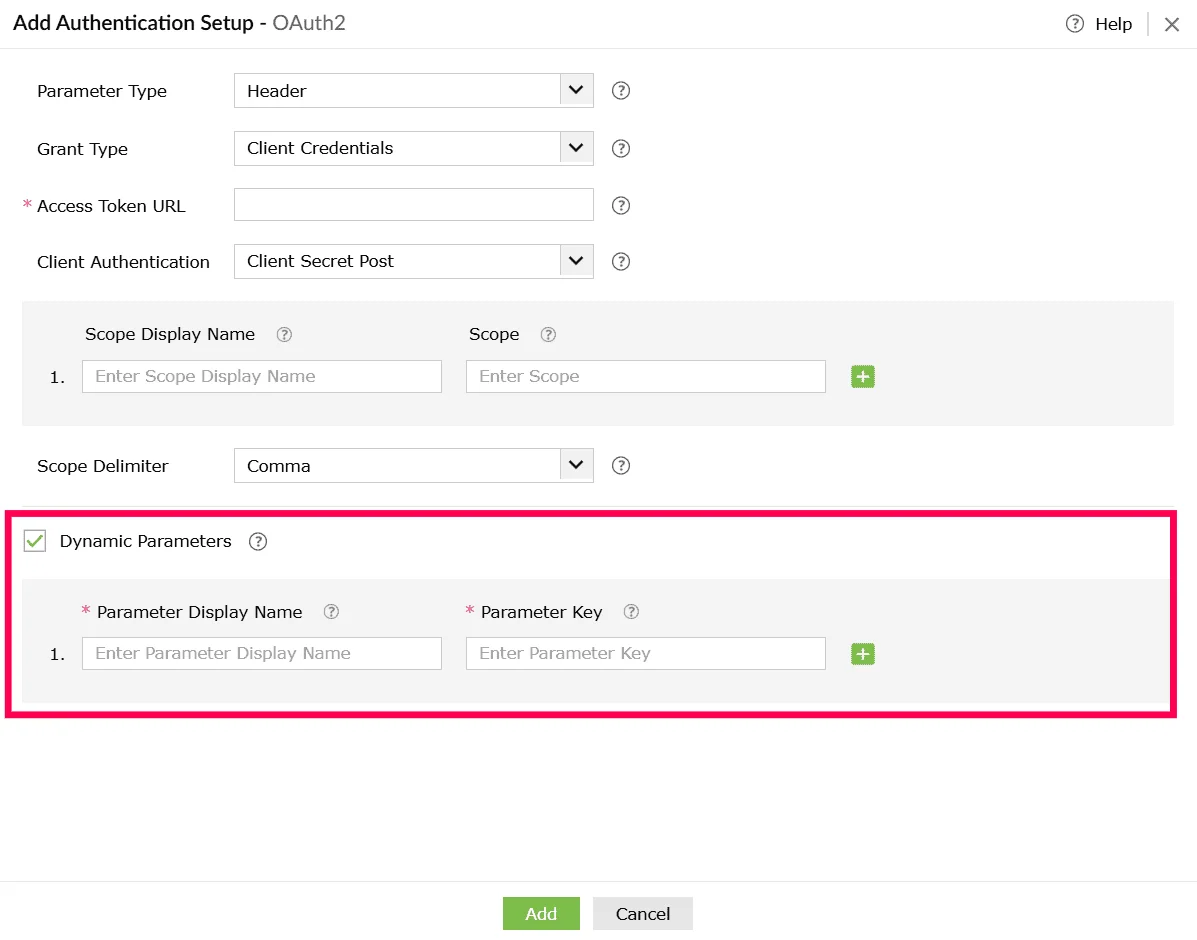
Figure 61: Enabling dynamic parameters - Use the icon next to each row to add a new parameter field, and the icon to remove a parameter you no longer need.
- Click Add to save the OAuth 2 authentication configuration for the custom service.
- Click Create to save only the custom service profile or Click Create and Setup Connection to proceed with establishing the actual connection.
Using multiple authentication
Some external applications require more than one authentication method to be configured for a single service. Log360 Cloud supports this through multiple authentication, allowing you to combine different authentication types such as API Key, Basic Authentication, OAuth1, or OAuth2 within the same custom service.
Follow the steps below to configure multiple authentication methods
- In the Create Custom Service page, enter a Service Name. It is the display name of the service that you want to create.
Note Display name can contain up to 50 characters.
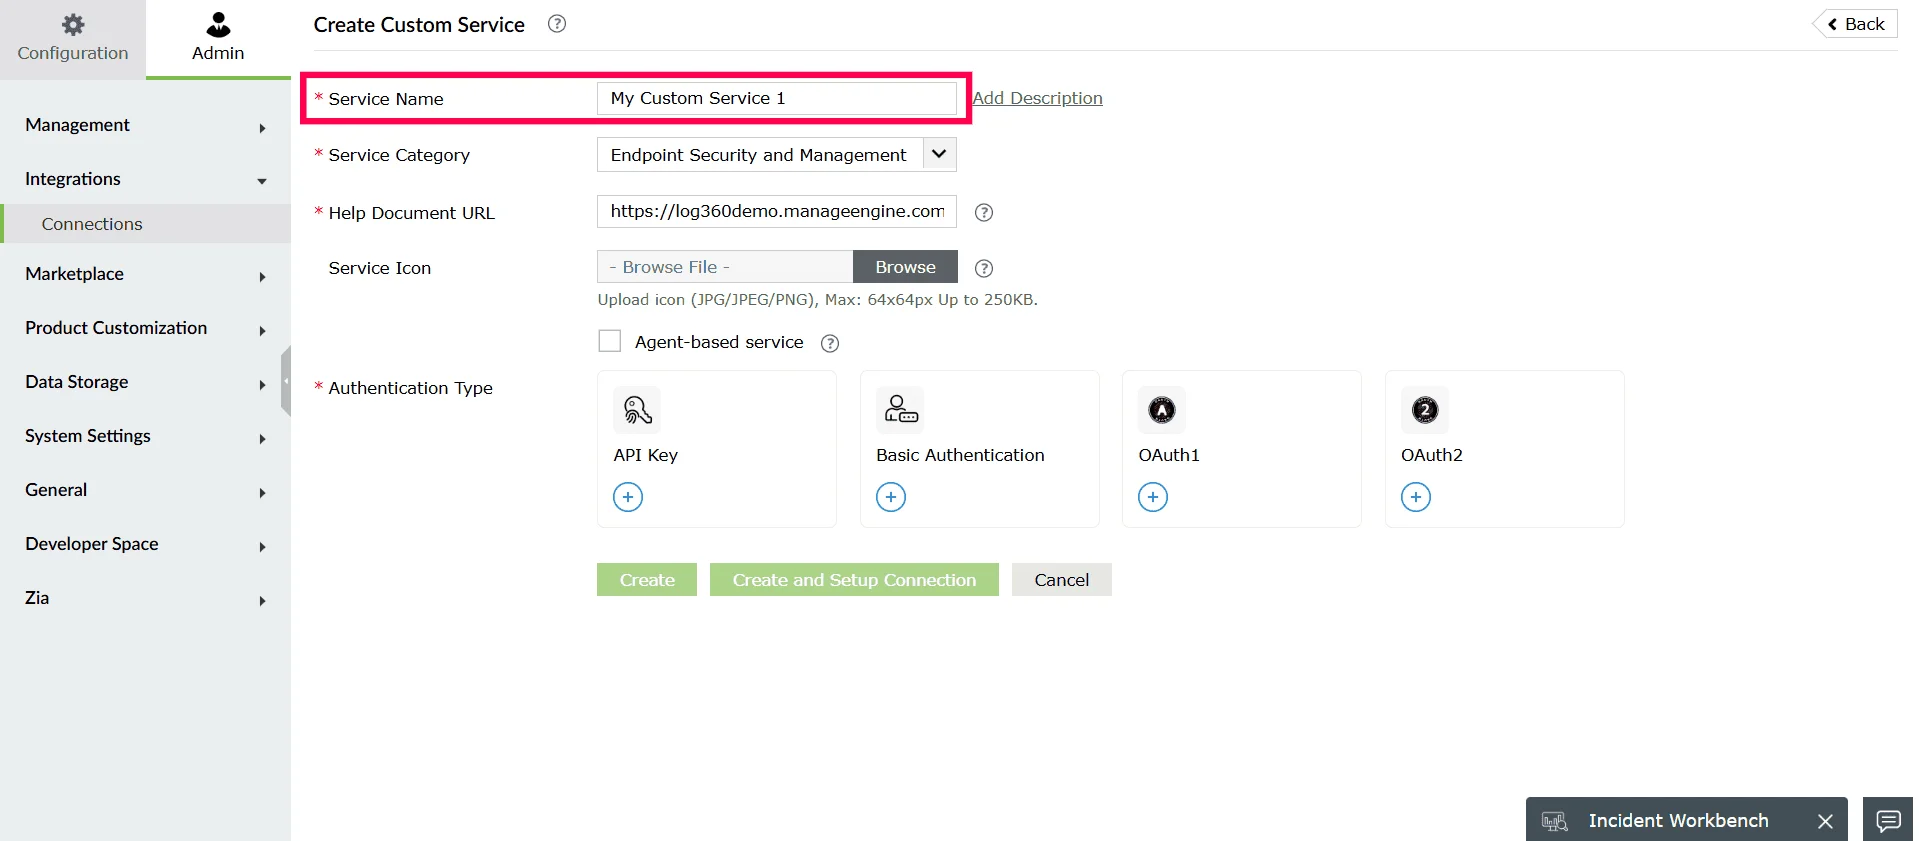
Figure 62: Entering a service name - (Optional) Click Add Description to include details about the service.
- Select a Service Category from the dropdown.
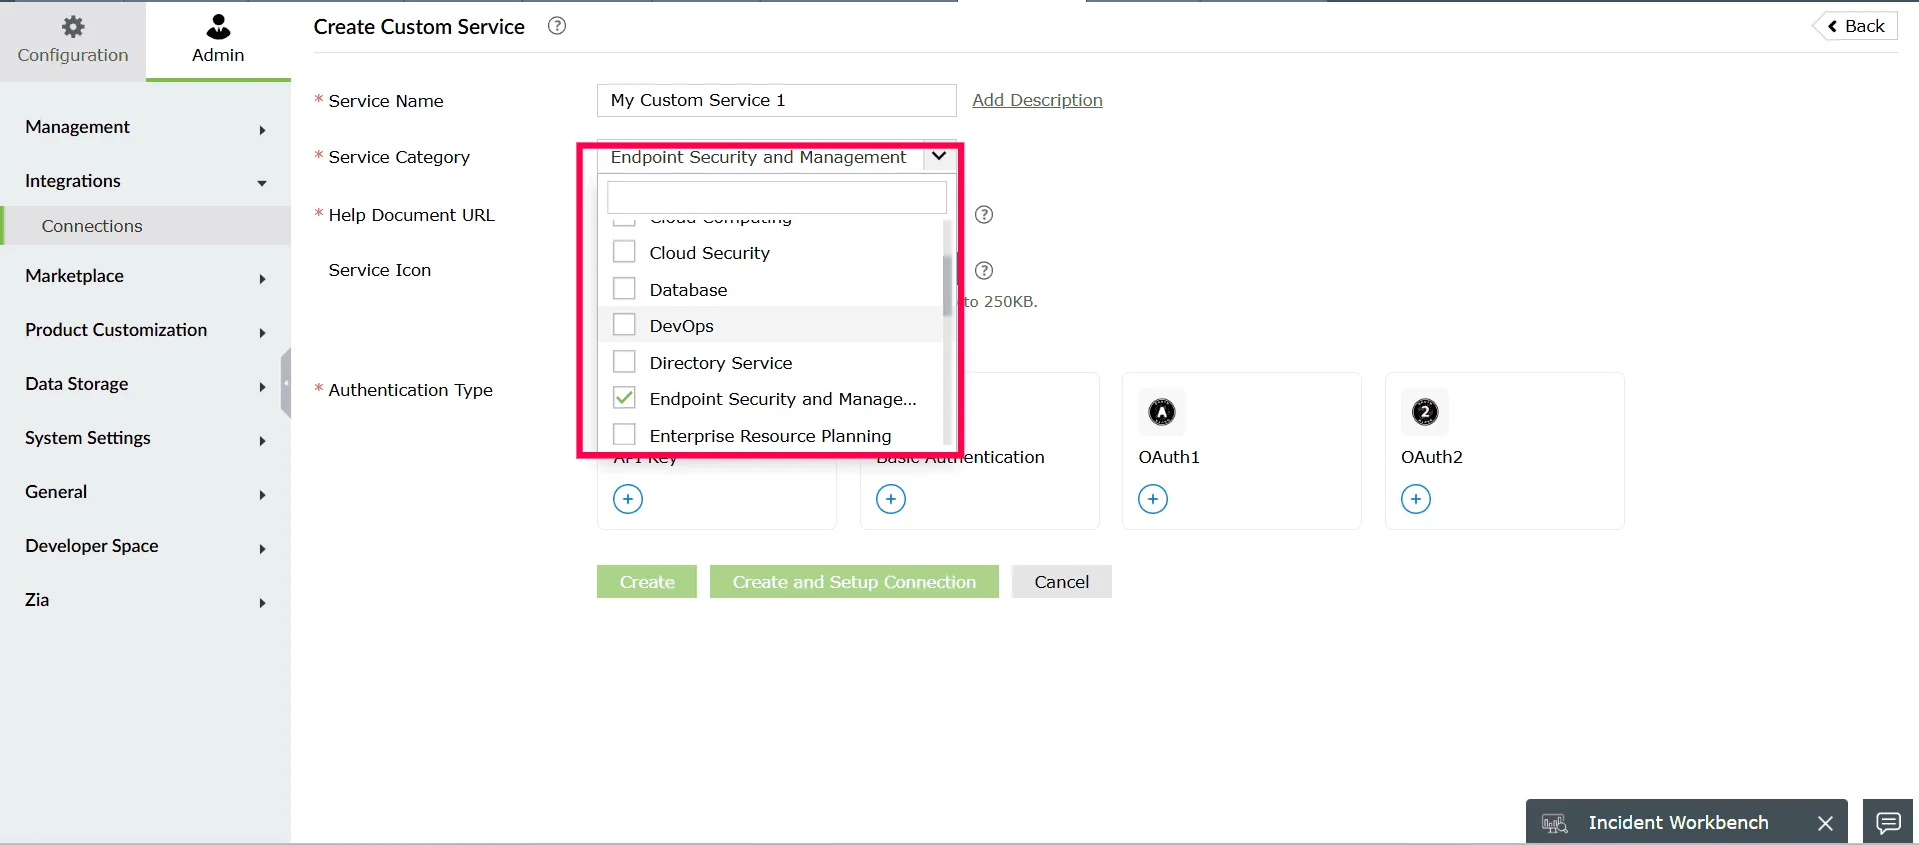
Figure 63: Selecting a service category - In the Help Document URL, specify the documentation link related to the external service.
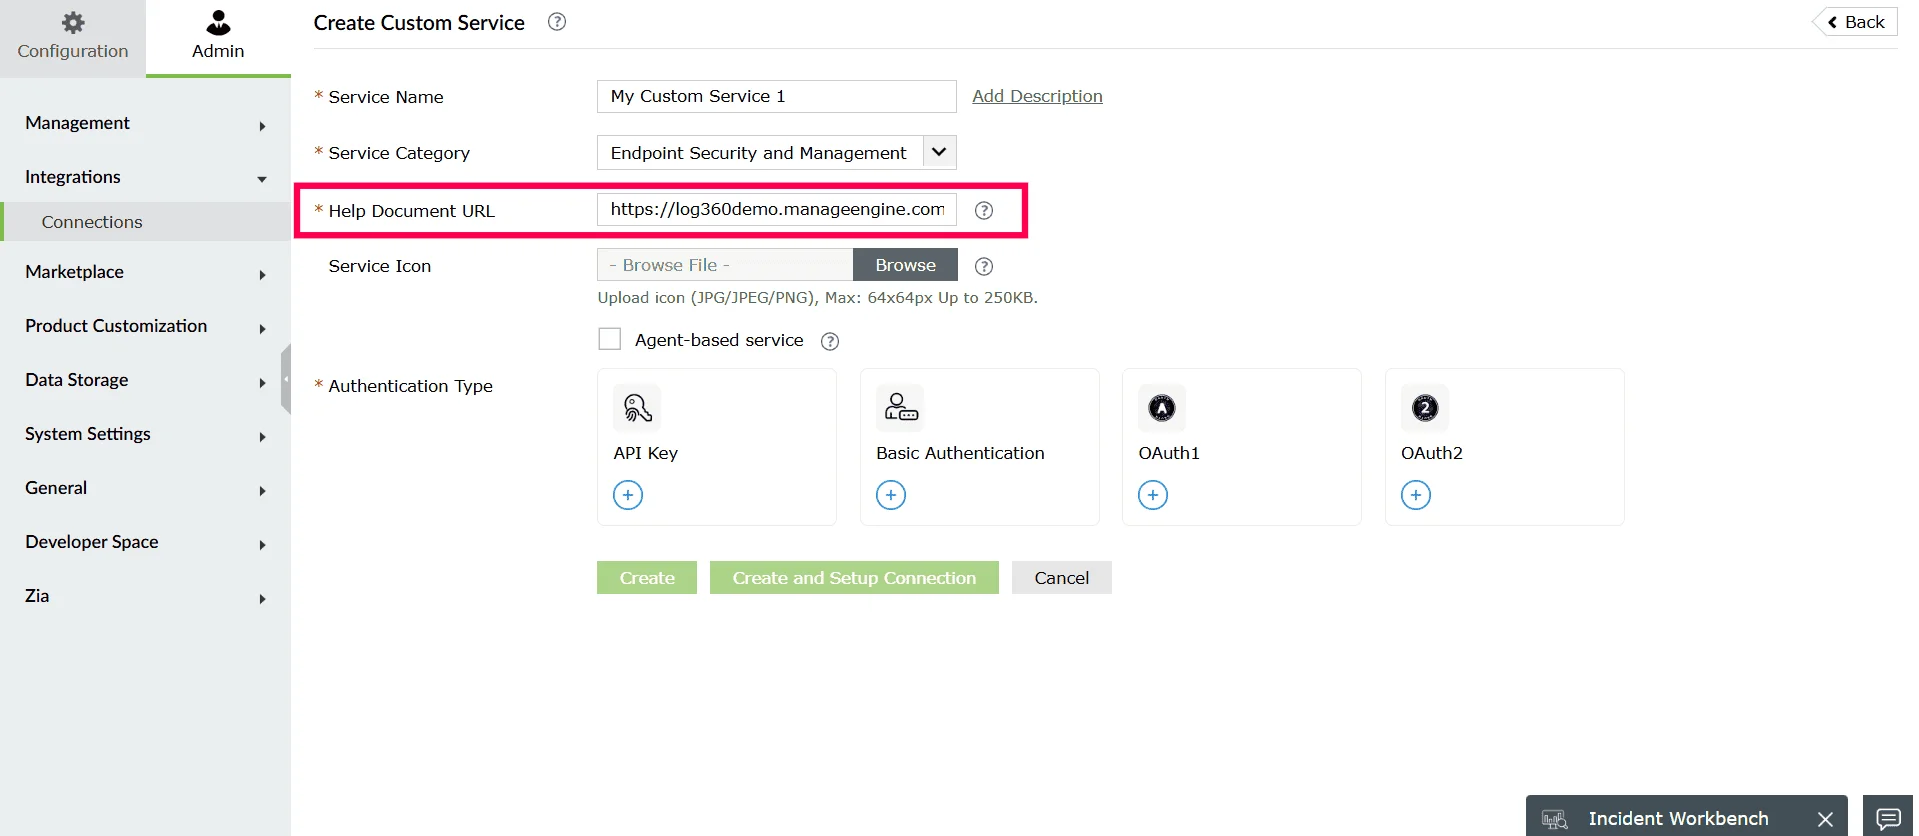
Figure 64: Adding help document URL - (Optional) Upload a Service Icon to visually identify the custom service.
- Enable the Agent-based service checkbox if the external application cannot be accessed directly over the internet and requires communication through an agent installed in your network.
- Under Authentication Type, click on the first authentication method you want to configure.

Figure 65: Selecting an authentication type - In the Add Authentication Setup window that appears, configure the selected authentication method.
Note Refer to the respective authentication section in this section
- Click Add to save the authentication configuration.
Figure 66: Adding the authentication - Repeat steps 7 to 9 to add required authentication methods.
- Click Create to save only the custom service profile or Click Create and Setup Connection to proceed with establishing the actual connection.
Read also
This page explained how to configure different authentication methods when creating a custom service. For additional setup and management guidance, refer to the following articles: