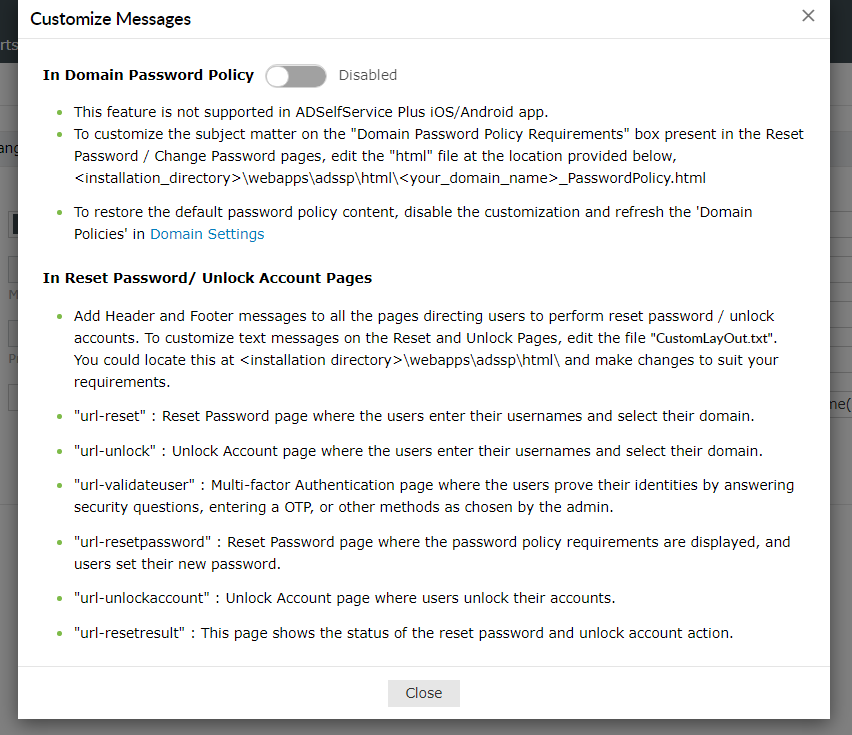
- To customize the header and footer messages in one or all the pages edit the file CustomLayout.txt from the location\webapps\adssp\html\
- Each page directing to Password Reset or Unlock Account has different names as described below.
url-reset: Reset Your Password Page where users enter their name and select their domain. Enter your text messages in the file CustomLayout.txt within the open and close Tags provided below.
<url-reset-header> Enter Message or Link </url-reset-header>
<url-reset-footer> Enter Message or Link </url-reset-footer>
url-validateuser: Security Questions Page where users answer secret questions. Enter your text messages in the file CustomLayout.txt within the open and close Tags provided below.
<url-validateuser-header> Enter Message or Link </url-validateuser-header>
<url-validateuser-footer> Enter Message or Link </url-validateuser-footer>
url-resetpassword: This is the page which provides Domain Password Policy requirements for users when Password Reset / Unlock Accounts. Enter your text messages in the file CustomLayout.txt within the open and close Tags provided below.
<url-resetpassword-header> Enter Message or Link </url-resetpassword-header>
<url-resetpassword-footer> Enter Message or Link </url-resetpassword-footer>
url-resetresult: This page shows the status of a password reset or account unlock. Enter your text messages in the file CustomLayout.txt within the open and close Tags provided below.
<url-resetresult-header> Enter Message or Link </url-resetresult-header>
<url-resetresult-footer> Enter Message or Link </url-resetresult-footer>
- Example:
<url-reset-header>
<table>
<td class = "blacktxt">Enter your text message</td>
</tr>
</table>
</url-reset-header>
Note: Save a back up copy of the existing file (customLayout.txt) before editing.
Portal rebranding
- Log in to the ADSelfService Plus web console with admin credentials.
- Navigate to Admin → Customize → Personalize → Portal Rebranding.
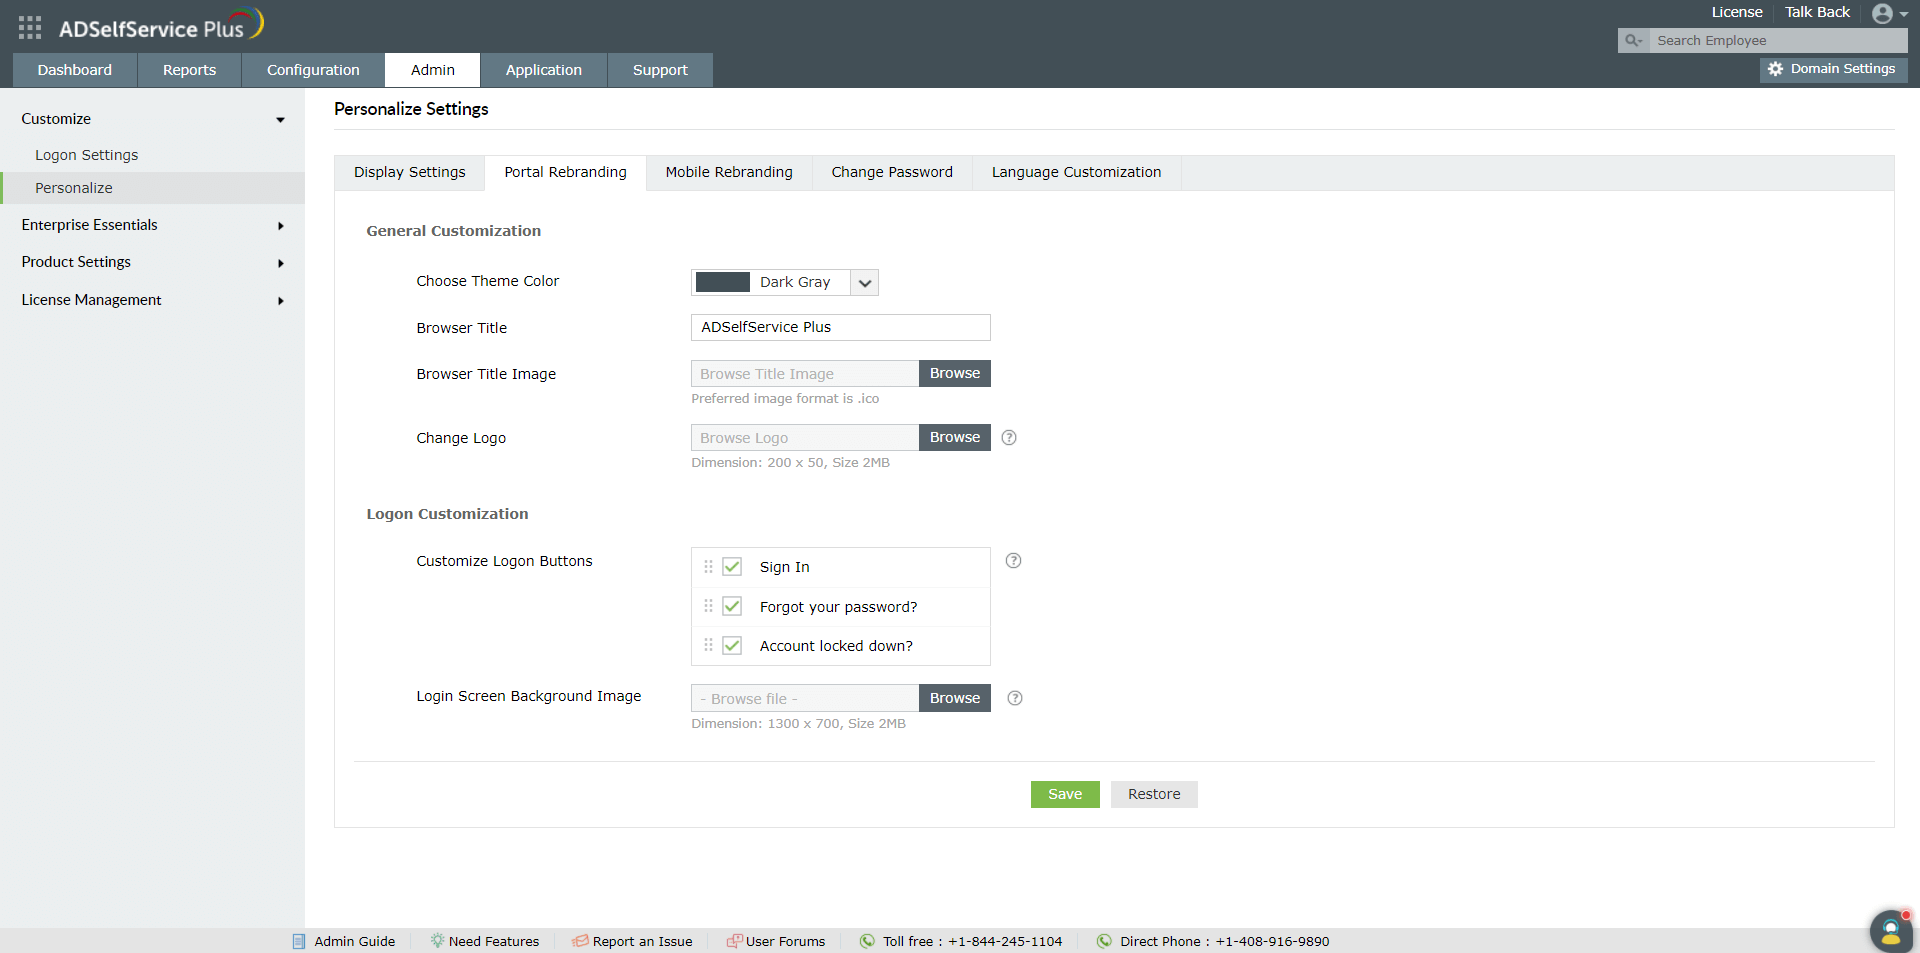
General Customization
- You can change the color of the portal theme by selecting a color from the Choose Theme Color drop-down.
- Enter a name for the Browser Title of the self-service portal. To change the Browser Title Image, click Browse, and upload the image of your choice.
- You can replace the ADSelfService Plus logo with your organization's logo using the Change Logo setting. Click Browse, and upload the image of your choice.
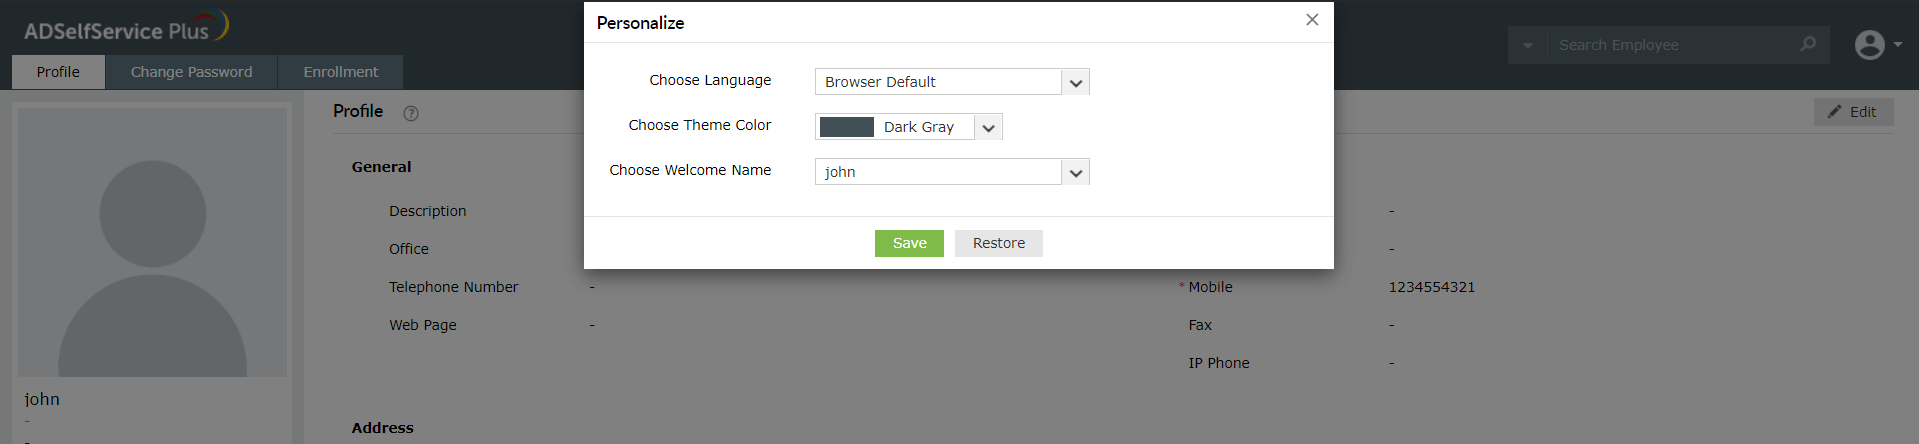
Personalization options for end users
The Personalize settings configured by the admin will be applied to the end-user portals. However, end users can also customize some settings including language, theme color of the portal, and name. These settings are applied only to them. To configure these settings:
- Log in to the ADSelfService Plus web portal.
- Click the drop-down menu next to the user icon on the top-right corner of the portal, and select the Personalize option.
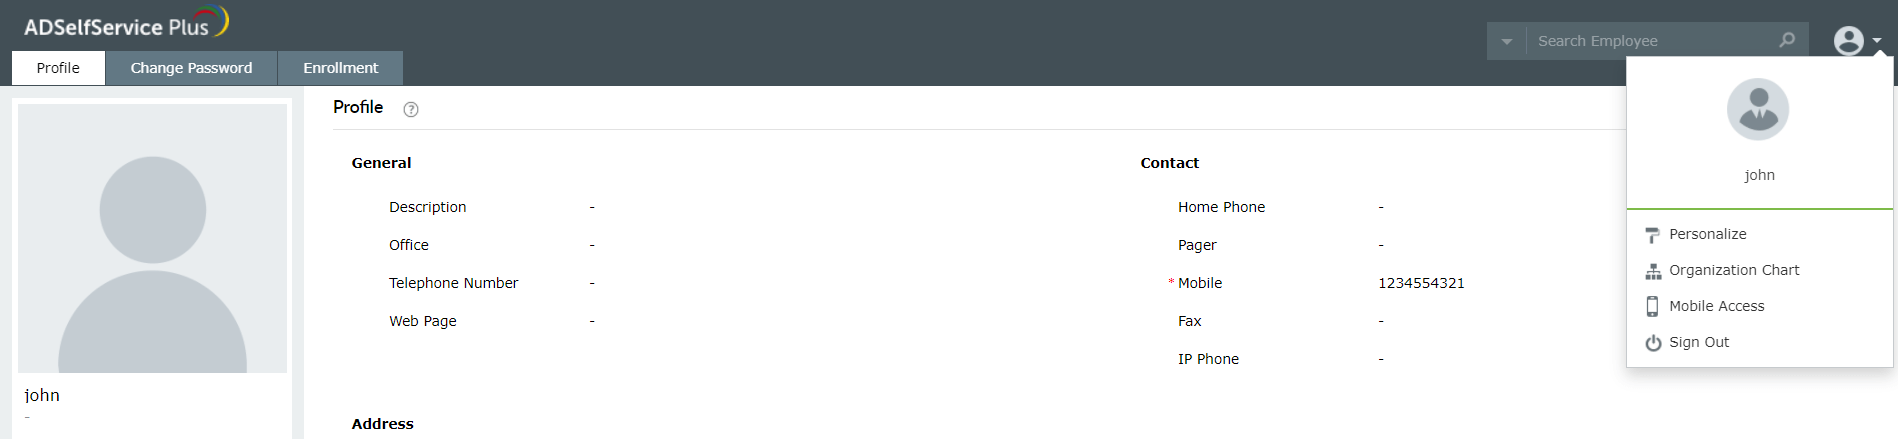
- From the pop-up that appears, users can change the language, theme color of the portal, and name to their preferences.
Logon customization
These settings help you customize the login screen to suit your organization's requirements.
Note: ADSelfService Plus has three types of login screens—one for admins and two for end users:
- Admin Login screen: The page that is loaded when the ADSelfService Plus icon is clicked from the machine it is installed in. It is also accessible via the URL-<protocol://server-name:port-no/adminLogin.cc>.
- End Users' Login screen: This page is accessible only if the Hide Admin Self-Service Admin Login setting is enabled. Otherwise, both the admins and end users can log in from the same page.
- Default End Users' Login screen: This is the default login page provided by ADSelfService Plus for the end users. Users land on this page when they access ADSelfService Plus using the access URL.
- Customizable End Users' Login screen: ADSelfService Plus allows you to entirely revamp the login page for your end users by editing the HTML file (<installation_directory>\webapps\adssp\html\DomainLogin.html) corresponding to the login page. On enabling End User Login HTML Customization, this page replaces the "Default End Users' Login" screen.
- You can Customize Logon Buttons by checking or unckecking the boxes next to the Sign In, Forgot your password?, and Account locked down? options. This allows you to show or hide the respective buttons in the login page for end users. The order in which they appear can also be changed by dragging and dropping. If you want to customize the entire login screen and want none of the buttons to be displayed, you can disable all of them.
- The Customize Logon Buttons setting is not applied to the admin login screen. It is applied to both the end-user login screens.
- You can change the text of the logon buttons from the Language Customization tab.
- You can modify the Login Screen Background Image by clicking Browse and uploading the image of your choice. This setting is applied to all the login screens except the "Customizable End Users' Login" screen.
Mobile rebranding
These settings help you customize the layout of ADSelfService Plus' iOS and Android mobile apps.
Follow these steps
- Log in to the ADSelfService Plus web console with admin credentials.
- Navigate to Admin → Customize → Personalize.
- Click the Mobile Rebranding tab.

- Click Browse and upload your organization’s logo.
- Customize the mobile app home screen by selecting the required tabs and arranging them in an order of your choosing. You can also customize the button labels of features or settings for the mobile app.
- Select the Restrict Mobile Access check box to restrict user access to the mobile site and mobile app.
- If you want to enable automatic login for the ADSelfService Plus mobile app, select Remember login in mobile app for auto login.
- Click Advanced, and select the Enable SSL Pinning for a secure mobile app connection.
- Click Save.
Note: It is recommended to enable SSL pinning. This helps prevent man-in-the-middle attacks by validating the ADSelfService Plus SSL certificate even after establishing an encrypted channel between the mobile app and the ADSelfService Plus server.
These settings help you customize the layout of ADSelfService Plus' iOS and Android mobile apps. To learn more about these settings, click here.
Changing the logon credentials
Change the password to the ADSelfService Plus admin console here.
-
Log in to the ADSelfService Plus web console with admin credentials.
-
Navigate to Admin → Customize → Personalize → Change Password.
-
Enter the Old password, New password and the Confirm New password in the respective fields.
-
Click Change Password.
Customizing the displayed language
-
ADSelfService Plus allows you to change the text displayed in the UI of the admin and user portal. Select the language you’d like to use for the admin portal.
-
In the search field, enter the text you’d like to change, then click Modify.
-
Or, you can click the Find & Replace button, enter the text that needs to be changed in the Find field, and the text it will be changed to in the Replace field.
-
Click Save.
Don't see what you're looking for?
-
Visit our community
Post your questions in the forum.
-
Request additional resources
Send us your requirements.
-
Need implementation assistance?
Try OnboardPro
Copyright © 2026, ZOHO Corp. All Rights Reserved.


 ADManager Plus
 ADAudit Plus
 Exchange Reporter Plus
 M365 Manager Plus