Product Settings
You can change the following settings of ManageEngine AD360 from this tab.
- Connection Type
- Privacy Settings
- General
- Security Hardening
- Product File Tamper Detection
- LDAP SSL Certificate import
Connection Type
- Choose your connection type. You can choose to use either HTTP or HTTPS.
- Specify the Port Number of your choice after choosing the connection type. The default port for HTTP is 8082, while the default port for HTTPS is 8445.
- If you selected HTTPS as your connection type, enable the Encrypt Keystore Password option and enter the password that you used to install the SSL certificate in AD360. If you don't enable this option, then password will be stored in clear text format in the server.xml file.
- Click Advanced to configure TLS versions and cipher suites.
- Select the desired TLS versions from the TLS drop-down. AD360 supports TLSv1, TLSv1.1, and TLSv1.2.
- AD360 supports the following cipher suites:
- TLS_ECDHE_RSA_WITH_AES_128_CBC_SHA256
- TLS_RSA_WITH_AES_128_CBC_SHA
- TLS_ECDHE_RSA_WITH_AES_128_CBC_SHA
- TLS_ECDHE_RSA_WITH_AES_256_CBC_SHA384
- TLS_ECDHE_RSA_WITH_AES_256_CBC_SHA
- TLS_RSA_WITH_AES_128_CBC_SHA256
- TLS_RSA_WITH_AES_256_CBC_SHA256
- TLS_RSA_WITH_AES_256_CBC_SHA
- TLS_ECDHE_ECDSA_WITH_AES_256_GCM_SHA384
- TLS_ECDHE_RSA_WITH_AES_128_GCM_SHA256
- TLS_ECDHE_ECDSA_WITH_AES_128_GCM_SHA256
- TLS_ECDHE_RSA_WITH_AES_256_GCM_SHA384
- TLS_DHE_RSA_WITH_AES_128_GCM_SHA256
- TLS_DHE_DSS_WITH_AES_128_GCM_SHA256
- TLS_RSA_WITH_AES_256_GCM_SHA384
- TLS_RSA_WITH_AES_128_GCM_SHA256
- Select the domains for which you wish to Enable LDAP SSL for from the drop-down box.
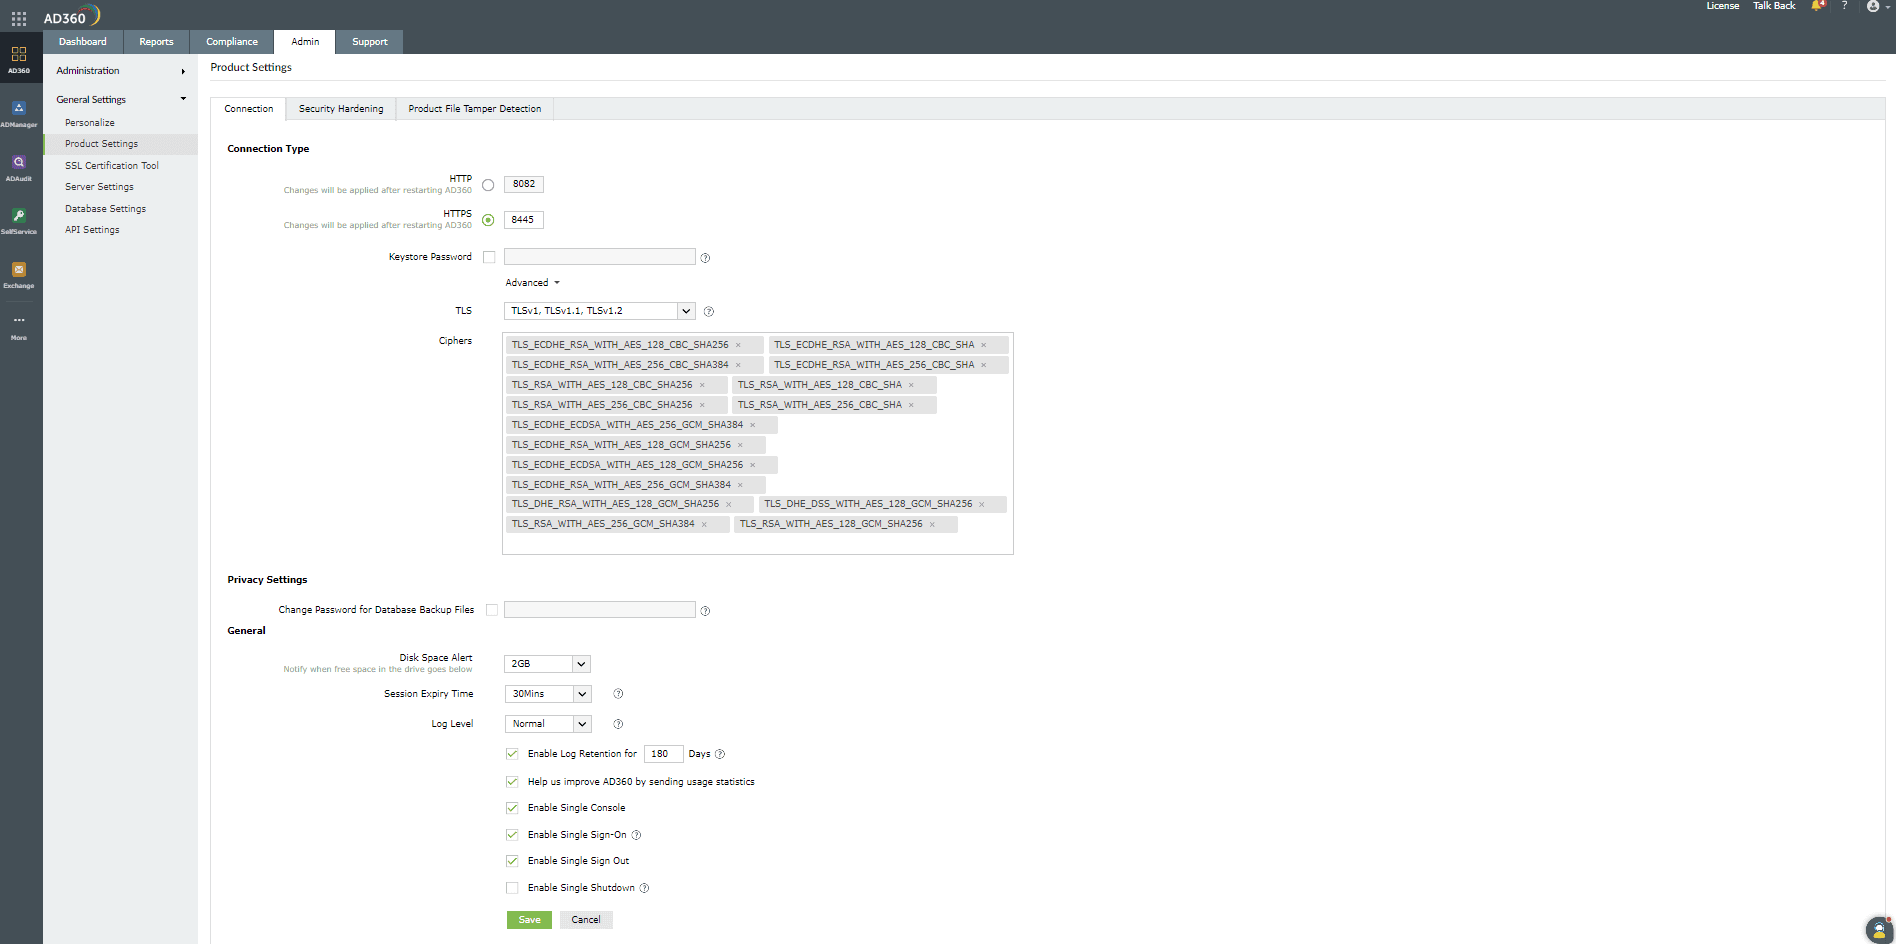
- Click Save to store the configured settings.
Privacy Settings
By default, AD360 secures your database backups with a strong, random password. If required, you can change the password for subsequent database backups by entering the new password in the Change Password for Database Backup Files field. Ensure that the new password is at least 8 characters long.
Note: If you forget the password that you have entered, the backup files created with that password cannot be restored. You will have to set a new password before taking the backups.
General
- Be alerted when the available disk space falls below a pre-defined level (1GB, 2GB, or 5GB) by selecting the appropriate value from the drop-down box.
- Select the Session Expiry Time (the user session duration, in minutes) from the drop-down box.
- Select the level of logs that is to be collected by the product. The default working mode for ManageEngine AD360 is Normal with minimal set of debugging information. Select Debug to collect detailed log reports.
- The Enable Log Retention for option allows you to choose the number of days for which you would like to retain the product logs (saved under the Archive folder). After the set period, the logs will be purged from the product.
- Enable or disable collection of anonymous Usage Statistics Gathering to send to us.
- The Enable Single Console option allows you to access all products integrated with AD360 using the Apps pane on the left side of the product and vice-versa.
- Select Enable Single Sign on if you would like to access integrated products without going through authentication after signing in to AD360.
- Select Enable Single Sign Out if you would like to sign out of all integrated products just by signing out of AD360.
- Select Enable Single Shutdown if you would like to shut down all integrated products just by shutting down AD360.
- Click Save to store the configured settings.
Security Hardening
This option allows you to configure and manage all product security settings in one place. A dashboard on the right side of the page displays a security score (as a percentage), which is calculated based on the importance of each configuration. Apart from this dashboard, the security settings alert will be shown under the browser and product notification centers, product License tab, and it will also be emailed to you along with product downtime and start-up mailers.
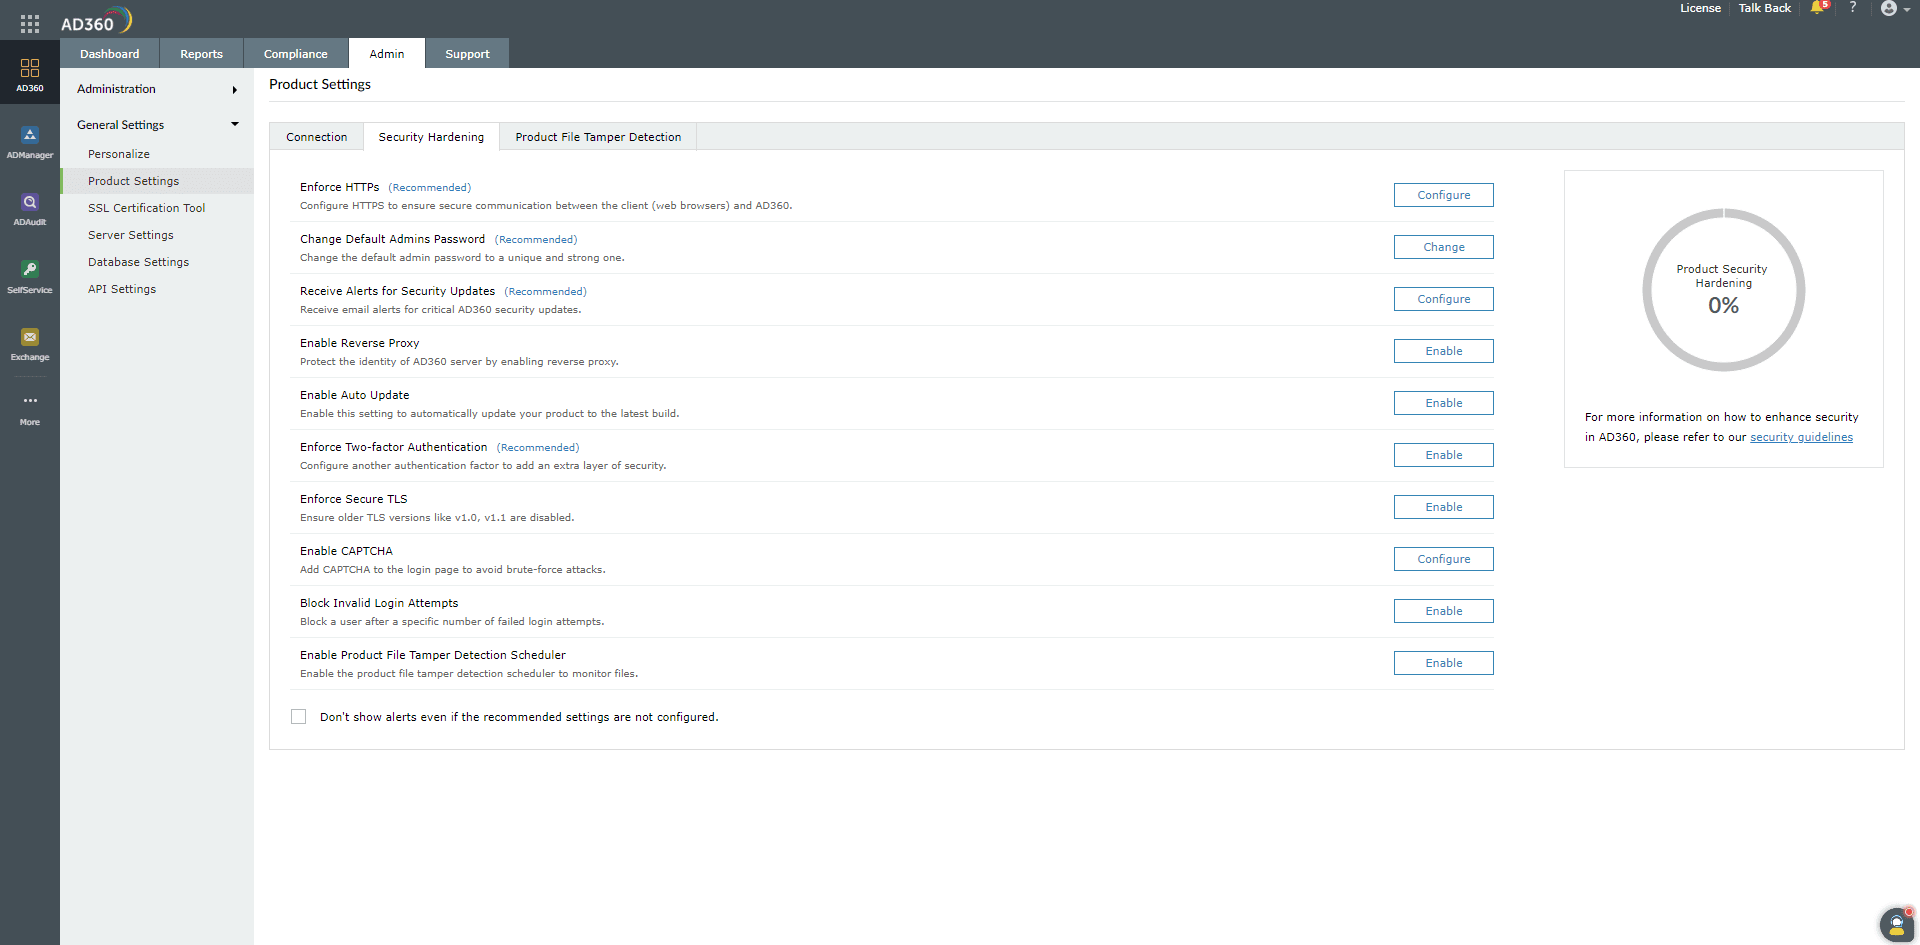
The security settings alert will be displayed in the notification center (which is the icon on the top-right corner) until a security score of 100% is reached. For licensed customers, the alert will also be displayed after every successful login until all the mandatory* security configurations are done. The security configurations available in AD360 are listed below.
- Enforce HTTPS*: This setting helps establish a secure connection between the web browsers you use to access AD360 and the AD360 server.
- Change Default Admin's Password*: Use this setting to change the default admin's password.
- Receive Alerts On Security Updates *: Configuring this setting allows you to receive email
notifications regarding released security patches. This ensures that you are well-informed about any security updates for the product, enabling you to
update it as soon as possible.
- Enable Reverse Proxy: With this setting, you can enable connection with a reverse proxy server in
order to secure the identity of the AD360 server.
- Enable Auto Update: This setting enables the product to be updated to the recent build automatically. This ensures
that you do not miss out on important patches and new features.
- Enforce Two-Factor Authentication*: Use this setting to add an extra layer of security while logging in to AD360. Choose from the set
of authentication options available, like email verification, SMS verification, Google Authentication, Duo Security, and more.
- Enforce Secure TLS: While using Transport Layer Security (TLS), this setting checks if the older versions of TLS are disabled. AD360
supports TLS versions 1.0, 1.1, and 1.2.
- Enforce LDAP SSL: This setting enforces an SSL connection between the AD360 server and Active Directory domains
configured in the product.
- Enable CAPTCHA: You can add a CAPTCHA to the login page using this setting. Users will be prompted to enter a CAPTCHA after a specific
number of failed login attempts.
- Block Invalid Login Attempts: This setting allows you to block a particular user after a specific number of failed
login attempts by the user.
- Enable Product File Tamper Detection: This setting monitors the executable files and identifies the tampered files in the AD360
installation directory.
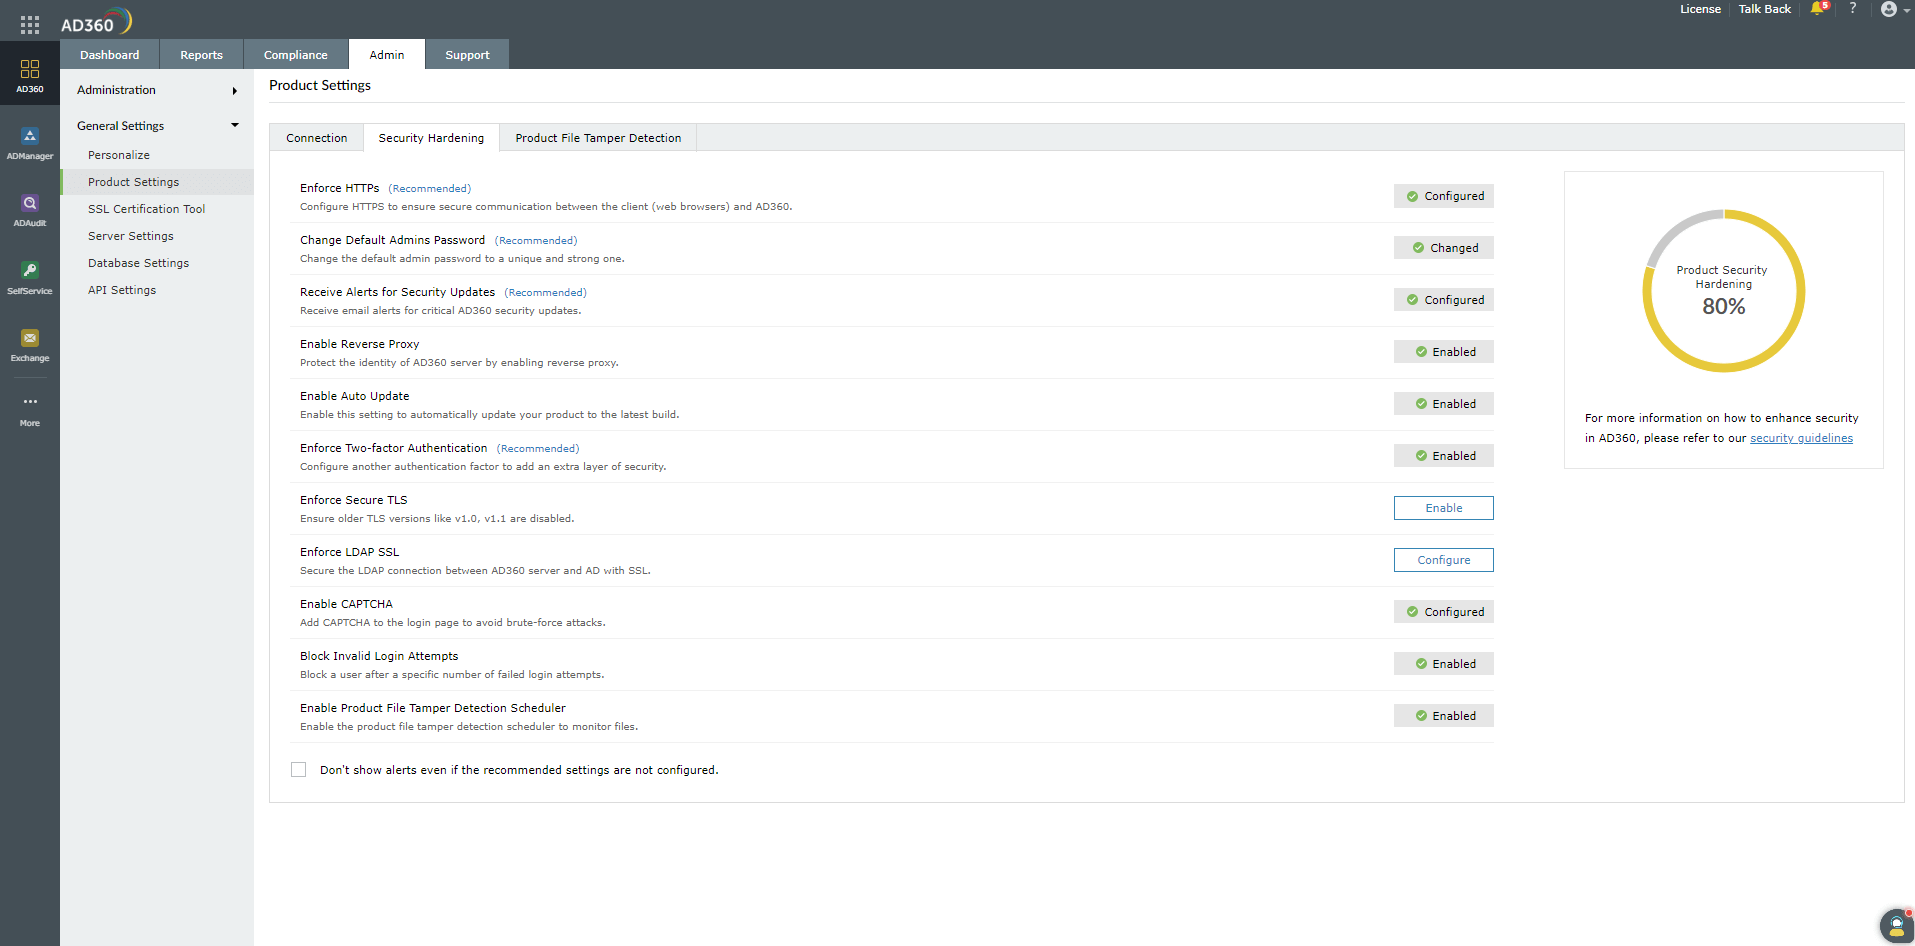
*These settings are mandatory for AD360. However, it is recommended to configure all settings to ensure your Product Security Hardening score reaches 100%. To manage individual settings, click the Configure option corresponding to that security setting and make the required changes. Once configured, the setting will have a green ticked Configured icon next to it, as shown in the image above.
Product File Tamper Detection
The Product File Tamper Detection feature examines the executable files (.exe, .bat, .msi, .dll, and .rll) in the AD360 installation directory to detect the changes made to them. It validates the files using a checksum to ensure data security. If a file in the installation directory is found to be tampered with, an alert will be displayed after every successful product login.
Note:
- PostgreSQL and JRE folders are excluded from scanning, as the external files will replace the product default files during externalization.
- Patch folder is excluded from scanning as it contains modified files of the previous version.
The Product File Tamper Detection feature facilitates:
- Scanning the installation directory
- Classification of files
- Action to be performed when the file is tampered with
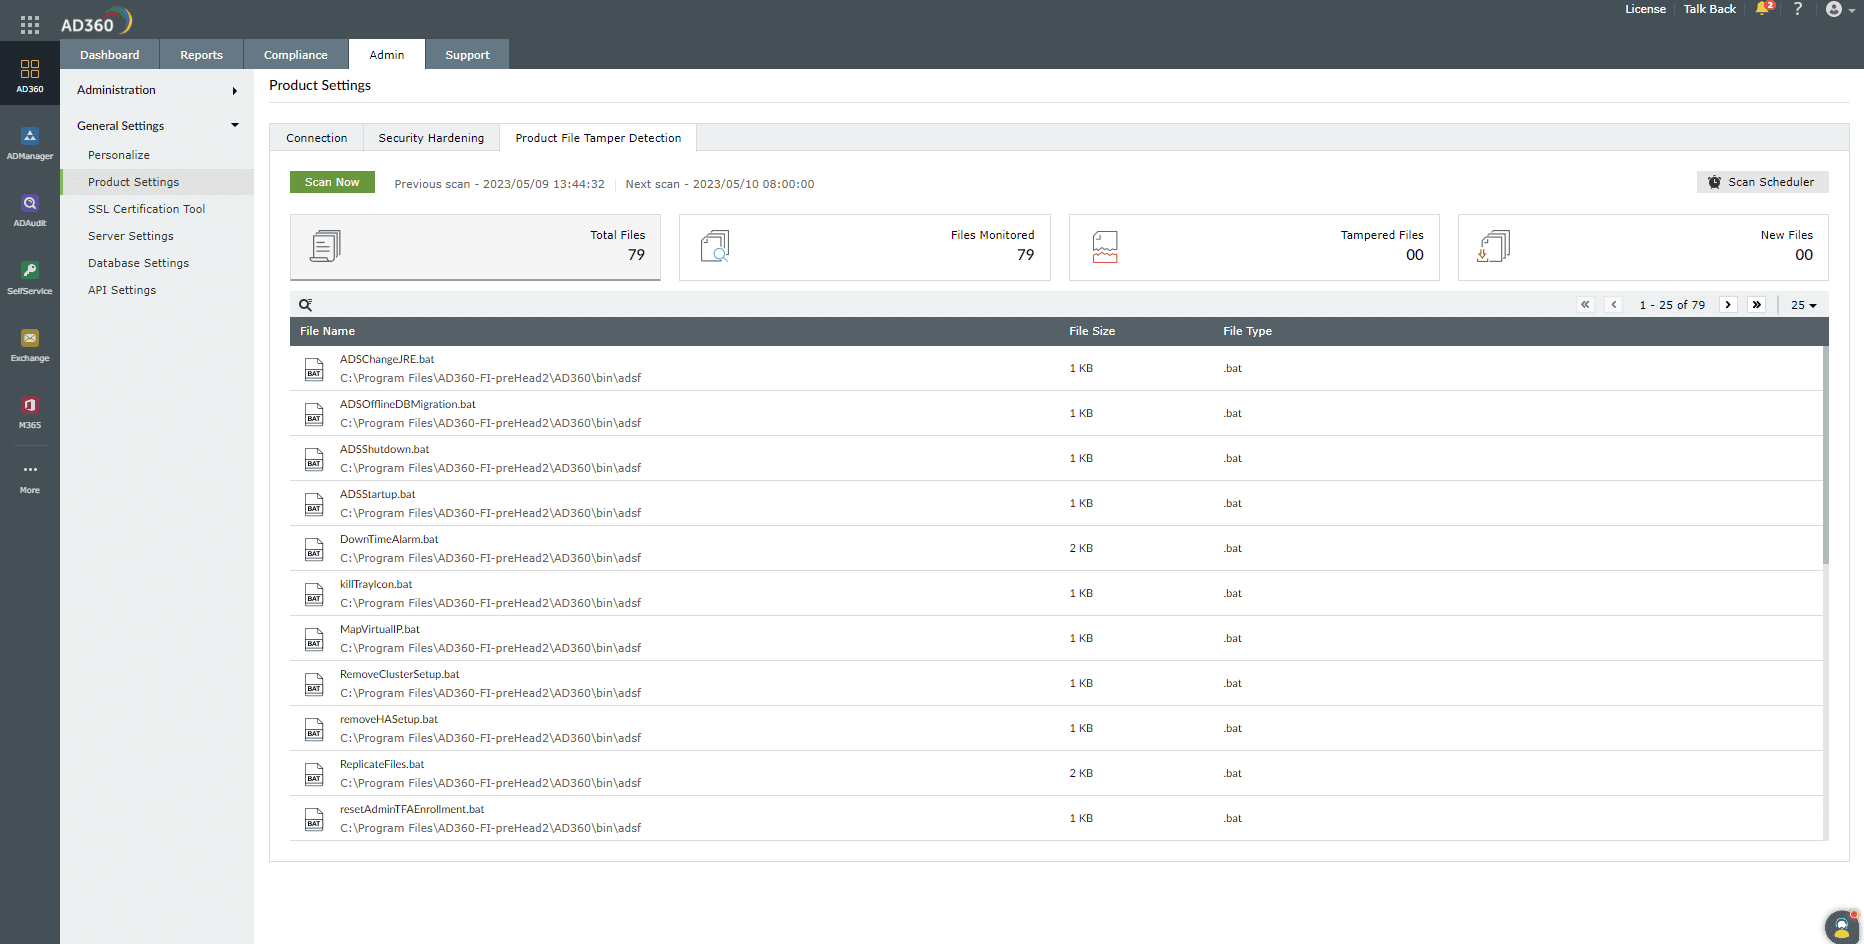
Scanning the installation directory
The files in the installation directory can be scanned in the following ways:
- While starting the product: The scanning process will be performed every time you start the product.
- Instant scan: Click Scan Now to start the file scanning process. The report will be generated after the scan is completed.
- Scheduled scan: Click Scan Scheduler to run the scanning process at a specified time. The report will be generated after all the files are scanned. The Scan Scheduler will simultaneously run even if you click Scan Now to scan a file instantly.
Classification of files
The files are listed under these categories:
Total Files: Total Files displays all the files that are found in the product installation directory, including the tampered files.
Files Monitored: Files Monitored displays the files with whitelisted extensions, where the current checksum matches the expected checksum after scanning them.
Tampered Files: Tampered Files displays the list of executable files that have been modified, i.e., the current checksum is not the same as the expected checksum.
New Files: New Files scans and shows files that are not a part of the application bundle but have the allowlisted extensions. These new files can be included in future scanning processes or can be restricted from being executed.

Action to be performed when the file is tampered with
LDAP SSL Certificate import:
If you want AD360 to utilize LDAPS to communicate with AD, import the SSL certificate by following the steps below:
Step 1: Obtain the LDAP SSL Certificate
- Connect to the LDAP server using a browser or command-line tool.
- Export the SSL certificate from the LDAP server in .cer, .crt, or .pem format.
Step 2: Open the Microsoft Management Console
- Press Win + R, type mmc, and press Enter.
- Click File -> Add/Remove Snap-in.
- Select Certificates, click Add, and choose Computer account.
- Click Next, select Local Computer, and click Finish.
Step 3: Import the Certificate
- Expand Certificates > Trusted Root Certification Authorities.
- Right-click Certificates and select All Tasks > Import.
- Browse to the downloaded LDAP certificate file and select it for import.
- Follow the import wizard steps and complete the process.
Step 4: Verify the Certificate Installation
- Restart the computer.
- Open MMC > Certificates > Trusted Root Certification Authorities to ensure the certificate is listed.
Don't see what you're looking for?
-
Visit our community
Post your questions in the forum.
-
Request additional resources
Send us your requirements.
-
Need implementation assistance?
Try onboarding
 ADManager Plus
 ADAudit Plus
 ADSelfService Plus
 AD360
AD360