
How to change Exchange Online retention policy for Microsoft 365 mailboxes
Last updated on:In this page
- How to change the retention period using the Exchange admin center
- How to change the retention period using Exchange Online PowerShell
- How to manage Exchange Online retention policies in M365 Manager Plus
- Track and manage Exchange Online retention effortlessly
- Important tips
- Frequently asked questions
Exchange Online mailbox retention policies define how long mailbox items are retained and what actions are taken as they age. These policies control when items are moved to the archive mailbox, when they are deleted from primary or archive mailboxes, and how retention behavior is applied across default folders, deleted items, and other mailbox content.
By applying retention tags to mailbox folders and item types using an Exchange Online retention policy, administrators can enforce consistent data lifecycle rules across users. This article explains how to change Exchange Online retention policies using native tools such as the Exchange Admin Center (EAC) and Exchange Online PowerShell, and how you can do it more efficiently with just a few clicks in ManageEngine M365 Manager Plus.
- Exchange Admin Center
- Graph PowerShell
- M365 Manager Plus
Method 1: How to change the retention period using the Exchange admin center
Prerequisites
You need the Exchange Administrator role for the account you use to sign in to EAC.
Steps
- Log in to the Exchange Admin Center and navigate to Recipients > Mailboxes.
- Select the mailbox for which you want to change the retention period.
- In the mailbox details pane, click the Mailbox tab.
- Under Retention policy, click Manage mailbox policies.
- Select the desired policy from the drop-down menu and click Save.

Limitation to consider
You will have to repeat this set of steps for every mailbox you wish to configure a retention policy. If you wish to configure Exchange Online retention policies for multiple mailboxes at the same time, you will have to use complex Exchange Online PowerShell scripts or you can try out the user-friendly interface of M365 Manager Plus, which would only take a few clicks— even to configure retention policies for hundreds of users simultaneously.
Method 2: How to change the retention period using Exchange Online PowerShell
Prerequisites
Before using Exchange Online PowerShell, verify that:
- The Exchange Administrator role is applied to the account you use to sign in to Exchange Online PowerShell.
- You are connected to the Exchange Online PowerShell module.
- To check if the Exchange Online PowerShell module is installed, use this script:
Get-Module -ListAvailable ExchangeOnlineManagement
- If it does not return a value, you will have to install the module. To install the
Exchange Online PowerShell module, execute this script:
Install-Module ExchangeOnlineManagement -Scope CurrentUser
- To connect to Exchange Online PowerShell, run this script:
Connect-ExchangeOnline
- To check if the Exchange Online PowerShell module is installed, use this script:
Using Set-Mailbox to change Exchange Online retention policy
The Set-Mailbox cmdlet can be used to assign a specific Exchange Online retention policy to a mailbox.
Use this syntax to apply an existing Exchange Online retention policy to a mailbox:
Set-Mailbox -Identity "User@domain.com" -RetentionPolicy "New-Retention-Policy"
Customizing retention of specific folders with Set-RetentionPolicyTag
You can modify the age limit for specific folders (like Deleted Items) within a policy using the Set-RetentionPolicyTag cmdlet.
Use this syntax to change the retention age to 30 days for a specific tag:
Set-RetentionPolicyTag -Identity "Deleted Items Tag" -AgeLimitForRetention 30
Supported parameters
| Parameter | Description |
|---|---|
| Identity | The unique identifier (email, alias, or display name) of the mailbox or tag. |
| RetentionPolicy | Specifies the name of the retention policy to be applied to the mailbox. |
| AgeLimitForRetention | Defines the number of days an item is kept before the retention action is triggered. |
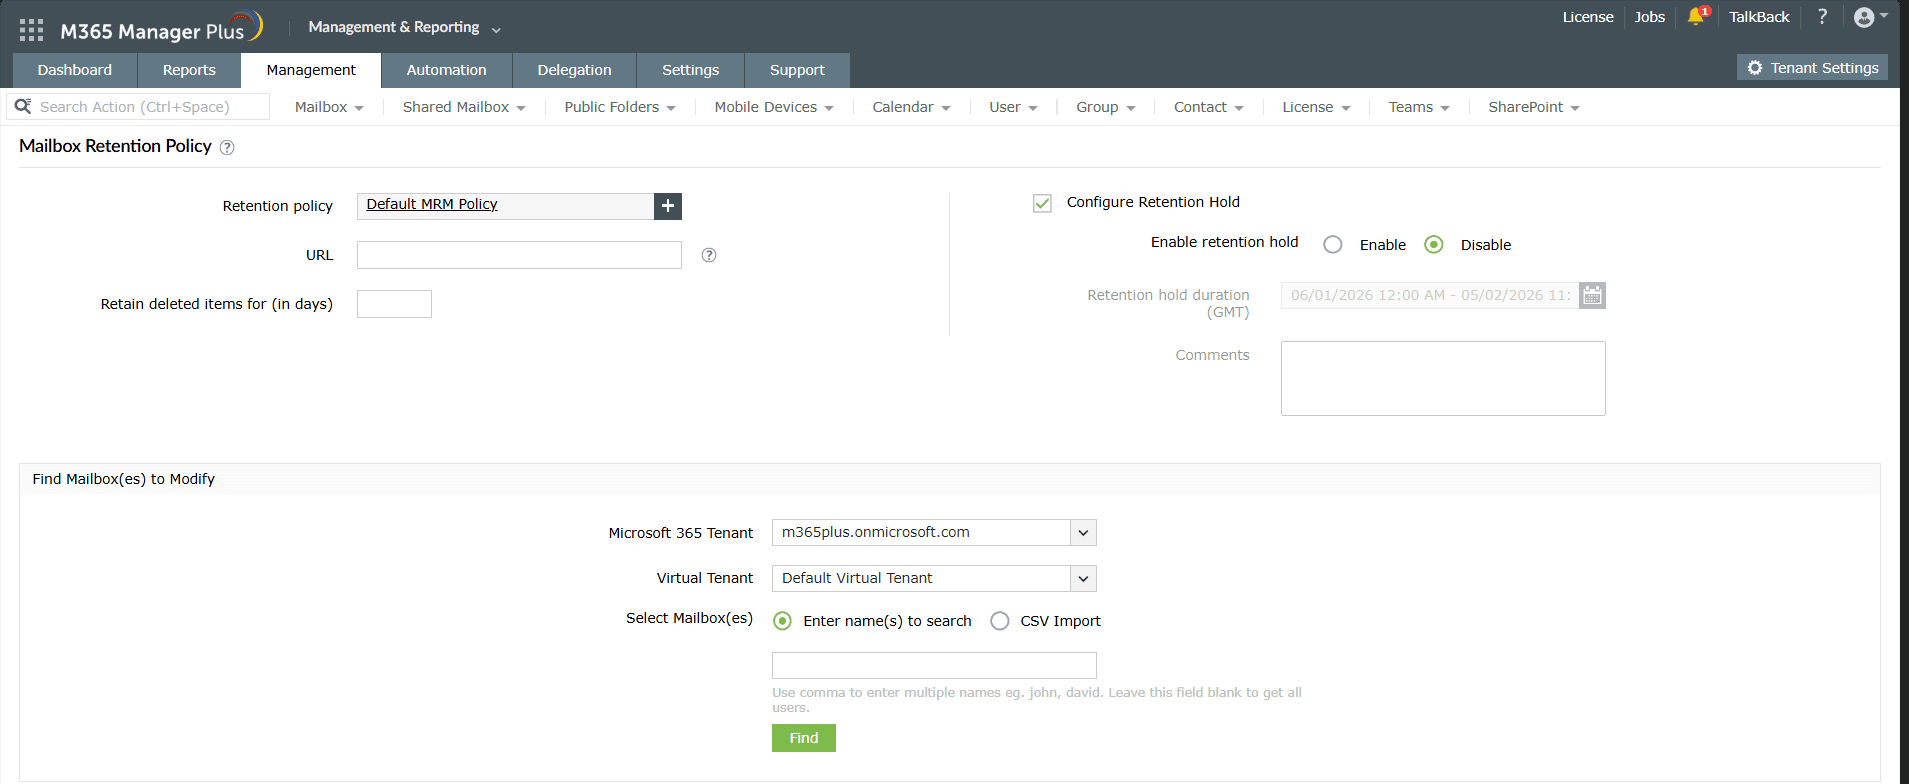
Method 3: How to manage Exchange Online retention policies in M365 Manager Plus
- Log in to M365 Manager Plus and click the Management tab.
- Navigate to Exchange Online > Mailbox Management.
- Under Bulk Mailbox Modifications, select Mailbox Retention Policy.
- Choose the Retention policy you wish to apply for your mailboxes.
- You can also add in the following details.
- Add a URL with the retention policy's details to keep your users informed.
- Configure how long to hold on to items in the Recoverable Items folder using the Retain deleted items for (in days) field.
- Check the Configure Retention Hold checkbox and click Enable to prevent mailbox content from being deleted. You can configure the Retention hold duration (GMT) in the field below the checkbox to configure how long the retention hold stays.
- Click Apply to update the retention settings for all selected mailboxes at once.

Track and manage Exchange Online retention effortlessly
M365 Manager Plus’ capabilities help you view, manage, and audit retention policies, litigation holds, eDiscovery holds, and all associated settings for the mailboxes in your Microsoft 365 environment. It streamlines policy assignment, offers in-depth reporting, and provides real-time monitoring, all through an intuitive web console, without the need for complex Microsoft Graph PowerShell scripting.
Bulk-enable litigation holds for Microsoft 365 mailboxes
Assign or update litigation holds for multiple mailboxes in one action using CSV imports or intuitive GUI options, removing the need for repetitive, manual updates.
Visibility into all mailboxes with holds applied
View archive mailbox status and hold duration alongside your litigation-enabled mailboxes, giving you a complete picture of your mailbox data for any of your litigation holds.
Real-time alerts on Exchange Online retention policy changes
Set up instant alerts for changes to the litigation hold status or duration so you can act quickly to prevent accidental or unauthorized modifications.
Eliminate PowerShell complexity
Perform all of your litigation hold activities and follow-ups through a user-friendly web interface, reducing dependency on scripting and minimizing configuration errors.
Important tips
Regularly audit retention policies: Periodically review which policies are assigned to ensure they align with current organizational compliance standards.
Understand licensing requirements: Mailboxes must have an Exchange Online Plan 2 license (or an equivalent E3/E5 license) to be placed on litigation hold, which provides the necessary In-Place Archive storage.
Preserve data before deprovisioning: Enable legal holds for Microsoft 365 users and mailboxes as a mandatory part of their off-boarding process for a cleaner Microsoft 365 life cycle management.
Frequently asked questions
By default, the Default MRM Policy is applied, which includes various tags such as moving items to the archive after two years or deleting items in the Deleted Items folder after 30 days.
Yes, you can create a personal retention tag and allow users to apply it to specific folders, or an admin can modify a standard retention policy tag using Exchange Online PowerShell.
No, the Managed Folder Assistant runs periodically (usually once every seven days) to process mailboxes and apply the policy actions.