

How to convert a shared mailbox to a user mailbox in Microsoft 365
Last updated on:In this page
- How to convert a shared mailbox to a user mailbox using the EAC
- How to convert a shared mailbox to a user mailbox using Exchange Online PowerShell
- How to convert a shared mailbox to a user mailbox using M365 Manager Plus
- Monitor your Exchange Online shared mailboxes and more
- Important tips
- Frequently asked questions
This article will help you convert an Exchange Online shared mailbox to a user mailbox using the Exchange admin center (EAC) and Exchange Online PowerShell. It will also show you how to convert multiple shared mailboxes to user mailboxes in Microsoft 365 in just a few clicks using ManageEngine M365 Manager Plus, a dedicated Microsoft 365 administration tool.
- Exchange Online
- Graph PowerShell
- M365 Manager Plus
Method 1: How to convert a shared mailbox to a user mailbox using the EAC
Prerequisites
- You must have the Exchange Administrator or Global Administrator role.
- Ensure an Exchange Online license or a Microsoft 365 plan with an Exchange Online license is available as user mailboxes require licensing to remain active.
Steps
- Log in to the EAC and navigate to Recipients > Mailboxes.
- Locate the shared mailbox you wish to change. You can click the Filter button and select Shared mailbox to narrow down the list.
- Click the display name of the shared mailbox to open the details pane.
- On the pane that appears, navigate to the Others tab and click Convert to regular mailbox.
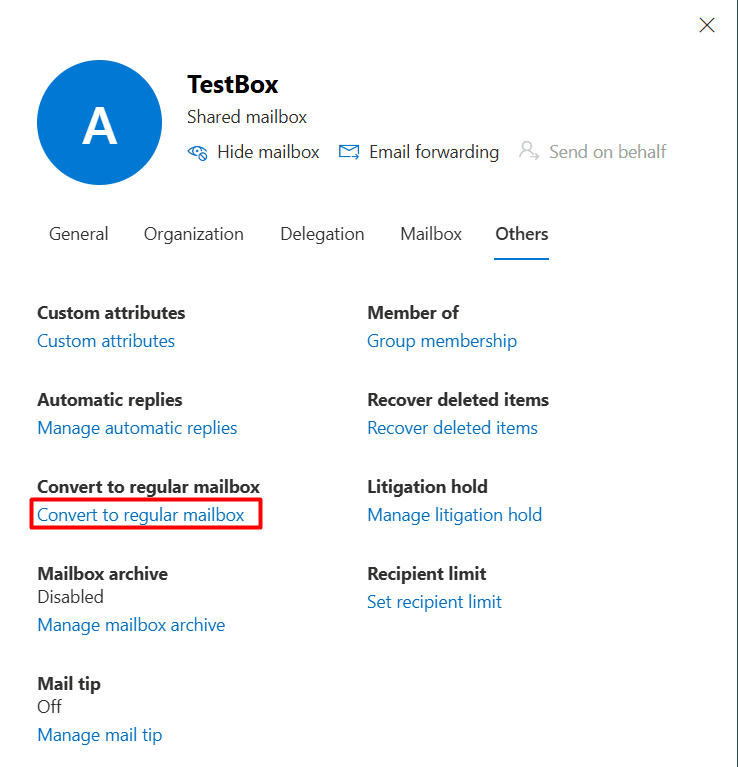
- Click Confirm in the confirmation dialog box.
- Once the Mailbox has been converted successfully message appears, use the Microsoft 365 admin center to assign a license and reset the password for the associated user account.

A limitation to consider
You will have to perform the same set of steps for every shared mailbox you want to convert to a user mailbox. To convert multiple shared mailboxes to user mailboxes, you can resort to complex Exchange Online PowerShell scripts, or you can try out M365 Manager Plus, which would only take a few clicks with its user-friendly interface.
Method 2: How to convert a shared mailbox to a user mailbox using Exchange Online PowerShell (Set-Mailbox)
Prerequisites
Before using Exchange Online PowerShell, verify that:
- The Exchange Administrator role is applied to the account you use to sign in to Exchange Online PowerShell.
- An Exchange Online license or a Microsoft 365 plan with an Exchange Online license is available as user mailboxes require licensing to remain active.
- You are connected to the Exchange Online PowerShell module.
- To check if the Exchange Online PowerShell module is installed, use this script:
Get-Module -ListAvailable ExchangeOnlineManagement
- If it does not return a value, you will have to install the module. To install the Exchange Online PowerShell module, execute this script:
Install-Module ExchangeOnlineManagement -Scope CurrentUser
- To connect to Exchange Online PowerShell, run this script:
Connect-ExchangeOnline
- To check if the Exchange Online PowerShell module is installed, use this script:
Convert shared mailboxes to user mailboxes with Set-Mailbox
The Set-Mailbox cmdlet is used to modify the properties of an Exchange Online mailbox. Modify the Type attribute of the shared mailbox to convert it to a user mailbox. Use the following cmdlet to convert one shared mailbox:
# Convert shared mailbox to user mailbox
Set-Mailbox -Identity "support@yourdomain.com" -Type Regular
Once the shared mailbox has been converted successfully, assign a Microsoft 365 license and reset the password for the associated user account.
A use case for the Set-Mailbox cmdlet
An IT administrator needs to convert several shared mailboxes to user mailboxes after a department-wide restructuring to ensure that data from the offboarded employees is accessible to the new recruits.
The administrator uses the following script to convert a list of shared mailboxes to user mailboxes in Microsoft 365:
$SharedMailboxes = Get-Mailbox-RecipientTypeDetails SharedMailbox -ResultSize Unlimited | Where-Object { $_.DisplayName -like"*Test*" } foreach ($Mailboxin$SharedMailboxes) { Set-Mailbox-Identity$Mailbox.ExternalDirectoryObjectId -Type Regular }
Method 3: How to convert a shared mailbox to a user mailbox using M365 Manager Plus
- Log in to M365 Manager Plus and navigate to Management > Exchange Online > Shared Mailbox Management and select Shared Mailbox Conversion.
- From the Convert to drop-down menu, select Regular mailbox.
- Enter the display names of the shared mailboxes you want to convert to user mailboxes and click Find. Alternatively, upload a CSV with the display names using the CSV Import option and click Import Shared Mailbox(es).
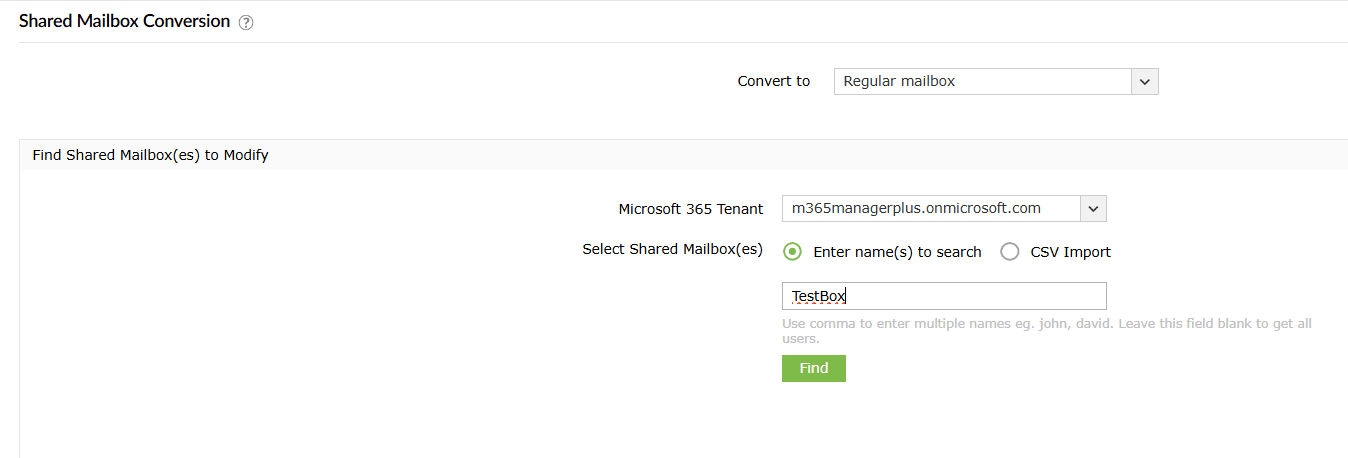
- After finalizing the list of shared mailboxes you want to convert to user mailboxes, click Apply.

Monitor your Exchange Online shared mailboxes and more
M365 Manager Plus’ shared mailbox management capabilities help you view, monitor, and control shared mailboxes across your Microsoft 365 environment. The solution simplifies permission audits, highlights inactive mailboxes, and provides proactive alerts.
Shared mailbox management
Easily create and manage shared mailboxes in bulk. Add or remove permissions, convert multiple shared mailboxes at once, and decide their retention policies and features—all using the intuitive GUI, eliminating the need for complex PowerShell scripts.
Reports on Microsoft 365 shared mailboxes
Generate detailed reports on shared mailboxes, their permissions, mailbox sizes, and any recent activity to stay on top of your Exchange Online environment.
Real-time alerts on access and permission changes
Set up proactive alerts for any changes to shared mailbox permissions. Get notified instantly when permissions are added or removed, enabling you to take immediate action if the changes are unauthorized.
Reclaiming unused shared mailbox licenses
Configure automation policies to automatically remove licenses from shared mailboxes after a set period of inactivity, ensuring you only pay for the resources you need.
Eliminating PowerShell complexity
Run shared mailbox actions in a single click instead of using PowerShell cmdlets like Set-Mailbox. This reduces dependency on scripting and minimizes the chances of configuration errors.
Important tips
Assign licenses immediately: Unlike shared mailboxes under 50GB, regular user mailboxes must have a license assigned to prevent them from being disabled.
Review mailbox permissions: After converting a shared mailbox to a user mailbox, review the existing permissions. Delegates who had access to the shared mailbox may still retain those permissions until manually removed.
Reset passwords to restore access: Since shared mailboxes usually have disabled or unknown passwords for their anchor accounts, you must reset the users' passwords in the Microsoft 365 admin center to allow the users to sign in directly.
Frequently asked questions
Yes. A user mailbox must have a Microsoft 365 license assigned to it to send or receive mail and access services like Outlook, OneDrive, and Teams. Without a license, the mailbox cannot function fully.
Shared mailbox permissions generally persist even after the mailbox is converted to a user mailbox. If the mailbox is becoming a private user mailbox, you should manually audit and remove any delegates who no longer require access.
You can convert a user mailbox to a shared mailbox by using the EAC or by using the Set-Mailbox cmdlet in PowerShell. This is often done when an employee leaves the company but access to their mailbox data is still needed.