

How to increase mailbox size in Office 365
Last updated on:In this page
When an Exchange Online mailbox reaches its storage capacity, the user can no longer send, and eventually, no longer receive emails. This disrupts work and forces IT admins to track and urge users to clear their mailboxes. However, repeated clean-up is fatiguing, and when a user is known to receive more mail than what their current mailbox can handle, it is best to increase their mailbox size in Office 365 (now Microsoft 365) to prevent this repeated chore.
This guide explains the different Microsoft 365 mailbox size limits and the available ways to increase mailbox storage using the Exchange admin center, PowerShell, and much more efficiently with ManageEngine M365 Manager Plus, a dedicated Microsoft 365 administration tool.
Microsoft 365 mailbox size limit factors
Before you can increase a mailbox size, you need to understand what defines the Microsoft 365 mailbox size limit. Mailbox storage in Exchange Online is controlled by two main factors:
- The license assigned to the mailbox, and
- Microsoft’s default Exchange Online mailbox quota
Understanding these limits helps you choose the right method to increase storage efficiently.
Exchange Online license (Plan 1 vs. Plan 2)
Your assigned license determines maximum mailbox storage available. Here’s a quick comparison:
| License type | Primary mailbox size | Archive mailbox | Auto-expanding archive |
|---|---|---|---|
| Exchange Online Plan 1 | 50GB | 100GB (requires add-on) | Not supported |
| Exchange Online Plan 2 | 100GB | 100GB | Supported up to 1.5TB |
Exchange Online limits (mailbox size quotas)
Microsoft applies mailbox quotas to prevent storage misuse and maintain service performance. These quotas are the technical upper limits set on an individual mailbox. They are:
- Issue Warning Quota: The point at which the user receives a warning that their mailbox is nearing capacity.
- Prohibit Send Quota: The user can no longer send new emails but can still receive them.
- Prohibit Send/Receive Quota: The mailbox can no longer send or receive any mail.
Increasing your mailbox quota is the easier and more cost effective step. Based on a department's mailbox usage, it is best to decide the quotas and set them differently for each department according to their needs.
However, if it is set very close to the actual mailbox size (for example, 45GB limits for a 50GB mailbox), modifying it is not going to give any real-world benefits. In that case, you might want to enable Exchange Online archive for your mailboxes to let them store older emails without having to repeatedly clean them up.
Upgrading to Exchange Online Plan 2 is most beneficial for mail-intensive roles or organizations with compliance-heavy email retention needs. However, before you commit to a license upgrade, ensure you have tried out the previous methods so you don't waste your license on what could have been achieved with means already in your hands.
How to increase Microsoft 365 mailbox size limit
Mailbox size in Microsoft 365 can be increased in several ways, depending on your license and administrative flexibility. The three methods that can be carried out by an Exchange Administrator to increase mailbox sizes in Microsoft 365 are:
- Increase Exchange Online mailbox quota
- Set up Exchange Online archive
- Change to Exchange Online Plan 2 license
Increase Exchange Online mailbox quota
Mailbox quotas define how much storage each user can utilize before email delivery stops. Increasing the quota within the Exchange Online plan enables users to continue sending and receiving mail without any add-on or licenses.
Example: A department manager’s mailbox keeps reaching the 49GB mark in Exchange Online Plan 1 due to monthly reports. Raising this quota slightly (for example, from 49GB to 50GB) prevents recurring delivery issues.
This method is a short-term fix as the inbox space freed up is usually minimal and users will reach their limits eventually. This method will have to be followed up by setting up an Exchange Online archive or upgrading the mailbox license to Exchange Online Plan 2 for a more permanent solution.
Set up Exchange Online archive
Exchange Online Archiving provides additional mailbox storage separate from the user’s primary mailbox. Once enabled, older emails are moved automatically into the archive mailbox.
This option provides the best balance between cost and scalability. It is especially effective for users with long-term retention requirements or limited compliance budgets.
Example:
Finance or HR teams that have to retain communication records for multiple fiscal years benefit from automatic archiving instead of constant quota increases.
If archiving and mailbox quota changes do not stop your users from filling up their inboxes, you will have to upgrade their mailbox license to Exchange Online Plan 2.
Change to Exchange Online Plan 2
Upgrading the user’s mailbox license from Plan 1 to Plan 2 doubles the default mailbox quota from 50GB to 100GB and automatically includes archiving features such as In-Place Archive and Auto-Expanding Archive. The archive automatically grows in 100GB increments as storage nears capacity, up to a maximum of 1.5TB.
This approach is ideal when storage limits consistently impact productivity or when organizational compliance demands indefinite email retention.
While this is the simplest and most permanent solution, it increases per-user licensing costs. Evaluate Microsoft 365 usage reports before upgrading your users to Exchange Online Plan 2 license to ensure the extra capacity is justified.
Example:
Legal and executive mailboxes with years of correspondence, attachments, and compliance hold requirements are best upgraded to Exchange Online Plan 2.
- M365 admin center
- Graph PowerShell
- M365 Manager Plus
How to increase mailbox size in Microsoft 365 native admin center
Prerequisites
Before starting, ensure you have the Exchange Administrator or Global Administrator role assigned in Microsoft 365.
Note: The option to manage mailbox size quota is not available in the Exchange Admin Center (EAC). The only native method to configure Exchange Online mailbox size quotas is Exchange Online PowerShell.
How to configure archive mailbox in Exchange Online
- In the Exchange Admin Center, navigate to Recipients > Mailboxes.
- Select the mailbox and click the Others tab.
- Click Manage mailbox archive and turn on Mailbox archive status to Enabled.
- Once enabled, Exchange Online automatically provisions a 100GB archive mailbox, which you can assign a name in the Name field.

How to assign Exchange Online Plan 2 license in Microsoft 365
- Open the Microsoft 365 Admin Center and navigate to Users > Active users.
- Select the user and click Licenses and apps.
- Choose Exchange Online (Plan 2) or a plan that includes it (for example, Microsoft 365 E3/E5).
- Click Save changes.

Limitations
- You can modify mailbox quotas and archive status for only one mailbox at a time in the EAC.
- No scheduling or automation capabilities are available out of the box for native admin centers.
If you need to update or monitor multiple mailboxes simultaneously, PowerShell or M365 Manager Plus is more efficient.
How to increase Microsoft 365 mailbox size with Exchange Online PowerShell
Prerequisites
Before using Exchange Online PowerShell, please verify that:
- The Exchange Administrator role is applied to the account you use to sign in to Exchange Online PowerShell.
- You are connected to the Exchange Online PowerShell module.
- To check if the Exchange Online PowerShell module is installed, use this script:
Get-Module -ListAvailable ExchangeOnlineManagement - If it does not return a value, you will have to install the module. To install the Exchange Online PowerShell module, execute this script:
Install-Module ExchangeOnlineManagement -Scope CurrentUser - To connect to Exchange Online PowerShell, run this script:
Connect-ExchangeOnline
- To check if the Exchange Online PowerShell module is installed, use this script:
Using Set-Mailbox to configure Microsoft 365 mailbox quota using Exchange Online PowerShell
The Set-Mailbox cmdlet is used to configure mailbox quotas, such as warning, send, and receive limits to configure user or shared mailbox limits. Use the following cmdlet for individual mailbox adjustments. Remember that quota changes cannot exceed the storage limit enforced by the user’s license.
Set-Mailbox -Identity "User Name" `
-ProhibitSendQuota 98GB `
-ProhibitSendReceiveQuota 100GB `
-IssueWarningQuota 95GB
To apply the same quota settings to all mailboxes in your organization (or a specific subset), combine Set-Mailbox with Get-Mailbox within a PowerShell pipeline.
Get-Mailbox -RecipientTypeDetails UserMailbox -ResultSize Unlimited |
Set-Mailbox -ProhibitSendQuota 98GB -ProhibitSendReceiveQuota 100GB -IssueWarningQuota 95GB
Using Enable-Mailbox to set Exchange Online archive for Microsoft 365 mailboxes with Exchange Online PowerShell
The Enable-Mailbox cmdlet enables or manages archive mailboxes. Once activated, Exchange Online provisions a 100GB archive for the mailbox. Use the following cmdlet to enable Exchange Online archive for one mailbox.
Enable-Mailbox -Identity "User Name" -Archive
To enable Exchange Online archive for multiple mailboxes in your organization, combine Enable-Mailbox with Get-Mailbox within a PowerShell pipeline.
Get-Mailbox -Filter {Department -eq "Finance"} | Enable-Mailbox -Archive
How to assign Exchange Online Plan 2 license to mailboxes with PowerShell
Prerequisites
- The License Administrator or Global Administrator role is assigned to the account you use to sign in to Microsoft Graph PowerShell.
- You need to be connected to the Microsoft Graph module to assign Exchange Online Plan 2 licenses to your mailboxes.
- To check if the Microsoft Graph PowerShell module is installed, use this script:
If it does not return a value, you will have to install the module.
Get-Module Microsoft.Graph -ListAvailable - To install the Microsoft Graph PowerShell module, execute this script:
Install-Module Microsoft.Graph -Scope CurrentUser - To connect to Microsoft Graph, run this script:
Connect-MgGraph -Scopes "User.Read.All","Directory.Read.All"
- To check if the Microsoft Graph PowerShell module is installed, use this script:
Steps
The Set-MgUserLicense cmdlet from the Microsoft Graph PowerShell SDK is the recommended way to assign or modify Microsoft 365 licenses.
Connect-MgGraph -Scopes "User.ReadWrite.All" $license = (Get-MgSubscribedSku | Where-Object {$_.SkuPartNumber -eq "EXCHANGEONLINEPLAN2"}).SkuId
Set-MgUserLicense -UserId "user@yourdomain.com" -AddLicenses @($license) -RemoveLicenses @()
- Assign Plan 2 to all users in a department with this script:
$license = (Get-MgSubscribedSku | Where-Object {$_.SkuPartNumber -eq "EXCHANGEONLINEPLAN2"}).SkuId $users = Get-MgUser -Filter "department eq 'Finance'" foreach ($user in $users) { Set-MgUserLicense -UserId $user.Id -AddLicenses @($license) -RemoveLicenses @() } - To increase shared mailbox limits similarly, use this cmdlet:
Get-Mailbox -RecipientTypeDetails SharedMailbox -ResultSize Unlimited |
Set-Mailbox -ProhibitSendQuota 98GB -ProhibitSendReceiveQuota 100GB -IssueWarningQuota 95GB
$license = (Get-MgSubscribedSku | Where-Object {$_.SkuPartNumber -eq "EXCHANGEONLINEARCHIVING"}).SkuId
Set-MgUserLicense -UserId "sharedmailbox@yourdomain.com" -AddLicenses @($license) -RemoveLicenses @()
How to increase Microsoft 365 mailbox size using M365 Manager Plus
How to set Microsoft 365 mailbox quota in M365 Manager Plus
- Navigate to the Management tab.
- Go to Exchange Online > Mailbox Management > Set Mailbox Storage Limit.
- Set the values for the Issue Warning At, Prohibit Send At, and Prohibit Send and Receive At quotas, and select the desired Microsoft 365 tenant.
- Enter the display names of the mailboxes you want to set mailbox size limits for and click Find, or upload a CSV with the display names using CSV Import and click Import CSV.
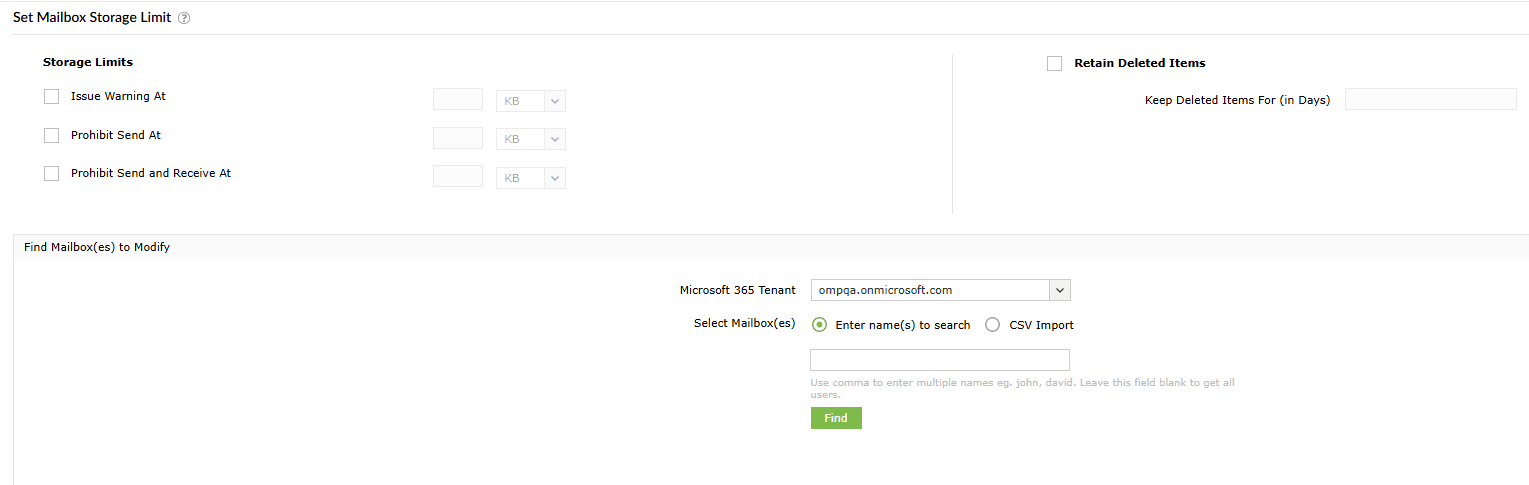
- After finalizing the list of mailboxes you want to increase mailbox size in Microsoft 365 for, click Apply.

Note: You can use the Current Mailbox Size vs Quota report from M365 Manager Plus to check the current Microsoft 365 mailbox size quota for your mailboxes.
How to configure Exchange Online archive for mailboxes in M365 Manager Plus
- Navigate to the Management tab.
- Go to Exchange Online > Mailbox Management > Enable/Disable Archive Mailbox.
- Select Enable and assign an Archive Name.
- Enter the display names of the mailboxes you want to configure Exchange Online archive for and click Find, or upload a CSV with the display names using CSV Import and click Import CSV.
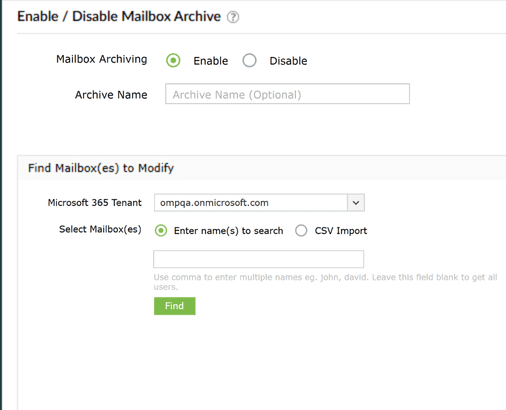
- After finalizing the list of mailboxes you want to configure Exchange Online archive for, click Apply.

Note: You can use the Archive Mailboxes Size report in M365 Manager Plus to check the current Exchange Online archive status and size of your mailboxes.
How to assign Exchange Online Plan 2 license to mailboxes with M365 Manager Plus
- Navigate to the Management tab.
- Go to Azure Active Directory > License Management > License Modification.
- Select Modify selected licenses in the Assign / remove licenses dropdown.
- Select the required licenses in the Select Licenses field.
- Enter the display names of the mailboxes you want to assign the Exchange Online Plan 2 license to and click Find, or upload a CSV with the display names using CSV Import and click Import CSV.
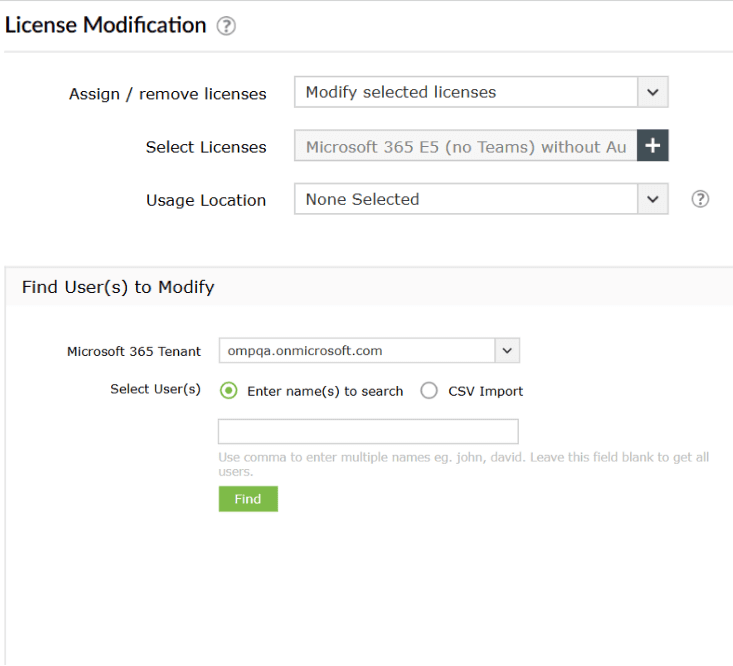
- After finalizing the list of mailboxes you want to apply Exchange Online Plan 2 licenses to, click Apply.

Note: You can use the Licensed Mailboxes report in M365 Manager Plus to check the current Exchange Online plan assigned to your mailboxes.
Manage your Exchange Online mailboxes proactively
Instead of waiting for users to report full mailboxes, you should proactively monitor your environment. M365 Manager Plus provides detailed reports on mailbox sizes, archive status, and other properties. It also provides script-less bulk mailbox management actions such as enabling archives, changing permissions, and assigning licenses. With real-time, customized alerts for every activity in your Microsoft 365 environment, you get a better Exchange Online administrative experience.
Detailed Microsoft 365 mailbox usage reports
Generate detailed reports on not just mailbox licenses, but also Exchange Online mailbox sizes, activity, permissions, and growth trends to get a complete picture of your Exchange Online environment.
Mailbox size quota management
Manage mailbox quotas efficiently by applying or updating storage policies in bulk. With M365 Manager Plus, you can assign quotas, retention settings, or archiving configurations to multiple mailboxes at once using CSV imports or the intuitive GUI, eliminating the need for repetitive, manual updates.
Real-time alerts on access and permission changes
Set up proactive alerts for any changes to mailbox license changes. Get notified instantly when Exchange Online plans are assigned or removed, enabling administrators to take immediate action if the changes are unauthorized.
Reclaim unused mailbox licenses
Configure automation policies to remove licenses from mailboxes after a set period of inactivity automatically, ensuring you only pay for the resources you need.
Important tips
Regularly audit mailbox activities Review mailbox usage patterns periodically with scheduled audits. For inactive or rarely used mailboxes, degrade their licenses, archive them, or apply retention policies to optimize storage.
Check for license-dependent features: Before removing a license, confirm that features like In-Place Archive or Litigation Hold are not in use as these require a license to function.
Frequently asked questions
Outlook storage reflects the underlying Exchange Online mailbox limit. To increase Outlook mailbox size to 100GB, assign an Exchange Online Plan 2 license or enable Exchange Online Archiving for additional storage. The change applies automatically once the new license or archive is activated.
Microsoft 365 mailbox sizes depends on the Exchange Online license it is assigned.
- Exchange Online Plan 1: 50GB
- Exchange Online Plan 2: 100GB
- Microsoft 365 E3/E5: 100GB
You can extend storage further by enabling Exchange Online Archiving or auto-expanding archive, which can grow up to 1.5TB in practice.
An auto-expanding archive provides additional storage for your Exchange Online archive mailboxes. When auto-expanding is enabled, Microsoft will automatically add more archive storage in increments once this initial 100GB quota is nearly full. This process continues, adding more space as needed, until the archive reaches a total size of 1.5TB. This feature requires an Exchange Online Plan 2 license or a standalone Exchange Online Archiving license.
If you downgrade a license (for example, from Plan 2 to Plan 1) and the mailbox size (for example, 80GB) exceeds the new quota (50GB), no data is deleted. However, the user cannot send or receive new mail until the mailbox size is reduced or the license is upgraded again. If you remove the license entirely, the mailbox enters a 30-day grace period, after which the mailbox and all its data are permanently deleted.