

Identify Exchange Online quota exceeded mailboxes
Last updated on:In this page
- How to get a list of mailbox quotas using the Microsoft 365 admin center
- How to get a list of exceeded mailbox quotas using Exchange Online PowerShell
- How to export Microsoft 365 mailbox quotas in M365 Manager Plus
- Monitor your Exchange Online mailbox sizes and more
- Important tips
- Frequently asked questions
Regularly monitoring mailbox sizes and their assigned quotas is a critical administrative task for managing mailbox storage and ensuring service continuity. When Microsoft 365 mailbox storage limits (previously Office 365 mailbox storage limits) are unmonitored, users eventually hit their Outlook email size limit. At that point, they can’t send or receive emails.
Regularly reviewing Microsoft 365 mailbox size limits lets you identify users who need more space, enforce retention policies where necessary, and prompt cleanup actions before anyone hits storage limits and gets blocked from sending emails.
This guide explains how you can review whether your mailbox quotas have been exceeded and their current status with the Microsoft 365 admin center, PowerShell, and most efficiently, with ManageEngine M365 Manager Plus, a dedicated Microsoft 365 administration tool.
What are Microsoft 365 mailbox size quotas?
Mailbox quotas define how much storage each user can use before email delivery stops. Increasing the quota within the Exchange Online plan allows users to continue sending and receiving mail without an add-on or additional licenses.
An admin will apply mailbox quotas to prevent storage misuse and maintain service performance. These limits vary based on license type but generally include:
- Issue Warning Quota: The point at which the user receives a warning that their mailbox is nearing capacity.
- Prohibit Send Quota: The user can no longer send new emails but can still receive them.
- Prohibit Send/Receive Quota: The mailbox can no longer send or receive any emails.
These quotas are the technical upper limits set on an individual mailbox.
- M365 admin center
- Graph PowerShell
- M365 Manager Plus
Method 1: How to get a list of mailbox quotas using the Microsoft 365 admin center
Prerequisites
You need the Exchange Administrator role for the account you use to sign in to the Microsoft 365 admin center.
Steps
- Log in to the Microsoft 365 Admin Center.
- Navigate to Reports > Usage.
- Click Exchange and select the Mailbox usage tab.
- Click Choose Columns, select the mailbox quota columns you want to view, and click Save.
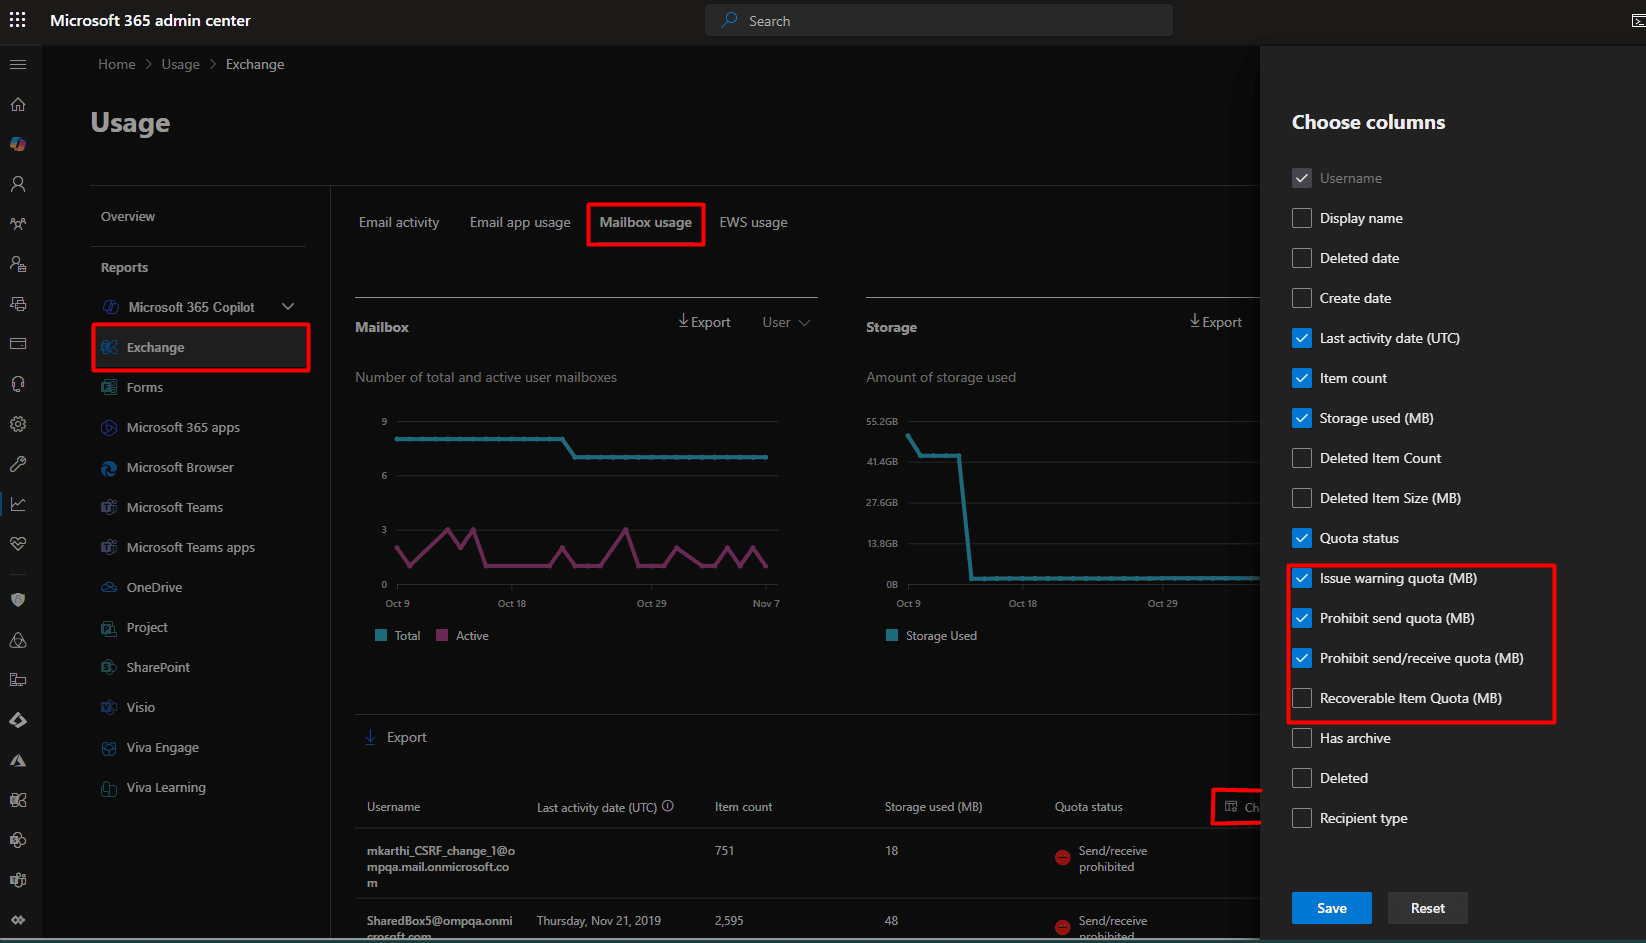
- Click Export to get a report of your Microsoft 365 mailbox quotas in a CSV file.

Limitation
You can view all mailbox size quotas in this report, but you cannot schedule it as a recurring report. This forces you to check it manually each time, which is inefficient and cumbersome.
You can get around this limitation by using the Schedule Reports feature in M365 Manager Plus to notify you of mailboxes that have exceeded their quotas and generate your reports every week automatically, without you having to manually sift through them to separate the mailbox quota exceeded entries.
Method 2: How to get a list of exceeded mailbox quotas using Exchange Online PowerShell
PowerShell offers the most comprehensive way to report on mailbox size and detailed mailbox quota settings, which is essential for proactive management when users face an Outlook mailbox size that's exceeded its limit.
Prerequisites
Before using Exchange Online PowerShell, verify that:
- The Exchange Administrator role is applied to the account you use to sign in to Exchange Online PowerShell.
- You are connected to the Exchange Online PowerShell module.
- To check if the Exchange Online PowerShell module is installed, use this script:
Get-Module -ListAvailable ExchangeOnlineManagement - If it does not return a value, you will have to install the module. To install the Exchange Online PowerShell module, execute this script:
Install-Module ExchangeOnlineManagement -Scope CurrentUser - To connect to Exchange Online PowerShell, run this script:
Connect-ExchangeOnline
- To check if the Exchange Online PowerShell module is installed, use this script:
Using Get-Mailbox to export mailbox quotas in Exchange Online
The Get-Mailbox cmdlet can be used to retrieve a list of all mailbox size quota properties.
Use this syntax to retrieve the quota setting for all mailboxes:
Get-Mailbox -ResultSize Unlimited |
Select-Object DisplayName, PrimarySmtpAddress, IssueWarningQuota, ProhibitSendQuota |
Export-Csv -Path "C:\Reports\MailboxQuotas-$(Get-Date -Format yyyyMMdd-HHmmss).csv" -NoTypeInformation -Encoding UTF8
Using the new Get-EXOMailbox cmdlet per Microsoft's recommendation
Microsoft recommends using Get-EXOMailbox instead of Get-Mailbox in Exchange Online. The Get-EXO cmdlets are optimized for the cloud service, offer better throttling management, and will continue to be updated, whereas the older cmdlets are maintained mainly for backward compatibility.
Use this syntax to retrieve the mailbox quotas in Exchange Online with the updated Get-EXOMailbox cmdlet:
Get-EXOMailbox -ResultSize Unlimited -Properties IssueWarningQuota, ProhibitSendQuota |
Select-Object DisplayName, PrimarySmtpAddress, IssueWarningQuota, ProhibitSendQuota |
Export-Csv -Path "C:\Reports\MailboxQuotas-$(Get-Date -Format yyyyMMdd-HHmmss).csv" -NoTypeInformation -Encoding UTF8
Supported parameters
The following table contains some parameters that can be used with the Get-Mailbox and Get-EXOMailbox cmdlets to provide details on your mailbox quotas.
| Parameter | Description |
|---|---|
| DisplayName | The friendly name of the mailbox, as shown in the admin center. |
| PrimarySmtpAddress | The primary email address of the mailbox. |
| ProhibitSendQuota | The mailbox quota at which the user is blocked from sending new emails. |
| IssueWarningQuota | The limit at which the user receives a warning message that their storage is nearing its full capacity. |
| -Properties | Retrieve additional attributes, such as IssueWarningQuota or ProhibitSendQuota, using Get-EXOMailbox. |
An example use case for the Get-EXOMailbox cmdlet: Find mailbox quotas of all mailboxes in your organization
Scenario: An IT administrator needs to find all users who have already exceeded their warning quota to manage storage proactively and prevent mailbox quota exceeded errors. This requires comparing the current size (from Get-EXOMailboxStatistics) with the quota limit (from Get-EXOMailbox).
This is the cmdlet you will have to run:
$report = @()
$mailboxes = Get-EXOMailbox -ResultSize Unlimited -Properties IssueWarningQuota

foreach ($mbx in $mailboxes) {
    # Get current size
    $stats = Get-EXOMailboxStatistics -Identity $mbx.UserPrincipalName

    # Compare size to warning quota (values are in bytes)
    if ($stats.TotalItemSize.Value -ge $mbx.IssueWarningQuota.Value) {
        $report += [PSCustomObject]@{
            DisplayName = $mbx.DisplayName
            EmailAddress = $mbx.PrimarySmtpAddress
            CurrentSize_GB = [math]::Round($stats.TotalItemSize.ToGB(), 2)
            WarningQuota_GB = [math]::Round($mbx.IssueWarningQuota.ToGB(), 2)
        }
    }
}

$report | Export-Csv -Path "C:\Reports\UsersOverWarningQuota.csv" -NoTypeInformation -Encoding UTF8
Note: Instead of writing this complex PowerShell script and running it manually, you can use the Current Mailbox Size vs Quota report in M365 Manager Plus to get a list of mailbox quota exceeded users. If you wish to get the mailbox quota warning message for Microsoft 365 mailboxes periodically, you can also schedule the reports to get a weekly report of mailbox quota exceeded users, all without a single PowerShell script.
Method 3: How to export Microsoft 365 mailbox quotas in M365 Manager Plus
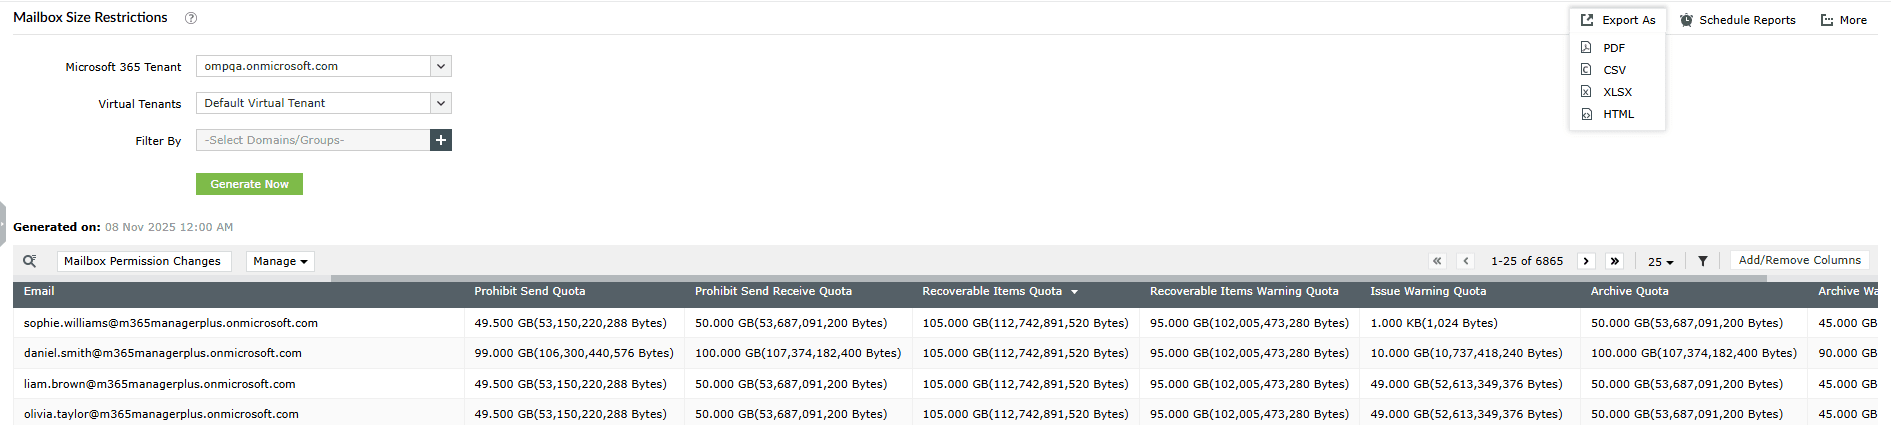
- Log in to M365 Manager Plus and click the Reports tab.
- Navigate to Exchange Online > Mailbox Reports in the left pane.
- Click the Mailbox Size Restrictions report. You can now view a list of all mailbox quota details of your Microsoft 365 mailboxes, such as prohibit send quota, prohibit send receive quota, issue warning quota, archive quota, and more.
- Click Export As and select your desired file format (CSV, XLSX, PDF, or HTML) to export the list of Microsoft 365 mailbox size quotas.

Get mailbox quota warning messages for Microsoft 365 mailboxes with M365 Manager Plus
To get the mailbox quota warning message for Microsoft 365 mailboxes that exceed their storage limit using M365 Manager Plus, you can create a custom report by filtering the Current Mailbox Size vs Quota report to identify users who have surpassed a specific percentage of their Prohibit Send and Receive quota.
Follow these steps to get your weekly mailbox exceeded users report:
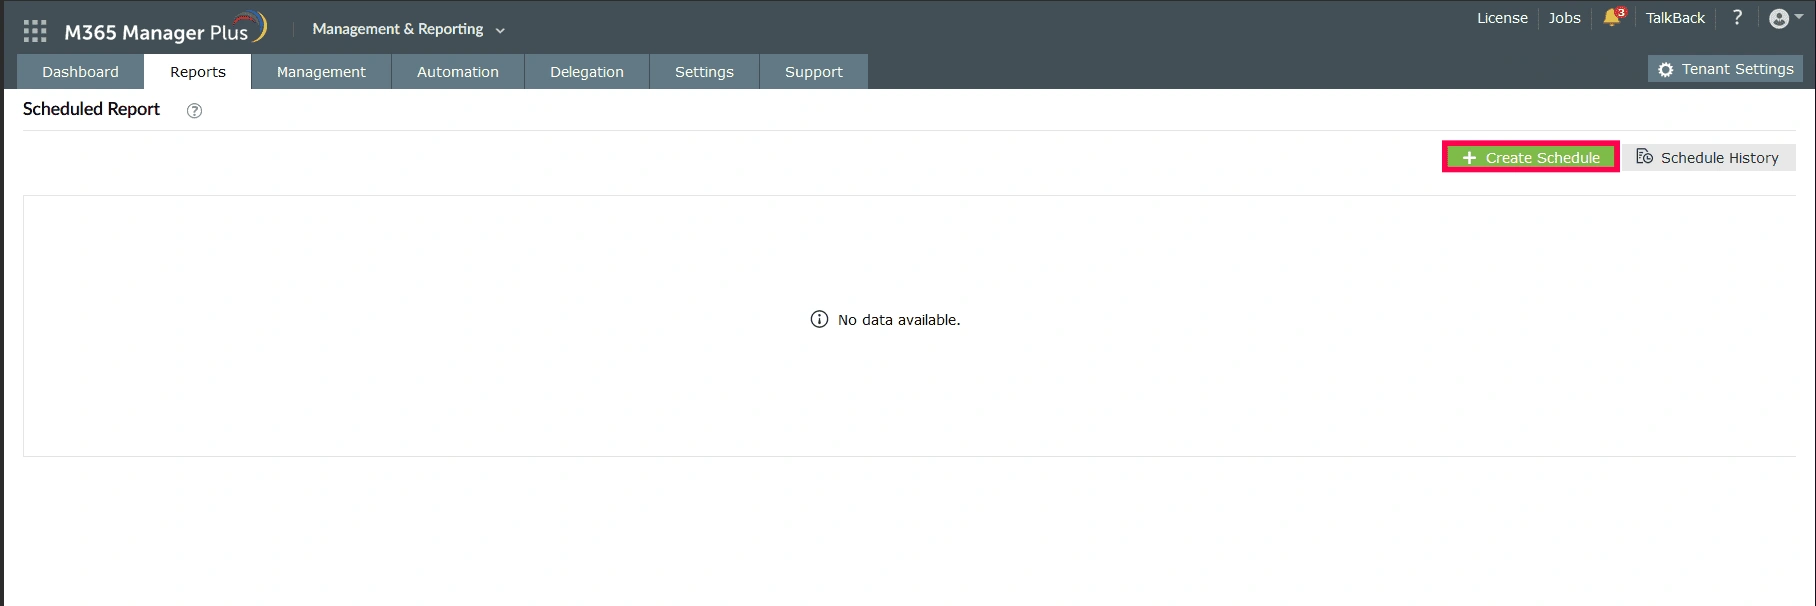
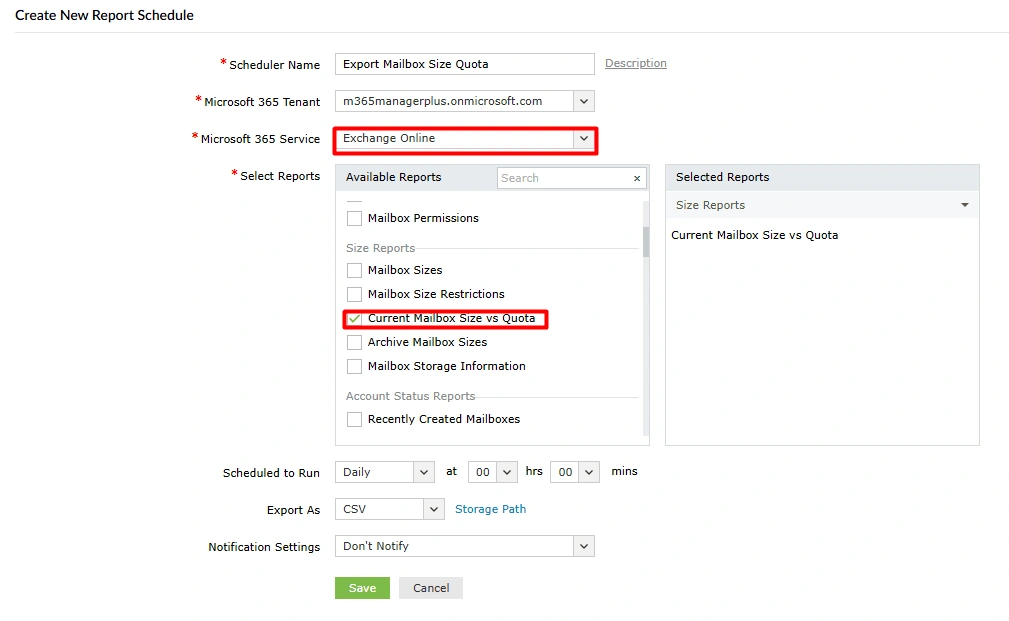
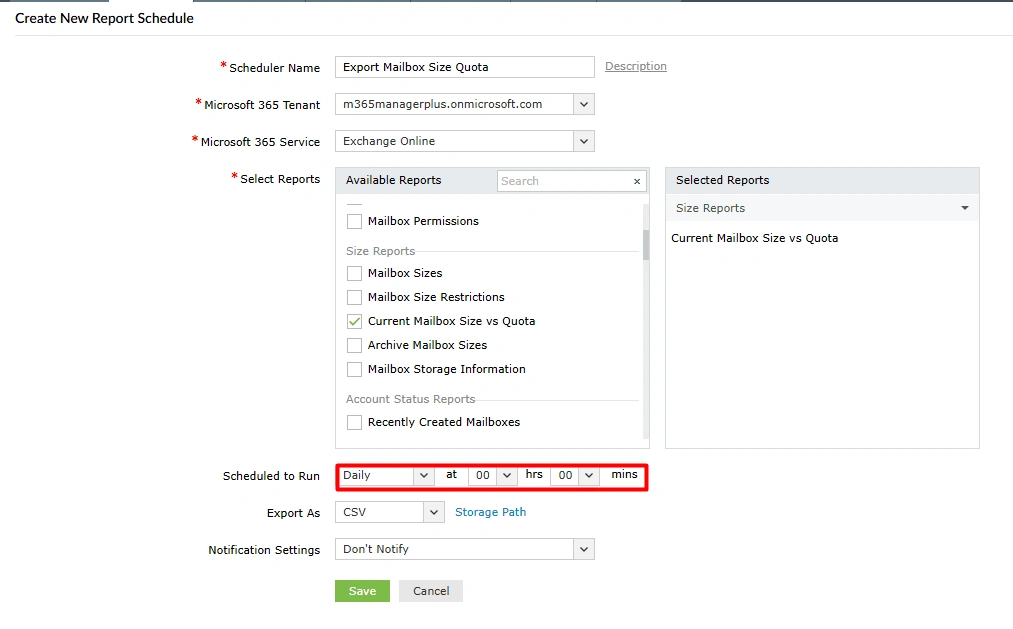
- Log in to M365 Manager Plus, navigate to Reports, and select Schedule Report.
- Click Create Schedule.
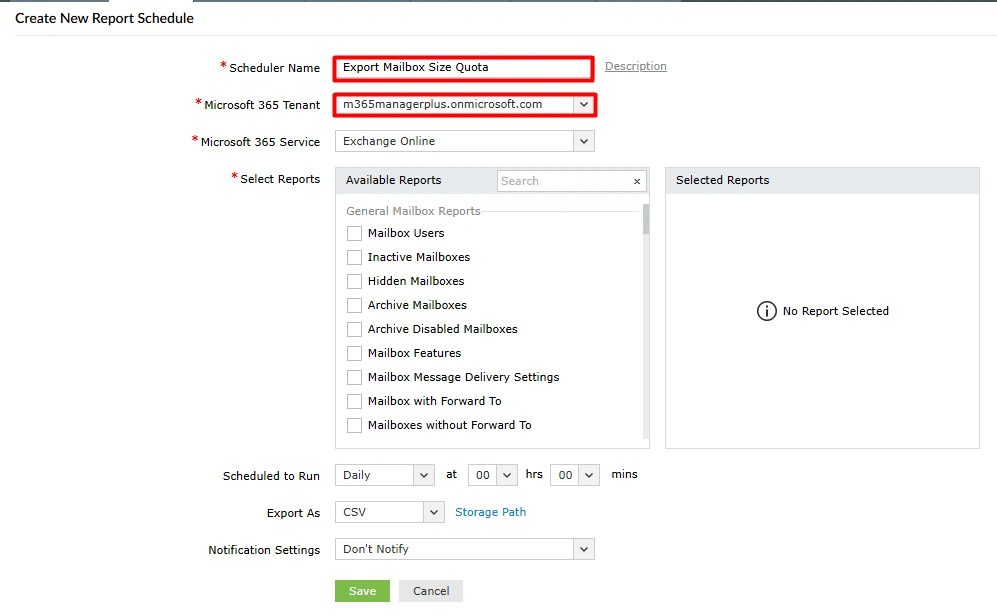
- Type in a Scheduler Name and select the tenant for which you want to generate and schedule this report.
- Select Exchange Online in the Microsoft 365 Service drop-down and select the Current Mailbox Size vs Quota report.
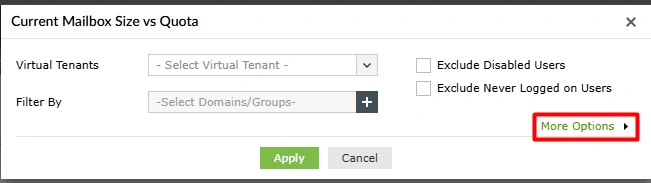
- Hover over the report under Selected Reports and click the edit icon, then click More Options to filter the report further.
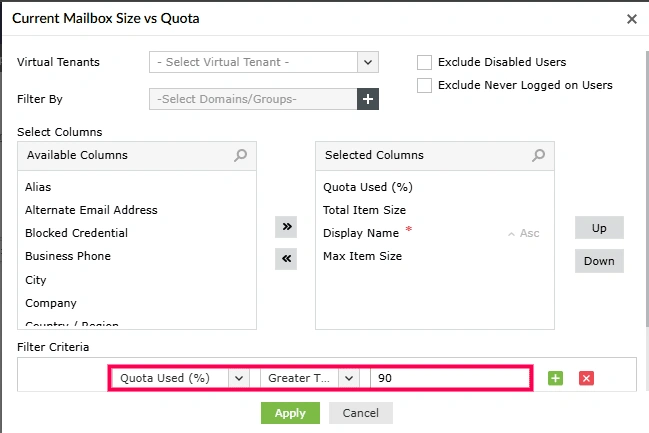
- Click Add Filter, select Quota Used (%) in the first drop-down, Greater than or equals in the second, and type in your preferred threshold percent in the field next to it.
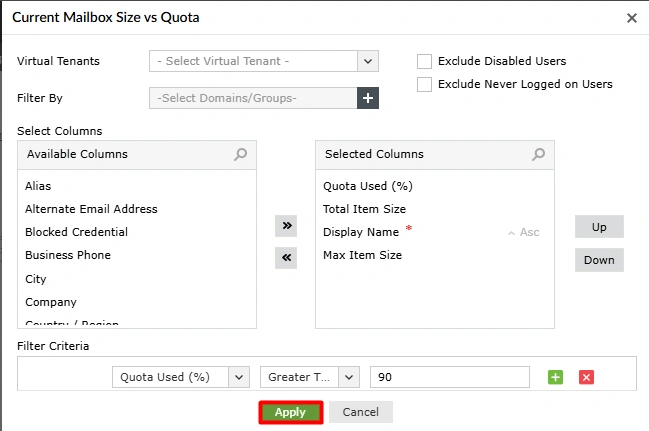
- Click Apply.
- Configure the schedule using the Scheduled to Run drop-downs.
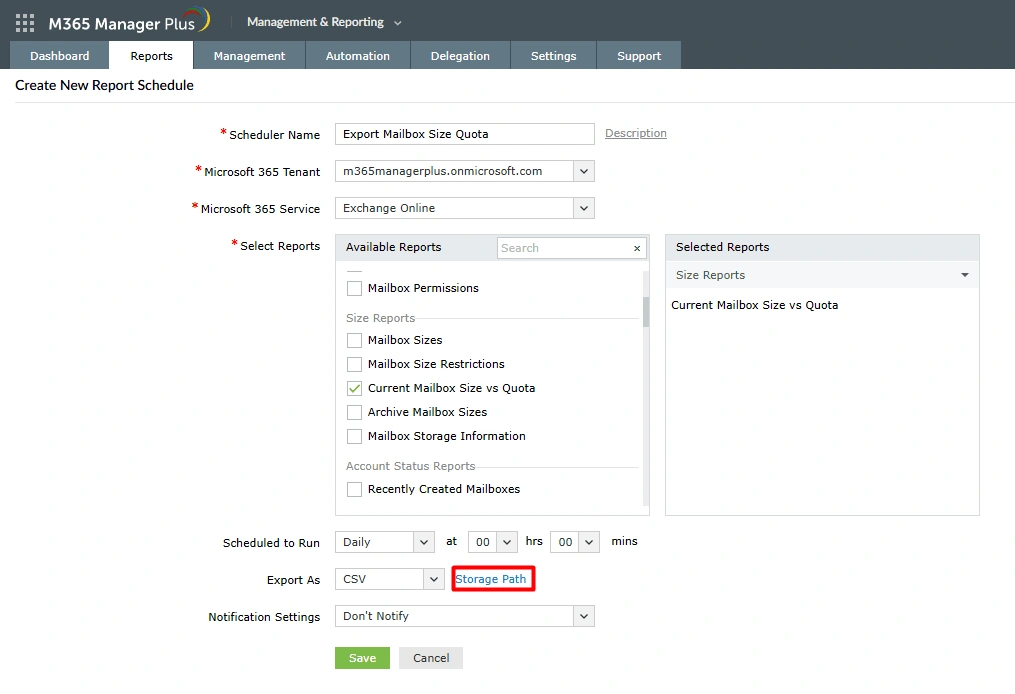
- Select the format in which you want the report to be downloaded or emailed using the Export As drop-down. Configure the Storage Path to download the reports locally.
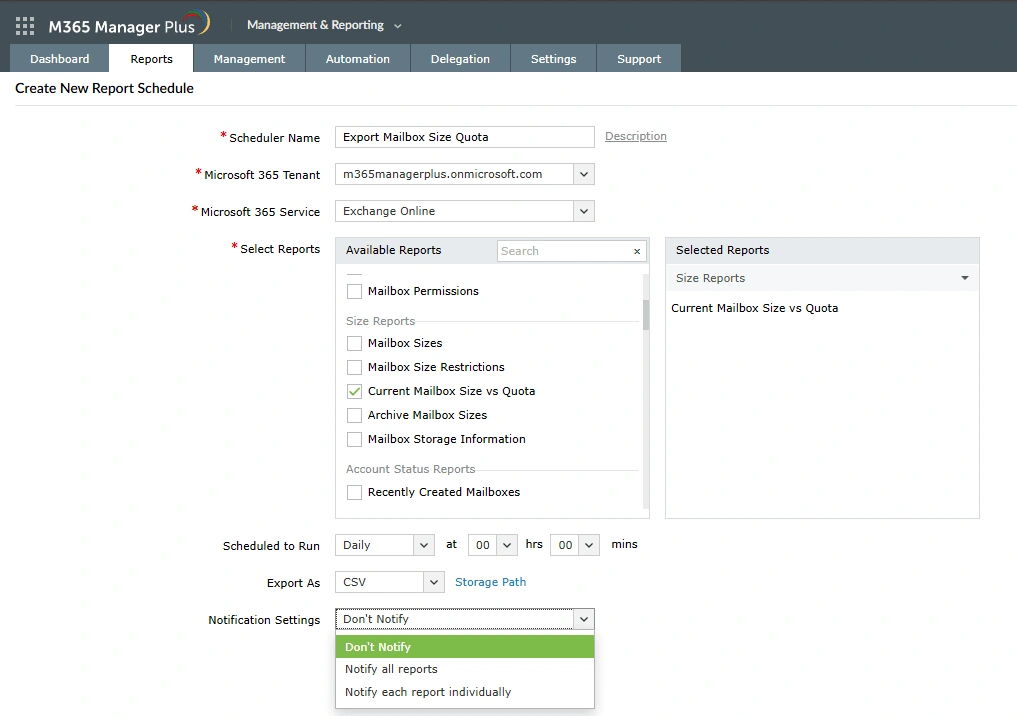
- In the Notification Settings drop-down, select Notify all reports.
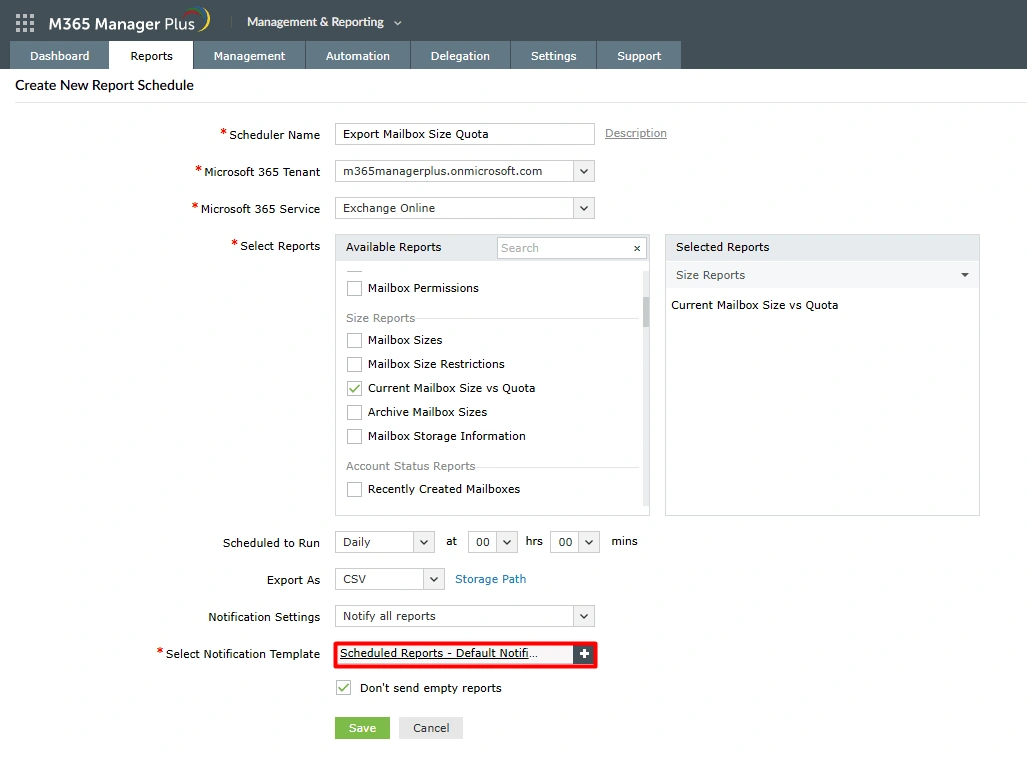
- If you want the reports emailed to you, use the Select Notification Template to select a format for your emails. This option will be accessible once you configure your email server.
- Click Save to schedule mailbox quota warning messages for your Microsoft 365 mailboxes.


Note: You can also create this filter as a custom report in M365 Manager Plus if you wish to generate it whenever you want to check for mailbox quota exceeded users.
Monitor your Exchange Online mailbox sizes and more
M365 Manager Plus’ mailbox size and quota management capabilities help you view, monitor, and control mailbox storage across your Microsoft 365 environment. It simplifies quota tracking, highlights usage trends, and provides proactive alerts—all through an intuitive web console without the need for complex Microsoft Graph PowerShell scripting.
Mailbox size reporting
Generate detailed Microsoft 365 mailbox size reports to track storage usage across all mailboxes, archive mailbox usage, and quota thresholds to help you stay ahead of storage limits.
Mailbox quota and size management
Manage mailbox quotas efficiently by applying or updating storage policies in bulk. With M365 Manager Plus, you can assign quotas, Exchange Online Plan 2 licenses, retention settings, or archiving configurations to multiple mailboxes at once using CSV imports or the intuitive GUI, eliminating the need for repetitive, manual updates.
Archive and hold visibility
Track archive mailbox status, total size, and consumption trends alongside quota data. Gain a unified view of mailbox storage posture, including whether archives are active and if users are utilizing them effectively.
Real-time alerts on mailbox changes
Perform all of your litigation hold activities and follow-ups through a user-friendly web interface, reducing dependency on scripting and minimizing configuration errors.
Important tips
Regularly audit mailbox usage: Review mailbox usage patterns periodically with scheduled audits. For mailboxes that need the extra storage, upgrade their licenses, enable auto-expanding archive, or apply retention policies to optimize storage.
Apply retention policies: Use Microsoft 365 retention policies to automatically delete old, unnecessary emails, helping to manage mailbox sizes and ensure compliance.
Frequently asked questions
You can increase the Microsoft 365 mailbox quota of a single user by using the Set-Mailbox -Identity "user" -ProhibitSendQuota "X"GB PowerShell cmdlet.
When the IssueWarningQuota is reached, the user gets a mailbox quota warning message that their inbox is nearing its limit.
If the ProhibitSendQuota is reached, the user can no longer send new emails.
If the ProhibitSendReceiveQuota is reached, the user can't send or receive any emails until their inbox is freed up.
- Increase the mailbox quota for that user.
- Enable archiving.
- Apply a retention policy to reduce mailbox size.
If they often receives mailbox quota warning messages, check whether their work nature requires you to increase their Exchange Online mailbox size.
Yes. You can assign different mailbox quotas based on user, department, role, or license type. For example, sales teams may need more storage than internal operations.
To bulk-apply different quota settings to a specific department, use the following cmdlet as an example:
$users = Get-EXOMailbox -ResultSize Unlimited -Filter "Department -eq 'Department'"

foreach ($user in $users) {
    Set-Mailbox -Identity $user.UserPrincipalName `
        -IssueWarningQuota 90GB `
        -ProhibitSendQuota 95GB `
        -ProhibitSendReceiveQuota 100GB
}
Make sure the mailboxes are licensed for the quota you're assigning (e.g., higher limits require Exchange Online Plan 2). If not, ensure you assign the right Exchange Online Plan license for your mailboxes.