NAT Settings
To manage mobile devices using Mobile Device Manager Plus, the MDM server must be reachable from the devices, at all times. While the MDM server is reachable when the devices are in the same network as the server, it is not possible for the devices to reach the server from outside the network. As the devices being managed are mobile and are mostly present outside the network, it is necessary to ensure devices are able to contact the MDM server, for continued device management. This can be achieved by mapping your internal IP address to a public IP address or FQDN(Fully Qualified Domain Name) after which the devices in LAN, or an external network can access the MDM server. This process is called Network Address Translation or NAT and is mandatory for managing devices outside your organization's network.
To ensure data security, self-signed or third-party certificates can be used. Since certificates encrypt the communication between the server and the devices, corporate data over the internet is secure.
It is recommended to use an FQDN since any changes to the internal IP address are automatically mapped to the FQDN and no intervention is required until you modify the NAT settings. Also, third-party certificates recognize the server using the FQDN.
Methods for configuring NAT settings
There are two approaches for configuring the NAT settings:
Exposing MDM Server to the Internet:
MDM server should be reachable via public IP address, you can configure the NAT settings in such a way that all the requests that are sent to the Public IP address get redirected to the MDM server.
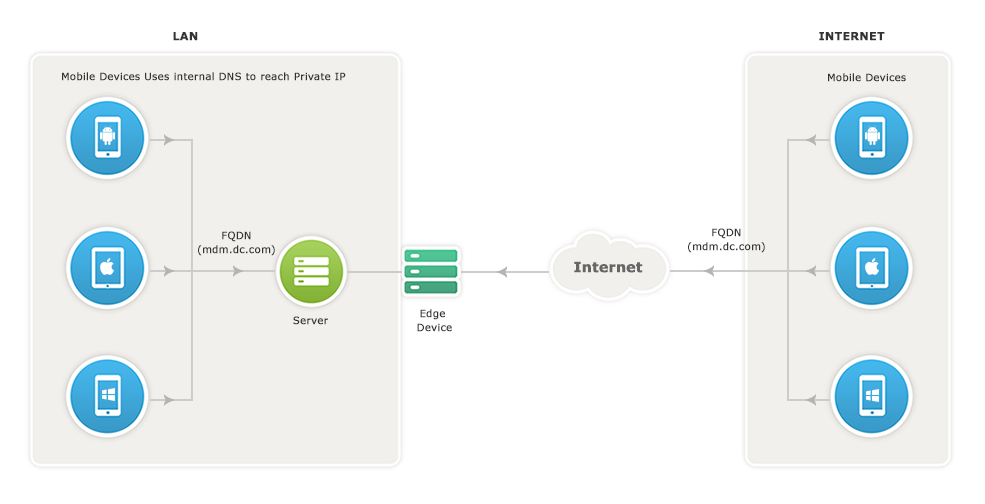
For devices within the LAN
If you use the same DNS name for both public and private IP, then all internal requests within the LAN will be directed through the internal DNS to reach the private IP without getting routed through the public IP.
For devices in the Internet
Devices from an external network such as the internet, use the DNS name to reach the public IP address from where it gets directed to the private IP address.
Exposing ManageEngine Secure Gateway to the Internet:
This section explains about managing mobile devices without exposing the MDM server directly to the internet. This can be achieved with the use of a Secure Gateway which ensures that the MDM server is protected against risks and threats from vulnerable attacks. ManageEngine Secure Gateway is that component exposed to the internet and not the MDM server. The Secure Gateway acts as an intermediary between the managed mobile devices and the MDM server. If the MDM server has been setup in a De-Militarized Zone(DMZ), then Secure Gateway need not be configured, as the MDM server in a DMZ is most secure.

The MDM server communicates with the APNs/FCM/WNS to wake up the mobile device. All communications from the mobile device will be navigated through the Secure Gateway. When the device tries to contact the MDM server, Secure Gateway receives all the requests and redirects them to the MDM server.
Steps to Configure NAT Settings
- In the product console, navigate to Admin ->NAT settings.
- The details of the Mobile Device Manager Plus server and the ports are pre-filled based on your current setup.
- Provide the public IP and the Ports of the Secure Gateway and click Save.
MDM is now successfully set up to manage mobile devices. To manage Apple devices you have to create an APNs certificate and upload it to the MDM server. Refer the Port details for Apple, Android and Windows devices.
We have made your job simpler!
Learn how to set up Secure Gateway in 3 minutes through this demo video.
Modifying NAT Settings
The FQDN/IP initially specified will be registered on the enrolled devices and used for communication between the MDM server and devices. Depending on the organization's preferences, the FQDN/IP might have to be changed especially during the following scenarios.
- If a public IP was being used and the organization decides to switch to an FQDN.
- The organization is to be rebranded which implies a change in the domain name. The existing public FQDN/IP has to be replaced with the new FQDN/IP which corresponds to the new domain name.
- The private FQDN/IP has to be changed to the public FQDN/IP if devices need to access the MDM server from an external network.
Although NAT is modified, the enrolled devices will continue to reach the MDM server using the previous FQDN/IP. This can be resolved by making a few changes to your environment for mapping the new address to the existing FQDN/IP. Without these changes, devices cannot be managed by MDM. However, devices enrolled after modifying NAT will not be affected and can be managed as usual.
To make the required changes, follow the steps given below.
For all platforms other than Android:
- The new FQDN/IP has to be mapped with the previously used FQDN/IP in the internal Domain Name System (DNS) of the organization.
NOTE: Ensure that the FQDN/IP entered is accessible so that the MDM server is reachable from an external network. - Every time NAT settings are modified, the certificates being purchased need to include all the FQDNs/IPs previously used as it is required for mapping the old and new values. For certificates issued by MDM, the changes will be made automatically. In case of self-signed or third-party certificates, ensure that the previously used FQDNs/IPs are included along with the new FQDN/IP.
NOTE: For these devices, the communication is redirected to the new address using the previously FQDN/IP. It is thus necessary to retain the previously used FQDNs/IPs in the certificates. If not, the devices will be unmanaged.
For Android devices, the process of registering the new FQDN/IP in the enrolled devices can be done by contacting MDM Support at mdm-support@manageengine.com.
If you want to modify the port, ensure that it is redirected to port 9383 in your internal environment for continued management of all platforms except Android, for which you need to contact MDM Support at mdm-support@manageengine.com
Setting Up Secure Gateway
Setting up Secure Gateway involves the following.
The Secure Gateway must be installed on a different machine than the one where the MDM Central Server is installed.
- Steps to Configure Secure Gateway
- Minimum Hardware requirements for Secure Gateway
- Installing the Certificates
- Verifying Secure Gateway
- Troubleshooting Tips
Steps to Configure Secure Gateway
- Download the Secure Gateway setup file here.
- Double click the setup file to start the installation process.
- Enter the MDM server Name, HTTP and HTTPS Port numbers, when prompted and click Next.
- MDM server name: Specify the FQDN/DNS/IP address of the MDM server
- HTTPS Port: The port number that the mobile devices use to contact the MDM server (ex:9383 - it is recommended to use the same port 9383(HTTPS) for MDM server in secured mode).
Minimum Hardware requirements for Secure Gateway
- Processor: Intel Core i5(4 core/8 thread) 2.3 GHz. 6 MB cache
- RAM size: 4 GB
Installing the Certificates
MDM automatically syncs the required certificates for the Secure Gateway. In case the sync fails, admins can manually install the required certificates. Follow the steps given below to manually install the certificates.
- If you are using self-signed certificates, follow the steps mentioned below: Copy the server.crt and server.key files present in ManageEngine\MDMServer\apache\conf and paste them on the folder ManageEngine\ME_Secure_Gateway_Server\nginx\conf on the machine where Secure Gateway is installed.
- If you are using third-party certificates, follow the steps mentioned below:
- Third-party server Certificate has to be renamed as server.crt
- The private key has to be renamed as server.key
- If you are using an intermediate certificate, modify the file name as intermediate.crt
- Copy the server.crt, server.key, and the intermediate certificate and paste it in the location where the Secure Gateway has been installed - ManageEngine\ME_Secure_Gateway_Server\nginx\conf
- Navigate to ManageEngine\ME_Secure_Gateway_Server\conf\websetting.conf and add the line: intermediate.certificate=intermediate.crt
You have successfully copied the certificates, click Install to complete the installation process.
Verifying Secure Gateway
Secure Gateway will start automatically. You can verify the same by running services.msc from the same machine. Also, verify if ManageEngine Secure Gateway has started. You have successfully configured the Secure Gateway.
Troubleshooting Tips
- Verify if the certificates are copied to the specified location correctly.
- Ensure that Port # 9383 is not used by some other service/process.
- Ensure that you use Run As Administrator and have the necessary permissions to install the service.
Removing Secure Gateway
Uninstalling Secure Gateway involves the following steps:
- On the machine running Secure Gateway, click on the Start menu, enter in the search box and open it.
- Now, choose ManageEngine Secure Gateway Server from the list of installed programs.
- To remove the Secure Gateway, select Uninstall and click Finish on the Install Shield Wizard.
Troubleshooting Tips
- Ensure FQDN on the MDM server remains identical to that of the deleted Secure Gateway server. If the FQDN varies or if it is unreachable, existing managed devices will lose contact with the MDM server.
- Verify whether the MDM server is reachable via public IP/FQDN address configured in NAT settings.