Pre-requisites for Automated Device Enrollment(ABM/ASM)
Before you can start enrolling devices through Apple Business/School Manager (ABM/ASM), ensure the following prerequisites are met:
- Availability of ABM/ASM in Your Country: Confirm that Apple Business Manager is available in your country or region. ABM’s features and functionalities might vary based on location.
- ABM/ASM Account: You must have an Apple Business/School Manager (ABM/ASM) account. If you don’t have one, you can create one here. To learn more, Visit ABM User Guide , ABM Sign Up Guide, ASM User Guide & ABM Sign Up Guide.
- Device Purchase: Devices must be bought directly from authorized resellers, or Add devices manually using Apple Configurator.If your devices were not purchased directly from Apple or its authorized resellers, you can still add them to Apple Business Manager, provided they are running iOS 16.0 or later versions. For devices running iOS 15.0 or earlier, visit our Add devices to ABM/ASM guide. To reset a Mac device, follow the steps outlined in the links below:
- Required Role for ABM/ASM Accounts: Ensure you hold the appropriate user role within Apple Business Manager (ABM) or Apple School Manager (ASM) to manage device enrollment. The necessary roles are as follows:
-
-
- Apple Business Manager: Administrator or Device Enrollment Manager
- Apple School Manager: Administrator, Site Manager, or Device Enrollment Manager
-
- ABM synchronization occurs through a series of requests sent from MDM. ABM server will monitor these requests and check for IP changes. If you are using a load balancer, the synchronization may fail. To ensure successful ABM sync, allow the URL mdmenrollment.apple.com to pass through using the same outgoing IP address.
Integrate Device Management Services with ABM Portal
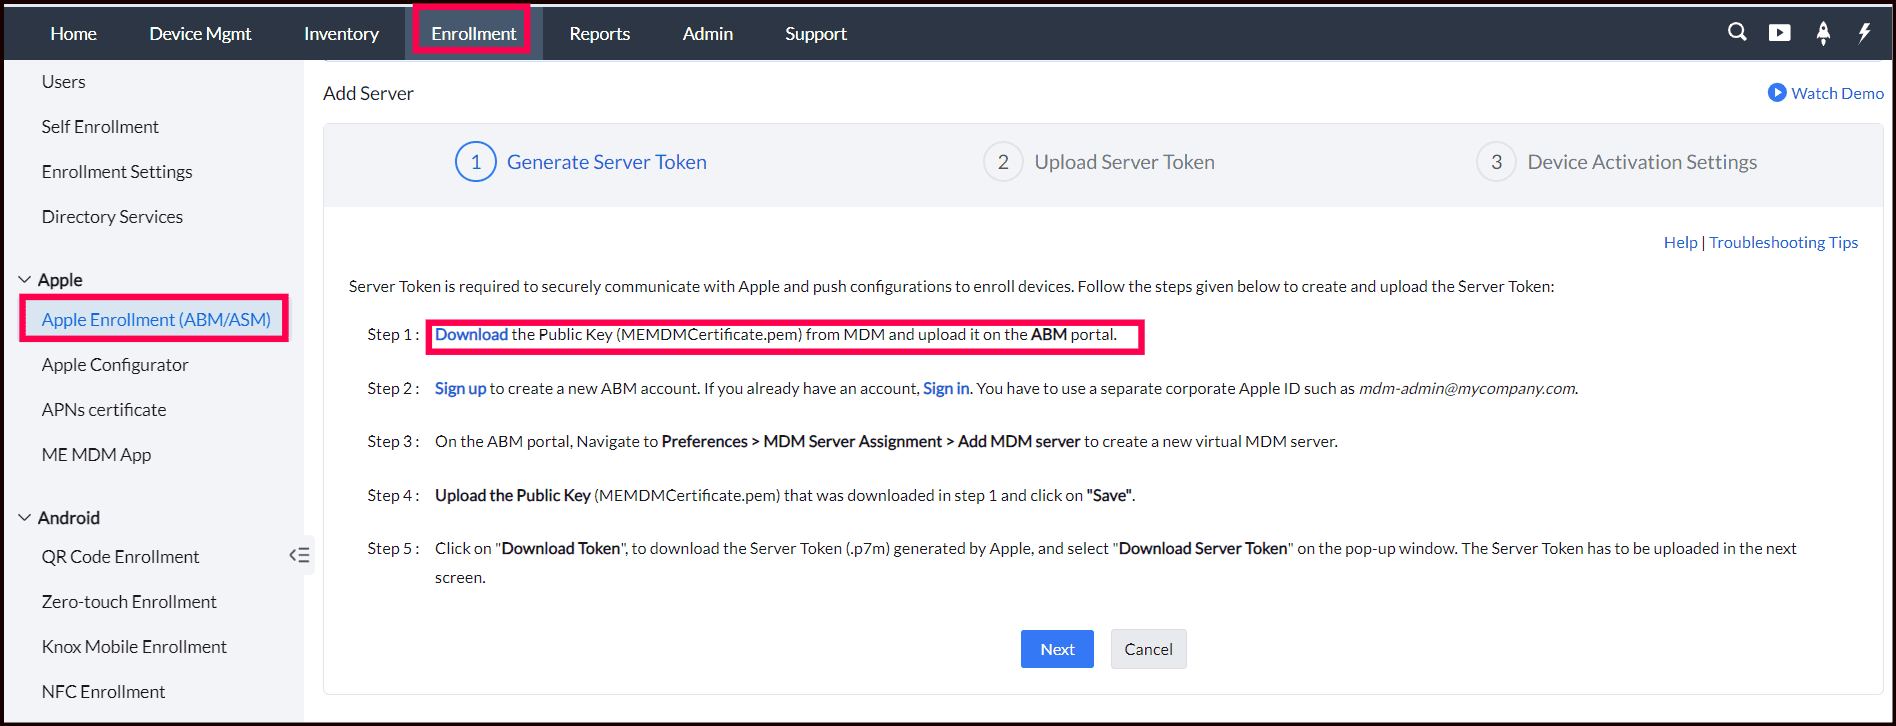
- Download MDM Public Key: On MDM Console, navigate to Enrollment -> Apple -> Apple Enrollment (ABM/ASM). Then, choose either "Enroll devices for business" or "Enroll devices for schools," depending on your needs.
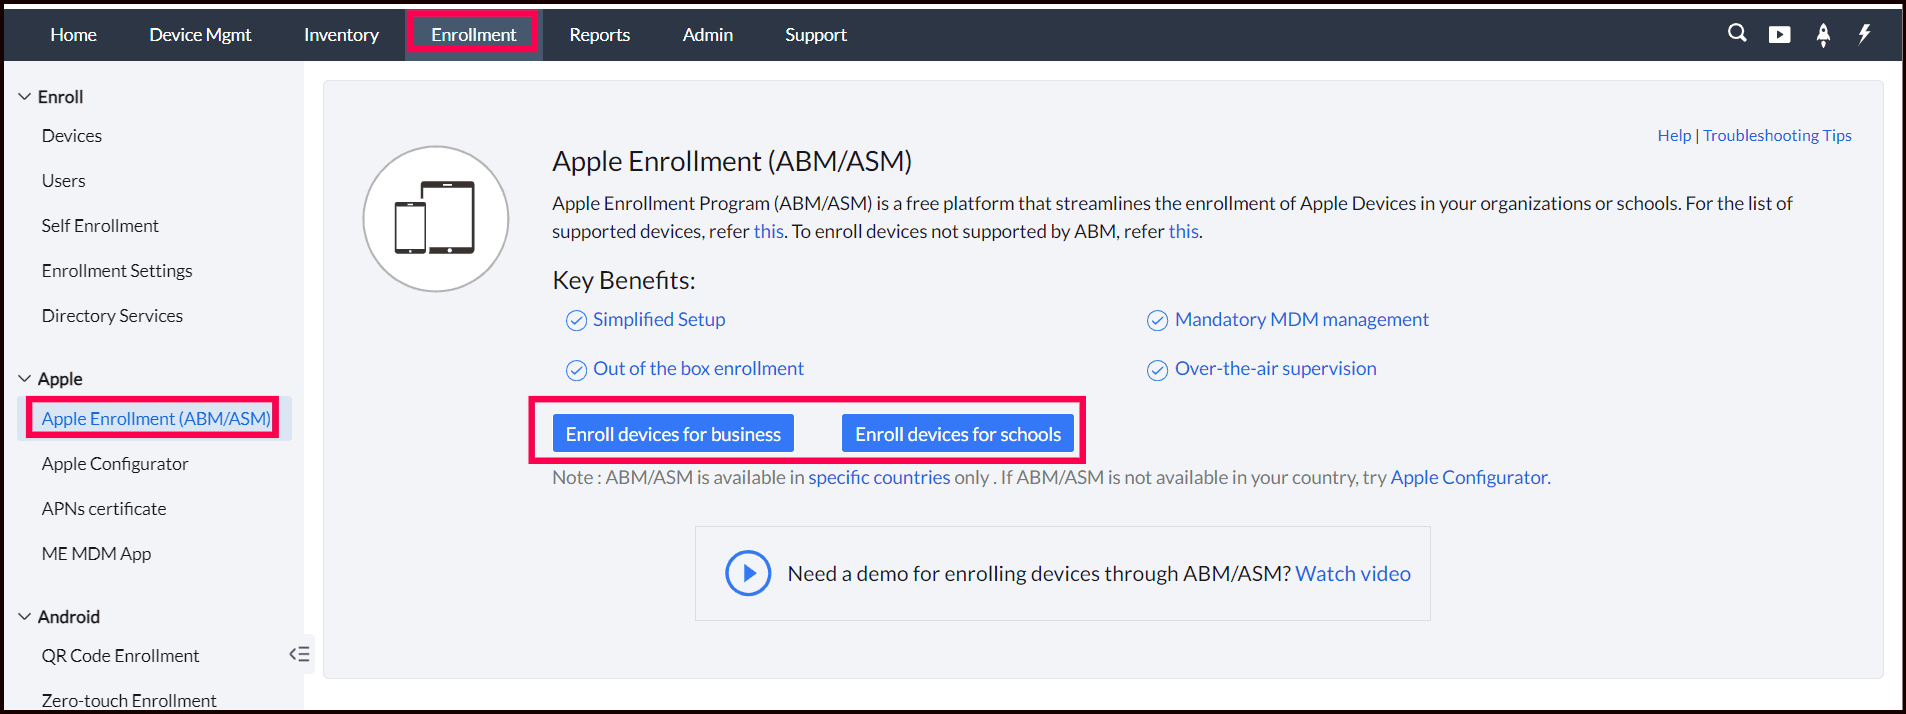
Download the "MDM Public Key (MEMDMCertificate.pem)", which needs to be uploaded to the ABM portal for the integration process.
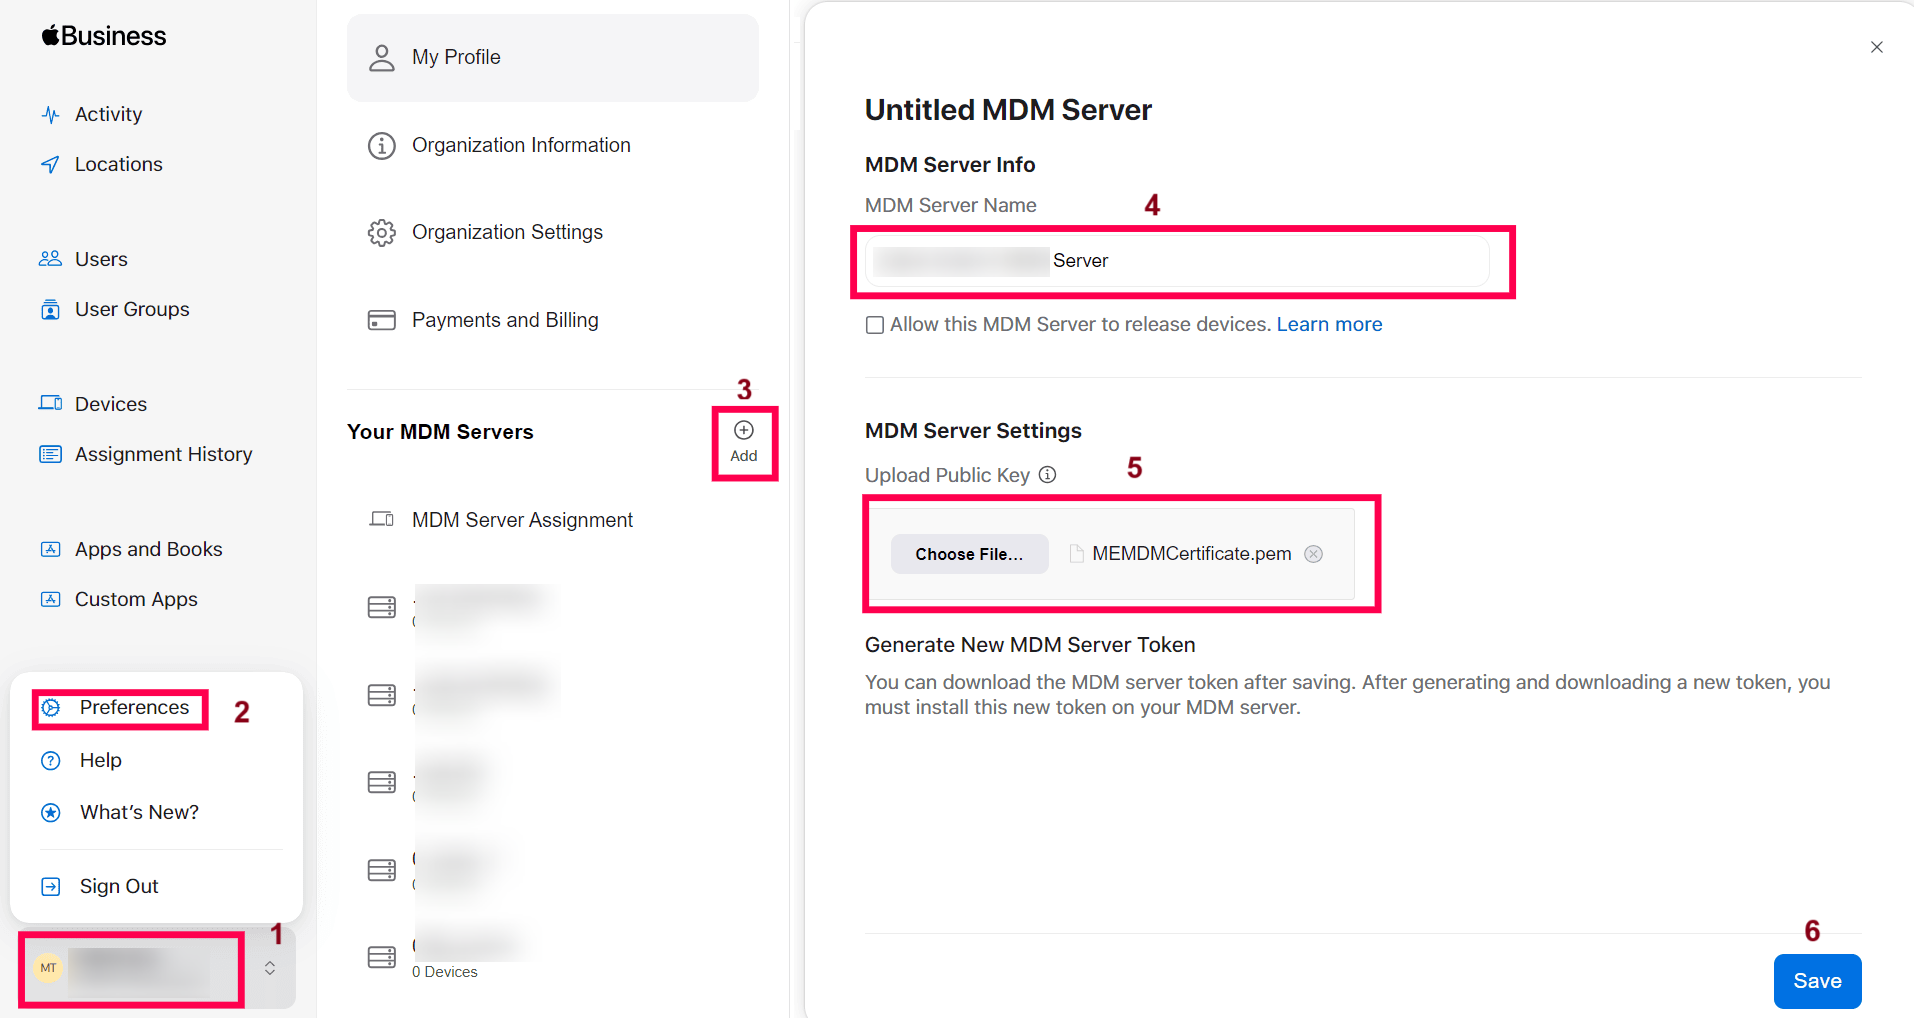
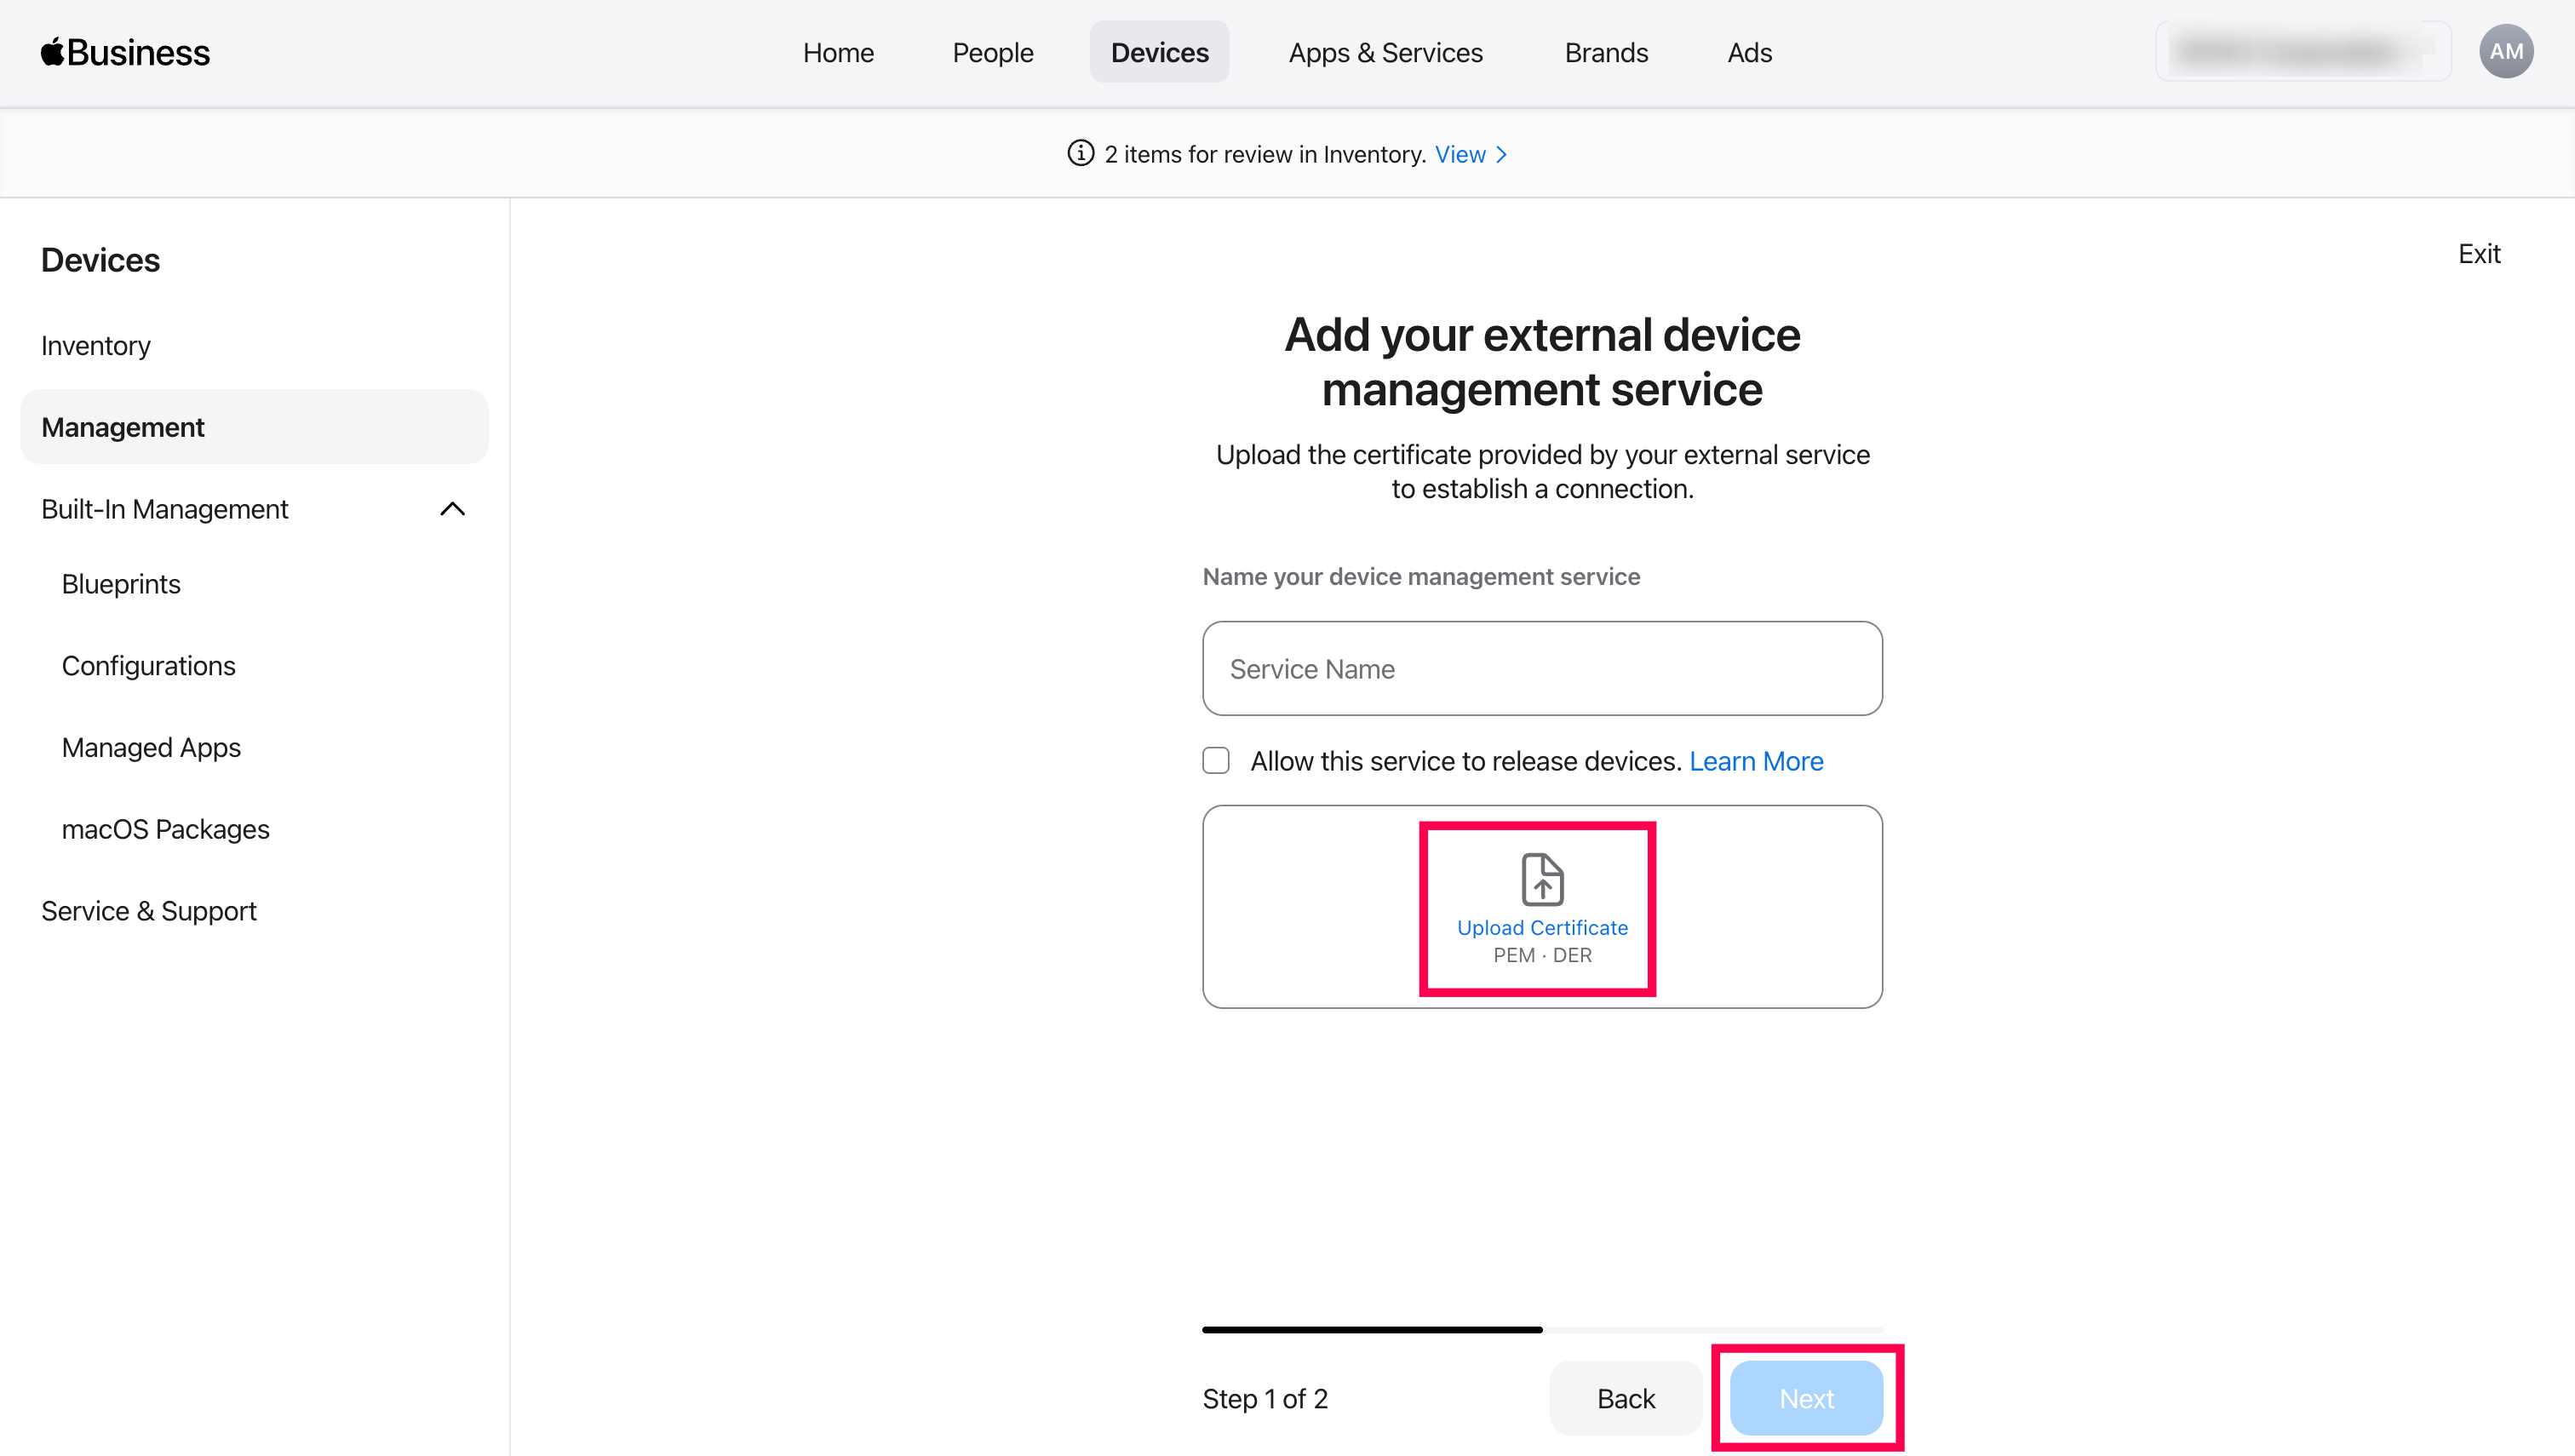
- Create Device Management Services in ABM/ASM by uploading the MDM public key: Log in to the Apple Business Manager portal using your organization's managed Apple ID. Navigate to Devices > Management. Here, you can either select an existing Device Management Services or create a new one. To create a new server, click on Add and follow the prompts to configure the server settings. Enter the Device Management Services Name that reflects your organization’s locations or departments for better identification. Now upload the MEMDM Public Key. Once the file is selected, click "Next" to complete the upload process and associate the public key with the server.
- Select your device management service and click Download Token. This token will need to be uploaded in the MDM console to establish a connection between Apple Business Manager and the MDM.
- Upload the Server Token in MDM: Navigate to the MDM console and click on Generate Server Token, then select the Next button. This action will direct you to the Upload Server Token section. Locate and select the downloaded server token from Apple Business Manager to upload it. Keep in mind that the server token is valid for one year and must be renewed and re-uploaded annually. To ensure timely renewals, enter your IT team's email addresses to receive reminders about the server token's expiration. Once done, click Next to proceed to the Device Activation Settings section.
- Device Activation Settings: When enrolling new or factory-reset devices through Apple Business Manager (ABM), the settings configured in the MDM console will be automatically applied upon device activation. This feature streamlines the device setup process and ensures that each device is provisioned according to your organization's policies and requirements. "Device Activation Settings" can be configured now or later.
To gain a deeper understanding of how to configure device activation settings, please visit our Configure Device Activation Settings page. There, you will find comprehensive details on various configuration options, including setting up devices to be activated by either users or administrators. Additionally, the page covers how to assign devices to specific groups, as well as platform-specific setup assistants applicable to all devices. It also includes instructions for configuring settings for shared devices and managing Mac account settings, ensuring that you have all the necessary information to effectively manage device activations within your organization.
- Create the server : After entering the required configuration details, click the "Create" button to add the Apple Business Manager (ABM) server to the MDM console. Once added, a notification will confirm: "ABM server '[Server Name]' has been successfully added."
The ABM server will now be successfully added to the MDM server. You can access three tabs:
Devices Tab: View devices assigned to this MDM server in ABM/ASM.
Servers Tab: Add multiple MDM server tokens from ABM and renew tokens here.
Settings: Choose the sync schedule for new devices from ABM.

To ensure proper management of your devices, it is essential to assign them to the designated MDM server from the Apple Business Manager (ABM) portal. You will find more information here on how to assign devices to the required server token in ABM or how to set a default server for all purchased devices.
Note: For efficient management of user-activated devices, including Mac and shared devices, it is advisable to set up a dedicated server specifically for these devices. You can either create a new server or modify an existing one to accommodate their unique management needs.
Add Devices to Apple Business/School Manager (ABM/ASM)
Adding devices to Apple Business/School Manager (ABM/ASM) is crucial for managing them effectively through MDM Console. Follow the below steps to add devices to the ABM portal:
Methods to Add Devices
Adding Reseller Details to the ABM/ASM Portal
This method ensures that devices purchased from Apple or authorized resellers are automatically added to ABM and subsequently to MDM server. Here’s how to do it:
- Log in to your Apple Business Manager portal using your organization's credentials.
Note: Only users with Administrator or Device Enrollment Manager roles can add reseller details in ABM.
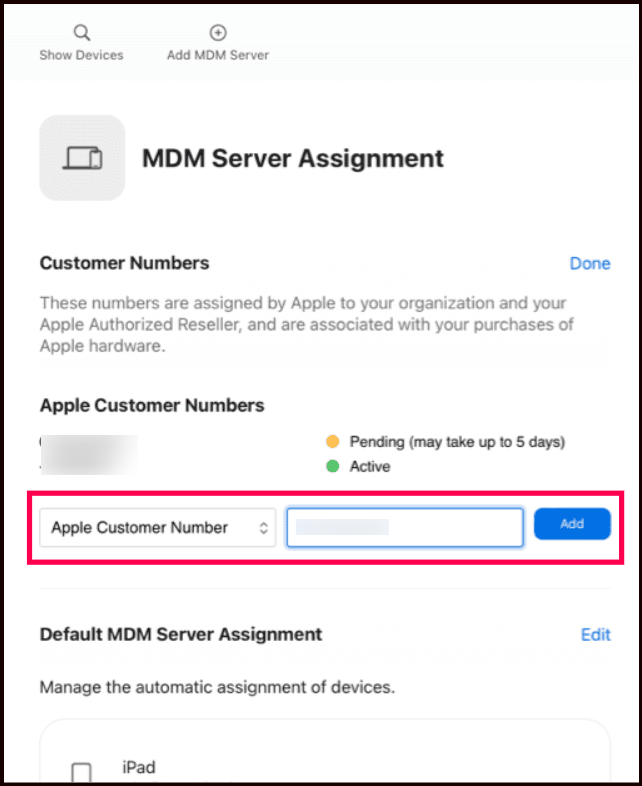
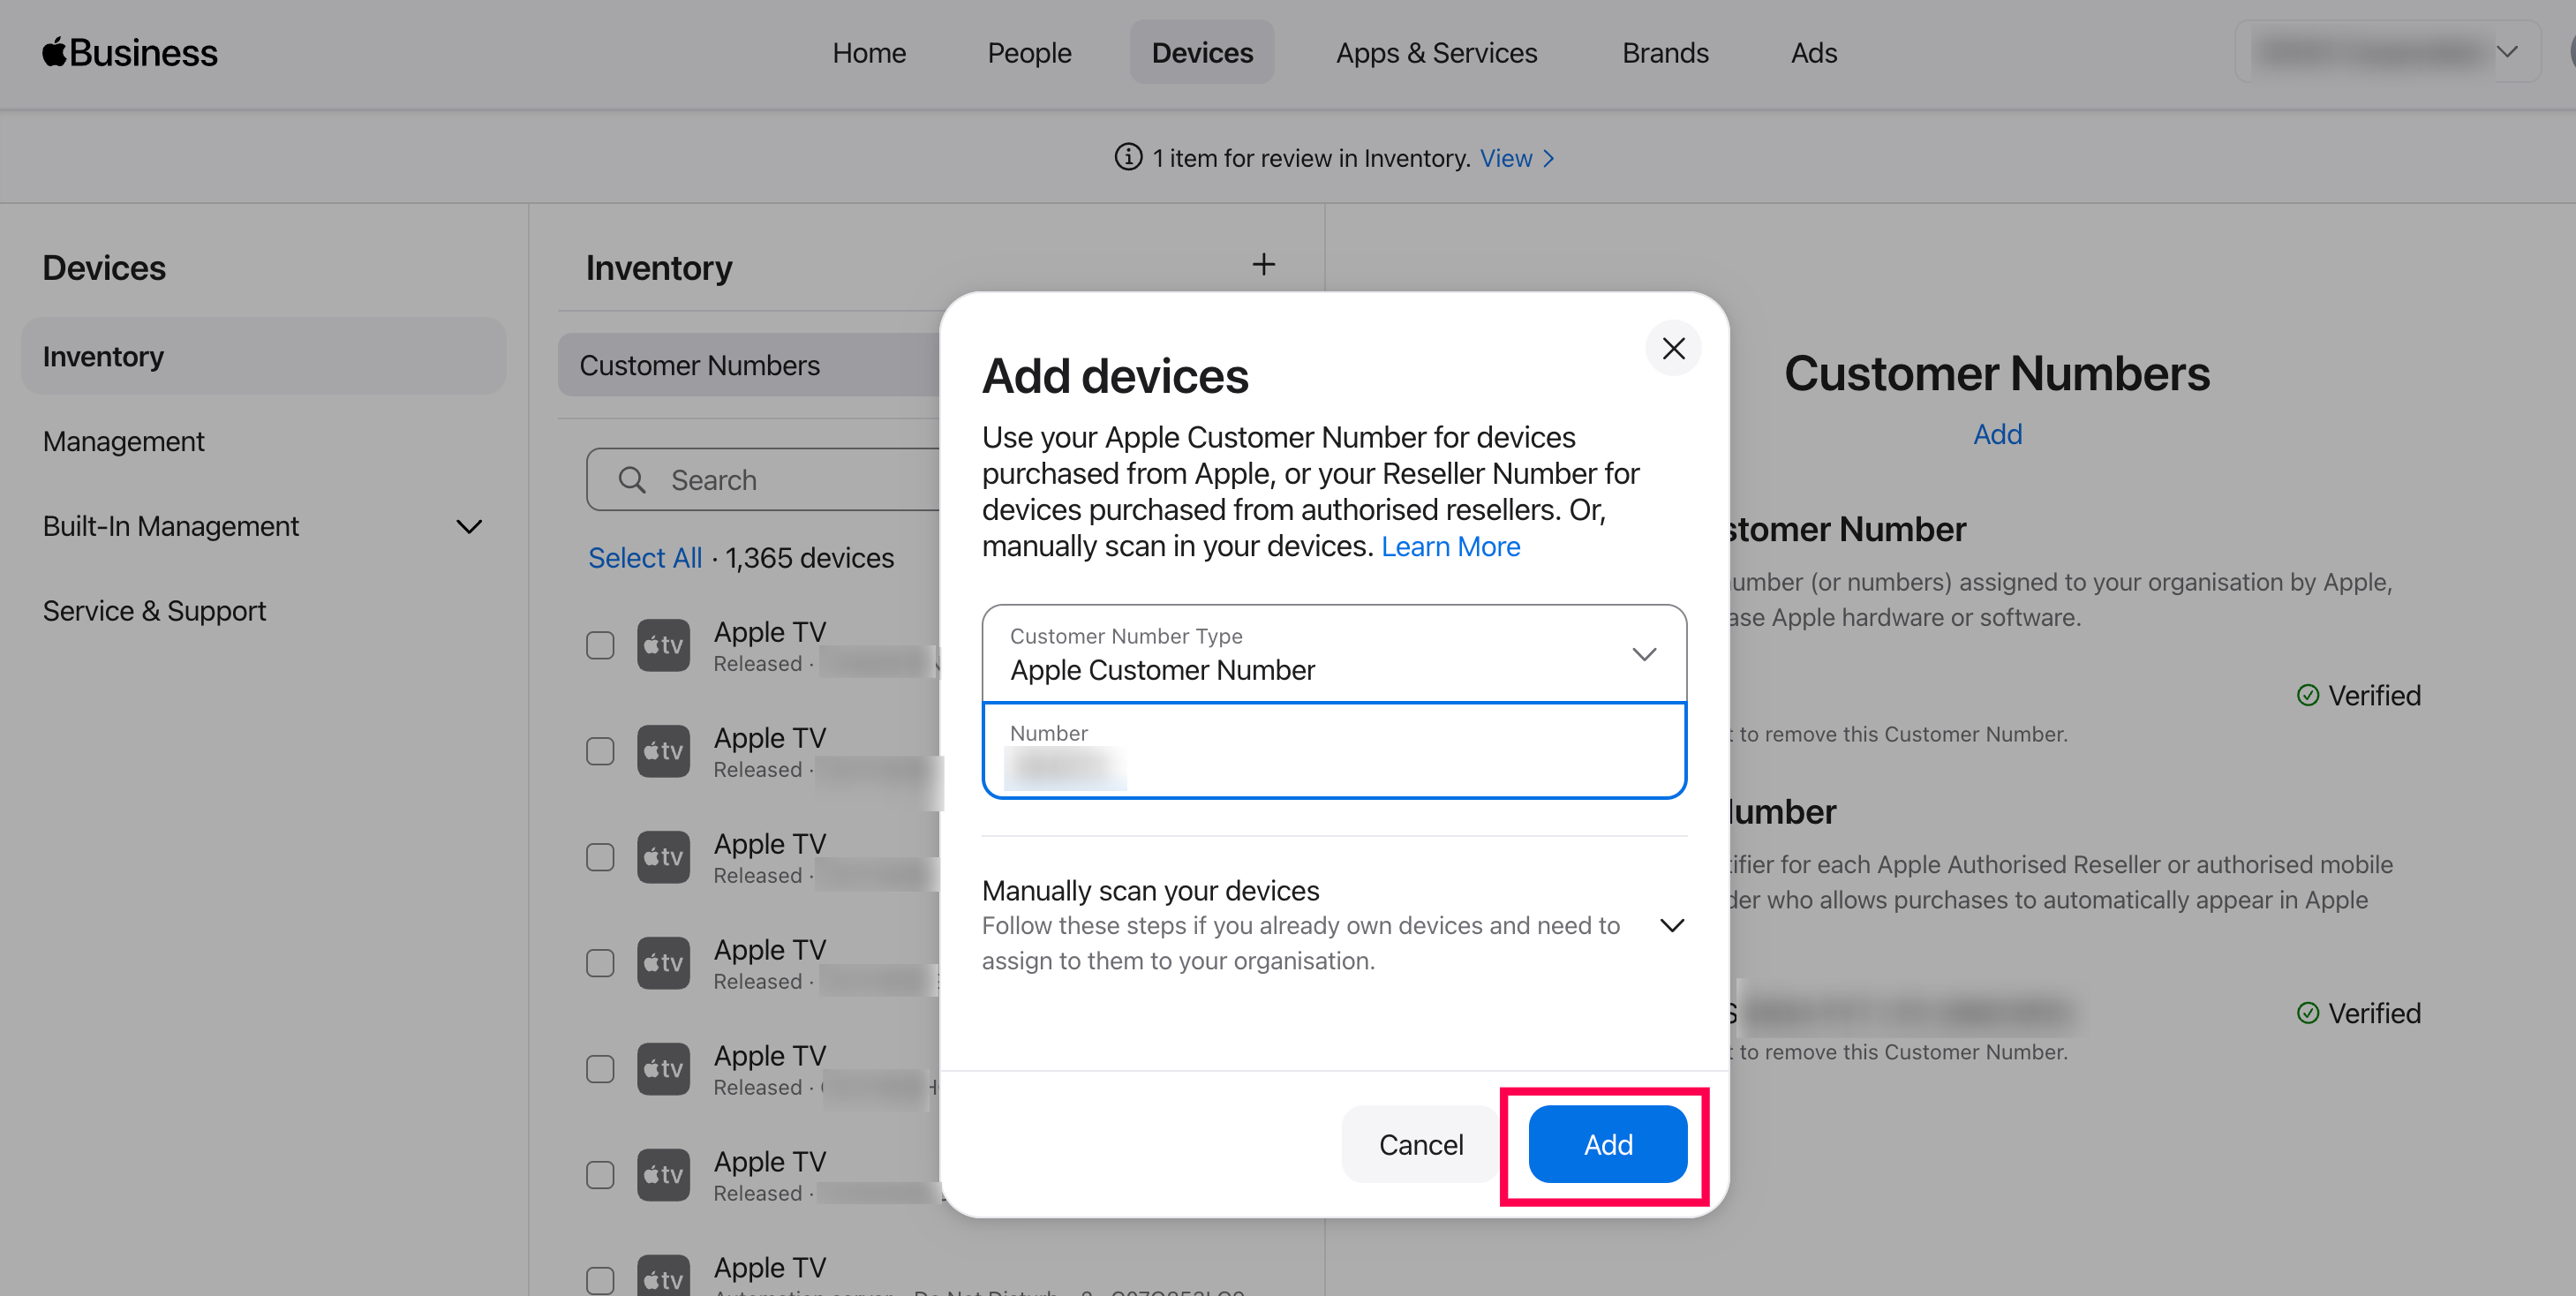
- Navigate to Devices > Inventory. Click on Add.
- Enter your Apple Customer Numbers and ABM/DEP Reseller IDs for the resellers from whom your organization purchases devices.
- Click Add to save the details and complete the process.
Manually Assign Devices to the Device Management Services in ABM/ASM Portal
If you have devices that were purchased before setting up Device Management Services with ABM, you can add them manually:
- Log in to your Apple Business/School Manager portal.
- In the ABM portal, navigate to Devices > Inventory, select the devices you want to assign.
- Click on 'Assign Device Management.'
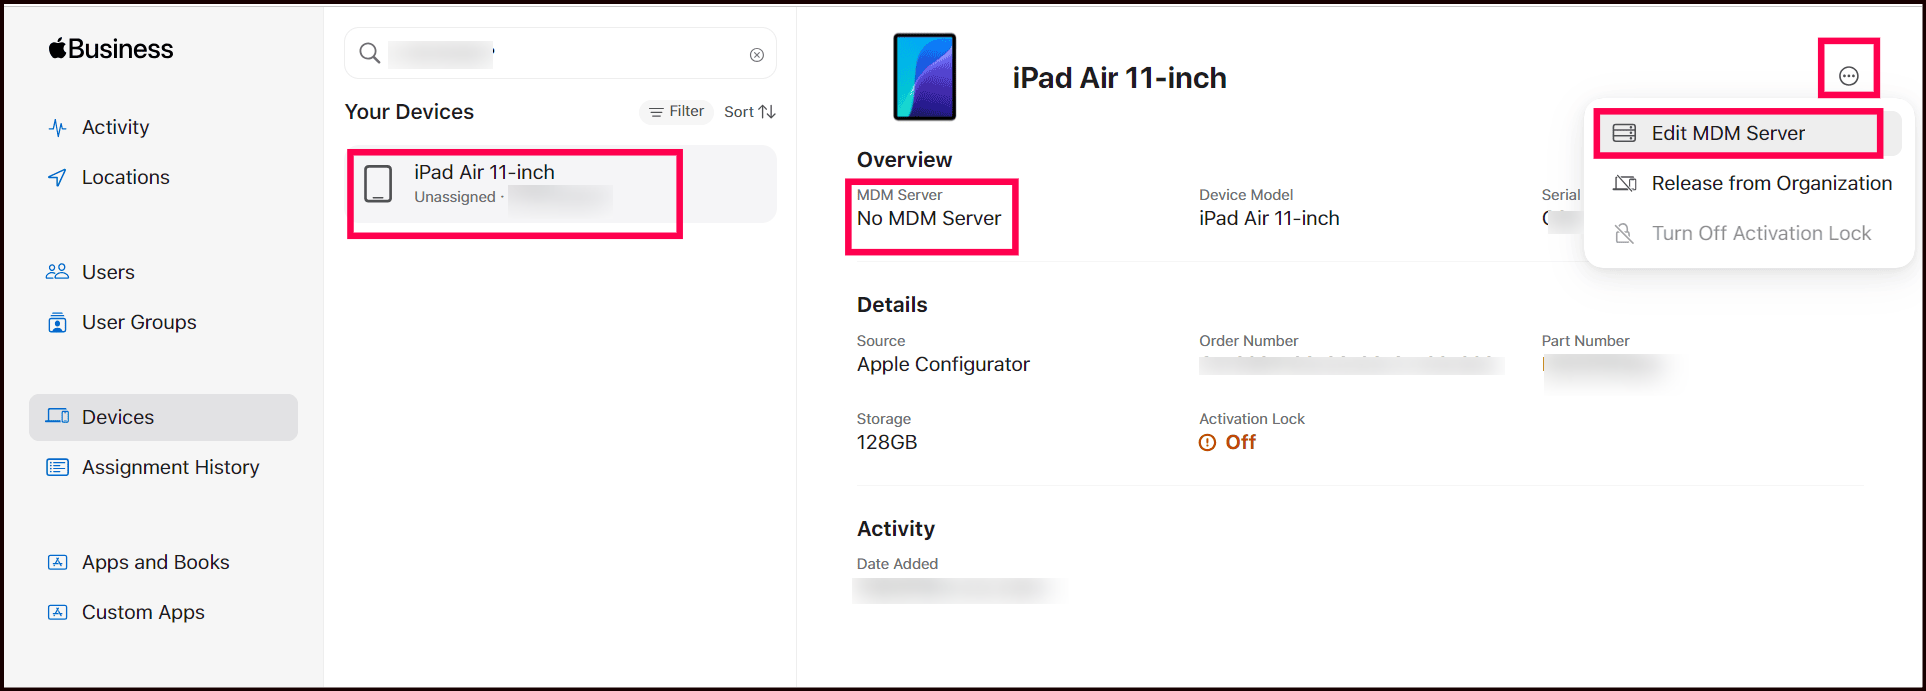
- Choose the Device Management Services you want to manage these devices from the dropdown.
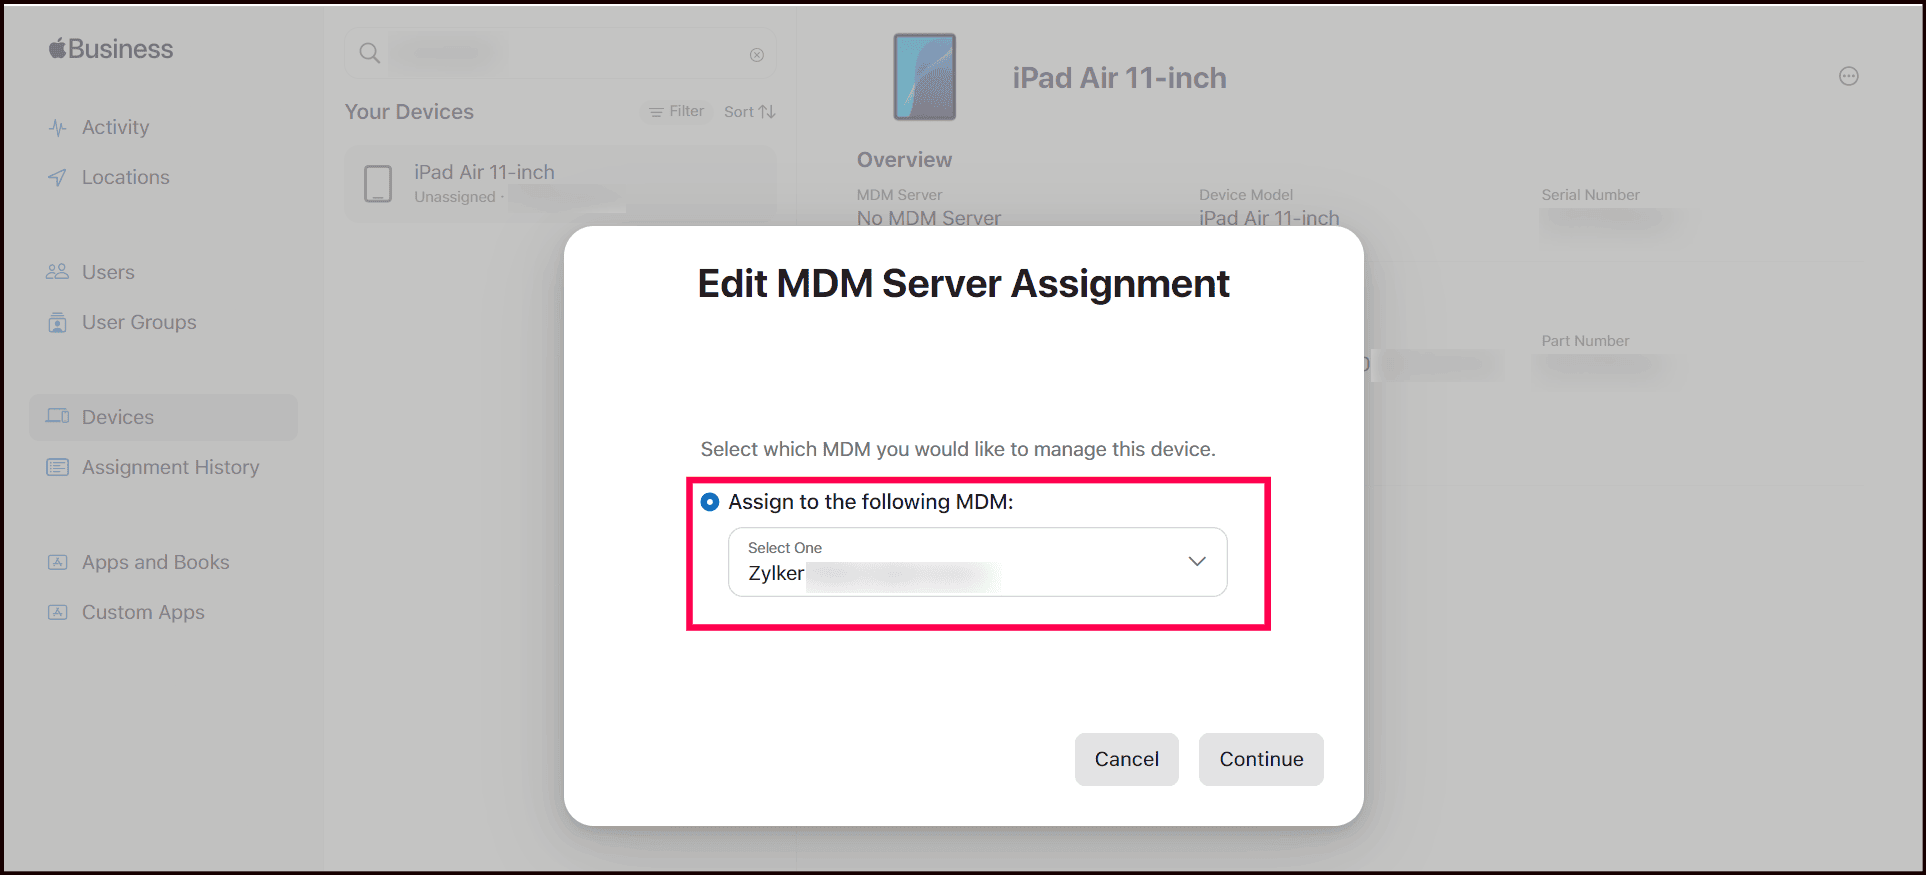
- Click Continue and confirm the assignment. Once completed, click Close.
- Go to Devices > Management, and you will see the assigned devices listed under that server.

The selected Apple devices will now be added to the Device Management Services due to the integration.
Note: To add devices purchased from sources other than authorized Apple resellers to Apple Business Manager (ABM) or Apple School Manager (ASM), follow the appropriate links below:
- For adding iOS/iPadOS devices.
- For adding MacOS devices.
- For adding Apple TV devices.
Automatic Device Assignment to Default Server in Apple Business/School Manager (ABM/ASM)
Whenever your organization purchases new Apple devices from a reseller or adds existing devices to ABM/ASM via Apple Configurator, these devices will be automatically assigned to the default server when "Default Device Assignment" is configured in ABM/ASM. This process ensures seamless device management without manual intervention. Follow the below steps to configure Default Device Assignment in ABM/ASM:
- Use your organization's managed Apple ID to log in to the Apple Business Manager portal.
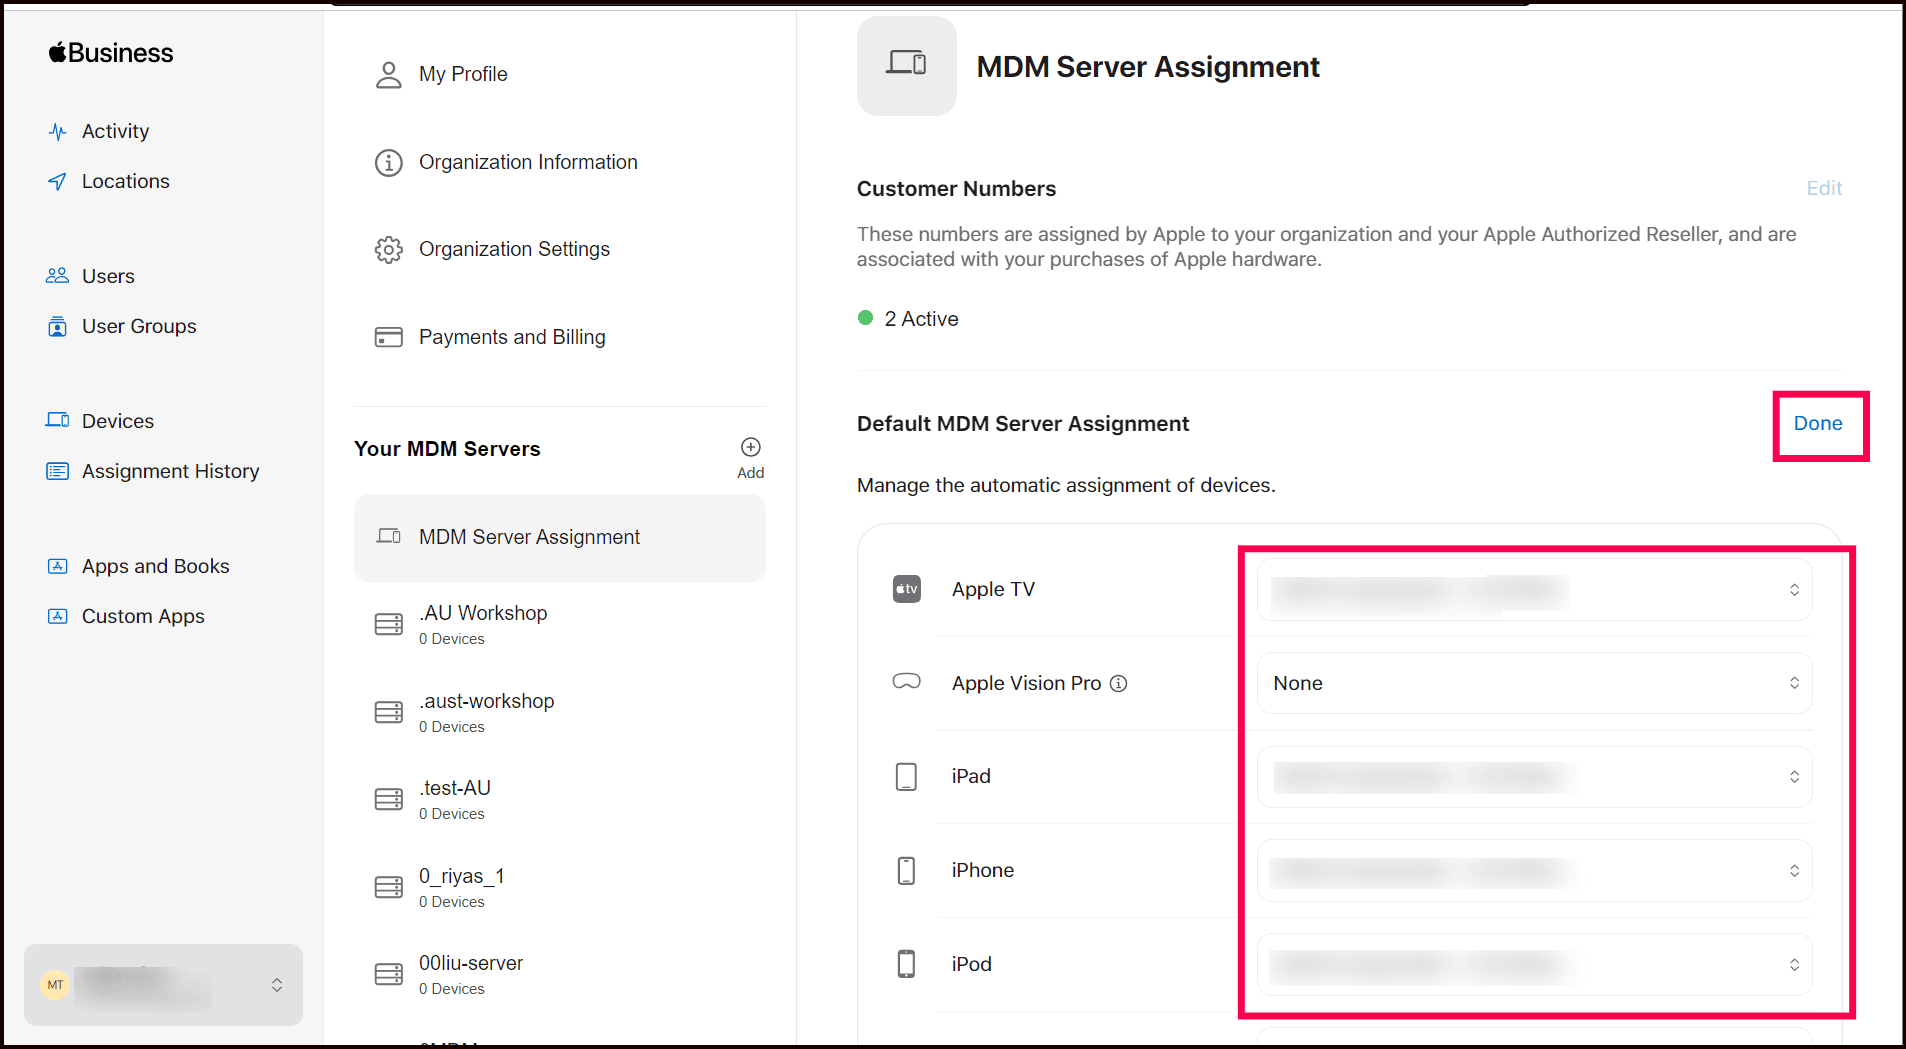
- Navigate to Devices > Management within the ABM portal.
- Click on Default Device Assignment. Choose the device specific Default servers from the dropdown available in the Default Device Management Services Assignment.

- Once you have selected the device type, click save to ensure that all new devices added to the ABM portal are automatically assigned to this server.
Sync Devices in MDM
Syncing devices between ABM/ASM and MDM console is essential for ensuring that all device information is up-to-date and accurately reflects the latest configurations.
Syncing ensures that devices added to ABM are correctly reflected in the MDM console, allowing for proper management and configuration. MDM automatically performs a sync every 24 hours. However, you can also manually schedule or initiate syncs based on your needs.
Steps to Sync Devices
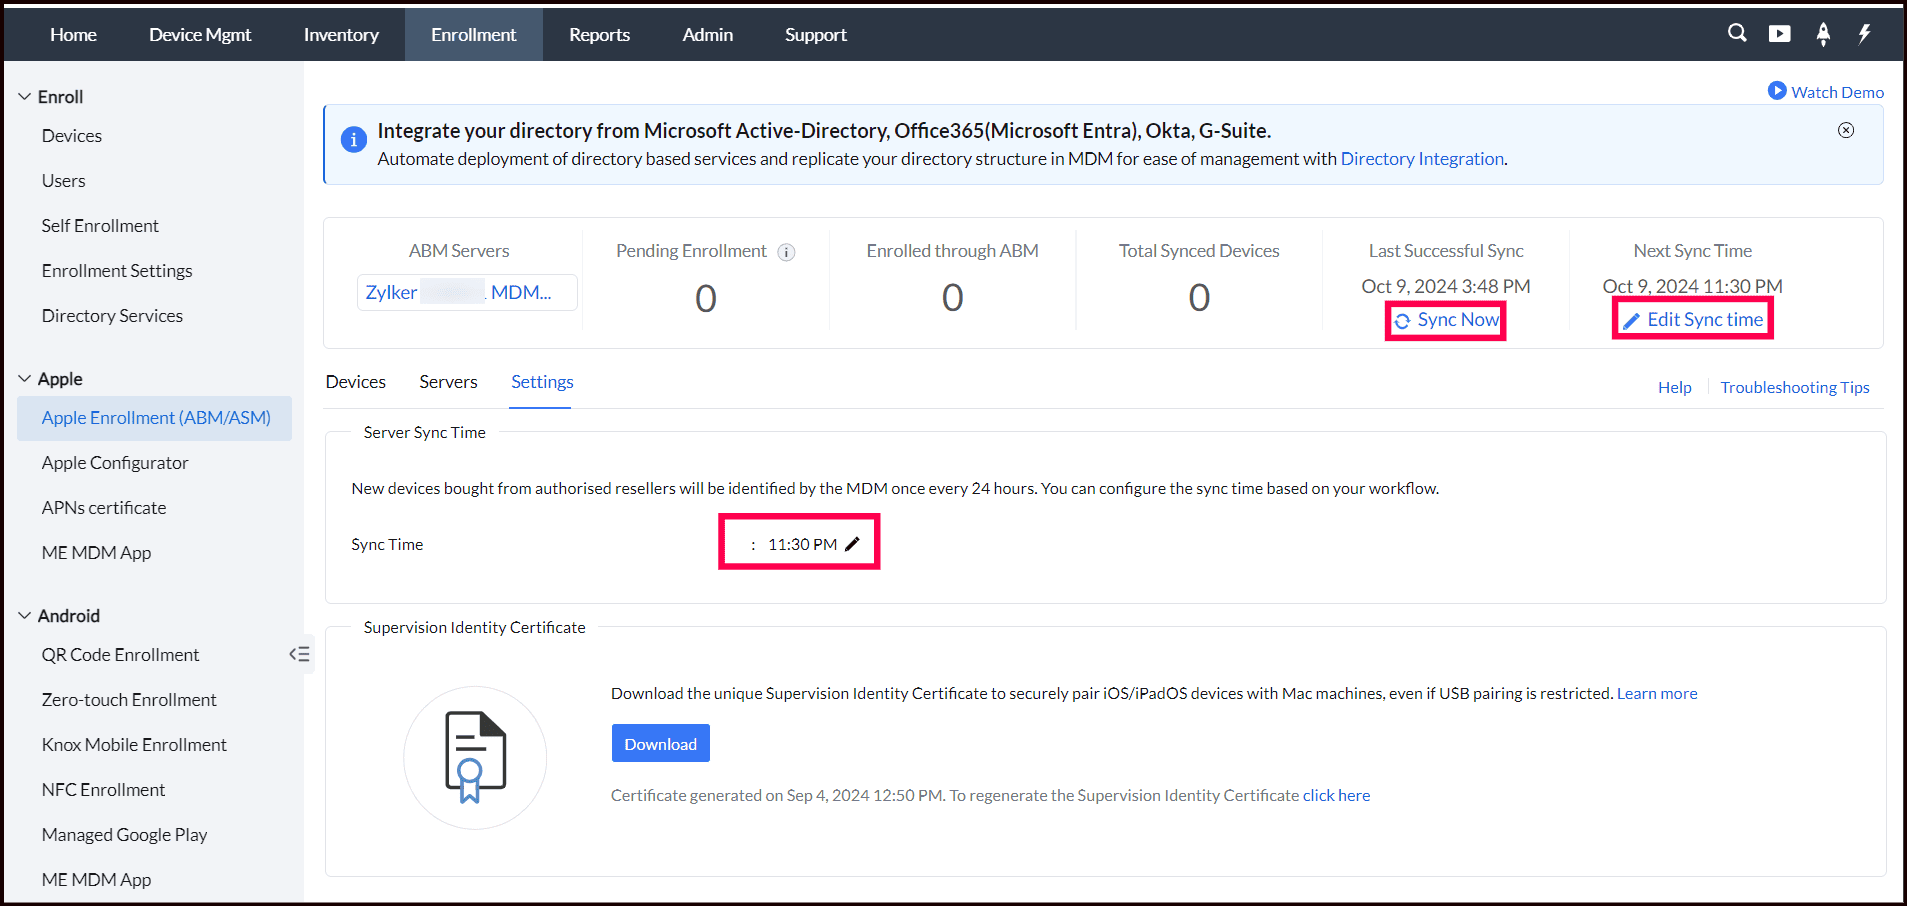
- Navigate to Enrollment > Apple > Apple Enrollment (ABM/ASM). Click on Edit Sync Time or navigate to the Settings tab in the top right corner. Enter your preferred sync time in the available field.
- Click the check-mark icon to save the scheduled sync time. Devices will now be synced from ABM to the MDM server according to the schedule you have set.
For example, if there is a requirement to sync all newly purchased devices from the reseller before 8 AM, the admin needs to configure the sync frequency accordingly. At the scheduled time, MDM will perform the sync as an additional operation, apart from the regular sync that occurs once every 24 hours.
- To perform a manual sync, you can click on Sync Now to immediately update device information between ABM and MDM.
MDM Server Token Renewals
The MDM Server Token is valid for one year and must be renewed to continue using the ABM/ASM portal for enrolling mobile devices. It is recommended to renew the token ahead of time to avoid any interruptions. For detailed steps on renewing the server token, please refer to our ABM/ASM Server Token Renewal Guide.
Troubleshooting Tips
For detailed Troubleshooting Tips on common issues during device enrollment or configuration, visit our Troubleshooting Guide .
What's Next?
Device Activation by Admin and End User
Find out how administrators and end users can activate devices after enrollment by checking out the Device Activation Guide.
Configure/Modify Device Activation Settings
To configure or modify your Device Activation Settings, visit our comprehensive Device Activation Settings guide for detailed instructions.
Create and Manage Groups
To create groups for effective device management, visit our detailed Creating Groups guide for step-by-step instructions.
Create and manage Profiles
To create a profile for the managed devices, please navigate to our dedicated Profile Creation Page.
FAQs
1. How do I fix an iPhone enrollment status stuck on "Awaiting Device Activation" in ABM?
The "Awaiting Device Activation" status is expected for devices assigned to Automated Device Enrollment via Apple Business Manager (ABM) or Apple School Manager (ASM). This enrollment method requires two steps, which can be completed in any order:
- Device activation: Boot up or activate the device. The device contacts Apple's enrollment services and automatically enrolls into MDM.
- Enrollment completion: Assign user or device group details to the device in the MDM console.
Once both steps are complete, the device is successfully enrolled. The scenarios below explain what happens depending on which step is pending:
- Step 1 is pending (device not yet activated): The status remains "Awaiting Device Activation." When the device is powered on, it will contact MDM and enroll automatically.
- Step 2 is already complete (user/group assigned): The device will complete enrollment immediately upon activation.
- Step 2 is pending (user/group not yet assigned): The device will enroll upon activation and remain pending until user or group assignment is completed in the MDM console.
2. Can I use Quick Start to transfer data to a new device enrolled in ABM/ASM?
If your new device is enrolled in Apple School Manager or Apple Business Manager, you can’t use Quick Start to transfer data from your current device.