To track who deleted a file, Enable Transfer Log for the required file sharing protocol and view log entries using Log Center or using an auditing solution like ADAudit Plus.
- Log Center
- ADAudit Plus
- FAQ and troubleshooting
File servers typically comprise of sensitive files of an organization. Since file servers, such as Synology NAS are network connected, multiple users have access to such files. These files must be monitored to identify accidental deletions, avoid insider attacks, and to comply with regulatory standards such as NIS 2, PCI-DSS, etc.
Tracking who deleted a file in Synology NAS requires Transfer Logs to be enabled. Once enabled, the events can be tracked using LogCenter or using file auditing solutions like ADAudit Plus.
1. Track who deleted a file with native auditing in Synology NAS
In Synology NAS, Transfer Log is tracking feature that records file and folder activities using different file protocols such as SMB, AFP, TFTP etc. However, file activities shall also be performed using File Station, a built-in file management solution in Synology NAS.
In such a case, File Station Log must be enabled which used to track the file modifications performed with the in-built management tool.
1.1 Enabling File Transfer Log and File Station Log in Synology NAS.
- Open Control Panel.
- Navigate to File Services.
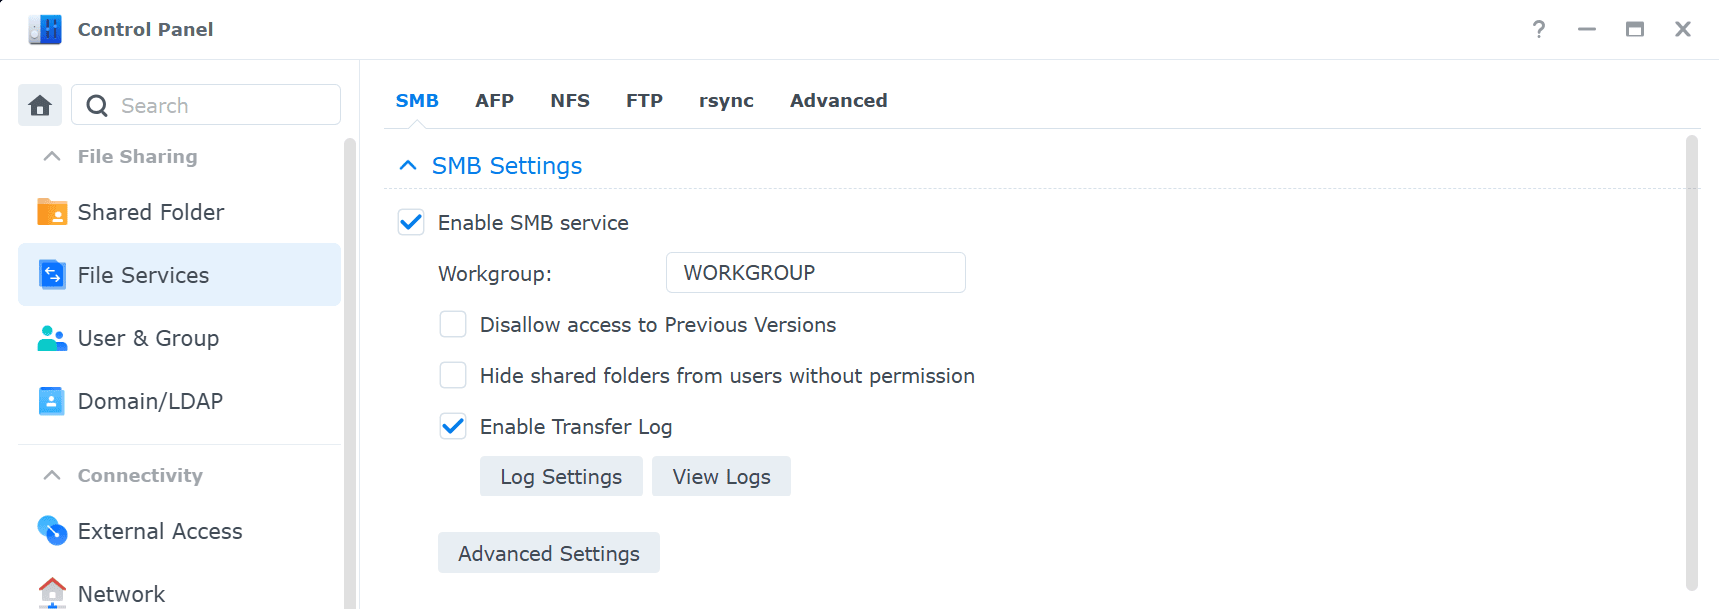
Fig 1: Transfer Log for SMB protocol - Select your preferred file sharing protocol from the top menu and Enable Transfer Log:
- For SMB protocol:
- Verify the domain or workgroup configured
- Select Enable Transfer Log.
- By default, activities Delete and Rename are enabled. Other options include
- Create: To track file creations
- Write: Enable it to track changes to a file's data.
- Move: To track if a file is moved between folders.
- Read: To monitor if a file was opened or read.
- Permission Change: To audit the permission changes to the file.
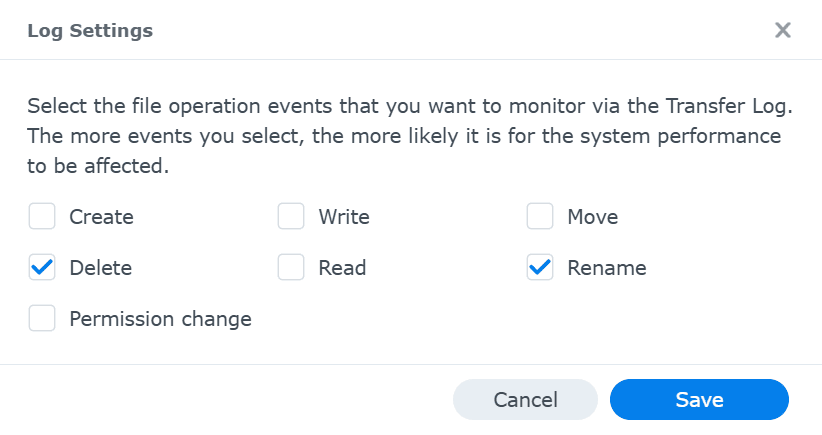
Fig 2: Log (auditing) settings - Select Apply to complete the configuration.
- For AFP protocol:
- Select Enable Transfer Log
- Select Apply to apply the configuration
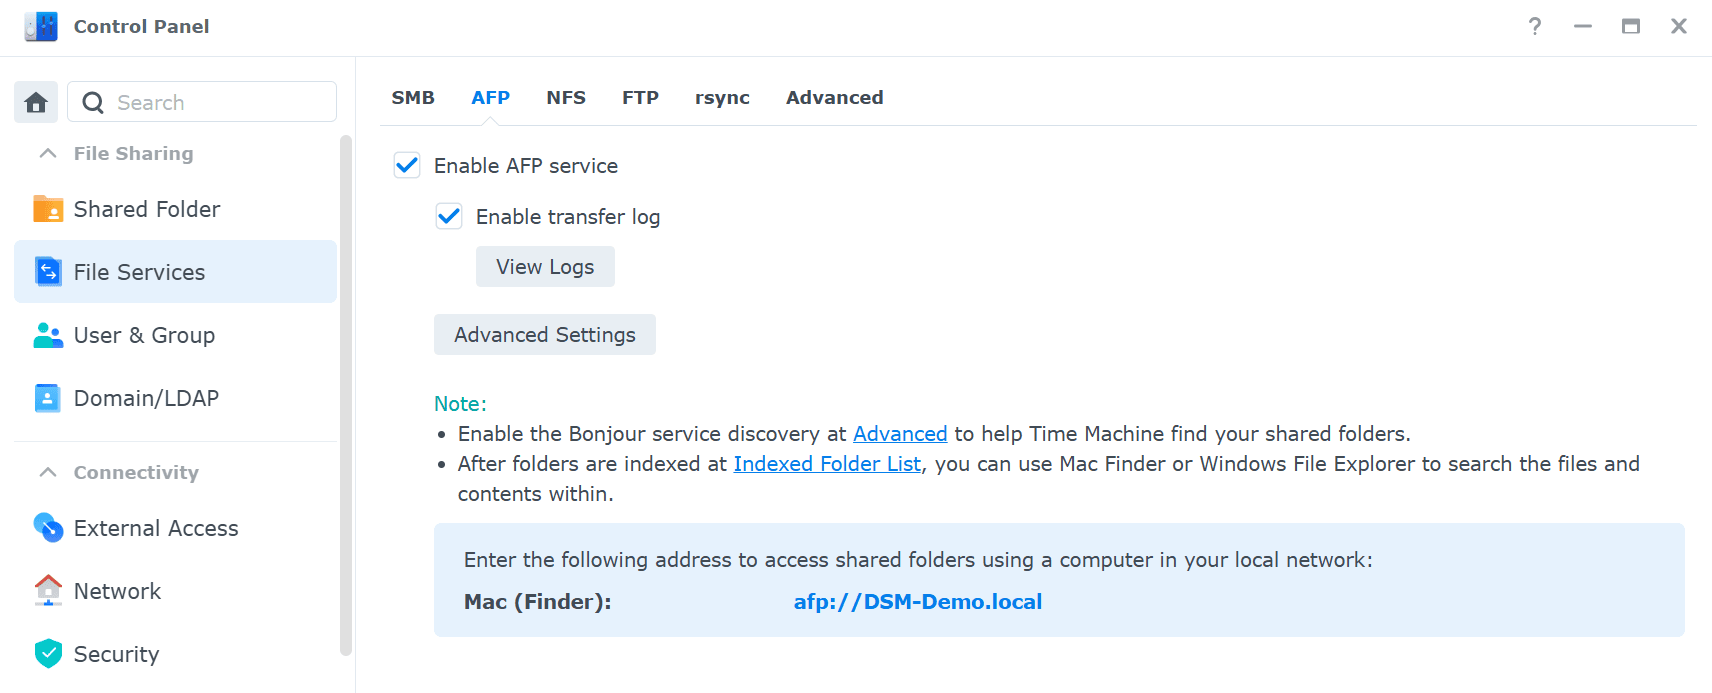
Fig 3: Log (auditing) settings
- For FTP protocol:
- Navigate to General.
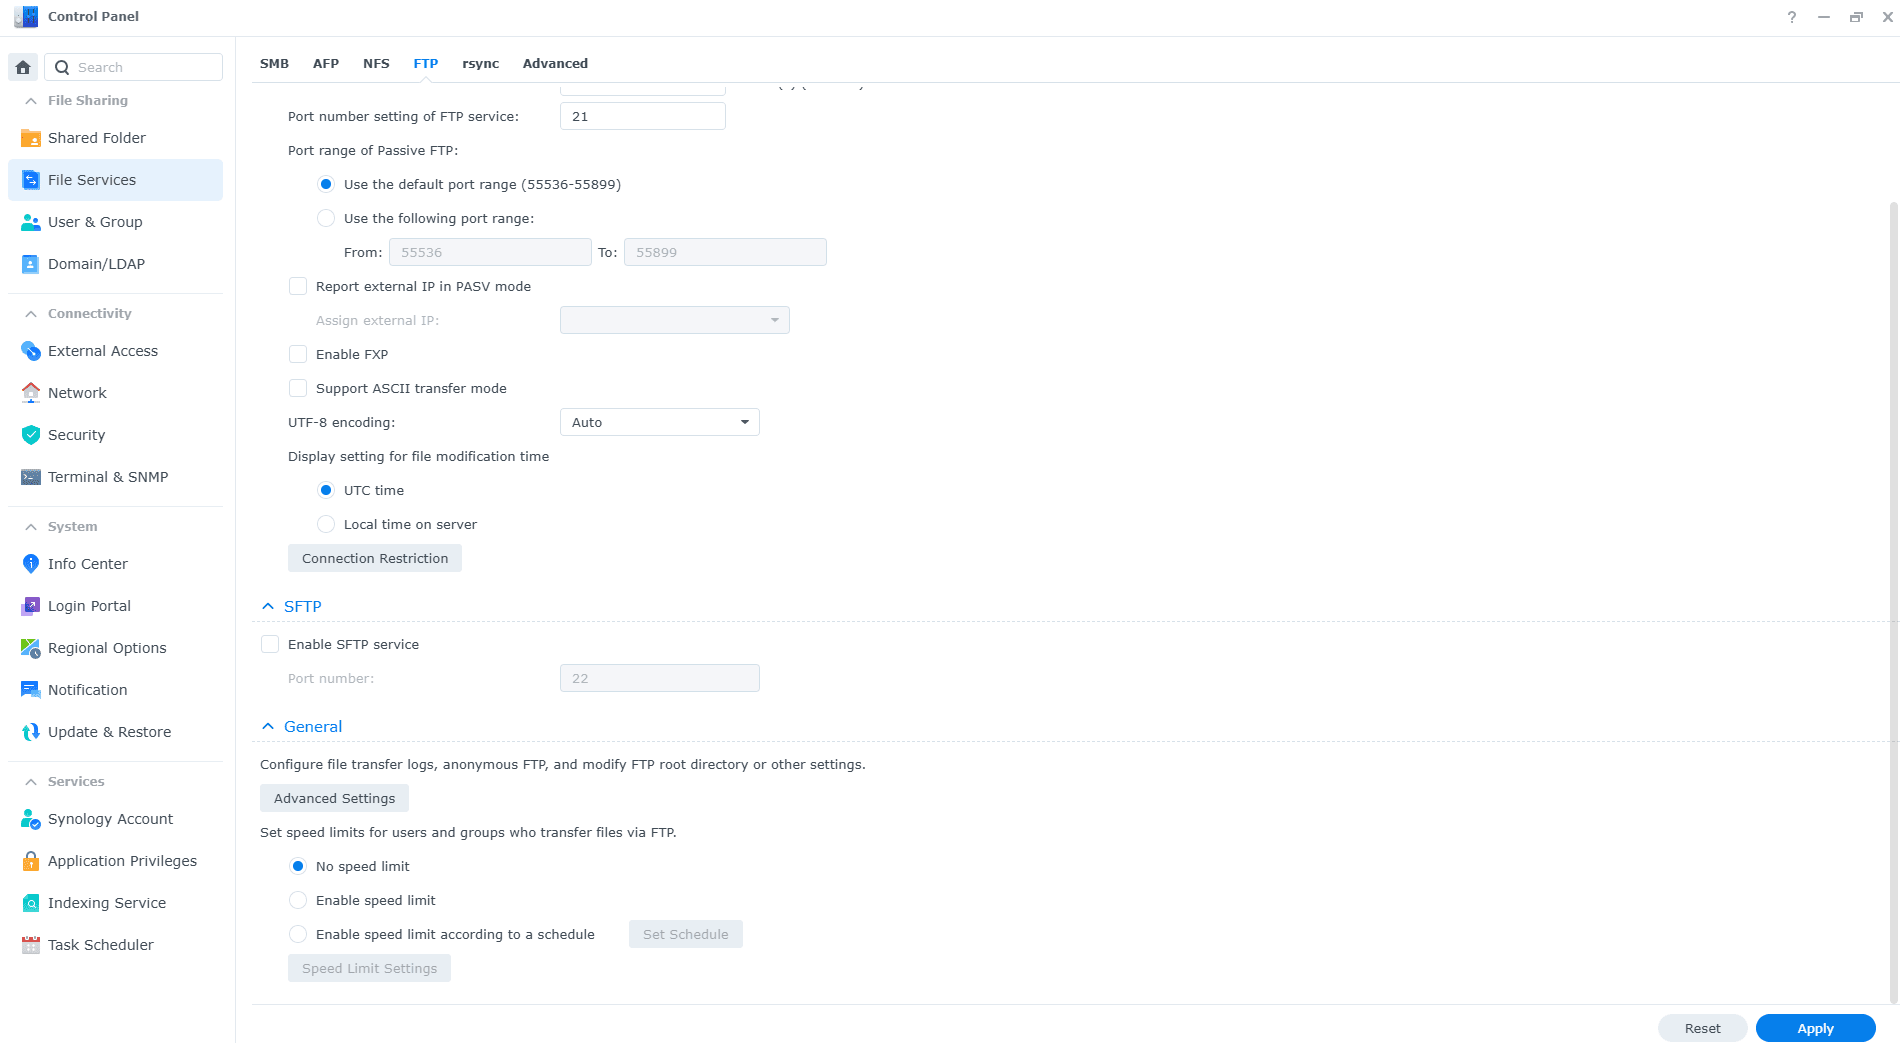
Fig 4: File Services - FTP protocol - Select Advanced Settings.
- Check Enable FTP File System Log.
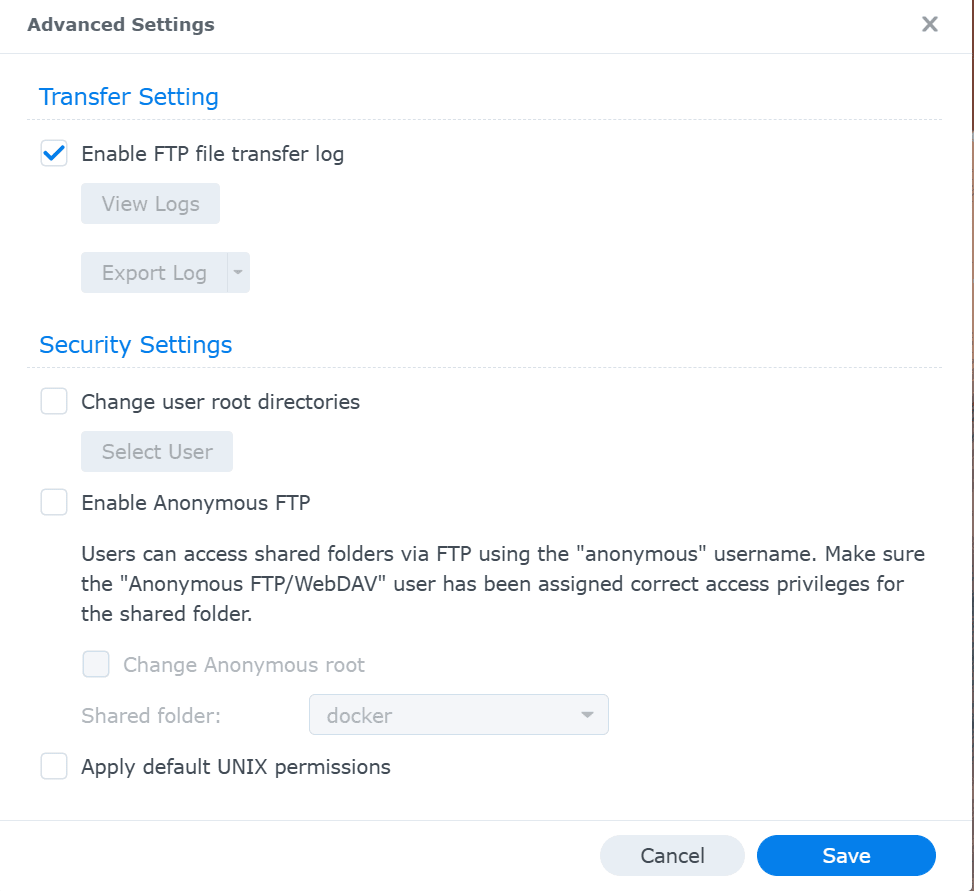
Fig 5: Enabling FTP file transfer log - Select Save and Apply to enable the configuration.
- Navigate to General.
- For TFTP protocol:
- Select Advanced from the top-menu, and navigate to TFTP.
- Add the TFTP root folder using Select option.
- Click on Advanced Settings.
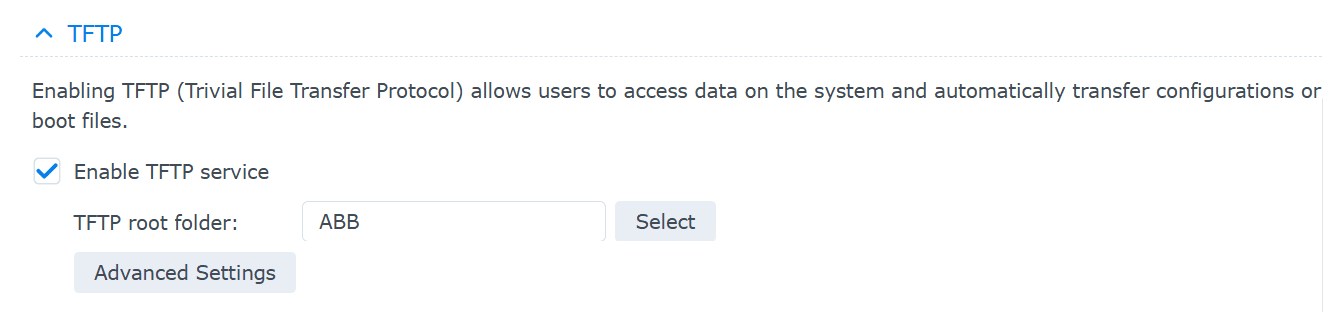
Fig 6: File Services - TFTP service - Under Transfer Setting, select Enable TFTP file transfer log.
- Click Save.
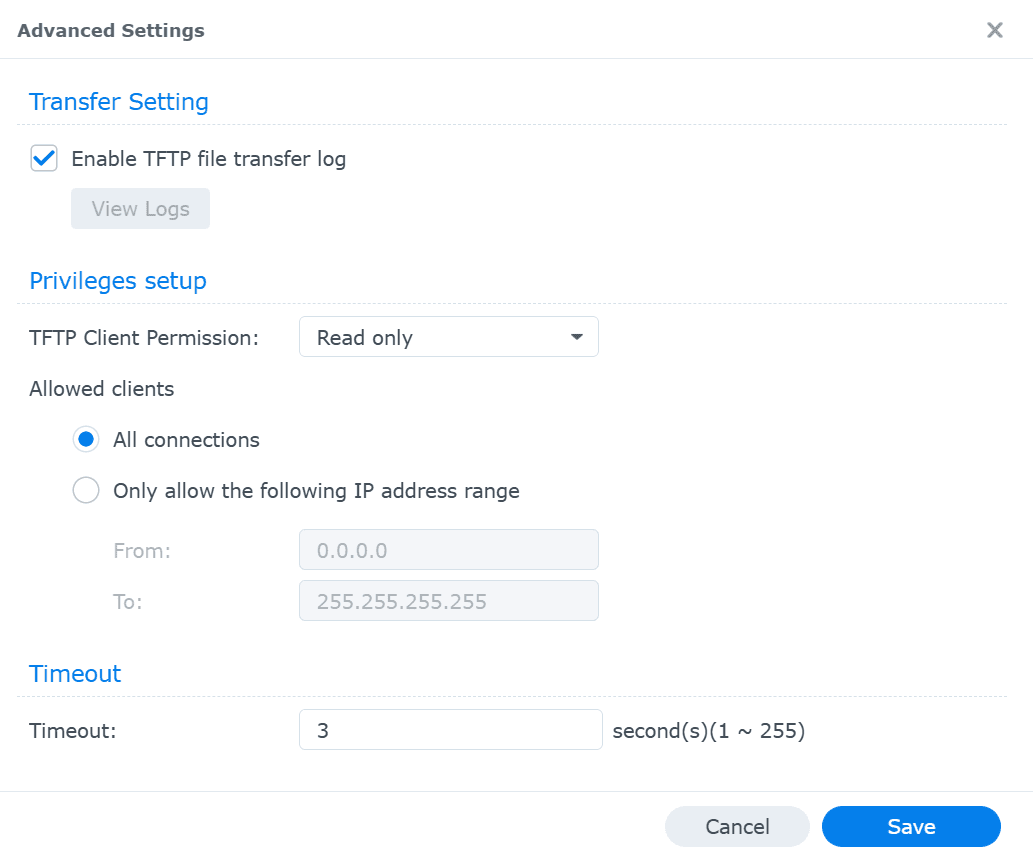
Fig 7: Enabling TFTP file transfer log - Select Apply to enable the configuration.
- For SMB protocol:
- If user accesses file directly through the server over a file sharing protocol, open File Station and select Settings from top-menu bar.
Note
File Station is built-in file management tool within a Synology NAS device, similar to Window Explorer or Apple Finder.
- Under General Settings, select Enable File Station log to record all file activities by users using the tool.
- Select Save to apply the configuration.
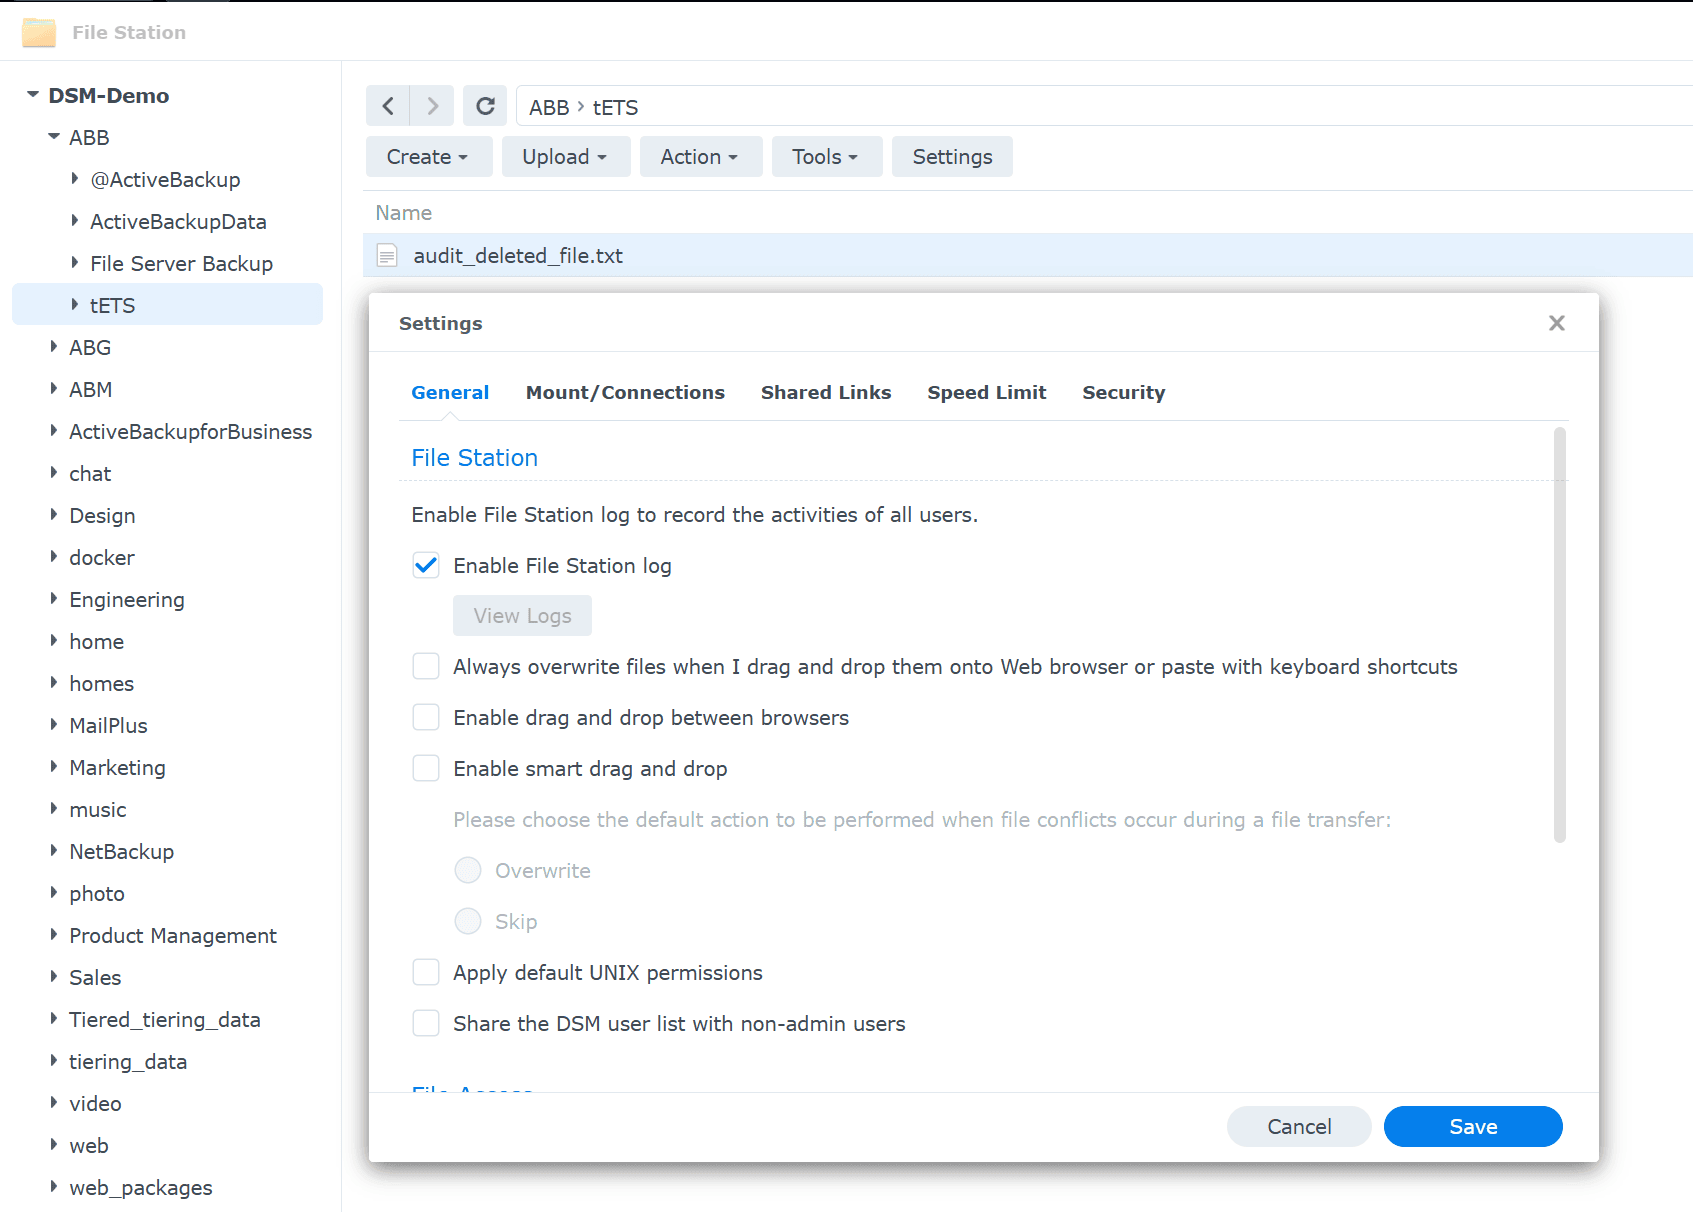
Fig 8: Enabling File Station log
1.2 Track who deleted a file in Synology NAS using Log Center.
Log Center is the primary native tool for viewing and auditing events performed on file within the Synology NAS device and itself. The logs are categorized into four different types:
| Log Type | Description |
|---|---|
| General | System-level events such as bootup, shutdown, and configuration changes. |
| Connection | Events that record user logons and activities with information such as name, IP address, protocol used. |
| File Transfer | Events about activities performed on files/shares present in the server. |
| Drive | Events about changes in drive status such as drive failures, drive removed, new drive inserted, etc. |
To identify who deleted a file in a Synology NAS:
- Open Log Center. If not installed, open Package Center, search for Log Center and select Install.
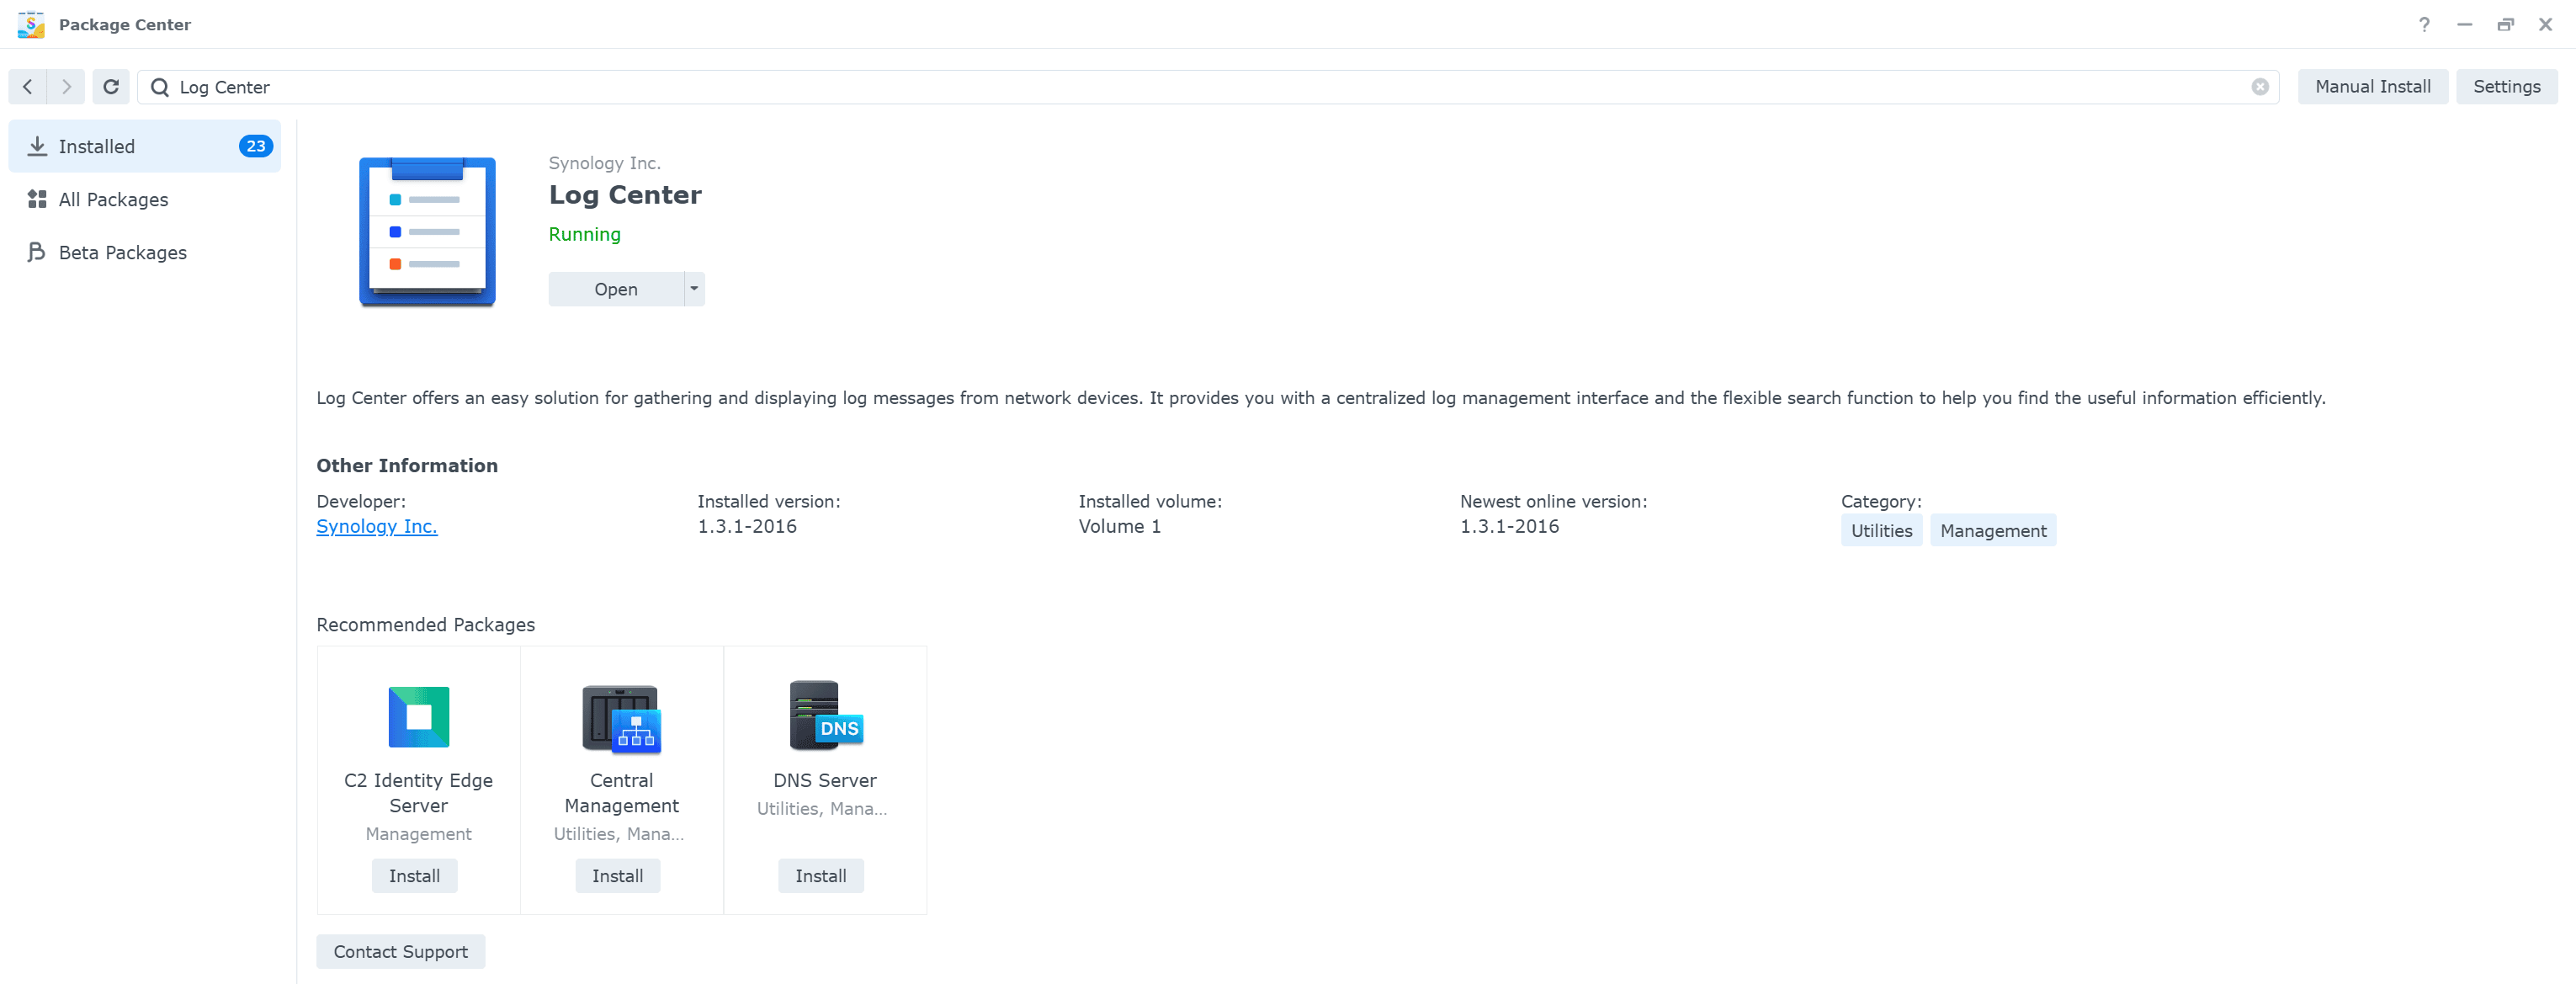
Fig 9: Installing Log Center in Synology NAS - Navigate to Logs, click on the second drop-down menu on the top-right menu.
- Select Transfer Files and verify logs with Event as DELETE. The following information shall be derived from each log:
- Time: Exact date-timestamp of the file deletion (Format: YYYY-MM-DD HH:MM:SS)
- IP address: IP address of the machine from which the file was deleted.
- User: Name of the user account who deleted the file.
- File Size: Size of the file deleted
- File Name: The complete path of the deleted file.
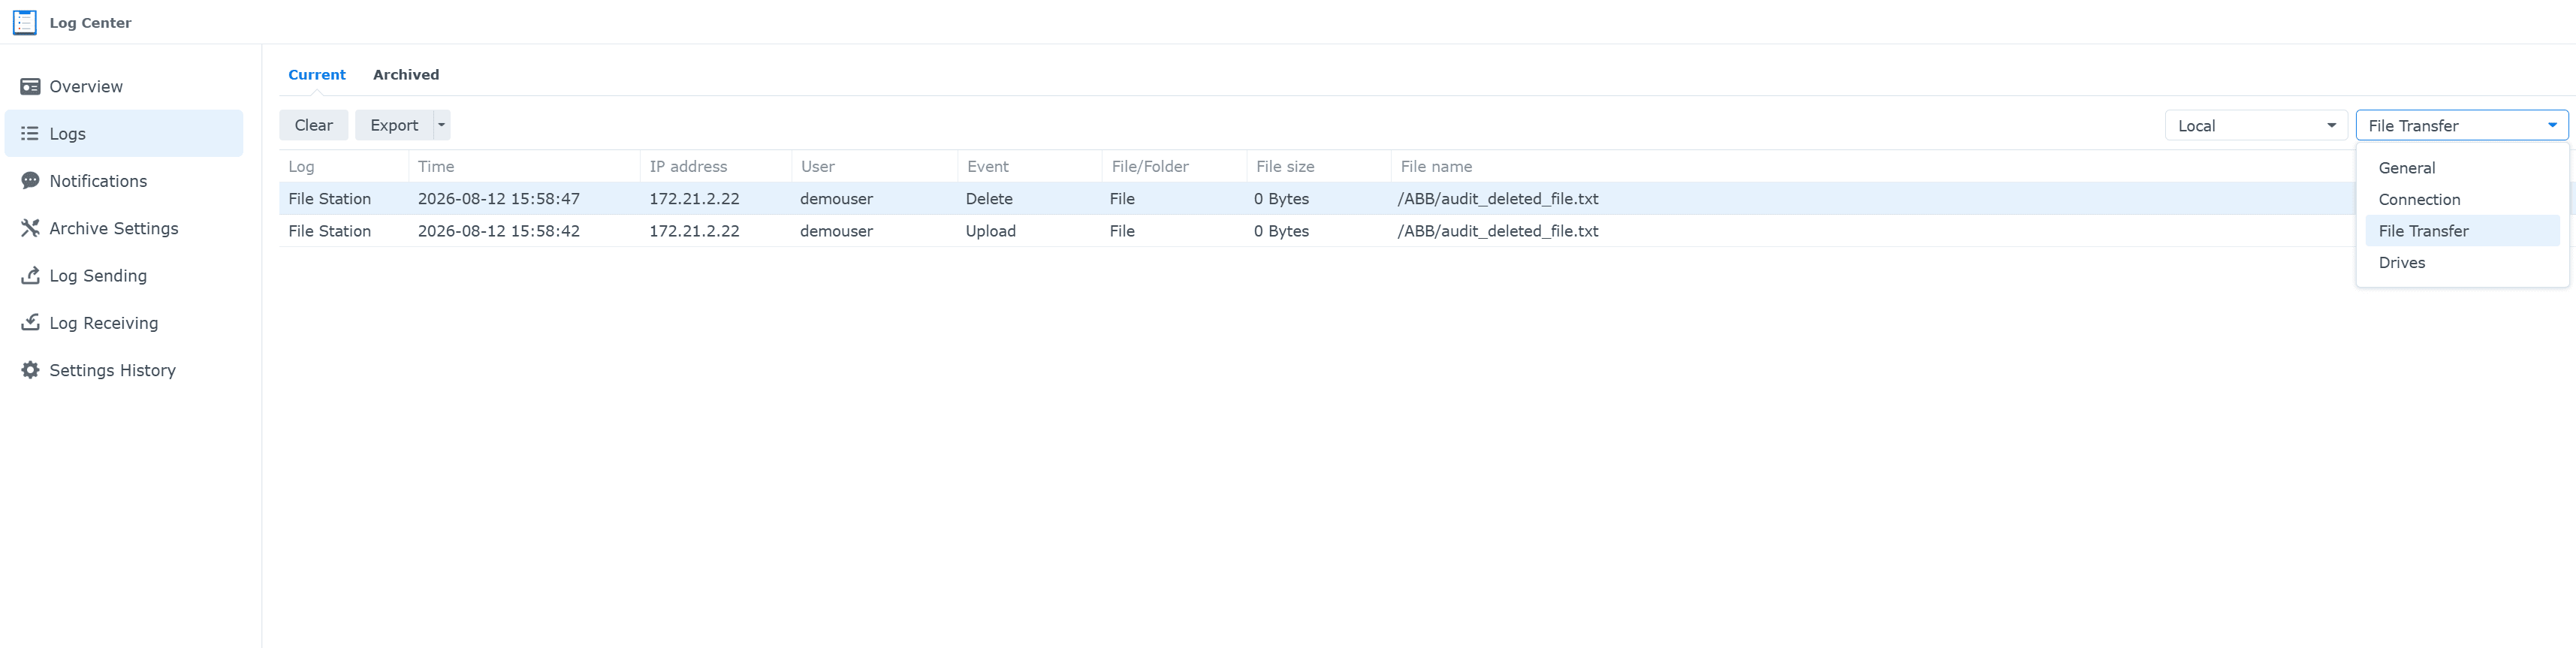
Fig 10: File transfer logs in Log Center
How to recover a deleted file/folder in Synology NAS server
Deleted files/folder can also be recovered from a Synology NAS device.
First, Recycle Bin must be enabled for each shared folder:
- Open Control Panel > Shared Folder.
- Select a shared folder and click Edit.
- Select Enable Recycle Bin. You may restrict its use to admins only using the Restrict access to administrators only.
- Click Save.
- Once enabled, a sub-folder named "#recycle" is created, which stores all deleted files.
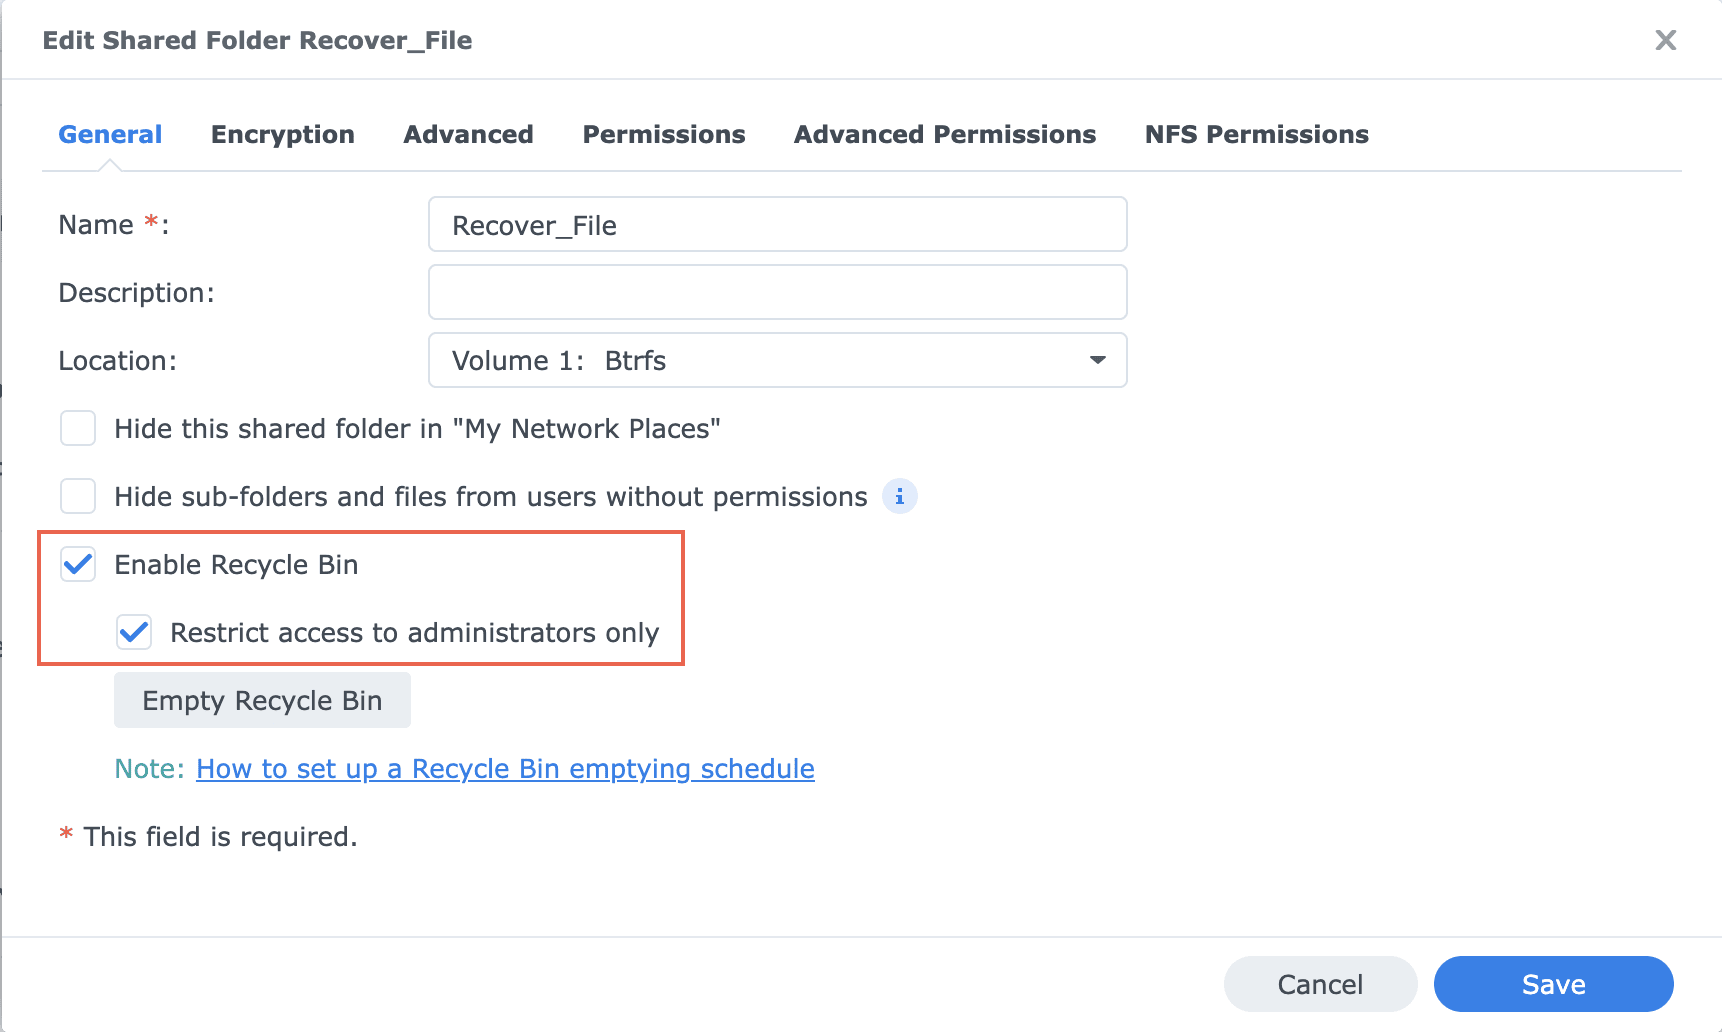
Fig 11: Enabling recycle bin in Synology NAS
To restore a file or folder from Recycle Bin:
- Launch File Station, navigate to the #recycle sub-folder.
- From the list displayed, right-click on the file or folder to be recovered.
- For DSM versions above 7.1, select Restore to return the file to the original location from which it was deleted.
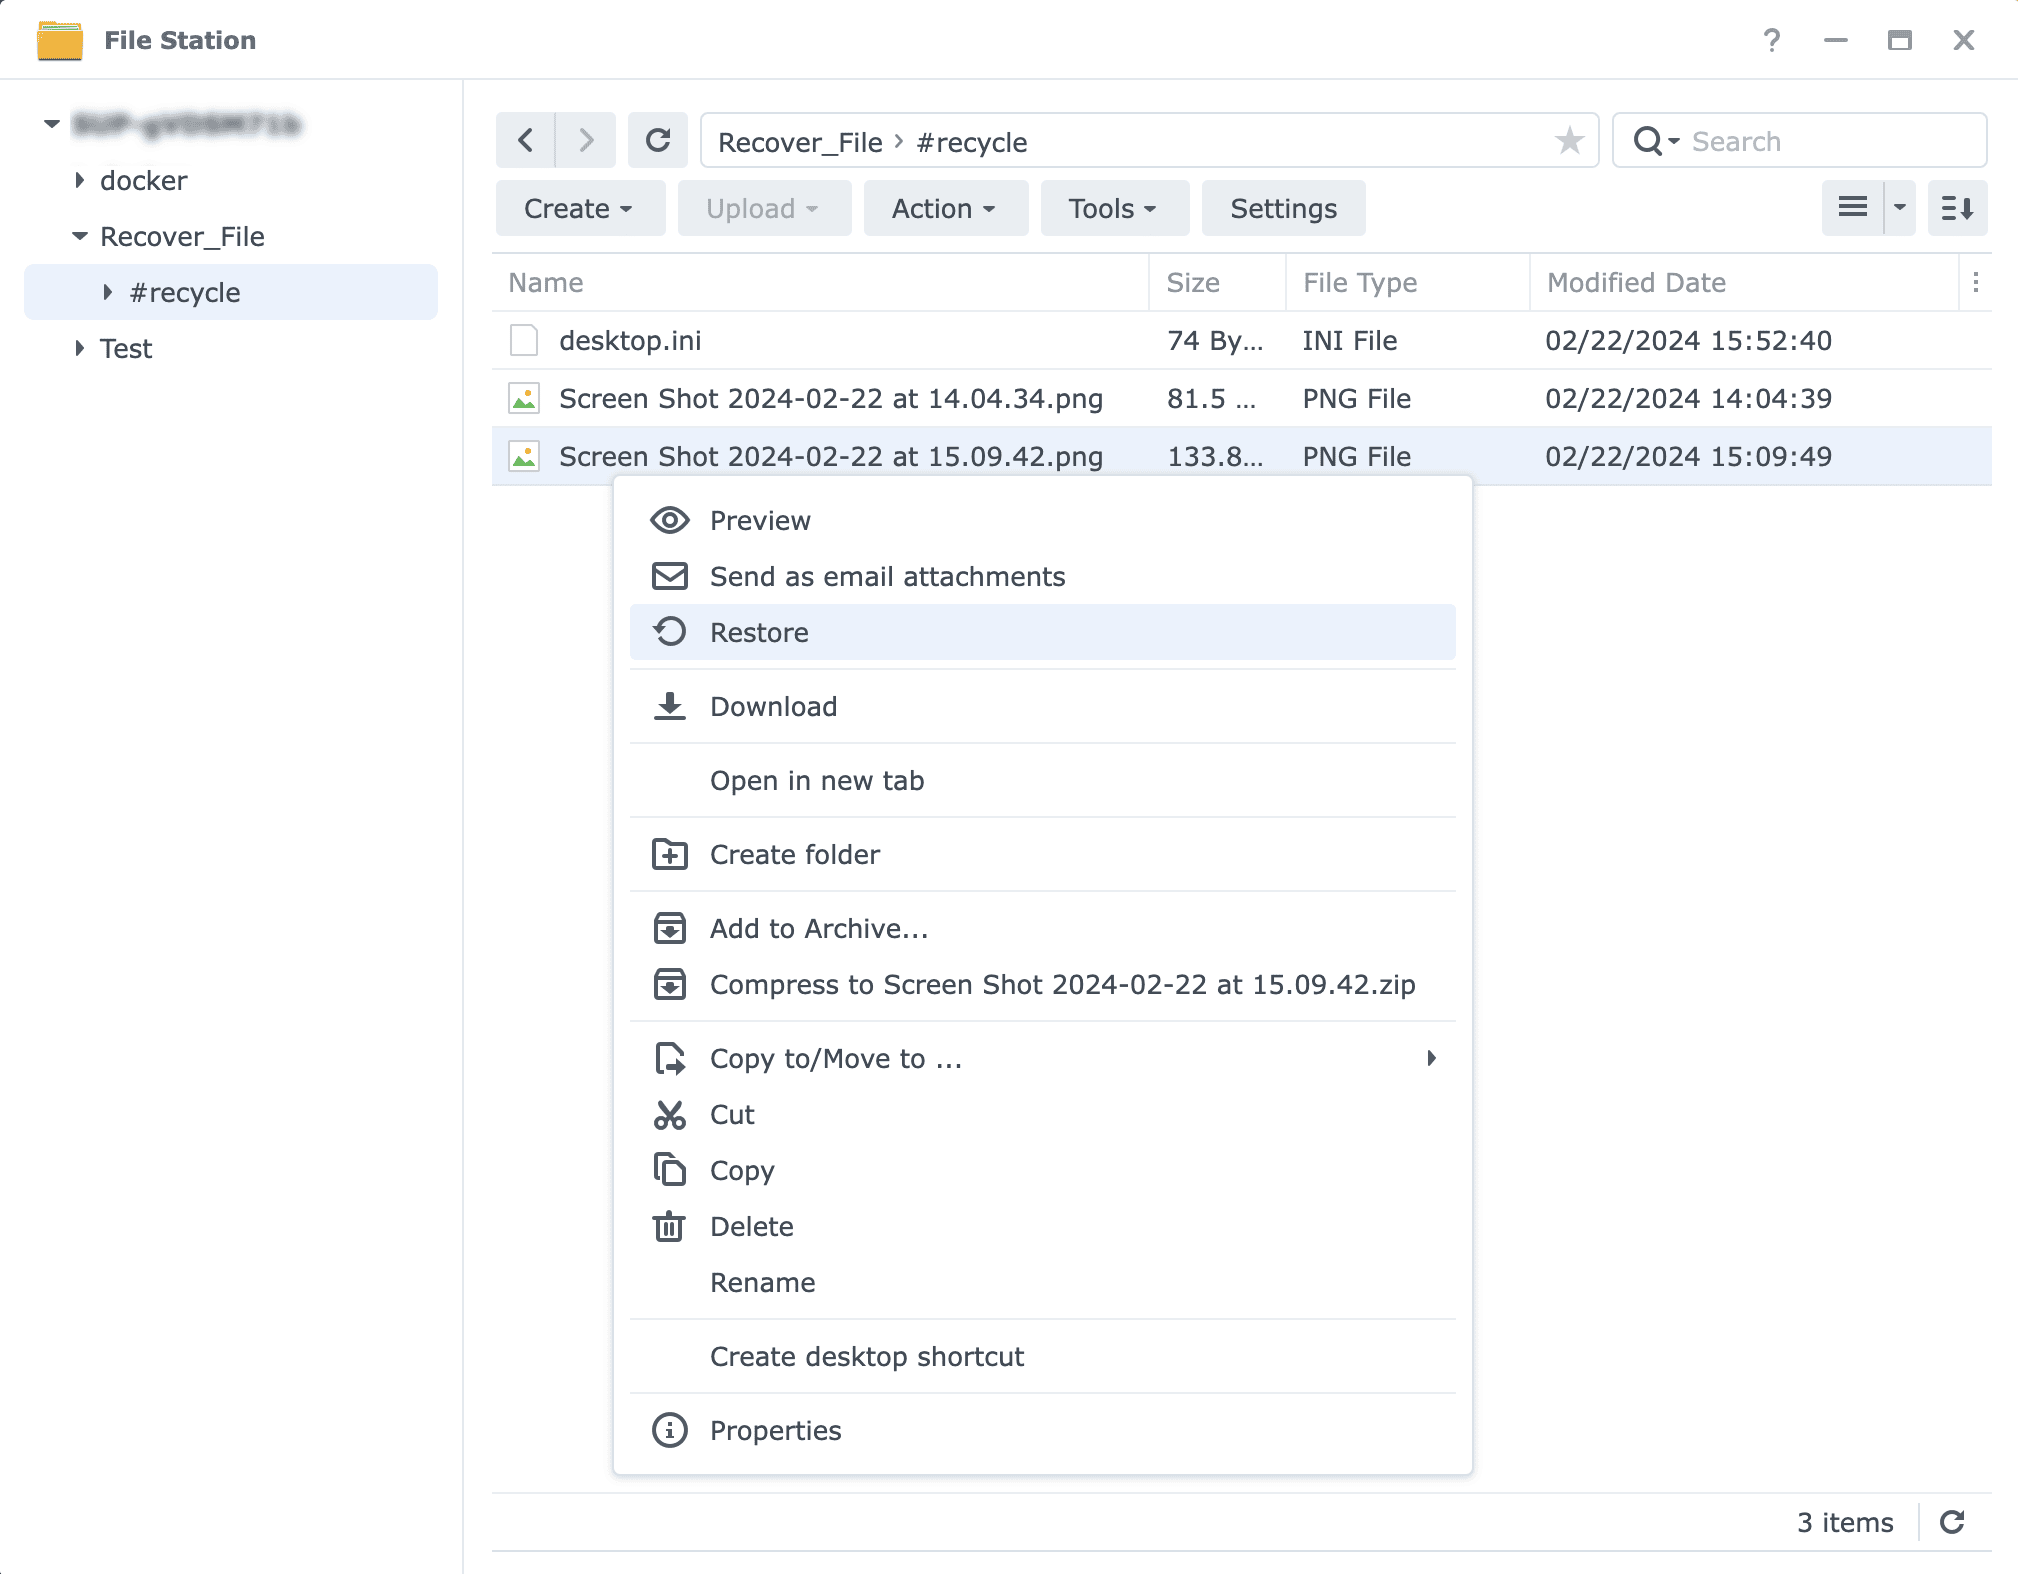
Fig 12: Properties of a deleted file in Recycle Bin - For older versions (7.0 and below), navigate to Copy to/Move to option and select Move to for moving the deleted file to the preferred destination folder.
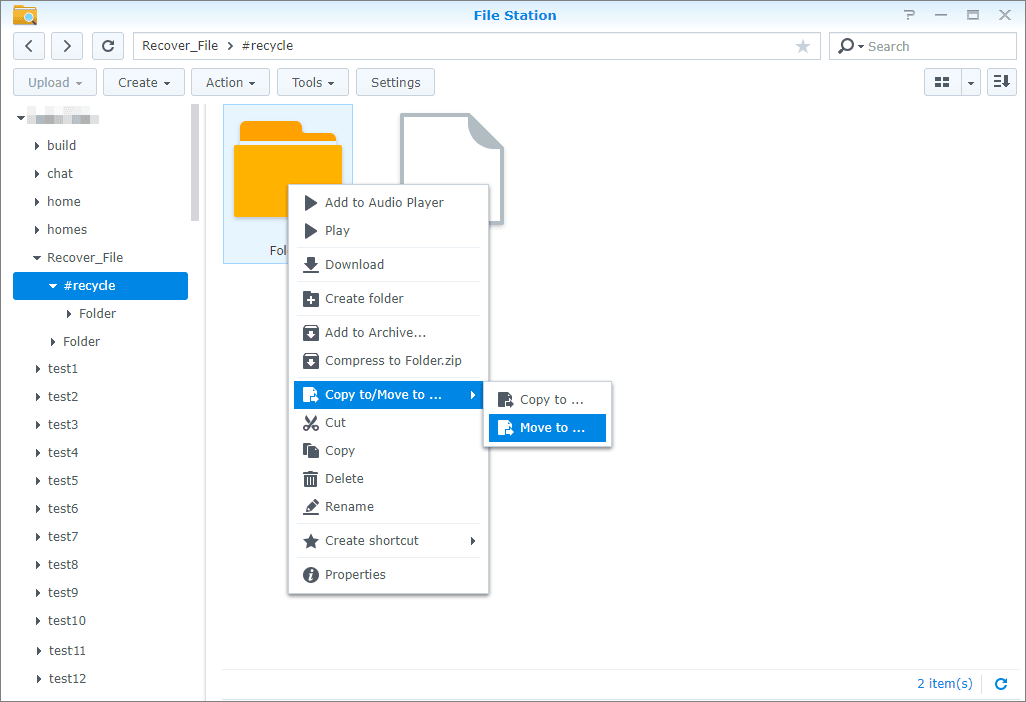
Fig 13: Restoring a deleted file
- For DSM versions above 7.1, select Restore to return the file to the original location from which it was deleted.
Common challenges faced using native auditing tools such as Log Center
- Log Center can only retain up to 2,000 entries of each log type. Once the limit is reached, old entries are overwritten unless archive settings are configured.
- The application is device-specific, hence, organizations will have no centralized view of deletion or other file events performed across multiple servers.
- Log Center lacks the filtering abilities to track specific event within each log type. File deletion events can be buried among other entries, making identification time-consuming and with high overhead.
2. Track who deleted in Synology NAS using ADAudit Plus
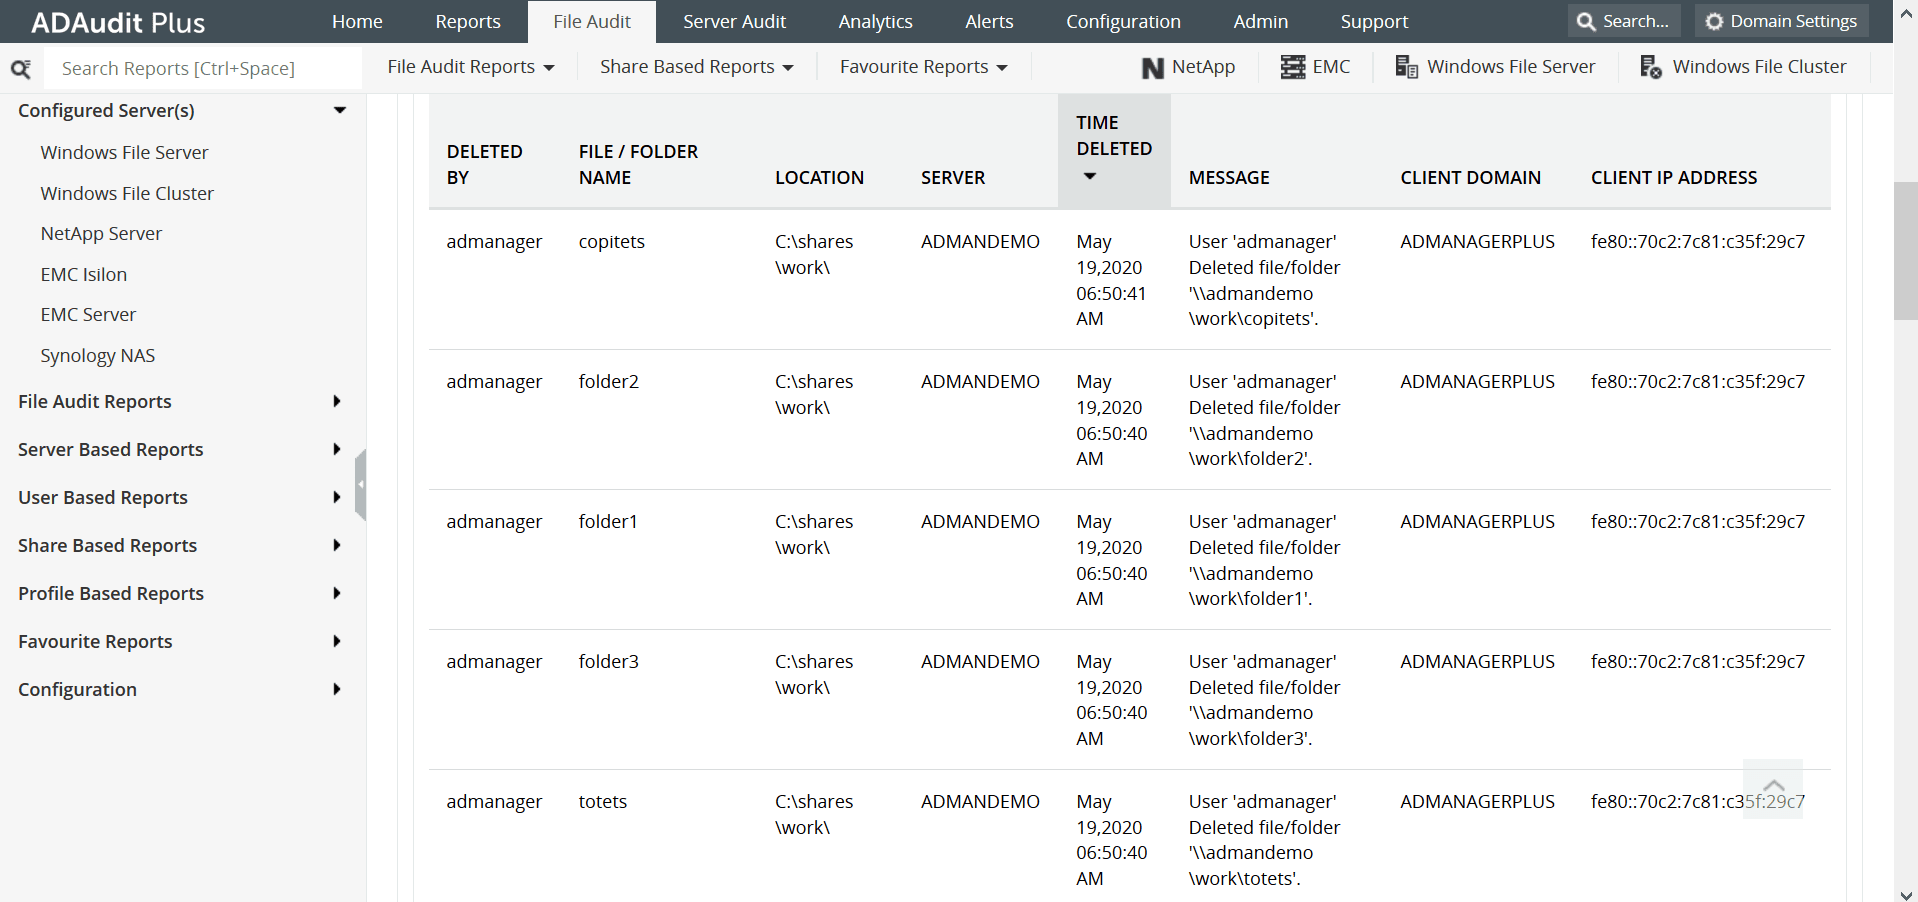
File auditing solutions like ADAudit Plus offers an effective and much simpler approach. ADAudit Plus offers reports categorized based on file actions such as Files Deleted, Files Created, Files Moved, etc. along with long-term archival and retention of events.
In addition to providing centralized log collection from multiple Synology NAS devices, it supports log collection for Windows File Servers, NetApp servers, and EMC Isilion as well.
To track who deleted a file with ADAudit Plus,
- Open ADAudit Plus. Navigate to File Audit > Server Based category
- Select Files Deleted report
- Select Advanced Search, apply the filter with "Server", "Is", and the name of Synology NAS server as value.
- The report provides information on:
- Name and location of the file/folder deleted or recovered.
- User who deleted/recovered the file and the domain they belong to
- The server from which the file/folder was deleted or recovered.
- Time of the deletion/recovery.

A one-stop solution for all your IT auditing, compliance, and security needs
ADAudit Plus provides capabilities like file change auditing, shared folder monitoring, compliance reporting, attack surface analysis, response automation, and more for diverse IT systems.
FAQ and Troubleshooting
Navigate to Log Center > View Logs> Select File Transfer> Identify entries with Event as DELETE. In the entry, you can derive details such as the name of the file deleted, the user who deleted the file, the time of deletion, etc.
If the Recycle Bin feature is enabled for a shared folder, a sub-folder named #recycle is created within it. Open the folder to browse, restore or permanently delete a the file/folder.
Enable the Recycle Bin feature for the shared folder. Navigate to the #recycle sub-folder of the shared folder, right click on the file/folder to be recovered and select Restore option (DSM 7.1 & above) or Move to option (DSM 7.0 & below).
Experience
ADAudit Plus for free
With ADAudit Plus, you can:
- Get full visibility into file changes
- Audit multi-vendor NAS file servers
- Detect anomalous file activities
- Generate file audit trails
- And much more