SNMP Agent Configuration
- Configuring SNMP agent in Windows 7,10 and Windows Server 2016, 2019
- Configuring SNMP agent in Windows XP/2000/2003
- Configuring SNMP agent in Windows NT
- Configuring SNMP Agent in Windows 2012
- Configuring the SNMP Agent in Linux versions prior to 8
- Configuring the SNMP Agent in Linux versions 8 and above
- Configuring the SNMP Agent in Solaris Systems
For details about installing SNMP agents, refer to Installing SNMP Agent section.
Configuring SNMP agent in Windows 7, 10 and Windows Server 2016, 2019
To configure SNMP agent, follow the steps given below:
- Run services.msc as administrator.
- In the Service details pane, scroll down and click SNMP Service.
- Right-click the SNMP Service and select Properties.
- Select Automatic as the Startup type. The service always runs, even after turning your computer off and on again.
- For monitoring purposes, select all of the services on the Agent tab to have all SNMP properties available.
- Click on the Security tab and select Send authentication trap if you want a trap message to be sent whenever authentication fails. Then adjust the security parameters like the community string and the IP/host filter list to your security compliance. To configure, follow the steps given below:
- Under Accepted community names, click Add.
- Under Community Rights, select a permission level for this host to process SNMP requests from the selected community.
- In Community Name, type a case-sensitive community name, and then click Add.
- Specify whether or not to accept SNMP packets from a host:
- To accept SNMP requests from any host on the network, regardless of identity, click Accept SNMP packets from any host.
- To limit acceptance of SNMP packets, click Accept SNMP packets from these hosts, click Add, type the appropriate host name and IP or IPX address, and then click Add again.
- Finally, click Apply and OK to apply and save the changes.
Configuring SNMP Agent in Windows XP, 2008 and 2003 Systems
For details about installing SNMP agents in Windows systems, refer to Installing SNMP Agent on Windows Systems.
To configure SNMP agent, follow the steps given below:
- Click Start, point to Settings, and then click Control Panel. Double-click Administrative Tools and then double-click Computer Management.
- In the console tree, click Services and Applications and then click Services.
- In the details pane, scroll down and click SNMP Service.
- On the Action menu, click Properties.
- On the Security tab, select Send authentication trap if you want a trap message to be sent whenever authentication fails.
- Under Accepted community names, click Add.
- Under Community Rights, select a permission level for this host to process SNMP requests from the selected community.
- In Community Name, type a case-sensitive community name, and then click Add.
- Specify whether or not to accept SNMP packets from a host:
- To accept SNMP requests from any host on the network, regardless of identity, click Accept SNMP packets from any host.
- To limit acceptance of SNMP packets, click Accept SNMP packets from these hosts, click Add, type the appropriate host name and IP or IPX address, and then click Add again.
- Click Apply to apply the changes.
Configuring SNMP Agent in Windows NT Systems
For details about installing SNMP agents in Windows systems, refer to Installing SNMP Agent on Windows Systems. To configure SNMP agent in Windows NT systems, follow the steps given below:
Click Start, point to Settings, and then click Control Panel. Double-click Administrative Tools, and then double-click Services.
In the details pane, click SNMP Service and then click Properties.
Click the Security tab.
If you want to send a trap for failed authentications, select the Send Authentication Trap check box.
Under Accepted Community Names, click Add.
In the Community Names box, type a community name from which you will accept requests.
To move the name to the Accepted Community Names list, click Add.
Repeat step 7 for any additional community name.
To specify whether to accept SNMP packets from any host or from only specified hosts, click one of two options:
- Accept SNMP Packets From Any Host, if no SNMP packets are to be rejected on the basis of source computer ID.
- Only Accept SNMP Packets From These Hosts, if SNMP packets are to be accepted only from the computers listed. To designate specific hosts, click Add, type the names or addresses of the hosts from which you will accept requests in the IP Host or IPX Address box, and then click Add to move the name to the Only Accept SNMP Packets From These Hosts list.
- Repeat step 9 for any additional hosts.
- On the Agent tab, specify the appropriate information (such as comments about the user, location, and services).
- Click OK to apply the changes.
Configuring SNMP Agent in Windows 2012
- Log into your dedicated server using Remote Desktop.
- Click on Windows Key > Administrative Tools > Server Manager.
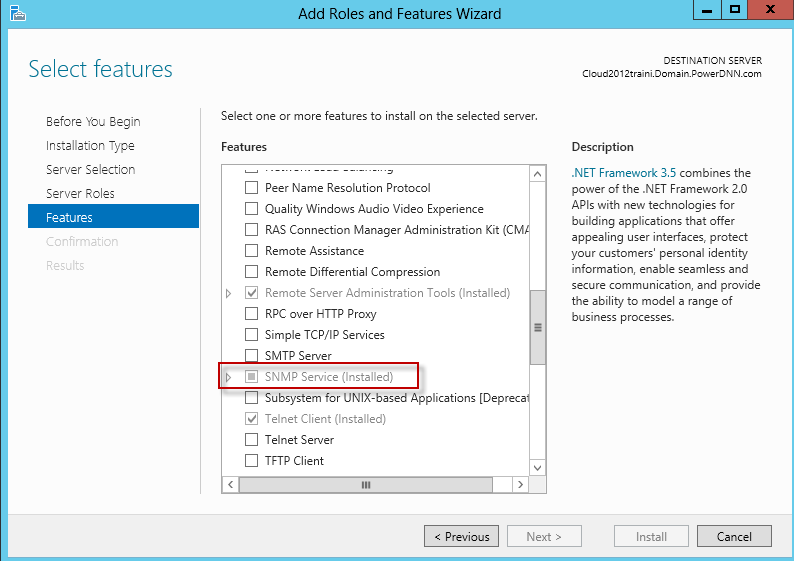
- Click Manage > Add Roles and Features.
- Click Next > Next > Next > Next. Verify SNMP Services are installed. Click Cancel.
Click on Windows Key > Administrative Tools > Services.
- Right click on SNMP Service and click on Properties.
- Click on the Security tab.
- Type your randomized 8 - 10 character connection string. Be sure to make it Read-Only, not Read Write.
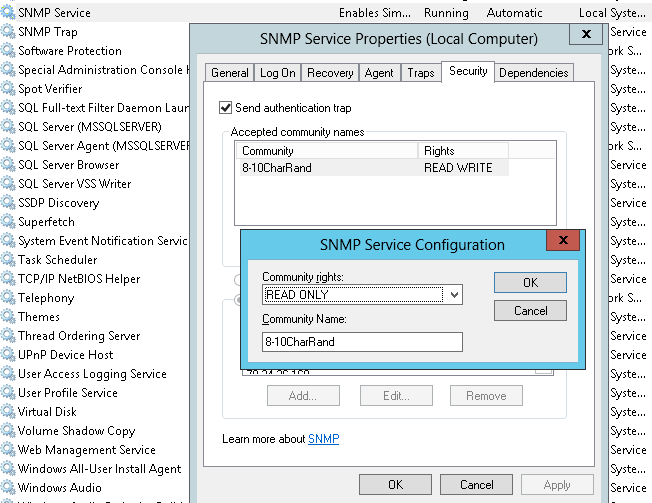
- Click on Add.
Configuring the SNMP Agent in Linux versions prior to 8
For details about installing SNMP agents in Linux systems, refer to Installing SNMP Agent on Linux Systems
Stop the agent if it is running already, using the command:
/etc/rc.d/init.d/snmpd stopMake the following changes in /etc/rc.d/init.d/snmpd file
- Replace the line
daemon /usr/sbin/snmpd $OPTIONS
with
daemon /root/ucd_agent/sbin/snmpd $OPTIONS - Replace the line
killproc /usr/sbin/snmpd
with
killproc /root/ucd_agent/sbin/snmpd
This is to choose the current installed version while starting and stopping the SNMP agent.
- Start the agent using the command /etc/rc.d/init.d/snmpd start.
Configuring the SNMP Agent in Linux versions 8 and above
On Linux versions 8 and above, the latest version of SNMP will already be available. You need to just make the following changes in snmpd.conf file:
Insert the lineview allview included .1.3.6
next to the line
# name incl/excl subtree mask(optional)Change the line
access notConfigGroup "" any noauth exact systemview none none
next to the line
# group context sec.modelsec.level prefix read write notif
as
access notConfigGroup "" any noauth exact allview none noneThen restart the snmp agent using the following command:
/etc/rc.d/init.d/snmpd restart
Configuring the SNMP Agent in Solaris Systems
For details about installing SNMP agents in Solaris systems, refer to Installing SNMP Agent on Solaris Systems.
Stop the agent if it is running already using the following command:
/etc/init.d/init.snmpdx stopMake the following changes in /etc/init.d/init.snmpdx file
- Replace the lines
if [ -f /etc/snmp/conf/snmpdx.rsrc -a -x /usr/lib/snmp/snmpdx ]; then
/usr/lib/snmp/snmpdx -y -c /etc/snmp/conf -d 3 -f 0
fi
with
<Installation Directory>/sbin/snmpd - Replace the line
/usr/bin/pkill -9 -x -u 0 '(snmpdx|snmpv2d|mibiisa)'
with
/usr/bin/pkill -9 -x -u 0 '(snmpd)'
- Restart the agent using the following command:
/etc/init.d/init.snmpdx start.
