SNMP Agent Installation
(Adapted from Windows help)
- Installing SNMP Agent on Windows 7 and above
- Installing SNMP Agent on Windows Server 2016 and above
- Installing SNMP Agent in Windows Server 2012
- Installing SNMP Agent on Windows Server 2008
- Installing SNMP Agent on Windows XP/2000/2003
- Installing SNMP Agent on Windows NT
- Installing SNMP Agent on Linux
- Installing SNMP Agent on Solaris
You need to know the following information before you install the Simple Network Management Protocol (SNMP) service on your computer:
- Community names in your network.
- Trap destinations for each community.
- IP addresses and computer names for SNMP management hosts.
Note: For Windows systems, you must be logged in as an administrator or as a member of the Administrators group to complete this procedure. If your computer is connected to a network, network policy settings may also prevent you from completing this procedure.
Installing SNMP Agent on Windows 7 and above
To install SNMP on Windows 7 and above, follow the steps given below:
- Click Start, go to the Control Panel and double-click Programs and Features. Alternatively you can also run appwiz.cpl @,2 command from the start menu.
- Click Turn Windows features on or off in the left-hand side of the page.
- Select the Simple Network Management Protocol (SNMP) check box, and click OK.
- Click Next.
- Insert the respective CD or specify the complete path of the location at which the files are stored.
- SNMP starts automatically after installation.
This completes the installation process. To configure SNMP agents respond to SNMP requests, refer to Configuring SNMP agents.
Installing SNMP Agent on Windows Server 2016 and above
To install SNMP on Windows Server 2016 and above, follow the steps given below:
- Click Start, go to the Control Panel, double-click Programs and Features. Alternatively you can also run appwiz.cpl @,2 command from the start menu.
- Click Turn Windows features on or off in the left-hand side of the page.
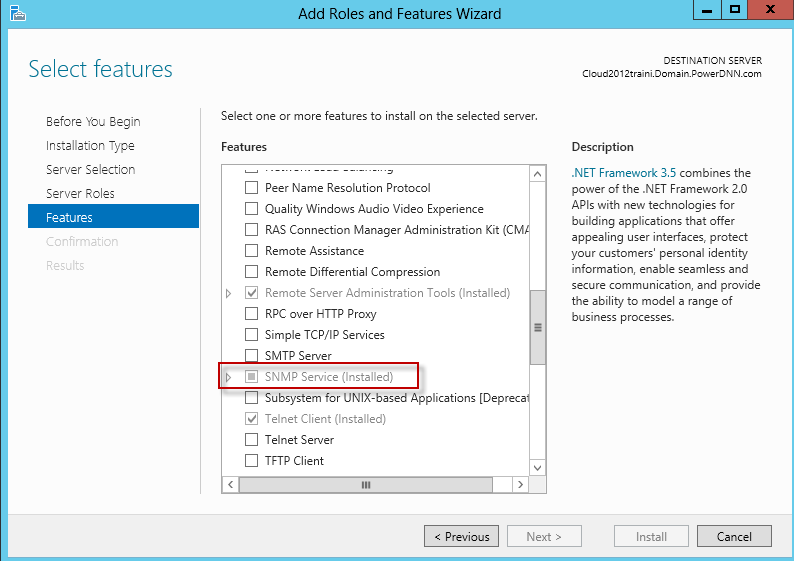
- In the Server Manager, click Add Roles and Features.
- Click Next in the Add Roles and Features Wizard until you reach the Features section.
- Now enable the SNMP Service checkbox, click Next and proceed to install the SNMP Service.
- SNMP starts automatically after installation.
This completes the installation process. To configure SNMP agents respond to SNMP requests, refer to Configuring SNMP agents.
Configuring SNMP Agent in Windows 2012
- Log into your dedicated server using Remote Desktop.
- Click on Windows Key > Administrative Tools > Server Manager.
- Click Manage > Add Roles and Features.
- Click Next > Next > Next > Next. Verify SNMP Services are installed. Click Cancel.
- Click on Windows Key > Administrative Tools > Services.
- Right click on SNMP Service and click on Properties.
- Click on the Security tab.
- Type your randomized 8 - 10 character connection string. Be sure to make it Read-Only, not Read Write.
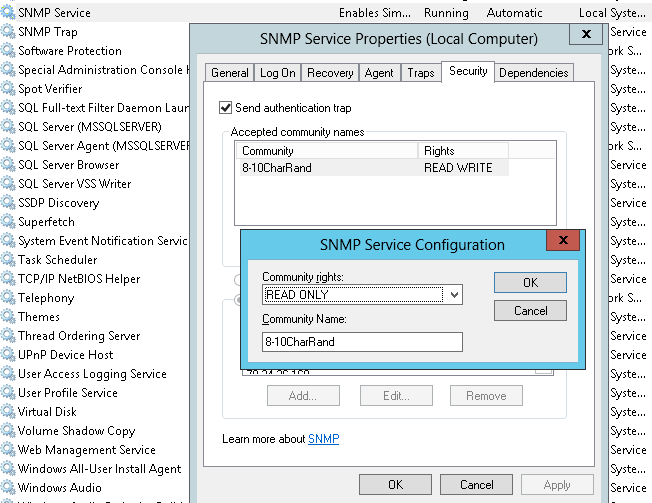
- Click on Add.
Installing SNMP Agent on Windows Server 2008
To install SNMP on Windows Server 2008, follow the steps given below:
- Click Start and go to the Control Panel, double-click Programs and Features. Alternatively you can also run appwiz.cpl @,2 in the start menu
- Click Turn Windows features on or off in the left-hand side of the page.
- Select the Simple Network Management Protocol check box, and click OK.
- Click Next.
- In Server Manager click Add Features
- In Add Features Wizard, check the SNMP Services option checkbox and Install.
This completes the installation process. To configure SNMP agents respond to SNMP requests, refer to Configuring SNMP agents.
Installing SNMP Agent on Windows XP, 2000 and 2003
To install SNMP on Windows XP, 2000 and 2003, follow the steps given below:
- Click Start, point to Settings, click Control Panel, double-click Add or Remove Programs, and then click Add/Remove Windows Components.
- In Components, click Management and Monitoring Tools (but do not select or clear its check box), and then click Details.
- Select the Simple Network Management Protocol check box, and click OK.
- Click Next.
- Insert the respective CD or specify the complete path of the location at which the files are stored.
- SNMP starts automatically after installation.
This completes the installation process. To configure SNMP agents respond to SNMP requests, refer to Configuring SNMP agents.
Installing SNMP Agent on Windows NT
To install SNMP in Windows NT, follow the steps given below:
- Right-click the Network Neighborhood icon on the Desktop.
- Click Properties.
- Click Services.
- Click Add. The Select Network Service dialog box appears.
- In the Network Service list, click SNMP Service, and then click OK.
- Insert the respective CD or specify the complete path of the location at which the files are stored and click Continue.
- After the necessary files are copied to your computer, the Microsoft SNMP Properties dialog box appears.
This completes the installation process. To configure SNMP agents respond to SNMP requests, refer to Configuring SNMP agents.
Installing SNMP Agent on Linux systems
The installation of new version of SNMP is required only for versions prior to 8. Download the latest rpm version of SNMP using the following URL: https://centos.pkgs.org/7/centos-x86_64/net-snmp-5.7.2-49.el7.x86_64.rpm.html Also, you can download the zip version of SNMP using the following URL: https://sourceforge.net/projects/net-snmp/files/net-snmp/
To install using the rpm file, follow the steps given below:
- Login as "root" user.
- Before installing the new version of net-snmp, you need to remove the earlier versions of net-snmp in your machine. To list the versions of net-snmp installed in your machine, execute the following command:
rpm -qa | grep "net-snmp" - If there are already installed version in your machine, remove them using the following command:
rpm -e <version of net-snmp listed as the output for previous command> --nodeps - If there are no previously installed versions in your machine, then execute the following command to install the new version:
rpm -i <new downloaded version of SNMP agent> --nodeps
To install using the zip file, follow the steps given below:
- Extract the file using following command:
tar -zxvf <SNMP_zip_filename>.zip
- Login as root user.
- Execute the command to set the path of the C compiler:
export PATH=<gcc_path>:$PATH
- Execute the following four commands from the directory where you have extracted the SNMP zip file:
- ./configure --prefix=<directory_name> --with-mib-modules="host"
- make
- umask 022
- make install
where, directory_name is the directory to install SNMP agent. Preferably choose a directory under /root. The directories /usr and /local might contain the files of an older version of SNMP and so do not choose these directories to ensure proper installation.
This completes the installation process. To configure SNMP agents respond to SNMP requests, refer to Configuring SNMP agents.
Installing SNMP Agent on Solaris Systems
Download the latest version of SNMP using the following URL: https://sourceforge.net/projects/net-snmp/files/OldFiles/ucd-snmp/
To install SNMP, follow the steps given below:
- Extract the file using following command: tar -zxvf <SNMP_downloaded_file>
- Login as root user.
- Execute the command to set the path of the C compiler:
export PATH=<gcc path>:$PATH - Execute the following four commands from the directory where you have extracted the ucd-snmp:
- ./configure --prefix=<directory_name> --with-mib-modules="host"
- make
- umask 022
- make install
where, directory_name is the directory to install SNMP agent. Preferably choose a directory under /root. The directories /usr and /local might contain the files of an older version of SNMP and so do not choose these directories to ensure proper installation.
The package would be installed. The package is configured with the compile option of " ./configure --with-mib-modules=host ". The agent would have support for host-resource-mib.
- Download the netsnmp-5.1.1 package from the following URL: ftp://ftp.sunfreeware.com/pub/freeware/sparc/8/netsnmp-5.1.1-sol8-sparc-local.gz
This package is for Solaris 8 on sparc. - Unzip the downloaded package using the command: gunzip netsnmp-5.1.1-sol8-sparc-local.gz
- Add the downloaded package using the command: pkgadd -d netsnmp-5.1.1-sol8-sparc-local
- To start netsnmp agent, execute the command: /usr/local/sbin/snmpd
- To stop this daemon, execute the command: pkill -9 -x -u 0 snmpd
This completes the installation process. For configuring SNMP agents to respond to SNMP requests, refer to Configuring SNMP agents.
