Migration Process
Step-by-step guidance on how to migrate to ManageEngine Endpoint Central — including architecture, pre-migration checklist, step-by-step tool execution, agent migration, post-migration verification, and FAQs.
Migration Architecture & Workflow
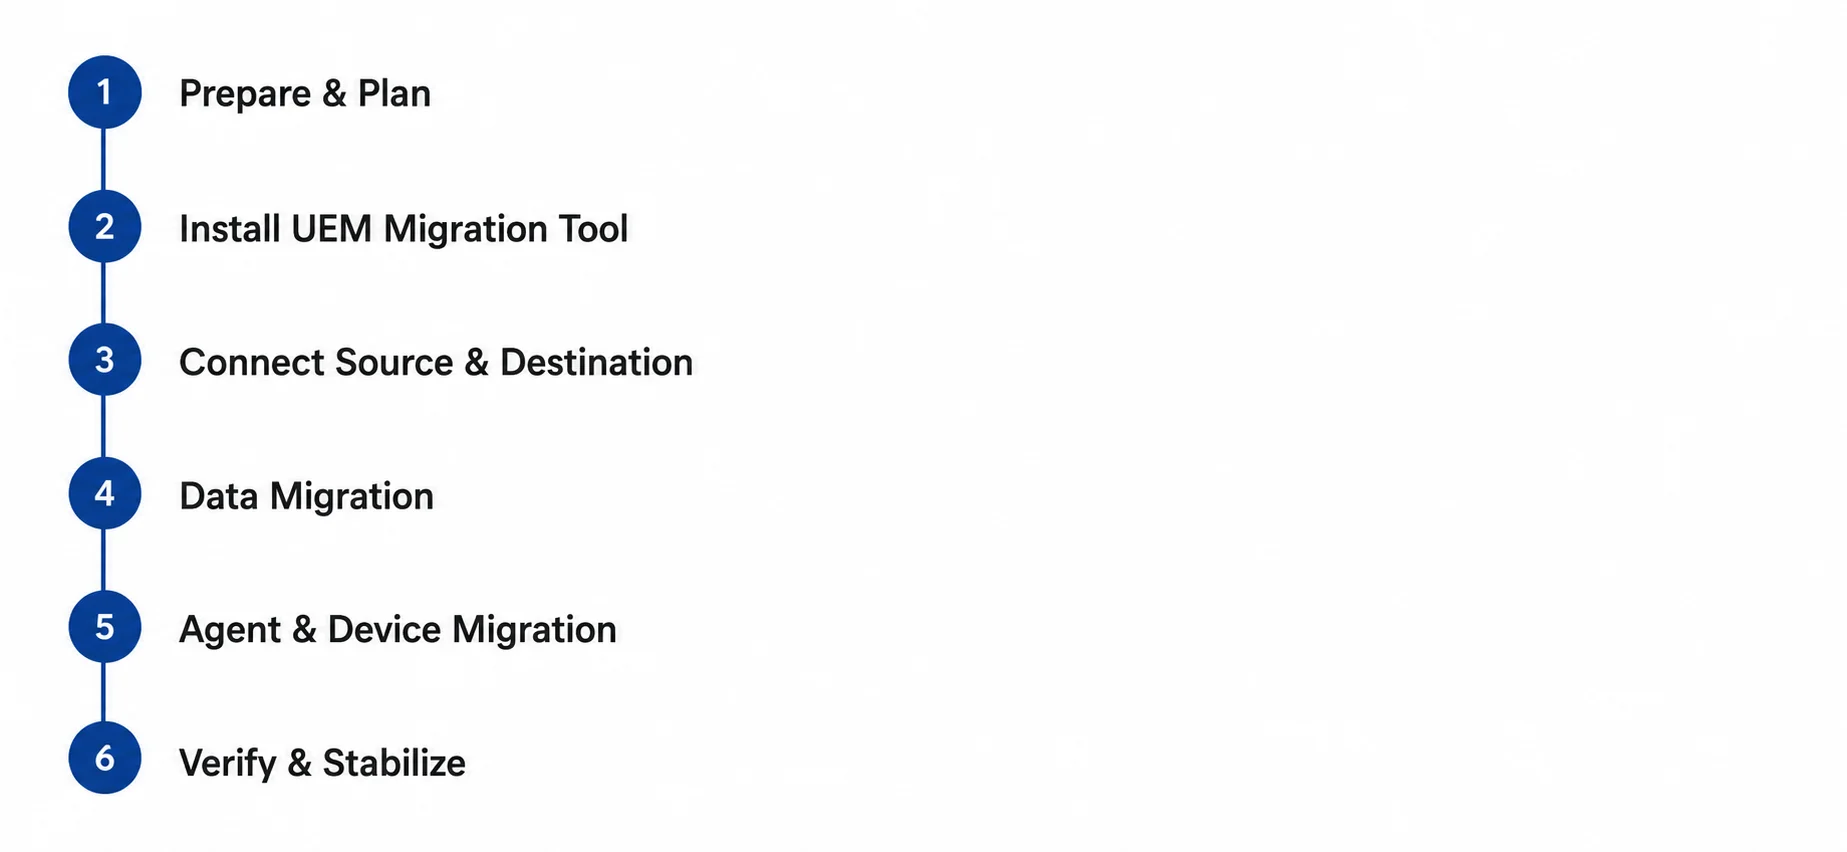
The migration process runs through three phases with distinct checkpoints at each stage. The following workflow covers the complete end-to-end journey from preparation to a verified, stable destination in Endpoint Central.
UEM Migration Tool — Key Capabilities
The UEM Migration Tool is ManageEngine's dedicated utility for automating UEM product transitions. It is available as a free download and provides a web console-based interface for managing the entire migration lifecycle.
- Free download — No additional licensing or subscription fees.
- 64-bit Windows executable — Runs on Windows Server or Windows desktop machine.
- Web console interface — Browser-based management dashboard for migration operations.
- Multi-module selection — Choose exactly which of the 11 migration modules to migrate. Modules not selected initially can be added later using Add New.
- Module-level retry — Retry failed modules individually without rerunning the full migration.
- Proxy support — Configure server connection type for restricted network environments (Settings → Proxy).
- NAT settings — Configure NAT rules for Apple device management scenarios (Settings → NAT).
- API key authentication — Secure API authentication for on-premises sources (Admin → API Explorer → API Key).
- Zoho OAuth — Sign in securely via Zoho accounts with consent-based authorization for cloud instances.
Pre-Migration Checklist & Network Port Requirements
Completing each item in this checklist before running the UEM Migration Tool ensures a smooth, uninterrupted transition. This preparation phase is the foundation for a successful migration.
a. General Prerequisites
- Both source and destination server licenses must be active before starting migration.
- Both the source and destination servers must be reachable from the machine running the migration tool.
- For on-premises source or destination servers, the server URL entered in the migration tool must be in FQDN format — IP addresses are not accepted.
- For on-premises servers, verify that the NAT settings configured on both the source and destination servers match the domain in each server's SSL certificate.
Prerequisites for Data Migration
1. Source server must be upgraded to the latest build before starting.
2. Agent Protection Settings disabled on source (required for agent migration).
1. APNs certificate must be configured on destination, required for iOS device management.
2. Knox enrollment must be configured on destination, required for Android device management.
3. Create the credentials in Credential Manager on the destination server exactly as they exist on the source server, ensuring there are no case sensitivity errors, spaces, or extra characters (only if credentials are used in configurations).
4. Add and integrate Active Directory in the MDM module on the destination server before initiating migration.
Prerequisites for Agent Migration
1. Agent Protection Settings disabled on source (required for agent migration).
Prerequisites for Device Migration
1. APNs certificate must be configured on destination, required for iOS device management.
2. Knox enrollment must be configured on destination, required for Android device management.
b. Network & Connections
Outbound
- For on-premises source or destination servers, allow outbound access from the machine running the migration tool to the source or destination server's domain and port. This step is not required if the source server and the migration tool are on the same network.
- For cloud source or destination products, allow outbound access to
*.manageengine.comand*.zoho.comon port 443 from the machine running the migration tool. The exact domains may vary based on your data center region — refer to the regional whitelisting table above.
Inbound (iOS Devices)
If you are migrating iOS devices, enrollment can be completed using either of the following methods:
- Using the ManageEngine MDM App — no additional port configuration required.
- Using Webclip — ensure port 7383 is open for inbound connections on the source server before distributing the iOS migration profile.
Required Domains Whitelisting
If you need specific domains to be whitelisted, allow the following:
| Domain URL | Purpose |
|---|---|
| https://patchdb.manageengine.com | Patch database updates sync |
| https://mdm.manageengine.com | Mobile Device Management profiles & settings |
| https://mdmdatabase.manageengine.com | MDM database sync |
| https://www.zoho.com | Zoho authentication APIs |
| https://manageengine.com | ManageEngine portal resources |
| https://creator.zoho.com | Zoho Creator integration services |
Regional Data Center Whitelisting
Based on your data center location, whitelist the following regional domains:
| Data Center | MDM Domain | Endpoint Central Domain | Download Domain | Accounts Domain | Upload Domain |
|---|---|---|---|---|---|
| US (.com) | mdm.manageengine.com | endpointcentral.manageengine.com | download-accl.zoho.com | accounts.zoho.com | upload-accl.zoho.com |
| EU (.eu) | mdm.manageengine.eu | endpointcentral.manageengine.eu | download-accl.zoho.eu | accounts.zoho.eu | upload-accl.zoho.eu |
| IN (.in) | mdm.manageengine.in | endpointcentral.manageengine.in | download-accl.zoho.in | accounts.zoho.in | upload-accl.zoho.in |
| AU (.com.au) | mdm.manageengine.com.au | endpointcentral.manageengine.com.au | download.zoho.com.au | accounts.zoho.com.au | upload-accl.zoho.com.au |
| JP (.jp) | mdm.manageengine.jp | endpointcentral.manageengine.jp | download.zoho.jp | accounts.zoho.jp | upload-accl.zoho.jp |
| CN (.com.cn) | mdm.manageengine.cn | endpointcentral.manageengine.cn | download.zoho.com.cn | accounts.zoho.com.cn | upload-accl.zoho.com.cn |
| CA (.ca) | mdm.manageengine.ca | endpointcentral.manageengine.ca | download.zohocloud.ca | accounts.zohocloud.ca | upload-accl.zohocloud.ca |
| UK (.co.uk) | mdm.manageengine.co.uk | endpointcentral.manageengine.co.uk | download-accl.zoho.co.uk | accounts.zoho.co.uk | upload-accl.zoho.co.uk |
| SA (.sa) | mdm.manageengine.sa | endpointcentral.manageengine.sa | files.zoho.sa | accounts.zoho.sa | upload-accl.zoho.sa |
| AE (.ae) | mdm.manageengine.ae | endpointcentral.manageengine.ae | files.zoho.ae | accounts.zoho.ae | upload-accl.zoho.ae |
Step-by-Step Migration Execution
The migration execution is divided into two sequential phases: Data Migration (configurations, policies, settings) followed by Agent/Device Migration (deploying new agents to endpoints per OS).
1. Setup and Prerequisites
Download the UEM Migration Tool on the machine running the central server.
Install the downloaded EXE file and set up credentials to access the migration tool. Once you sign in, you will be able to view the migration tool console.
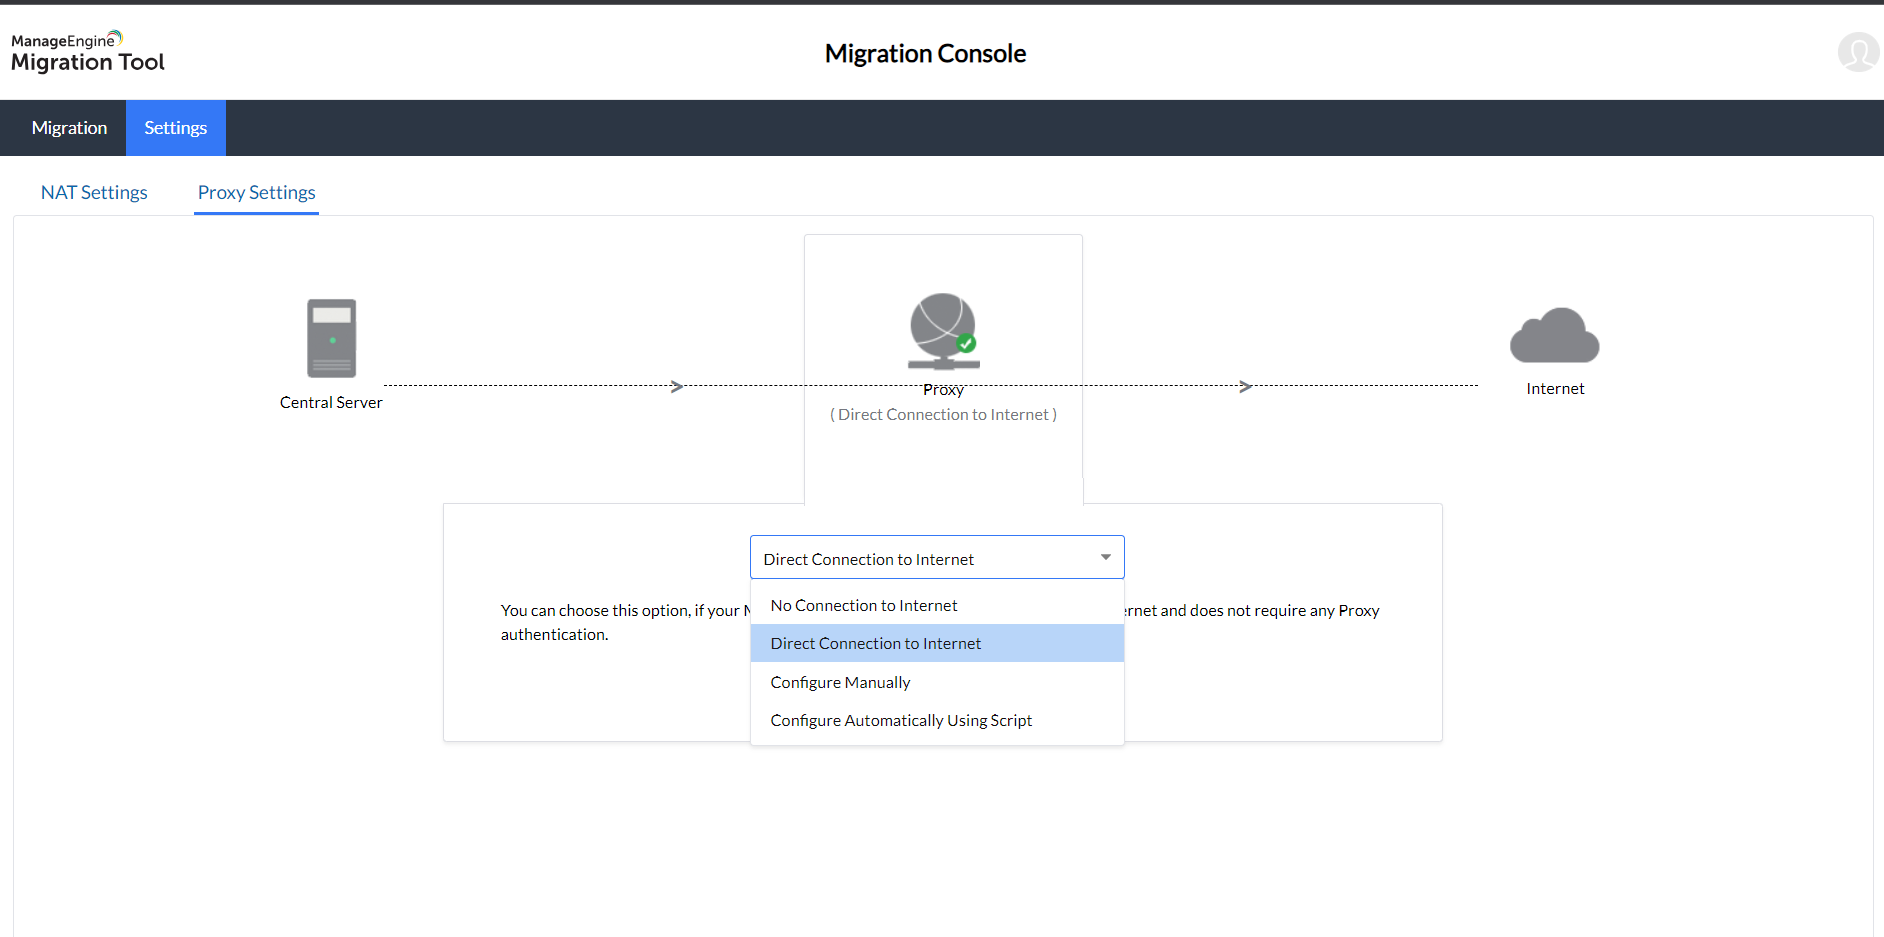
Configure Proxy Settings. Supported options:
- No Connection to Internet
- Direct Connection to Internet
- HTTP Proxy configuration
- Automatic configuration using script
To set up proxy settings, click Settings → Proxy → Choose the connection type from the dropdown → Save.
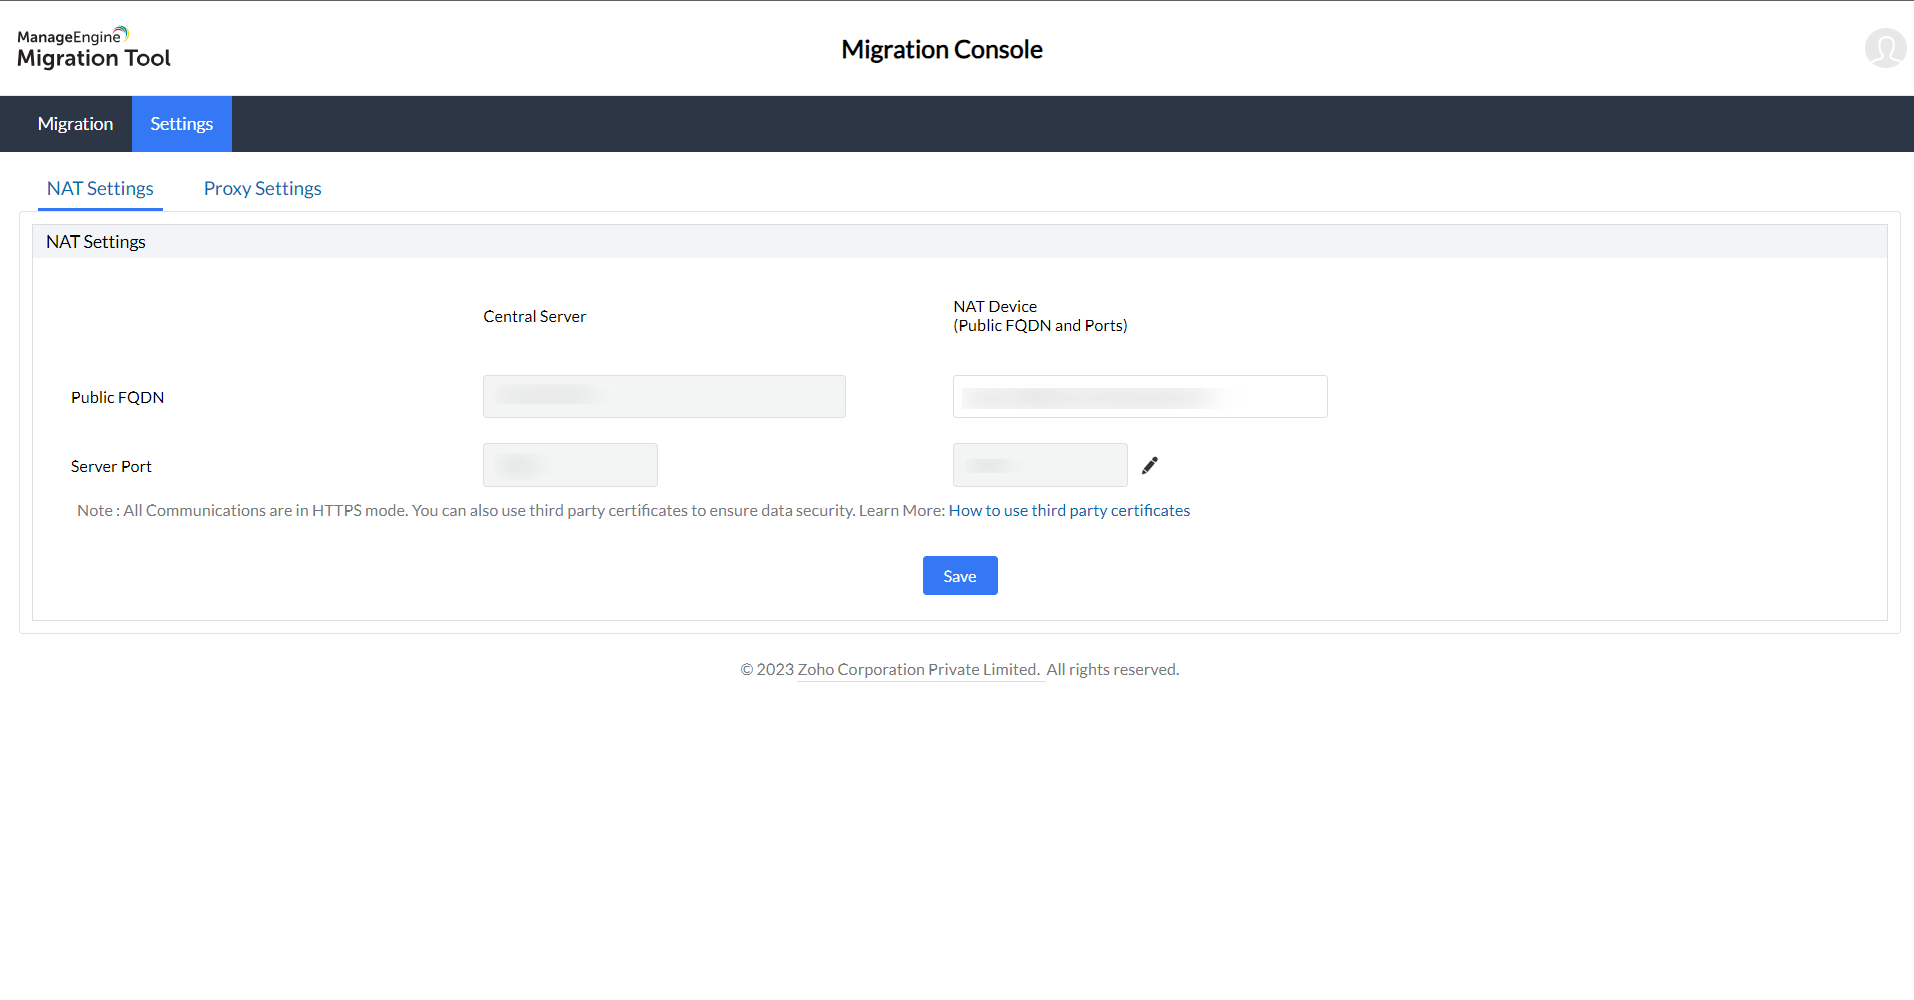
For Apple devices, configure NAT settings by clicking Settings → NAT and adding the required IP address or FQDN, then click Save.
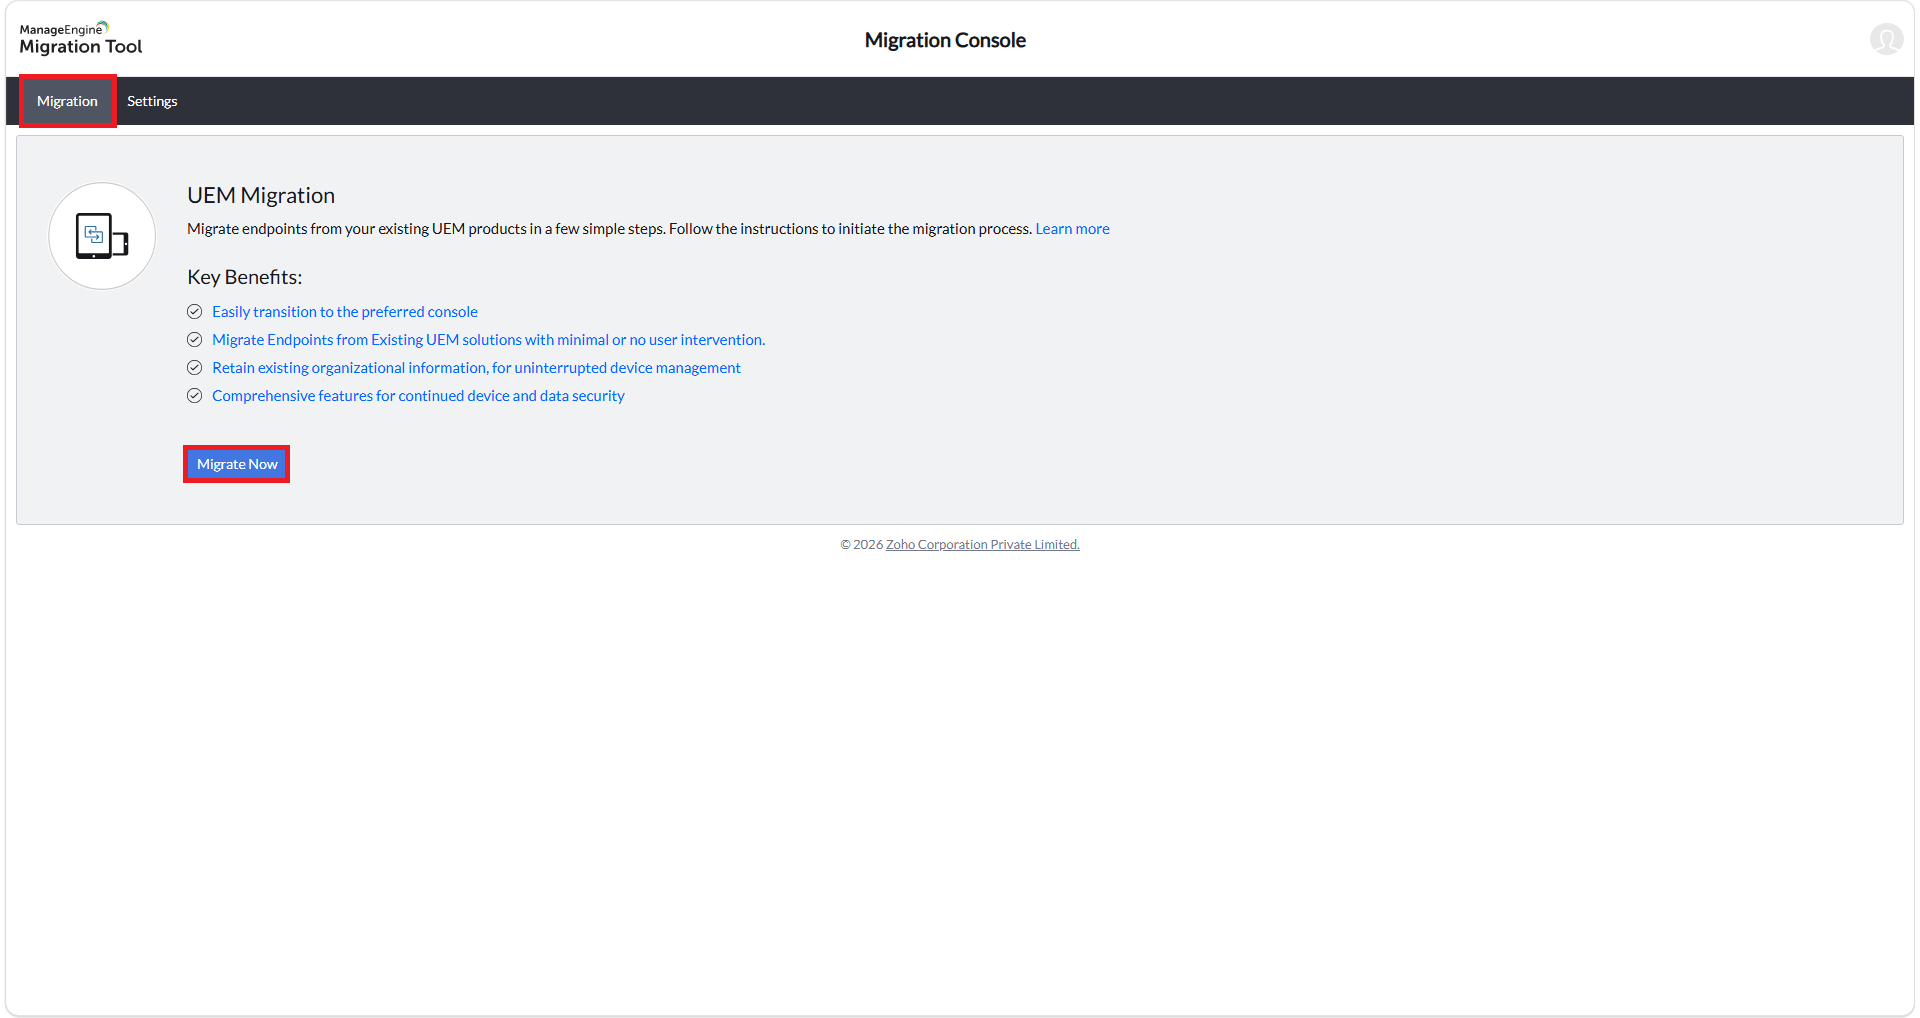
Navigate to the Migration tab and click Migrate Now to proceed.
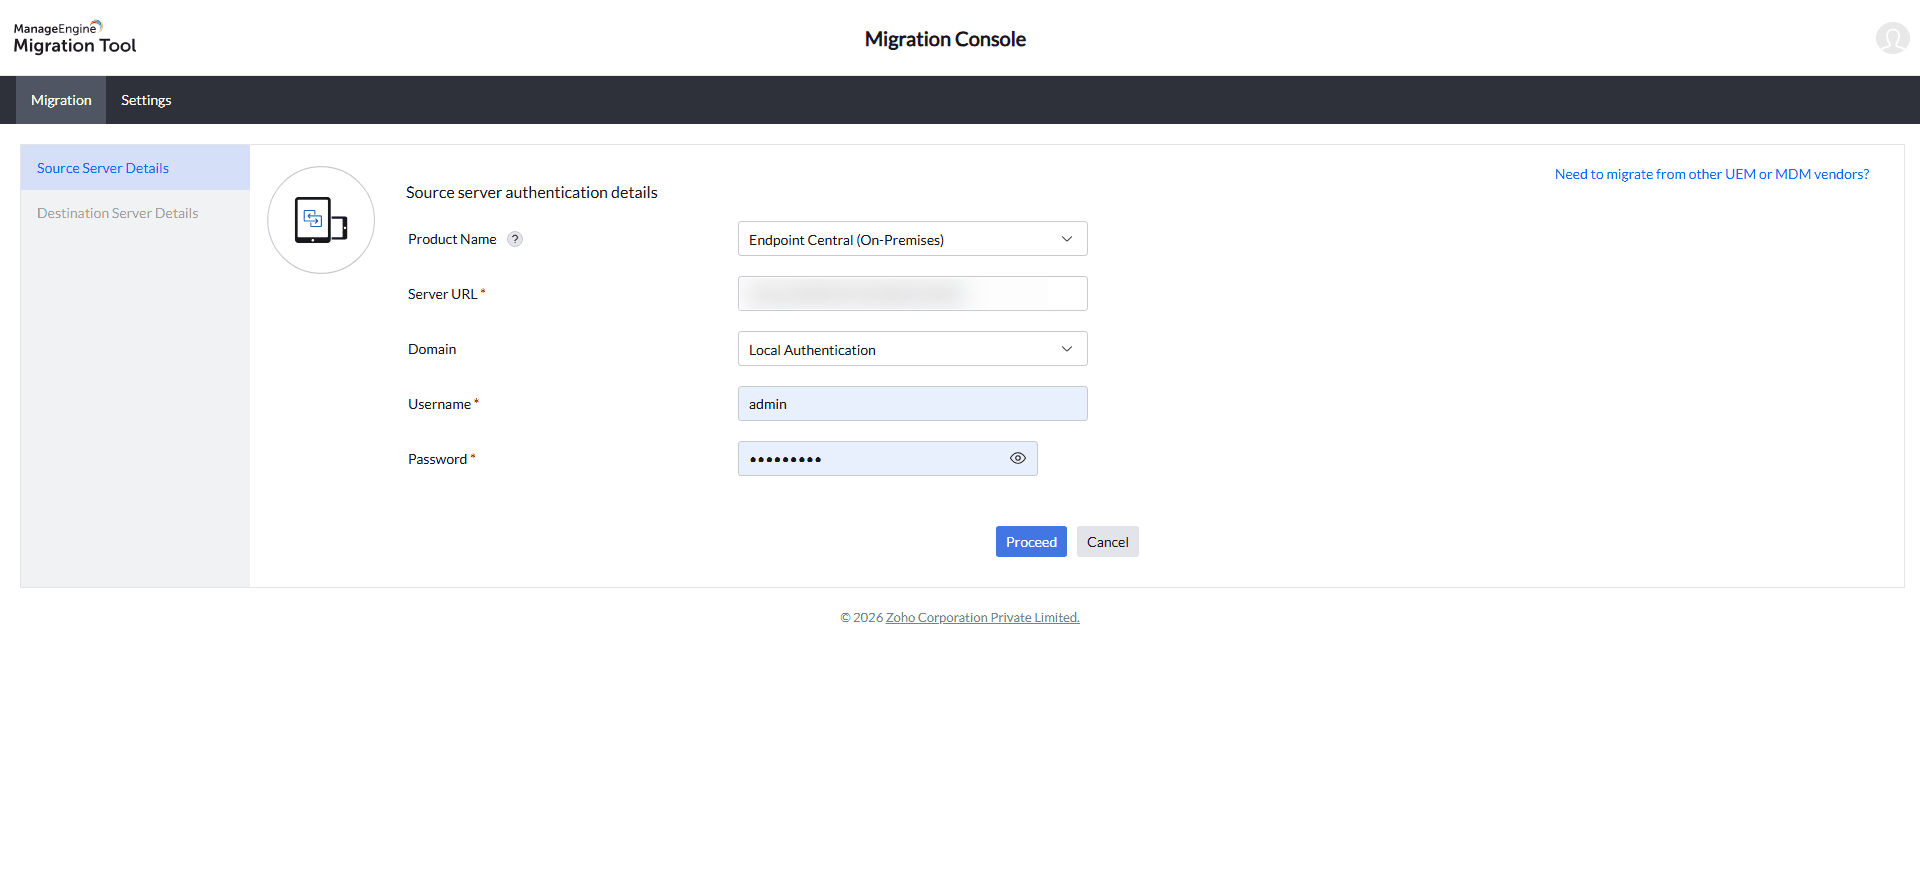
2. Source Authentication (On-Premises as Example)
1. If you are migrating from a cloud product, select the product name and proceed to the cloud authentication steps.
2. If you are migrating from or to MSP products, contact support for further assistance.
- Select the required product for migration (e.g., Endpoint Central On-premises).
- Enter the complete URL (FQDN) and port number of your source server.
- Select the domain associated with your administrator account.
- Enter the credentials of an administrator account with the required privileges on the source server and click Proceed to authenticate. Once validated, the tool connects to the source server and transitions to the Destination Server Details section.
3. Destination Authentication(Cloud as Example)
- Select the destination product (e.g., Endpoint Central Cloud).
- Select the Data Center (US, EU, CN, IN, AU, UK, CA, SA, AE, JP) in which your cloud account is hosted.
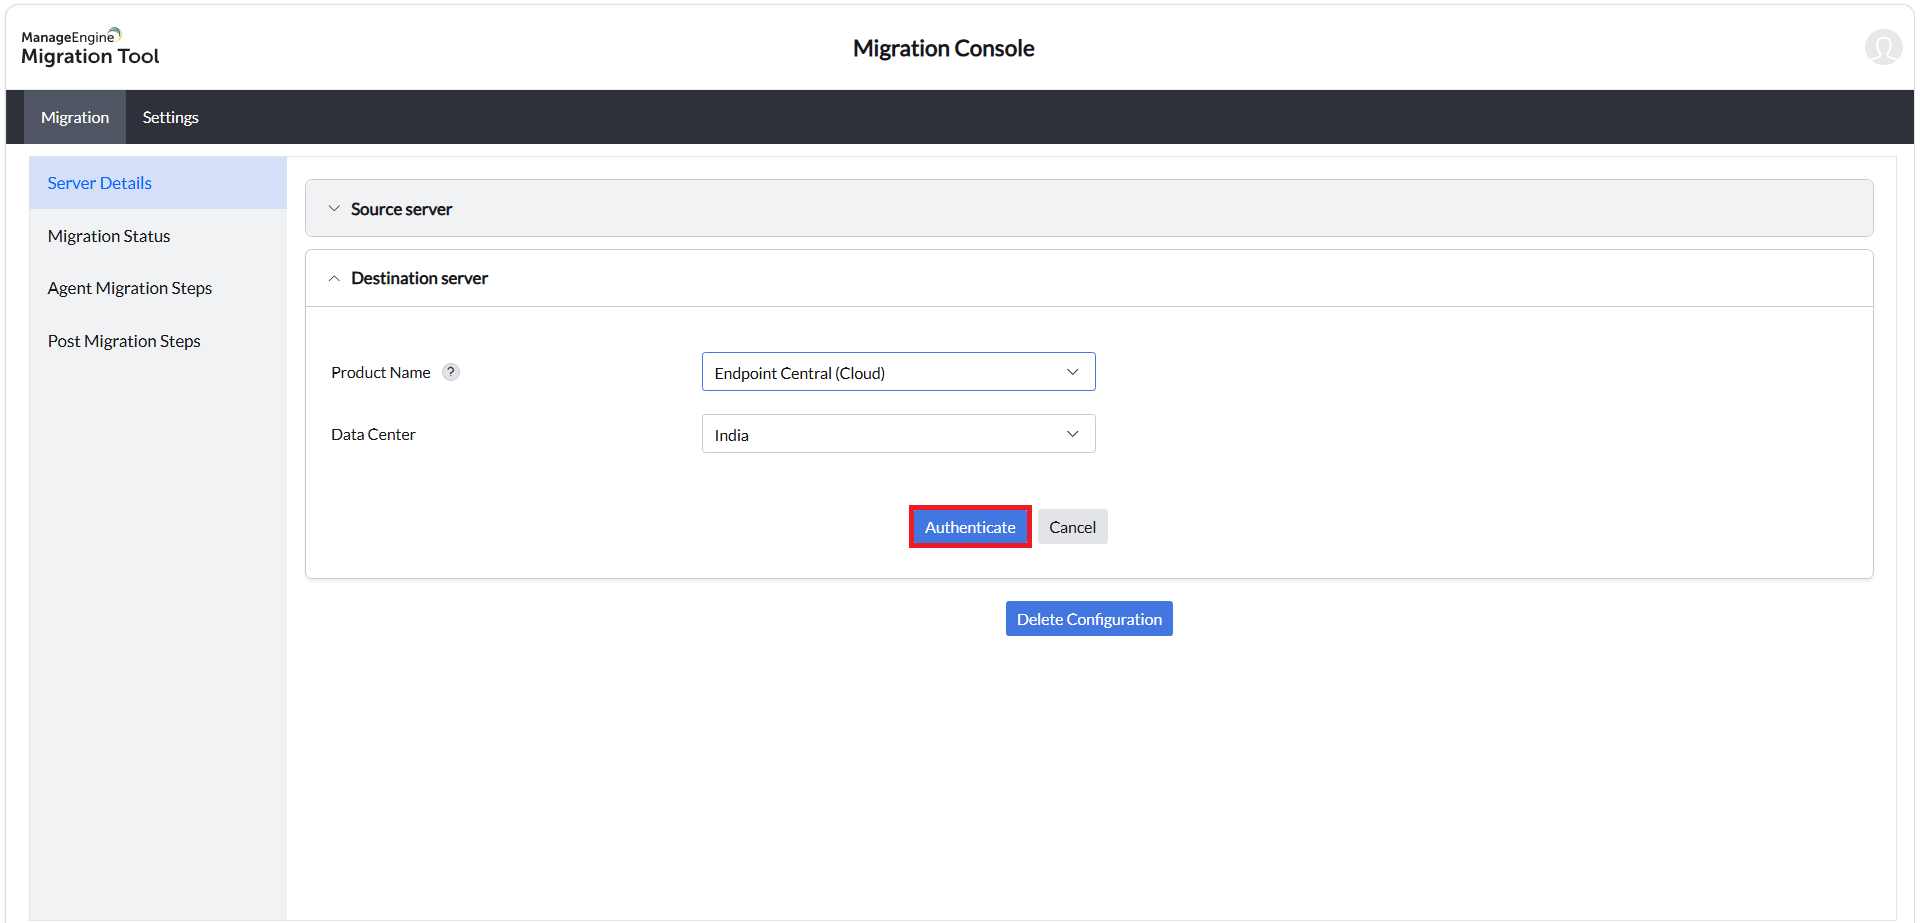
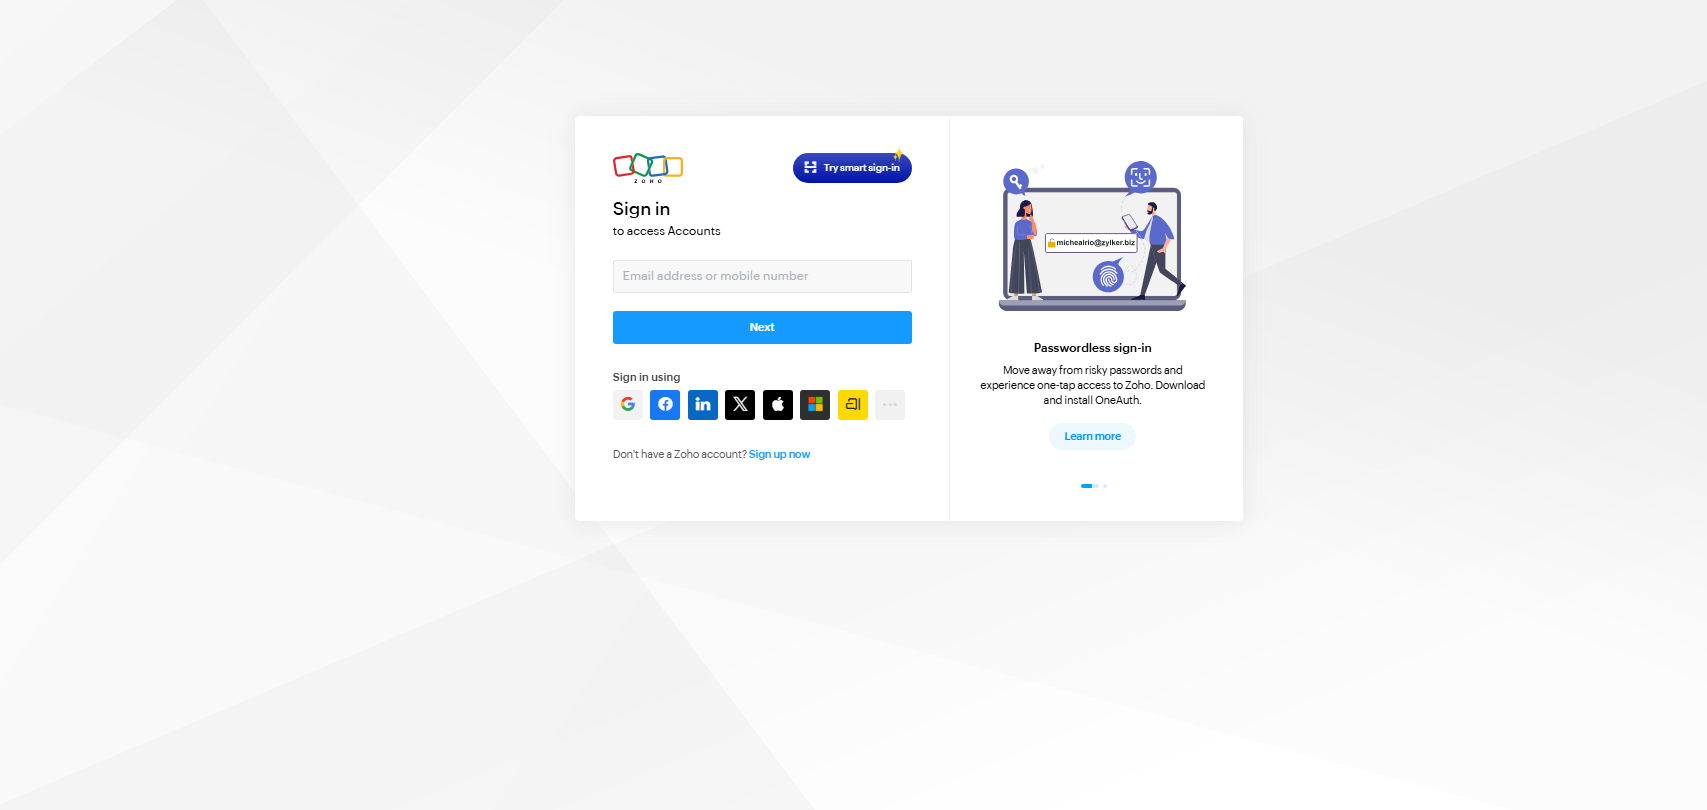
- Click Authenticate. You will be redirected to the Zoho Accounts page to sign in with your credentials.
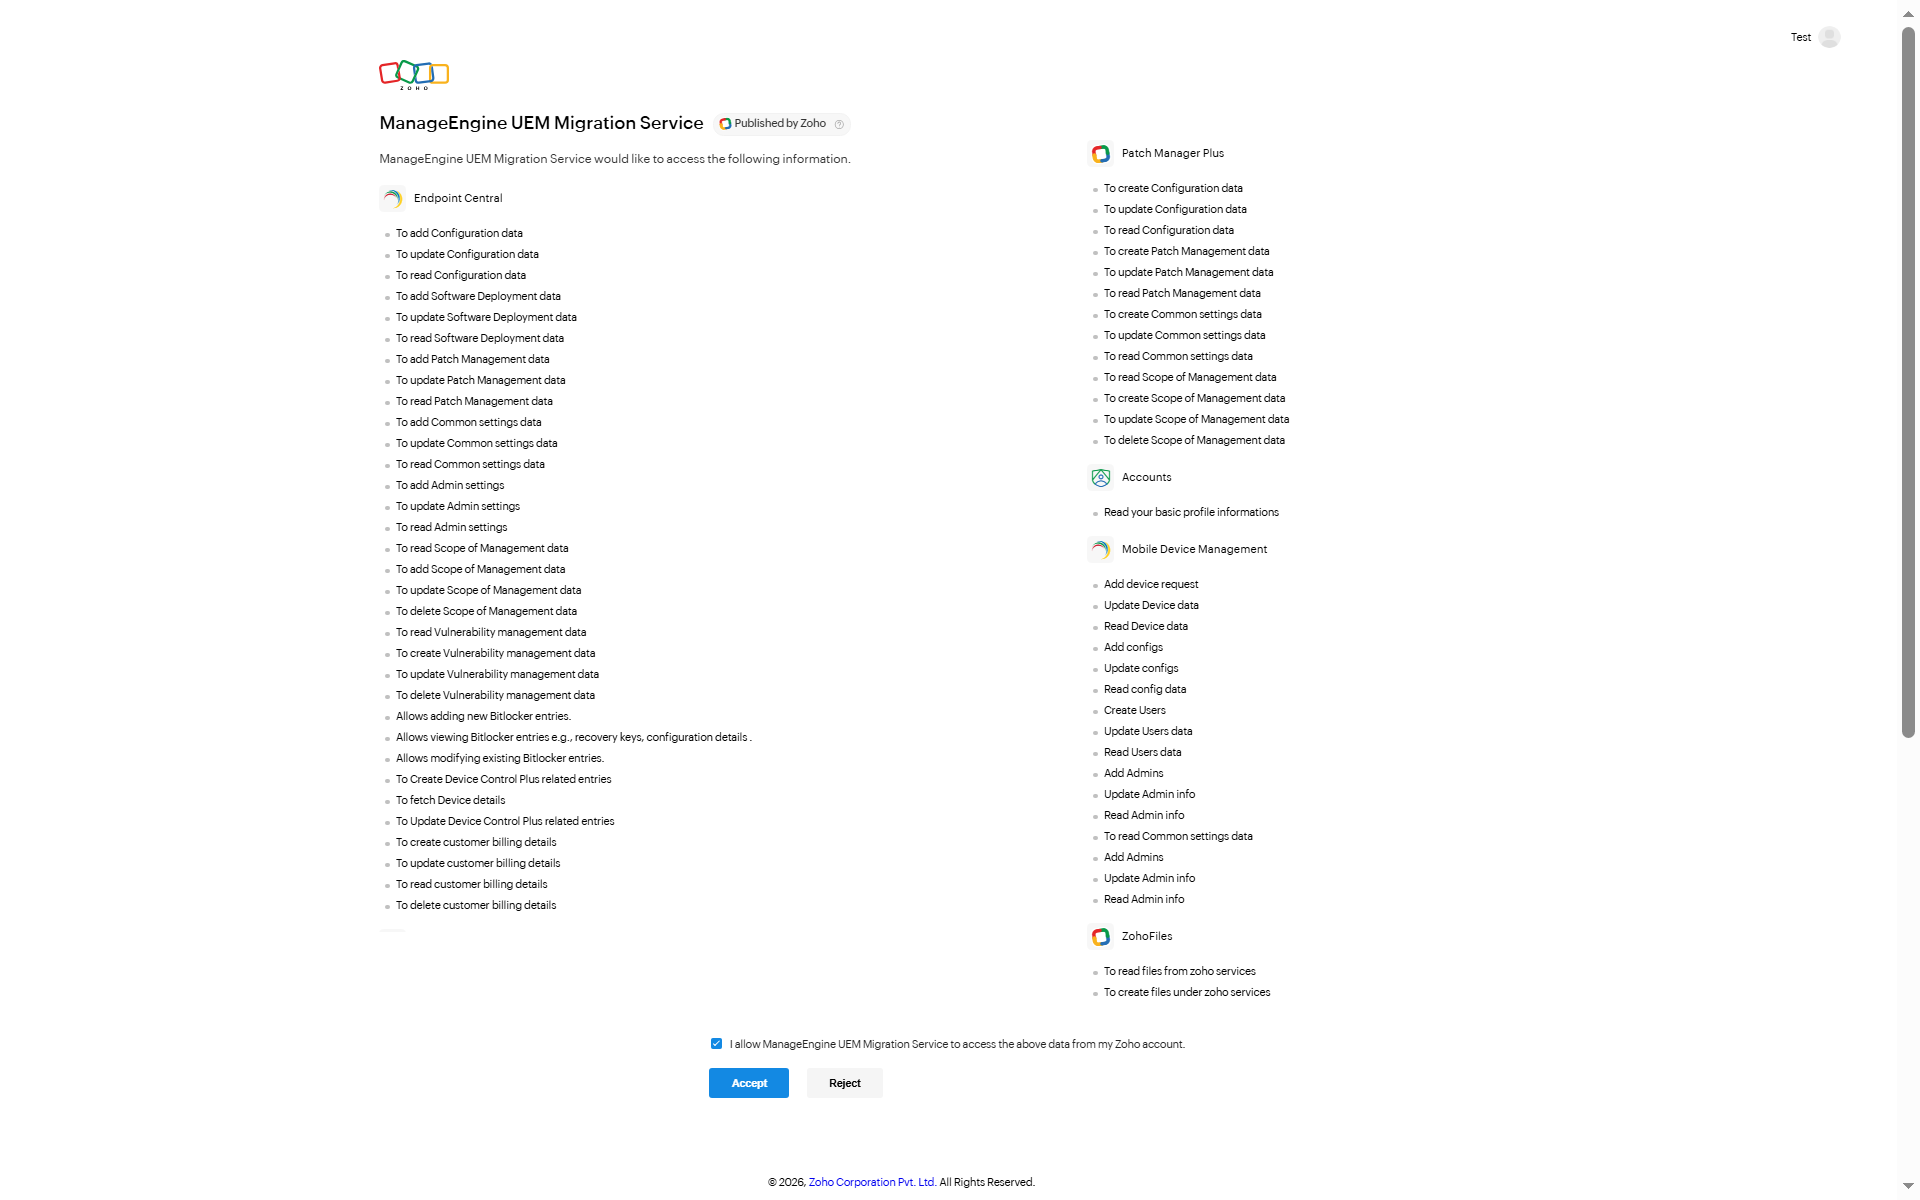
- On the Consents page, read the terms and agreements and click Accept.
4. Module Selection & Execution
- After completing authentication, select the modules to migrate. The tool presents 11 migration modules — select the ones relevant to your migration path:
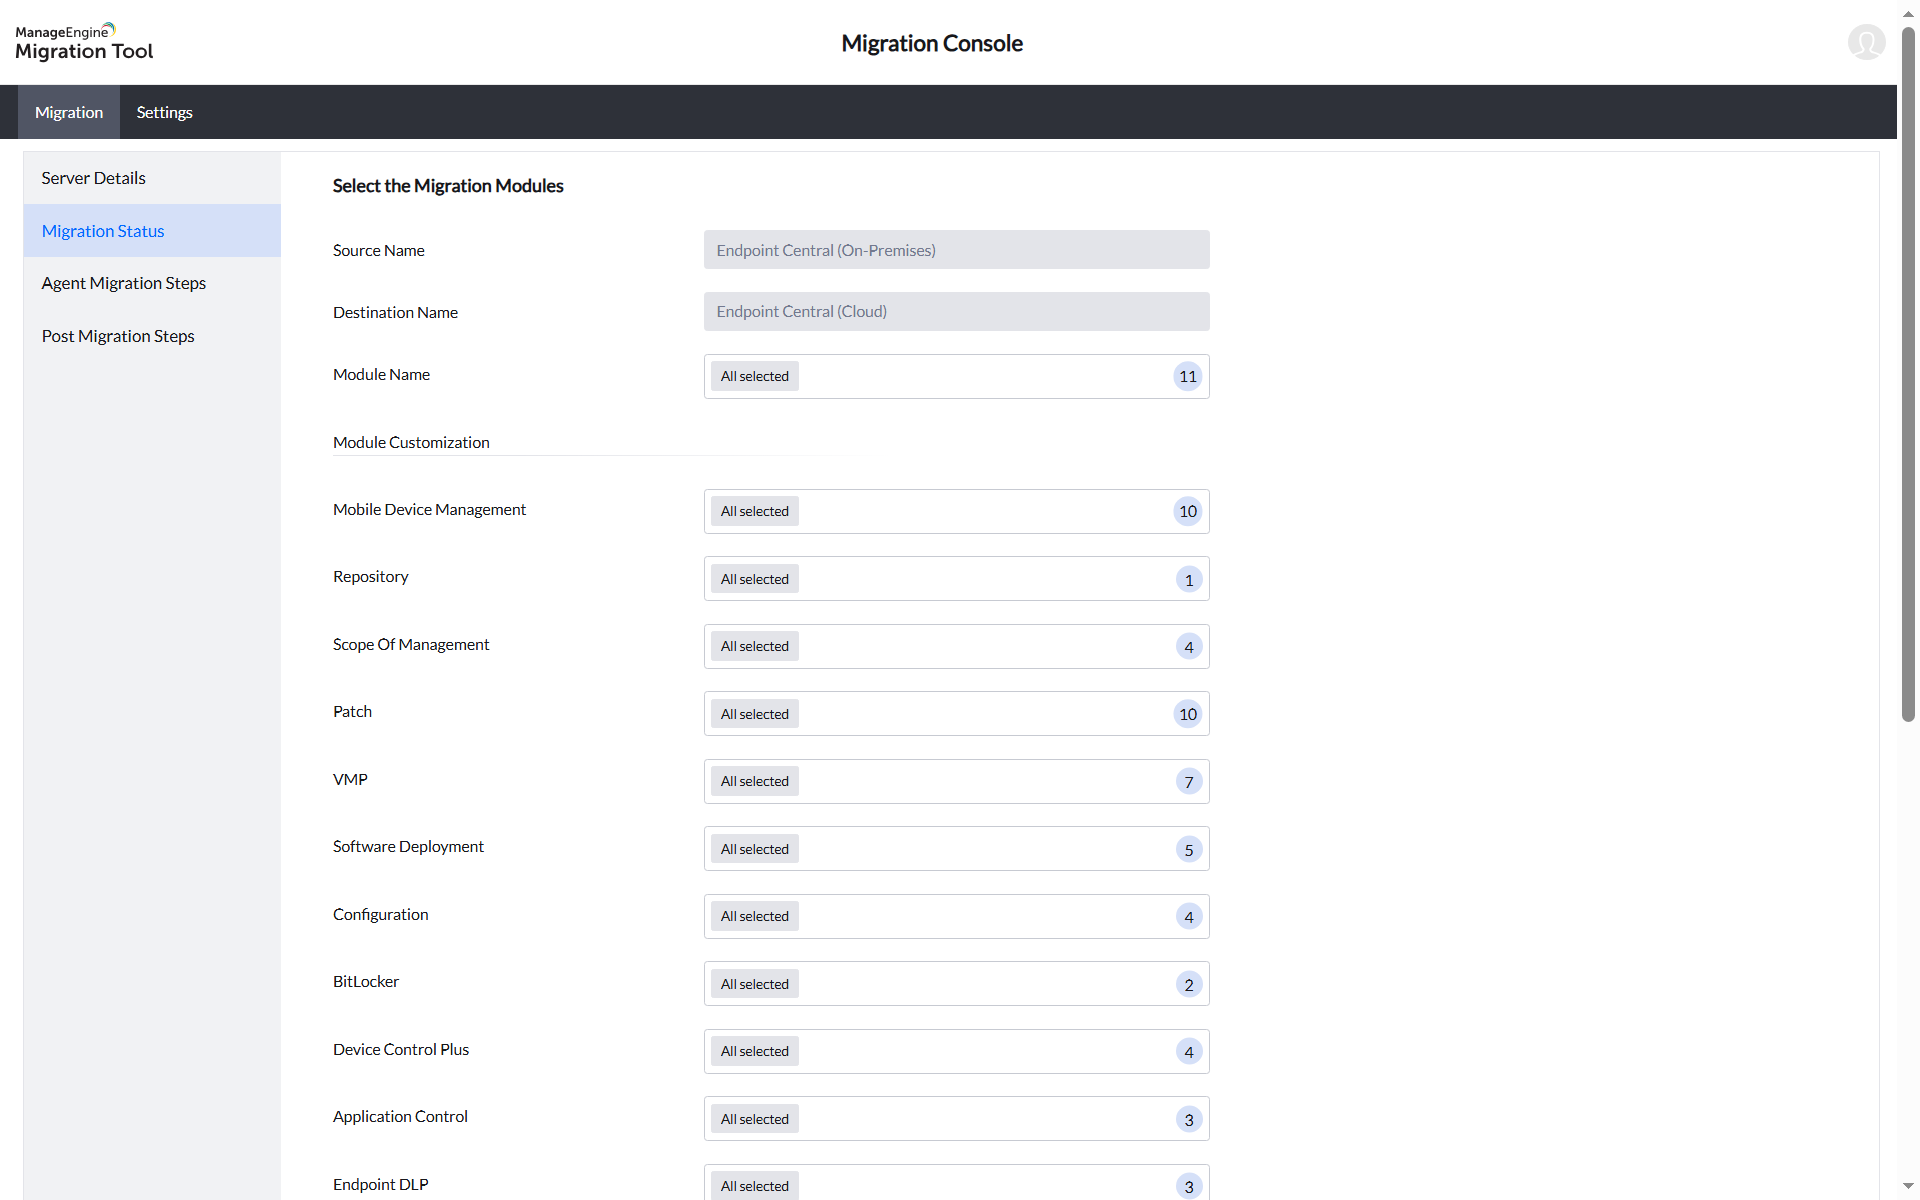
- Mobile Device Management
- Scope of Management
- Patch
- Software Deployment
- Configuration
- Repository
- Vulnerability Manager (VMP)
- BitLocker
- Device Control Plus
- Application Control
- Endpoint DLP
- Pay attention to dependencies: Some sub-groups within a module depend on others. For example, within the Mobile Device Management module, MDM Groups depends on MDM Users — if MDM Users is not selected, MDM Groups cannot be migrated.
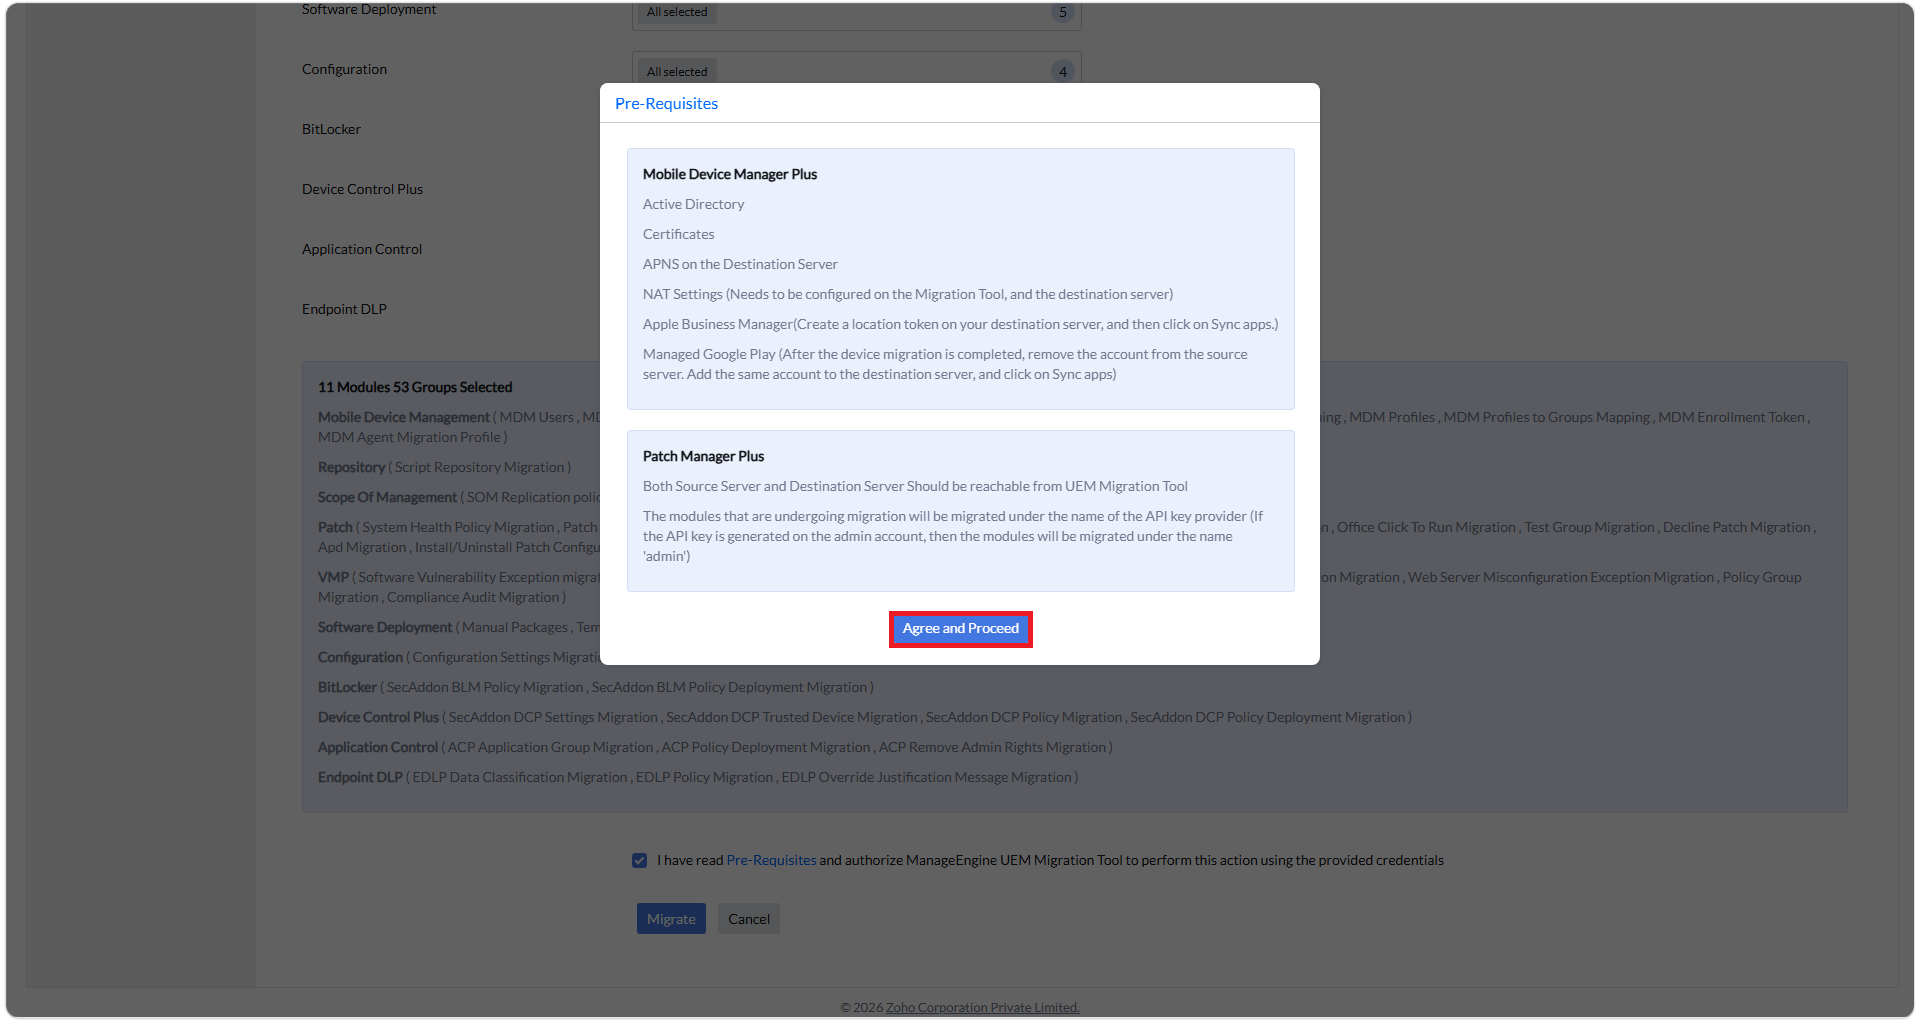
- Select the prerequisites checkbox to view the list of prerequisites in a pop-up, verify them, and click Agree and Proceed.
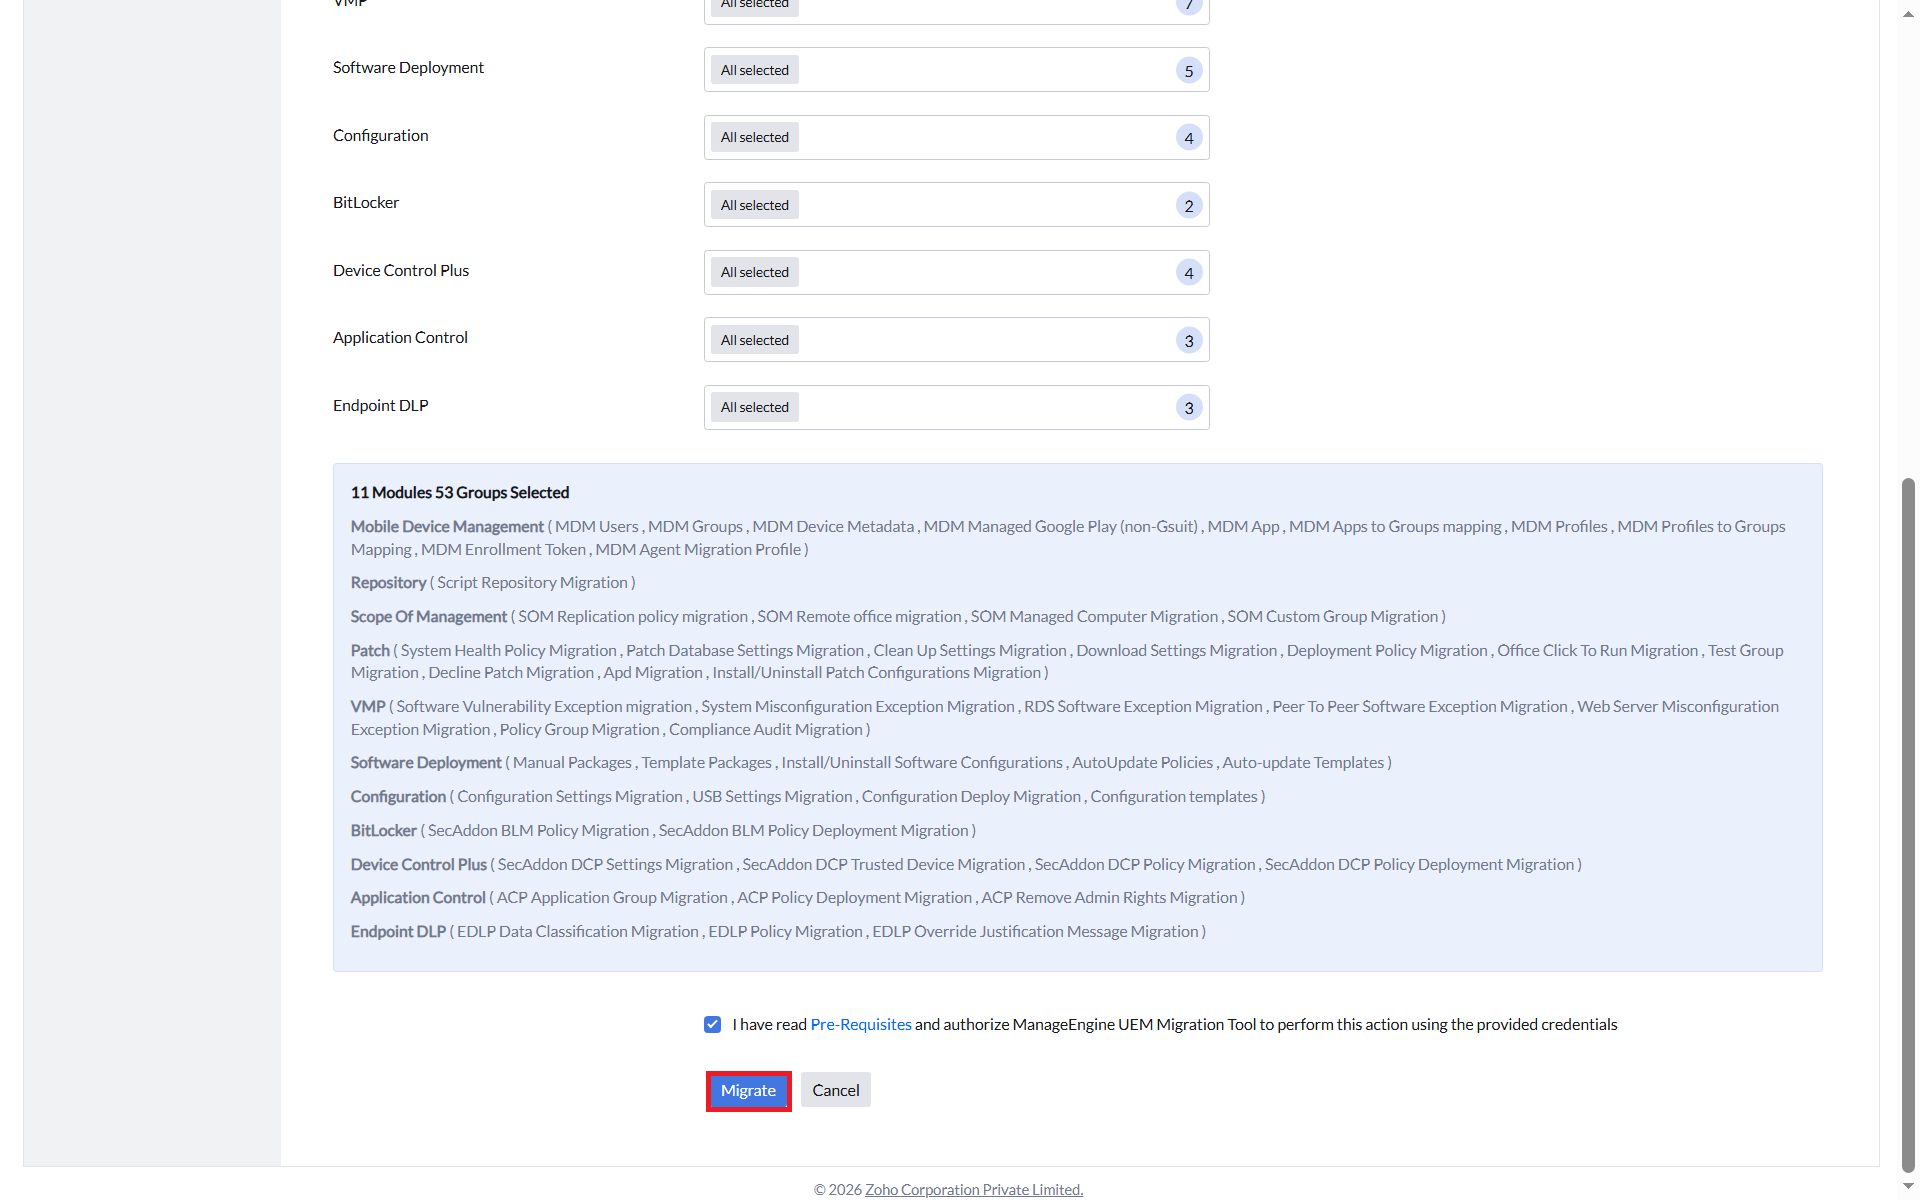
- Click Migrate to initiate data migration.
- Monitor progress on the Migration Status page.
- Failure Recovery: If a module fails, click Retry. If a dependent module fails, it will be marked as Skipped. You cannot edit details while migration is in progress.
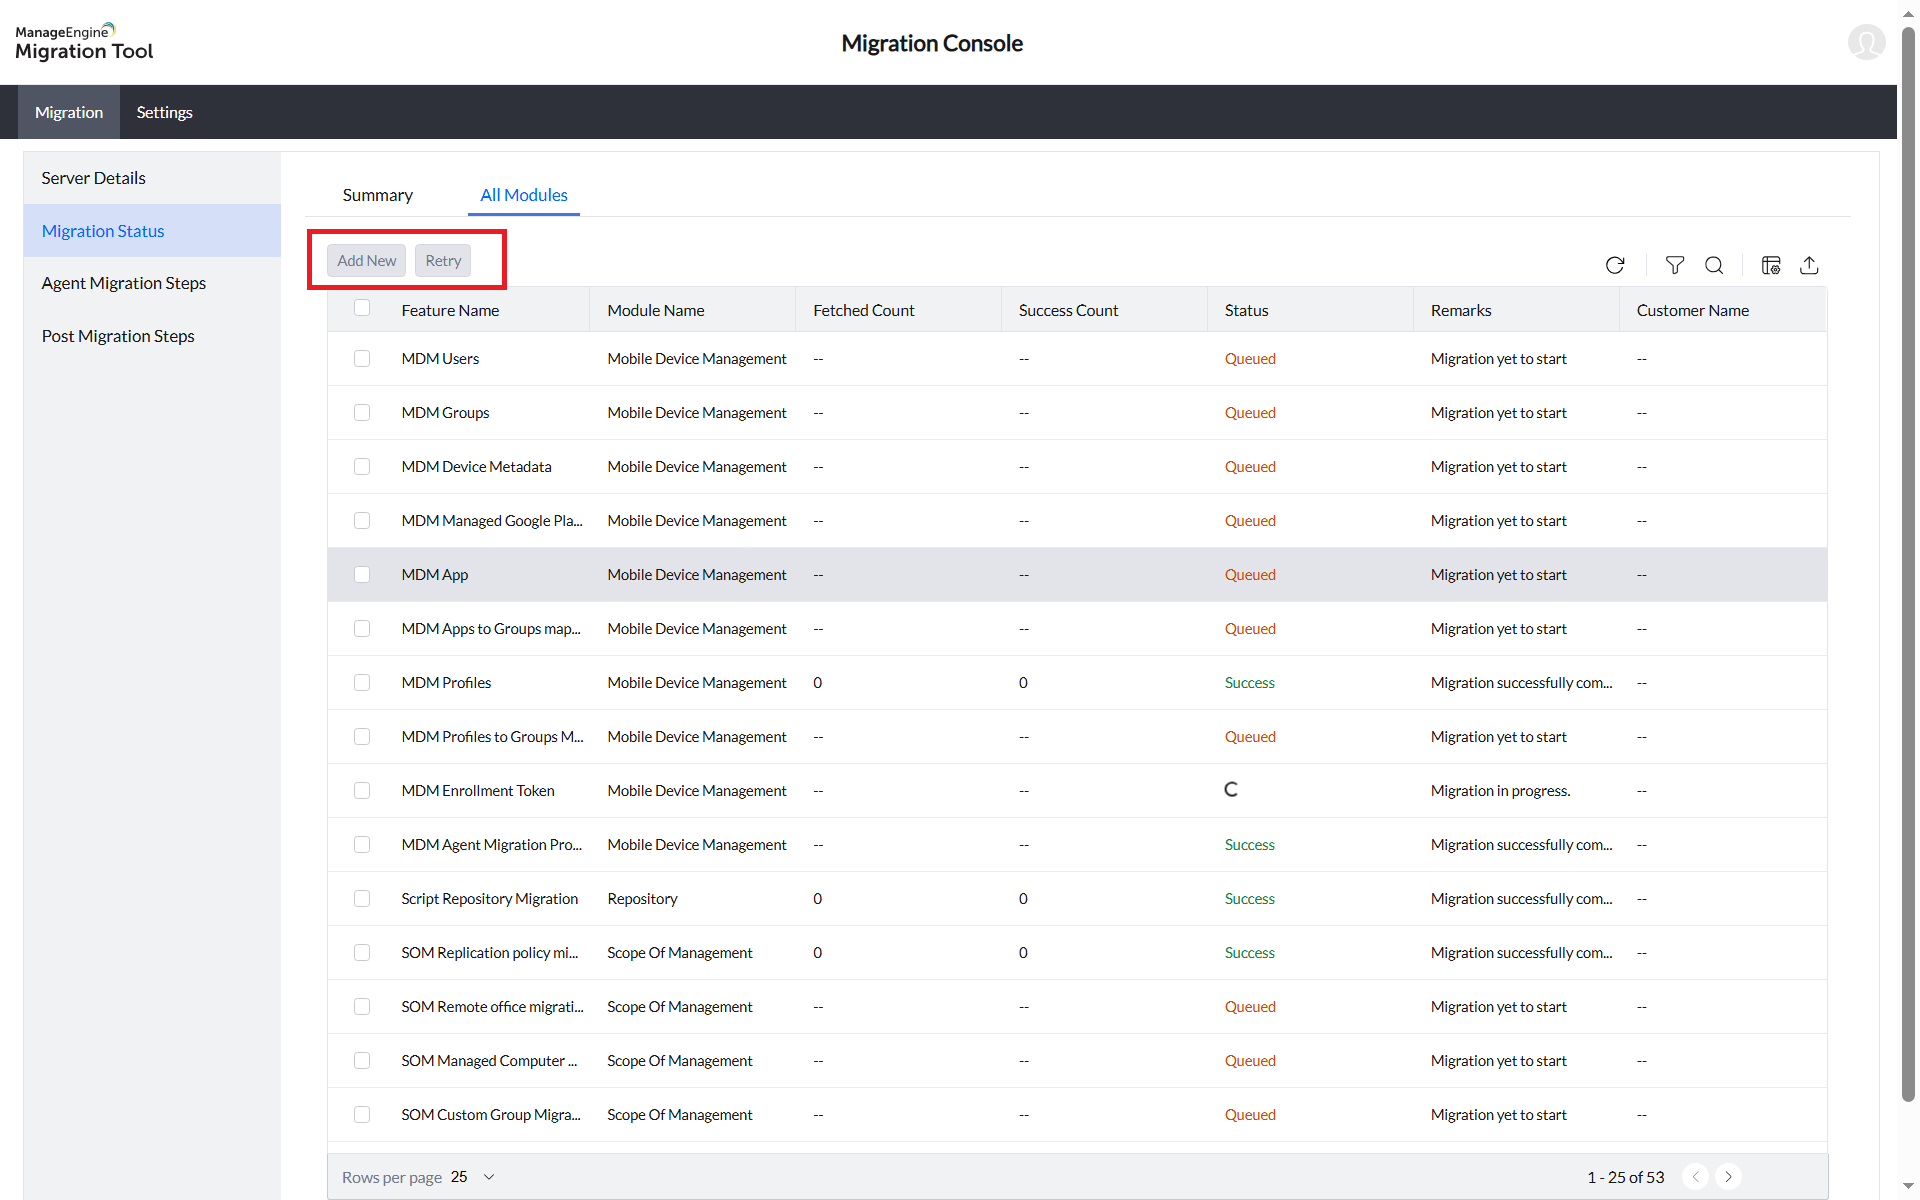
- Use the Add New button to migrate additional modules that were not selected in the initial run.
Retry option for migration failure
1. Agent Deployment
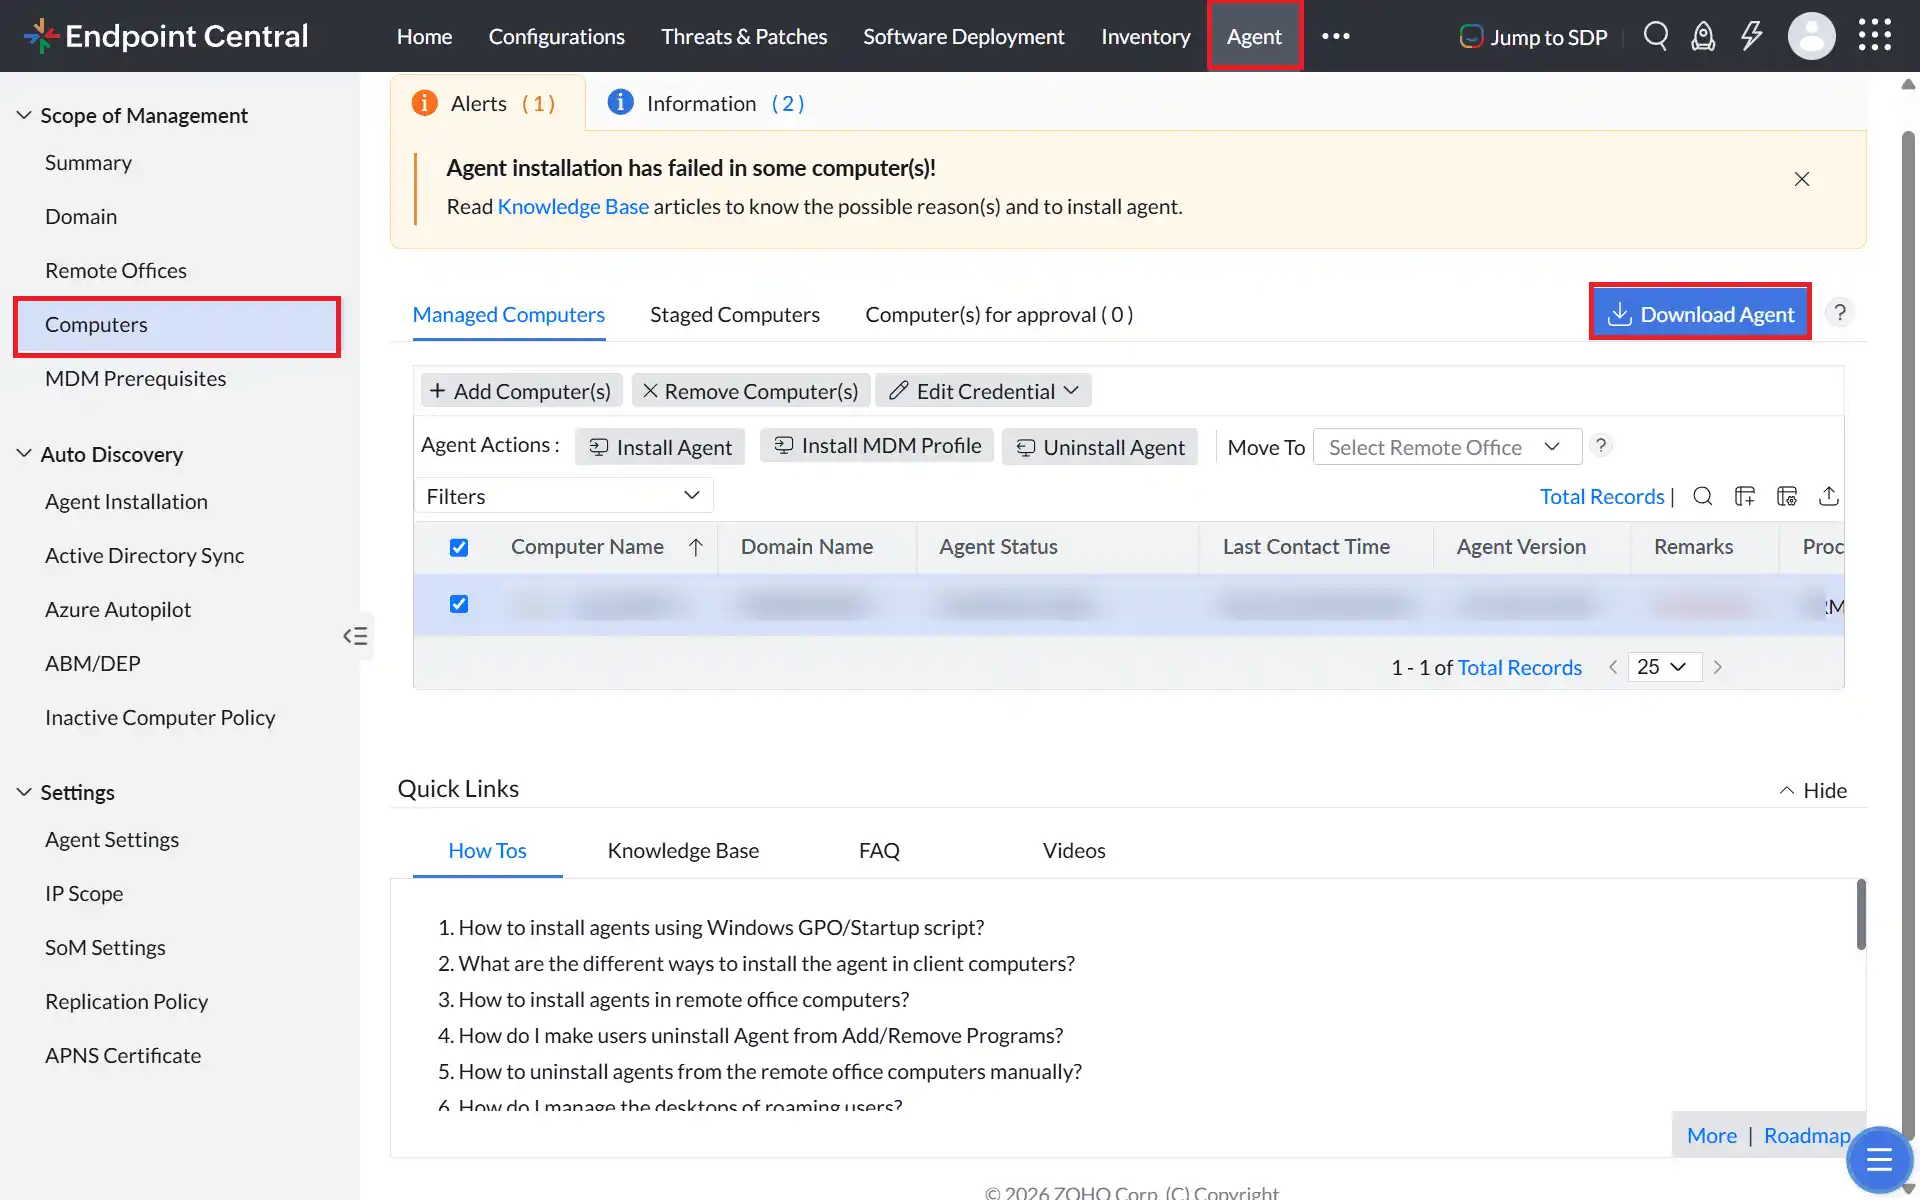
- Open the destinationEndpoint Central console → Agent → Computers → select remote office → Download Agent (.exe).
- Download the Agent Migration Tool (.exe) to the same folder.
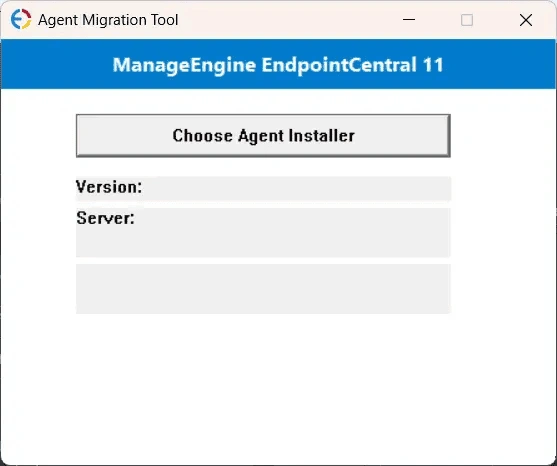
- Right-click AgentMigrationTool.exe → Run as administrator.
- Click Choose Agent Installer → select the downloaded agent .exe.
- Confirm Version and Server info match the destination server → click Create Agent.exe.
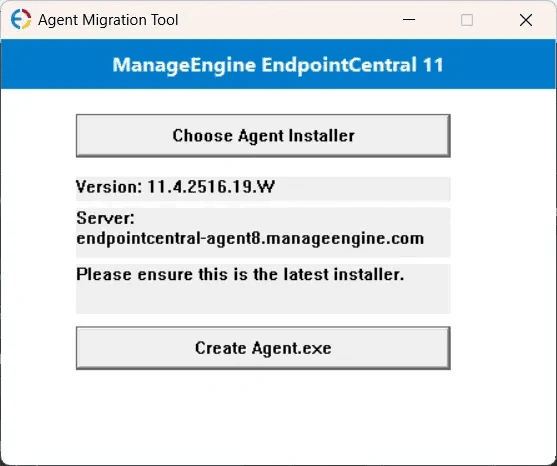
- The
Agent.exefile will be created in the same directory as the tool.
- Copy Agent.exe to the client machine and run it in CMD as administrator with the /silent argument:
Agent.exe /silent.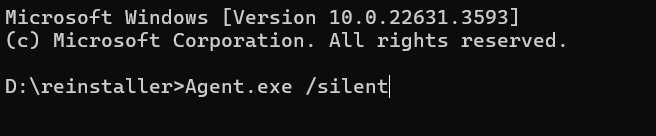
- Verify that the migration is working correctly on the test devices before proceeding to batch deployment.
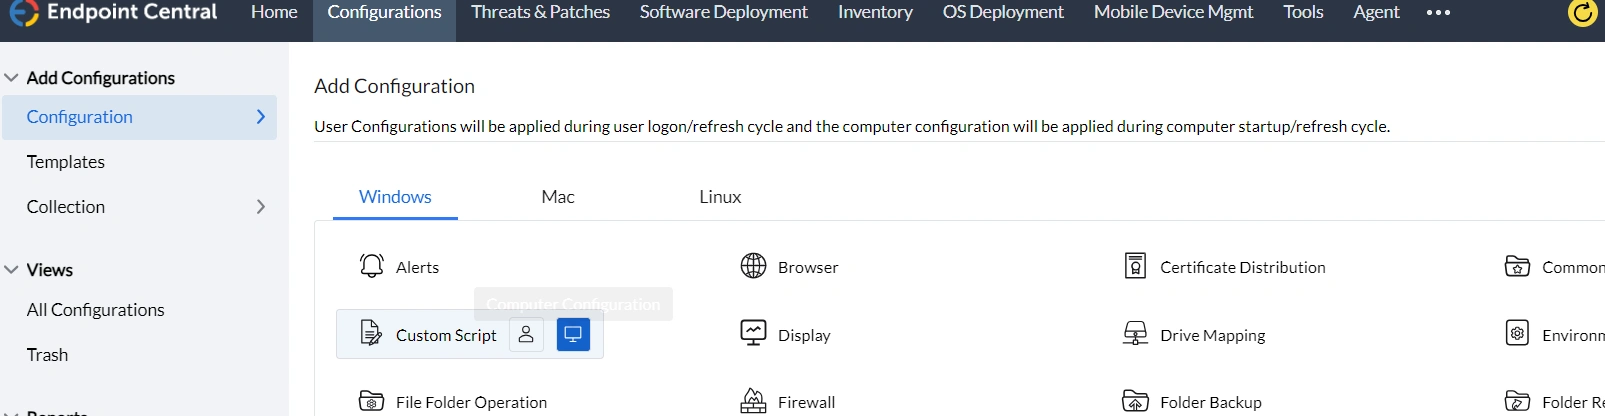
- In the sourceEndpoint Central server console, navigate to Configuration → Windows → Custom Script → Computer.
- Enter the name of the configuration, click Create/Modify Script, and add the script to the repository. Download the script here.
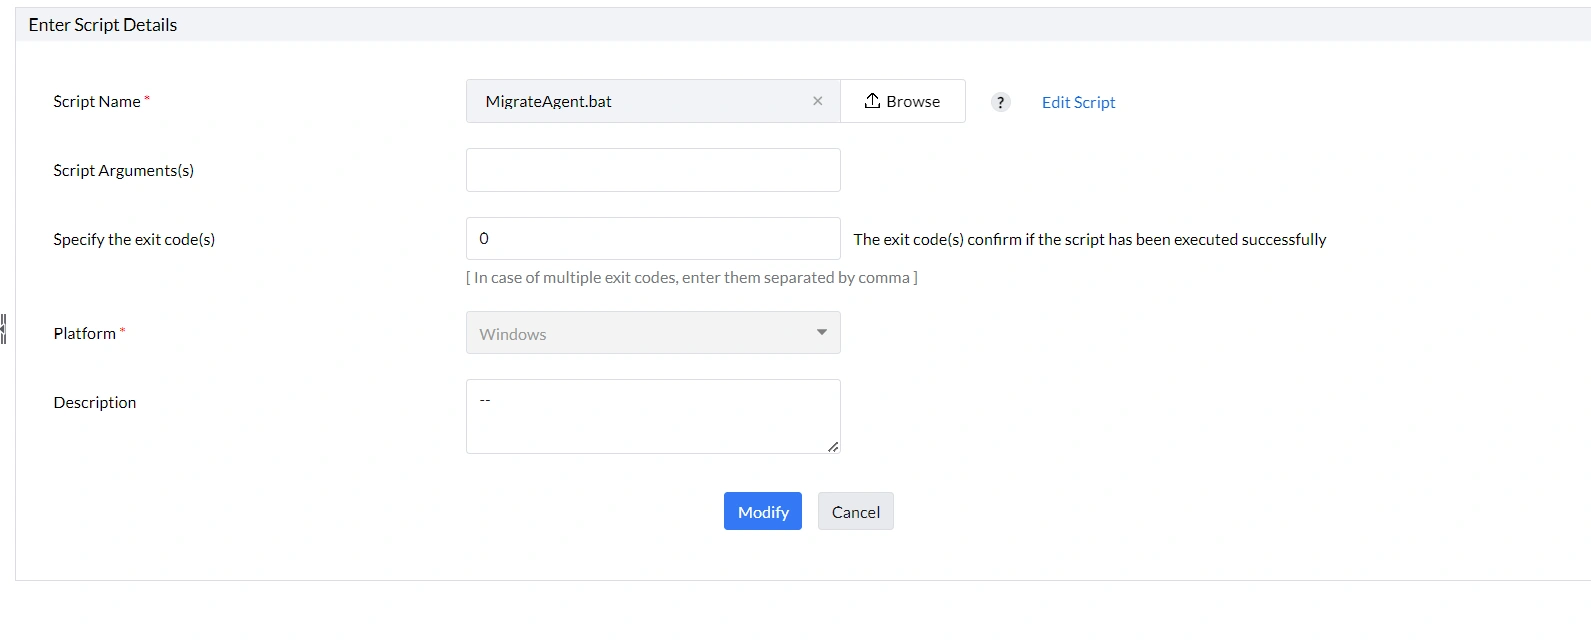
- Select the script in the custom script configuration.
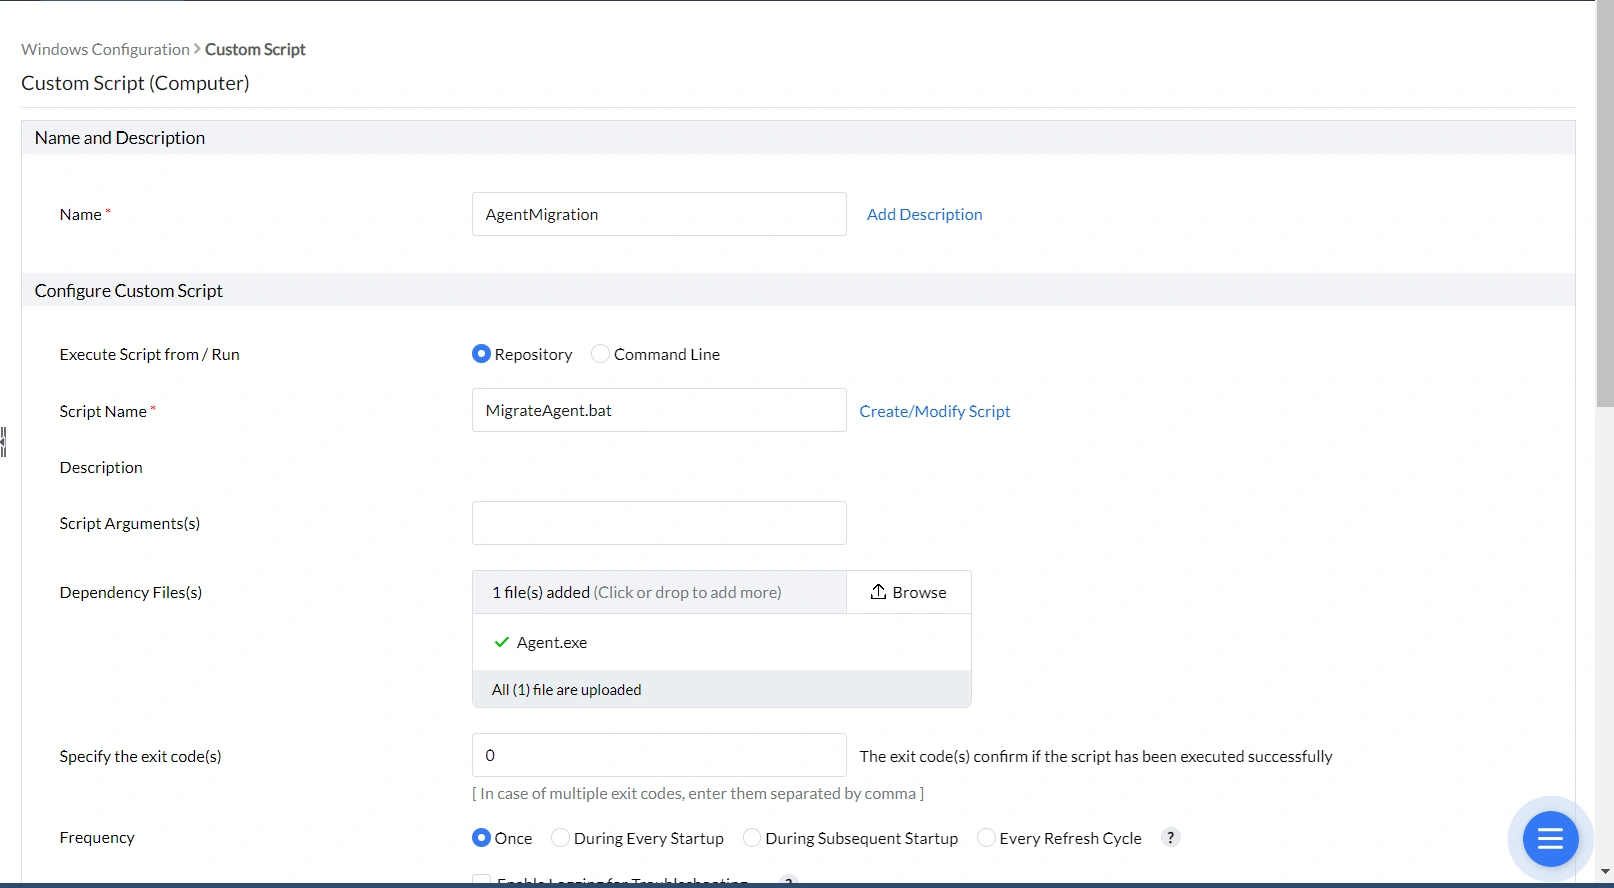
- In dependency files, upload the previously generated Agent.exe file. Select the target devices and deploy the configuration.
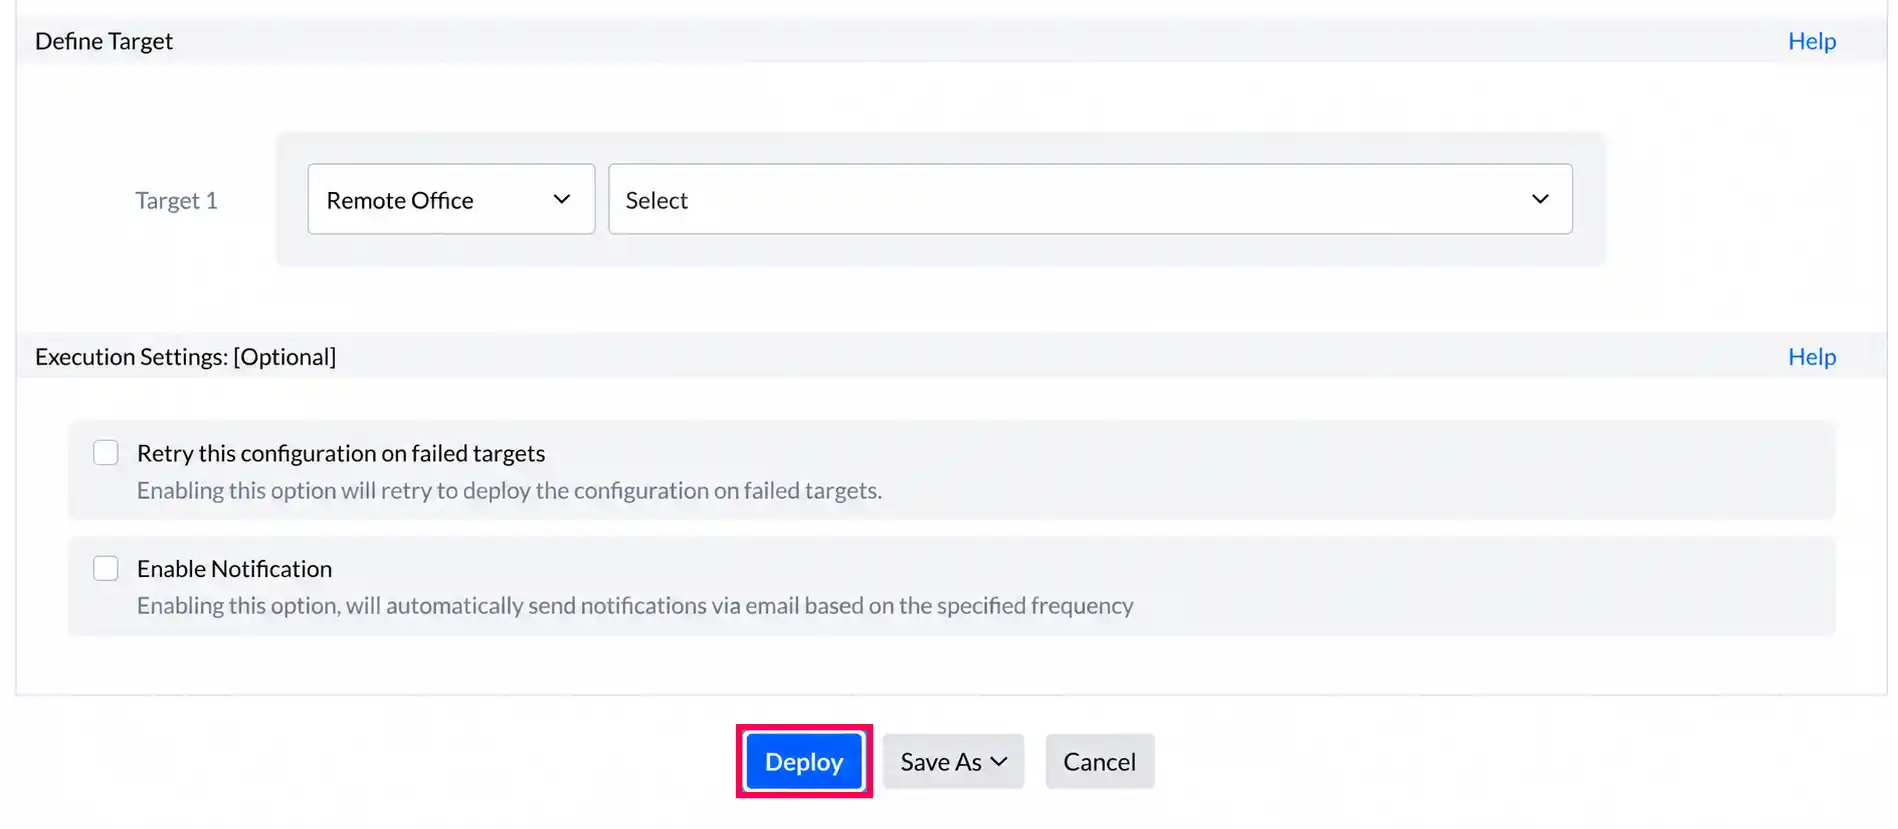
- Once the changes are applied, the agent will be moved to the destination server console.
2. Windows Endpoints MDM Re-enrollment
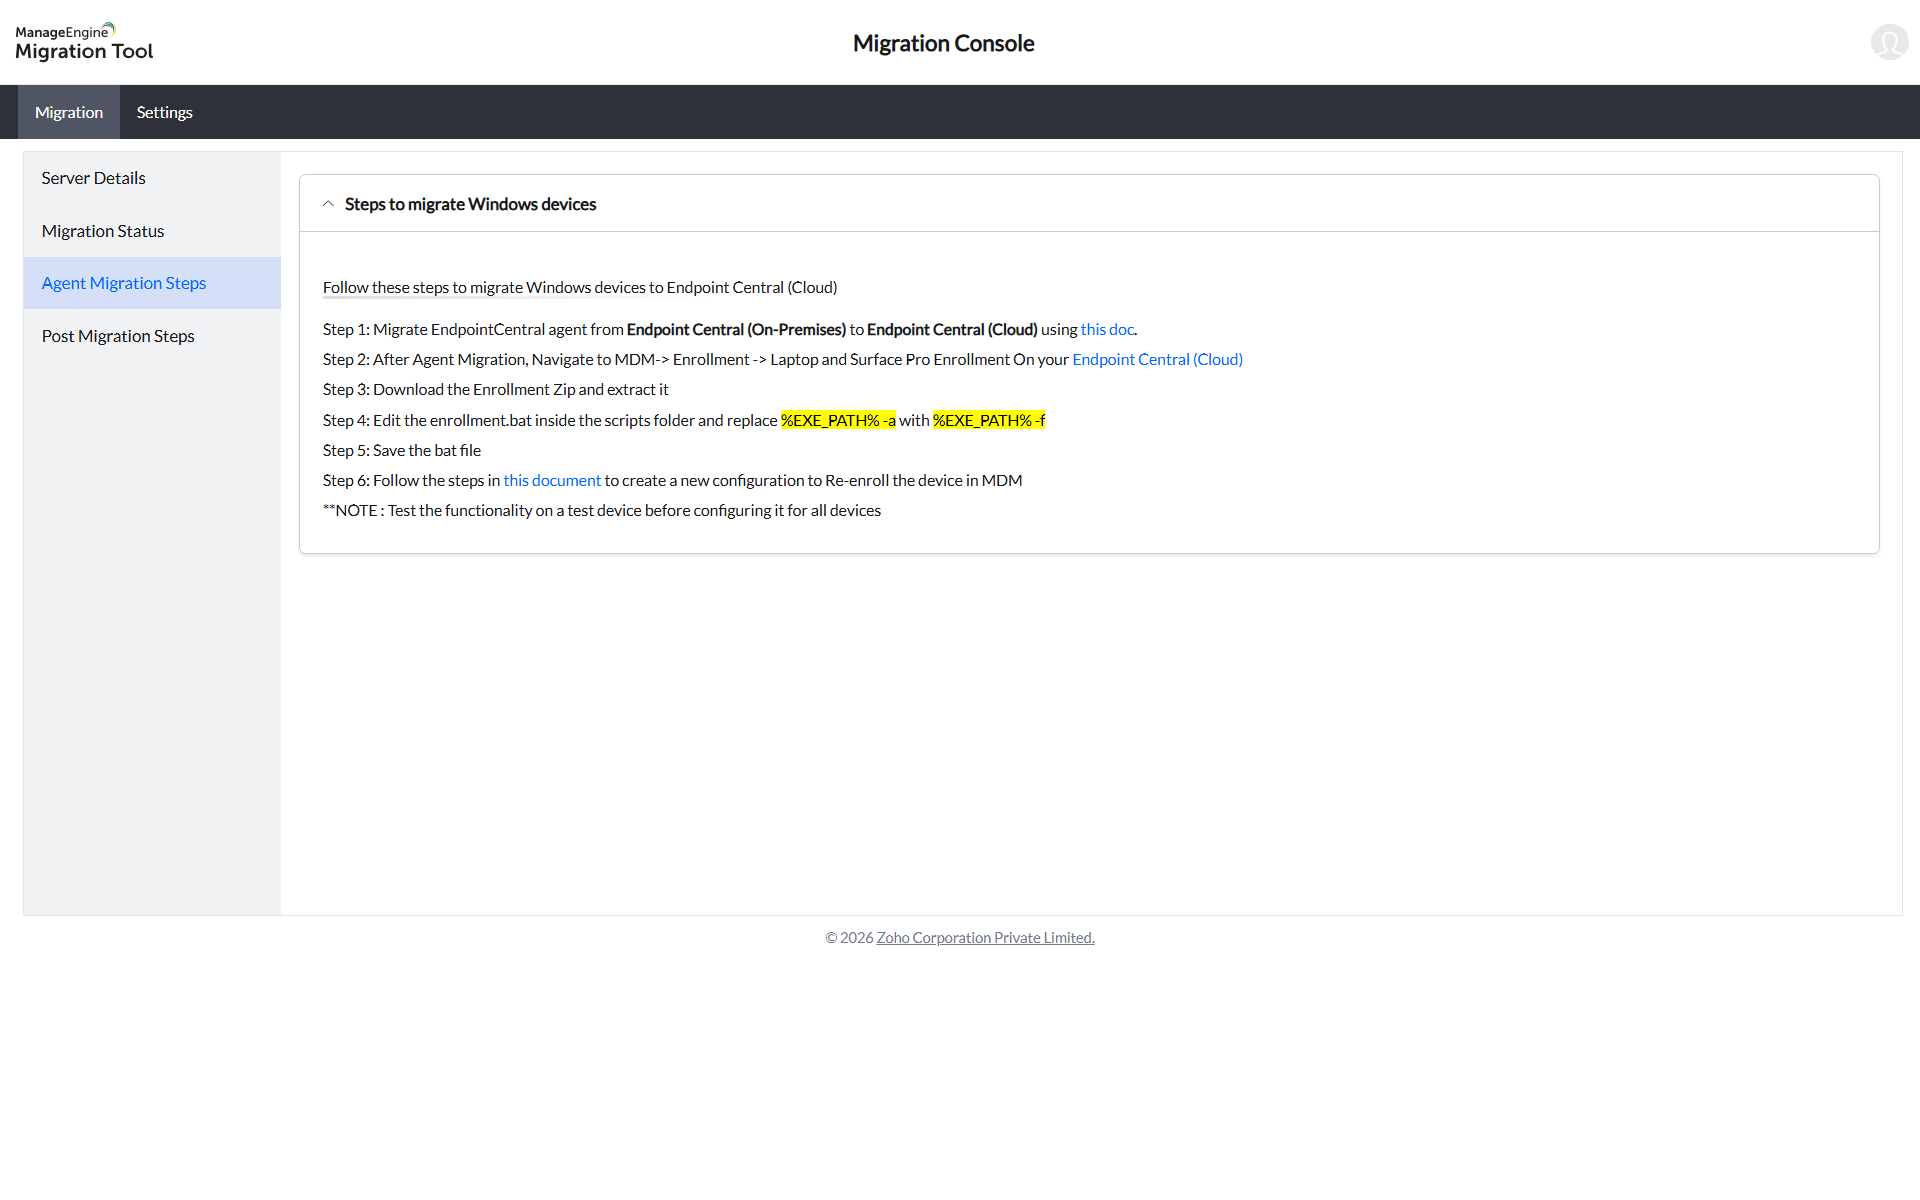
This step is required only after deploying the Endpoint Central agent and confirming the connection is established between the server and the agents.
To re-enroll Windows machines under MDM, refer to the agent installation document.
1. Mac Agent Migration
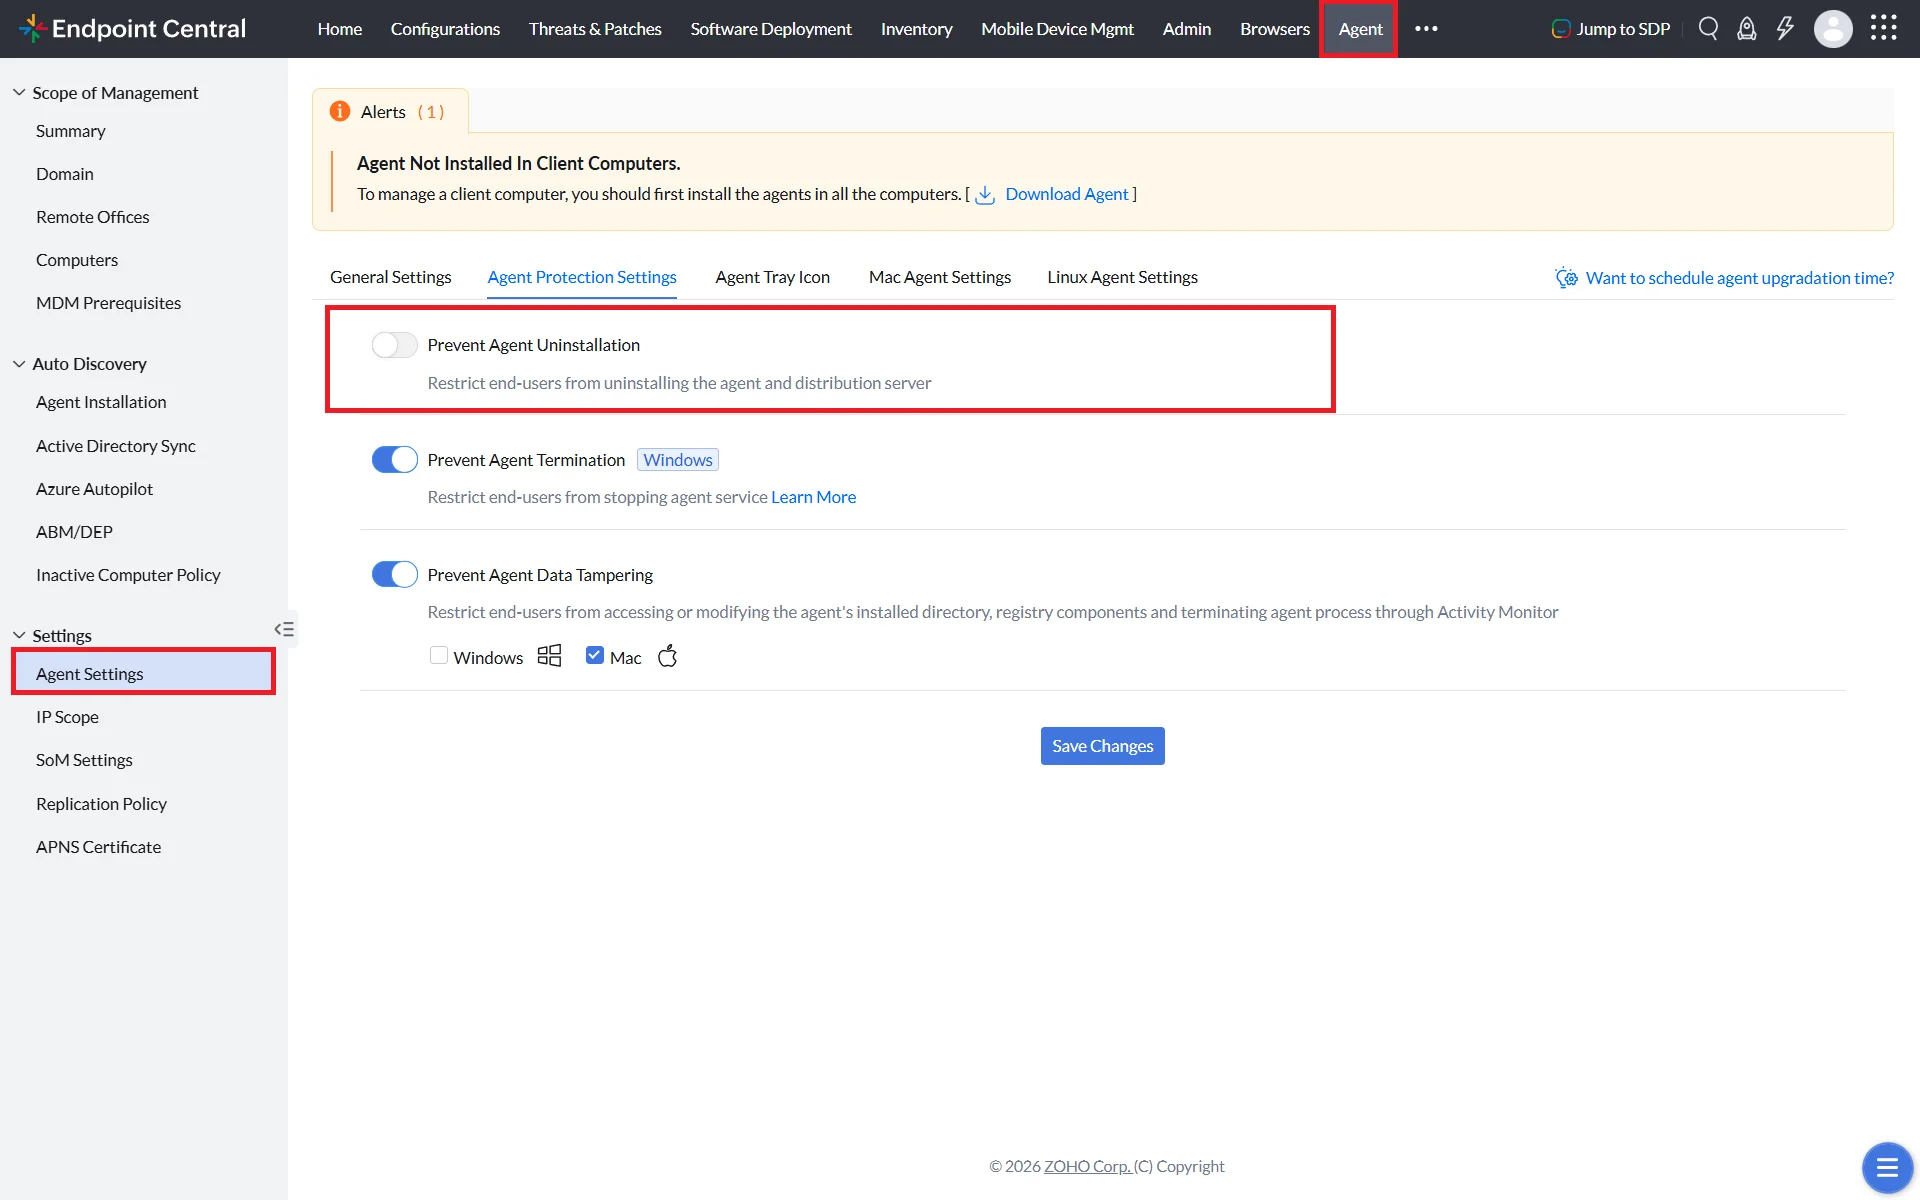
- Disable Agent Protection Settings: In the Endpoint Central on-premises web console, navigate to Agent → Agent Settings → Agent Protection Settings and disable Restrict users from uninstalling the Agent and Distribution server, if enabled.
- Download the agent package:
- Open the destination web console.
- Navigate to Agent → Computers.
- Select the required remote office.
- Click Download Agent.
- Rename the file to UEMS_MacAgent.pkg and place it in a folder.
- Download Migration.sh to the same directory.
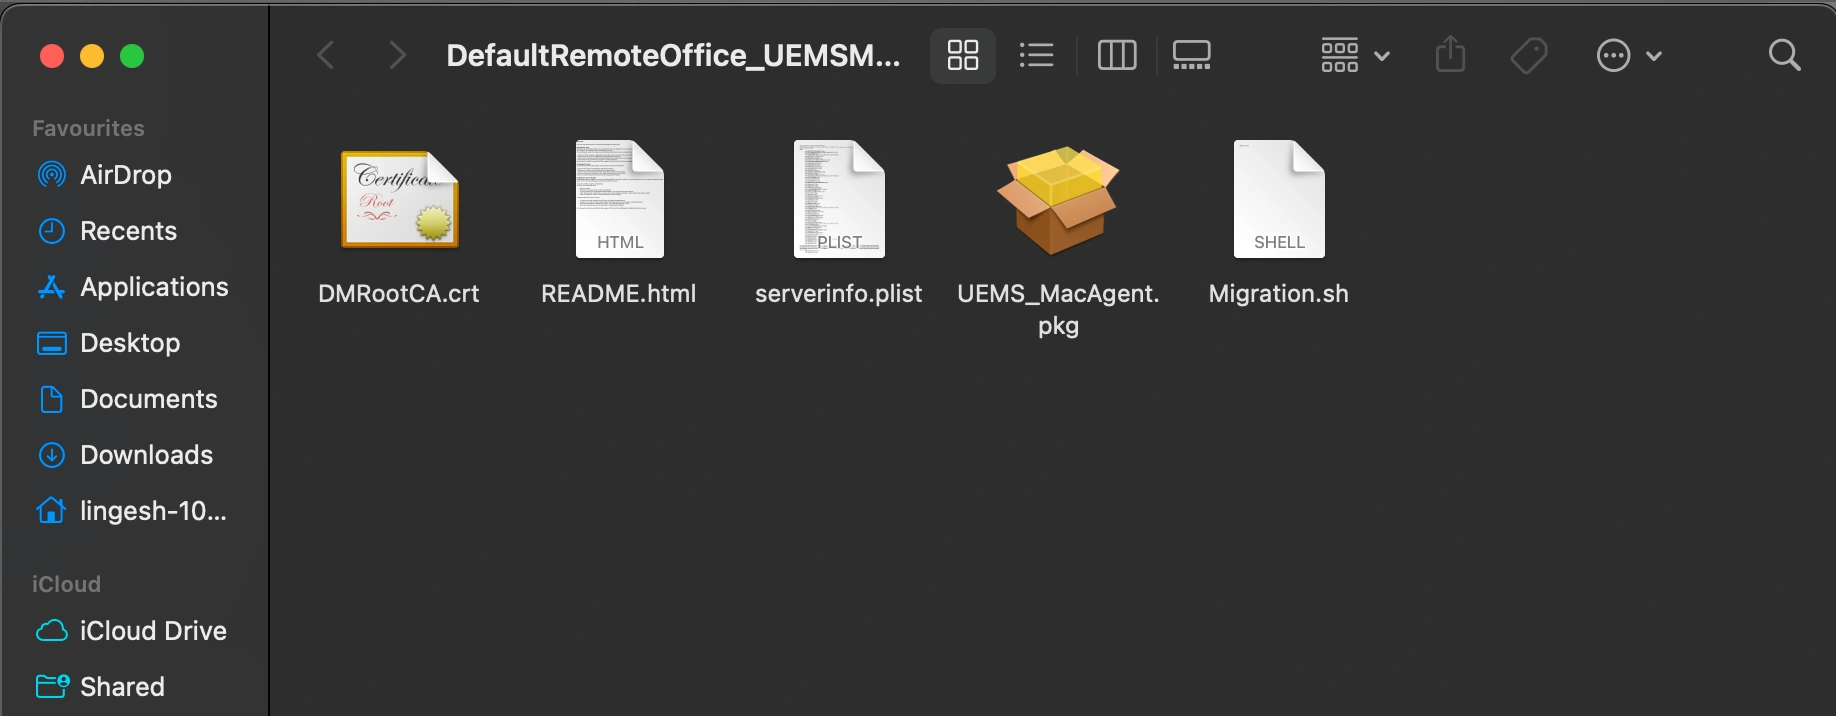
- Zip the package with serverinfo.plist and Migration.sh.
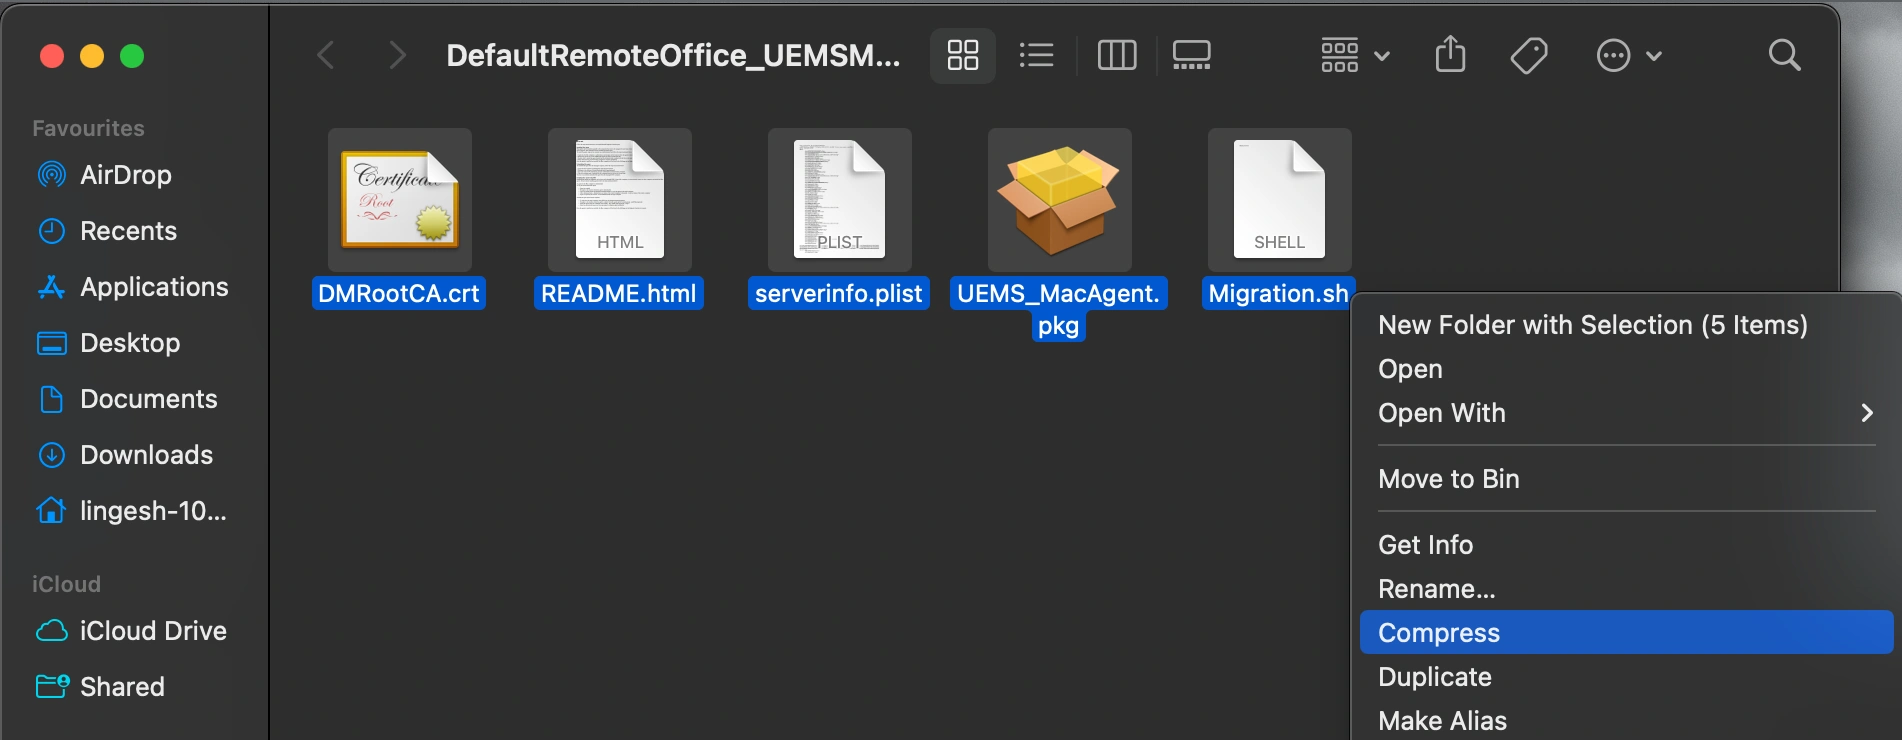
- Navigate to Endpoint Central → Software Deployment → Add Package → Mac.
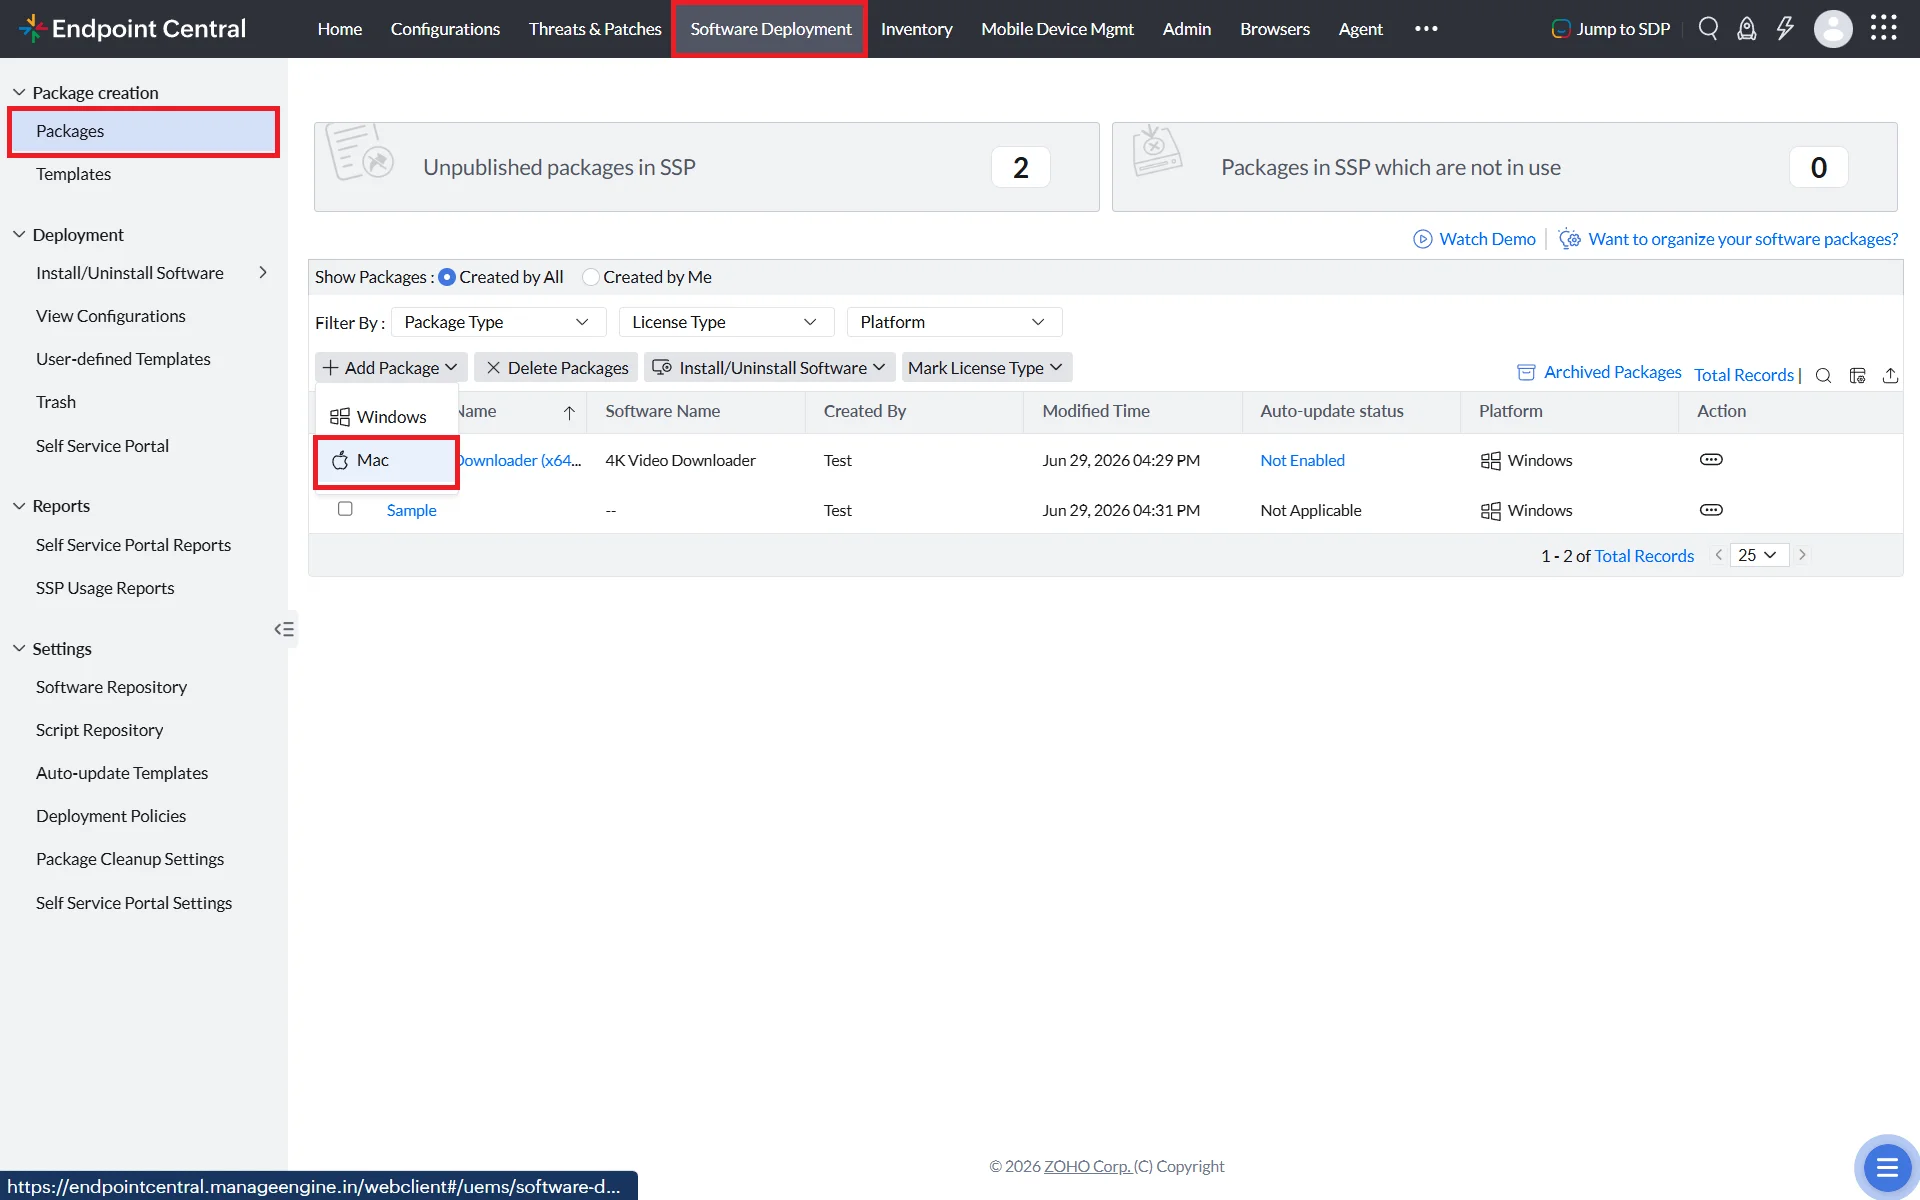
Create a Mac package by uploading the generatedArchive.zip. In Advanced Options, enter
sh ./Migration.sh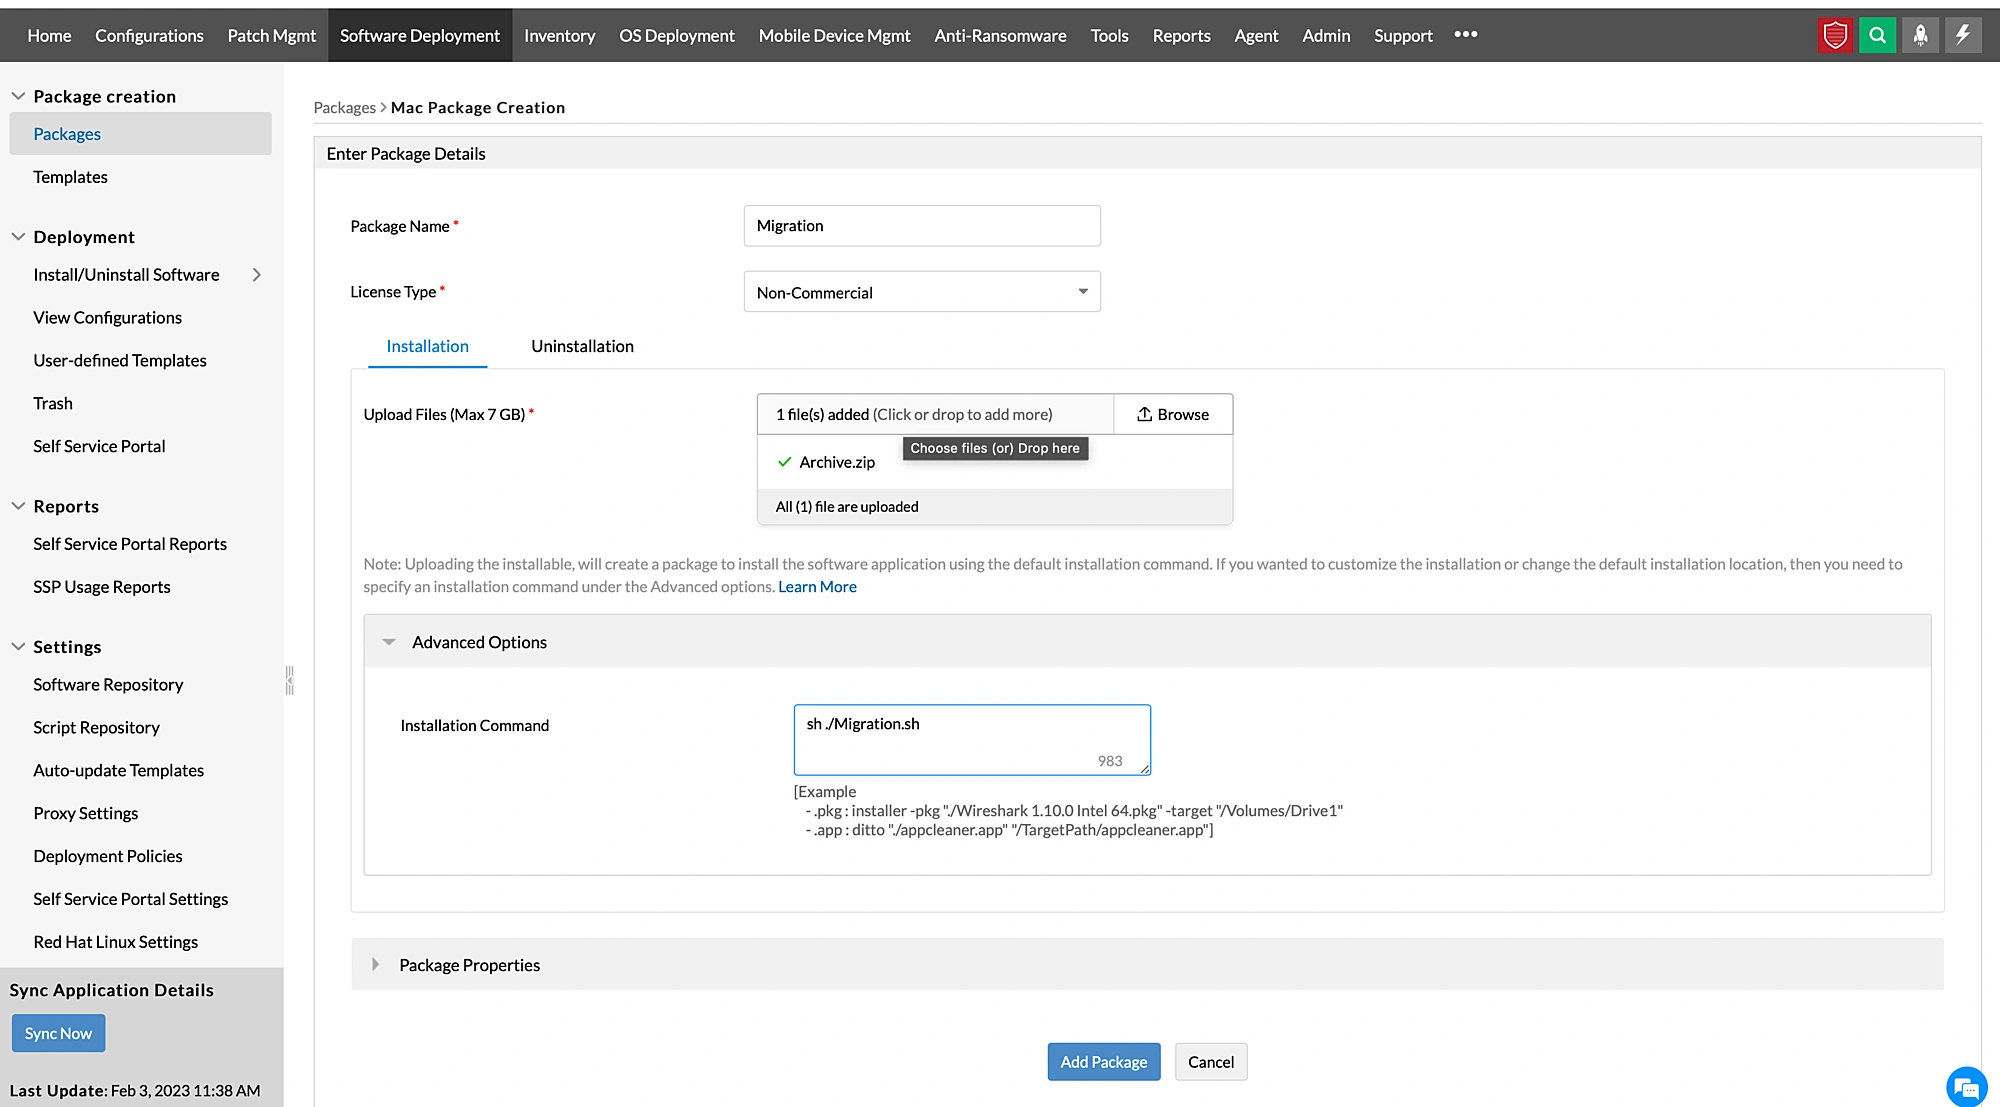
- Create a Mac Software Deployment configuration and deploy the package to the required machines on-premises. Apply to a few test machines first before full deployment.
2. Mac MDM Migration Steps (OP to Cloud / Non-ABM & ABM)
For assistance with the MDM part of Mac migration, reach out to the ManageEngine migration support team at endpointcentral-support@manageengine.com
Linux Agent Migration
- In the destination Endpoint Central Cloud console: Agent → Agent Settings → Agent Protection Settings → disable "Restrict users from uninstalling the Agent and Distribution Server, if enabled."
- Open the destination Endpoint Central Cloud console → Agent → Computers → select remote office → Download Agent → rename the downloaded file to UEMS_LinuxAgent.bin.
- Create a Linux custom script configuration in the sourceEndpoint Central console.
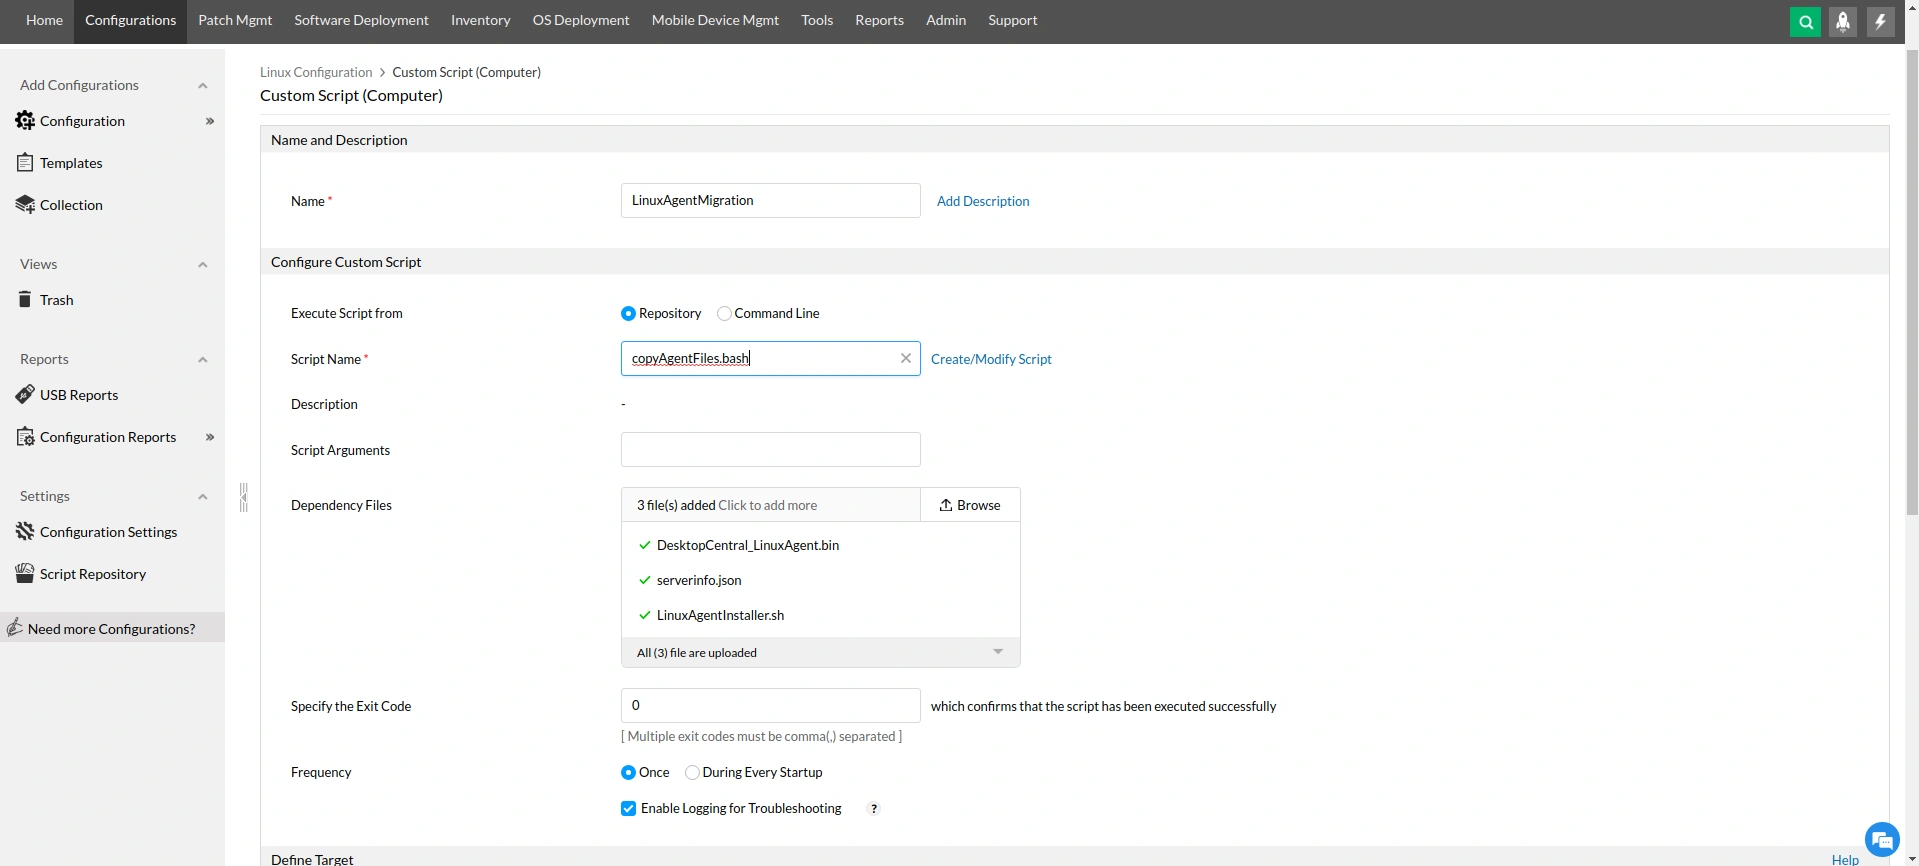
- Add copyAgentFiles.bash to the script repository.
- Upload the following dependency files:
UEMS_LinuxAgent.bin— from the zip file downloaded from the destination Endpoint Central Cloud consoleserverinfo.json— from the same zip fileLinuxAgentInstaller.bash
- Define targets and apply the configuration.
Migrate Android Devices
Android devices are migrated by applying a migration profile to the device or through re-enrollment after data migration is complete.
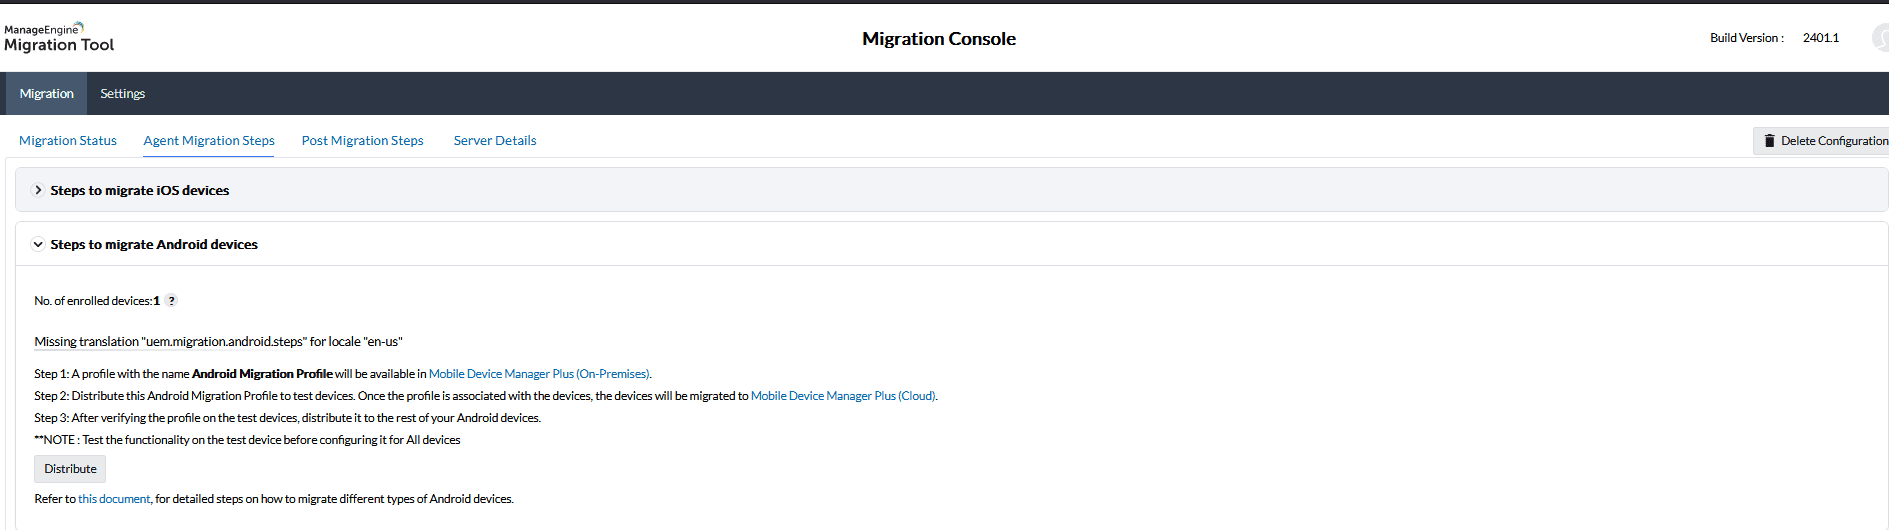
Steps to Migrate Android Devices
- A profile named Android Migration Profile will be available in the Mobile Device Management module on the destination server once data migration is complete.
- Distribute the Android Migration Profile to your test devices first. Once the profile is applied, those devices migrate to the destination server automatically.
- Verify that migration is working correctly on the test devices before proceeding. Once confirmed, distribute the profile to the rest of your Android devices.
Migrate iOS Devices
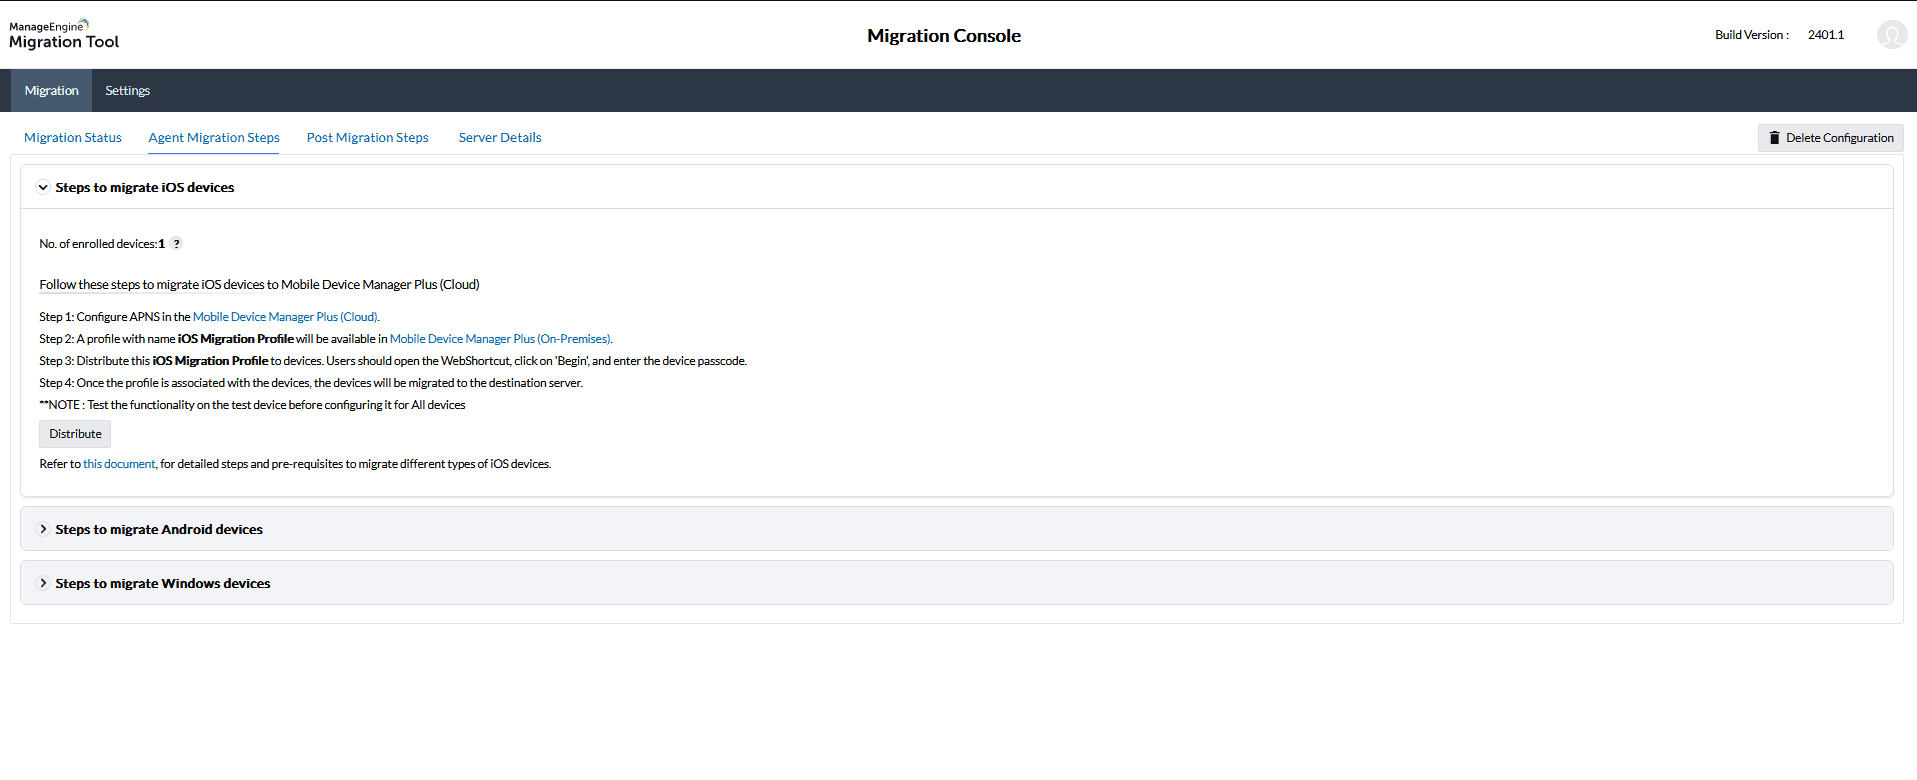
Steps to Migrate iOS Devices
- Configure APNs on the destination server before distributing the migration profile. This is required for iOS device management to function on the destination.
- A profile named iOS Migration Profile will be available on the source server once data migration is complete.
- Distribute the iOS Migration Profile to your devices. Users must open the Webclip on their device, tap Begin, and enter their device passcode to initiate enrollment.
- Once the profile is applied, the device migrates to the destination server automatically.
Post-Migration Verification
- Migrated agents land in the default remote office by default. Manually move them to their respective remote offices after migration is complete. Refer to Remote Office Management for steps.
- Distribution servers for each remote office must be manually installed on the destination server after migration.
- Inventory scan details will populate automatically after agent migration completes.
- Configurations and Automated Patch Deployment (APD) tasks are saved as drafts and remain suspended after migration. Redeploy them to the target devices after moving agents to their respective remote offices.
- Only manually created software packages and template packages that are live and unmodified are migrated. All other packages must be recreated on the destination server.
- Domain metadata transfers automatically. Enter domain credentials on the destination server to sync the domains.
- After migration, mobile devices are moved to their respective groups. Device-specific MDM profiles are not migrated and must be manually redeployed to the respective devices on the destination server.
- Only Android Enterprise apps and enterprise apps are migrated. Apple ABM/ASM tokens must be manually added on the destination server after migration.
Real-World Migration Scenarios
Common migration scenarios that organizations encounter, along with the recommended approach for each.
Situation
Your organization uses Patch Manager Plus for patching and Mobile Device Manager Plus for mobile management as separate standalone products.
Goal
Consolidate into Endpoint Central for a single-console experience.
Approach
Migrate Patch Manager Plus first — patches, policies, and groups transfer via the UEM Migration Tool. Then migrate Mobile Device Manager Plus — profiles, devices, and apps. After data migration completes, deploy Endpoint Central agents to all desktop endpoints and re-enroll mobile devices through the migration profile.
Situation
Your organization uses Patch Manager Plus for Windows patch management alongside a separate third-party UEM platform for Mac and mobile device management — resulting in two consoles and two toolsets.
Goal
Migrate both platforms into a single Endpoint Central instance.
Approach
Use the UEM Migration Tool to migrate Patch Manager Plus data first — patches, policies, and groups transfer fully. For the third-party platform, use a combination of the migration tool for supported data items such as device metadata and groups, and a guided migration session to map existing configurations to their Endpoint Central equivalents. Deploy agents to all endpoints after data migration completed and re-enroll mobile devices through the migration profile.
Situation
You want to migrate your existing on-premises Endpoint Central infrastructure to the cloud to eliminate the administrative overhead of managing server hardware, OS updates, and daily upkeep.
Goal
Move to Endpoint Central Cloud without losing existing configurations.
Approach
Use the UEM Migration Tool for a direct Endpoint Central On-premises → Endpoint Central Cloud data migration. Then deploy cloud agents per OS. The source server stays operational throughout the transition — no gap in endpoint management coverage.
Situation
Your managed service provider was using Endpoint Central MSP to manage your endpoints. You are bringing IT management in-house.
Goal
Migrate from the MSP instance to your own Endpoint Central setup.
Approach
Use the EC MSP → Endpoint Central migration path. All configurations, policies, and device data transfer via the UEM Migration Tool. Coordinate with your MSP for the agent switchover window and redeploy configurations after migration completes.
Situation
Your organization is using another UEM platform but requires broader endpoint management coverage — including stronger patch management, OS deployment, and cross-platform support across Windows, macOS, Linux, and mobile devices.
Goal
Replace the current UEM platform with Endpoint Central.
Approach
Begin with an audit of your current platform's policies, groups, and configurations to identify what can be migrated and what needs to be recreated. Use the UEM Migration Tool to transfer supported data items — device metadata, groups, and users — and work with ManageEngine's guided migration session for platform-specific configuration mapping. Deploy Endpoint Central agents to endpoints and validate coverage before decommissioning the existing platform. Reach out to endpointcentral-support@manageengine.com to begin a guided migration assessment.