How to enable MFA for Windows, macOS, and Linux
You can apply MFA for Windows, macOS, and Linux machines in two ways:
- User-based MFA: Protect desktop or laptop logins, including remote desktop logons using MFA for a specific group of users. Click here for the configuration steps.
- Machine-based MFA: Apply MFA specifically to machines, irrespective of the users accessing it, their enrollment status, and ADSelfService Plus connectivity. The authenticators configured under user-based MFA are prompted during the machine-based MFA process. User Account Control (UAC) prompts, RDP client and server authentication, and system unlocks can also be secured by machine-based MFA. Click here to know more.
Note: The Professional edition of ADSelfService Plus with Endpoint MFA is required for machine MFA to work on Windows server machines. If not, MFA will be bypassed on Windows servers.
Machines can be secured by MFA in one of two ways:
- Online MFA: The default or online MFA process in ADSelfService Plus uses a network connection between the ADSelfService Plus server and user machines to verify the identity of users' based on the authenticator data registered in the ADSelfService Plus server.
- Offline MFA: To ensure identity security even in the absence of a proper network connection or communication with the ADSelfService Plus server, offline MFA verifies user identity with authenticator data securely stored in the user machine by the Windows or macOS login agent. Offline MFA is supported only for Windows and macOS logins, and other peripheral actions related to Windows (UAC prompts, RDP server authentication, and machine unlocks) when the ADSelfService Plus server is inaccessible. Click on these links to learn more about the enrollment and verification process.
Prerequisites
General
- The Endpoint MFA for ADSelfService Plus is required to enable the MFA for machine logins feature. Visit the store to purchase Endpoint MFA.
- SSL must be enabled: Log in to the ADSelfService Plus web console with admin credentials. Navigate to the Admin tab > Product Settings > Connection. Select the ADSelfService Plus Port [https] option. Refer to this guide to learn how to apply for a SSL certificate and enable HTTPS.
- Access URL must be set to HTTPS: Navigate to Admin > Product Settings > Connection > Connection Settings > Configure Access URL and set the Protocol option to HTTPS.
- Enable the required authentication methods. For steps on enabling the authentication methods, refer to the Authenticators section.
- Install the ADSelfService Plus client software login agent for Windows, macOS, and Linux on the machines in which you want to enable MFA. Click here for steps to install the ADSelfService Plus login agent.
Prerequisites for offline MFA
- Offline MFA support requires the Professional Edition of ADSelfService Plus with Endpoint MFA.
- Offline MFA is supported only for Windows machines (except Windows 10 version 1803) and macOS logins. For remote logins, offline MFA is not supported for Windows RDP-client authentication.
- Please make sure that the login agent installed on your machines meets the required version: version 6.3 or above for Windows, and version 3.0 or above for macOS. If not, update the agent to the latest version by following these steps. If you have not installed the login agent yet, please configure offline MFA before doing so to ensure that the changes are updated.
Steps to enable MFA for Windows, macOS, and Linux machines
- Go to Configuration > Self-Service > Multi-factor Authentication > MFA for Endpoints.
- Select a policy from the Choose the Policy drop-down. This will determine which authentication methods are enabled for which sets of users.
- In the MFA for Machine Login section, enable the option by checking the box, choose the number of authentication factors to prompt, and select the desired authentication method from the drop-down menu.
- Select the Choose Authenticators for Offline Machine Login MFA option and select the authentication methods you prefer for offline MFA from the drop-down. The following authenticators are supported:
- Google Authenticator
- Microsoft Authenticator
- Custom time-based one-time password (TOTP) authenticator
- Zoho OneAuth TOTP
- FIDO2 Passkeys (Click here for supported scenarios)
- Click Save Settings.
- If offline MFA isn't configured or a user's machine isn't enrolled for offline MFA, offline access is denied unless:
- The Skip MFA when the ADSelfService Plus server is down or unreachable setting is enabled. This setting can be found under Configuration > Self-Service > Multi-factor Authentication > Advanced > Endpoint MFA > Machine Login MFA.
- Machine-based MFA is not enforced for that machine. The Manage MFA setting under Configuration > Administrative Tools > GINA/Mac/Linux (Ctrl+Alt+Del) > GINA/Mac/Linux Installation > Installed Machines is set to Exempt.
- Changes to the offline MFA configuration, advanced settings, enrollment data, and disenrollment of the machine from offline MFA will be reflected only after the next successful online MFA attempt in that machine.
- Learn how to enable local language support for MFA for Windows.
To force users to enroll for authenticators selected here, choose the Force enrollment option in this advanced setting.
Note:
To avoid degrading security by bypassing MFA or hampering productivity by denying access when offline, it is recommended to enable offline MFA.
Enrolling Windows machines for offline MFA

Authenticator enrollment by users
Once offline MFA is configured, after a user completes online MFA via the login agent or in the ADSelfService Plus portal, they will be prompted to enroll for authenticators configured for offline MFA if not yet enrolled.
Machine enrollment for offline MFA
After online MFA is completed, depending on advanced setting configuration, the user's machine will either be automatically enrolled for offline MFA, or they will have to choose between enrolling their machine and skipping enrollment.
Once the machine is enrolled for offline MFA for the specific user, the user's authenticator enrollment data will be securely transmitted from the ADSelfService Plus server and stored as encrypted data in the specific machine for offline MFA. This process will repeat regularly to keep the authenticator data up to date.
The device enrolled for offline MFA can be disenrolled by the admins or the end users if required.
How does offline MFA work?
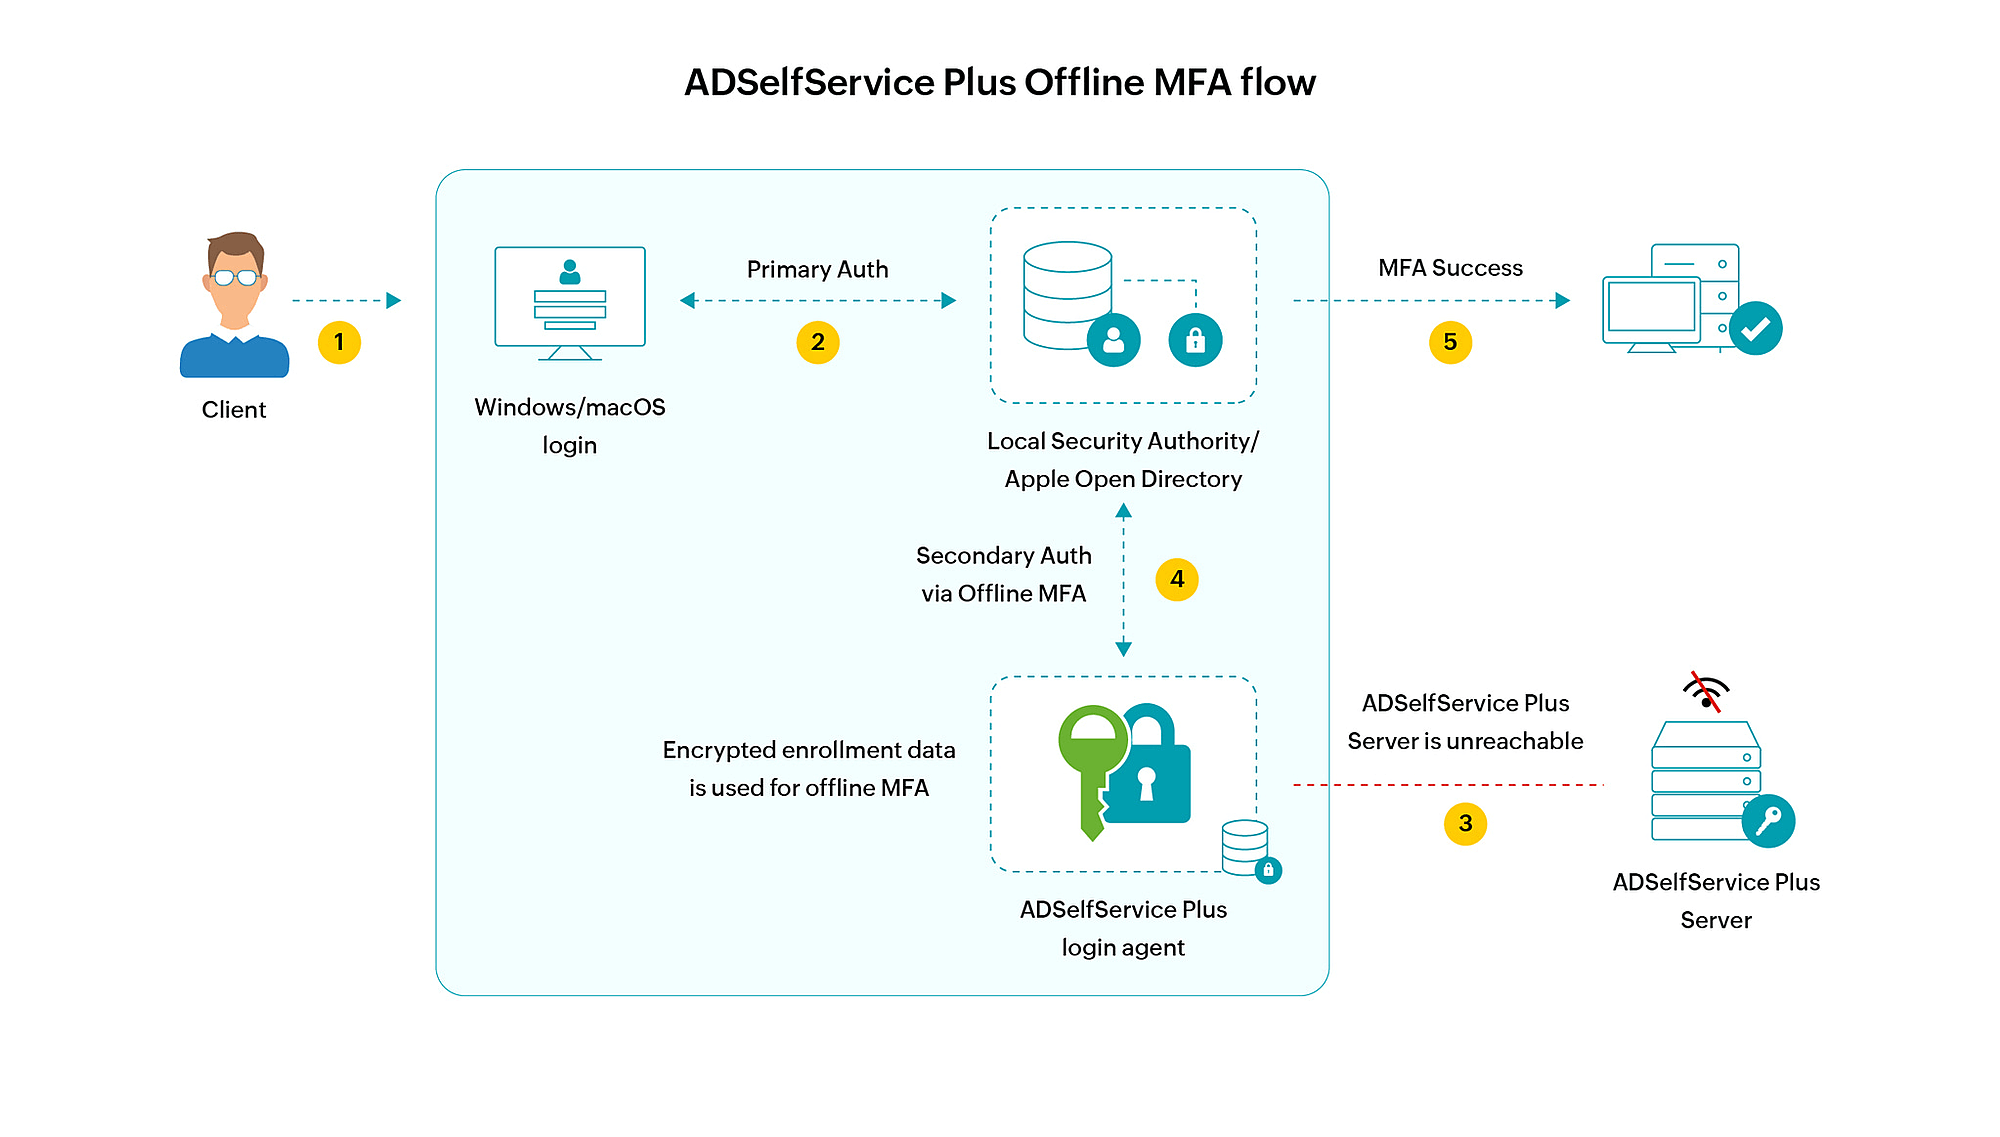
- The user enters their credentials to log in to their machine.
- If primary authentication is successful, the ADSelfService Plus login agent installed in the machine tries to access the ADSelfService Plus server to initiate MFA but fails due to lack of connectivity.
- The login agent then initiates offline MFA.
- If the user completes the required authentication levels successfully, they are logged into the machine.