How to upload files, documents, and folders to SharePoint
Last updated on:In this page
Adding documents to SharePoint allows you to securely store, organize, and collaborate on files in a centralized document library. This article will explain how you can upload files manually using the SharePoint Online interface or PowerShell, or perform large-scale, scheduled file imports using tools like SharePoint Manager Plus.
- SharePoint Online
- Windows PowerShell
- SharePoint Manager Plus
Method 1: Upload files to SharePoint using the SharePoint Online browser UI
Prerequisites
You must have Contribute, Edit, or Full Control permissions on the document library.
Steps
- Sign in to SharePoint Online.
- Navigate to the site containing the document library.
- Open the document library.
- Click + Create or upload from the top-right corner and select Files upload or Folder upload.
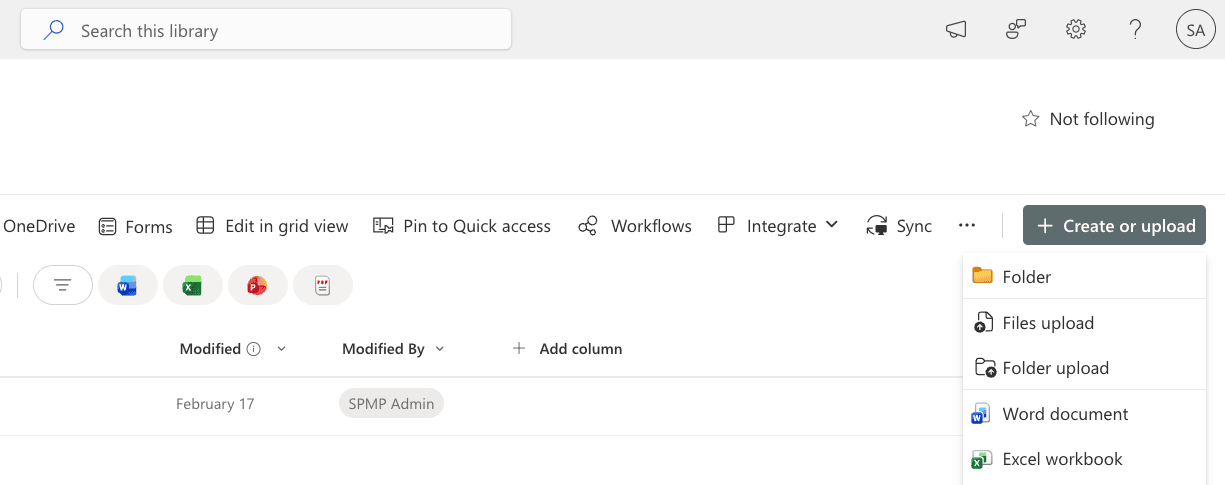
- Choose the file(s) from your device and click Open.
- Alternatively, drag and drop files directly into the document library.

Limitations to consider
- There is no built-in scheduling for uploads.
- There is no incremental sync from file shares.
- Bulk uploads are manual and site-specific.
Method 2: Upload files to SharePoint using PowerShell
Prerequisites
- Before using PowerShell, ensure that:
- You're using an account or app with permission to upload to the target site or library.
- The PnP.PowerShell module is installed.
- Install and connect to SharePoint Online using the script below:
Install-Module PnP.PowerShell -Scope CurrentUser
                    Connect-PnPOnline -Url https://tenant.sharepoint.com/sites/ProjectSite -Interactive
Upload a single file
Add-PnPFile -Path "C:\Files\Report.docx" -Folder "Shared Documents"
Upload multiple files from a folder
Get-ChildItem "C:\Files" -File | ForEach-Object {
    Add-PnPFile -Path $_.FullName -Folder "Shared Documents"
}
Upload files with metadata
Add-PnPFile -Path "C:\Files\Invoice.pdf" `
-Folder "Shared Documents" `
-Values @{"Department"="Finance"}
Supported parameters
The following parameters can be used while adding files to SharePoint:
| Parameter | Description |
|---|---|
| -Path | Specifies the local file path. |
| -Folder | Defines target document library or folder. |
| -Values | Assigns metadata during upload. |
| -Overwrite | Replaces an existing file. |
| -Connection | Uses an existing session. |
| -Web | Specifies the target site. |
Limitations to consider
- Requires scripting knowledge.
- There is no graphical interface.
- There is no centralized dashboard for monitoring uploads.
- Scheduling requires external task automation (e.g., Windows Task Scheduler).
- Incremental sync logic must be custom-built.
Method 3: Upload files to SharePoint using SharePoint Manager Plus
While native SharePoint supports manual uploads and PowerShell enables scripting, ManageEngine SharePoint Manager Plus provides centralized, scheduled, and GUI-based file import capabilities.
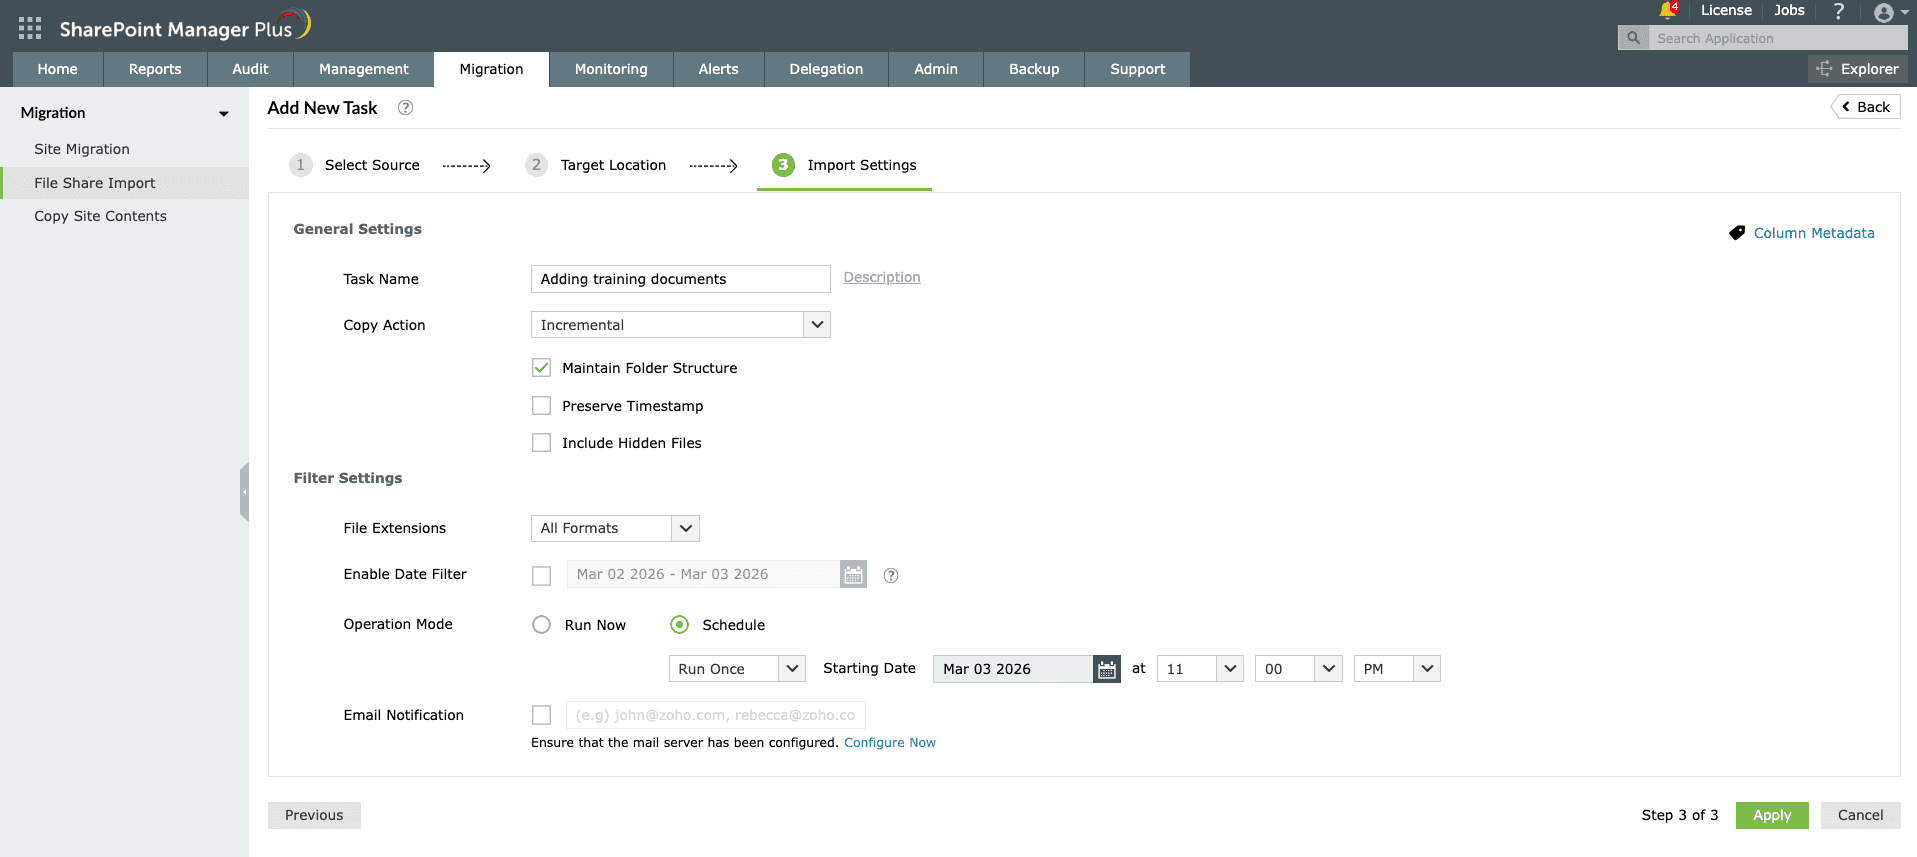
- In SharePoint Manager Plus, navigate to Migration > File Share Import and click + Add New Task from the top-right corner.
- Browse to the source location (local system or mapped network drive) to select the required files or folders, then click Next.
- Choose the tenant, then select the site by clicking the add icon .
- Navigate through the site structure and choose the target document library or folder, then click Next.
- Choose your preferred copy action:
- Copy and Replace Files: Replaces files with the same name.
- Skip If File Exists: Skips duplicate files.
- Keep Both Files: Saves duplicate files with a new name.
- Incremental: Replaces all files the first time, then imports only modified files in future runs.
- Configure other options, like filters and column metadata, if required, and click Apply.

Streamline document and folder uploads to SharePoint
Uploading documents manually works well for small teams, but as file volumes grow, organizations need more control, automation, and visibility. Third-party tools like ManageEngine SharePoint Manager Plus simplify large-scale and recurring uploads.
Incremental file import
Automatically copy only newly added or modified files after the first full upload, reducing duplication and saving bandwidth.
Automate file upload
Schedule file share imports, migration tasks, and report generation to run at a defined time or periodic intervals, saving time and manual effort.
Preserve hierarchy and metadata
Import files to SharePoint while maintaining the original folder hierarchy and assigning metadata values to documents. This ensures files remain organized and properly categorized.
Manage in bulk
Import documents to SharePoint, manage site permissions, and control group memberships at scale, without complex scripts and repetitive manual actions.
Important tips
Verify required permissions
Native tools require Contribute, Edit, or higher permissions to upload files to SharePoint. With SharePoint Manager Plus, admins can delegate import tasks to technicians without modifying native library permissions.
Enable versioning before bulk uploads
Turn on version history to ensure version tracking for uploaded files to protect against accidental overwrites.
Watch file size and path limits
SharePoint Online supports files up to 250GB, but long folder paths may cause upload issues if folder structures are deeply nested.
Use metadata instead of deep folder nesting
Metadata tagging upon upload improves search, filtering, and governance without relying on complex folder hierarchies.
Frequently asked questions
Open the folder inside the document library in SharePoint and click Sync. The folder and its contents will sync using the OneDrive sync client and appear in File Explorer. Any changes you make locally will automatically sync back to SharePoint. See the full guide
You cannot add an entire site directly to File Explorer. However, you can access your site's files directly in File Explorer using one of the two methods below.
Method 1: Add a shortcut to OneDrive (recommended)
- Open your SharePoint site and navigate to the Document tab.
- In the top menu bar, click Add shortcut to OneDrive.
Now, you will see the library folder appear inside your OneDrive - [Company Name] folder in File Explorer.
Method 2: Sync individual libraries
- Navigate to the specific document library you wish to access.
- Click the Sync button in the top toolbar. Repeat this for all document libraries in your site.
This method creates a separate root entry in File Explorer specifically for SharePoint, which is useful if you want to keep SharePoint libraries separate from personal OneDrive folders.
Here are the primary methods for uploading Excel files to SharePoint:
Method 1: Uploading the file
- Open the SharePoint site and navigate to the document library.
- Drag and drop the Excel file from your computer directly into the browser window.
- Alternatively, click Upload in the top menu, select Files upload, and choose your Excel workbook.
Method 2: Import as a SharePoint list
Use this method to turn Excel rows and columns into actionable SharePoint list items.
- In Excel, select your data and click Insert > Table to format it as a table.
- Go to your site, click + New > List.
- Under Import from, select Excel and choose the Excel file from your device.
- Verify that the data types (e.g., text, number, and date) are correctly identified.
- Name your list and click Create.
Method 3: Save directly from Excel
- Open your Excel file.
- Click File > Save As.
- Select your SharePoint site or OneDrive - [Company Name].
- Choose the specific folder and click Save.
Method 4: SharePoint Manager Plus
For automated or incremental uploads, SharePoint Manager Plus provides a centralized GUI to upload Excel files and other content to SharePoint.
To upload a file to SharePoint with Python, use the Office365-REST-Python-Client library. This method is the standard for modern, secure automation.
Prerequisites:
- Install the Microsoft 365 Python Client by running: pip install office365-rest-client
- Register an app in the Azure Portal to get a client ID and client secret.
- Grant Sites.ReadWrite.All API permissions to your app.
This script authenticates using app-only credentials, which bypasses MFA for automated tasks. It reads your local file as binary data, targets a specific SharePoint folder URL, and uploads the file.
from office365.sharepoint.client_context import ClientContext
from office365.runtime.auth.client_credential import ClientCredential

# Configuration
SITE_URL = "https://yourcompany.sharepoint.com/sites/TargetSite"
ID, SECRET = "your_client_id", "your_client_secret"
LOCAL_PATH = "./file.txt"
REMOTE_PATH = "Shared Documents/Folder"

# Auth & Upload
ctx = ClientContext(SITE_URL).with_credentials(ClientCredential(ID, SECRET))

with open(LOCAL_PATH, 'rb') as f:
    content = f.read()

target_folder = ctx.web.get_folder_by_server_relative_url(REMOTE_PATH)
target_folder.upload_file("uploaded_name.txt", content)
ctx.execute_query()

print("Upload successful.")
You can upload files to SharePoint using Power Automate by utilizing the Create file action within a flow triggered by a desired event (e.g., a new email attachment, a form submission, or a local file upload from Power Automate Desktop).
The method for uploading files to SharePoint with Power Automate depends on where the file originates:
- From email attachments: This is an automated cloud flow that triggers when a new email arrives.
- From Power Apps: This involves a cloud flow with a PowerApps (V2) trigger, which accepts file content directly from a Power App.
- From a local computer: This is typically done using Power Automate Desktop, which can either use a premium connector or sync a local folder to SharePoint.