Discovering VMware ESX / ESXi servers in OpManager
Discovering hosts and VMs in the vSphere environment requires providing the IP Address/DNS Name and vSphere credentials for the vCenter/Host. It is crucial that the vSphere user has at least Read access to all hosts and VMs for uninterrupted device monitoring. If the user intends to perform actions like powering on/off VMs, Administrator privileges are recommended. This documentation guides users through the essential steps for VMware discovery.Discover vCenter: Use discover vCenter with the vCenter's VMware credentials, to discover all the hosts, VMs and datastores managed by that particular vCenter.
Discover ESX: Use discover ESX with the ESX's VMware credentials, to discover the host along with its datastore and VMs.
Configuring VMware credentials
Before proceeding, ensure that you have configured the VMware credentials for the vCenter/ ESX host and the SNMP and WMI credentials for the VMs in the credential library.

- Go to Settings → Discovery → Virtualization Discovery → VMware.
- Select the Discovery Type:
- vCenter Discovery – Discovers all ESX/ESXi hosts and virtual machines managed by a vCenter server.
- ESX Discovery – Discovers a standalone ESX/ESXi host.
- Enter the DNS name or IP address of the vCenter server or ESX/ESXi host.
- Select a VMware Credential from the drop-down list or click Add Credential.
- Enter the vSphere Username and Password for the selected vCenter/Host.
- Configure the connection settings by specifying the HTTPS Port (VMware web service port) and the Timeout interval.
- Select Auto VM Discovery to automatically discover newly created virtual machines.
- Click Save.
- Click Discover to fetch the VMware inventory. The Discovered Devices page displays all ESX/ESXi hosts and virtual machines associated with the selected vCenter or ESX host.
- All hosts will be discovered by default. Select or clear the checkboxes to choose the virtual machines that need to be monitored.
- For OS-level and performance monitoring, click Select Credentials and assign the required dependent credentials (SNMP, WMI, or CLI). If the required credentials are unavailable, add them from Settings → Discovery → Credentials.
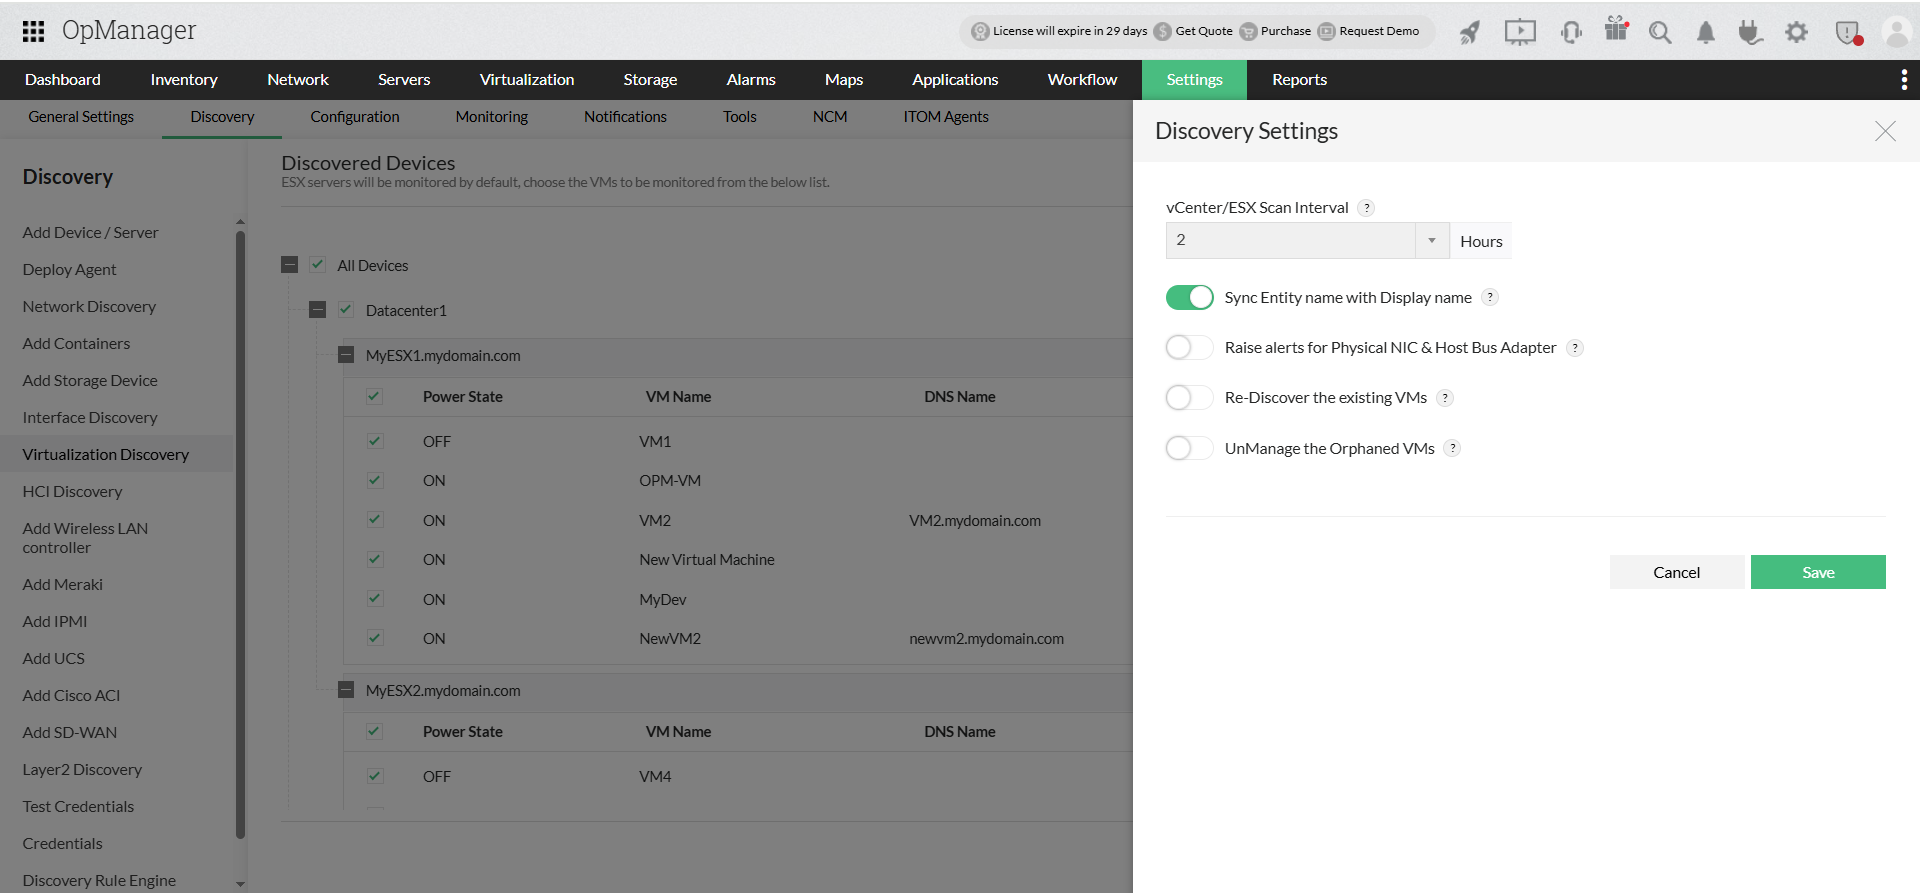
- Click Discovery Settings to configure VMware discovery behavior:
- Set Scan vCenter / ESX Interval (hrs) to automatically rediscover inventory changes.
- Enable Sync entity name with display name to synchronize VMware entity names with device display names.
- Enable Raise alerts for Physical NIC & Host Bus Adapter to receive alerts for NIC and HBA status changes.
- Enable Rediscover existing to rediscover previously discovered VMs during manual inventory updates.
- Enable UnManage the Orphaned VMs to automatically unmanage VMs removed or moved to an orphaned state.
- Click Save to apply the settings
- Click Discover to start the discovery process.
Once discovery is complete, navigate to Virtualization → VMware to view the discovered vCenter, hosts, and virtual machines.
If any of the VMs are already discovered or added, OpManager automatically maps them as virtual devices.
Configuring VM IP Address
OpManager, with the help of the installed VMware Tools, identifies the IP address of the VM and maps it to the host. If VMware Tools are not installed, OpManager discovers it using the VM's entity name. You can assign the IP address manually for such VMs in the host's snapshot page. (Navigate to Inventory -> Devices and then click on the device to open its snapshot page.)
If VM's are not discovered/ mapped to its vCenter/Host because of an unassigned IP address, you can assign an IP address in the vSphere environment. OpManager will automatically map that VM to its vCenter/Host. (or) You can manually assign an IP address to a VM by following the simple steps below.
- Go to the vCenter/Host's snapshot page → Virtual Machines tab.
- Click the start monitoring button in the Monitoring column for devices that are not monitored.
- This will open IP Mapping. Enter the VM's IP address/ DNS name and the corresponding credentials to rediscover and map the VM to its vCenter/Host.
You can now choose to monitor only the required VMs on a Host. If you wish to stop monitoring a VM, you can do so by clicking on the Stop monitor button of the corresponding VM under Virtual Details tab in the vCenter/Hosts snapshot page. Select the relevant icon to stop monitoring the required VMs on the host. OpManager maintains this configuration when a HA, VMotion, or rediscovery happens.
To gain in-depth insights into OpManager's VMware monitoring practices, explore the following help documents.
- Monitoring VMwares
- Monitoring VMware performance
- Configuring Thresholds for VMware Host and VMs
- Managing VMware Alerts
- VMware fault management
- About VMware templates
- How to discover devices and interfaces in OpManager?
- How to add a new credential?
- Can I add a non-admin user account for WMI?
- Can I add devices using SSH?
- Why are devices discovered as 'Unknown'?
- What are devices supported in OpManager?
- Why are interfaces not discovered for my device?
- How can I associate device templates to a newly discovered device?
- How to associate monitors to the discovered device?
- What is a discovery filter?
- How do I configure a new discovery rule?
- How to manage or unmanage a device?
- How to configure device dependencies?
- How can find the missing VMs and hosts?
- How can I discover a VLAN?.
- How does availability monitoring work in OpManager?
- What are the basic system requirements to install and use OpManager?
- How can I troubleshoot issues with device discovery?
- How can I troubleshoot issues with VCenter/ESX discovery?