How to use the PXE troubleshooting tool?
In OS Deployer, PXE booting is essential for image deployment to multiple computers and offline image creation. The PXE troubleshooting tool helps users to resolve issues that hinder the seamless functioning of the PXE booting process.
The tool inspects,
- If any service/application is interfering with the PXE service
- If the PXE media is published, and
- The DHCP configurations required for PXE boot
This document explains how to troubleshoot PXE-related issues and ensure the PXE booting process functions seamlessly.
- Perform PXE troubleshooting
- To configure the Windows DHCP Server using the PXE troubleshooting tool, see the configuration guide.
How to perform PXE troubleshooting?
1. Download and extract the OSDPXETroubleshootingTool.zip.
2. Run PXETroubleshootingtool.exe on the machine where the Central Server/Distribution server is installed.
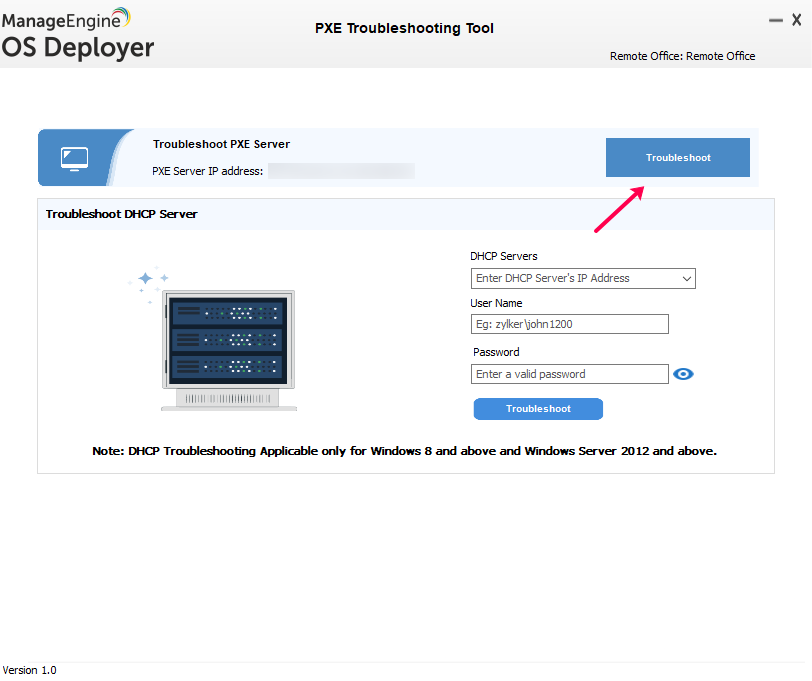
3. If the Central Server/Distribution server is detected, the Troubleshoot button will be shown. Click the Troubleshoot button.

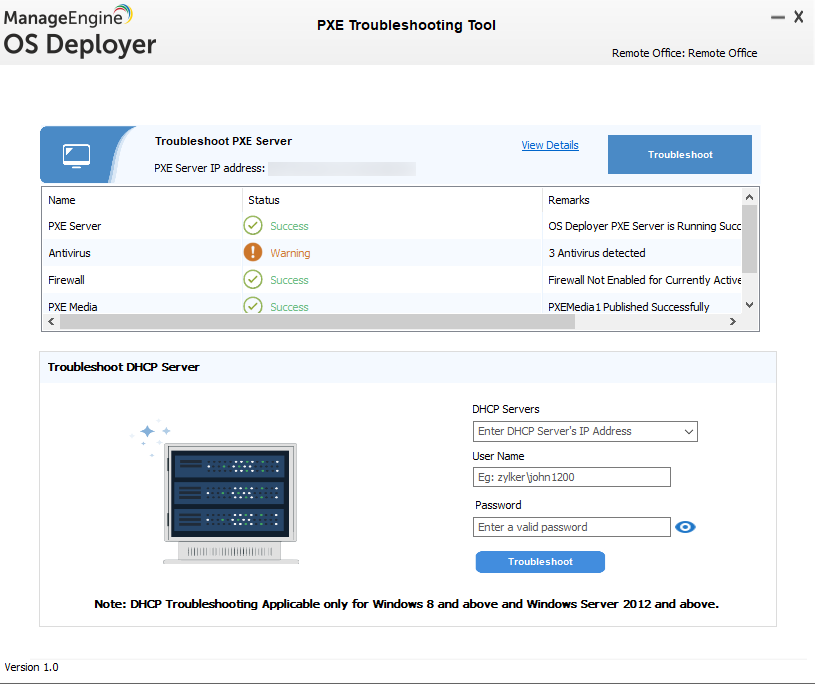
4. You will be shown the summary of PXE-related services and their status.

Summary and Resolution
PXE Server Status
- If it's failed, ensure that the PXE service is running on the machine.
- Navigate to Start → Run → services.msc and double-click the service ManageEngine OS Deployer PXE Server. If the service is not running, click Start.
If the PXE service is not running, you can try manually restarting the service or check if it is overridden by any other service. To restart the PXE service, follow the steps given below:
- Open command prompt in the path C:\Program Files (x86)\ZohoCorp\OSDPXEComponent\PXEService\bin for remote offices. For local offices use the path \bin
- Run osd-tftp.bat -p to stop the PXE service
- Run osd-tftp.bat -r to remove the PXE service
- Run osd-tftp.bat -i to install PXE service
- Run osd-tftp.bat -t to start the PXE service
If the service is still not running, verify if any other PXE service is running in port 69.
- To verify, run the following command in Command Prompt,
netstat -naop UDP | findStr "69"
- You will receive a response with the PID in the far right.
UDP 0.0.0.0:<portnumber> _:_ <PID>
Example: UDP 0.0.0.0:69 _:_ 11235
- Go to Task Manager → Services tab and search for the PID.
- If any other PXE service (e.g., WDS PXE) is running in that port, stop/uninstall the service. And start ManageEngine OS Deployer PXE service.
Antivirus Status
- If any antivirus is detected, ensure that the antivirus is not blocking the ManageEngine OS Deployer - PXE Server Service and Central Server/Distribution Server.
- Also, check if the antivirus doesn't block UDP ports 69 and 4011.
Firewall Status
- If it's failed with the remark "No firewall rule is added to allow the PXE Service", follow the steps given below:
- Navigate to Start → Control panel → Windows Defender Firewall.
- Add inbound & outbound rules in the firewall to allow traffic to ports 69 and 4011.
- To allow traffic, navigate to Advanced Settings → Inbound/Outbound rules → New Rule.
- Under Rule type, select the Port option.
- Select UDP Protocol, feed in port numbers 69 and 4011 under Specific local/remote ports option.
- Select Allow the connection.
- Specify a name for the rule and click Finish.
- If it's failed with the remark "PXE Service Blocked by Firewall", double-click the remark to view the blocking rules. Exclude ports 69 and 4011 to allow PXE Service to transfer data.
PXE Media Status
If failed, ensure that the PXE Media is created and published successfully for that remote office in the web console. To publish the created WinPE media in the PXE server, click Action against the media to be published and select Publish PXE media. This will lead you to the list of remote office(s). Select the remote office(s) and click on the Publish Media button.


 Yes
Yes