Pricing  Get Quote


Configuring Active Directory-based SSO and MFA for Cisco ASA

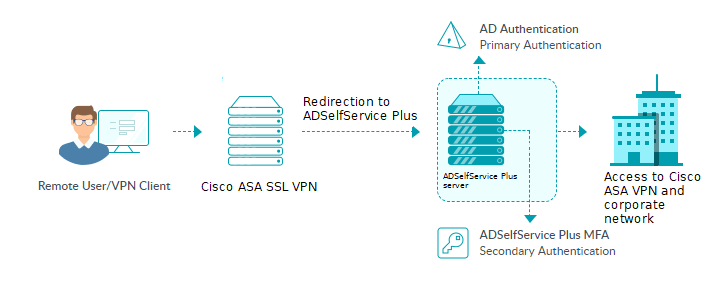
This guide provides steps for enabling single sign-on (SSO) and multi-factor authentication (MFA) for Cisco's Adaptive Security Appliance (ASA) product using ManageEngine ADSelfService Plus' Enterprise SSO and MFA for cloud applications features.

The Enterprise SSO feature allows users to complete Active Directory authentication once and then access integrated SAML-based cloud applications without logging in again.

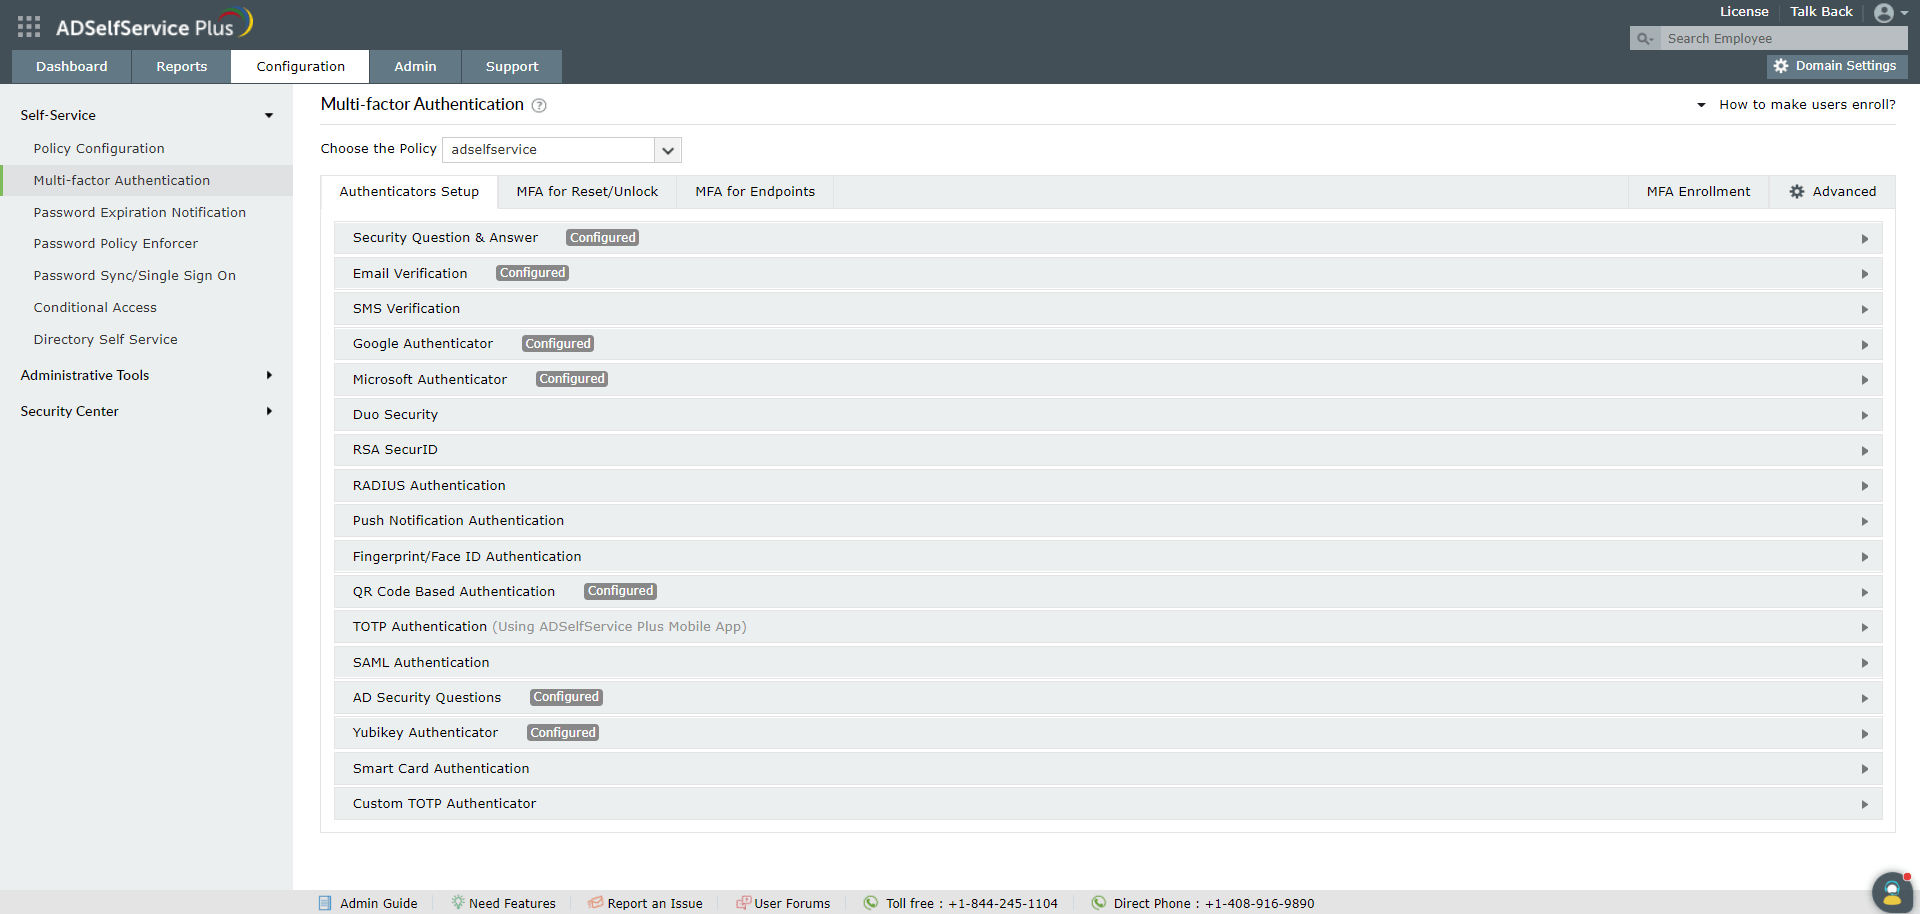
When enabling SSO for Cisco's VPN providers, admins can enable MFA for cloud applications feature to add additional authentication steps during AD-based single sign-on using any of the 18 authentication methods, including Yubico OTP, biometrics, Microsoft Authenticator, Google Authentication, Zoho OneAuth TOTP, and DUO Security.

The SSO and MFA process for Cisco ASA using ADSelfService Plus

Configuring Active Directory-based SSO and MFA for Cisco ASA

Configuration process

Step 1. Configuring SSO for Cisco ASA

Prerequisite:

  1. Log in to ADSelfService Plus as an administrator.
  2. Go to Configuration > Self-Service > Password Sync/Single Sign On.
  3. In the Configured Applications section, click on Add Application.
  4. In the All Applications page that opens, click on Custom Application.
  5. In the Create Custom Application page that opens, click IdP details at the top right of the page.
  6. In the pop-up that opens, copy the Entity ID, Login URL, and Logout URL. Also, click Download X.5O9 certificate to download the ADSelfService Plus certificate.

    Configuring Active Directory-based SSO and MFA for Cisco ASA

1. Configure Cisco ASA SSO:

  1. Open your Cisco ASA using SSH.
  2. Log into the Cisco ASA SSH using admin credentials.
  3. Type the following commands in order to access the configuration terminal:

    ciscoasa> enable

    ciscoasa# config t

  4. Import ADSelfService Plus’s X.509 certificate into a trustpoint:

    ciscoasa(config)# crypto ca trustpoint adselfserviceplus

    ciscoasa(config-ca-trustpoint)# enrollment terminal

    ciscoasa(config-ca-trustpoint)# no ca-check

    ciscoasa(config-ca-trustpoint)# crypto ca authenticate adselfserviceplus

  5. Open the X.509 certificate file downloaded in step 6 of Prerequisites in a text editor. Paste the contents in the configuration terminal.

    -----BEGIN CERTIFICATE-----

    ..............................

    .........certificate content...

    ..............................

    -----END CERTIFICATE-----

  6. End with the word quit on a separate line:

    quit

    INFO: Certificate has the following attributes:

    Fingerprint: *************

  7. Enter yes to accept the certificate

    Do you accept this certificate? [yes/no]: yes

    Trustpoint CA certificate accepted.

    % Certificate successfully imported

  8. If you do not have a signing PKCS12 certificate, you need to generate it using the following openssl commands:

    openssl req -newkey rsa:2048 -nodes -keyout key.pem -x509 -days 365 -out certificate.crt

    openssl pkcs12 -inkey key.pem -in certificate.crt -export -out certificate.p12

    openssl base64 -in certificate.p12 -out certificate.base64

  9. Import the ASA signing PKCS12 into a trustpoint:

    ciscoasa(config)# crypto ca import asa_saml_sp pkcs12 [yourPassword]

  10. Enter the base 64 encoded pkcs12. [It should be the content of the certificate.base64 file from step 4.]
  11. End with the word quit on a line by itself:

    quit

    INFO: Import PKCS12 operation completed successfully

  12. Run webvpn and use it to add ADSelfService Plus as SAML IdP by providing the Entity ID from step 6 of Prerequisites:

    ciscoasa(config)# webvpn

    ciscoasa(config-webvpn)# saml idp https://demo.adselfserviceplus.com/iamapps/ssologin/custom_saml_app/69fe37783af4a3c22769ab3496eda8b41d4f6805

  13. Provide the Login URL and Logout URL copied in step 6 of Prerequisites as the sign-in URL and sign-out URL respectively:

    ciscoasa(config-webvpn-saml-idp)# url sign-in https://demo.adselfserviceplus.com/iamapps/ssologin/custom_saml_app/69fe37783af4a3c22769ab3496eda8b41d4f6805

    ciscoasa(config-webvpn-saml-idp)# url sign-out https://demo.adselfserviceplus.com/iamapps/ssologout/custom_saml_app/69fe37783af4a3c22769ab3496eda8b41d4f6805

  14. Configure ADSelfService Plus as a trusted identity provider for Cisco ASA:

    ciscoasa(config-webvpn-saml-idp)# trustpoint idp adselfserviceplus

    ciscoasa(config-webvpn-saml-idp)# trustpoint sp asa_saml_sp

  15. Configure the Clientless VPN base URL, SAML request signature SAML assertion timeout and Force Authentication:

    ciscoasa(config-webvpn-saml-idp)# base-url https://[yourASAbaseURL]

    ciscoasa(config-webvpn-saml-idp)# signature

    ciscoasa(config-webvpn-saml-idp)# timeout assertion 7200

  16. Configure an IdP for a tunnel group and enable SAML authentication:

    ciscoasa(config)# webvpn

    ciscoasa(config-webvpn)# tunnel-group-list enable

    ciscoasa(config)# tunnel-group cloud_idp_adselfserviceplus type remote-access

    ciscoasa(config)# tunnel-group cloud_idp_adselfserviceplus webvpn-attributes

    ciscoasa(config-tunnel-webvpn)# authentication saml

    ciscoasa(config-tunnel-webvpn)# group-alias cloud_idp enable

    ciscoasa(config-tunnel-webvpn)# saml identity-provider [Entity ID]

  17. Obtain the Assertion Consumer Service (ACS) URL and SP Entity ID values:
  18. Obtain the ASA's SAML SP metadata:

    ciscoasa(config)# show saml metadata cloud_idp_adselfserviceplus

  19. Copy and save the AssertionConsumerService and Entity ID attributes values. They will be used later during ADSelfService Plus configuration.

    ............................................................................

    ............................................................................

    entityID="https://<entity ID>/saml/sp/metadata/cloud_idp_adselfserviceplus"

    ............................................................................

    ........."https://<ACS value>/+CSCOE+/saml/sp/acs?tgname=/cloud_idp_adselfserviceplus"............

    ............................................................................

2. Configure SSO in ADSelfService Plus

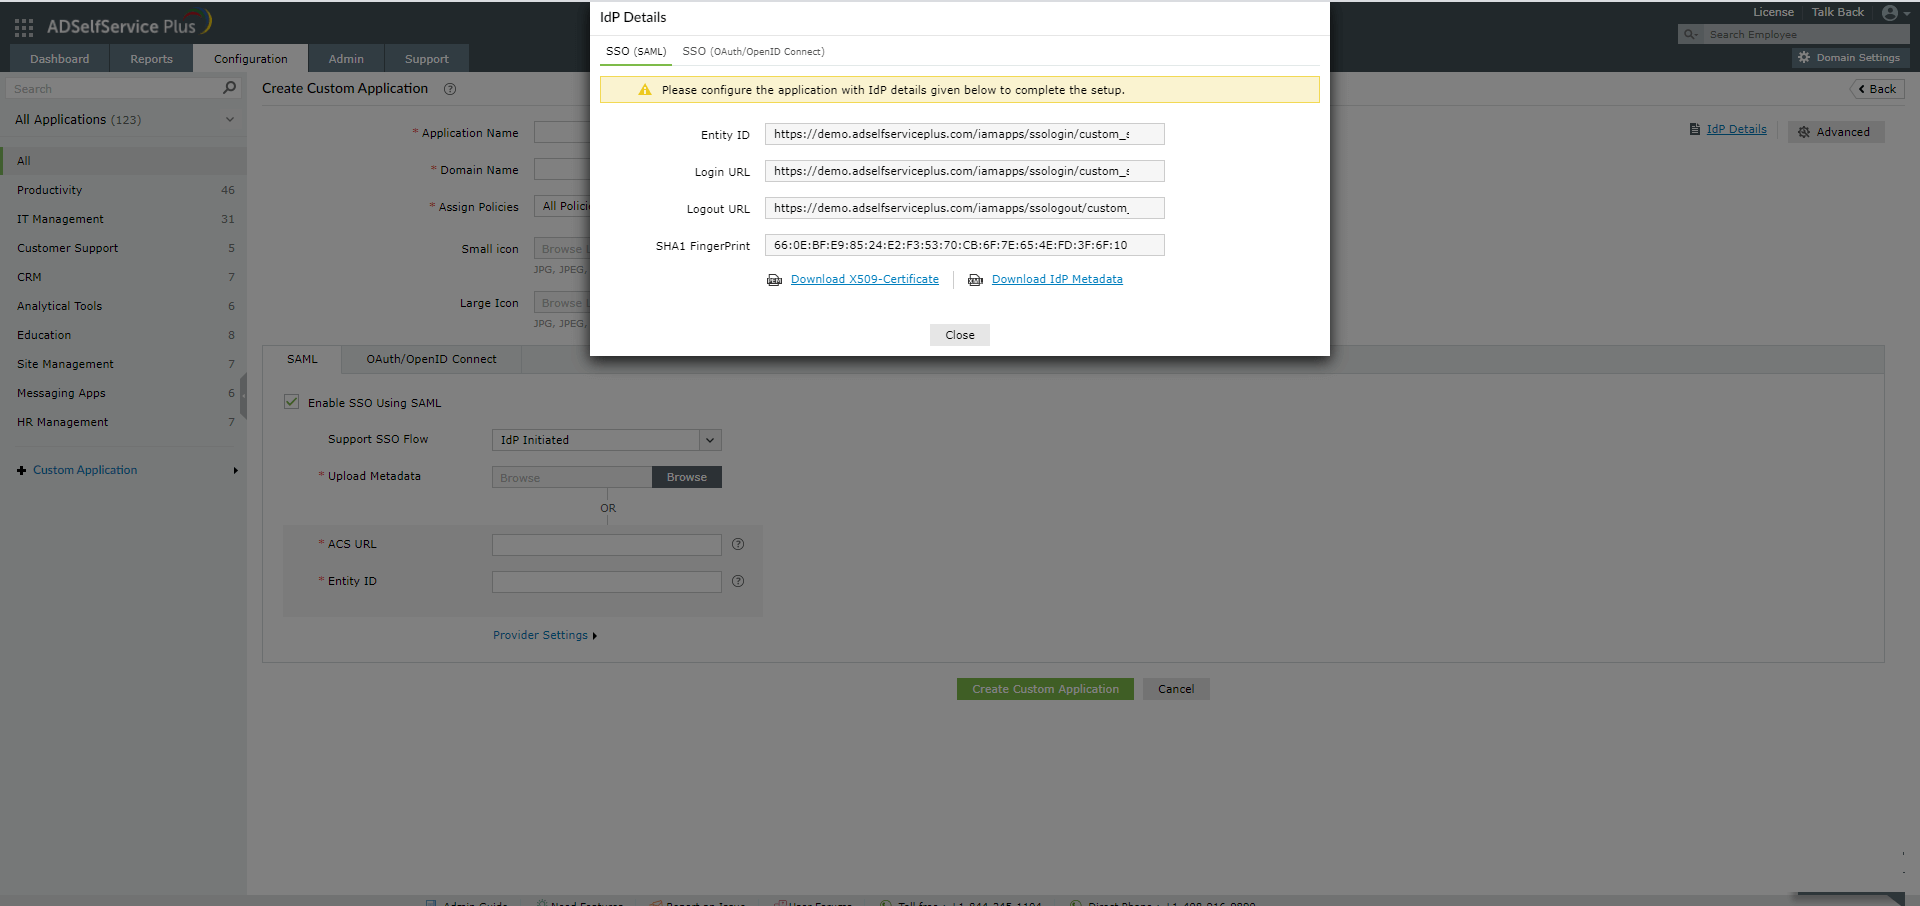
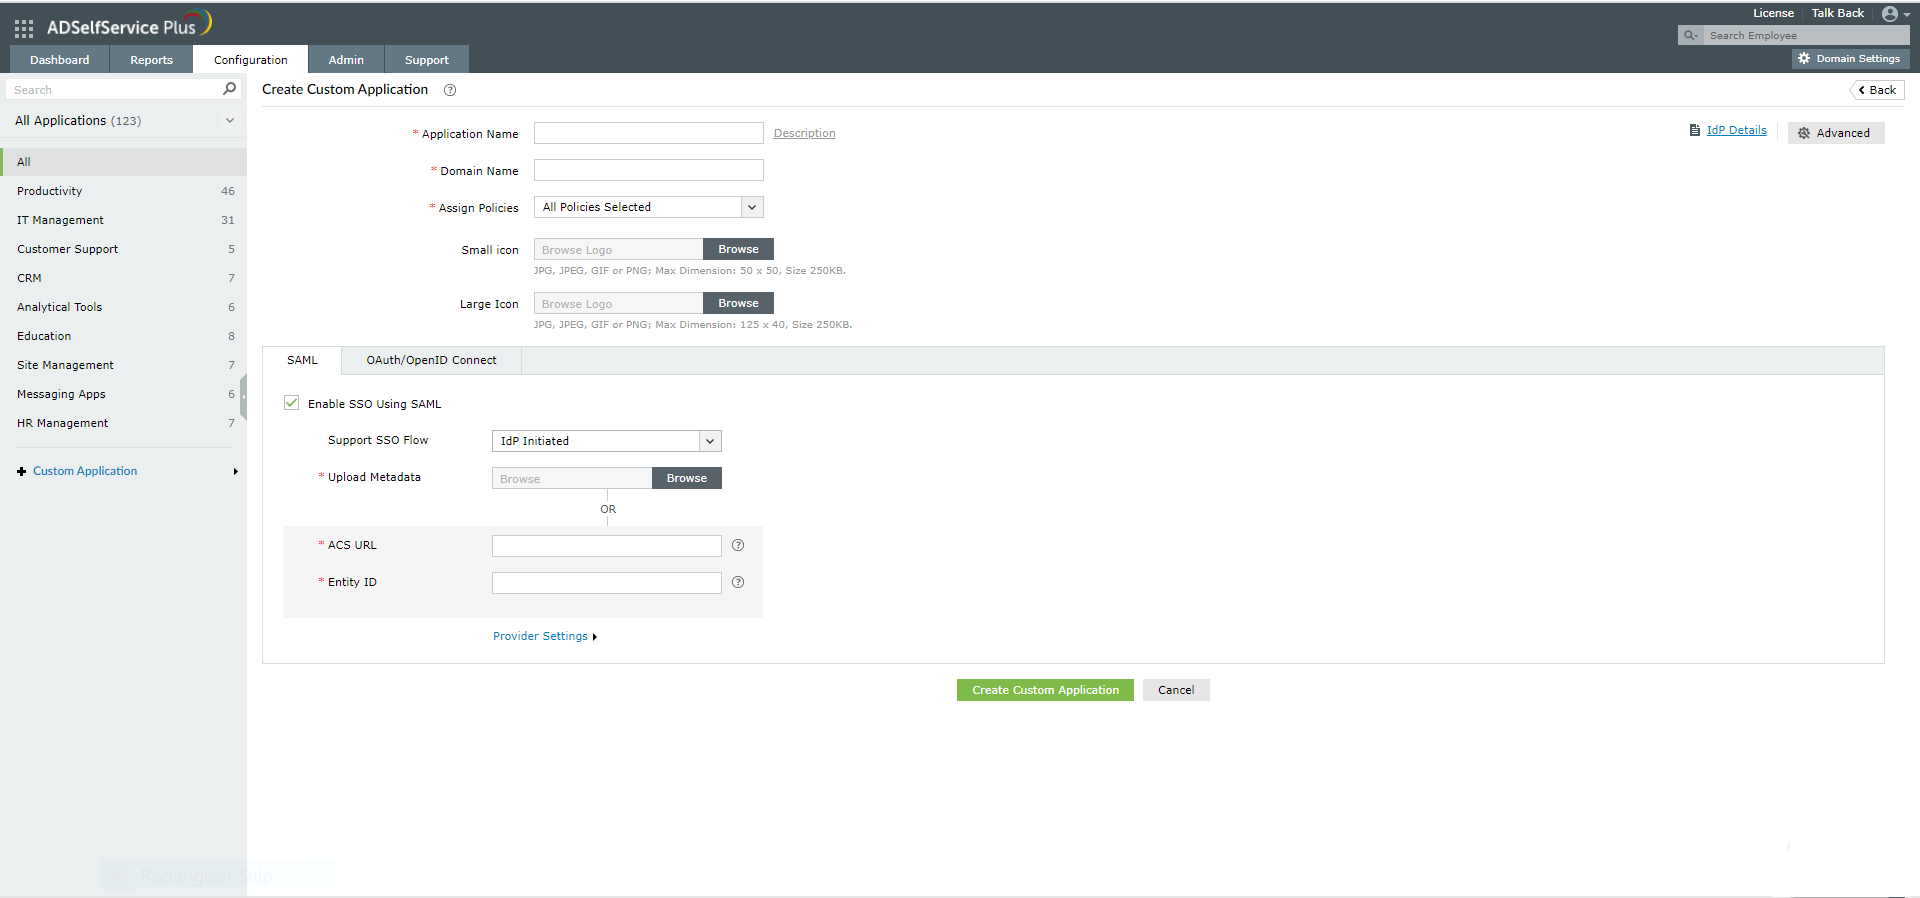
The steps given below will guide you through setting up the single sign-on functionality between ADSelfService Plus and Cisco ASA.

  1. Log in to ADSelfService Plus web console as an administrator.
  2. Navigate to Application → Add Applications → Custom Application.
  3. Enter your Application name and Description.
  4. In the Domain Name field, enter the domain name of your email address. For example, if you use johndoe@mydomain.com to log in, then mydomain.com is the domain name.
  5. Select the policies you want this SSO configuration to apply to from the Assign Policies drop-down. To learn more about creating an organizational unit or a group-based policy, click here.
  6. Upload a Small Icon and Large Icon image for the Cisco ASA app icon.
  7. Select SAML. In the SAML section, click the Enable SSO using SAML checkbox.
  8. Select IdP Initiated from the Support SSO flow drop-down.
  9. Enter the ACS URL from step 19 of Configure Cisco ASA in the ACS URL field.
  10. In the Entity ID field, enter the Entity ID from step 19 of Configure Cisco ASA
  11. Under Provider Settings:
    • Choose an RSA-SHA1.
    • Choose Signed as the SAML response.
  12. Click Create Custom Application.

SSO has now been enabled for Cisco ASA.

Configuring Active Directory-based SSO and MFA for Cisco ASA

Step 2: Enable MFA for Cisco ASA

  1. Go to Configuration → Self-Service → Multi-Factor Authentication.
  2. Configure the authentication methods necessary.

    Configuring Active Directory-based SSO and MFA for Cisco ASA

  3. Go to MFA for Applications.
  4. Select a policy from the Choose the Policy drop-down. This will determine which authentication methods are enabled for which sets of users.
  5. In the MFA for Cloud Applications section, enter the number of authentication methods to be enforced, and select the authentication methods to be used.
  6. Click on the asterisk (*) symbol next to the authentication method to set it as mandatory. You can reorder the authenticators as well.
  7. Click Save Settings.
  8. Access other settings like passwordless login, MFA idle time, and browser trust, by clicking on Advanced.

Features of ADSelfService Plus

Streamline access to your Cisco ASA SSL VPN with AD-based SSO secured by MFA

  Download a free trial now!  Request demo

Request for Support

Need further assistance? Fill this form, and we'll contact you rightaway.

  • Name
  •  
  • Business Email *
  •  
  • Phone *
  •  
  • Problem Description *
  •  
  • Country
  •  
  • By clicking 'Submit' you agree to processing of personal data according to the Privacy Policy.
Highlights

Password self-service

Free Active Directory users from attending lengthy help desk calls by allowing them to self-service their password resets/ account unlock tasks. Hassle-free password change for Active Directory users with ADSelfService Plus ‘Change Password’ console. 

One identity with Single sign-on

Get seamless one-click access to 100+ cloud applications. With enterprise single sign-on, users can access all their cloud applications with their Active Directory credentials. Thanks to ADSelfService Plus! 

Password/Account Expiry Notification

Intimate Active Directory users of their impending password/account expiry by mailing them these password/account expiry notifications.

Password Synchronizer

Synchronize Windows Active Directory user password/account changes across multiple systems, automatically, including Office 365, G Suite, IBM iSeries and more. 

Password Policy Enforcer

Ensure strong user passwords that resist various hacking threats with ADSelfService Plus by enforcing Active Directory users to adhere to compliant passwords via displaying password complexity requirements.

Directory Self-UpdateCorporate Search

Portal that lets Active Directory users update their latest information and a quick search facility to scout for information about peers by using search keys, like contact number, of the personality being searched.

ADSelfService Plus trusted by

Embark on a journey towards identity security and Zero Trust