Block Executable
IT admins always handle a lots of software and applications for their IT. With a lot of applications to handle, IT admins will have the need to restrict the usage of certain applications, IT admins can leverage the Block Executable capability of Endpoint Central.
What is Block Executable
Block Executable is the capability using which IT admins can restrict the initialization and working of an executable. This blocks the running of exe which are launched without installation on the network. If in case, a software is to be prohibited from your network, prohibited software can be configured to achieve the same.
Check these pre-requisites to deploy a block executable rule
- Local Group Policy should be enabled on the target machine
- Default security Policy should be set as "Unrestricted"
- Local Group Policy should be enabled for Administrator
Creating and Removing Block Executable Policy
- To create a Block Executable rule, navigate to Inventory > Block Executable > Add Policy.
- Add Custom Group(s) to which this rule is to be applied.
- Next, add the executable that needs to be blocked using either a Path Rule or Hash Rule
To remove a rule, navigate to Inventory > Block Executable and select the policies you wish to remove and click the "Remove Policy" button.
Block Executable using Path Rule
IT admins can block an executable using the Path Rule when the targeted file name/path name remains static. Path Rule works on the logic of filename and it's extensions. Rename or relocation of the file will lead to failure of execution of the rule applied. This rule can be used to block applications even if they are not available in your network. Using path rule, IT administrators can block the executables located inside the given value.
Block using Hash Value
Hash is a unique value, that represents the executable. To use this method, IT admins should compute the Hash value for the targeted application and add it to the rule to block that executable. If you want to block an executable that is greater than 200 MB in size, use the below attached code snippet to compute the Hash value. While computing the Hash value, provide the full path of the file location of the software that you want to block using Hash value.
- Blocking executables using AppLocker hash value is applicable only for Windows 10 build 1803 & later as well as Windows Server 2019 & later.
- To compute the AppLocker Hash value, use Microsoft PowerShell, as the AppLocker Hash value code snippet is not supported in Command Prompt.
Windows commands
dir <"FILE LOCATION">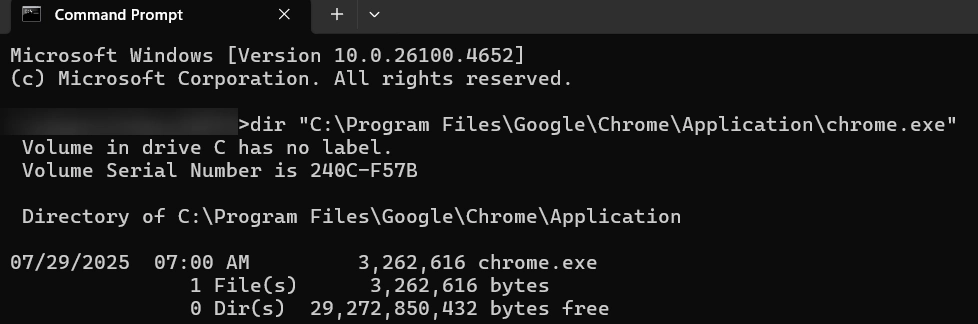
certutil -hashfile <"FILE LOCATION"> md5
certutil -hashfile <"FILE LOCATION"> sha256
(Get-AppLockerFileInformation -Path <"FILE LOCATION">).Hash -replace '^SHA256 0x', 'Hash: '
Block Executable for All Computers
Endpoint Central by default has a custom group named "All Computers Group", which contains all the managed computers. If you want to block an executable for all the managed computers, then you can choose the default Custom Group and select the executable, which needs to be blocked.
Block Executable for Specific Computers
To block an executable for specific target, create a new custom group or use the existing custom groups. Custom groups can be of any type such as, unique or static. You can block executable by choosing custom group which contains computers.
Block executable does not support blocking executable which are initiated by the system.
Troubleshooting Tips
How to enable Local Group Policy on the target machine?
Perform the following actions manually on the target computer:
- Go to Run
Type gpedit.msc
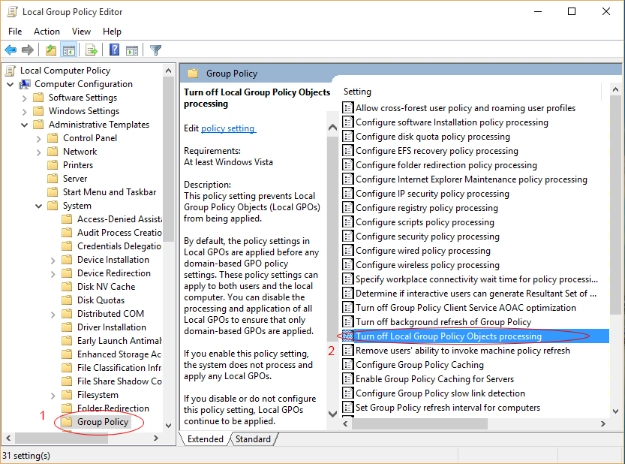
Click Group Policy
Click on "Turn Off Local Group Policy Objects Processing" as shown below.
Ensure that you have chosen "Not Configured" as shown in the below image.
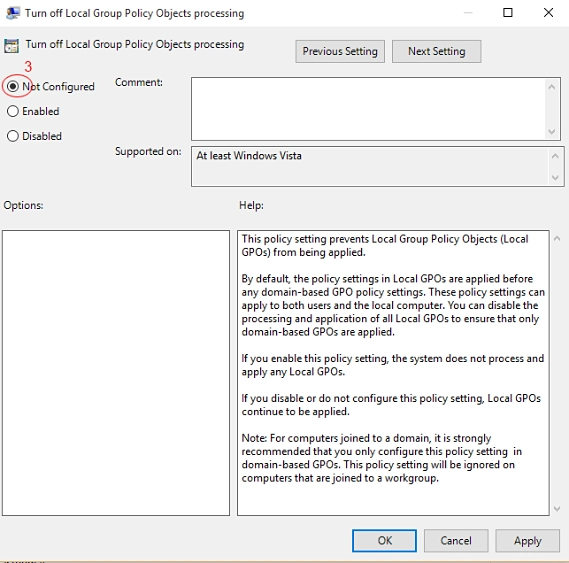
You have now enabled Local Group Policy on the target machine.
How to enable Local Group Policy on the target computer?
Perform the following actions manually on the target computer:
- Go to Run
Type gpedit.msc
- Right Click on "Local Computer Policy", Choose Properties to ensure that "Disable Computer Configuration Settings" is not selected.You have now enabled Local Group Policy on the target computer.
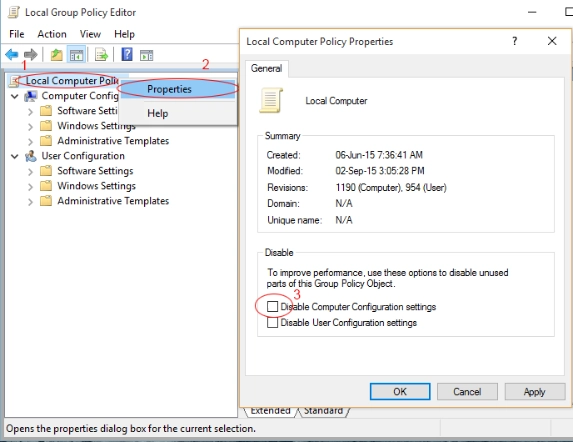
How to set the Default security Policy as "Unrestricted"
Perform the following actions on the target computer:
- Go to Run
Type gpedit.msc
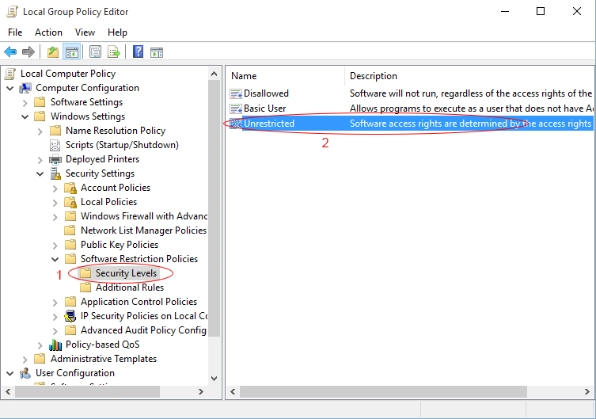
- Click "Security Levels" and double click "Unrestricted" as shown below
- Ensure that the status is set as "Default" as mentioned in the image below.
You have now enabled Local Group Policy on the target computer.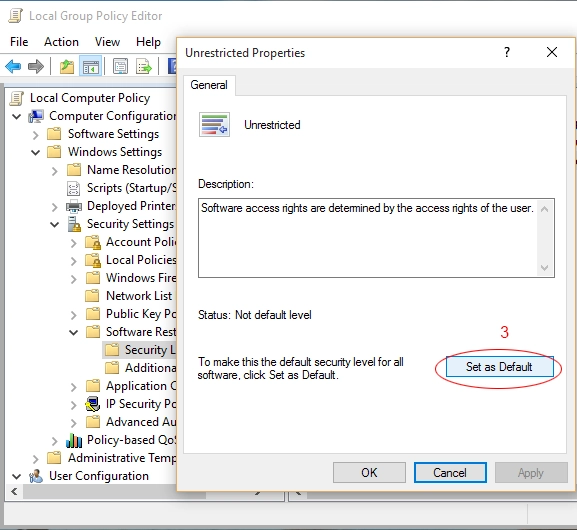
How to enable Local Group Policy for the Administrator?
Perform the following actions on the target computer:
- Go to Run
Type gpedit.msc
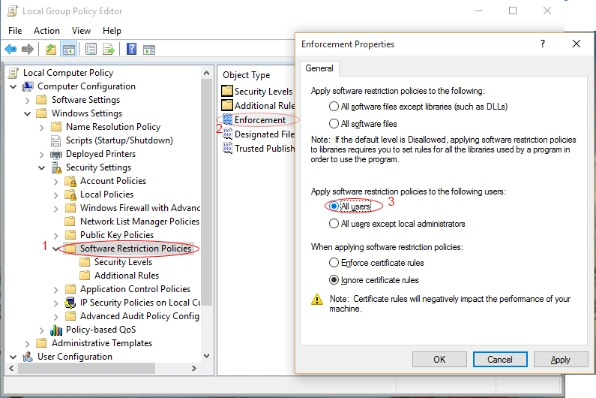
Click "Software Restriction Policy"
Double click "Enforcement" to ensure that "All Users" is selected as shown in the image below
You have now enabled Local Group Policy for Administrators.