Two-factor authentication
Two-factor authentication adds an extra layer of security to the product. When you try to access RecoveryManager Plus, the login process will be complete only after the two-factor authentication is completed. Users with the Admin role can bypass TFA.
To enable TFA,
- Log in to RecoveryManager Plus as an administrator.
- Navigate to Delegation tab → Configuration → Logon Settings → Two-factor Authentication.
- Toggle the button near Two-Factor Authentication. RecoveryManager Plus provides the following modes of secondary authentication.
Click on the name of any method to learn how to set up that method as the second authentication factor.
Note: After configuring TFA, if users cannot access their phones or face issues with the selected second-factor authentication method, you can use Backup Verification Codes to log in. When enabled, a total of five codes will be generated. A code once used will become obsolete and cannot be used again. Users also have the option to generate new codes. To learn how to enable backup verification code, click
here.
Email verification
When this option is selected, RecoveryManager Plus sends a verification code via email to the user’s email address. The user has to enter the verification code to successfully login.
Prerequisites: To use this method as your secondary authentication method, it is mandatory to have configured a mail server with RecoveryManager Plus. If you haven’t already, follow the steps listed here to configure a mail server.
Google Authenticator
When this option is selected, users will be required to enter a six-digit security code generated by the Google Authenticator app for identity verification.
Duo Security
If your organization uses Duo Security for two-factor authentication, it can be integrated with RecoveryManager Plus to secure logins. To log in to RecoveryManager Plus, users need to approve a push notification or enter the six-digit security code generated by the Duo mobile app. Authentication via Duo Security can be configured in two ways in RecoveryManager Plus: Web v2 SDK and Web v4 SDK
Web v2 SDK uses a traditional Duo prompt which will be displayed in an iframe in RecoveryManager Plus, whereas Web v4 SDK uses Duo's OIDC-based universal prompt with a redesigned UI that redirects users to Duo for authentication.
Note: Duo Security has phased out Web v2 SDK. We recommend using Web v4 SDK.
Prerequisites
- Add the API hostname and admin console (e.g., https://admin-325d33c0.duosecurity.com ) as a trusted site or intranet site in the users' machine if they are using older versions of Internet Explorer.
- Please follow these steps in the Duo Admin Panel to migrate from Web v2 SDK, which uses the traditional prompt, to Web v4 SDK, which employs the new Universal Prompt.
Web v4 SDK configuration steps
Note: It is required to have a secure connection to set up the Web v4 SDK authentication. Please make sure that you have enabled HTTPS connection in RecoveryManager Plus.
- Login to your Duo Security account (e.g., https://admin325d33c0.duosecurity.com ) or sign up for a new account, and log in.
- Navigate to the Applications section in the left pane.
- Click on the Protect an Application option.
- Search for Web SDK and click Protect.
- Copy the Client ID, Client secret, and API hostname values.
- In RecoveryManager Plus, navigate to Delegation > Configuration> Logon Settings > Two-Factor Authentication > Duo Security.
- Check the Enable Duo Security box, and select Web v4 SDK for Integration Type.
- Paste the Client ID, Client secret, and API hostname obtained from the Duo Admin Panel in the respective fields.
- Enter the same username pattern used in Duo Security in the Username Pattern field.
- Click Save.
Web v2 SDK configuration steps
- Login to your Duo Security account (e.g., https://admin325d33c0.duosecurity.com ) or sign up for a new account, and log in.
- Navigate to the Applications section in the left pane.
- Click on the Protect an Application option.
- Search for Web SDK and click Protect.
- Copy the Integration key, Secret key, and API hostname values.
- In RecoveryManager Plus, navigate to Delegation > Configuration> Logon Settings > Two-Factor Authentication > Duo Security.
- Check the Enable Duo Security box and select Web v2 SDK for Integration Type.
- Paste the Integration key, Secret key, and API hostname obtained from the Duo Admin Panel in the respective fields.
- Enter the same username pattern used in Duo Security in the Username Pattern field.
- Click Save.
Steps to migrate to the new Universal Prompt
- In the Duo Admin Panel, select the Web SDK application which was previously configured for RecoveryManager Plus, and copy the Integration key, Secret key and API hostname values.
- Scroll down to the Universal Prompt section. The App Update Ready message will be displayed, indicating that Universal Prompt can now be activated for RecoveryManager Plus.

- In RecoveryManager Plus, navigate to Delegation > Configuration > Logon Settings > Two-Factor Authentication > Duo Security.
- Click Web v4 SDK and paste the Integration key, Secret key, and API hostname values in the Client ID, Client Secret, and API Host name fields respectively.
- Once the Web v4 SDK is configured in RecoveryManager Plus and a user authenticates through the frameless Duo v4 SDK, the App Update Ready message in Duo Admin Panel will be updated and the New Prompt Ready message will be displayed.
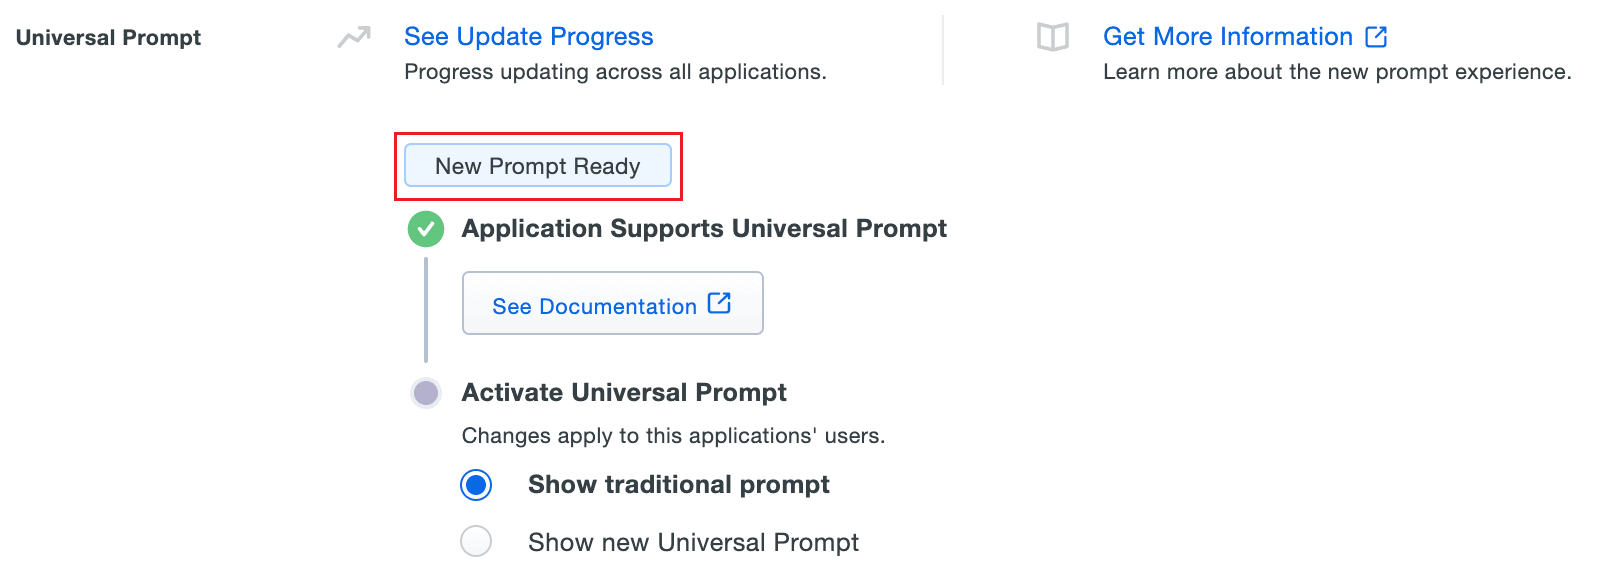
- Select Show new Universal Prompt to activate the universal prompt for RecoveryManager Plus.
RADIUS Authentication
RADIUS-based two-factor authentication for AD360 can be configured in two steps.
Step 1: Integrate RADIUS with AD360
- Log in to RADIUS server.
- Navigate to clients.conf file.(/etc/raddb/clients.conf).
- Add the following snippet in the clients.conf file.
client <RecoveryManagerPlusServerName>
{
ipaddr = xxx.xx.x.xxx
secret = <secretCode>
nastype = other
}
- Restart RADIUS server.
Step 2: Configure RecoveryManager Plus for RADIUS
- In RecoveryManager Plus, mark the checkbox against Enable RADIUS Authentication.
- Provide the Server Name/IP address and the Server Port in the respective fields.
- Select the Authentication Scheme from the drop-down box.
- Provide the Secret Key that was added to the clients.conf file in RADIUS server.
- Select the Desired Username Pattern from the available choices.
- Provide a limit for the Request Time Out (in secs) and click Save.
- When users next try to log in to RecoveryManager Plus, they will be prompted to verify RADIUS Authentication as a verification method after authentication using username and password is successful. Select RADIUS Authentication and click Next.
- Enter the RADIUS password.
- Mark the checkbox against Trust this browser if you do not want to verify every time you log in. You will only be asked to verify once every 180 days.
Note: Do not use this option if more than one person uses the same machine.
- Click Verify Code.
Note: Username Pattern is case-sensitive. Please make sure you select the exact pattern (uppercase or lowercase) you use in your RADIUS server.
Microsoft Authenticator
When this option is selected, users will be required to enter a code generated in the Microsoft Authenticator app during the login process.
Backup Verification Codes
To enable backup verification codes,
- Mark the check-box against Backup Verification Code.
- Once enabled, technicians will be notified to configure their codes when they log in to RecoveryManager Plus. On clicking Configure Now, they will be taken to the two-factor authentication settings page.
- Click the Manage Backup Verification Codes link to view the codes.
- Technicians can also download the codes as a text file, print them, get it delivered to their personal email address, or generate new codes.
Using the backup verification code to login
If technicians find themselves unable to get to their phones or use their selected authentication factor, they can use their backup codes by following the steps listed below.
- In the second-factor authentication page, click the Use backup verification codes link.
- In the backup verification code page, enter one of your backup verification codes and click Verify Code to login.
Upon successful authentication, the technician will be logged in.
Note: If you cannot access your backup verification codes, follow the steps listed here to log in to the product.
Managing users who have enrolled for two-factor authentication
As an admin, you can view which authentication method other technicians have enrolled for and remove users’ enrollment for two-factor authentication using the Enrolled Users option.
To do so, follow the steps below:
- Under the Two-factor Authentication tab, click Enrolled Users.
- In the TFA Enrolled Users pop up, you can view the list of users who have enrolled for two-factor authentication and the authentication method they have chosen.
- To remove a user, select the user and click the
 icon.
icon.
Personalizing two-factor authentication settings
Technicians who have enrolled for two-factor authentication can modify their preferred authentication method and manage trusted browsers by following the steps below:
- Log in to RecoveryManager Plus.
- Click the
 icon in the top-right corner and click Personalize.
- Select Two-Factor Authentication from the left pane.
- To modify authentication mode, click Modify Authentication mode and make the necessary changes.
- To manage trusted browser, click Manage Trusted Browsers and make the necessary changes.
 ADManager Plus
 ADAudit Plus
 ADSelfService Plus
 M365 Manager Plus