Knowledge Base

How to restore SharePoint Online and OneDrive for Business sites using RecoveryManager Plus

In this article:

Objective

This article explains how to restore SharePoint Online and OneDrive for Business sites and items using RecoveryManager Plus. It helps administrators recover entire sites, specific items, or particular versions of data efficiently, ensuring minimal downtime and data integrity. This feature is critical for IT admins managing Microsoft 365 environments as it safeguards against accidental deletions, cyberattacks, or data corruption, maintaining productivity and compliance.

Prerequisites

  • To restore SharePoint Online and OneDrive for Business sites, you must have at least one backup of the sites in RecoveryManager Plus. For information on how to back up sites, click here.

Steps to restore SharePoint Online and OneDrive for Business sites

By following these steps, you can securely restore Exchange Online mailboxes with RecoveryManager Plus.

  1. Log in to RecoveryManager Plus as an administrator.
  2. Navigate to the SharePoint & OneDrive tab > Restore.
  3. Select the Tenant that has the SharePoint Online or OneDrive for Business site with data that needs to be restored.
  4. In the Select Backup drop-down, select the backup schedule that contains the SharePoint Online or OneDrive for Business site to be restored.
  5. Select the site that you want to restore and click the Review and Restore button.
  6. To view how your sites looked at any point in the past, select a date and time from the Snapshot field.
    1
     

    Select a date and time to view how your site appeared at that specific point in the past.

    1
     

    Review the selected sites before starting the restore process.

    Restoring SharePoint Online and OneDrive for Business sites in RecoveryManager Plus

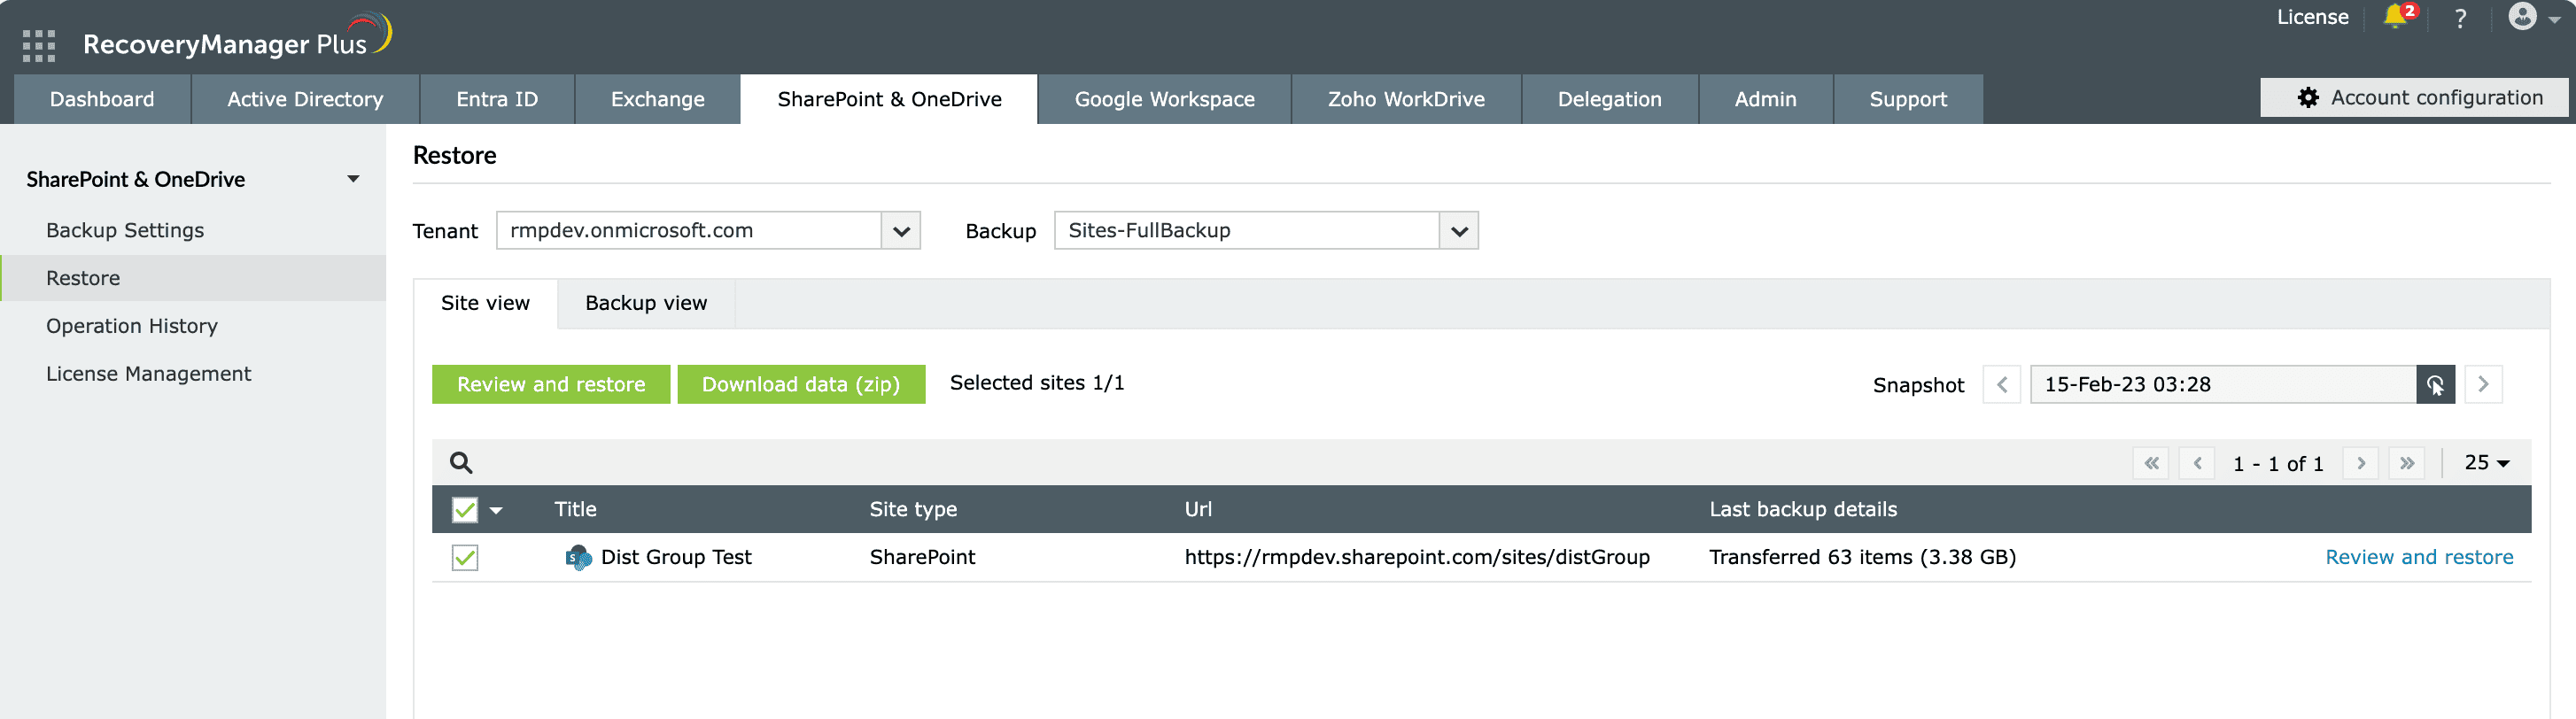
    Figure 1: Restoring SharePoint Online and OneDrive for Business sites in RecoveryManager Plus.

    Select a date and time to view how your site appeared at that specific point in the past.
    Review the selected sites before starting the restore process.

  7. RecoveryManager Plus provides two views to explore site items in each backup:
    • Site View: This is the default restoration view that provides a list of all sites that were backed up in the selected schedule. This view also includes details such as the URL of the SharePoint Online or OneDrive for Business site backed up, the number of items backed up during the last backup cycle, and the size of those items. You can also download the entire content of the site by selecting the site and clicking the Download data (zip) button.
    • Backup view: This view provides the complete execution history of the selected backup schedule along with the number of items backed up during each cycle. Click the Review and Restore link beside the backup that contains the items to be restored.
  8. Select the site and click Review and Restore in any view. The left pane on the next screen will display a list of all the sites you have selected.
  9. To view how your SharePoint Online or OneDrive for Business site looked at any point in the past, select a date and time from the Snapshot field and click Apply. The tree in the left pane will provide an exact representation of your SharePoint Online or OneDrive for Business data at the selected instant. You can restore any site or item to the backed up state.
  10. Clicking the name of any site will expand it and display three trees: Subsites, Contents, and Channels. The subsites tree displays all the SharePoint Online and OneDrive for Business subsites, the contents tree displays all the lists in the site, and the channels tree displays all the posts and files in the Microsoft Teams site.
    1
     

    Select specific site items for recovery.

    Selecting SharePoint Online and OneDrive for Business site items for restoration

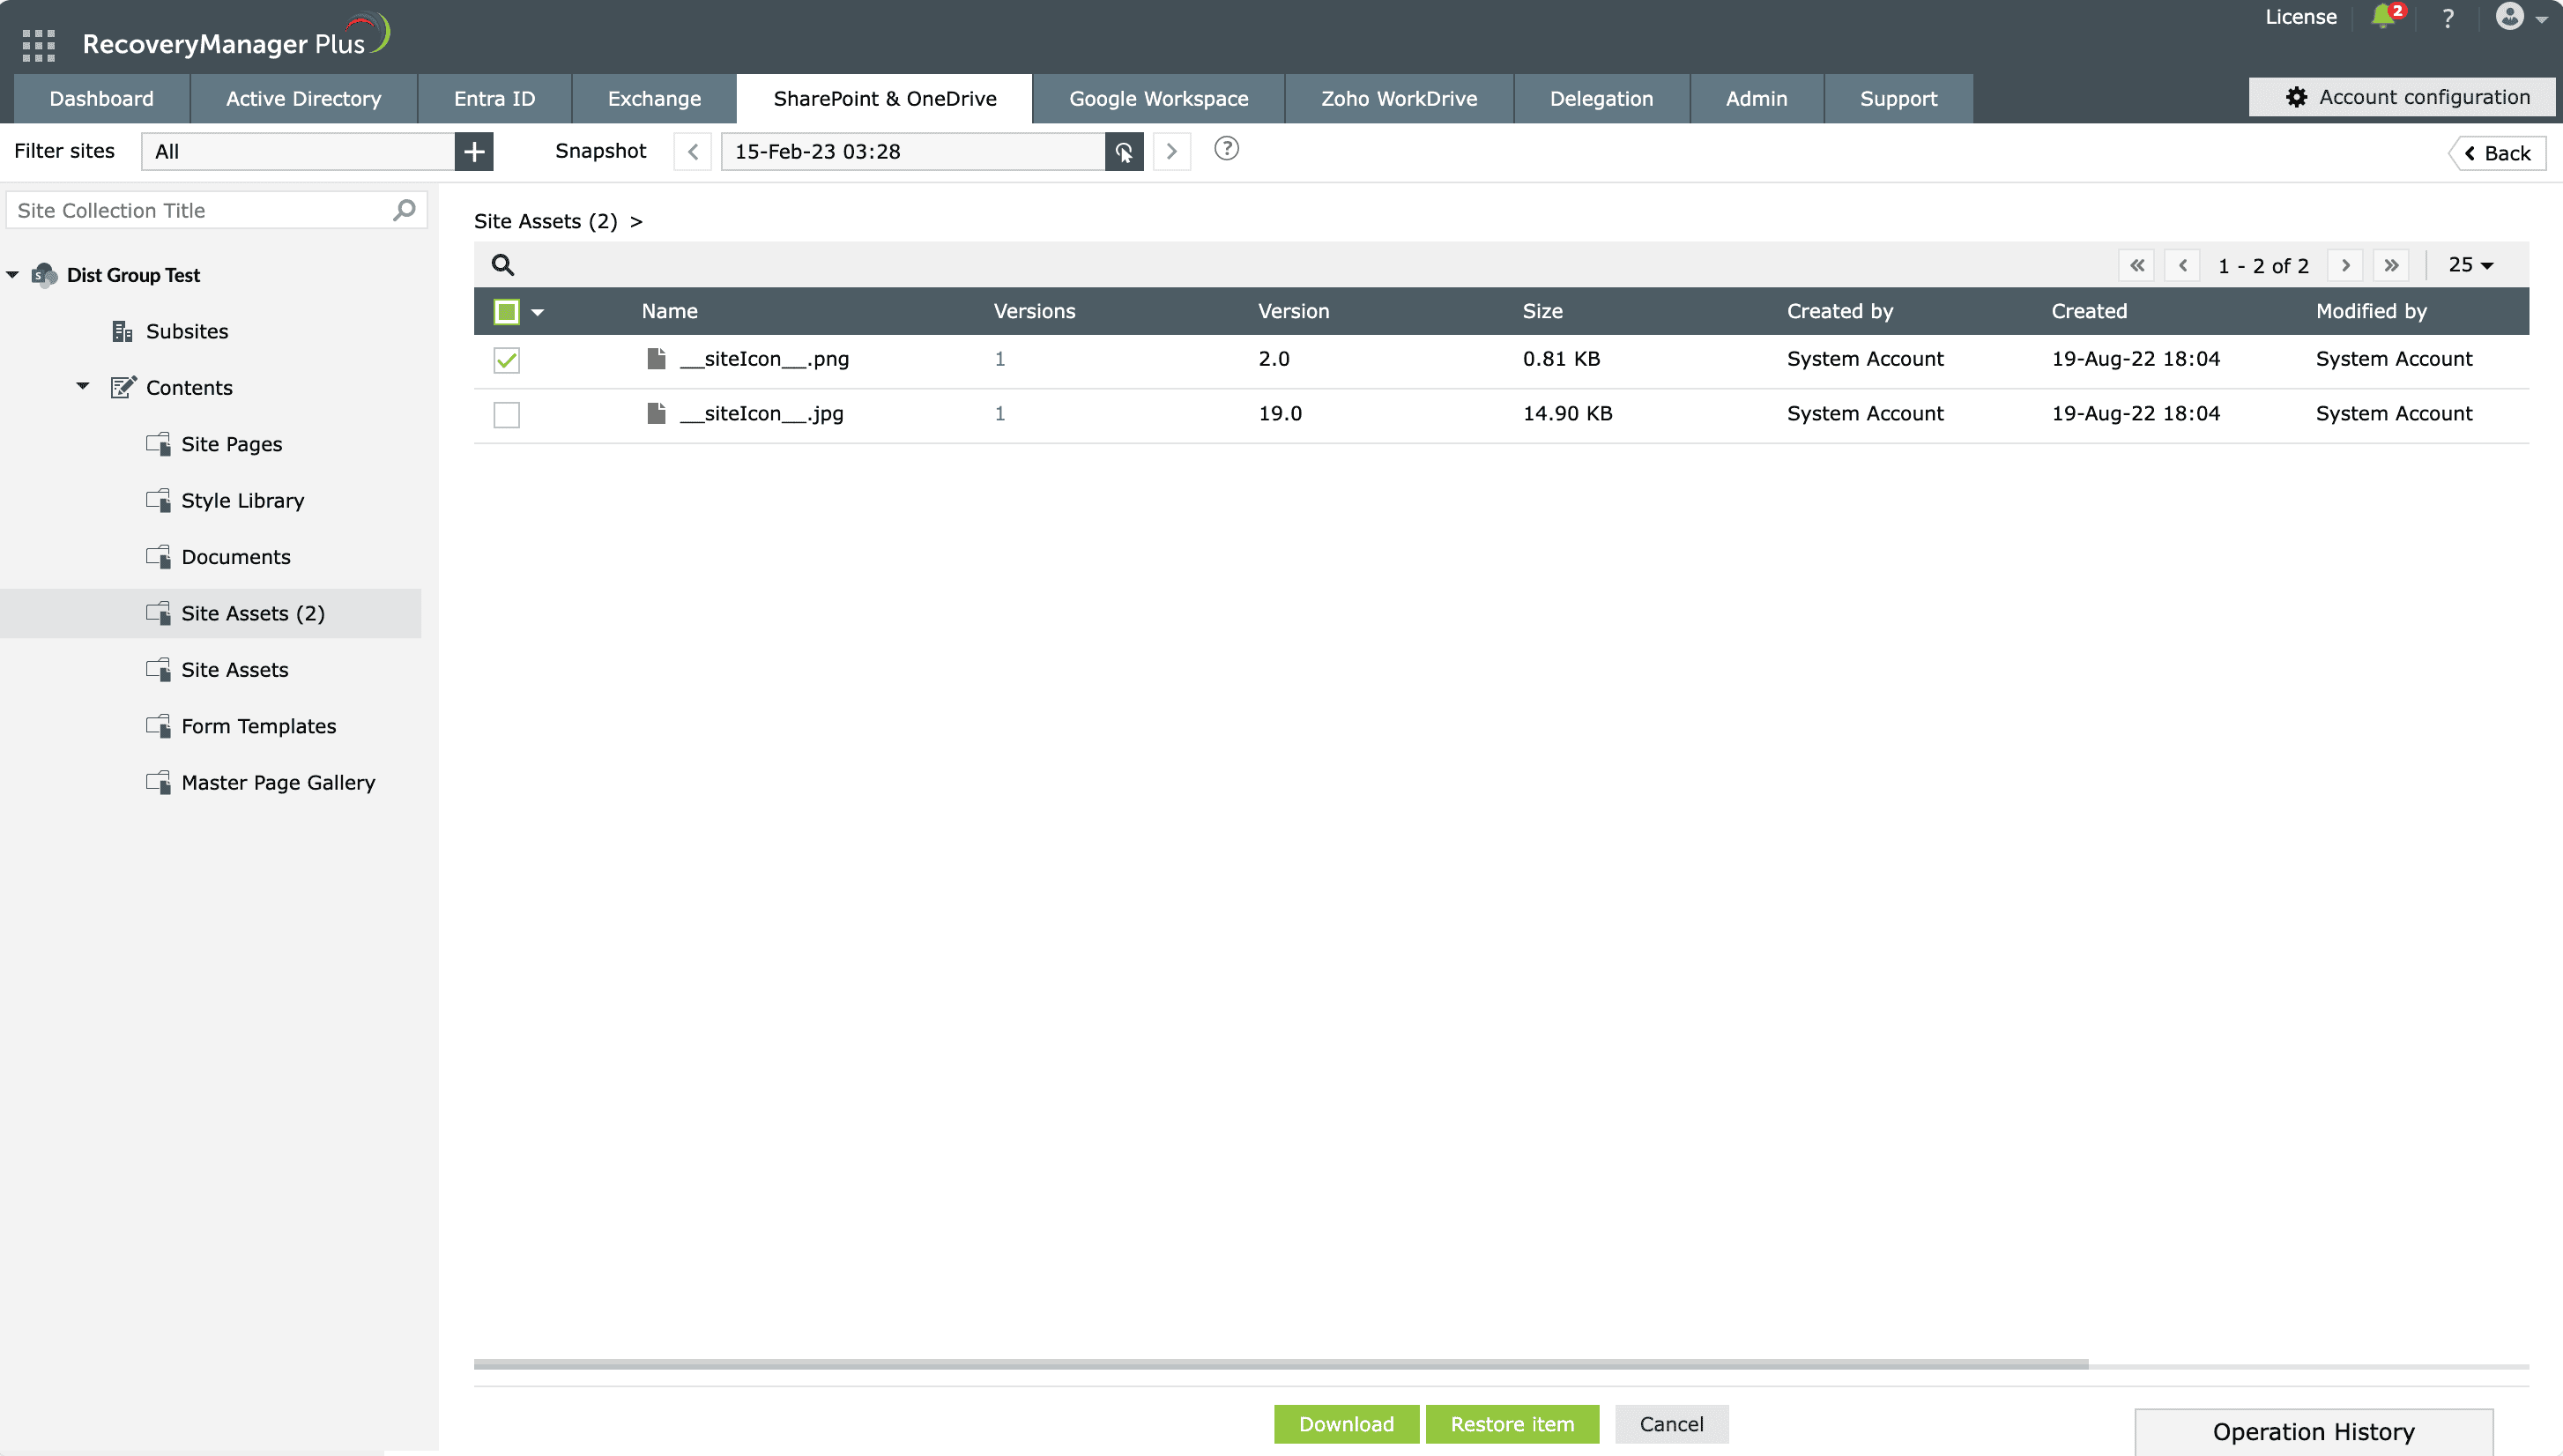
    Figure 2: Selecting SharePoint Online and OneDrive for Business site items for restoration.

    Select specific site items for recovery.

  11. You can restore an entire site or just a few items.
    • Restore an entire site

      To restore an entire site to the backed-up version:

      1. Click the site’s name and click the Restore Site button at the bottom of the screen. You can also use the search bar in the top of the left pane to search for a particular site.
      2. Select if the site should be restored to the same location or a different one.
      3. If you wish to restore the contents to the same site, select Restore to the same site.
      4. If you wish to restore the contents to a different location, select Restore to another site and click Browse. Select the site under which this site is to be restored and click Next.
      5. Provide a name for the restore operation.
      6. You can choose to restore just the changed items or missing items by selecting the appropriate option in the Restore following items section.
      7. Specify if you wish to restore all versions of the list items contained in the site or just the current version. If you need to restore just the current version, you can also specify if you wish to overwrite the version history or merge it with the existing version history in the Version history restore option section.
      8. Note: If you select overwrite, the item will be deleted from the list and the backed-up version will be restored to the list.
      9. Specify if you wish to restore the site permissions, the subsites, and the list views.
      10. Click Restore to begin the restoration process.
      11. Click the Operation History link at the bottom-right corner of the screen to view the status of the last five restoration or download operations performed using the product. Clicking Stop will stop the restore process. Clicking the View All link in the pop-up will take you to the Operation History screen. Click here for more information about the details provided in the Operation History section.
    • Restore individual site items

      To restore individual items to a backed-up version:

      1. Select the items that you would like to restore and click the Restore Item button at the bottom of the screen.
      2. Select if the item should be restored to the same list or a different one.
      3. If you wish to restore the contents to the same site, select Restore to the same list.
      4. If you wish to restore the contents to a different location, select Restore to another list and click Browse. Select the site and list in which the items are to be restored and click Next.
      5. Provide a name for the restore operation.
      6. You can choose to restore just the changed items or missing items by selecting the appropriate option in the Restore following items section.
      7. Specify if you wish to restore all versions of the item or just the current version. If you need to restore just the current version, you can also specify if you wish to overwrite the version history
        Note: If you select overwrite, the item will be deleted from the list and the backed-up version will be restored to the list.
      8. Specify if you wish to restore the permissions and previously configured list views.
      9. Click Restore to begin the restoration process.
      10. Click the Operation History link in the bottom-right corner of the screen to view the status of the last five restoration or download operations performed using the product. Clicking Stop will stop the restore process. Clicking the View All link in the pop-up will take you to the Operation History screen. Click here for more information about the details provided in the Operation History section.
    • Restore a particular version of any item

      To restore a particular version of any item:

      1. Click the number under the Versions column of the item that is to be restored.
      2. On the screen that appears, you will be provided with a list of all versions of the items.
      3. To preview the item’s version, hover the mouse over the version and click the preview icon icon-preview.
      4. To restore the item to any particular version, hover the mouse over the version and click the Restore link.
      5. Select if the item should be restored to the same list or to a different list.
      6. If you wish to restore the contents to the same site, select Restore to same list.
      7. If you wish to restore the contents to a different location, select Restore to another list and click Browse. Select the site and list in which the items are to be restored and click Next.
      8. Provide a name for the restore operation.
      9. You can choose to restore just the changed items or missing items by selecting the appropriate option in the Restore following items section.
      10. Specify if you wish to overwrite the version history or merge it with the existing version history.
      11. Specify if you wish to restore the permissions and previously configured list views.
      12. Click Restore to begin the restoration process.
      13. Click the Operation History link in the bottom-right corner of the screen to view the status of the last five restoration or download operations performed using the product. Clicking Stop will stop the restore process. Clicking the View All link in the pop-up will take you to the Operation History screen. Click here for more information about the details provided in the Operation History section.

By following these steps, you can securely restore SharePoint Online and OneDrive for Business sites with RecoveryManager Plus.

Related topics and articles

Last updated on: 23-05-2025

Need further assistance?

Fill this form, and we'll contact you rightaway.

Request Support

  •  
  • *
     
  • *
     
  • *
     
  • By submitting you agree to processing of personal data according to the Privacy Policy.

"Thank you for submitting your request.

Our technical support team will get in touch with you at the earliest."

A single pane of glass for AD, Entra ID, Microsoft 365,
Google Workspace, Exchange, and Zoho WorkDrive backup.
  • » Personal WorkDrive backup
  • » Backup retention
  • » Incremental backup