Add an Oracle database monitor in OpManager Nexus
Track the availability and performance of your Oracle Database instances and databases by monitoring the key performance indicators—including the pluggable database (PDB), response time, hit ratios, System Global Area (SGA), Program Global Area (PGA), Tablespaces, Sessions, Redo log files, and Automatic Storage Management (ASM) disk group—and get instant alerts whenever there is a breach.
Prerequisites
Supported versions:
- Oracle versions: 11g, 12c, and above
- Linux OpManager Nexus Server Monitoring agent version 19.8.0
- Windows OpManager Nexus Server Monitoring agent version 22.3.00
- Operating system: Linux and Windows
Add an Oracle Database monitor
The steps to install the Instant Client and to install and configure the agent depend on your operating system. Select your operating system to view the steps that apply. The steps to create a user and grant access are the same for both.
Install the Instant Client
- Navigate to the Oracle Instant Client Downloads page:
https://www.oracle.com/database/technologies/instant-client/downloads.html - Download the desired Oracle Instant Client zip files. Ensure to select the correct platform, architecture, and packages of your choice. For example, if your application is 64-bit, then select 64-bit Instant Client and download the Basic Package zip file.
Linux
- All installations require a Basic or Basic Light package. All other packages are optional. For more information, refer Instant Client Installation Guide
- Ensure that the unzipped directory is accessible to the OpManager Nexus Linux Agent on your server. Note that this Instant Client path will be required for OpManager Nexus Oracle monitoring.
- Example:
mkdir -p /opt/oracle/ && cd /opt/oracle/
unzip /opt/oracle/instantclient-basiclite-linux.x64-21.13.0.0.0dbru.zip
- Example:
Windows
- Ensure that you select the Windows platform. All installations require a Basic package. All other packages are optional. For more information, refer Instant Client Installation Guide
- Ensure that the unzipped directory is accessible to the OpManager Nexus Windows Agent on your server. Note that this Instant Client path will be required for OpManager Nexus Oracle monitoring.
- Example:
Extract the downloaded zip file tomkdir C:\oracle
C:\oracle. The Instant Client path will then be similar to the following:
C:\oracle\instantclient-basic-windows.x64-23.26.1.0.0\instantclient_23_0
- Example:
Create a user (multi-tenant architecture (CDB) databases)
- You need to create a user in the Oracle database for the OpManager Nexus server monitoring agent. With the following instructions, you can create a user and grant the Oracle Database user permission. These steps are the same for Linux and Windows.
CREATE USER C##username IDENTIFIED BY "password" CONTAINER=ALL;
Example:
CREATE USER C##site24x7 IDENTIFIED BY "Monitoring@123" CONTAINER=ALL;
Create a user for non-CDB databases (and version 11g)
You need to create a user in the Oracle database for the OpManager Nexus server monitoring agent. With the following instructions, you can create a user and grant the Oracle Database user permission.
CREATE USER username IDENTIFIED BY "password";
Example:
CREATE USER site24x7 IDENTIFIED BY "Zylker123";
Grant access (multi-tenant architecture (CDB) databases)
- The OpManager Nexus agent needs a few privileges to collect the metrics. You need to provide the Oracle user with the following limited privileges by connecting to the CDB container (CDB$ROOT) with the SYS user:
GRANT CREATE SESSION TO C##username CONTAINER=ALL;
GRANT CONNECT TO C##username CONTAINER=ALL;
GRANT SELECT_CATALOG_ROLE TO C##username CONTAINER=ALL;

ALTER USER C##username SET container_data=all container=current;
The following permission is required for monitoring ORA alerts:
GRANT SELECT ON v$diag_alert_ext TO C##username;
Grant access for non-CDB databases (and version 11g)
Then grant access to the user created in the previous step:
GRANT CREATE SESSION TO <username>;
GRANT CONNECT TO <username>;
GRANT SELECT_CATALOG_ROLE TO <username>;
The following permissions are required for monitoring ORA alerts (only for version 11g):
CREATE OR REPLACE VIEW v_$site24x7_alertlog_ext AS SELECT * FROM x$dbgalertext;
CREATE OR REPLACE PUBLIC SYNONYM v$site24x7_alertlog_ext FOR sys.v_$site24x7_alertlog_ext;
GRANT SELECT ON v$site24x7_alertlog_ext TO <username>;
If there are multiple Oracle Database instances, repeat the above steps for each Oracle Database instance.
Install and configure the agent
After providing the required permissions, you can proceed to add an Oracle Database monitor using the following steps for your operating system.
Linux
- Log in to OpManager Nexus and install the OpManager Nexus Linux server monitoring agent on your Linux server.
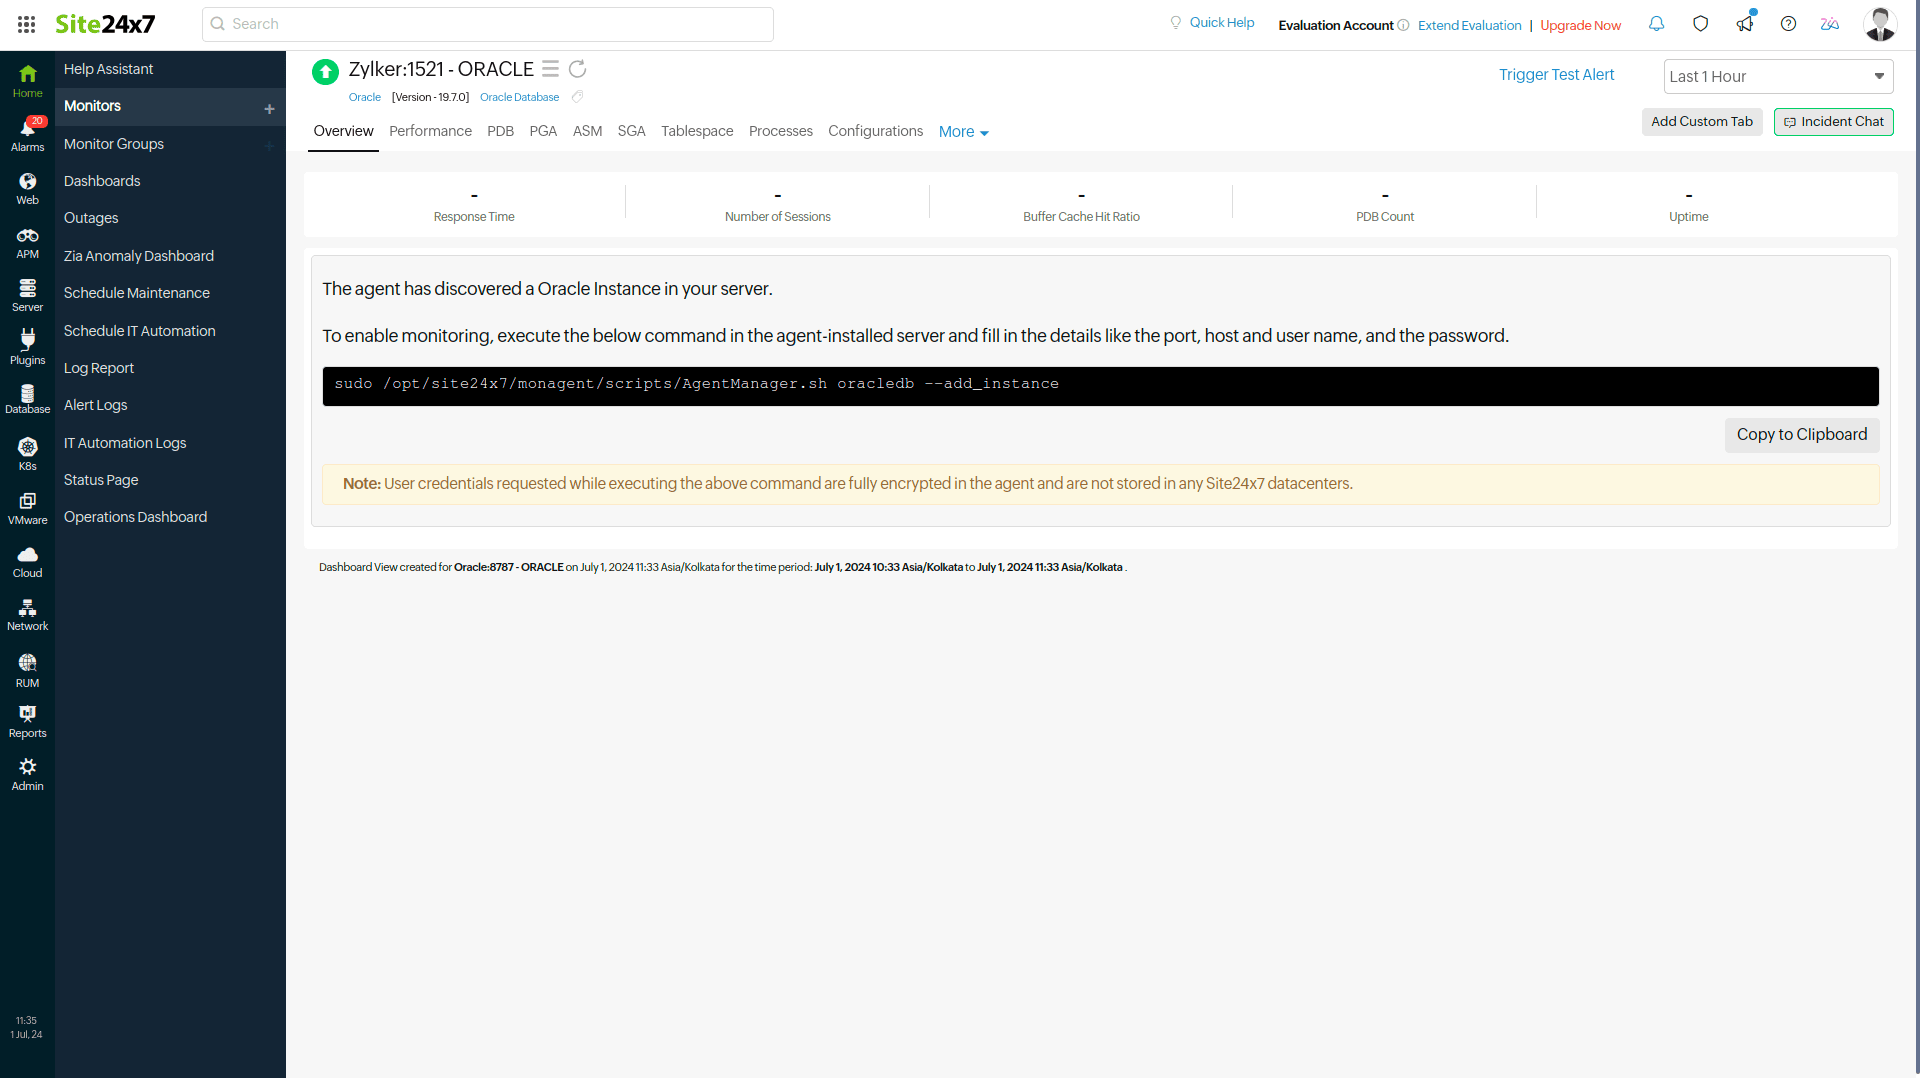
- OpManager Nexus server monitoring agent automatically discovers Oracle Database instances in your servers and adds a sample view of the Oracle monitor on the Home tab. To start monitoring, follow the instructions below to authenticate OpManager Nexus to collect metrics.
Enter the Instant Client path procured from the above steps. This entry is a one-time step, and it need not be repeated for all the instances. This Instant Client path will be used by the OpManager Nexus agent for all the Oracle instances.
To update the Instant Client path if it is changed, use the below command:
/opt/site24x7/monagent/scripts/AgentManager.sh oracledb --update_library_path

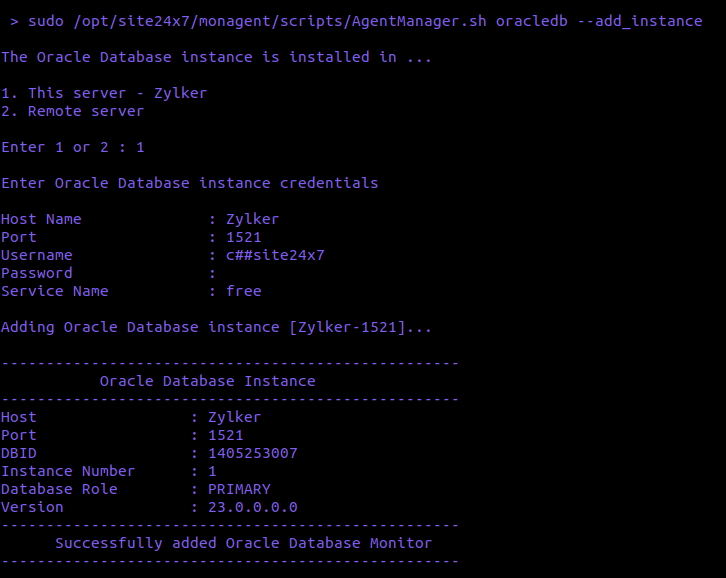
- Execute the following command in your terminal and enter the username and password of the Oracle user you created, as well as the Host Name, Port, and Service Name for the OpManager Nexus agent to authenticate and configure Oracle monitoring:
/opt/site24x7/monagent/scripts/AgentManager.sh oracledb --add_instance
NoteThis step has to be repeated for every Oracle instance in the server to be monitored.
- After logging in to OpManager Nexus, click Database > Oracle on the navigation pane.
- You will be directed to the monitor page to view the list of Oracle Database instances you have added to monitor.
- Under the Oracle Database instance, click PDB to view the list of databases in the selected instance.
Note- The username and password you provide will be securely encrypted in the agent and will not be stored in any of the OpManager Nexus databases.
- If you don't want Oracle to be auto-discovered and added for monitoring, toggle the Auto discover applications on the server option to No in the Settings page (Admin > Server Monitor > Settings).
- By default, ten pluggable databases and ten Tablespaces will be auto-discovered and added in each Oracle Database instance.
Windows
- Log in to OpManager Nexus and install the OpManager Nexus Windows server monitoring agent on your Windows server.
- After the installation is complete, right-click the OpManager Nexus tray icon in the system tray and select AgentManager.
- In AgentManager, run the following command and update the Oracle Instant Client path:
oracledb update_library_path
NoteUpdating the Oracle Instant Client path is a one-time configuration. You need not update it each time you add an Oracle monitor.
- After you update the Oracle Instant Client path in the agent, run the following command to add an Oracle monitor:
Enter the username and password of the Oracle user you created, as well as the Host Name, Port, and Service Name for the OpManager Nexus agent to authenticate and configure Oracle monitoring.oracledb add_instance
NoteThis step has to be repeated for every Oracle instance in the server to be monitored.
- After logging in to OpManager Nexus, click Database > Oracle on the navigation pane.
- You will be directed to the monitor page to view the list of Oracle Database instances you have added to monitor.
- Under the Oracle Database instance, click PDB to view the list of databases in the selected instance.
Note- The username and password you provide will be securely encrypted in the agent and will not be stored in any of the OpManager Nexus databases.
- By default, ten pluggable databases and ten Tablespaces will be auto-discovered and added in each Oracle Database instance.
Performance metrics
Monitoring the key performance metrics of your Oracle Database instance is highly crucial. By closely tracking these parameters, you can proactively identify potential bottlenecks, troubleshoot issues, and optimize the overall efficiency of your Oracle environment.
Individual pluggable database (PDB) monitoring
OpManager Nexus offers individual PDB monitoring as well. Track the critical performance metrics of your pluggable databases, set thresholds, and get alerts.
Threshold configuration
After adding the Oracle monitor to your OpManager Nexus account, you can add a threshold and availability profile to set thresholds and receive alerts when there is a breach and take corrective action.
To set a threshold and availability profile:
- Select the Oracle monitor, click the hamburger icon > Edit.
- On the Edit Oracle page, you will find the Threshold and Availability tab under Configuration Profiles. Click the plus + icon to add a new threshold profile. Or click the pencil icon to edit a threshold profile.
- Click Save.
You will receive alerts when a particular threshold is breached, and the specific resource will be declared as Trouble or Critical.
Dashboards
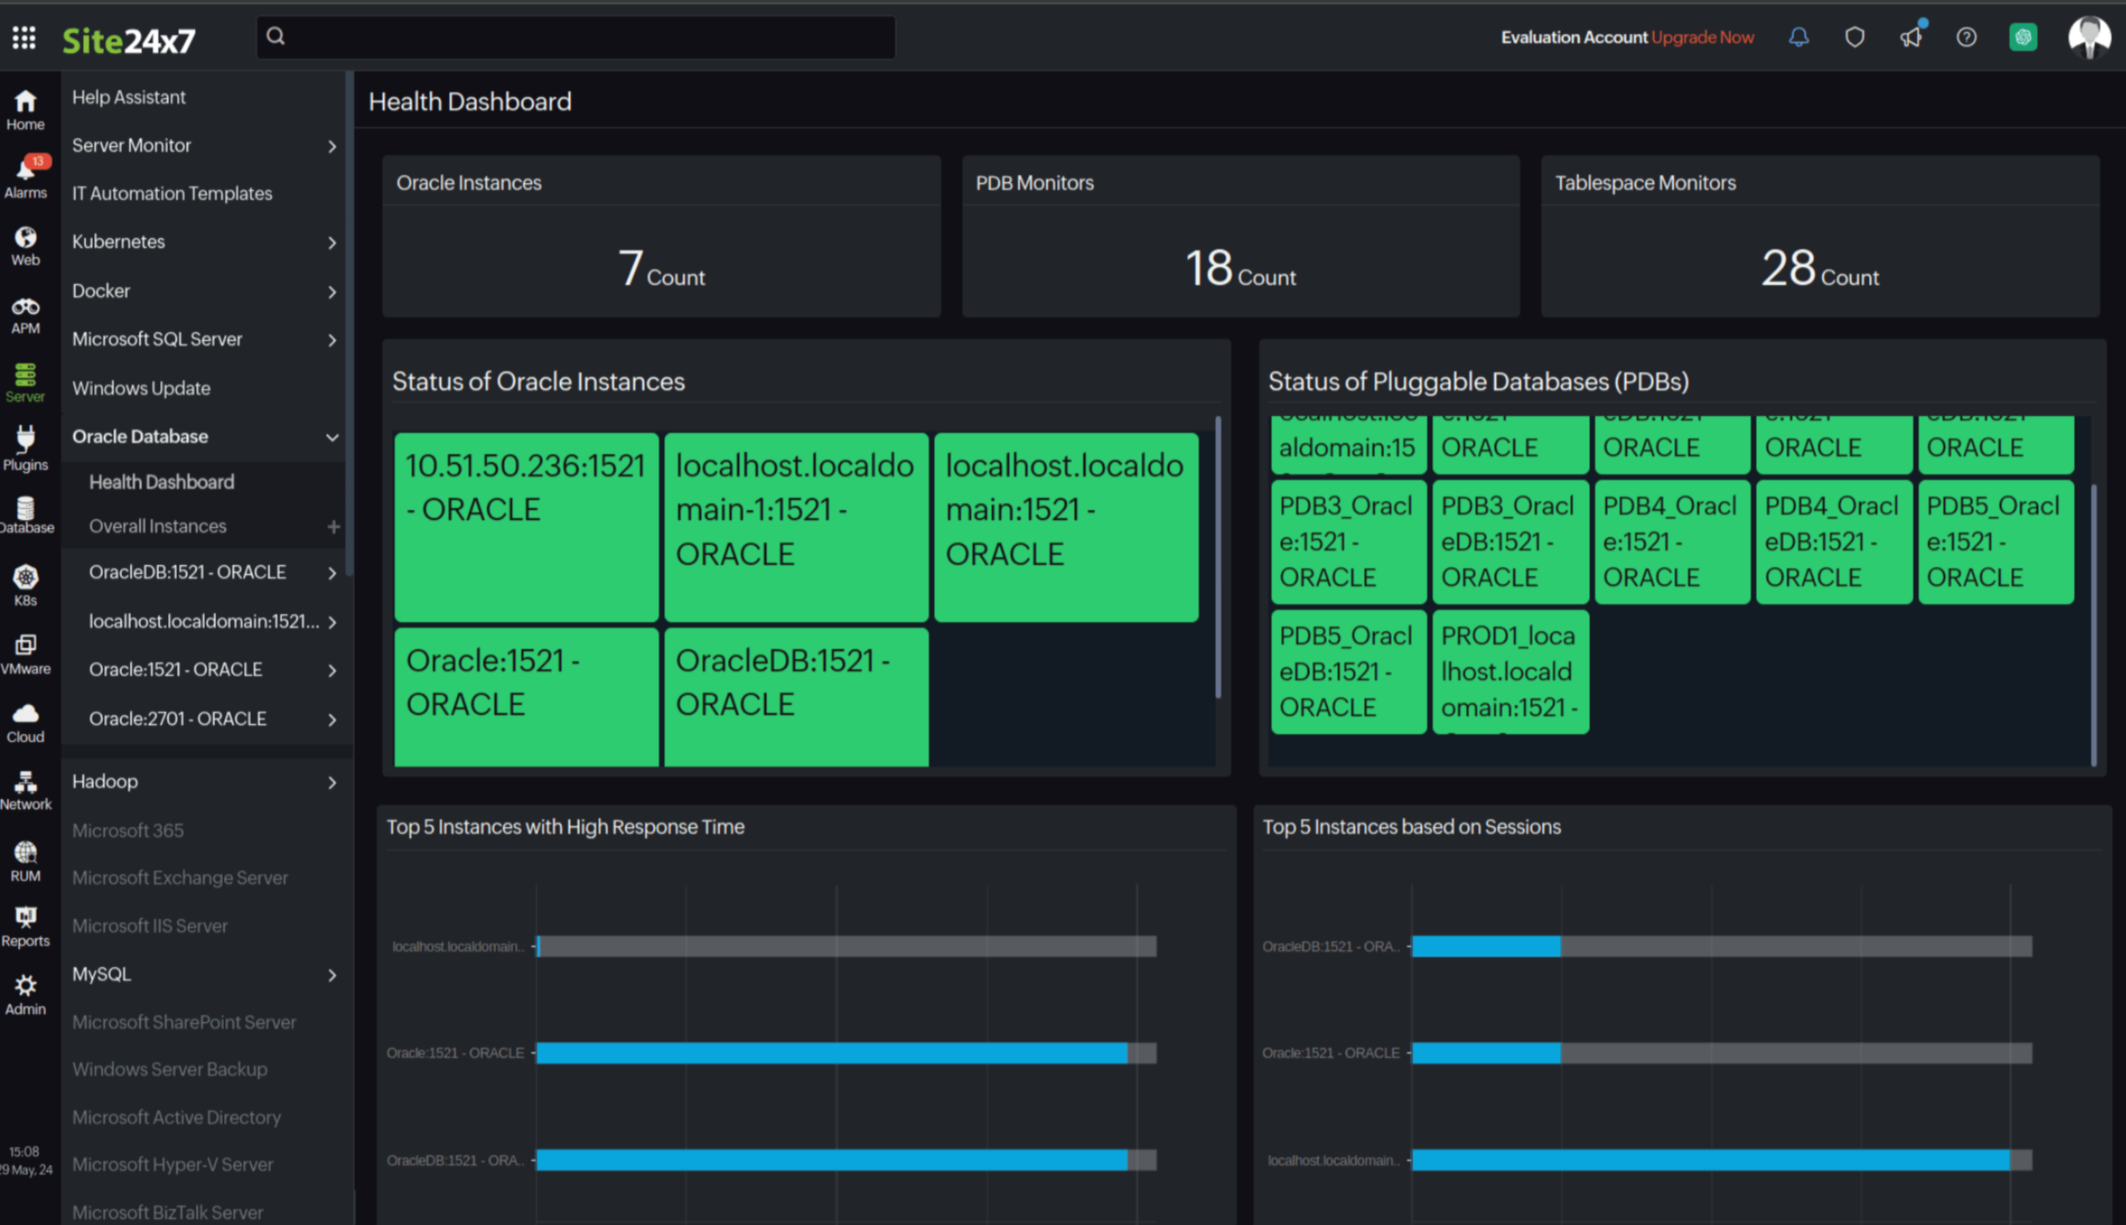
After successfully adding an Oracle instance monitor, you can view your instances and databases by logging into your OpManager Nexus account and then navigating to Database > Oracle Database > Health Dashboard. You can analyze the performance of your Oracle instance environment and your individual PDBs and detect performance outages. From here, you can:
- See the total number of all the Oracle instances and PDBs in one view.
- View the current status of all the Oracle servers as separate NOC dashboards. Click on an NOC box to go to that particular resource's Summary page.
- Identify issues faster by seeing the status of your servers as Down, Critical, or Trouble.
- Analyze the top CPU and memory utilizing instances to troubleshoot performance issues instantly and avoid future performance degradation.
Security
The OpManager Nexus server monitoring agent never stores your data in the OpManager Nexus app servers. The username and password are encrypted in the agent for security reasons.
If you have more questions or concerns, check out some FAQs on the security aspects of our Oracle Database monitoring.
FAQs
- Is it mandatory to download the Instant Client for Oracle monitoring?
No. By default, we connect to your Oracle database using Thin Client for monitoring purposes. We can also make Oracle database connections using Thick Client, for which we would require Oracle Instant Client to be downloaded and extracted. You should also provide the extracted folder path of the Instant Client to our agent using the below command:
Linux:
/opt/site24x7/monagent/scripts/AgentManager.sh oracledb --update_library_path
Windows:
oracledb update_library_path
- Should I update the Instant Client path for every Oracle database instance on the same machine?
No, you would not be required to provide multiple Instant Client paths. Instant Client is a set of library files provided by Oracle (.so files on Linux and .dll files on Windows), and is the only way by which we can make a connection to the Oracle database. So, a single Instant Client path is sufficient. - I have given the wrong library path by mistake. How do I update it?
You can use the below command to update the Instant Client:
Linux:
Example:/opt/site24x7/monagent/scripts/AgentManager.sh oracledb --update_library_path
Windows:
oracledb update_library_path
- Does OpManager Nexus need write permission to access databases?
No. - What performance data is collected by OpManager Nexus for monitoring Oracle Databases?
OpManager Nexus collects data for the performance metrics listed in the Oracle performance metrics document for monitoring Oracle Databases. - How does OpManager Nexus collect performance metrics for Oracle monitoring?
Performance metrics are collected using SQL queries by connecting to the Oracle Database with the user credentials given by the user, which has read-only access. - How does OpManager Nexus connect with Oracle Database?
OpManager Nexus connects with the Oracle Database using the user credentials given in the terminal console (Linux) or AgentManager (Windows) and collects data. - Does OpManager Nexus keep the Oracle connection open?
No. OpManager Nexus creates a connection to the Oracle Database for collecting performance metrics. Once the data collection is complete, the connection will be closed. - Does OpManager Nexus store the Oracle user password directly?
No. OpManager Nexus encrypts the password given. The username and password are encrypted in the agent for security reasons. They will not be saved or stored in the OpManager Nexus app servers.
Licensing
Each Oracle Database instance consumes one Advanced monitor license and includes monitoring for 25 PDBs. For each additional PDB, one Basic monitor license will be consumed. For now, each Oracle instance and each PDB can include monitoring of up to 10 Tablespaces. For more information, contact support@opmnexus.com.
Related links
- Database monitoring: Oracle PDB | PostgreSQL | MySQL | Microsoft SQL | MySQL NDB Clusters
- Server monitoring: Linux | Windows
-
On this page
- Prerequisites
- Add an Oracle Database monitor
- Install the Instant Client
- Create a user (multi-tenant)
- Create a user (non-CDB and 11g)
- Grant access (multi-tenant)
- Grant access (non-CDB and 11g)
- Install and configure the agent
- Performance metrics
- Individual pluggable database (PDB) monitoring
- Threshold configuration
- Dashboards
- Security
- FAQs
- Licensing