Azure Active Directory Integration
Integrating Azure Active Directory (AD) with ADManager Plus offers a seamless solution for organizations to streamline user provisioning, authentication, and security management. Enabled by Azure AD Connect, this integration streamlines synchronization and eradicates manual data input, thereby improving efficiency and precision. However, encountering errors in Azure AD integration may require troubleshooting, involving adherence to best practices and a comprehensive understanding of the integration steps and requirements.
This guide to Azure AD integration provides invaluable insights into prerequisites and configuration, empowering organizations to optimize their Azure AD integration for maximum effectiveness and security.
Prerequisites for Microsoft 365 integration
Ensure the installation of the below-listed modules:
- Microsoft .NET Framework 4.8 or later
Refer to this link to determine the version of the .NET Framework installed on your computer. You can download .NET Framework 4 from here.
- Windows PowerShell 5.1
To determine the version of PowerShell installed, run the command $PSVersionTable from Windows PowerShell. If the version is below 5.1 or if PowerShell is not installed, download it from here.
- MSOnline PowerShell for Azure Active Directory[(V1) 1.1.166.0]
Run the PowerShell cmdlet Import-Module MSOnline from Windows PowerShell to determine whether this module is installed. The PowerShell cmdlet returns an error if the module is not installed and there will be no message to be displayed if the module is already installed. To install the module, open PowerShell as an administrator and enter the following cmdlet: Install-Module -Name MSOnline -RequiredVersion 1.1.166.0 -Force.
- Administrative privileges
The account must have Global Administrator (preferred) or user management administrator privileges in Microsoft 365.
- Other requirements
- Make sure your firewall settings allow access to these domains.
- The 64-bit version of the product must be installed.
Steps for automatic Microsoft 365 tenant configuration in ADManager Plus
- Navigate to the Domain/Tenant Settings > Microsoft 365 tab.
- Click +Add New Tenant.
- Click Configure using Microsoft 365 Login.
- Select the required AD domains to be linked with this account. It is essential to link the on-premises domains with Microsoft 365 domains to apply OU-based restrictions.
- Click Proceed in the dialog box that appears. You will be redirected to the Microsoft 365 login page, where you will be required to log in with the Global Administrator's credentials.
- The Microsoft 365 login portal will list the permissions requested from your organization. Once you are informed about these permissions, click Accept.
- Once the tenant configuration is successful, it will be listed in the Microsoft 365 window.
Note: If automatic configuration fails due to permission issues, the tenant must be configured manually.
Steps to manually configure a Microsoft 365 tenant
Prerequisite: A service user account with at least View-Only Organization Management, View-Only Audit Logs, and Service Administrator permissions.
Steps to create an Azure AD application
- Sign in to the Azure AD portal using the credentials of a Global Administrator account.
- Select Azure Active Directory from the left pane.
- Select App registrations.
- Click New registration.
- Provide a Name for the ADManager Plus application to be created.
- Select a supported account type based on your organizational needs.
- Leave Redirect URI (optional) blank; you will configure it in the next few steps.
- Click Register to complete the initial app registration.
- You will now see the Overview page of the registered application.
- Click Add a Redirect URI.
- Click Add a platform under Platform configurations.
- In the Configure platforms pop-up, click Web under Web applications.
- In the Redirect URI field, enter http://localhost:port_number/webclient/VerifyUser. For example, http://localhost:8080/webclient/VerifyUser or https://192.345.679.345:8080/webclient/VerifyUser.
- You can leave the Logout URL and Implicit grant fields empty. Click Configure.
- On the Authentication page, under Redirect URIs, click Add URI.
- Enter http://localhost:port_number/webclient/ GrantAccess as the Redirect URI. For example, http://localhost:8080/webclient/GrantAccess or https://192.345.679.345:8080/webclient/GrantAccess.
- Similarly, using the Add URI option, add http://localhost:port_number/AADAppGrantSuccess.do and http://localhost:port_number/AADAuthCode.do as URIs as well.
- Again click Add URI to add the below Redirect URIs in the subsequent rows. Please note that for users with ADManger Plus build 7200 or higher, Redirect URIs (b) and (c) are optional.
- https://identitymanager.manageengine.com/api/public/v1/oauth/redirect
- https://demo.o365managerplus.com/oauth/redirect
- https://manageengine.com/microsoft-365-management-reporting/redirect.html
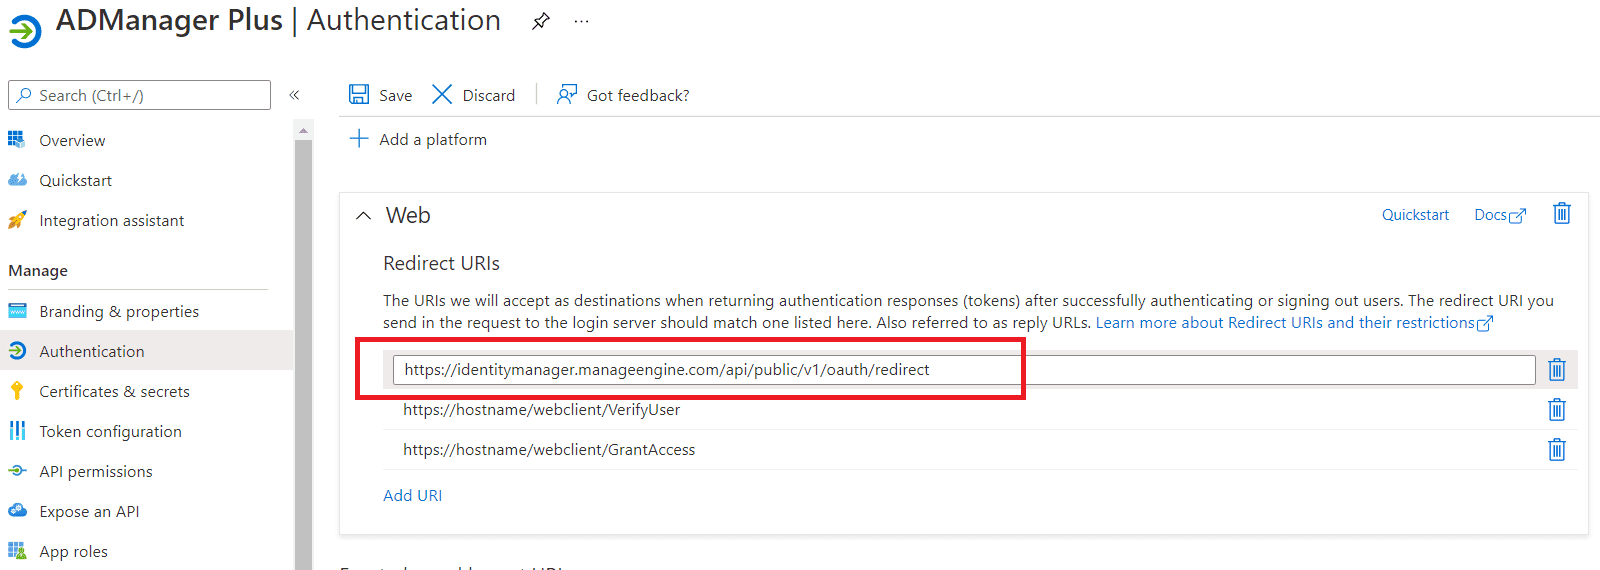
Note:
- The Redirect URI must adhere to the following:
- It must be fewer than 256 characters in length.
- It should not contain wildcard characters.
- It should not contain query strings.
- It must start with HTTPS or http://localhost.
- It must be a valid and unique URL.
- For HTTP, the URI value is http://localhost:8080. If HTTP is used, the machine name or IP address cannot be used in the place of localhost.
- For HTTPS, the URI value is https://192.345.679.345:8080 or https://testmachine:8080 (where <testmachine> is the hostname of the machine where ADManager Plus is installed).
- The Redirect URI format varies according to the connection type (HTTP or HTTPS) that has been configured in ADManager Plus.
- To find your machine's IP, open the Command Prompt, type ipconfig, and click enter. You can find your IPv4 address in the results shown.
- Click Save.
- Click Manifest from the left pane.
- Look for the requiredResourceAccess array in the code.
- Copy the contents of this file and paste the content as highlighted in the image below, then click Save. If you want to modify the permissions to be provided, skip this step and follow the steps mentioned in this guide.
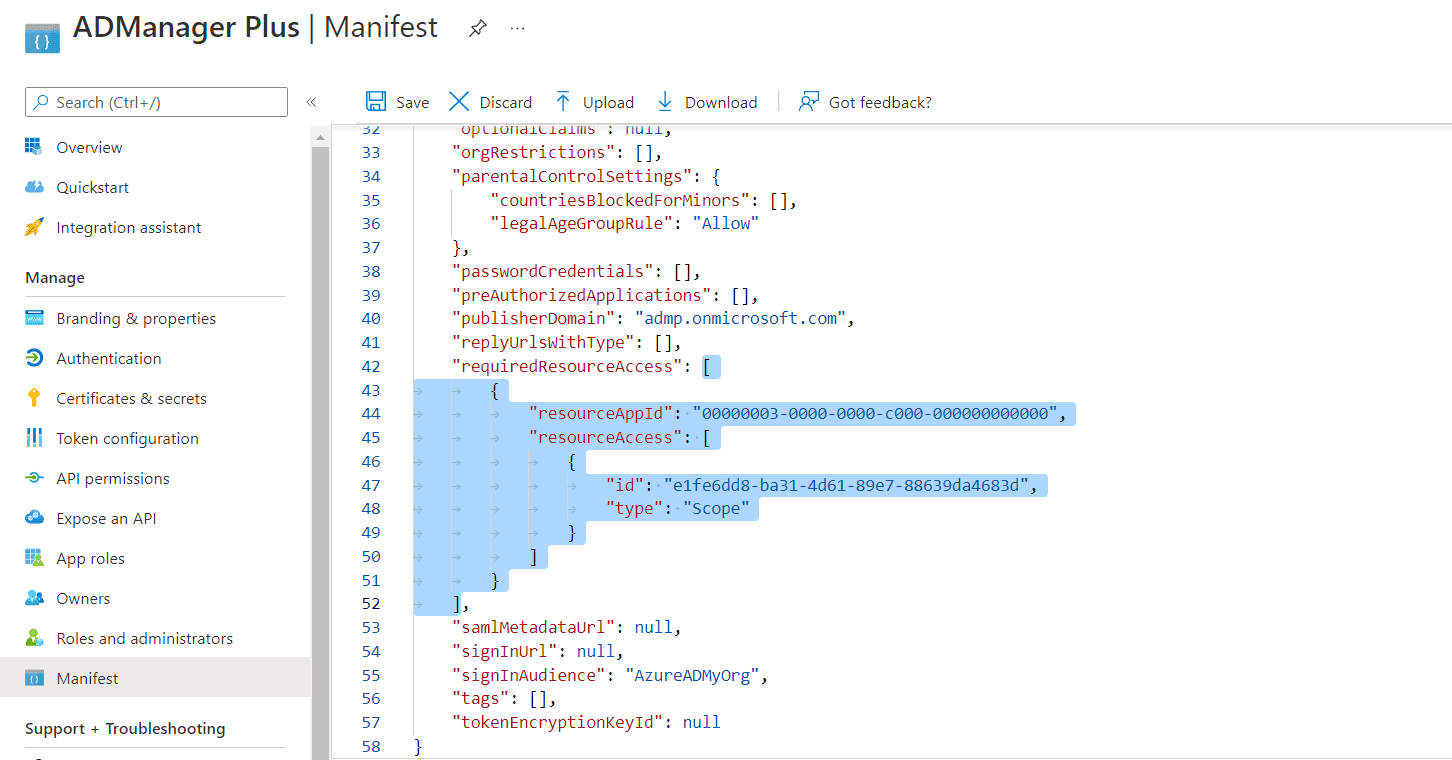
Note: Copy and paste content only from the open square bracket to the closed square bracket. Ensure that all punctuation marks are retained correctly. Once you have pasted the content in the file, it should look like the image below.
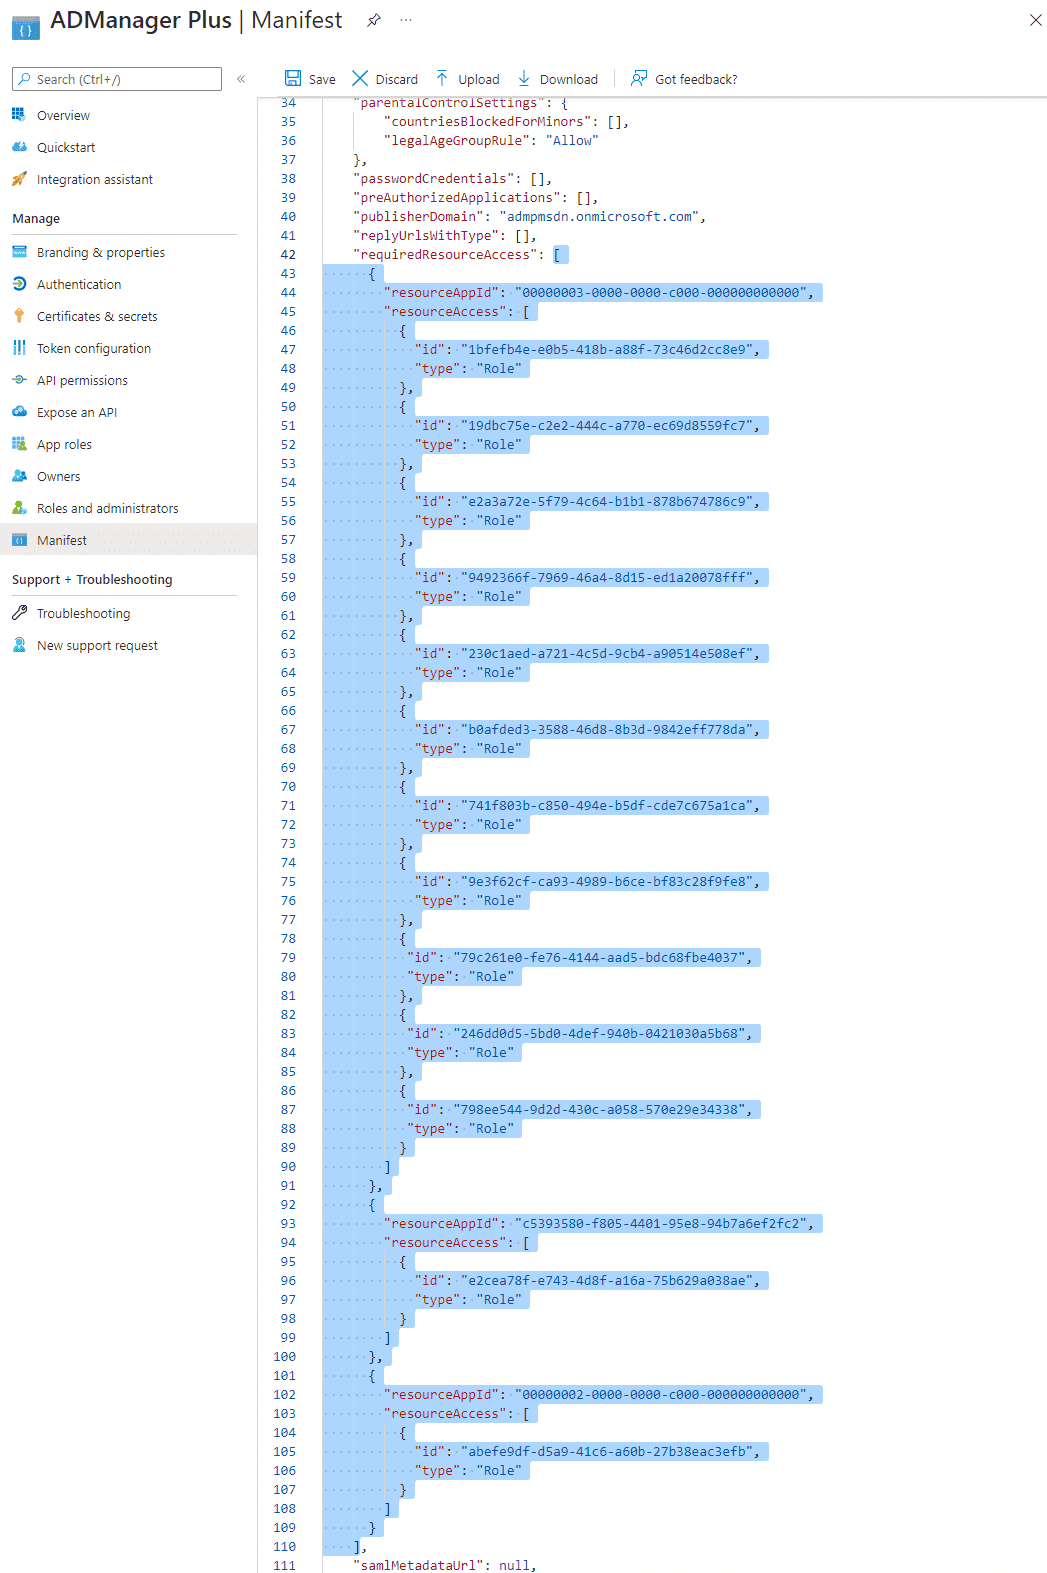
Note:
- If your tenant is being created in Azure Germany, copy the entire contents of this file and paste it into the section highlighted in the image above.
- If your tenant is being created in Azure China, copy the entire contents of this file and paste it into the section highlighted in the image above.
- Click Save.
- Click API permissions from the left pane, and then click the Grant admin consent for <your_company_name> option listed under the Grant consent section. Grant the necessary permissions as required. The API permission and its scope are available in this table.
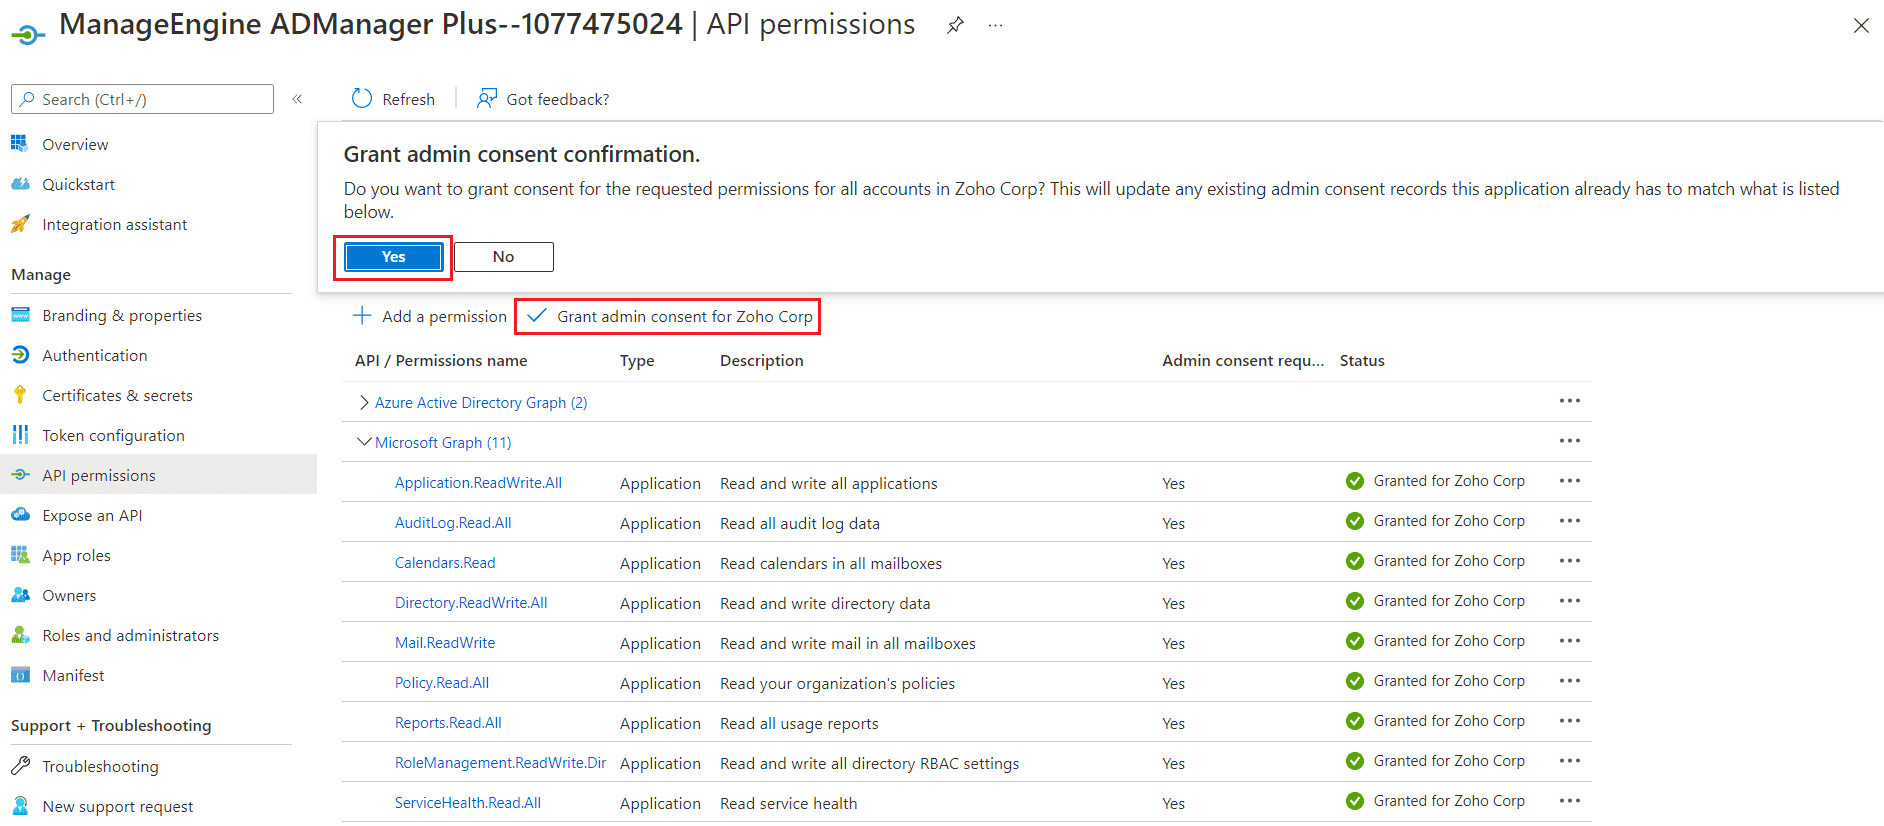
- Click Yes in the pop-up that appears.
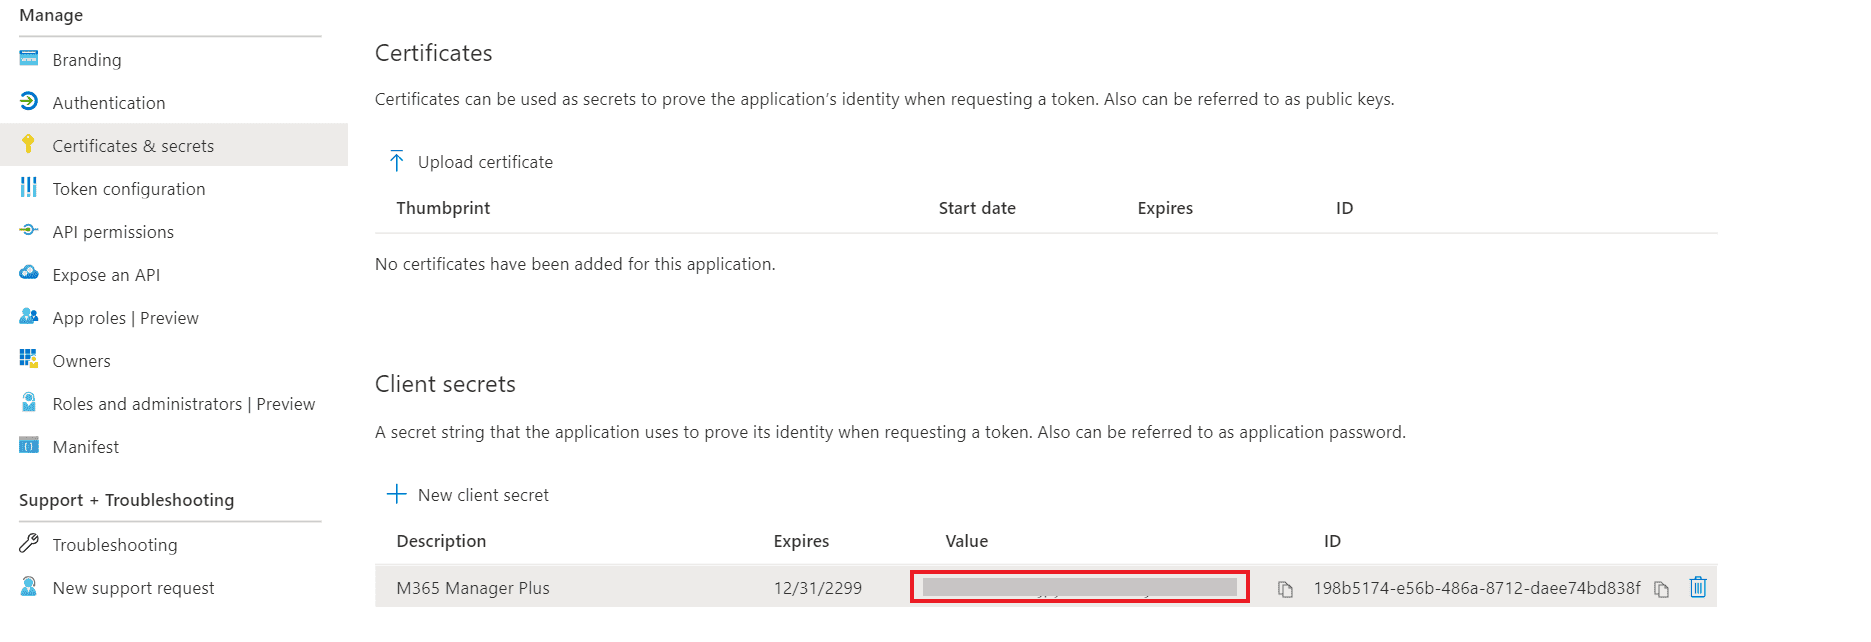
- Click Certificates & secrets from the left pane.
- Under the Client secrets section, click New client secret.
- This section generates an app password for ADManager Plus. In the Description field of the pop-up, provide a name to identify the app to which the password belongs.
- Choose when the password should expire.
- Click Add.
- Copy the string under Value and save it. This is the Application Secret Key, which you will require later.
- Go to Certificates and click Upload certificate. Upload your application certificate as a .cer file.
- If the user has an SSL certificate, it can be used here. Otherwise, click here for steps to create a self-signed certificate.
Note: Certificate-based authentication is used to contact Microsoft 365 securely and fetch data. During manual configuration, you will be asked to enter your application secret and upload the application certificate.
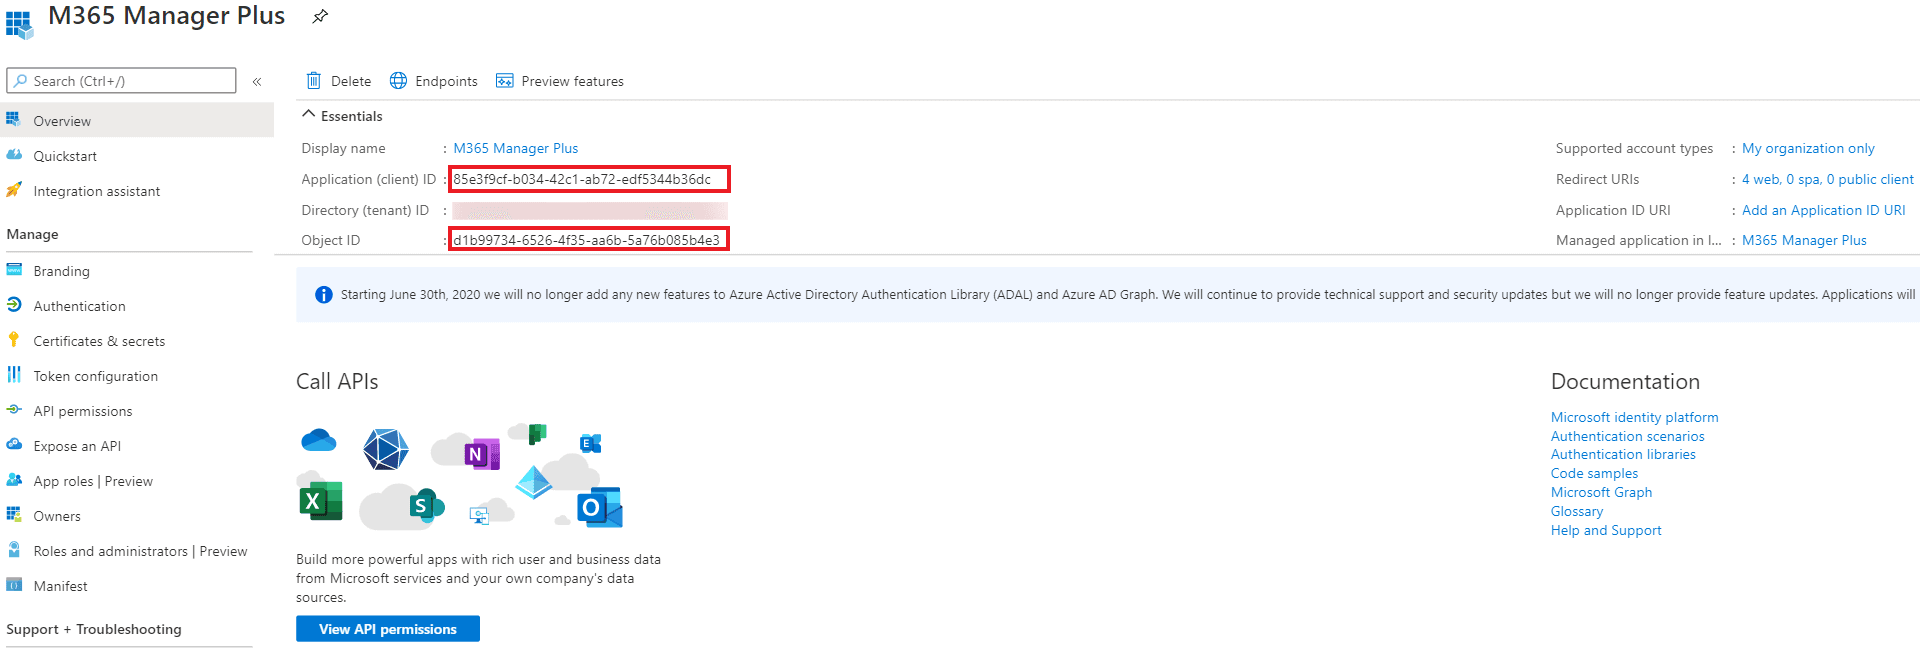
- Now go to the Overview section in the left pane.
- Copy the Application (client) ID and Object ID values and save them. You will need these values to configure your tenant in the ADManager Plus portal.
Steps to manually configure a Microsoft 365 tenant in ADManager Plus
- Open the ADManager Plus portal.
- Navigate to Domain/Tenant Settings > Microsoft 365.
- Click + Add New Tenant.
- Select Click here to configure a tenant with an already registered Azure AD application.
- The below pop-up will appear.
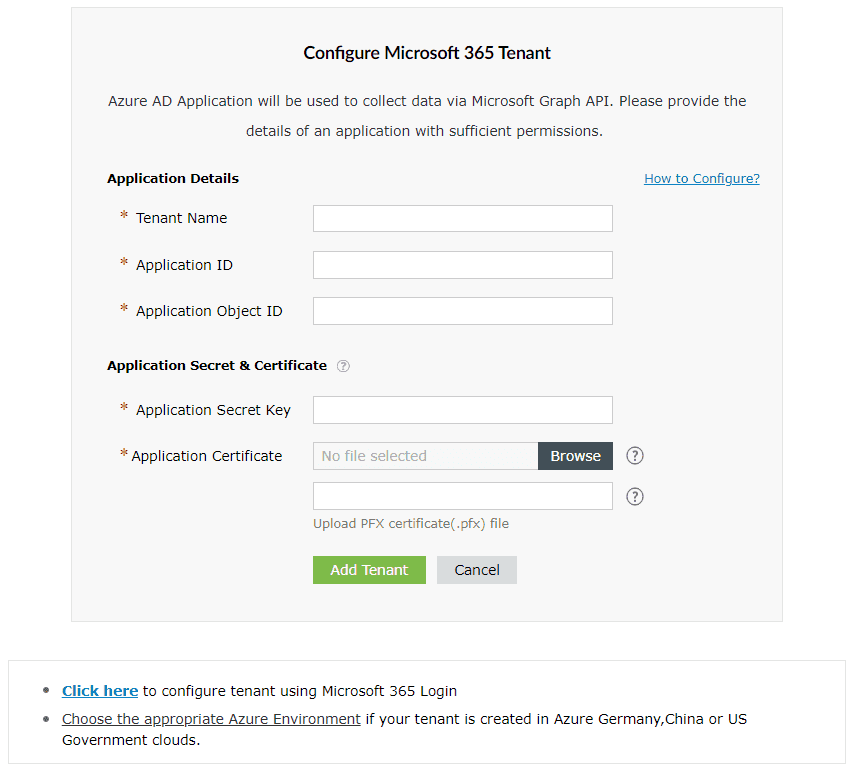
- Enter your Tenant Name. For example, test.onmicrosoft.com.
- Paste the Application (client) ID and Application Object ID, which were saved earlier in step 35, in the respective fields.
- Enter the Application Secret Key that was saved during step 31.
- Upload a .pfx file of the certificate that has been uploaded in the Azure portal. Refer to step 33.
- Enter your Certificate Password.
- If you have an SSL certificate, you can upload it in the appropriate field.
- Click Add Tenant. The tenant will be added in ADManager Plus. If you wish to modify the details in it, click Edit once the configuration is listed and proceed to make the changes.
- Click Update once the necessary modifications are done. REST API access should now be enabled for the configured account.
Steps to update a service account in ADManager Plus
- Now the service account must be configured. To do this, navigate to Domain/Tenant Settings > Microsoft 365 and click the edit option under the Actions column.
- Click the edit icon found near Service Account Details.

- Enter the credentials of the service account you need to configure in the respective fields.
- Click Update, and close the pop-up window.
Steps to create a self-signed certificate
- Run the following command in PowerShell:
Set-ExecutionPolicy -ExecutionPolicy RemoteSigned -Force -Scope process
- Now, run the Create-selfsignedcertificate.ps1 script.
- While running the script, you will be asked to add a common name for the certificate, start and end dates (yyyy-MM-dd) for the certificate's validity, and a private key to protect it.
- Once you enter the values, the script will create a .pfx file (contains both public and private keys) in the bin folder.
- The .pfx file needs to be uploaded to ADManager Plus, while the .cer file should be uploaded to the Azure portal of your application.
Integrating Azure AD with ADManager Plus streamlines administrative tasks by providing a unified platform to manage both AD and Azure AD environments. It offers robust management, reporting, and automation features, simplifying compliance monitoring and ensuring adherence to regulatory standards. Automated user provisioning ensures that user accounts are created, modified, or disabled according to predefined policies.
Select a language to translate the contents of this web page: