An essential guide to create custom reports using ADManager Plus
Introduction
Prebuilt reports don't offer admins the option to customize reports to meet their organization's constantly changing requirements. ADManager Plus helps admins overcome this challenge. The Custom Reports feature allows admins to:
- Filter data to narrow their results based on their exact requirements.
- Create reports that include custom attributes in their AD.
- Build reports based on LDAP queries.
- Perform management actions from custom reports.
- And more!
Filtering report data to meet specific requirements
When generating AD reports, a major concern for many admins is that prebuilt reports contain too much irrelevant information. It can be difficult to find the information they need, even if some reports allow them to customize the fields displayed in the report. To make reports display only relevant information, admins often have to export reports to a spreadsheet and filter them manually. This process can be made more efficient using ADManager Plus, which allows admins to use filters like naming attributes, employee IDs, proxy addresses, etc. to fetch their exact requirements in a report. Create custom reports from scratch on user account expiration, user passwords, group members, and other vital information, and use them like any other report with ADManager Plus.
Use case: An organization wants to generate a report for members of their marketing team who joined more than a month ago and haven't reset their password in the last 30 days.Specifically, they only want information for marketers working on five different products (A, B, C, D, and E). Since this requirement is very specific, this organization's admins would have to generate a report and then manipulate it in a spreadsheet to get the information they need.
How to filter report data using ADManager Plus
- Select the Reports tab.
- Select Custom Reports from the left navigation pane.
- Click New custom report.
- Specify a Report Name and add details about the report under Description. For example:
- Report name: Marketing team password reset report
- Description: A report to generate the list of marketing team members of five different products (A, B, C, D, and E) who joined more than a month ago and have not reset their password in the last 30 days.
- In the Add report to section, select User Reports.
- Choose the appropriate domain from the Select Domain list. Select the OUs for these five products.


- In the Conditions section, select the Users object type from the drop-down list.
- In the Filters section,
- Click LDAP Filter to create a customized LDAP search query for an object. You can add the conditions to the filter. Select
- When Created attribute -> Before N days -> 30
- AND Password Last Set -> Before N days -> 30
- AND Department Is marketing
- Click Advanced Filter to automatically update the LDAP query based on the pre-defined report chosen in the Filter from Report option.
- Select Refine results option and click Add Conditions to refine your criteria on a database level.
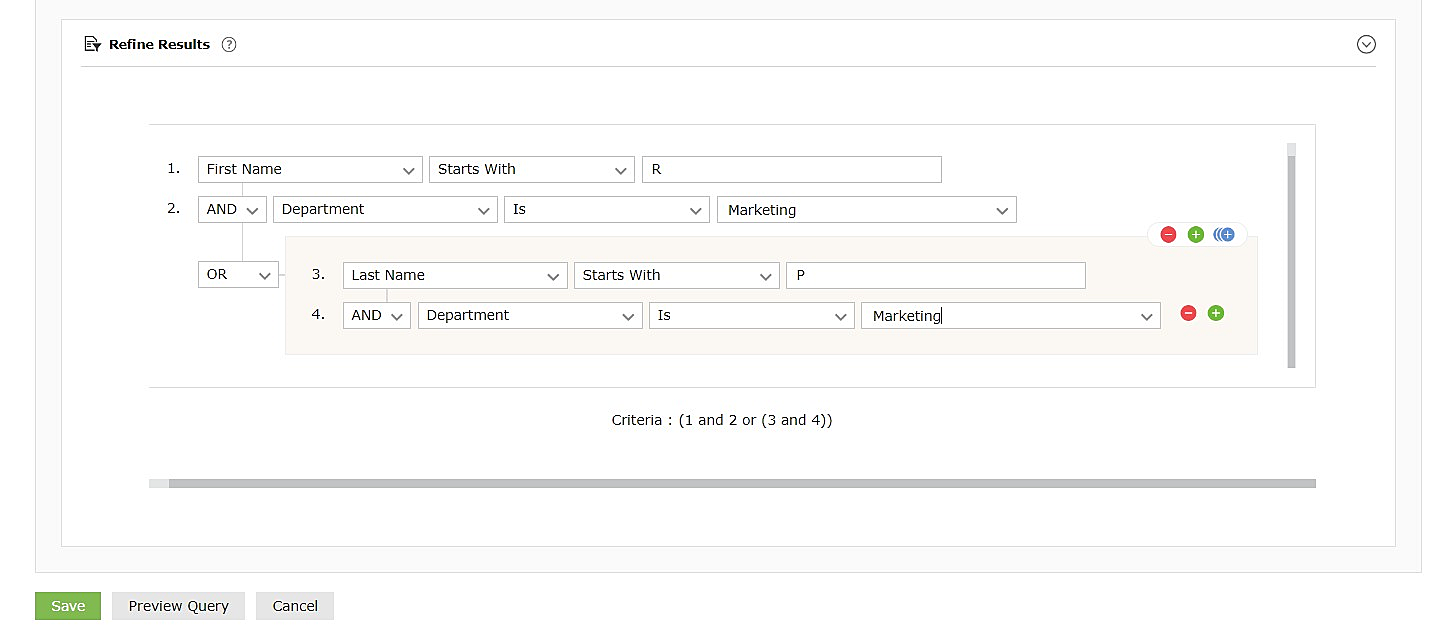
- Click LDAP Filter to create a customized LDAP search query for an object. You can add the conditions to the filter. Select
- Click
 symbol to add grouped conditions which is applicable to both LDAP Filters as well as Refine Results.
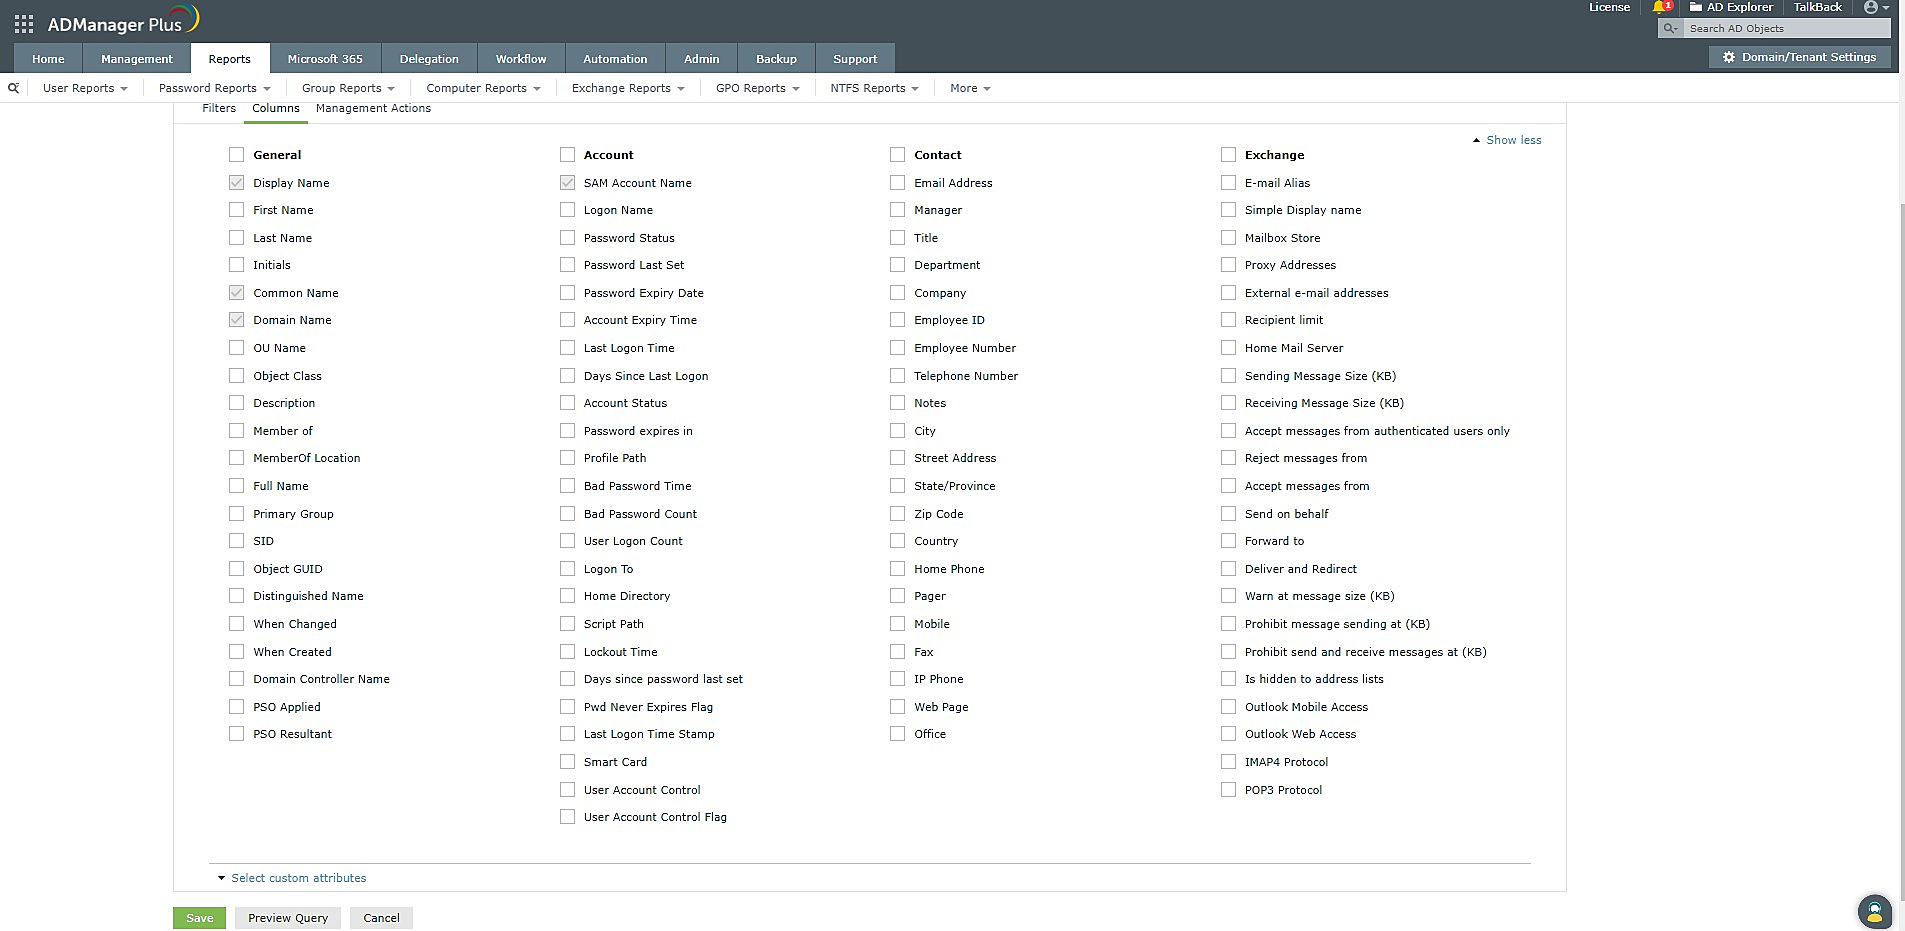
- Select the Column option to specify the columns that must be shown in the resulting report. Select the management actions that can be performed, directly from the custom report.
- Click Save.
- Now that you've created the report, you can export it in PDF, XLS, CSV, CSVDE, or HTML format using the Export as option
Creating reports based on custom AD attributes
Organizations often have to store some information using attributes that are not available in native AD. When the need arises, the AD schema can be extended to include additional attributes that can store this information. For instance, organizations may extend the user class to store additional information such as social security numbers, passport details, gender, birthday, etc., or modify the computer class to store asset ID, location, and so on.
In such cases, a custom report where the filter conditions are set using custom attributes can be generated from scratch, or in the final report of select objects (viz., users, groups, computer and contact). Custom attributes can be added in filter conditions to get updated reports from the original reports.
Use case: An organization wants to generate a series of reports based on the values of specific schema attributes, including their custom attribute and technicalteam attribute that they created to define the specific user account function. They want to create reports that include details such as last logon time, password expiration, and more based on that custom attribute; the report needs to be generated for various values of technicalteamAttribute, such as networking, server, and so on. They can either create a new custom report with the above mentioned attributes or include the custom attributes in the filter conditions to get updated reports instantaneously.This makes it easy for the organization to monitor each technical team and share a particular team's report amongst team members.
How to create custom attribute-based reports using ADManager Plus
- Select the AD Reports tab.
- Select Custom Reports from the left navigation pane.
- Click New custom report.
- Specify a Report Name and add details about the report under Description. For example:
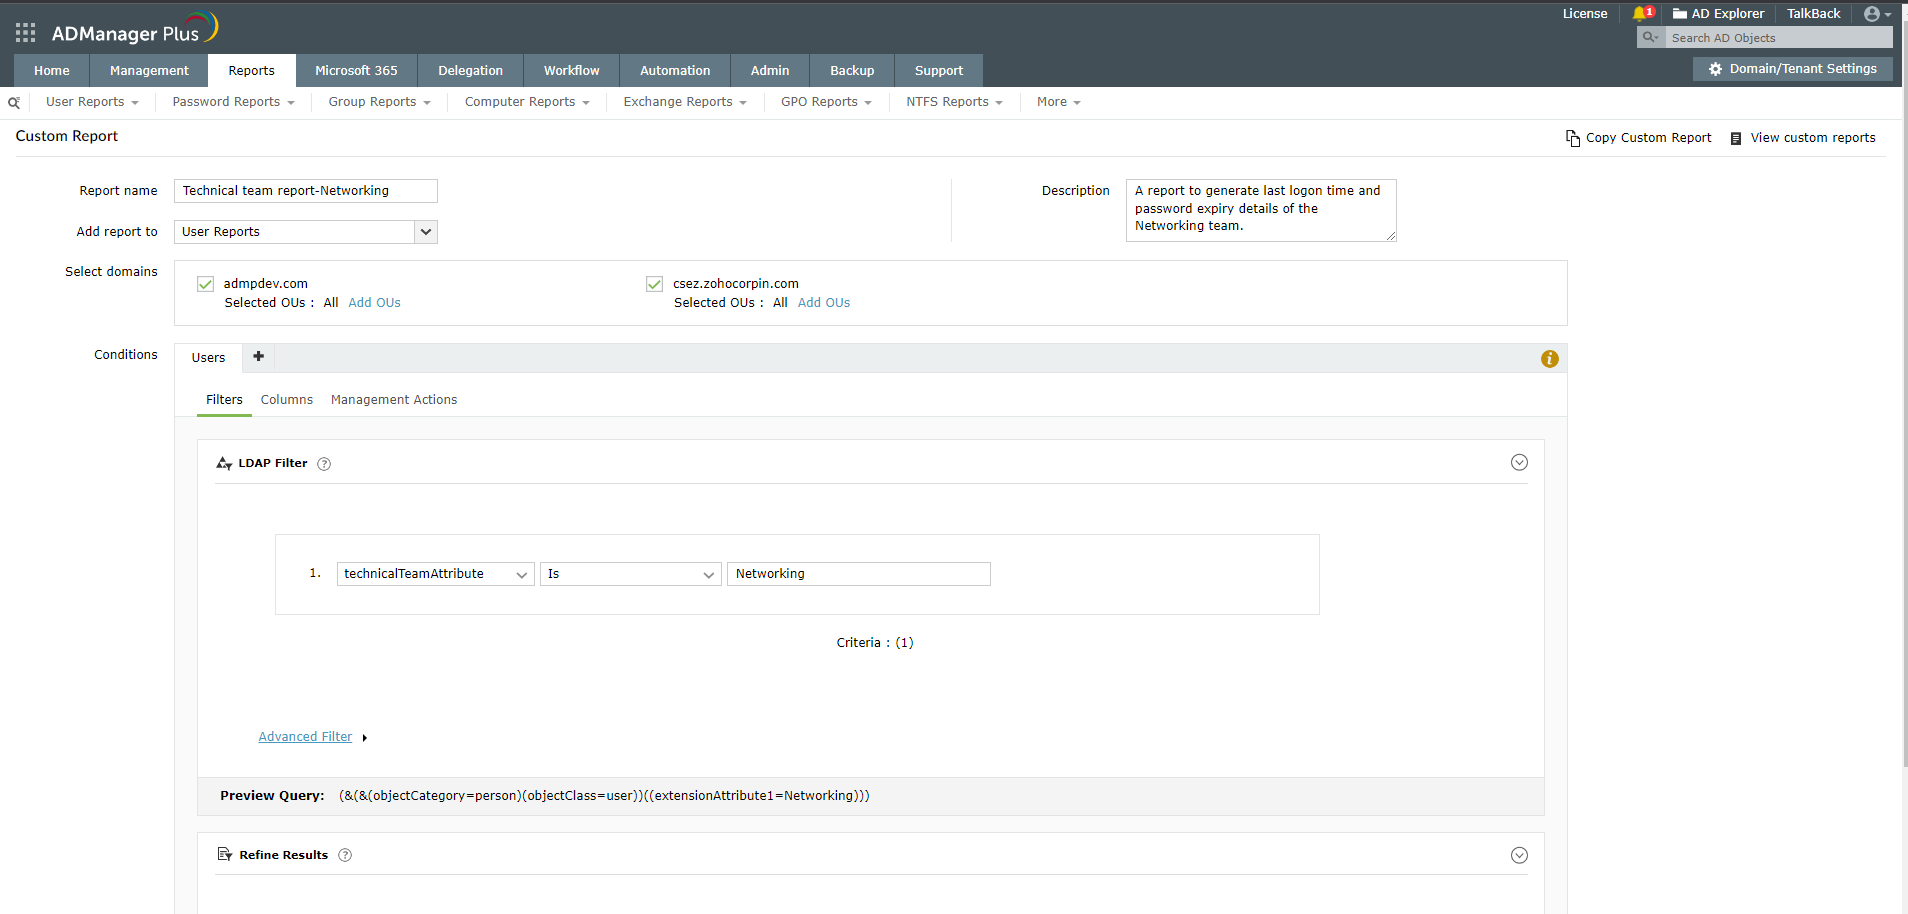
- Report Name: Technical team report - Networking
- Description: A report to generate the last logon times and password expiration details of the networking team.
- In the Add report to section, select the User Reports category.
- Choose the appropriate domain from the Select Domain list.
- In the Conditions section, select the Users object type from the drop-down list.
- In the Filters section, select Click to Add. From this list, select technicalteamAttribute
listed under Configured Custom Attribute.
- In the next section, you can select the details about the users in the networking team
which have to appear in the report. Here, select details such as First Name, Last Name,
Email Address, Last Logon Time, Password expires in, and so on
You will be redirected to the Admin tab to create custom attribute, where you can create the attribute to suit your needs. Once it is created, it will be reflected under the 'Configured Custom Attribute'.
- Click Save
- Now that you've created the report, you can export it in PDF, XLS, CSV, or HTML format using the Export as option.
Creating a report based on LDAP queries
If administrators can't meet their reporting requirements using prebuilt reports, they can use LDAP queries to generate the required reports instead. Sometimes technicians may prefer to use the LDAP queries they already have, instead of setting filters available in the custom reports.
Use case: An organization wants to generate a report to find all users whose accounts are enabled but have not logged in for the past 30 days.
How to create LDAP query-based reports using ADManager Plus:
- Select the AD Reports tab.
- Select Custom Reports from the left navigation pane.
- Click New custom report.
- Specify a Report Name and add details about the report in Description. For example:
- Report name: Account enabled but inactive users
- Description: A report to find all users whose accounts are enabled but have not logged in for the past 30 days.
- In the Add report to section, select the User Reports category
- Choose the appropriate Domain from the Select Domain list.
- In the Conditions section, select Custom query from the drop-down list.
- Enter the query below in the space provided:
- (&(objectCategory=person)(objectClass=user)(&(!(userAccountControl:1.2.840.113556 1.4.803:=2))(lastLogon<=131556638360000000)))
- Select the necessary details to be displayed for this report, such as SAM Account Name,
Email Address, Employee ID, Department, Manager, and so on.
- Click LDAP Filters, and add the conditions based on the report you want. If you want to add nested conditions like (1 AND 2 OR (3 AND 4)) click the symbol. You can frame these conditions based on your needs.
- Click Save
- Now that you've generated the report, you can export it in PDF, XLS, CSV, or HTML format using the Export as option.
Summary
Every organization has unique reporting needs that can't always be met using prebuilt reports. ADManager Plus' Custom Reports feature helps overcome this challenge by providing:
- Report filters.
- Custom attribute-based reporting.
- LDAP query-based reporting
Admins no longer have to waste their precious time downloading and manipulating every report, instead, they can build reports that match their exact requirements using ADManager Plus.