Agent Deployment
Agent-based scanning is supported for Windows, Linux, and Mac machines. Before proceeding with an agent-based scan, ME DesktopCentral has to be installed. Click here for more details. Below are the methods of agent deployment, uninstallation, and steps for creating image with Endpoint Central (formerly Desktop Central) agents for each OS.
Quick Links
Windows agent
Installing Windows agents using startup script in ActiveDirectory
Installing Windows agents through GPO lightweight tool
Installing Windows agents for workgroup machines.
Installing Windows agents manually
How to image a Windows computer with Endpoint Central (formerly Desktop Central) agent
Linux agent
Installing Linux agent using Linux agent installation tool
Installing Linux agent manually
How to image a Linux computer with Endpoint Central (formerly Desktop Central) agent
Mac Agent
Installing Mac agents using Mac agent installation script
How to image a Mac computer with Endpoint Central (formerly Desktop Central) agent
Windows Agent
Follow the below listed methods for Windows agent deployment, uninstallation, and for creating a Windows image with Endpoint Central (formerly Desktop Central) agents.
Installing Windows agents using startup script in ActiveDirectory
DesktopCentral Windows agents can be installed through startup scripts in ActiveDirectory so that the agents are deployed in the windows machine during reboot. Below are the steps for deploying the agents as a startup script.
- Download the Windows agent (Zip file) from Admin tab --> Agent Configuration--> Download Windows Agent and extract it.
- Save the .msi & .mst file in this path \\Domain name\SysVol\Domain name\Policies\{ID}\Machine\Scripts\Startup
- Include DCAgentServerInfo.json file only if the Endpoint Central (formerly Desktop Central) build version is 10.1.2124.1 and above.
How to obtain { ID } Value :-

- Click on start>Run
- Enter gpmc.msc
- Click OK
- Right click the domain to select, create and link a GPO here
- Specify a name for the GPO
- Select the GPO
- Click on the Scope tab
- Under Security Filtering section, click Add
- In the Select User, Computer, or Group dialog box, click Object Types
- Select specific computer object types
- Click OK
- Specify the computer names
- Click on Check Names
- Click OK
- Right click the GPO and click on Edit.
- For executing VBScript, follow these steps (refer this image):
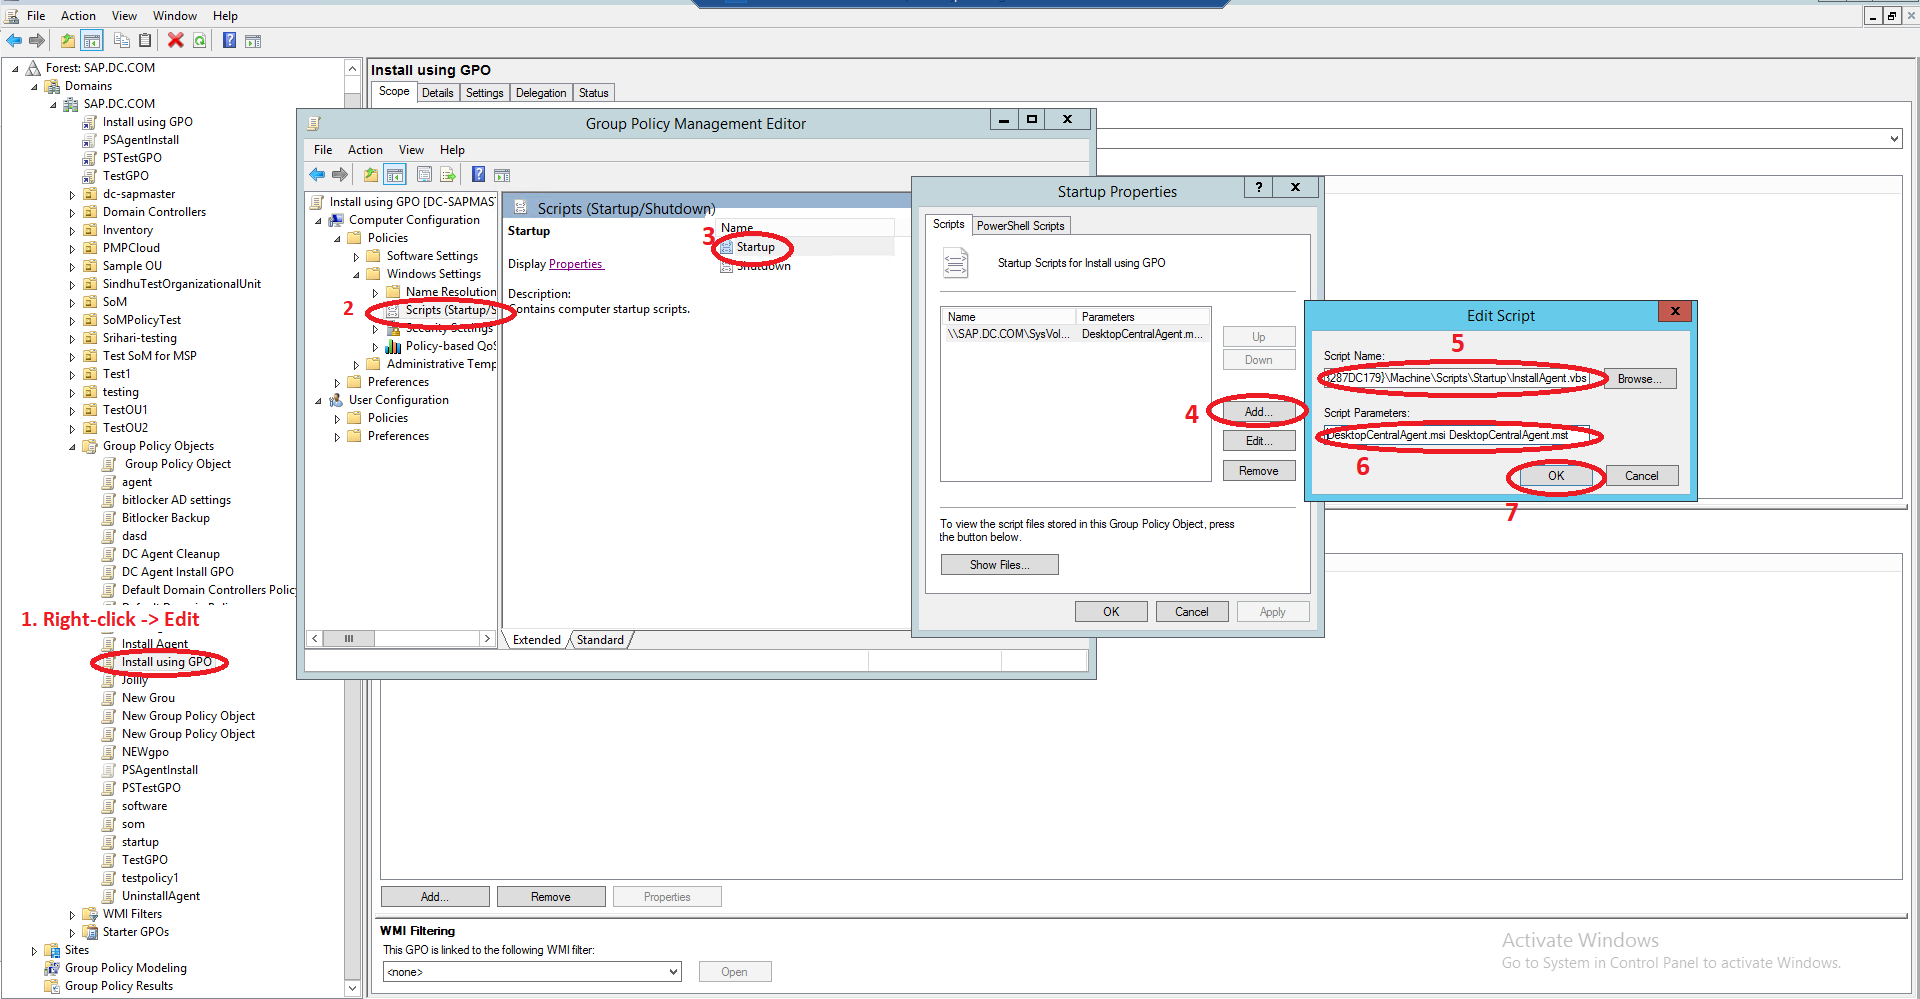
- Expand Computer Configuration --> Policies --> Windows Settings --> Scripts
- Right click Startup and click Properties.
- Click Show Files.
- Drag and drop the InstallAgent.vbs (First save the .txt file and rename it as .vbs) & UEMSAgent.msi UEMSAgent.mst to this location and Copy the location (\\Domain name\SysVol\Domain name\Policies\{ID}\Machine\Scripts\Startup) and close.
- In the Startup Properties dialog box, click Add.
- Browse and navigate to the location, copy the browsed path (\\Domain name\SysVol\Domain name\Policies\{ID}\Machine\Scripts\Startup) and select InstallAgent.vbs script. Then specify the path (copied location) and the script as mentioned below:
- (\\Domain name\SysVol\Domain name\Policies\{ID}\Machine\Scripts\Startup)\InstallAgent.vbs
- Specify the script parameters as mentioned below:
UEMSAgent.msi UEMSAgent.mst
If SSL third party certificate is uploaded in the server, go to Admin -> Security Settings -> Import SSL Certificates,the below files should be added along with Agent installer files:-
DMRootCA.crt
- Specify the script arguments as "UEMSAgent.msi UEMSAgent.mst DMRootCA.crt"
If SSL third party certificate is not uploaded in the server, Admin -> Security Settings -> Import SSL Certificates,the below files should be added along with Agent installer files:-
DMRootCA.crt DMRootCA-Server.crt
- Specify the script arguments as "UEMSAgent.msi UEMSAgent.mst DMRootCA.crt DMRootCA-Server.crt"
For executing PowerShell script, follow these steps and refer this image):
-
Ensure if PowerShell is enabled in all the client computers before execution of this script.
-
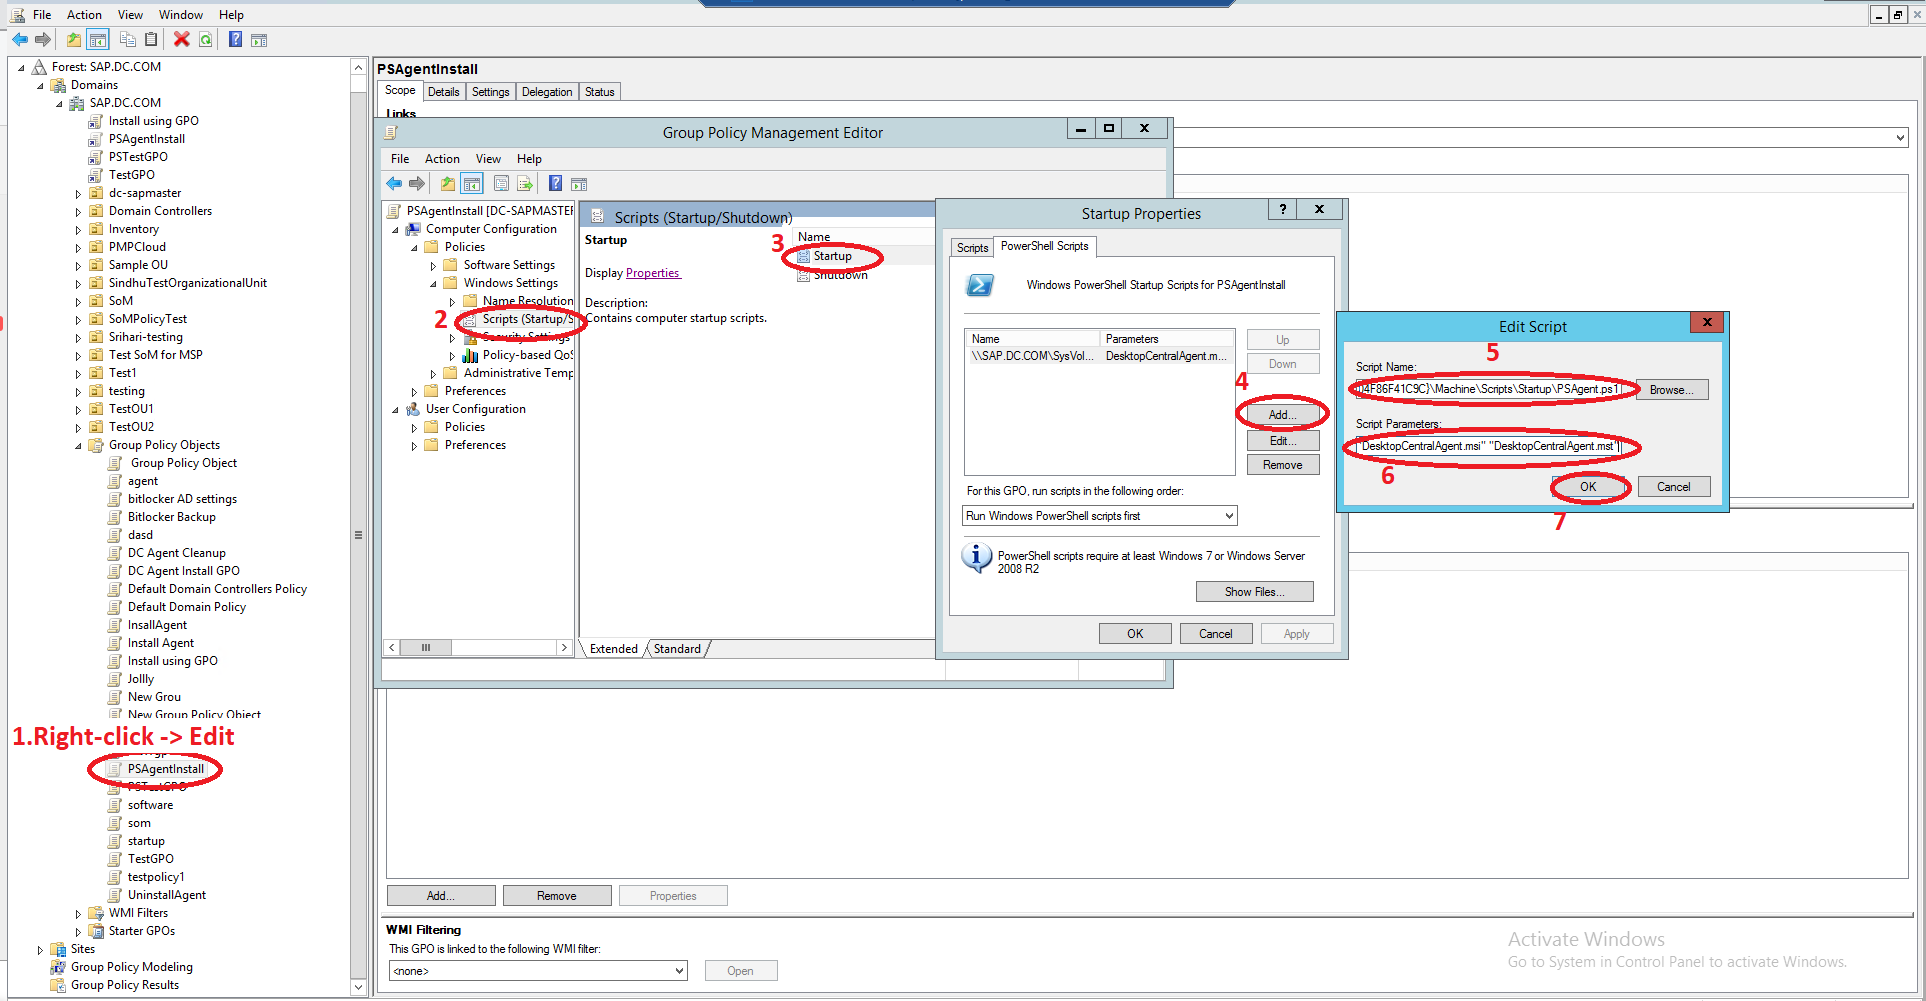
Expand Computer Configuration --> Policies --> Windows Settings --> PowerShell scripts
-
Right click Startup and click Properties
-
Click Show Files
-
Drag and drop the PSInstallAgent.ps1 (First save the .txt file and rename it as .ps1) & UEMSAgent.msi UEMSAgent.mst to this location and copy the location (\\Domain name\SysVol\Domain name\Policies\{ID}\Machine\Scripts\Startup) and close.
-
In the Startup Properties dialog box, click Add
-
Browse and navigate to the location, copy the browsed path (\\Domain name\SysVol\Domain name\Policies\{ID}\Machine\Scripts\Startup) and select the PSInstallAgent.ps1 script. Then specify the path (copied location) and the script as mentioned below:
-
(\\Domain name\SysVol\Domain name\Policies\{ID}\Machine\Scripts\Startup)\PSInstallAgent.ps1
-
Specify the script parameters as mentioned below:
"UEMSAgent.msi" "UEMSAgent.mst" -
If SSL third party certificate is uploaded in the server, go to Admin -> Security Settings -> Import SSL Certificates,the below files should be added along with Agent installer files:-
DMRootCA.crt -
Specify the script arguments as "UEMSAgent.msi UEMSAgent.mst DMRootCA.crt"
If SSL third party certificate is not uploaded in the server, Admin -> Security Settings -> Import SSL Certificates,the below files should be added along with Agent installer files:-
DMRootCA.crt DMRootCA-Server.crt
- Specify the script arguments as "UEMSAgent.msi UEMSAgent.mst DMRootCA.crt DMRootCA-Server.crt"
- Click OK to close the Add a Script dialog box
- Click OK to close the Startup Properties dialog box
- Close the Group Policy Object Editor
- Close the Group Policy Management dialog box
The script will be executed when the client computers reboot after the script is deployed to the domain. After the execution of the script, Endpoint Central (formerly Desktop Central) agents will be installed automatically in all the client computers.
-
Set the file association properties of .vbs files to Microsoft Windows (r) based script host in all the client computers. This ensures that the script is executed successfully. Do not modify the file association properties to open in a text editor as the execution of the script will fail.
-
You can leave the Endpoint Central (formerly Desktop Central) GPO object installed indefinitely to ensure that the agent is installed in future client computers.
-
This will not re-install the agent that is already installed as the script is programmed to ensure that it doesn't re-install agents that are already installed. This will not cause any problems during startup.
-
You also do not need to update and download the DesktopCentralAgent.msi file every time Endpoint Central (formerly Desktop Central) releases a new version. The agent is programmed to check for new versions from the server and upgrade itself automatically. When an agent is installed, it updates itself automatically when new versions are released.
Installing Windows agents through GPO lightweight tool
Endpoint Central (formerly Desktop Central) agent can be installed using the GPO light-weight tool. Follow the steps given below to create a Group policy and link it with OUs and Domains.
Steps:
- Download the Windows agent (Zip file) from Admin tab --> Agent Configuration--> Download Windows Agent and extract it.
- Save the .msi and .mst in a folder location.
- Save and Download the GPO_Tool.ps1 script on the location where the .msi and .mst files are saved.
- If you want to configure the policy using VB script, then save the script as InstallAgent.vbs on the same location.
(or)
In case you want to configure the policy using PowerShell script, then and save the script as PSInstallAgent.ps1 on the same location.
- Run Windows PowerShell in administrative mode and navigate to that script (GPO_Tool.ps1) location, then execute the script with arguments as mentioned below.
- For vb script configuration: .\GPO_Tool.ps1 UEMSAgent.msi UEMSAgent.mst InstallAgent.vbs
- For PowerShell script configuration: .\GPO_Tool.ps1 UEMSAgent.msi UEMSAgent.mst PSInstallAgent.ps1
- In the PowerShell window, enter the name of the GPO to be created and press Enter.
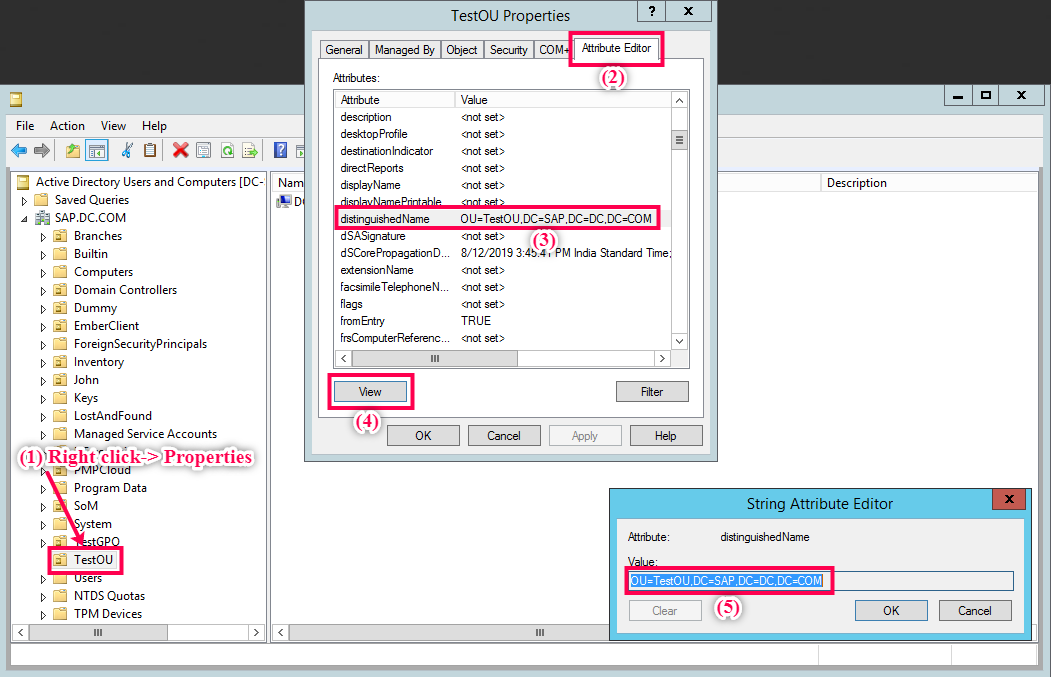
- After creating the GPO, enter the distinguished name of the OU or Domain to be linked with. Follow the steps mentioned below to get the distinguished name:
- Open Active directory users and computers in Administrative tools.
- Under View, enable Advanced Features.
- Right click on the OU / Domain which you want to be linked with.
- Select Properties -> Attribute Editor -> distinguishedName -> View
- Now paste the copied distinguished name in the PowerShell window and click Enter.
- If you want to 'Add' another Domain, press y and repeat step 5. Else, press n to end the process.
Installing Windows agent for workgroup machines
Windows agent for workgroup machines can be installed using IP addresses and IP ranges through a .exe file with support files to install agents using a command-line tool.
To install an agent using IP addresses and IP ranges, follow the steps given below:
Windows agents for workgroup machines can be installed using IP addresses and IP ranges through a .exe file with support files to install agents using a command-line tool.
To install an agent using IP addresses and IP ranges, follow the steps given below:
To install agents on Mac computers, follow the steps given here.
To install agents on Linux computers, follow the steps given here.
- Download the agent-installation-via-ip.zip.
- Extract the zip file 'agent-installation-via-ip.zip'.
Note: If the build version is 10.1.2124.1 and above, kindly include DCAgentServerInfo.json.
- Right click on SetupUtility.bat file with administrative mode.
- Choose the required option from the ones listed.
- Download the agent. Follow the steps given below:
Copy and paste UEMSAgent.msi & UEMSAgent.mst files to the extracted InstallAgentViaIP folder.- Navigate to Agent tab.
- Click Agent Installation on the left pane
- Under Using Active Directory, in the GPO tab, click on Download Agent.
- Select the required office.

- Provide the required details.
Then the agent will be installed remotely in the client machines.
Note: IP addresses of the client computers listed in ipaddress.txt should be mentioned in independent lines. The credentials to be provided for agent installation in client computers should have domain admin permissions.
To install agents using ipaddress.txt, enter the IP address or IP range of the computers on which you want to install the agent and save the file.
Installing Windows agents manually
To install the agent manually, follow the steps given below:
- Download the Windows agent from Admin tab --> Agent Configurations --> Download Windows Agent button
- Save the .zip file in the computer on which you want to install the agent
- Extract the contents of the zip file
- Open a command prompt with run as admin privilege and navigate to the location of extracted zip folder and run the command setup.bat
- Select option 1 to install the agent on this computer
You have now successfully deployed the agent.
How to image a Windows computer with a Endpoint Central (formerly Desktop Central) agent
Endpoint Central Agent has a unique ID that represents the machine with its name and system details. If more than one Endpoint Central (formerly Desktop Central) Agent is identified with the same ID , the details listed in AssetExplorer will be overwritten. This would end up listing details of only one computer though there are several computers with the same ID. So in order to avoid this issue, follow the steps mentioned below to image a computer with Endpoint Central (formerly Desktop Central) Agent on it.
- Install Endpoint Central (formerly Desktop Central) Agent on the computer which is to be used for imaging.
- Download Agent by accessing the Assets module and selecting Download Windows Agent (or) go to Admin >> Agent Configuration >> Download Windows Agent.
- Save and Download this script and store it in the system that is supposed to be imaged.
(running this script will block the Endpoint Central (formerly Desktop Central) Agent from communicating with the Endpoint Central (formerly Desktop Central) Server) - Rename the .txt file as .vbs file
- Open the command prompt as administrator and navigate to the folder where the above script is stored.
- Execute the script as: cscript.exe dcagentPreImage.vbs
(example : E:\Downloads>cscript.exe dcagentPreImage.vbs)
Now your computer is ready to be imaged with Endpoint Central (formerly Desktop Central) Agent, for deployment.
Endpoint Central (formerly Desktop Central) Agent in the newly imaged computers will contact the Endpoint Central (formerly Desktop Central) Server only if they are renamed.
Uninstalling Windows agents
You can uninstall the ManageEngine Endpoint Central (formerly Desktop Central) Agent manually as well as by using PsExec Utility.
Manually Remove from Individual Computers
- Save and rename the script UnInstallAgent.txt as UnInstallAgent.vbs
- Run the script in all the client computers from the command prompt: cscript UnInstallAgent.vbs
Using PsExec Utility to Remove from Multiple Computers
You can use the PsExec utility to execute the agent uninstallation script on multiple computers.
- Create a network share (eg. \\MyServer\MyShare).
- Save and rename the script UnInstallAgent.txt as UnInstallAgent.vbs
- Save the vb script in the network share created in step 1
- Download the PsExec utility from http://technet.microsoft.com/en-us/sysinternals/bb897553.aspx and save it in, for example, C:
- Run the script using the following command from the dos promptC:\for /f %f in (c:\computernames.txt) do psexec \\%f -u <domain>\administrator -p <password> CSCRIPT \\MyServer\MyShare\UnInstallAgent.vbs where,computernames.txt contains a list of computers from where the agent has to be uninstalled, which has to be specified with its complete path <domain> refers to the domain or the workgroup admin user name <password> refers to the domain or the workgroup administrator password.
Linux agent
The following section discusses Linux agent deployment, uninstallation, and steps for creating a Linux image with Endpoint Central (formerly Desktop Central) agents.
Installing Linux agent using Linux agent installation tool
For the bulk installation of agents in Linux machines, it is necessary to use the Linux Agent Push Installation tool.
To install Linux agents in bulk:
- Go to Assets module and click on Download Linux Agent in the middle section Or go to Admin >> Agent Configuration >> Download Linux Agent.
- Download and extract the Linux Agent Push Installation tool.
- Extract the Agent file which you downloaded in step 1 and copy the Linux Agent binary and serverinfo.json to the Linux_Agent_Push_Installation folder.
- To install agents using computers.csv, enter the hostname and optionally the agent installation directory in the sample computers.csv that has been provided and save the file.*
- Execute LinuxAgentPushInstaller_32bit.exe. Choose the required option and follow the instructions given in the command window.
Installation Modes
Mode 1 - Install agents on the computers listed in computers.csv using a common Username and Password
Mode 2 - Install agents on the computers listed in computers.csv using SSH Keys
Mode 3 -Install agents on the computers in an IP Range using a common Username and Password
Mode 4 - Install agents on the computers in an IP Range using SSH Keys
computers.csv format
The hostname of the agent machine is required.
The agent installation directory is optional. When left empty, the agent will be installed in the default agent installation directory under /usr/local/.
Example:
hostname,agent_installation_dir
test-machine-1,
test-machine-2,/opt
SSH Keys
The following details apply to Modes 2 and 4.
SSH keys should have been configured in the agent machines (i.e) the Public Key of the Windows machine from which Push Installation is to be done, should be present in the authorized_keys file in the agent machines.
By default, the Private Key present in the current User's home directory will be used. If a different key is to be used, the full path to the Private Key can be provided when it is prompted.
In case the Private Key is encrypted, the passphrase should be entered. If not, it can be left empty.
If the user is a sudo user, NOPASSWD option should be enabled for this user in sudoers. This is not necessary in case of installation using the root user.
IP Range
The following details apply to Modes 3 and 4.
Only IPv4 is supported.
End IP is inclusive.
SSH Port
By default, SSH port 22 will be used. To use a custom SSH port, provide it as an argument to the tool.
Example:
LinuxAgentPushInstaller_32bit.exe 8888
Installing Linux agent manually
Linux agents can be installed manually in the computers that need to be managed. Agents should be downloaded on the Linux computer manually before initiating the installation process. For invoking the installation in client computers, the SSH port (default port 22) should be open in the computers where the agent needs to be installed. SSH port is used only for agent installation purposes and not for agent-server communication. Follow the steps mentioned below.
- Go to the terminal as a root user. If you do not log in as a root user, open the terminal and use sudo command to perform each operation mentioned below and enter password whenever prompted. This provides you the root privilege.
- Navigate to the location, where the agent is downloaded and Unzip the DCLinuxAgent.zip by using the command "unzip -e DCLinuxAgent.zip".
- Verify if, "DesktopCentral_LinuxAgent.bin" & "serverinfo.json" are located in the same path
- Execute the Command, "chmod +x DesktopCentral_LinuxAgent.bin" as a root user. This prepares the executable for installation.
- Run the Installer using "./DesktopCentral_LinuxAgent.bin". Agent will be installed by default in "/usr/local/desktopcentralagent" directory.
- If you wanted to change the installation location of the agent, use this command "./DesktopCentral_LinuxAgent.bin -d <new_location>" .
You can see that the Endpoint Central (formerly Desktop Central) agent is successfully installed on the Linux computer.
How to image a Linux computer with a Endpoint Central (formerly Desktop Central) agent
Endpoint Central (formerly Desktop Central) Agent has a unique ID that represents the machine with its name and system details. If more than one Endpoint Central (formerly Desktop Central) Agent is identified with the same ID, the details listed in the AssetExplorer Console will be overwritten. This would end up listing details of only one computer though there are several computers with the same ID. To avoid this, follow the steps mentioned below to image a computer with Endpoint Central (formerly Desktop Central) Agent on it.
Steps to be performed on the computer which is to be used for imaging.
- Install Endpoint Central (formerly Desktop Central) Agent on the computer.
- Download Agent by accessing the Assets module and selecting Download Linux Agent (or) go to Admin >> Agent Configuration >> Download Linux Agent.
- Ensure that you have superuser privileges to perform the below actions.
- Open the terminal and run this command "dcservice -p" to stop Endpoint Central (formerly Desktop Central) Agent Service.
- Download "LinuxOSImager" in the Machine.
- Navigate to the location where "LinuxOSimager" is stored, open the terminal and run this command "chmod +x LinuxOSImager". This prepares the file for execution.
- Run this command : "./LinuxOSImager set". Now the machine will be marked as imaged.
- Take the Image of the OS.
- Run the command : "./LinuxOSImager reset". This is needed for the machine to contact Endpoint Central (formerly Desktop Central) Server.
- Restart the Endpoint Central (formerly Desktop Central) Agent Service by running the command "dcservice -t &".
Steps to be performed on the computer where the image will be deployed.
- Deploy the OS image in the new machine.
- Rename the New machine.
- Restart the machine or open the terminal and run the command dcconfig refresh as the root user.
Uninstalling Linux agents
To uninstall Linux agents from the computers, follow the steps mentioned below:
- Go to the terminal as a root user. If you do not log in as a root user, open the terminal and use sudo command to perform each operation mentioned below and enter the password whenever prompted. This provides you the root privilege.
- Navigate to the location, where the agent is installed, (default Location : /usr/local/desktopcentralagent) execute this command to "chmod +x RemoveDCAgent.sh" to initiate the uninstaller. You need to have root privilege to uninstall the agent. If you do not remember the installation location, you can locate it here, Agent Installed Directory : "/etc/desktopcentralagent/dcagentsettings.json"Execute this command "./RemoveDCAgent.sh" to uninstall the agent.
You can see that the Endpoint Central (formerly Desktop Central) agent has been uninstalled successfully from the computer.
Supported Linux OS versions
Endpoint Central (formerly Desktop Central) currently supports the following Linux versions:
- Ubuntu 10.04 and later versions
- RedHat Enterprise Linux 6 and later versions
- CentOS 6 and later versions
- Fedora 19 and later versions
- Mandriva 2010 and later versions
- Debian 7 and later versions
- Linux Mint 13 and later versions
- Open SuSe 11 and later versions
- Suse Enterprise Linux 11 and later versions
- Pardus 17, and 19
- Oracle Linux Server 6, 7, and 8
Mac agent
This section discusses the methods of Mac agent deployment, uninstallation, and steps for creating a Mac image with Endpoint Central (formerly Desktop Central) agents.
Installing Mac agents using Mac agent installation script
For bulk installing Mac agent, it is necessary to use the script. Scripts are used to install mac agent through ssh in computers.
Follow the below steps to install Mac agents in bulk:
- Go to the Assets module and click on Download Mac Agent at the middle section or go to Admin >> Agent Configuration >> Download Mac Agent.
- Make sure sshpass is installed in the Mac system from which the script will be executed.
- Ensure that Remote Login has been enabled in all the managed Mac computers and should be reachable by their machine name.
- Execute the script and specify the username and password using which the installation will be carried out. The credentials provided should have sudo permissions.
- Prepare a list of computers in which the agent needs to be installed. The computer names or ip addresses should be furnished as new line entries and the list should be saved as a text file (.txt).
Installing Mac agent manually
Follow the steps mentioned below to install the Mac agents manually,
- Login into the Mac computer as an administrator and navigate to the location where the agent is downloaded.
- Extract the zip file and locate DesktopCentral_MacAgent.pkgand serverinfo.plist file.
- Double click to install the agent.
- Enter administrator's password when prompted to complete installation.
How to image a Mac computer with a Endpoint Central (formerly Desktop Central) agent
Steps to image a Mac system with Endpoint Central (formerly Desktop Central) Bundling
- Save and Download the pre-installation script in the machine that is to be imaged and rename the .txt file as a .sh file.
- Execution of this script will block the Agent-Server communication on a temporary basis.
- Open the terminal and navigate to the folder where the pre-installation script is stored.
- Execute the command sudo ./dcagentpreimage_Mac.sh and the machine is now ready to be imaged.
Endpoint Central (formerly Desktop Central) Mac agent, residing on the computer with the deployed OS image, will contact the server only if renamed. Here's why!
Every Endpoint Central (formerly Desktop Central) Agent has a unique resource ID that is indicative of the machine name and other details. If more than one agent is identified with the same ID, the details of both the agents will be overwritten. This would end up listing the details of only one machine, despite two machines having the same agent ID. In order to avoid this situation, it is mandatory to rename the agent name in the computer with the deployed OS image.
Follow these steps for restoration of agent-server communication in the imaged computer:
- Save and Download post-installation script in the imaged computer and rename .txt file as .sh file.
- Open the terminal and navigate to the folder where the post-installation script is stored.
- Execute sudo ./dcagentpostimage_Mac.sh.
- Upon the successful execution of this script, agent-server communication will be restored.
Uninstalling Mac agents
To uninstall the agents from the computers, follow the steps mentioned below.
- Login into the computer as an administrator and open the terminal.
- Navigate to the directory /Library/DesktopCentral_Agent/uninstall
- Type sudo chmod 744 uninstall.sh,and enter
- Type the commandsudo./uninstall.sh, this command removes all the files except logs.
Supported Mac OS versions
Endpoint Central (formerly Desktop Central) currently supports the following Mac versions:
- 10.7 Lion
- 10.8 Mountain Lion
- 10.9 Mavericks
- 10.10 Yosemite
- 10.11 El Capitan
- 10.12 Sierra
- 10.13 High Sierra
- 10.14 Mojave
- 10.15 Catalina
- 11.0 Big Sur