Failover Service (Version 13000 and above)
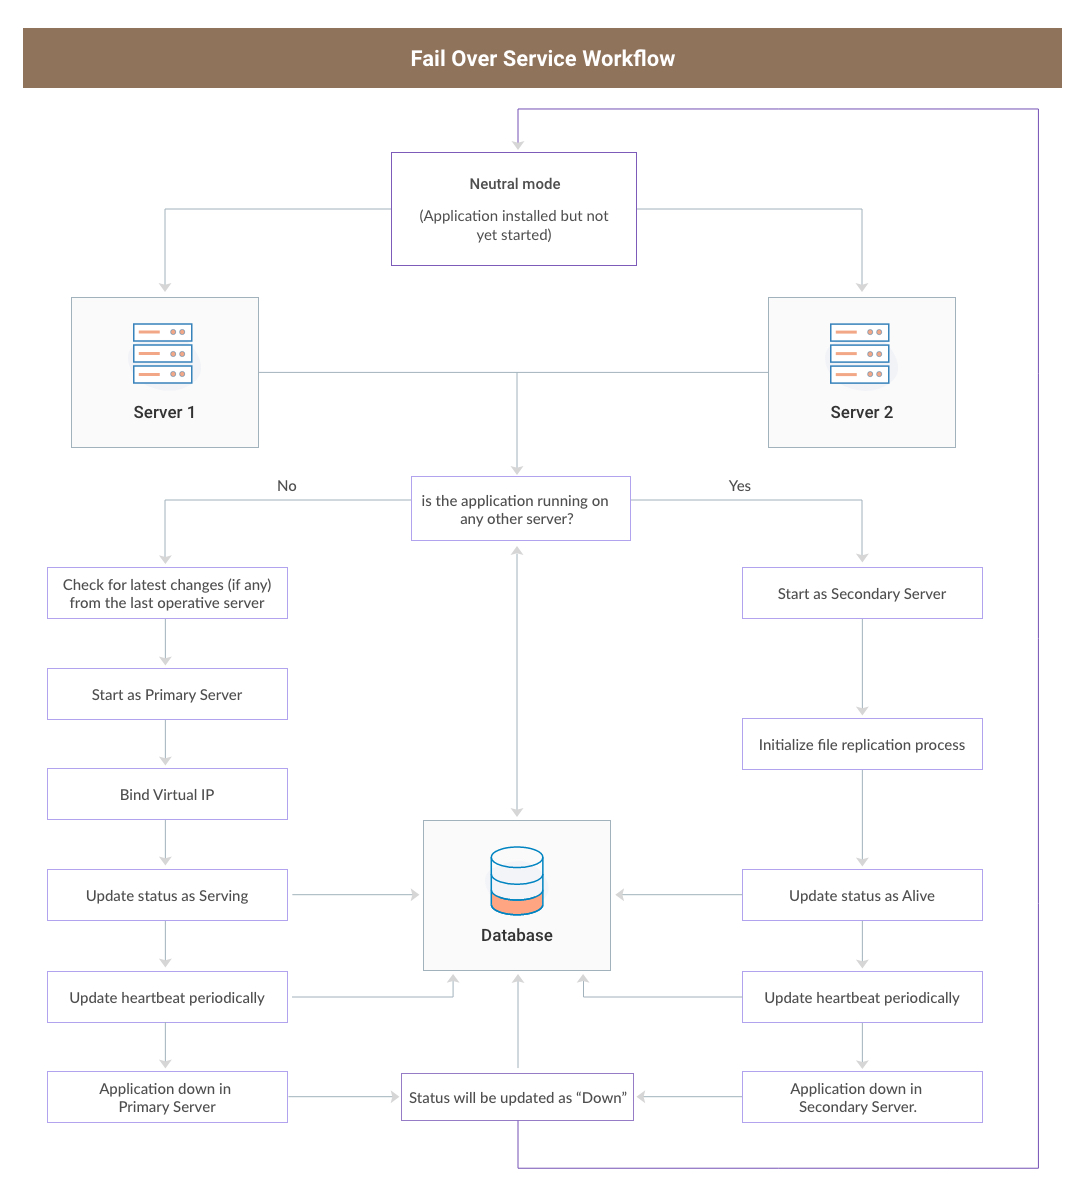
Failover Service (FOS) configuration ensures the availability of ServiceDesk Plus MSP in case of hardware/software failure. It implements a hot-standby system: a primary server runs by keeping a secondary server in standby mode while the primary server runs the application while the secondary server stays in a standby mode. In the event of primary server unavailability/scheduled downtime, the secondary server takes over the primary server functions.
NOTE: Currently, Failover Service is supported only for servers running on Windows Operating System.
You can launch FOS mode from Admin > General Settings > HA Configuration.
Role Required: SDAdmin
This guide discusses configuring Failover Service through the following topics:
- Prerequisites
- How does Failover Service work?
- Benefits of launching ServiceDesk Plus MSP in FOS mode
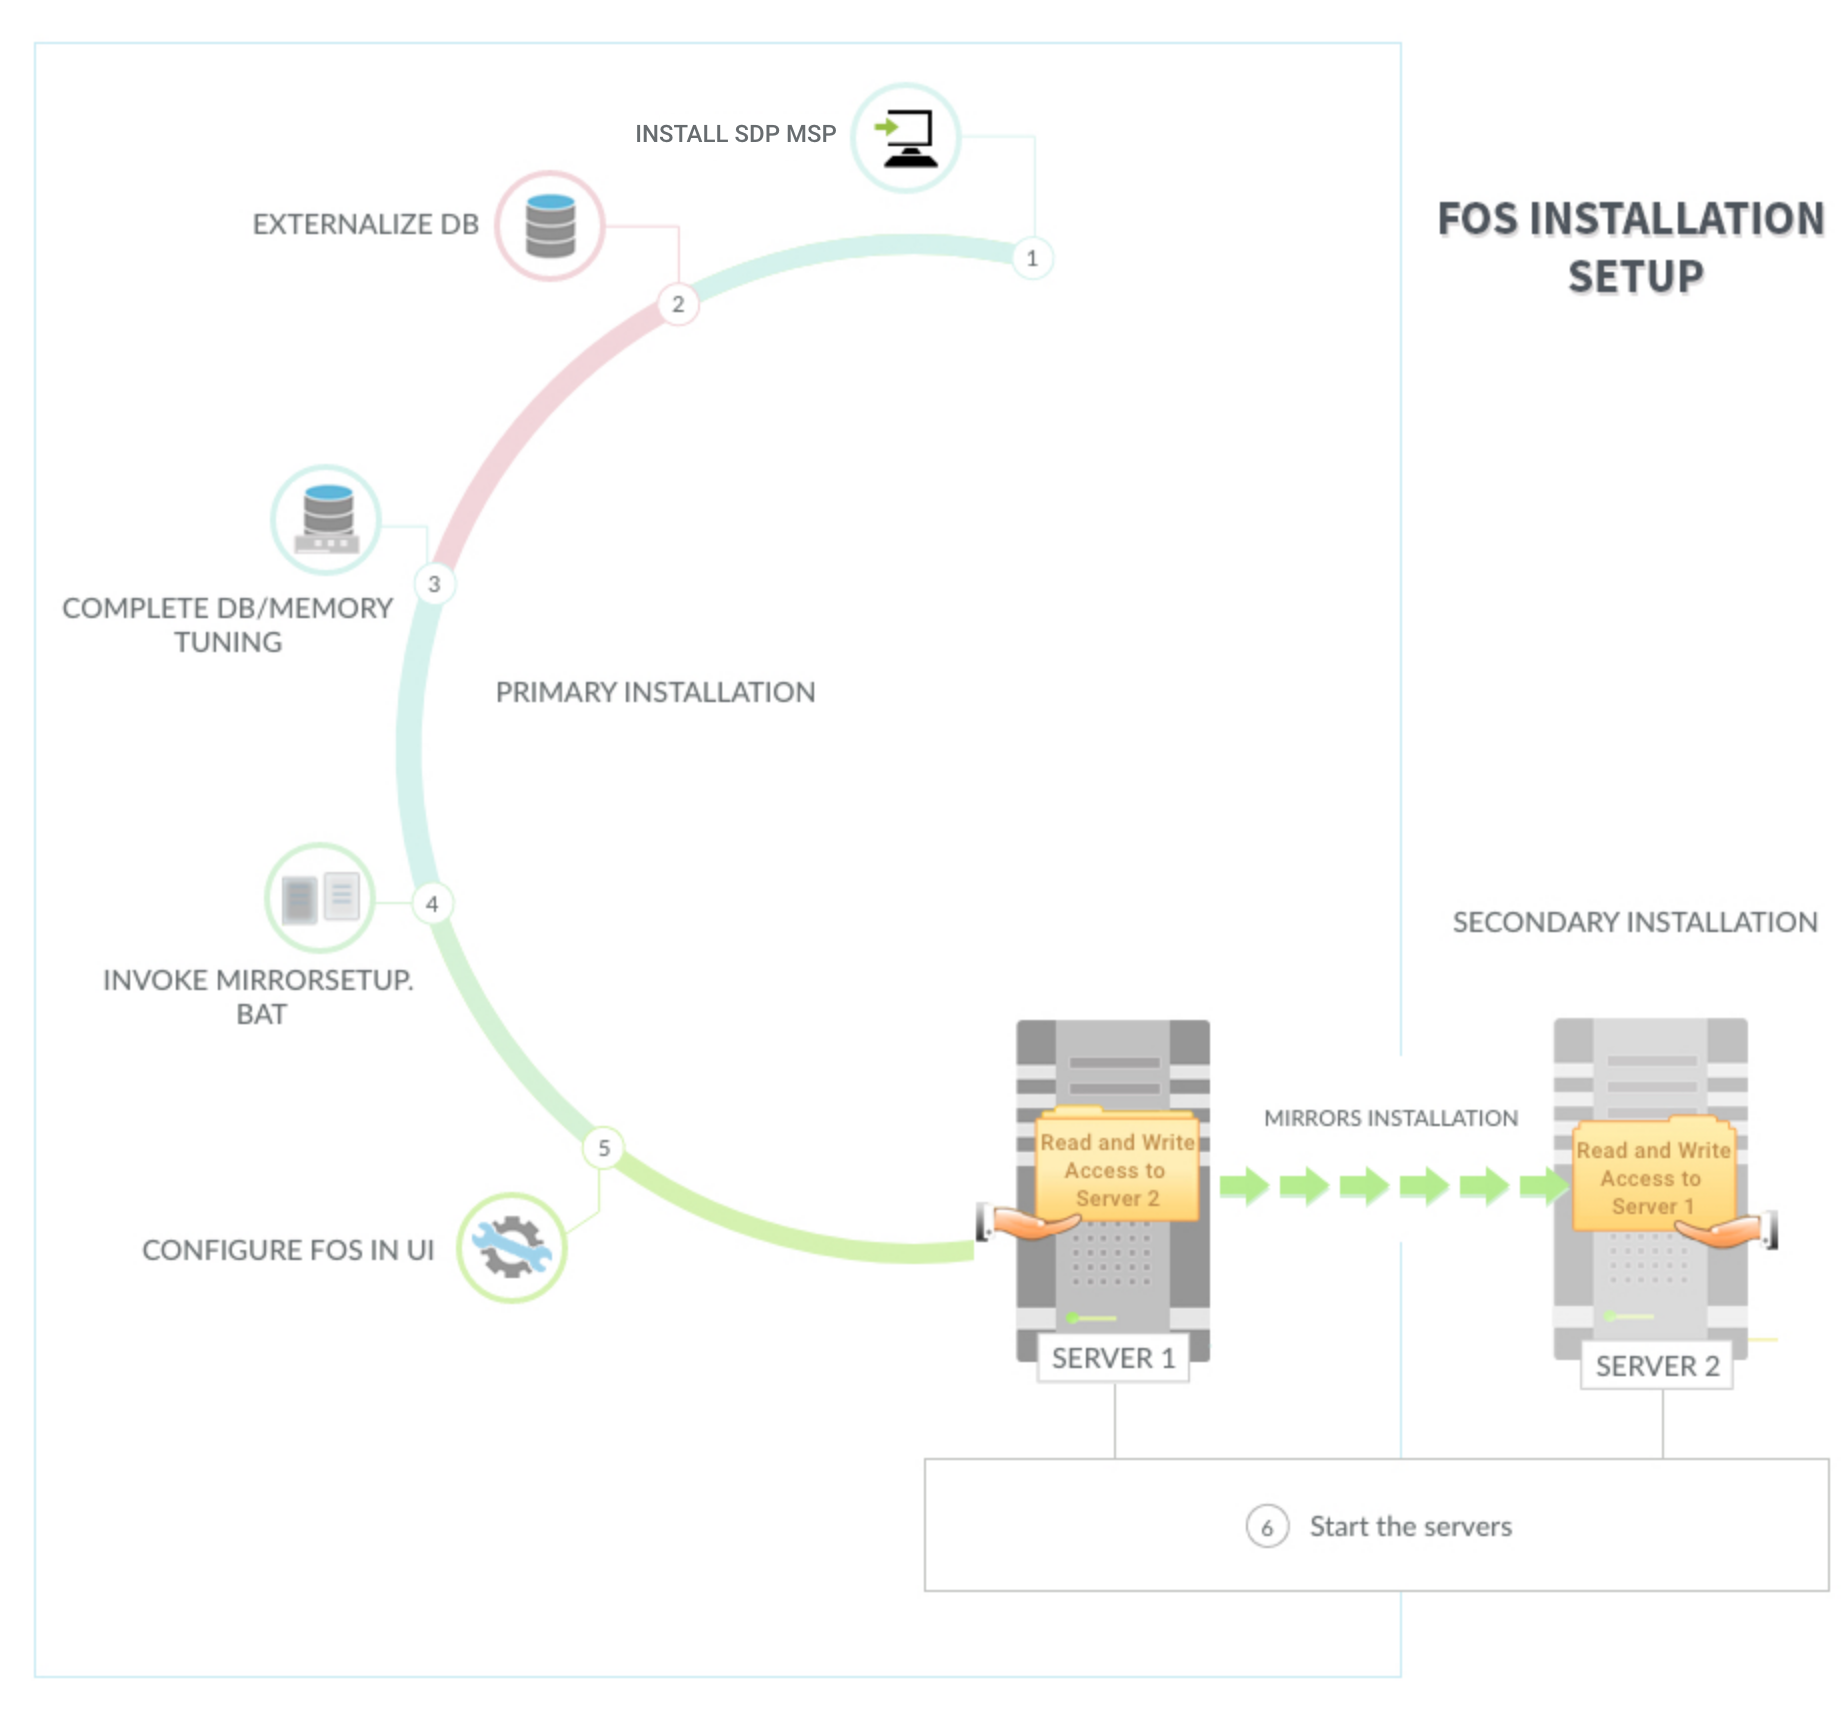
- Set Up Process
- Set Folder Permissions
- Configuring Failover Service
- Upgrade/Restore FOS
- Disable FOS
- History
Prerequisites
Server Requirements
- Two 64-bit server machines with high network connectivity.
- ServiceDesk Plus MSP 64 bit .exe installations (preferred).
- Servers used for the FOS setup must have two way read-write access for the ManageEngine folder (where ServiceDesk Plus MSP is installed).
- A common IP Address in the same network as primary and secondary servers.
- Two virtual or physical servers with different NIC card addresses to set up the FOS.
ServiceDesk Plus MSP Configuration Requirements
- FOS license must be purchased as an add-on to your application edition. You cannot view FOS configurations in Admin without applying FOS license to your application.
- The database must be externalized from primary and secondary servers but remain accessible to both. Preferably, use MSSQL setup.
- File attachment path must be set as network path by externalizing from the primary and secondary servers. The attachment path must belong to the same network domain and remain accessible to both machines.
- HTTPS certificate must be obtained for the alias URL of the common IP.
- The common URL (for which the SSL certificate is obtained) must be bound to the common IP address configured in the DNS of the network.
- The application must be started as a service using Java Service Wrapper.
- Polling and retry parameters should be the same in both servers.
- The applications installed in the primary and secondary servers must both run on the same port.
How does Failover Service work?
- The Failover Service setup involves the following components:
- Primary Server: The server where the application is currently hosted.
- Secondary Server: The backup server in standby mode that monitors the health of the primary server periodically. The secondary server also replicates files from the primary server constantly.
- Database Server: The primary and secondary servers are connected to a common database server. By default, the database server is used to monitor the primary server's health via the DB heart beat mechanism. The database server also replicates the data stored in the primary server. This ensures that no data is lost during the time between the server failure and the take-over.
Note: The primary server, secondary server, and the database server are connected to a common network.
- The IP address of the primary server, secondary server, and virtual IP should be static and in the same network.
- The primary server's status can be monitored in two ways:
- DB heartbeat Mechanism - Default method for monitoring the health of a peer machine. The primary server updates its status to the database server every minute. If no status update is received, it is assumed that the primary server is unavailable and the secondary server takes over.
- Ping Mechanism - Requires SSL certificate and can be configured only in the HTTPS protocol. In case of database failure, the application automatically sets up this method.
- Standby server monitors the health of primary via the database server and replicates files from the primary server periodically.
- When the primary server goes down, no status update is sent to the database server. The primary server status is updated as "Down" in database server.
- The secondary server recognises the primary server failure and instantly begins the takeover process.
- The secondary server pulls the latest files from the primary server and takes over as the primary server. The time taken to complete the takeover depends on the size of replication data.
- When the primary server is restored back online, it starts as the standby server and the other server continues to act as the primary server. Thus, the cycle continues.
Benefits of launching ServiceDesk Plus MSP in FOS mode
- Availability of ServiceDesk Plus MSP application at all times.
- Smooth and automatic take-over of the failed server.
- Prevents loss of data stored in primary server in the event of server failure by configuring file replication.
- When the primary server goes down and gets restored, it will start in standby mode while the other server continues to act as the primary server. Therefore, it is not essential for administrators to restore FOS setup every time a hardware/software failure occurs.
Set Up Process
You can set up your servers for FOS configuration in two ways:
Approach 1: Set up each server individually
Install ServiceDesk Plus MSP separately in both servers and configure them separately to the same database server.
Approach 2: Set up one server and mirror the configurations to the other server
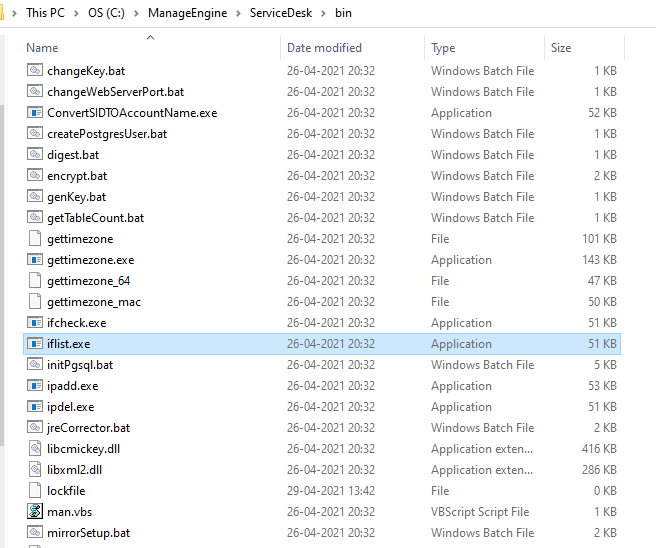
An easier approach using Robocopy. Install the application in the primary server and execute the following command from <ServiceDeskPlusMSP_home>\bin directory: mirrorSetup.bat <IP address of secondary server>.
- In the command prompt, go to {SDPMSP_Home}/bin
- Execute the following command: sd_service.bat -i
- The service will be created in the secondary server. You can now start ServiceDesk Plus MSP as a service.
- Share the ServiceDeskPlus-MSP folder from the primary server to secondary server and vice-versa
- Ensure that the servers have mutual full read/write permission for this folder. You can set the folder access permission to "Everyone".
- To access the shared folder on your server, go to Start menu > Run and invoke \\<machineIP>\ServiceDesk Plus MSP. Provide the user name and password (if needed) to make sure an IPC connection is established between the machines.
- If you want to restrict the folder access to one particular user account,
- Set the folder access to that account and open Run command (Win+R) 'services.msc'.
- Search for "ManageEngine ServiceDesk Plus MSP" and go to Properties.
- Select the Log on tab and choose This account option.
- Enter the login credentials of the domain user to whom the access is given and save it.
- Start the application.
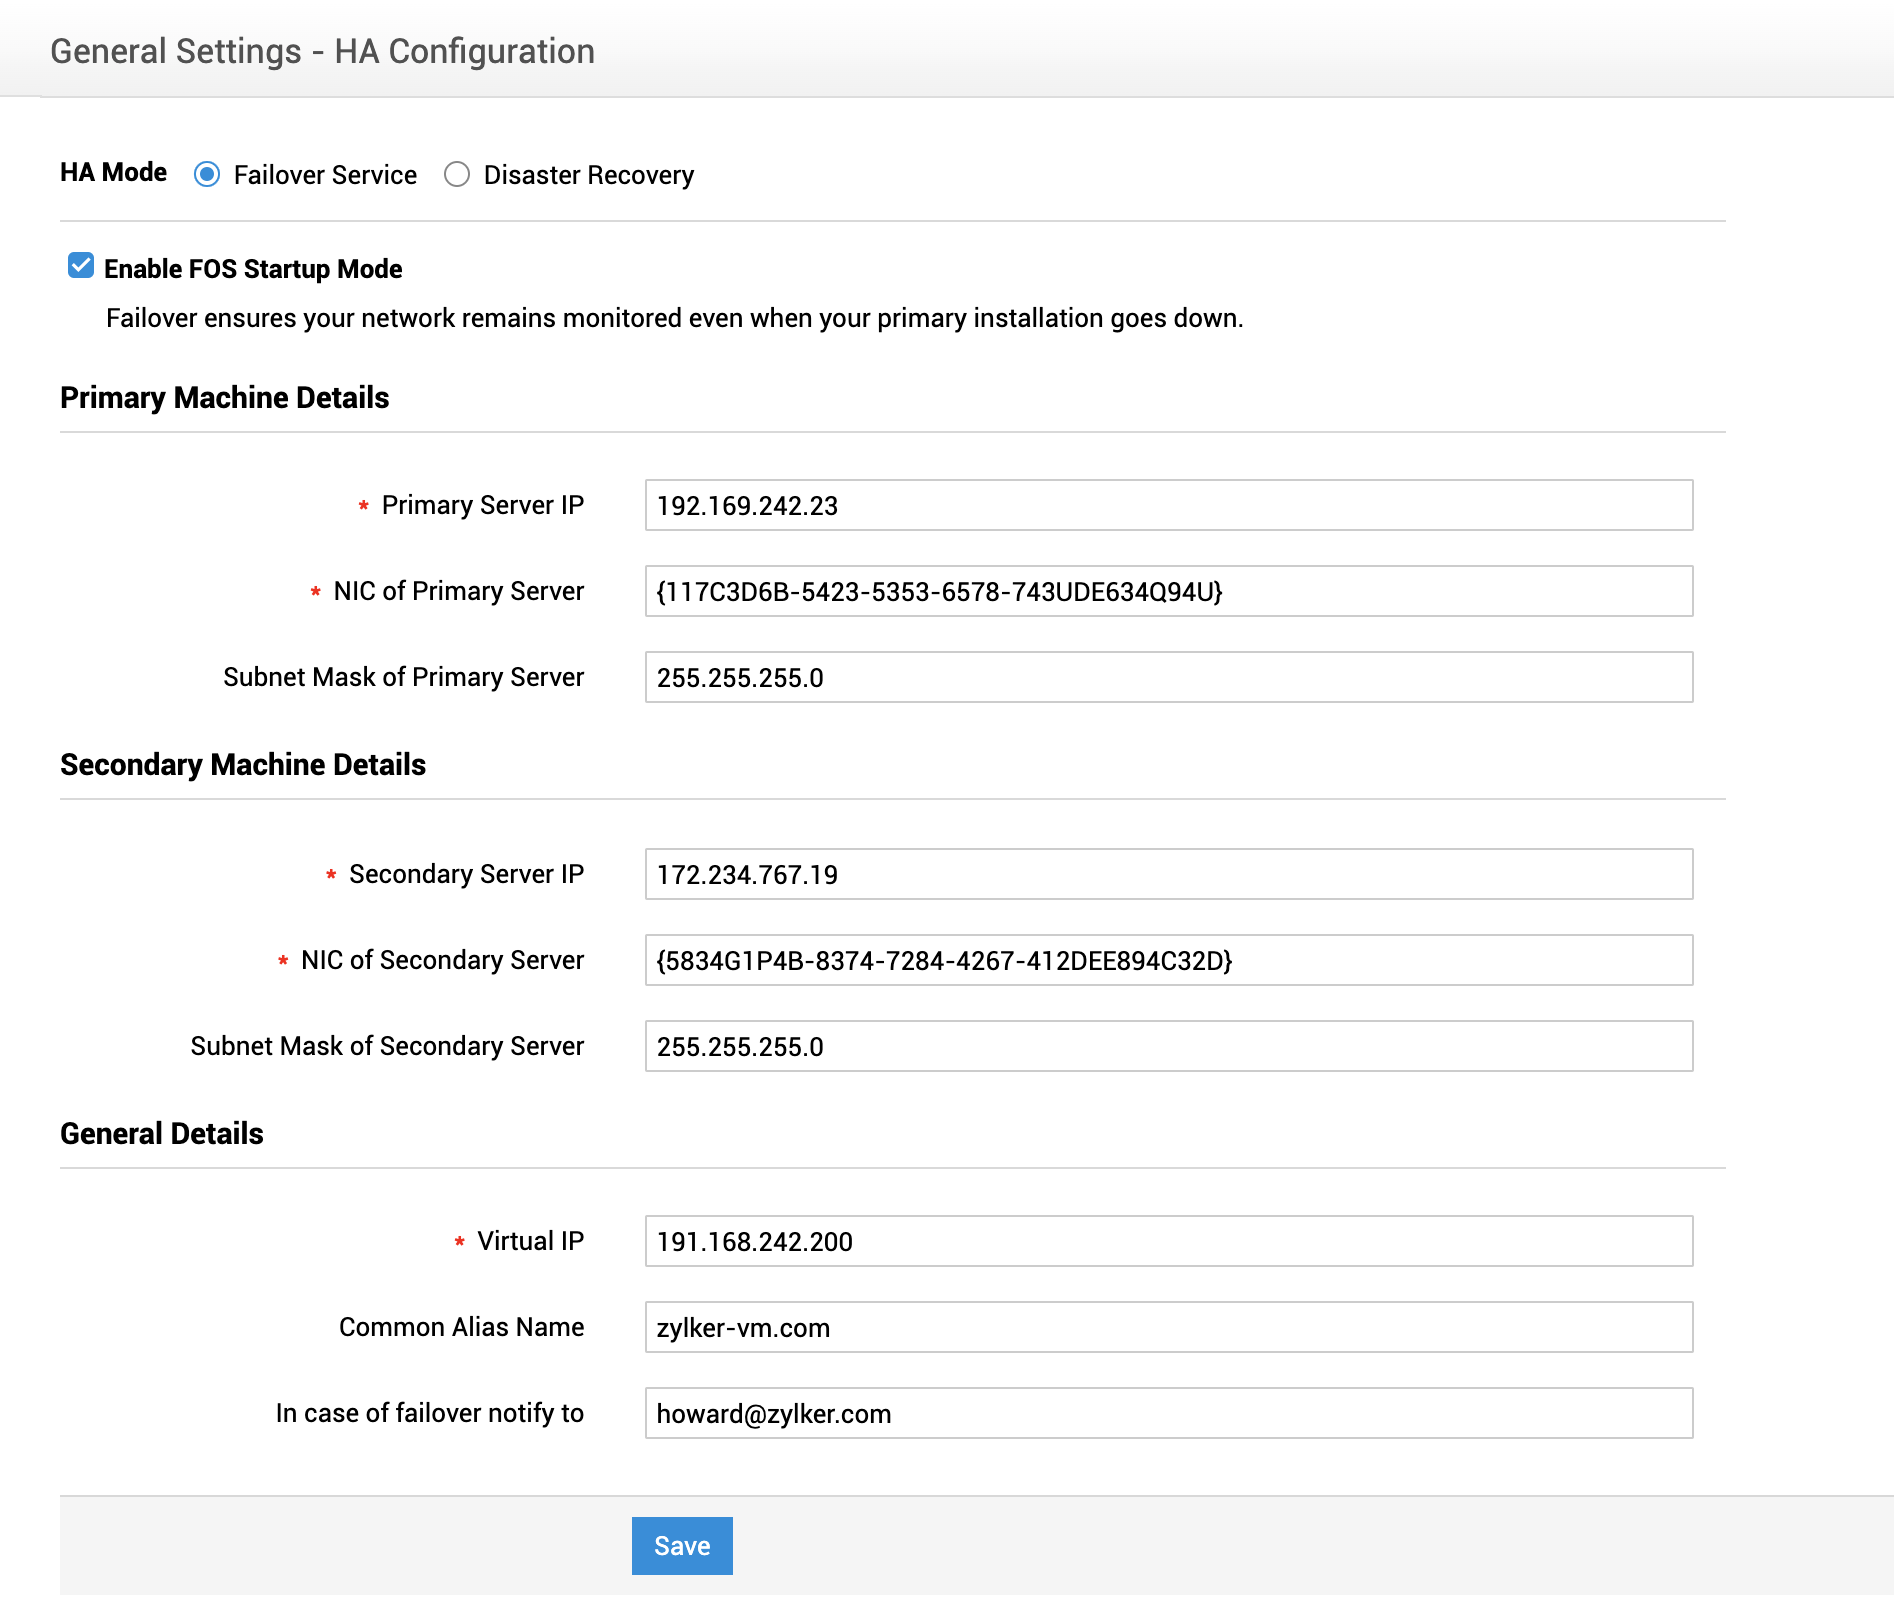
On the HA Configuration page,
- Choose the HA Mode as Failover Service.
- Select Enable FOS Startup Mode check box.

Use the pointers below to configure the application in FOS mode:
Primary Server Details:
- Primary Server IP - Enter the IP address of the server where the application is running.
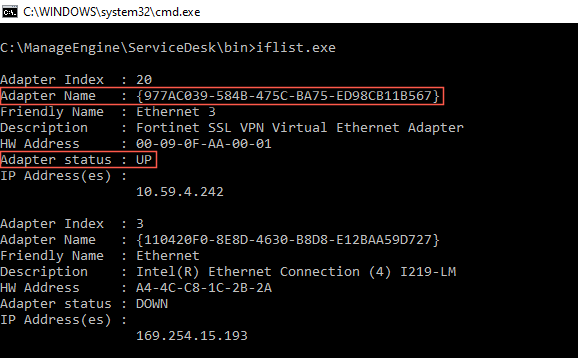
- NIC of Primary Server - Enter the Network Interface Card (NIC) address (also called the physical address) of your primary server. The NIC address should be enclosed within curly braces { }. For example: {117C3D5B-4395-4369-8812-741EEA26D76D}.
|
Learn how to identify the NIC address of your primary server ServiceDesk Plus MSP contains an inbuilt provision to help you identify your NIC address.
 |
- Subnet Mask of Primary Server - Enter the subnet mask of your primary server. The default subnet mask is set at 255.255.255.0. You can also configure other valid subnet mask values.
|
Secondary Machine Details:
- Secondary Server IP - Enter the IP address of your standby server.
- NIC of Secondary Server - Enter the Network Interface Card (NIC) address (also called the physical address) of your secondary server. The NIC address should be enclosed within curly braces { }. For example: {03C0161D-737E-4E97-A6BA-F8546FD2C6DB}.
|
Learn how to identify the NIC address of your secondary server ServiceDesk Plus MSP contains an inbuilt provision to help you identify your NIC address.
 |
- Subnet Mask Secondary Server - Enter the subnet mask of your secondary server. The default subnet mask is set at 255.255.255.0. You can also configure other valid subnet mask values.
|
- Virtual IP - Specify the IP address to which the primary and secondary server must be bound to. You can access the application by using a virtual IP address. Ensure that the virtual IP address you configure belongs to the subnet mask and is not bound to any existing servers in the network.
|
Learn how to test the virtual IP address The virtual IP address is a common IP address in the local network, that is not bound to any specific machine. A simple way to check if an IP address can be used as a common one is to ping the IP address. If the IP is not reachable then it can be used as a common IP address. To test the virtual IP address,
|
- Common Alias Name - Specify a domain name using which you can access the application apart from the virtual IP address. You can customize the alias name as needed.
- In case of failover notify to - Specify the email address to which notifications must be sent in the event of a server failure. Notifications regarding failover service monitoring alerts, data synchronization alerts, and secondary server takeover alerts are built-in and will be sent to this email address. You can configure multiple email addresses by separating them using commas.
By default, the primary server monitors the secondary server's status every 5 minutes. In the event of secondary server failure, an email is triggered to the configured email address. You can modify the primary server's listening time as needed by following the steps below:
- Navigate to {SDPMSP_home} / conf.
- Open the ha.conf file and find the entry: #peer.status.check.time.period=
- Uncomment the entry by removing the hashtag
- Specify the required time period in minutes. For example: peer.status.check.time.period=10
For the notification emails to be sent, the outgoing mail server should be configured for the application. You can customize the notification message from Translations.
Click Save and restart the application for the configurations to take effect.
NOTE:
- After setting up FOS configuration, set up HA file replication configuration.
- When the secondary server takes over as the primary server, the configurations in the FOS page are NOT auto-updated accordingly. In other words, FOS configurations do not reflect which server is primary/secondary unless manually updated.
- While editing FOS configurations or general configurations like changing the webserver port, theme changes, or translations, always update the primary server first.
Upgrade/Restore
Upgrade FOS
|
Announcement for Users using ServiceDesk Plus MSP version 10609 and below The current FOS configurations will not work after the upgrade and you will be automatically migrated to the new FOS. Enable new FOS for continued support.
Announcement for Users using ServiceDesk Plus MSP version 13001 and above Users upgrading to version 6971 and above are not required to mirror the updates in both the servers as the changes are automatically pushed during the upgrade. |
To upgrade your application,
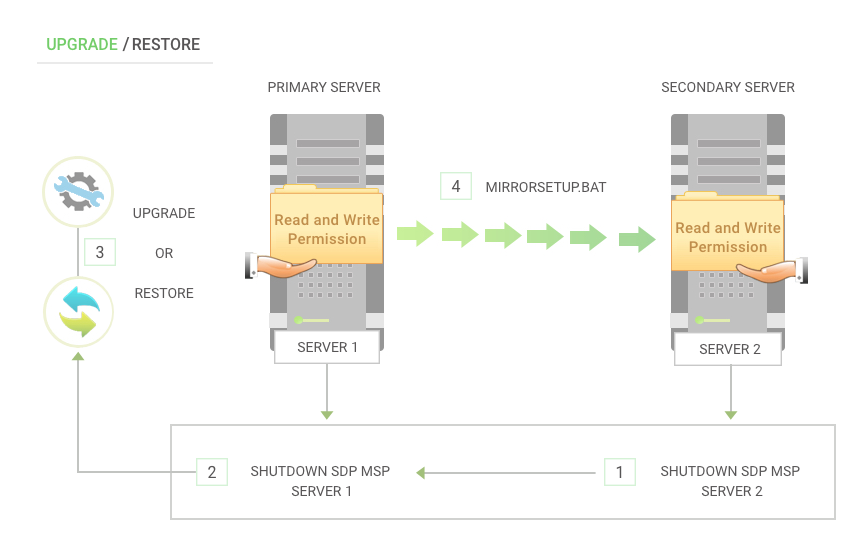
- Invoke <ServiceDeskPlus-MSP>\bin\shutdown.bat in the primary and secondary server. This will stop ServiceDesk Plus MSP.
- Upgrade the build in the primary server using PPM. Click here to learn how.
- Mirror the settings in the secondary server via Robocopy by invoking <ServiceDesk Plus MSP HOME>\bin\mirrorSetup.bat <IP address of secondary server> - pass the secondary server IP as parameter.
- Invoke <ServiceDeskPlus-MSP>\bin\run.bat in both the servers to start ServiceDesk Plus MSP.
NOTE: Ensure that you backup your files before upgrading your application. Click here to know more.
Restore FOS
In the event of upgrade failure, you can restore the application to its previous version by following the steps mentioned below.
- Invoke <ServiceDeskPlus-MSP>\bin\shutdown.bat in the primary and secondary server. This will stop ServiceDesk Plus MSP.
- Restore the data in the primary server. Click here to learn how.
- Mirror the settings in the secondary server via Robocopy by invoking <ServiceDesk Plus MSP HOME>\bin\mirrorSetup.bat <IP address of secondary server> - pass the secondary server IP as parameter.
- Invoke <ServiceDeskPlus-MSP>\bin\run.bat in both the servers to start ServiceDesk Plus MSP.
|
Why is FOS disabled on restoring ServiceDesk Plus MSP and an application reboot is required? In some cases, the application backup from one machine with FOS enabled is restored in another machine. In such cases, the restoration will fail and the application will fail to start as the NIC address will be incorrect in the ha.conf file. To avoid such failures, FOS will be disabled by default. Administrators can enable FOS and configure the NIC address from Admin > General Settings > FOS Configuration and restart the application for the changes to take effect. |
Disable FOS
To disable FOS from the application,
- Uncheck the Enable FOS Startup Mode option under Admin > General Settings > HA Configuration.
- Invoke <ServiceDeskPlus-MSP>\bin\shutdown.bat in both the primary and secondary servers. This will stop ServiceDesk Plus MSP.
You can then restart the application in the servers individually by invoking <ServiceDeskPlus-MSP>\bin\run.bat command. On restart, the servers will behave individually as two separate machines.
Alternatively, you can also start ServiceDesk Plus MSP as a service.
History
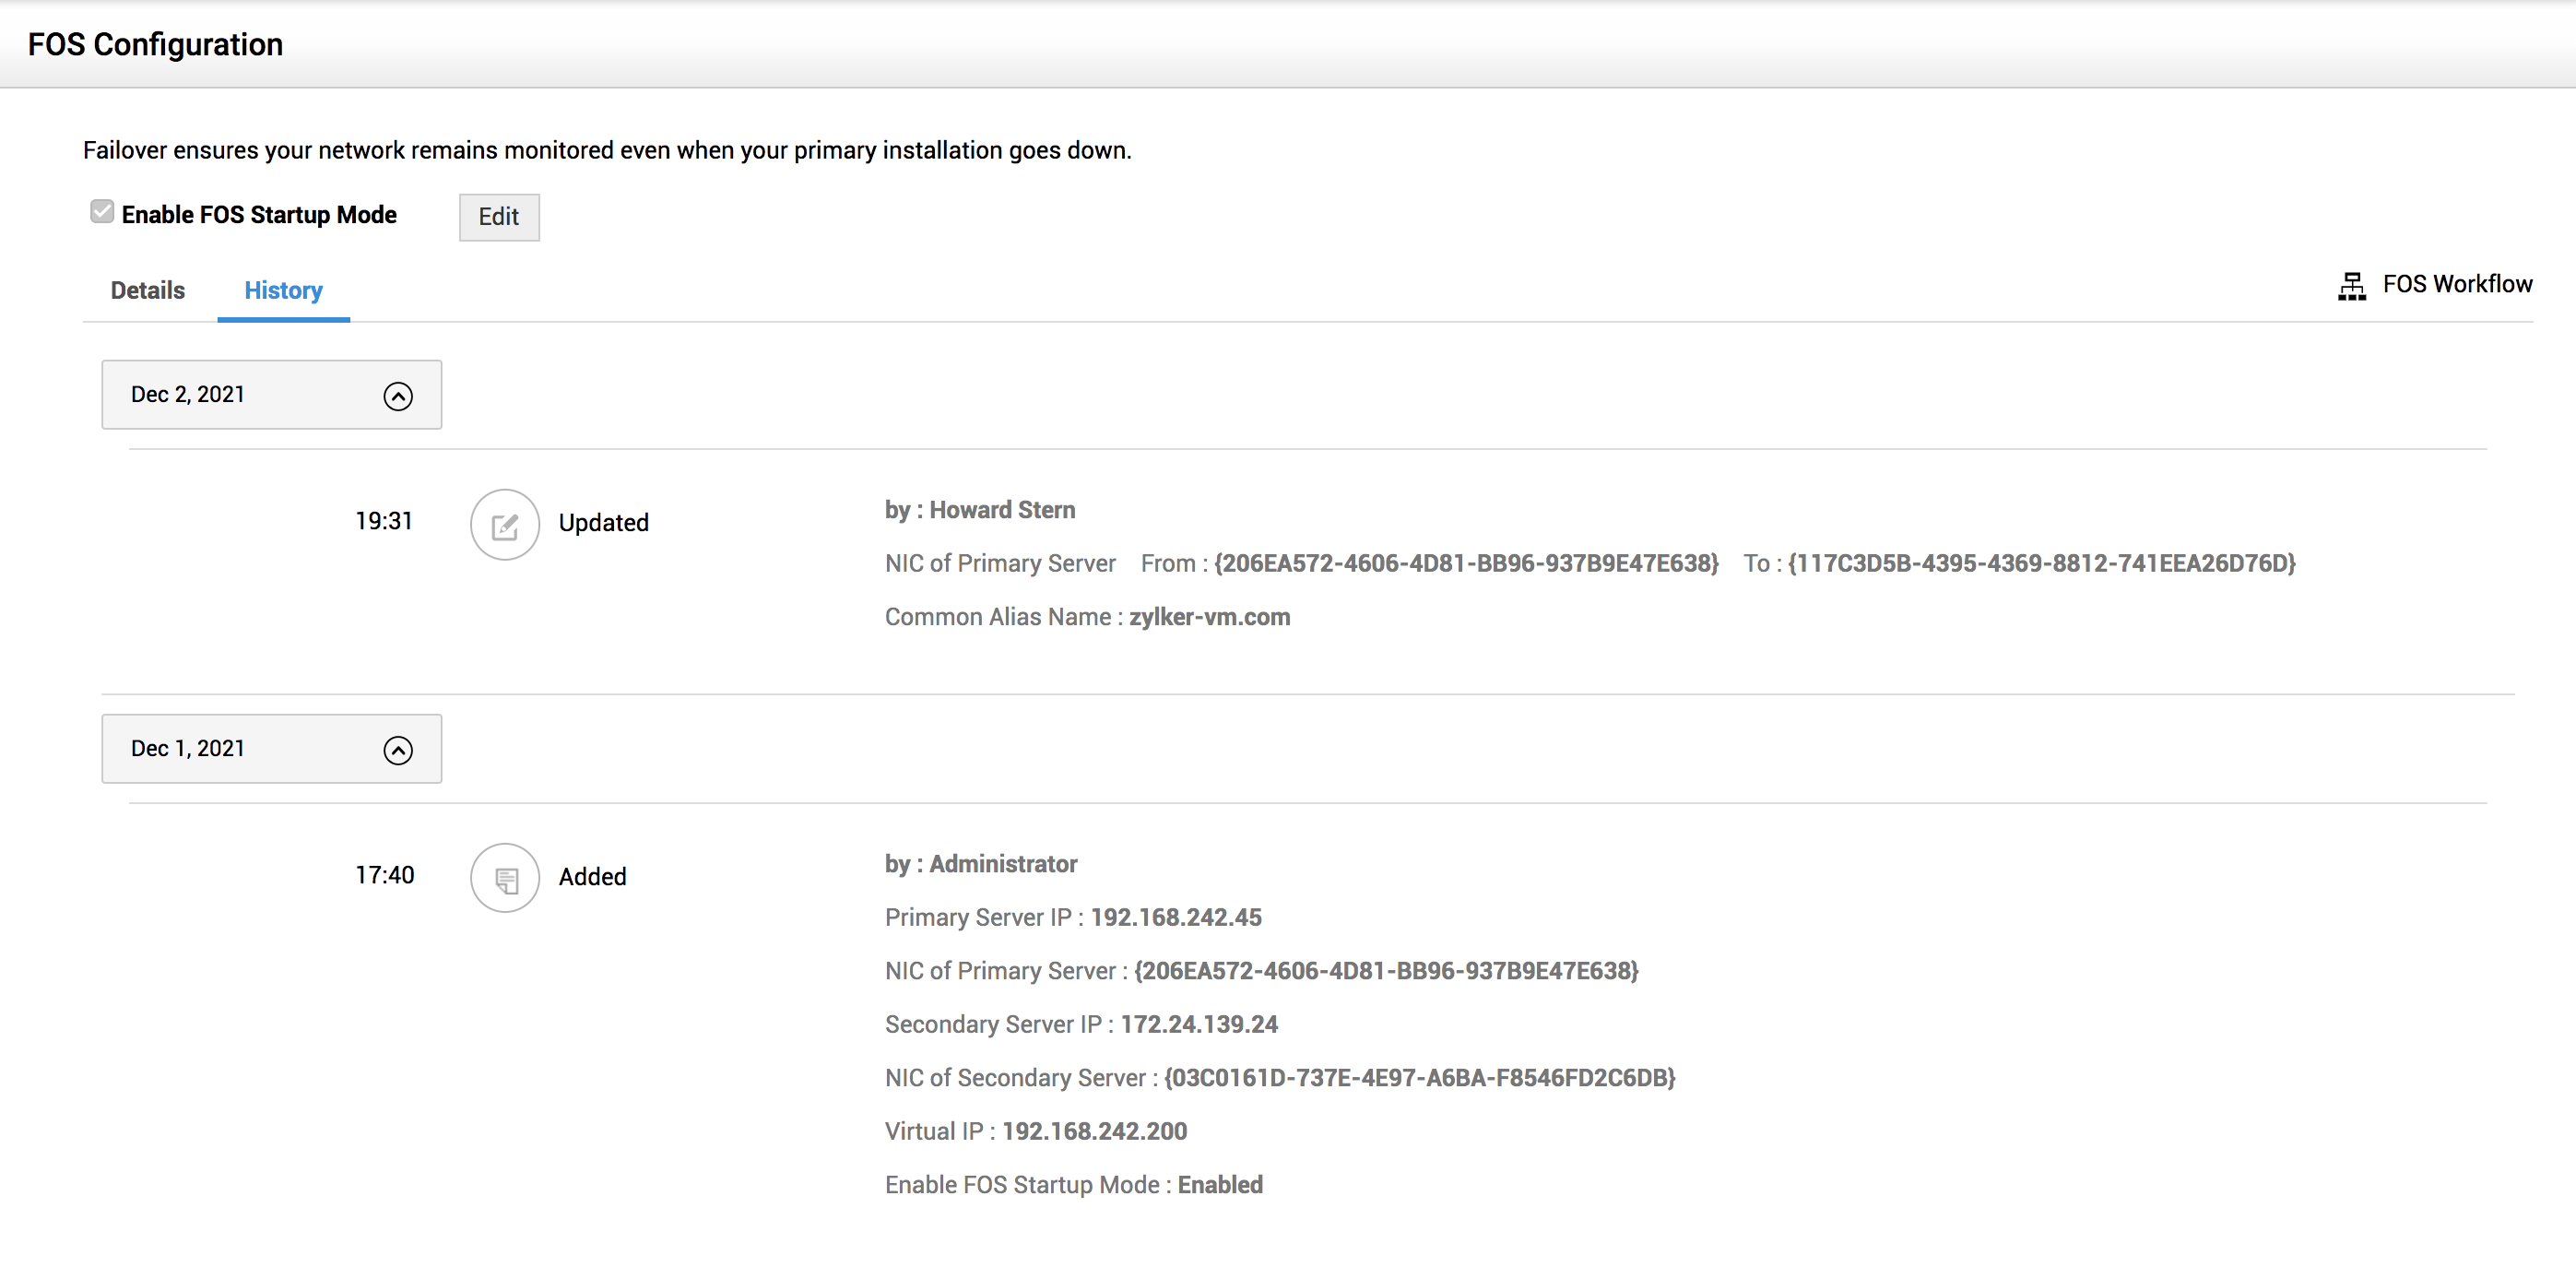
The history tab documents the summary of operations performed on HA Configuration.
|
For existing users using ServiceDesk Plus MSP version 10609 and below, the HA Configuration history will be blank upon migrating to the new FOS setup. Changes will be recorded in the history tab if you modify the configurations after migration. |


