How to back up a SharePoint document library
Last updated on:In this page
A SharePoint document library stores critical business files along with their metadata, version history, and permissions. Backing up a document library safeguards your organization against accidental deletion, ransomware attacks, compliance risks, and migration errors. Native recovery options are limited to a 93-day retention period. If a document library is permanently deleted, corrupted, or no longer available in either stage of the Recycle Bin, it can only be restored from a backup, making a well-defined backup strategy essential.
You can back up a SharePoint document library using native sync capabilities, PowerShell, or third-party solutions depending on your environment.
- SharePoint Online
- Windows PowerShell
- SharePoint Manager Plus
Method 1: Manual local copy workflow
This is ideal for quick, manual backup of document libraries and other files in SharePoint. Ensure you have the OneDrive sync client installed before you start.
- Sign in to SharePoint Online and navigate to the site.
- Open the document library you want to back up.
- Click Sync from the command bar.
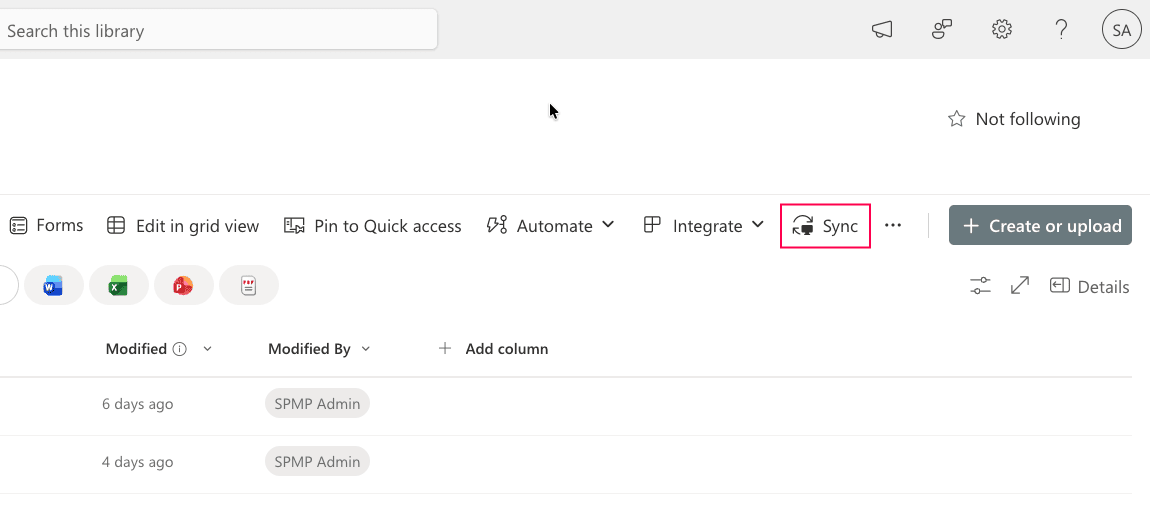
- The library will sync to your local machine using OneDrive.
- Once synced, copy the library folder from your OneDrive directory to an external drive or backup location.

Limitations to consider
- It's not a true backup. Syncing mirrors changes, so deletions or corruption can propagate to the local copy.
- Syncing is not a substitute for a backup and does not provide point-in-time recovery or long-term retention.
- It's a manual process that requires users to copy files to a separate backup location.
- There's no centralized interface for visibility, control, or reporting.
Method 2: Back up a document library using PowerShell
PowerShell allows you to download library content programmatically and automate backups.
Prerequisites
- Before using PowerShell, ensure that:
- You have SharePoint Administrator or Global Administrator rights.
- You have Read access to the library and Write access to the drive folder.
- The PnP.PowerShell module is installed.
- Install and connect to SharePoint Online using the script below:
Install-Module PnP.PowerShell -Scope CurrentUser
                    Connect-PnPOnline -Url https://tenant.sharepoint.com/sites/ProjectSite -Interactive
Backing up a single document library
This script downloads all files from the specified document library to a local folder.
# This preserves your folders locally
$items = Get-PnPListItem -List "Project Documents" -PageSize 1000
foreach ($item in $items) {
    # Get the relative path to recreate folders locally
    $fileUrl = $item["FileRef"]
    $localPath = "C:\SPBackup\ProjectDocuments" + ($item["FileDirRef"] -replace "/sites/ProjectSite/Project Documents","")
    # Create the folder if it doesn't exist
    if (!(Test-Path $localPath)) { New-Item -ItemType Directory -Path $localPath }
    # Download the file
    Get-PnPFile -Url $fileUrl -Path $localPath -AsFile -Force
}
Supported parameters
The following parameters can be used to back up SharePoint document libraries.
| Cmdlet | Parameter | Description |
|---|---|---|
| Get-PnPListItem | -List | Specifies the document library (list) name or ID to retrieve items from. |
| -PageSize | Defines the number of items retrieved per page (useful for large libraries). | |
| -FolderServerRelativeUrl | Limits retrieval to a specific folder within the document library. | |
| Get-PnPFile | -Url | Specifies the server-relative URL of the file to download. |
| -Path | Defines the local folder path where the file will be saved. | |
| -Force | Overwrites the file in the destination path if it already exists. |
Limitations to consider
- This requires advanced scripting knowledge.
- It also requires elevated administrative privileges.
- Manual setup and maintenance are needed for scheduling, logging, and error handling.
Method 3: Automate backups using third-party tools
Native SharePoint recovery options are limited to a 93-day retention window. If a document library is permanently deleted, corrupted, or no longer available in either stage of the Recycle Bin, restoration must be performed from a backup.
Third-party tools like SharePoint Manager Plus provide full site backup and restoration capabilities, automated scheduling, and long-term retention beyond native limits.
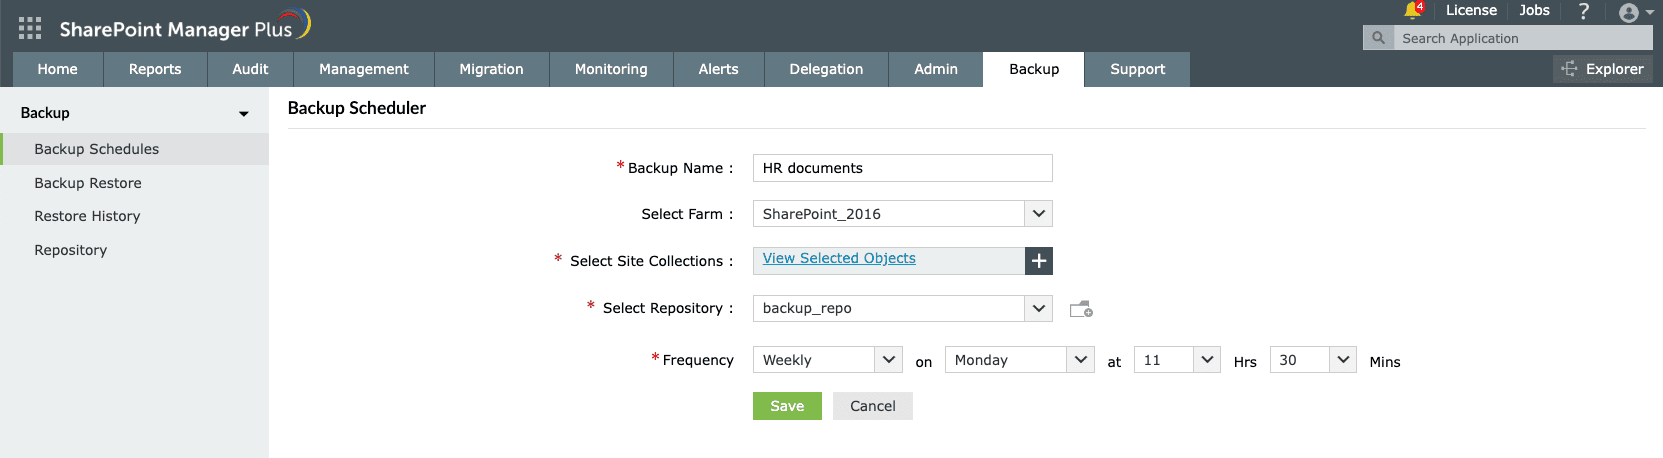
- In SharePoint Manager Plus, navigate to Backup > Backup Schedules and select + Create Backup.
- Enter the backup name, and select the farm and required sites to backup.
- Select the repository in which the backup should be stored.
- Choose the frequency at which you want the backup to be performed.
- Click Save. To view and enable or disable the backup, navigate to Backup Schedules.
After backing up SharePoint data, easily restore to a previous version at any time.

How SharePoint Manager Plus helps safeguard your SharePoint environment
Protecting SharePoint requires more than just periodic backups. Administrators must continuously monitor activity, control permissions, and ensure rapid recovery from accidental deletion and security incidents. SharePoint Manager Plus provides a centralized, web-based console to help you secure, monitor, and manage your entire SharePoint environment efficiently.
Comprehensive change tracking
Track who created, modified, deleted, or accessed SharePoint files and document libraries. Detailed audit logs help detect suspicious activity, investigate incidents, and support compliance requirements.
Automated reporting
Generate scheduled SharePoint reports on permissions, storage usage, and activity trends to stay informed. Export them in different formats, like CSV, PDF, XLSX, and HTML.
Permission and access governance
Identify broken inheritance, remove excessive permissions, and enforce consistent access controls across sites and document libraries to ensure least privilege.
Role-based delegation
Delegate SharePoint reporting, auditing, and management tasks to non-admin users and help desk staff without affecting native SharePoint permissions.
Important tips
Understand retention and versioning
SharePoint Online includes retention policies and version history. Native retention (93 days across both Recycle Bins) is not a substitute for long-term data protection.
Have secure backup storage
Store backups in a secure, access-controlled repository. Use encryption, role-based access, and isolated storage locations to reduce the risk of ransomware or unauthorized access.
Determine an RPO
A recovery point objective (RPO) defines the maximum acceptable amount of data loss measured in time. For example, if your RPO is four hours, ensure your backups run at least every four hours for minimal data loss.
Specify an RTO
A recovery time objective (RTO) defines the maximum acceptable time required to restore services after a disruption. For example, if your RTO is two hours, the document library must be restored and accessible within that timeframe to meet business continuity requirements.
Frequently asked questions
are service-level safeguards and not full-featured backups. They offer limited flexibility and do not deliver granular restore control. For long-term retention, faster restores, and ransomware protection, a dedicated SharePoint Online backup tool is recommended.
Yes, SharePoint includes strong security controls and data redundancy. However, built-in retention and recycle bin features are not full backups. To properly protect sensitive data against accidental deletion, corruption, or ransomware, a dedicated backup solution is recommended for disaster recovery.
The Preservation Hold Library stores SharePoint content retained due to retention policies or eDiscovery holds for compliance purposes. It is not a true backup solution and cannot replace scheduled backups for disaster recovery.
Open the document library in SharePoint Online and click Sync from the command bar. This connects the library to the OneDrive sync client, allowing files to be accessed and stored locally on your device. Read the step-by-step guide
Open the list and select Export > Export to CSV from the command bar. This downloads the list as a CSV file. See detailed steps