How to delete a folder in SharePoint
In this article
Deleting folders in SharePoint Online is a common administrative task that is done to remove outdated content, reorganize libraries, or comply with retention policies. However, removing a folder, especially one containing files or subfolders, can fail due to insufficient permissions, sync conflicts, retention holds, or special links from apps like Microsoft Teams. Understanding the correct method ensures folders are deleted safely without affecting synced devices, shared content, or compliance settings.
- SharePoint Online
- Windows PowerShell
Method 1: Delete a SharePoint folder using the SharePoint Online browser UI
SharePoint Online enables users to delete folders directly from the document library interface, making it the simplest way to remove content without scripts or external tools.
Prerequisites
- You must have Edit or higher permissions over the library.
- The folder must not be protected by retention policies or legal holds.
- Files inside the folder must not be locked, open, or checked out by another user.
Steps
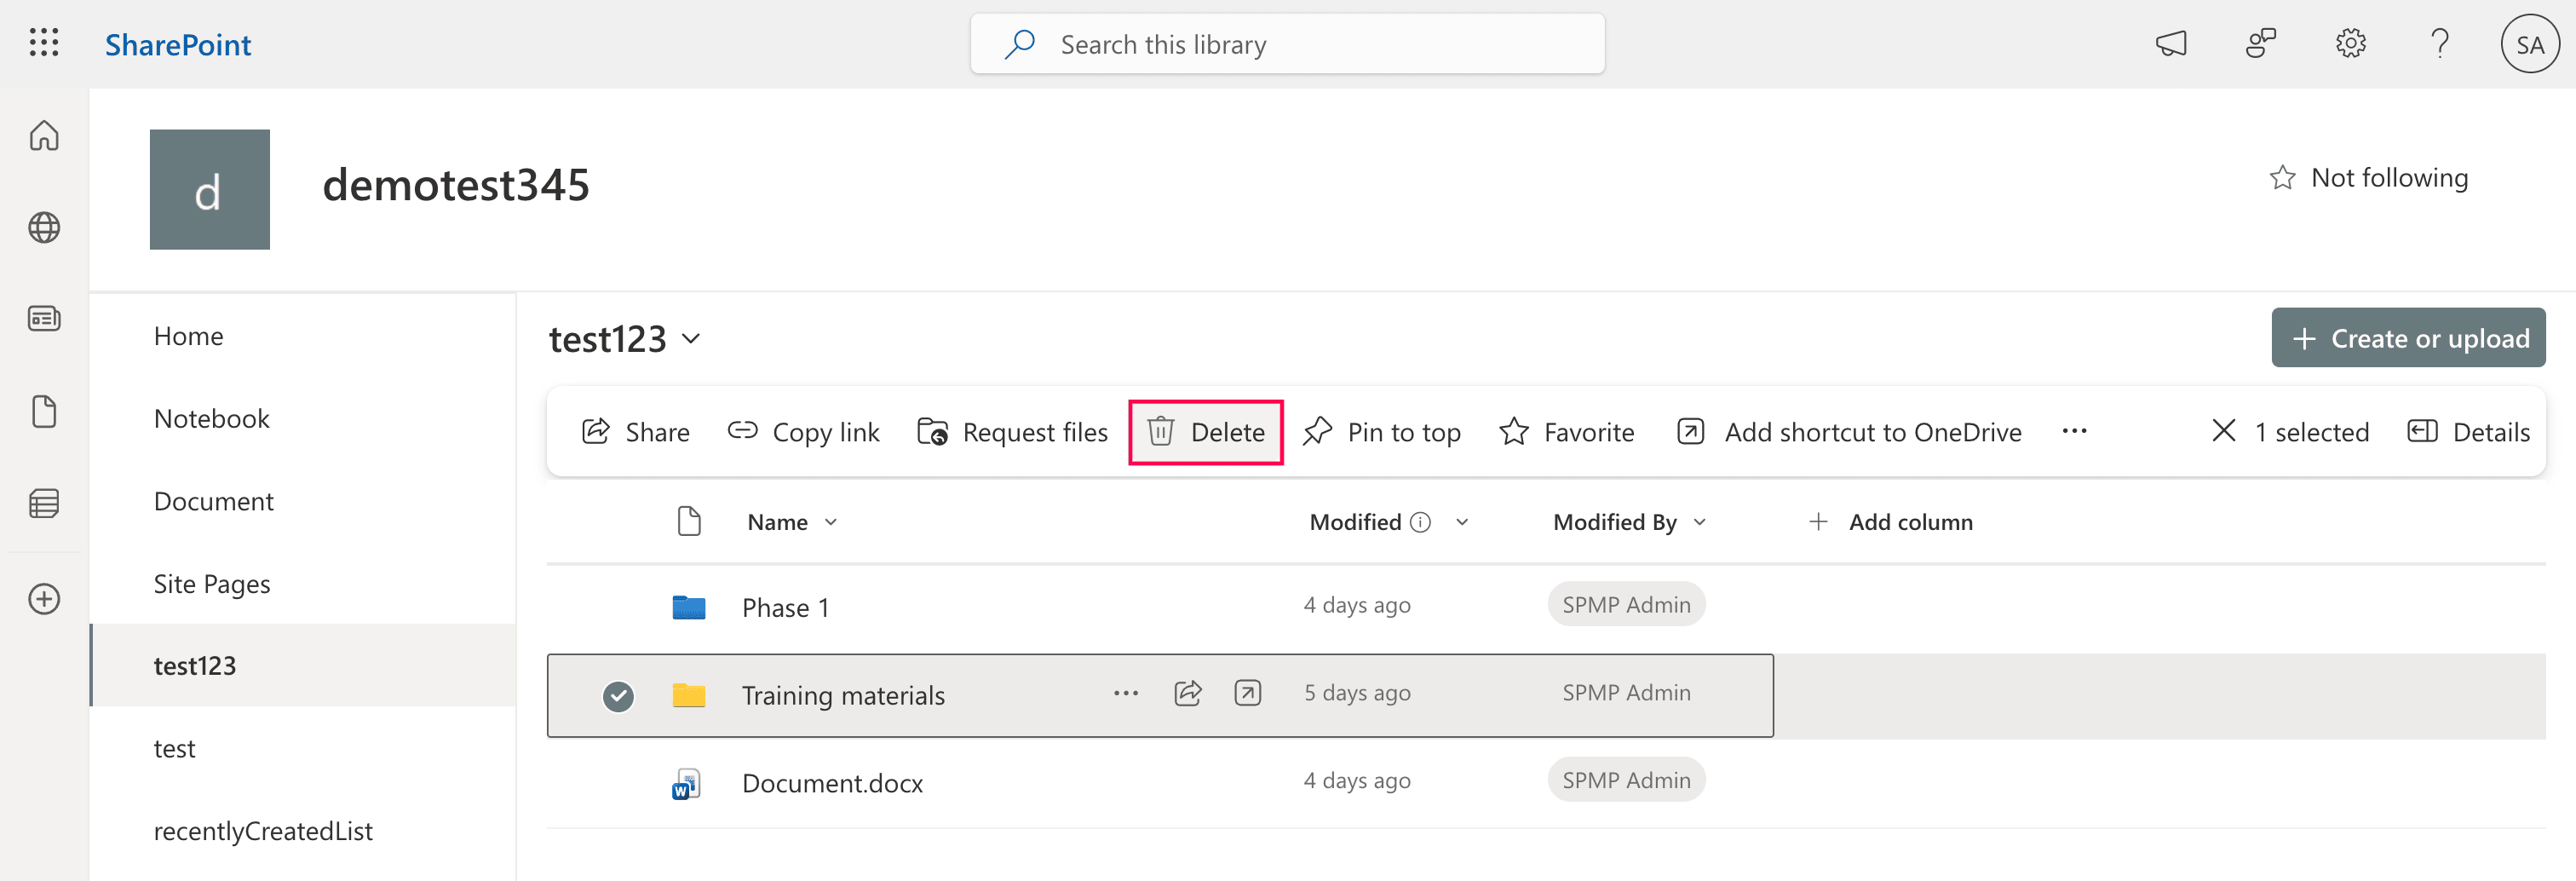
- Sign in to SharePoint Online and open the target site.
- Navigate to the document library containing the folder.
- Select the folder you want to delete.
- Click Delete from the command bar (or right-click the folder and click Delete).
-
Click Delete in the confirmation pop-up.
Note:Deleted folders and their contents are moved to the site Recycle Bin for up to 93 days. During this period, they remain recoverable unless permanently deleted or restricted by retention policies and legal holds.

Delete a SharePoint folder from File Explorer
If your document library is synced with File Explorer, deleting the folder in File Explorer will also delete it in SharePoint.
- Open File Explorer and navigate to your synced SharePoint folder that you want to delete.
- Select the folder and click Delete from the Home tab (or right-click the folder and click Delete).
- Click Yes in the confirmation dialog box.
Limitations to consider
- You cannot delete folders protected by retention policies or legal holds.
- Deletion may fail if files are locked, checked out, or in use.
- Large folders may take time to process.
- Folders linked to Teams channels or shared externally may be restricted.
- Deleting a folder in a synced library triggers a two-way sync, removing it from local devices as well.
Method 2: Delete a SharePoint folder using PowerShell
Windows PowerShell enables administrators to delete SharePoint folders programmatically, including large folders or bulk operations across sites. This is useful when the browser UI fails or automation is required.
Prerequisites
Before using PowerShell, ensure that:
- You have Site Collection Administrator or Full Control (Site Owner) permissions over the target SharePoint site.
- The PnP.PowerShell module is installed. Install and connect it using the following:
Install-Module PnP.PowerShell -Scope CurrentUser
Connect-PnPOnline -Url https://tenant.sharepoint.com/sites/ProjectSite -Interactive
Delete a single folder (with files and subfolders)
This command removes the specified folder and everything inside it:
Remove-PnPFolder -Name "OldProject" -Folder "Shared Documents"
Delete a folder using its server-relative URL
This is useful when folder names contain special characters or deep paths:
Remove-PnPFolder -ServerRelativeUrl "/sites/ProjectSite/Shared Documents/OldProject"
Delete multiple folders (bulk operations)
This script deletes several folders in one run:
$folders = @("ProjectA","ProjectB","ProjectC")

foreach ($f in $folders) {
    Remove-PnPFolder -Name $f -Folder "Shared Documents"
}
Supported parameters
The following parameters can be used when deleting folders in SharePoint:
| Parameter | Description |
|---|---|
| -Name | The folder name to delete |
| -Folder | The parent library or folder path |
| -ServerRelativeUrl | The full SharePoint path to the folder |
| -Force | Deletes the folder without a confirmation |
| -Recycle | Sends the folder to the Recycle Bin instead of permanently deleting it |
Limitations to consider
- This requires scripting knowledge and administrative access.
- You cannot bypass retention policies or compliance holds.
- Errors may occur if the folder is synced or locked.
- Bulk deletions can be risky without validation.
- This does not provide built-in reporting or audit visibility.
How to simplify folder cleanup and governance
Manually deleting folders works for small tasks, but organizations often need visibility, control, and safety, especially when dealing with large or sensitive content. ManageEngine SharePoint Manager Plus provides a centralized, script-free way to manage SharePoint content at scale.
Management at scale without scripts
Control permissions over SharePoint folders and files in bulk, with point-and-click GUI actions instead of complex PowerShell scripts. Manage group memberships as well without repetitive manual effort.
Permission-aware operations
Identify who has access before deleting content, helping prevent the accidental removal of shared or business-critical folders. Generate comprehensive reports on folders, files, lists, and more and export them in different formats.
Audit trails and reporting
Track who deleted what, when, and where with detailed audit reports essential for investigations and compliance requirements. Archive audit data for long-term retention and analysis.
Critical alerting
Receive notifications about risky activities such as mass deletions, unusual user behavior, or large data changes. Configure email recipients to have them notified instantly.
Important tips
Check compliance restrictions first
Folders protected by retention labels, eDiscovery holds, or legal policies cannot be deleted until those restrictions are removed. Attempting deletion in such cases will fail, even if you have full permissions.
Be cautious with synced libraries
If the library is synced to your device, deleting a folder locally (via File Explorer) will also delete it in the cloud due to two-way synchronization. For large folders, consider pausing synchronization first to avoid accidental mass deletion across devices.
Use the Recycle Bin as a safety net
Deleted folders and their contents typically go to the site Recycle Bin first, enabling recovery if needed. Empty the Recycle Bin only when you are sure the content is no longer required.
Frequently asked questions
You may not be able to delete a folder because of the following reasons:
- You may not have sufficient permissions. Delete rights (Edit or higher) are required.
- Files inside the folder may be checked out, open, or in use.
- Active OneDrive synchronization can temporarily lock items and block deletion.
- Retention policies, legal holds, or records management settings may prevent removal.
- Unique permissions, approval workflows, or required metadata can restrict deletion.
If the issue persists, contact your SharePoint administrator to review site settings and policies.
Both the browserUI and PowerShell methods delete folders recursively, removing all nested content.
To delete a SharePoint folder using Power Automate, create a flow that identifies the folder and removes it using its unique ID:
- Initialize your flow.
- Sign in to Power Automate.
- Click Create and choose your trigger (e.g., select Instant cloud flow > Manually trigger a flow).
- Identify the folder (get folder metadata). Because the Delete item action requires an ID number, you first need to find the folder to get that ID.
- Click + New step.
- Search for SharePoint and select Get folder metadata using path.
- Select your Site Address.
- In the Folder Path field, click the folder icon to browse for and select the specific folder you want to delete.
- Add the Delete item action.
- Click + New step.
- Search for SharePoint and select the action Delete item.
- Configure the Delete item action.
- Site Address: Select the same SharePoint site used in step 2.
- List Name: Select the document library where the folder is (e.g., Documents).
- Id: Click this field and select the ItemId (ID) output from step 2 in the Dynamic content panel.
- Save and test the flow.
- Click Save.
- Click Test in the top-right corner, select Manually, and run the flow.
The folder (and all its contents) will be moved to the SharePoint Recycle Bin.