How to migrate a SharePoint list
On this page
Migrating a SharePoint list to another site helps administrators move list structures, columns, views, and data without rebuilding them manually. This is useful when reorganizing sites, consolidating environments, or relocating project data.
This article explains how to migrate a SharePoint list to another site using the SharePoint Online browser UI, Windows PowerShell, and migrate multiple SharePoint lists at scale with ManageEngine SharePoint Manager Plus, a SharePoint management and reporting tool.
- SharePoint Online
- Windows PowerShell
- SharePoint Manager Plus
Method 1: SharePoint Online browser UI
This method is best suited for site owners who need to migrate a SharePoint list to another site within the same tenant once and prefer a visual interface without writing scripts.
Prerequisite s
- You must have Edit or Full Control permissions on the source SharePoint site and destination site.
- You need to enable Custom Scripts for the SharePoint list you are migrating to another site since this feature may be disabled in some modern SharePoint environments.
Steps to migrate a SharePoint list to another site using SharePoint Online browser UI
- Open the SharePoint site and navigate to Site Contents from the left navigation or the gear icon.
- Hover over the list you want to duplicate, select the ellipsis menu (...) , and select Settings.
- In the List Settings page, scroll down to Permissions and Management and select Save list as template.
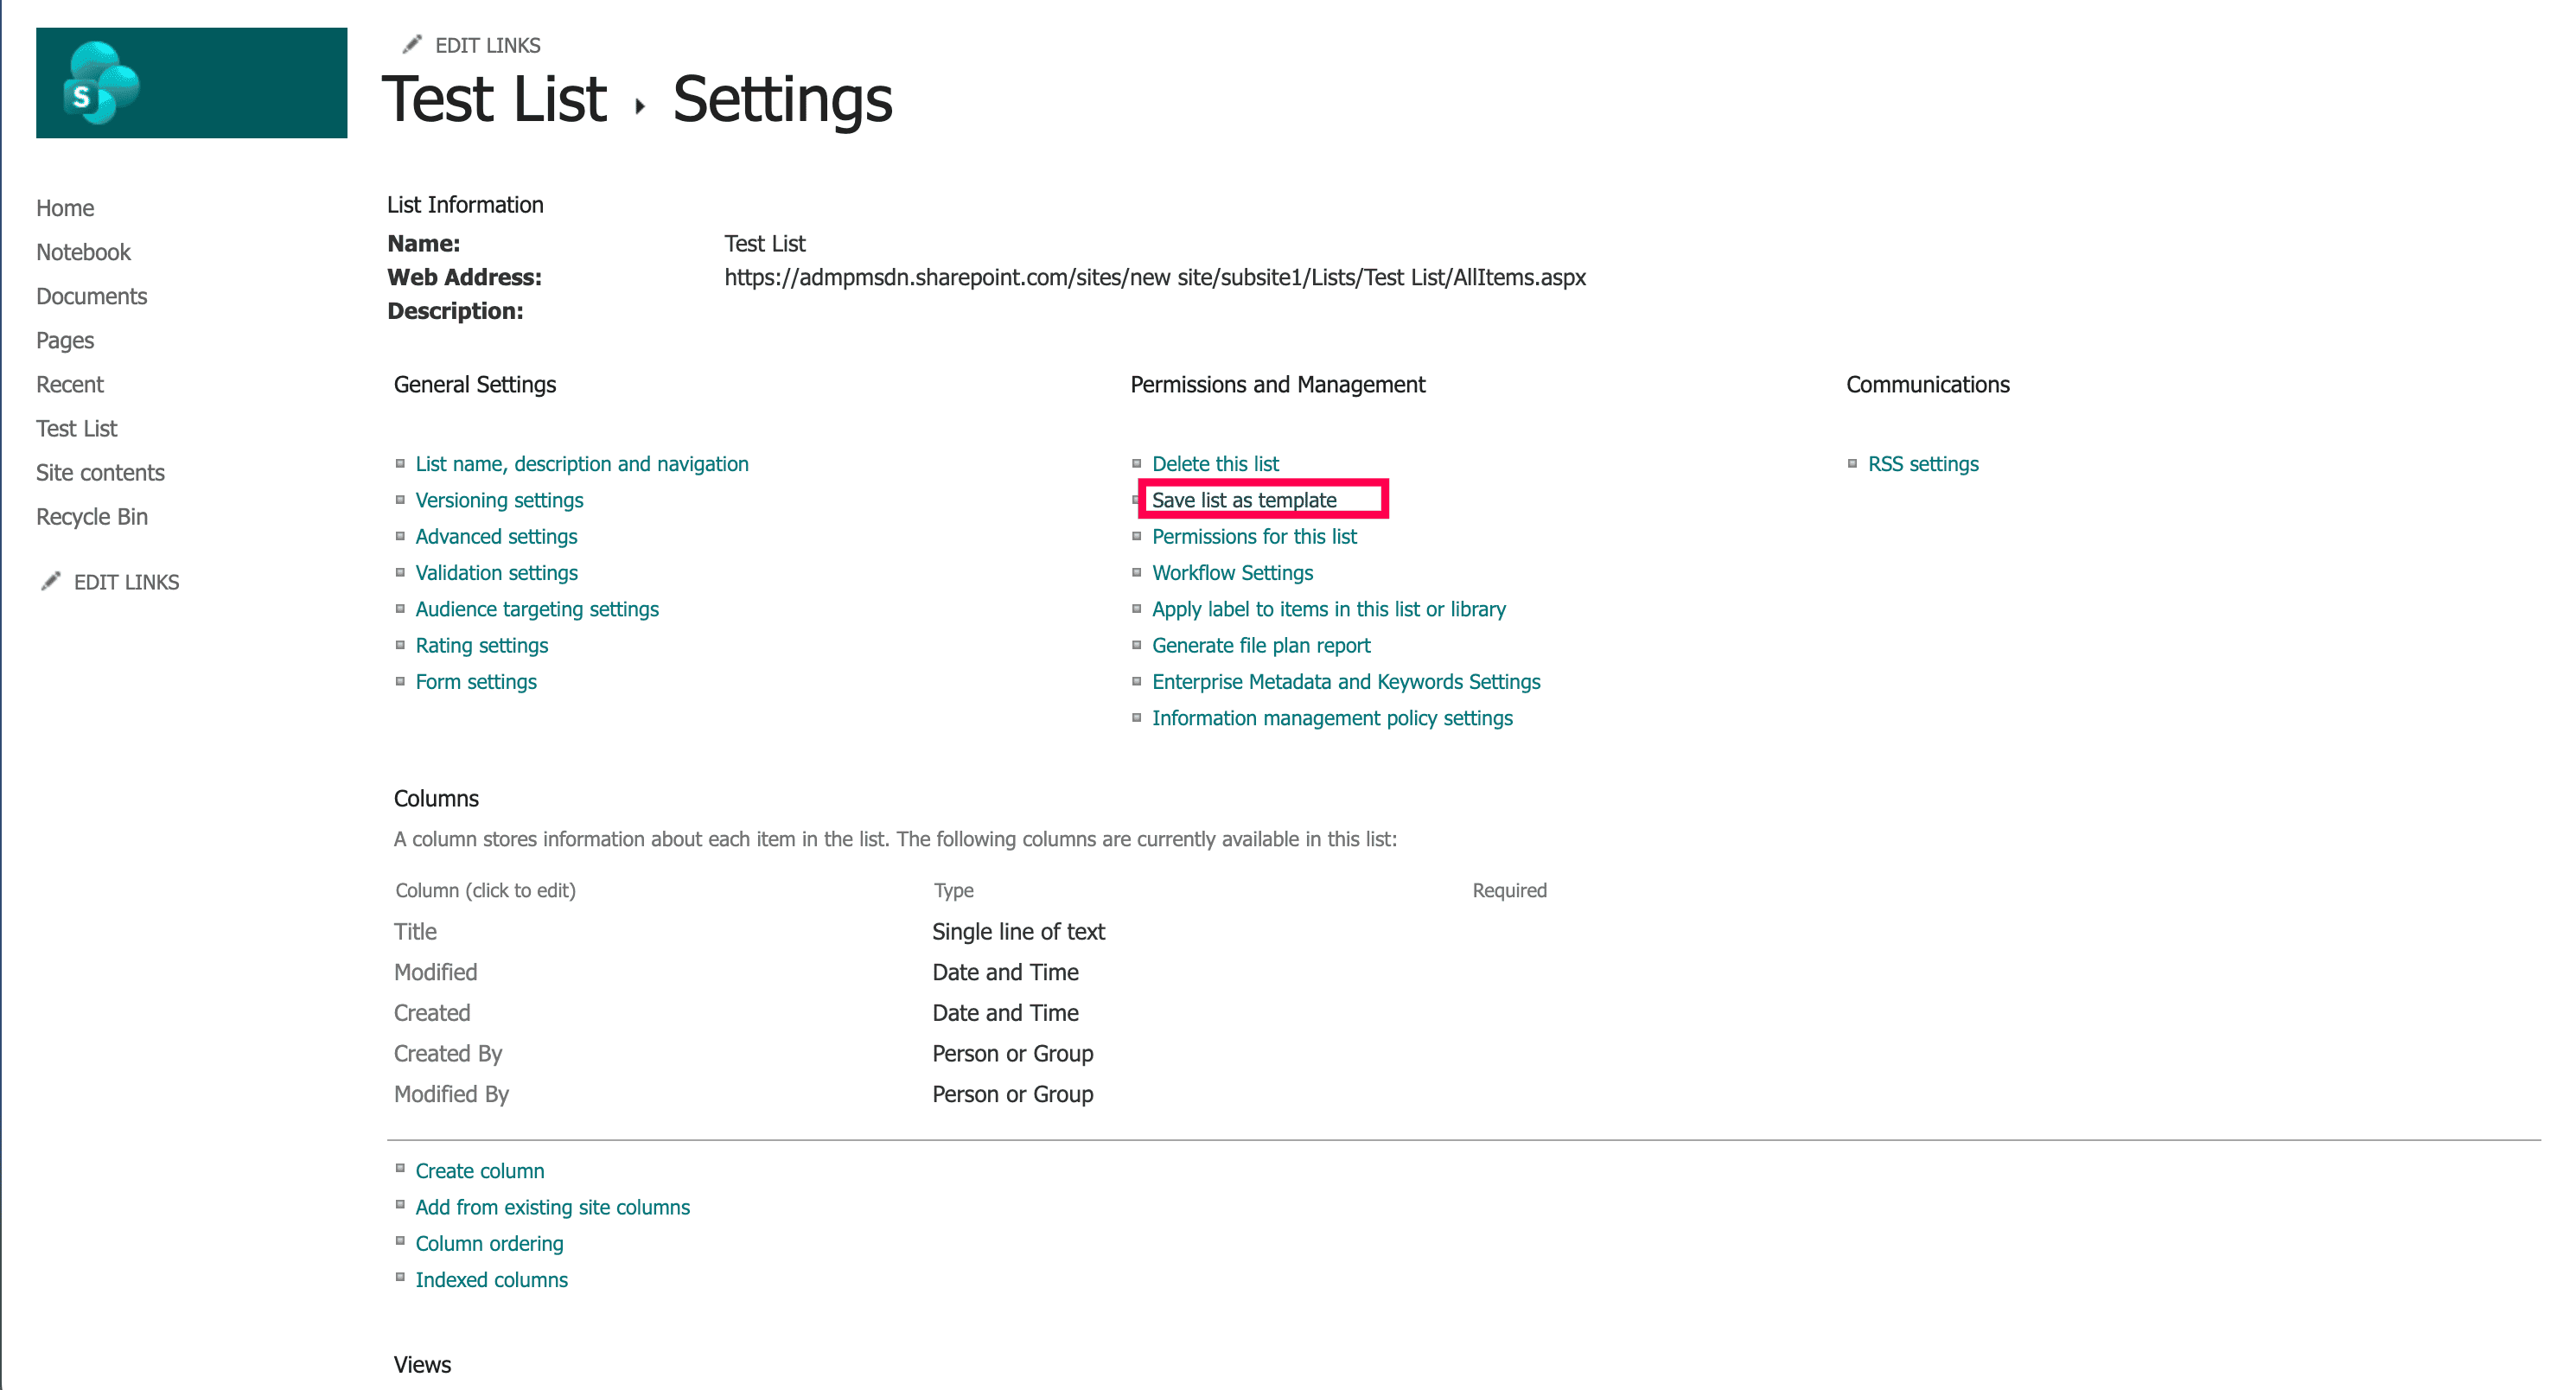
- In the Save as Template page, fill in the following fields:
- File name: The internal file name for the template (no spaces).
- Template name: A display name for the template.
- Template description: An optional description.
- Include Content: Check this box if you want to duplicate the SharePoint list with data (i.e., existing list items). Leave unchecked to copy only the structure.
Note: The Include Content option copies list items at the time of template creation. Any items added after saving the template will not be included.
- Select OK. SharePoint will create an STP template file and notify you when it is ready.
- Go to Site Settings > List templates in the List Template Gallery. Select the template file and download it to your computer.
- Navigate to the destination site and open Site Settings > List templates. Upload the STP file you downloaded.
- Go to Site Contents on the destination site and select New > List. Under Templates, select the template you uploaded, enter a name for the new list, and select Create to copy your SharePoint list to another site.

List permissions and role assignments are not transferred when you migrate a SharePoint list using the template method. The new list will inherit the default permissions of the destination site. You will need to configure any unique permissions manually.
How to manage a SharePoint list from SharePoint Online browser UI
Once the SharePoint list is successfully migrated to the new site, you can edit the following from List Settings:
- Edit columns by going to List Settings > Columns.
- Update permissions under List Settings > Permissions for this list.
- Rename the list from List Settings > List name, description and navigation.
- Delete the template from the List Template Gallery (Site Settings > List templates) if you do not want to use it as a list template.
Limitations of using the SharePoint Online browser UI to migrate SharePoint lists
- Version history is not copied when migrating via a SharePoint list template.
- Attachments are not included in the template export.
- Power Automate flows associated with the source SharePoint list must be recreated manually on the destination list.
- SharePoint list permissions and role assignments are not migrated and must be reconfigured after the list is created at the destination site.
Method 2: Windows PowerShell
PowerShell allows administrators to migrate a SharePoint list to another site programmatically. This is ideal for moving lists across multiple sites or automating list migration as part of a larger deployment workflow.
Prerequisites
- You must have the PnP PowerShell module for Windows PowerShell installed.
- You must have Edit or Full Control permissions on the source SharePoint site.
- You must have access to both the source and destination SharePoint sites.
Migrate a SharePoint list without data using Windows PowerShell
Use the following PowerShell script when you only need to migrate a SharePoint list's structure (i.e., columns, views, settings) without copying any items.
# Connect to source site
Connect-PnPOnline -Url https://.sharepoint.com/sites/ -Interactive  # Export list schema $template = Get-PnPProvisioningTemplate `   -ListsToExtract "Project Tracker" `   -Handlers Lists  # Connect to destination site Connect-PnPOnline -Url https://.sharepoint.com/sites/ -Interactive  # Apply schema to destination Apply-PnPProvisioningTemplate -InputInstance $template
Migrate a SharePoint list with data using Windows PowerShell
Use the following PowerShell script when you need to copy the SharePoint list's structure and its data. This approach retrieves items from the source list and recreates them in the destination list.
# Connect to source site
Connect-PnPOnline -Url https://<tenant>.sharepoint.com/sites/<sourcesite> -Interactive
$sourceItems = Get-PnPListItem -List "Project Tracker" -PageSize 500

# Connect to destination site
Connect-PnPOnline -Url https://<tenant>.sharepoint.com/sites/<destinationsite> -Interactive
$targetListName = "Project Tracker"

foreach ($item in $sourceItems) {
    $values = @{}

    foreach ($field in $item.FieldValues.Keys) {
        if ($field -notmatch "^(ID|GUID|Created|Modified|Author|Editor)$") {
            $values[$field] = $item[$field]
        }
    }

    Add-PnPListItem -List $targetListName -Values $values
Supported parameters
Replace the values in the following parameters with your own data to migrate a SharePoint list across sites.
| Parameter | Description |
|---|---|
| -Url | URL of the SharePoint site (source or destination). |
| -ListsToExtract | Name of the source list whose schema will be exported. |
| -Handlers | Specifies which components to extract (use Lists for list structure only). |
| -InputInstance | Provisioning template object used to create the list in the destination site. |
| -List | Name of the SharePoint list (used for retrieving and inserting items). |
| $targetListName | Name of the destination list where data will be copied. |
| -PageSize | Number of items retrieved per batch to improve performance. |
| -Values | Hash table of field values mapped from source to destination list items. |
Limitations of using PowerShell to migrate SharePoint lists
- Writing and debugging scripts can be time-consuming for administrators who are unfamiliar with PowerShell.
- Even with provisioning templates, certain elements such as custom forms (Power Apps), Power Automate flows, advanced JSON formatting, and complex calculated columns may not be carried over correctly.
- SharePoint Online PowerShell requires specific admin roles and access to the PnP module, which may not be available in all environments.
Method 3: SharePoint Manager Plus
If you need to migrate multiple SharePoint lists to another site in a single operation—including version history, attachments, and list permissions—a third-party SharePoint administration tool like ManageEngine SharePoint Manager Plus is what you’re looking for.
SharePoint Manager Plus provides a script-free GUI that combines the power of PowerShell with the ease of a visual interface to facilitate your cross site SharePoint migrations while keeping your site contents safe.
Steps to migrate SharePoint lists with SharePoint Manager Plus
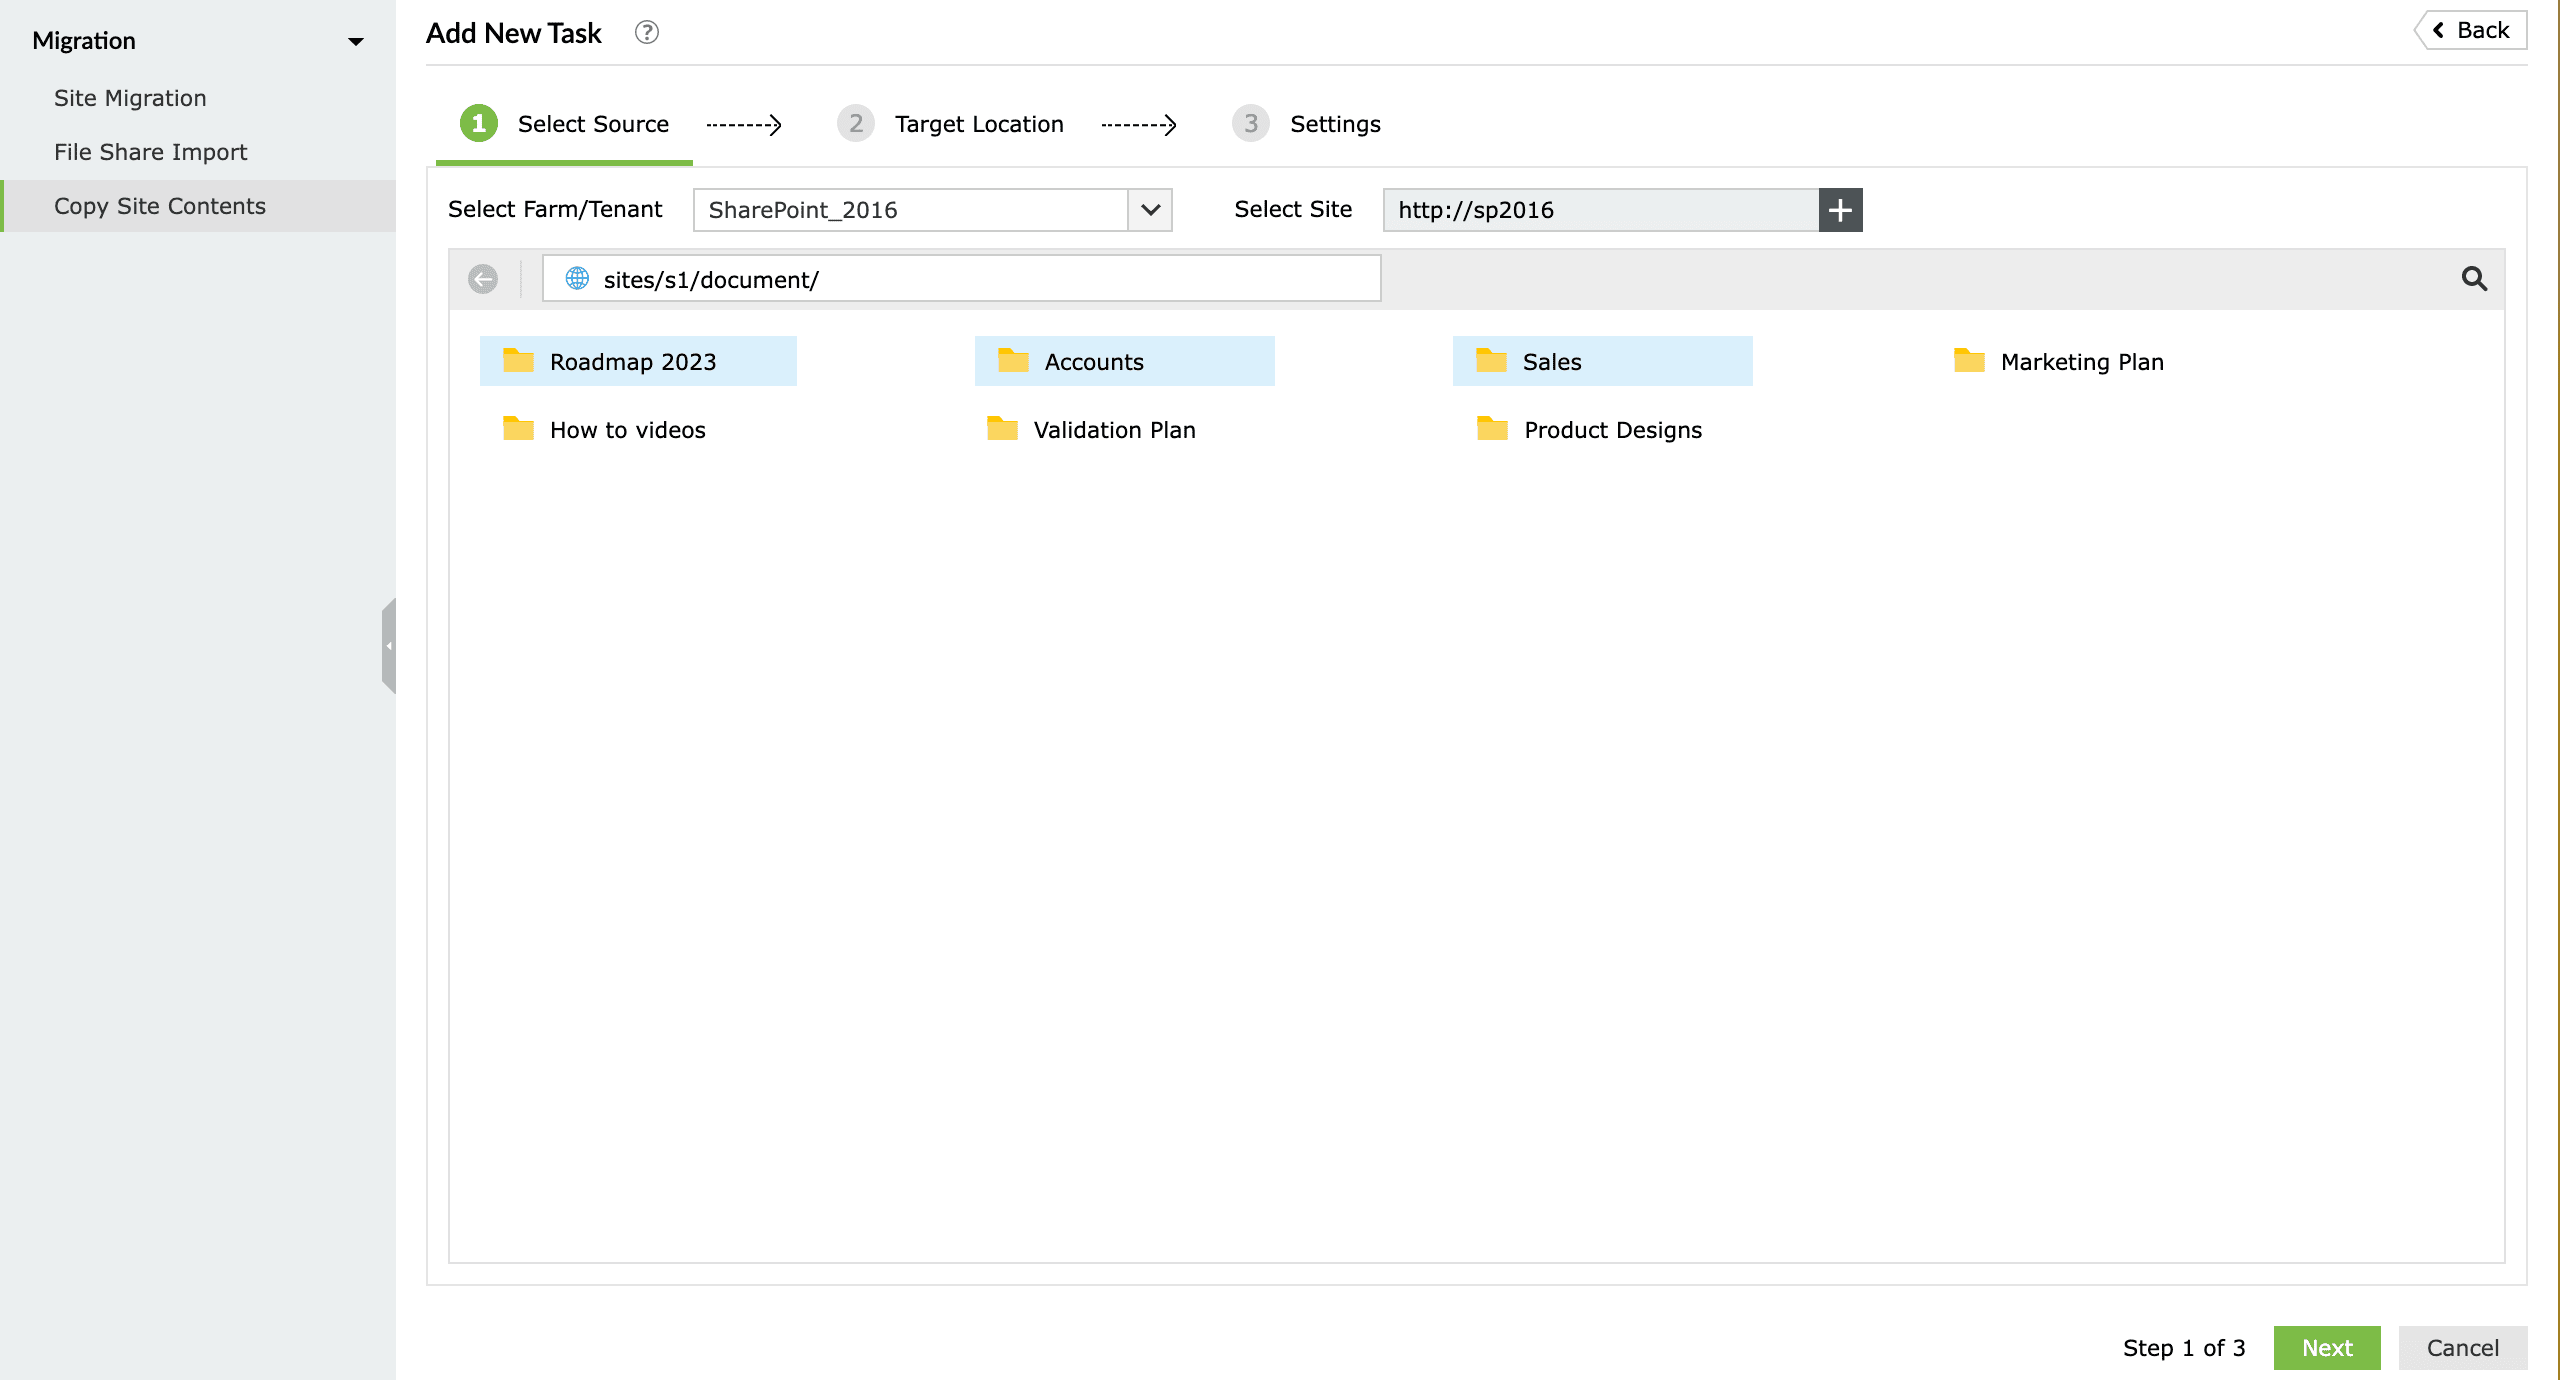
- Log in to SharePoint Manager Plus and navigate to the Migration tab.
- Select the Copy Site Contents field and click Add New Task.
- In the Select Source tab, after selecting the farm/tenant and the site, you can select the SharePoint lists that you want to duplicate by clicking them while holding the Ctrl key. After you select the lists, click Next.
- In the Target Location tab, select the destination farm/tenant and site. Navigate to the target folder and click Next.
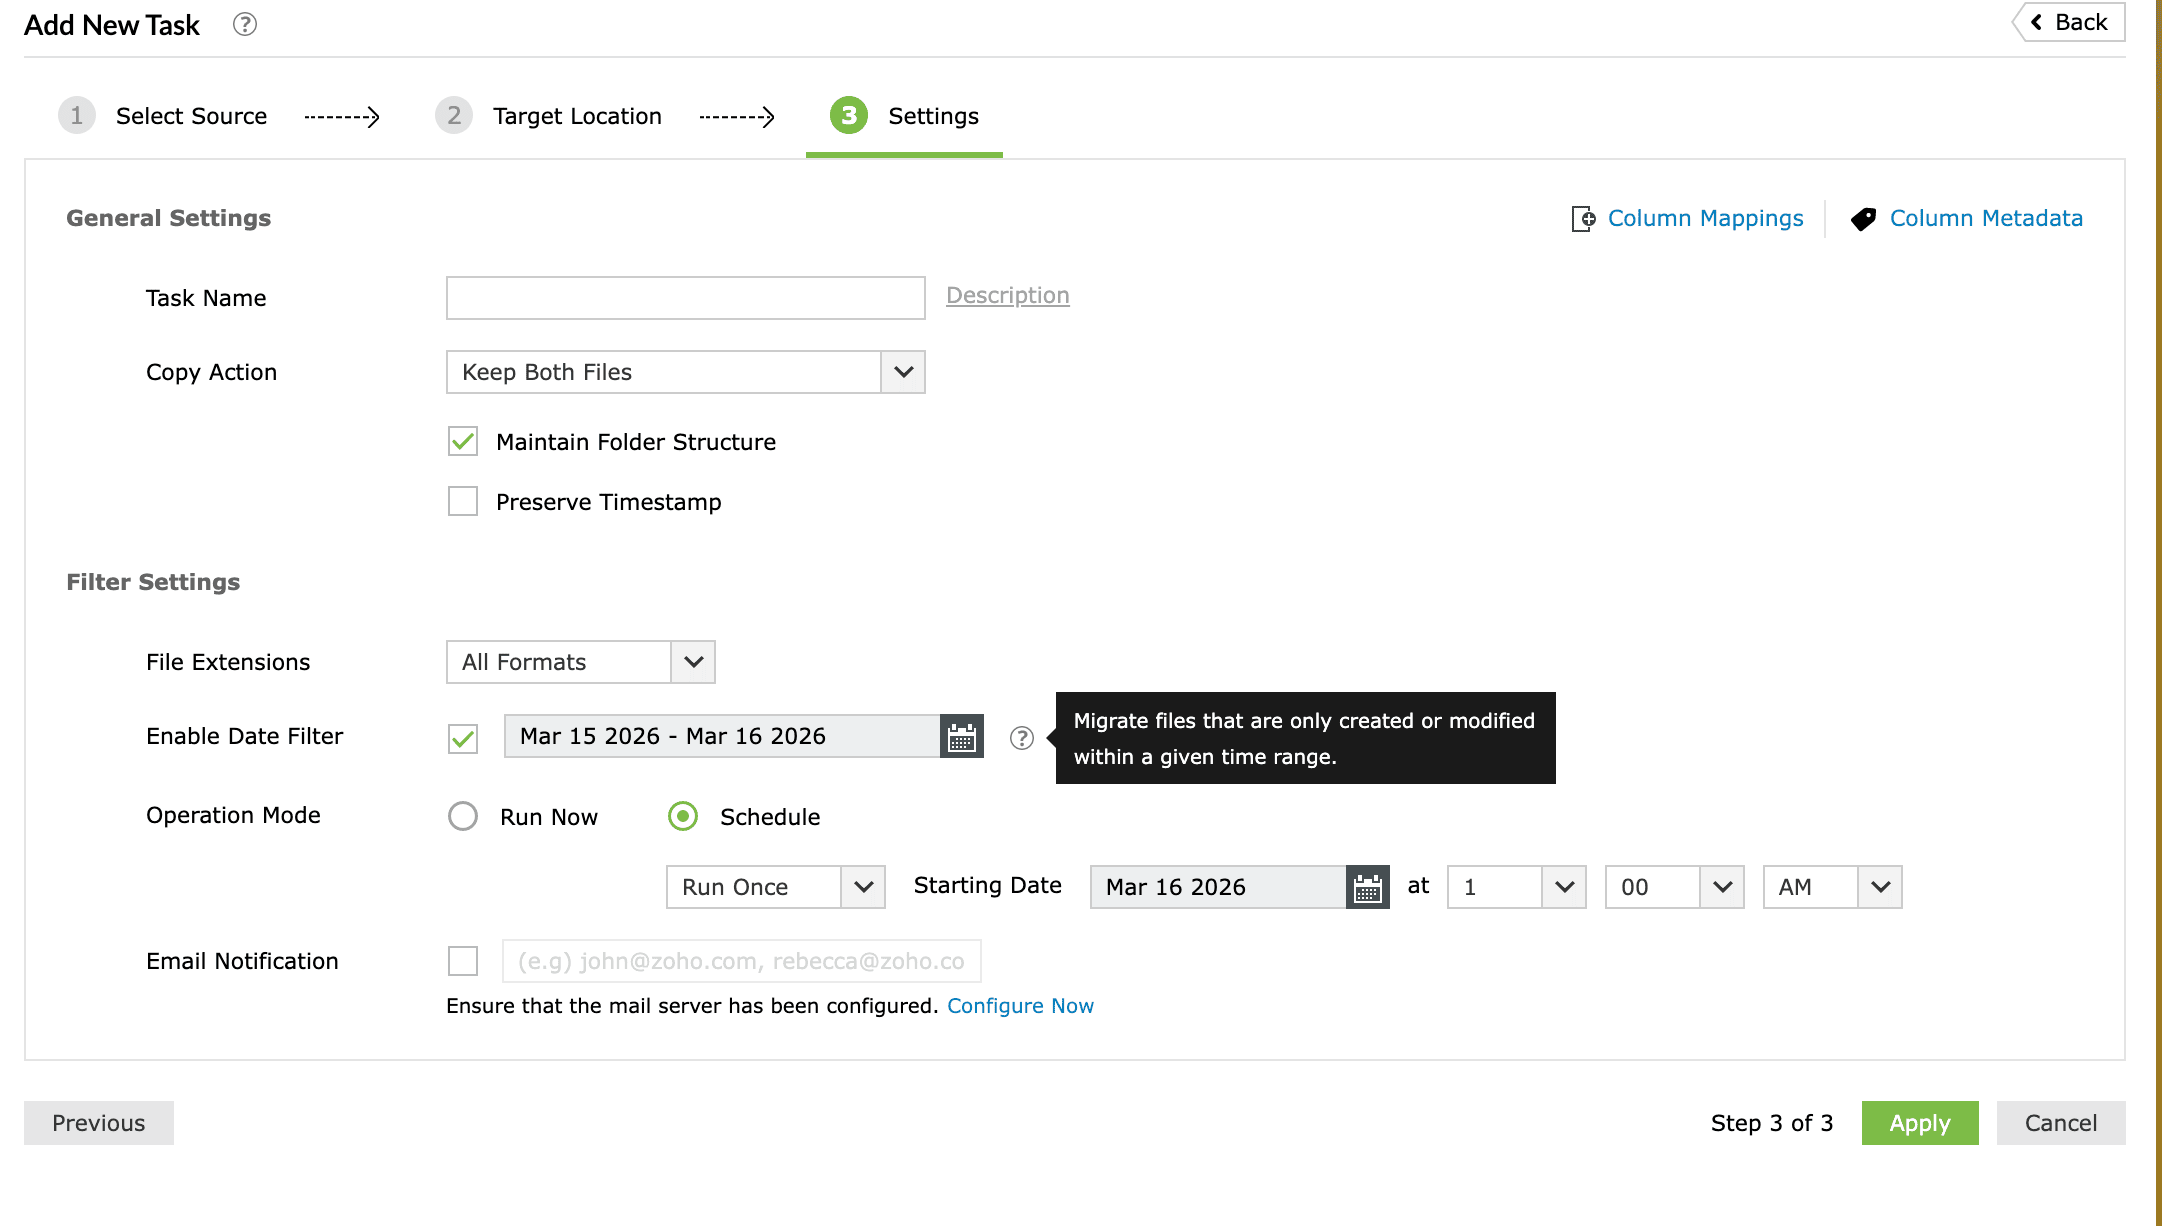
- In the Settings tab, select the Copy Action as Keep Both Files.
- Use File Extensions to restrict the migration to specific file formats if required.
- Enable Date Filter to migrate only files created or modified within a specific time range.
- Choose the Operation Mode:
- Run Now to migrate your SharePoint lists immediately.
- Schedule to migrate your SharePoint lists regularly for list template updates.
- Configure an Email Notification to receive updates on task completion.
- Click Apply to create and start migrating all of your selected SharePoint lists to another site in a single operation.


How SharePoint Manager Plus simplifies SharePoint list management
After you migrate a SharePoint list, setting up list permissions, tracking changes, and keeping list access structured is critical for collaboration and compliance. SharePoint Manager Plus provides a script-free, intuitive GUI for managing all aspects of your SharePoint lists.
SharePoint list permissions reporting
Schedule detailed SharePoint list permission reports to view who has access to specific lists; identify users with excessive or unique permissions; and export reports in CSV, PDF, XLSX, or HTML formats for easy auditing and compliance tracking.
Auditing SharePoint list activities
Track changes made to SharePoint list items, such as additions, edits, deletions, or permission updates, along with the exact time and source of the activity. Maintain clear audit trails for compliance reviews and internal investigations.
Manage SharePoint list access
Control permissions for SharePoint lists and list items to ensure least-privilege access. Quickly add, modify, or remove SharePoint list permissions in bulk using CSV imports, reducing manual effort and improving administrative efficiency.
Migrate and replicate SharePoint lists
Migrate SharePoint lists with their data intact, replicate lists across SharePoint environments, and manage list structures without relying on complex PowerShell scripts.
Best practices when duplicating SharePoint lists
Audit SharePoint list permissions before migrating
List permissions and role assignments are not transferred by the list template or PowerShell method. Review and document source list permissions before you migrate, then reconfigure them at the destination site.
Clean up your data before copying
If you are migrating existing list items, remove obsolete or test items from the source list first to avoid carrying unwanted data to the destination site.
Recreate Power Automate flows at the destination site:
Power Automate flows associated with the source list are never transferred automatically. Plan to rebuild or clone flows and reconnect any triggers and actions to the migrated list.
Delete saved templates after use
Templates saved to the List Template Gallery consume storage and can clutter Site Settings. Remove them once the migration is complete.
Test on a non-production site
Before migrating SharePoint lists across multiple production sites using PowerShell or Power Automate, validate on a test environment to confirm columns, views, attachments, and data migrate correctly.
Frequently asked questions
Yes. SharePoint views are part of the list schema and are included when you save and restore a list template. PowerShell’s Copy-PnPList also replicates views from the source list.
Not automatically. List permissions and role assignments are not transferred when migrating a SharePoint list using the template or PowerShell methods. The new list inherits the default permissions of the destination site. You will need to configure unique permissions manually, or use a migration tool like SharePoint Manager Plus that includes a permission migration option.
Version history is not copied when using the list template method or PowerShell’s Copy-PnPList. Only the current state of each list item is migrated. To preserve version history, use a dedicated migration tool such as SharePoint Manager Plus, which supports full version history migration.
Attachments are not included when migrating via a list template. You can migrate attachments using Power Automate by adding Get attachments and Add attachment actions to your migration flow. Migration tools like SharePoint Manager Plus also support attachment migration as part of a full list migration.
No. Power Automate flows are not included when migrating a list using any of the methods described in this article, even when Include Content is enabled. Flows must be recreated or reassigned manually at the destination site after migration.
Creating a list from an existing list (via New > From existing list) copies only the column structure. It is a lightweight option when you do not need to transfer items, views, or content types. Migrating a SharePoint list using Save list as template or PowerShell preserves views, content types, and optionally list items, making it more suitable for full migrations to another site.