Total visibility, total control: Inside DDI Central's IP address management tower
Managing IP addresses across a growing network means tracking a lot of moving parts at once, including: sites, clusters, subnets, VLANs, leases, and DNS records. Add in subnets imported from other tools, addresses that were assigned manually years ago, and the occasional reservation nobody remembers creating, and it's easy for even a well-run network to lose a clear picture of what's actually happening across its address space.
DDI Central's IP address management brings all of that into one place. Admins get a live, structured view of their entire IP inventory instead of piecing together a picture from spreadsheets, static exports, and tribal knowledge. This view is organized by site, environment, or address structure, depending on what question they're trying to answer.
From there, it's just as easy to zoom in: Down to a single subnet, VLAN, or IP, with full visibility into whether that address is active, reserved, excluded, or simply sitting free. The result is clear visibility and direct control over the entire address space, from the top-level plan down to a single IP; all without switching between tools or relying on guesswork.
One inventory, three lenses
Not every admin thinks about their network the same way. Some think in locations, environments, or raw address structure. DDI Central's IPAM Tower gives you all three options, over the same underlying inventory. You'll never be stuck viewing your network the wrong way for the question you're asking.
Site View
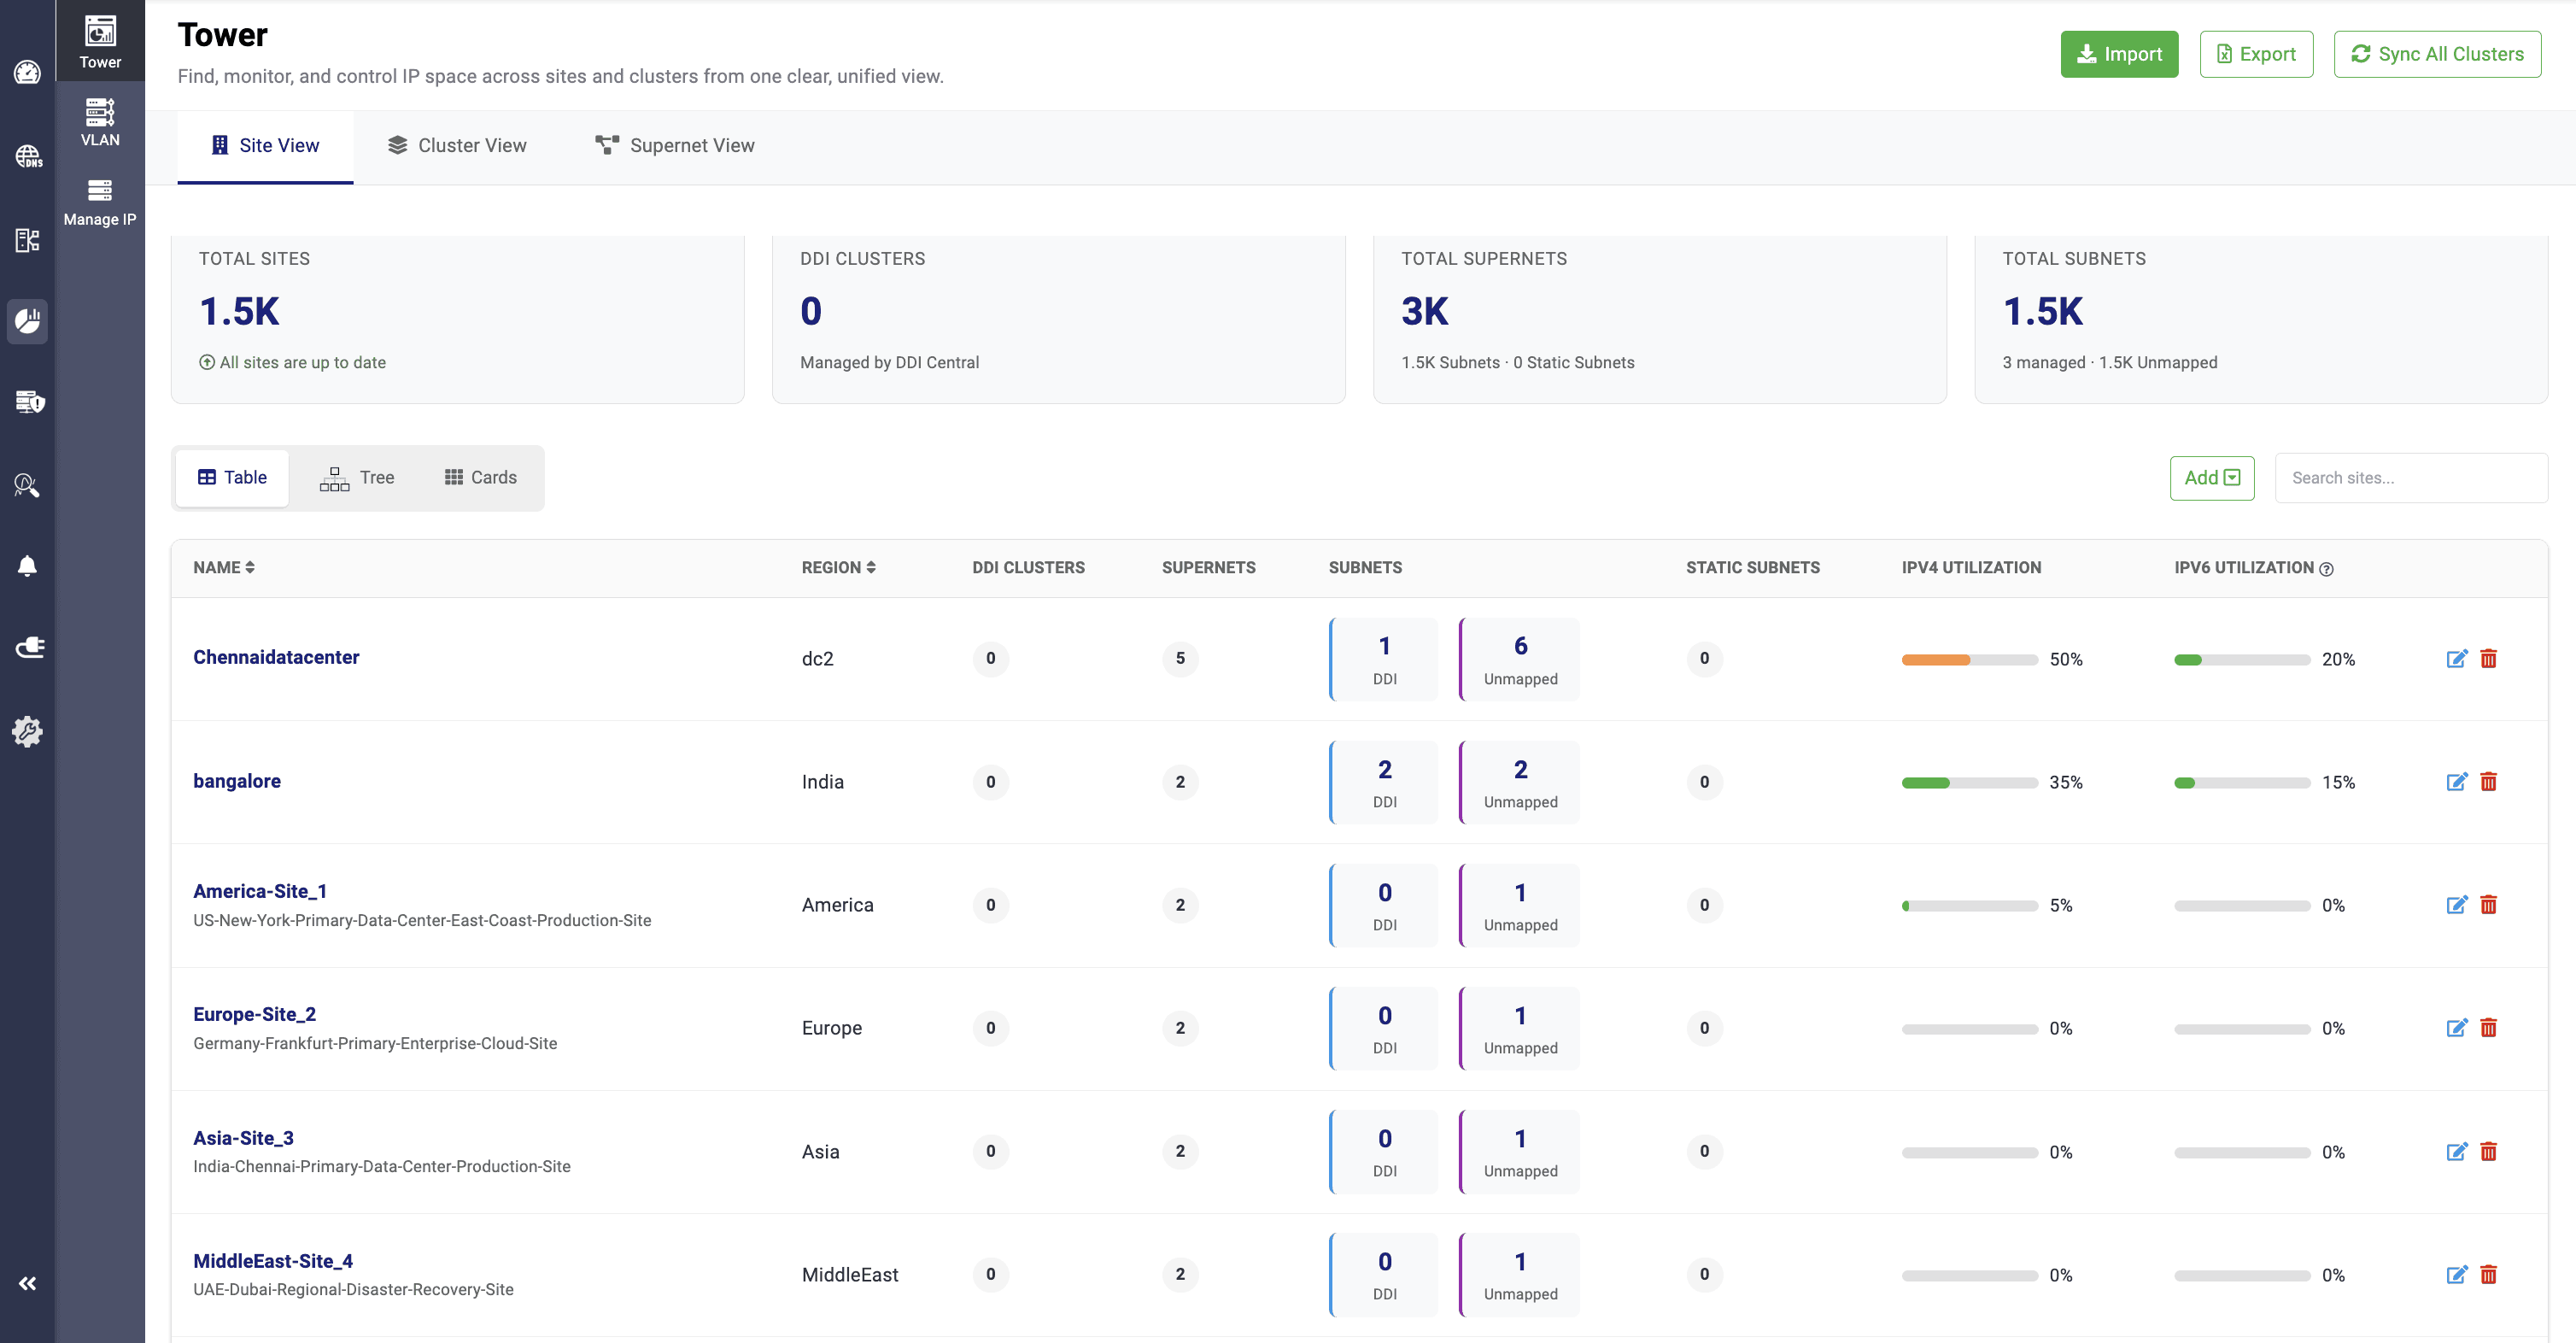
Site View organizes IP resources by physical location, including: a data center, branch office, campus, or cloud region. Every cluster, supernet, subnet, and static subnet tied to that site rolls up under it, alongside any subnets that exist on the network but aren't yet mapped into DDI Central.
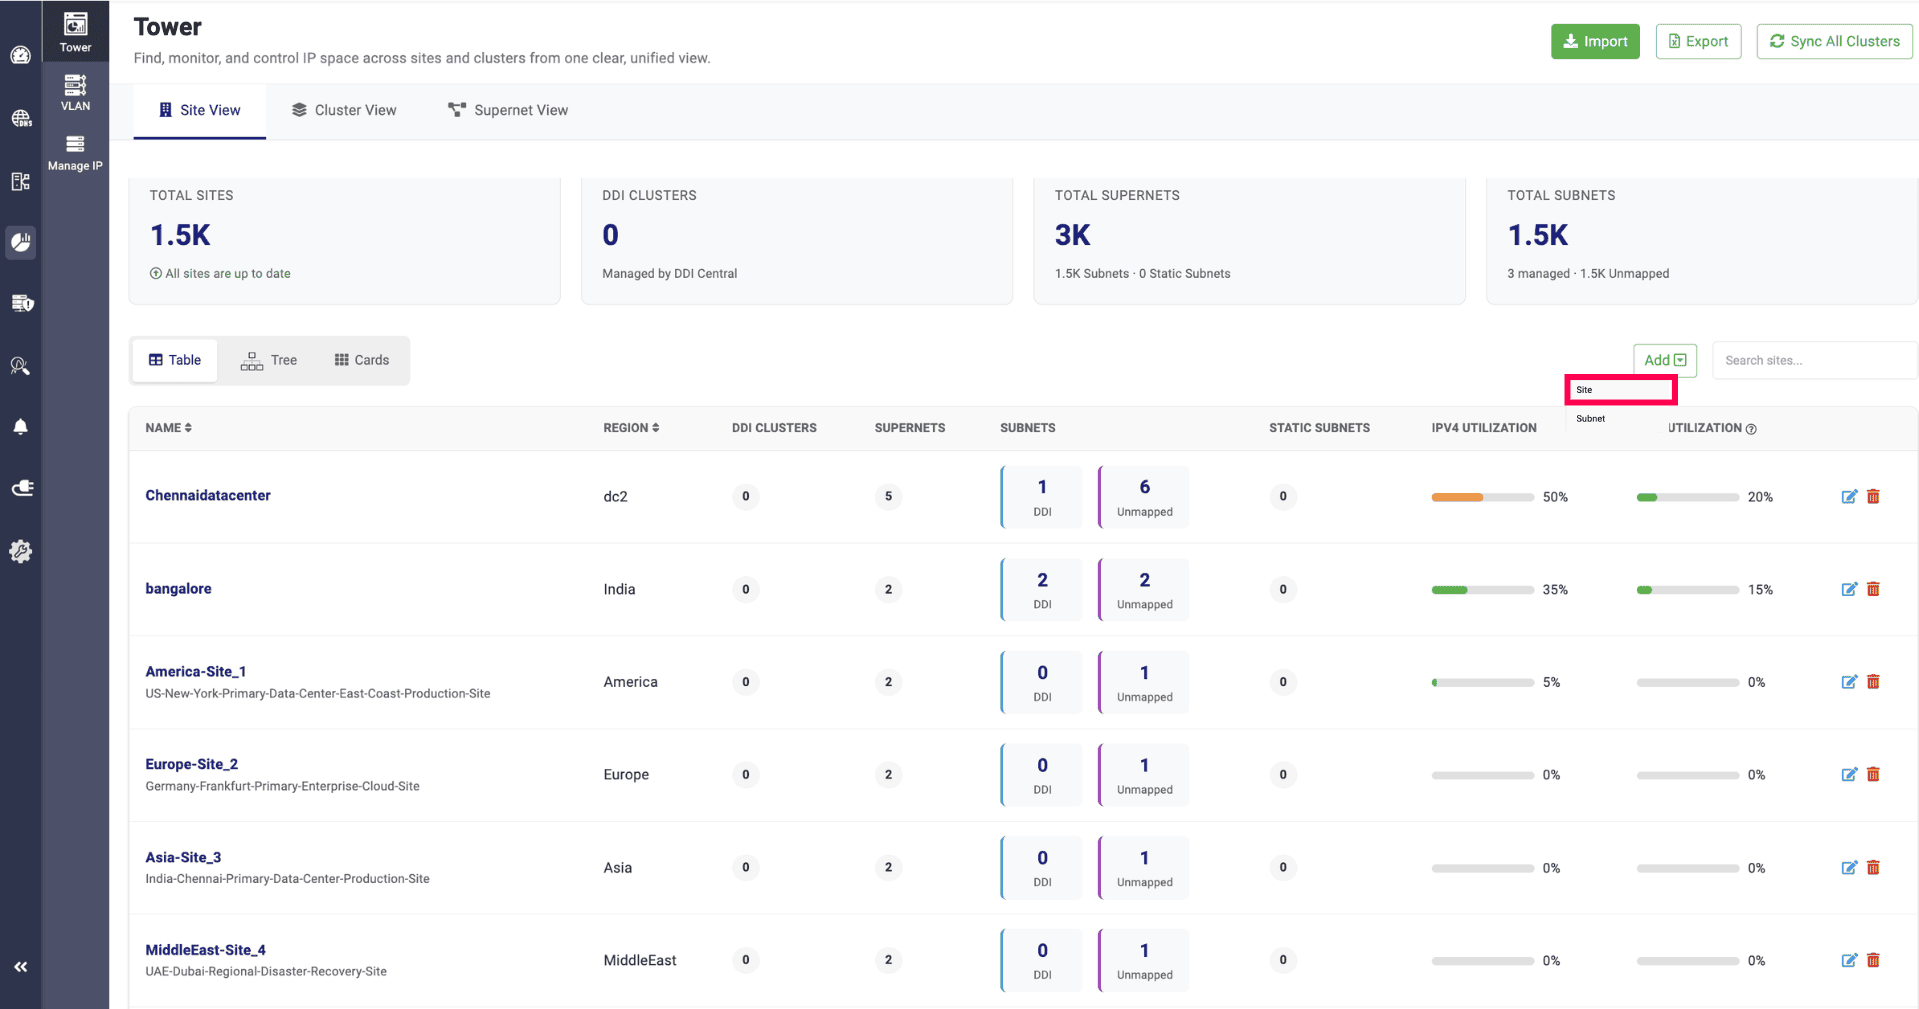
Setting one up starts with Add Site: name it, optionally tag it to a region, add a description, and link the clusters and supernets that belong to it.
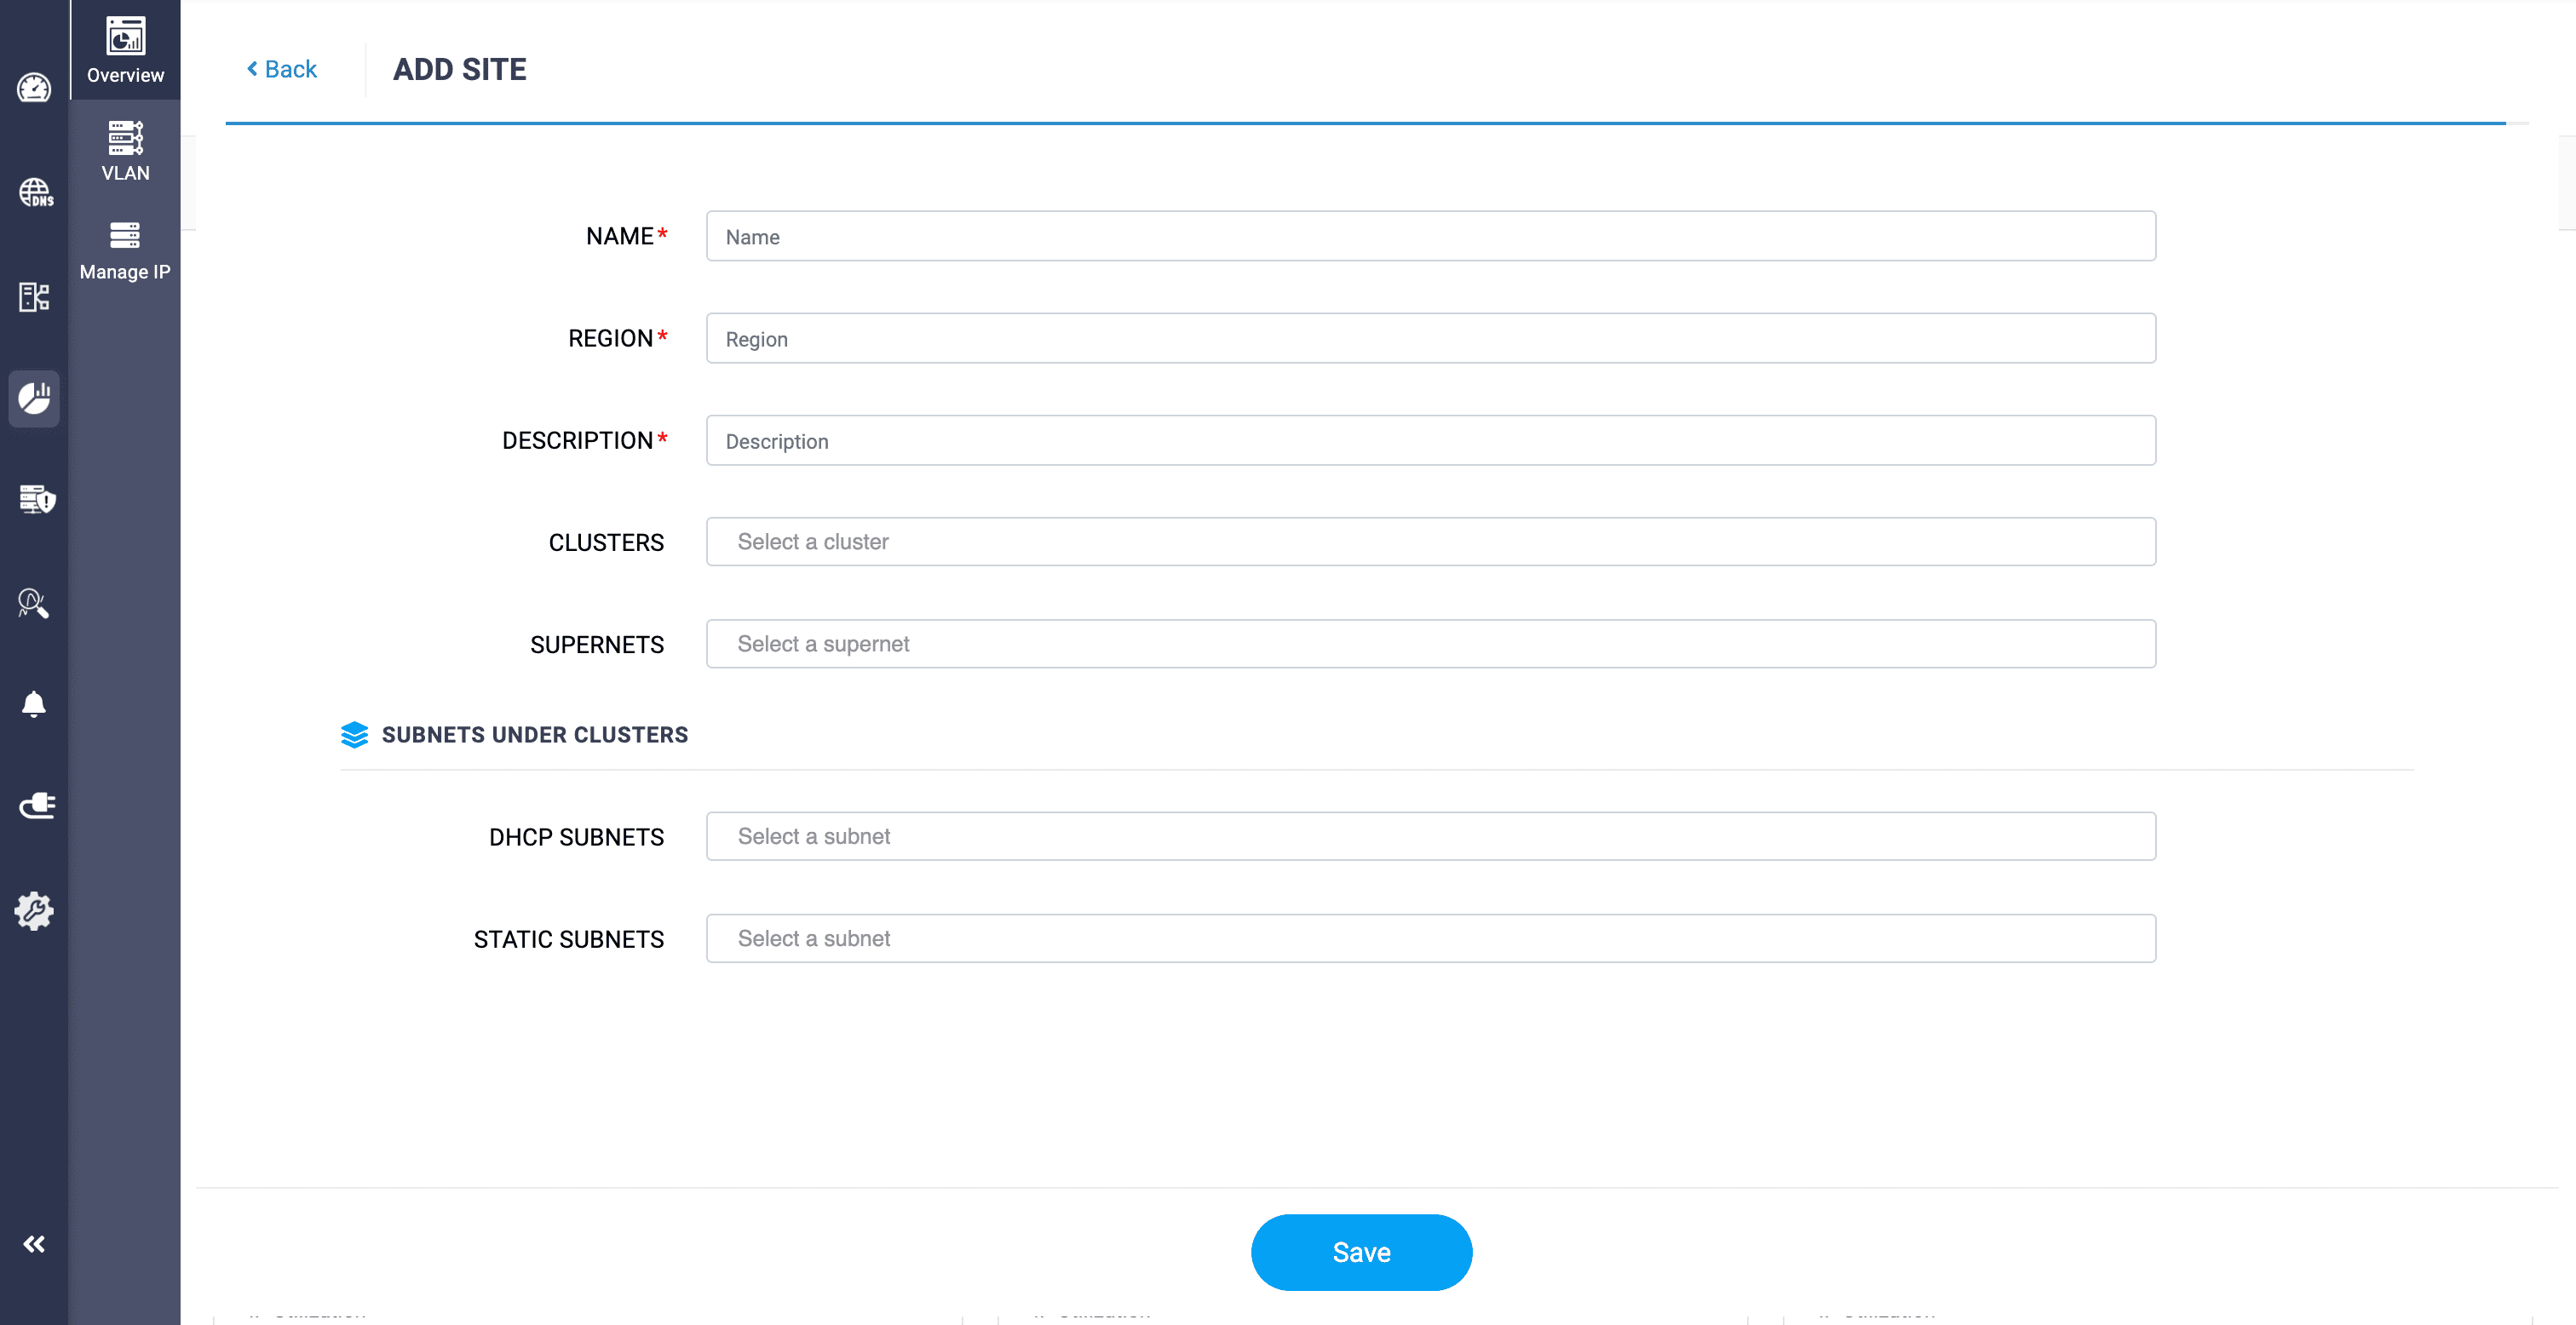
A site can hold multiple clusters, but each cluster can only belong to one site, so there's no ambiguity about where a piece of infrastructure lives.
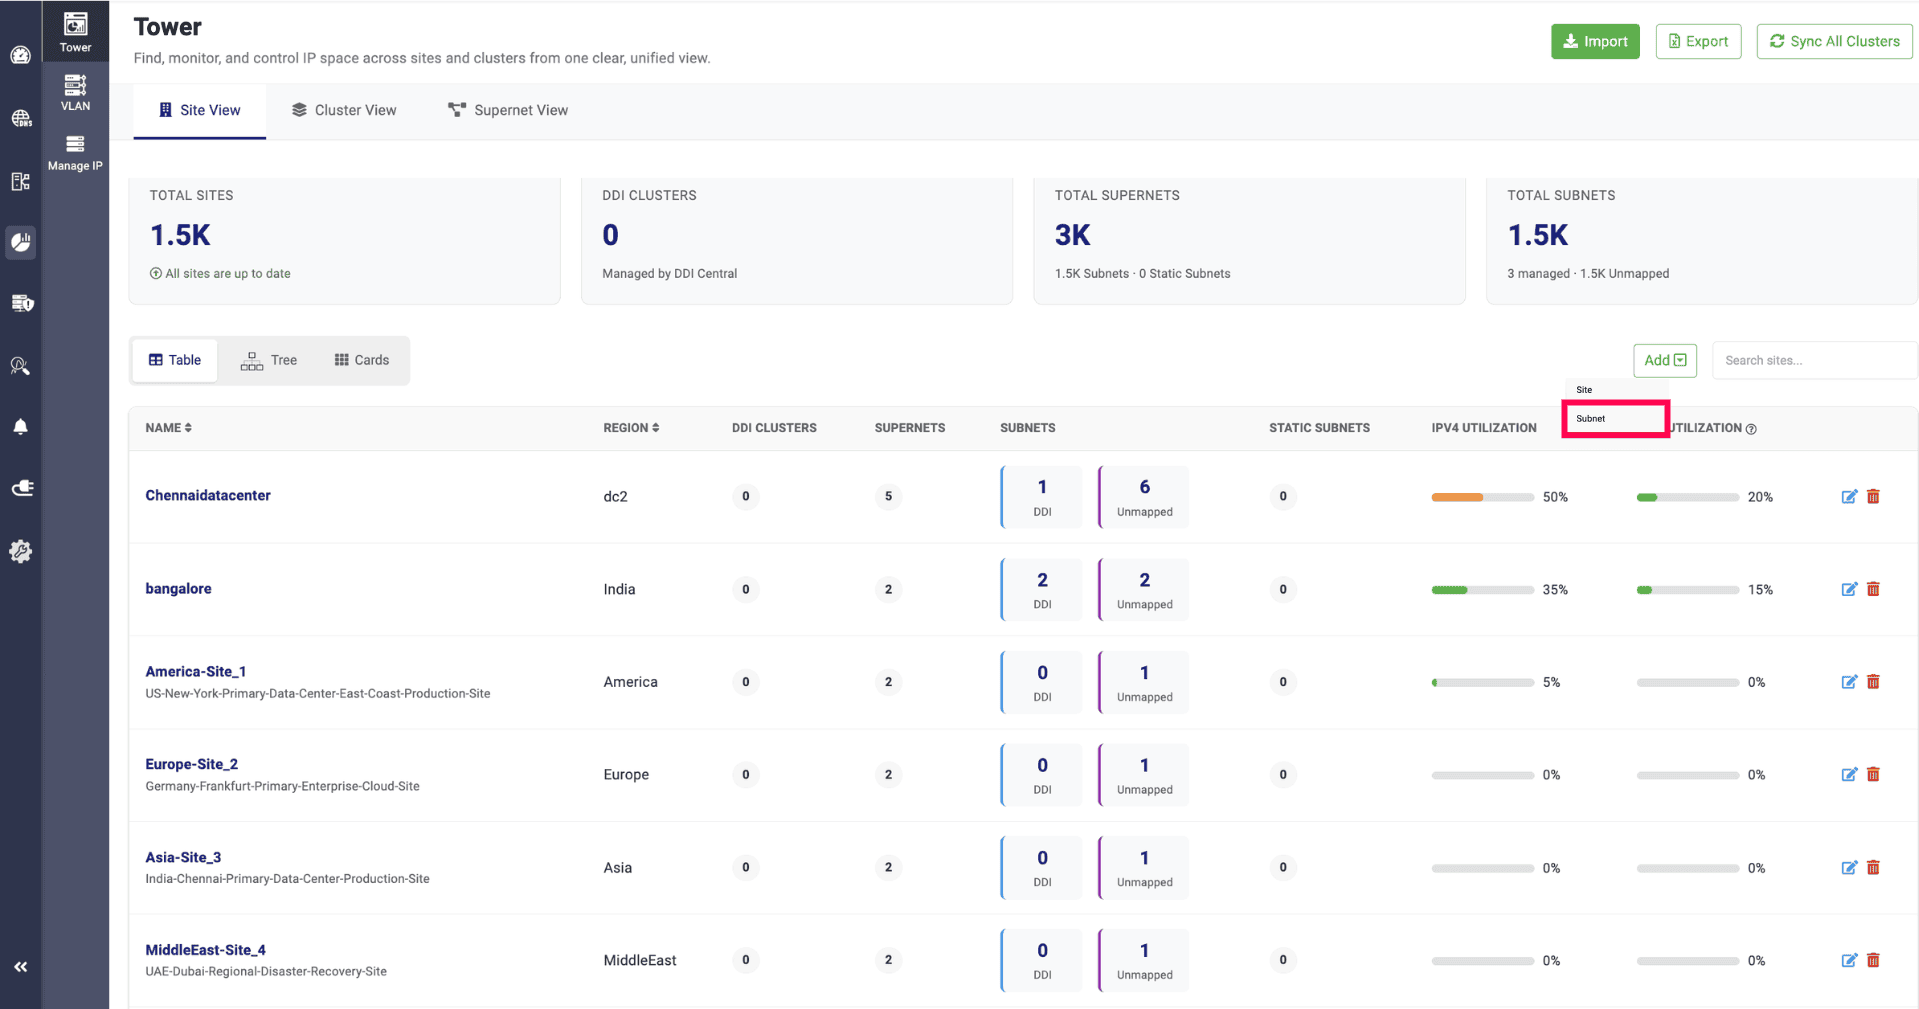
From there, Add Subnet lets you attach specific subnets to that site's clusters directly: set the network address, a description, and whether it's an Unmapped, DHCP-managed, or Static subnet, then assign it to a supernet.
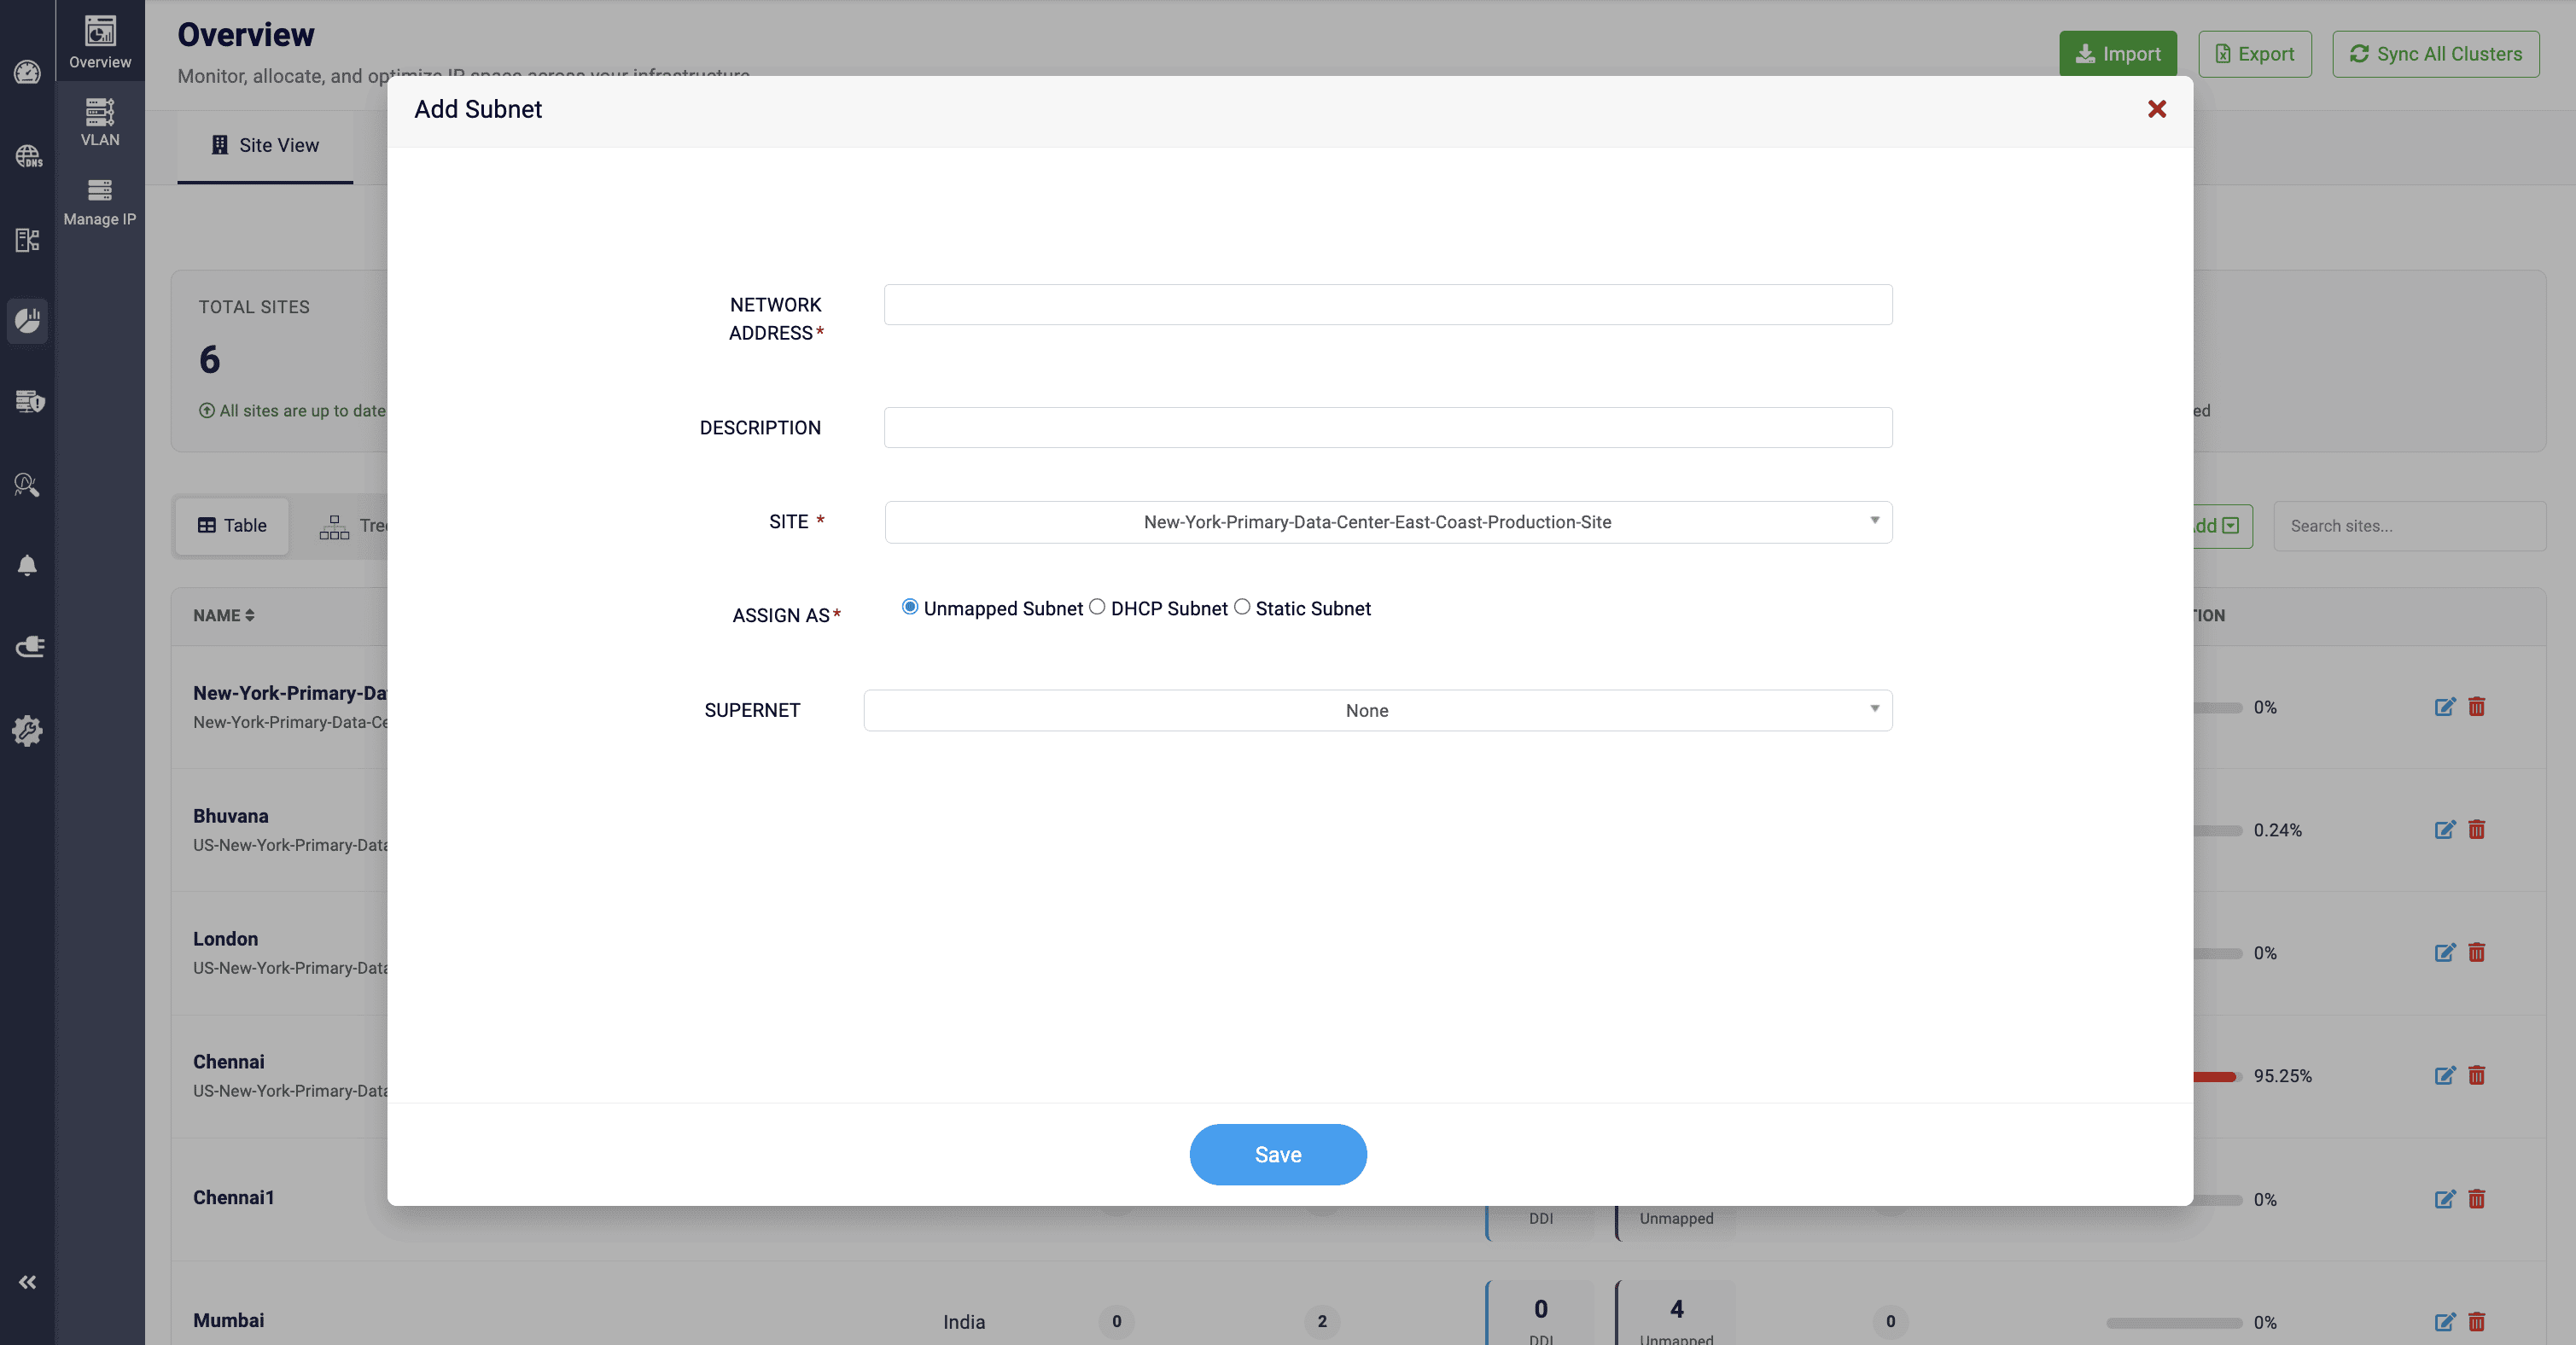
Once assigned, the subnet is configured on both the site and the relevant cluster's servers in one step, instead of being set up twice.
That last part matters: Instead of unmanaged address space sitting invisible, it shows up right next to what you manage, tagged as unmapped. If a location is having trouble, this is where you start—everything relevant to that site, in one place, with nothing scattered across other views.
Cluster View
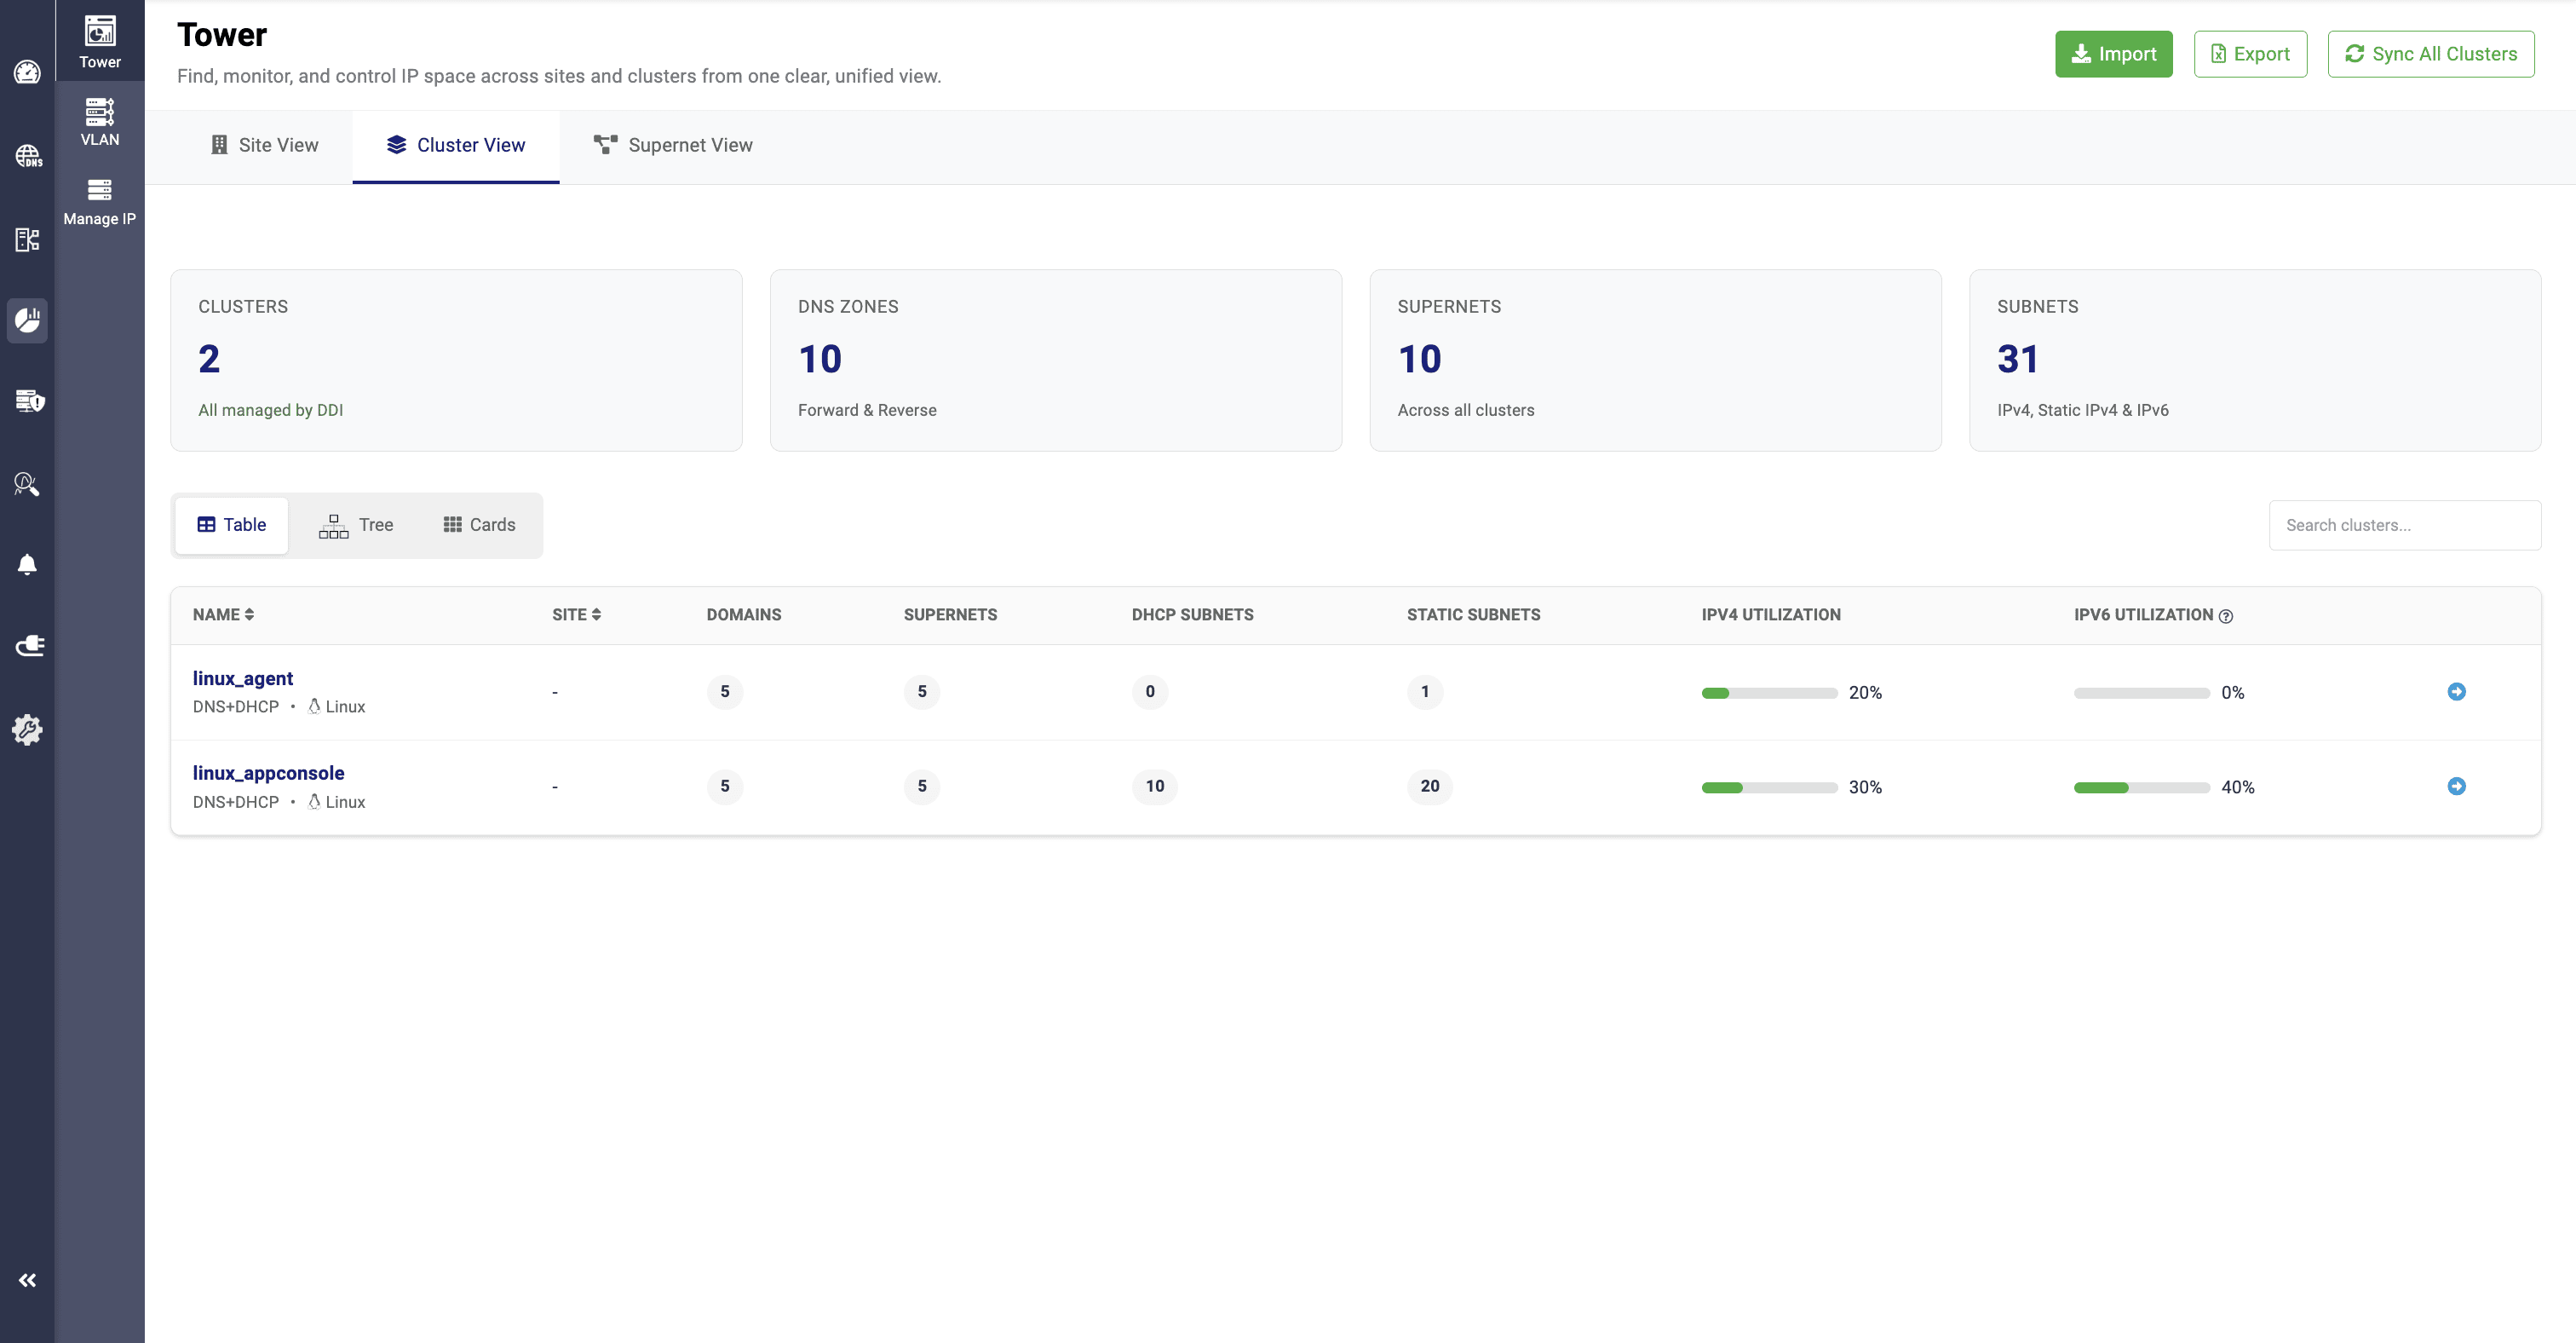
Cluster View flips the lens from geography to logical environment. A cluster is a logical grouping of IP space, typically mapped to its own dedicated DNS and DHCP servers, including: production, staging, a specific customer's environment, or any custom segmentation your network needs.
Where Site View starts with where, Cluster View starts with which environment. This makes it the better starting point for multi-tenant setups or networks running overlapping IP ranges across parallel environments. Every cluster shows up here, whether it's tied to a site or standalone, so nothing environmentally tagged gets lost inside a location-first hierarchy.
At the top level, Cluster View surfaces the total number of clusters created or imported, the total DNS zones (forward and reverse) across them, total supernets, and a breakdown of IPv4, static IPv4, and IPv6 subnet counts. This is a fast way to compare environments side by side instead of opening each one individually.
Also, a cluster's site association isn't fixed. It can be disassociated at any time from the Clusters page by editing the cluster and setting its Site field to None.
Supernet view
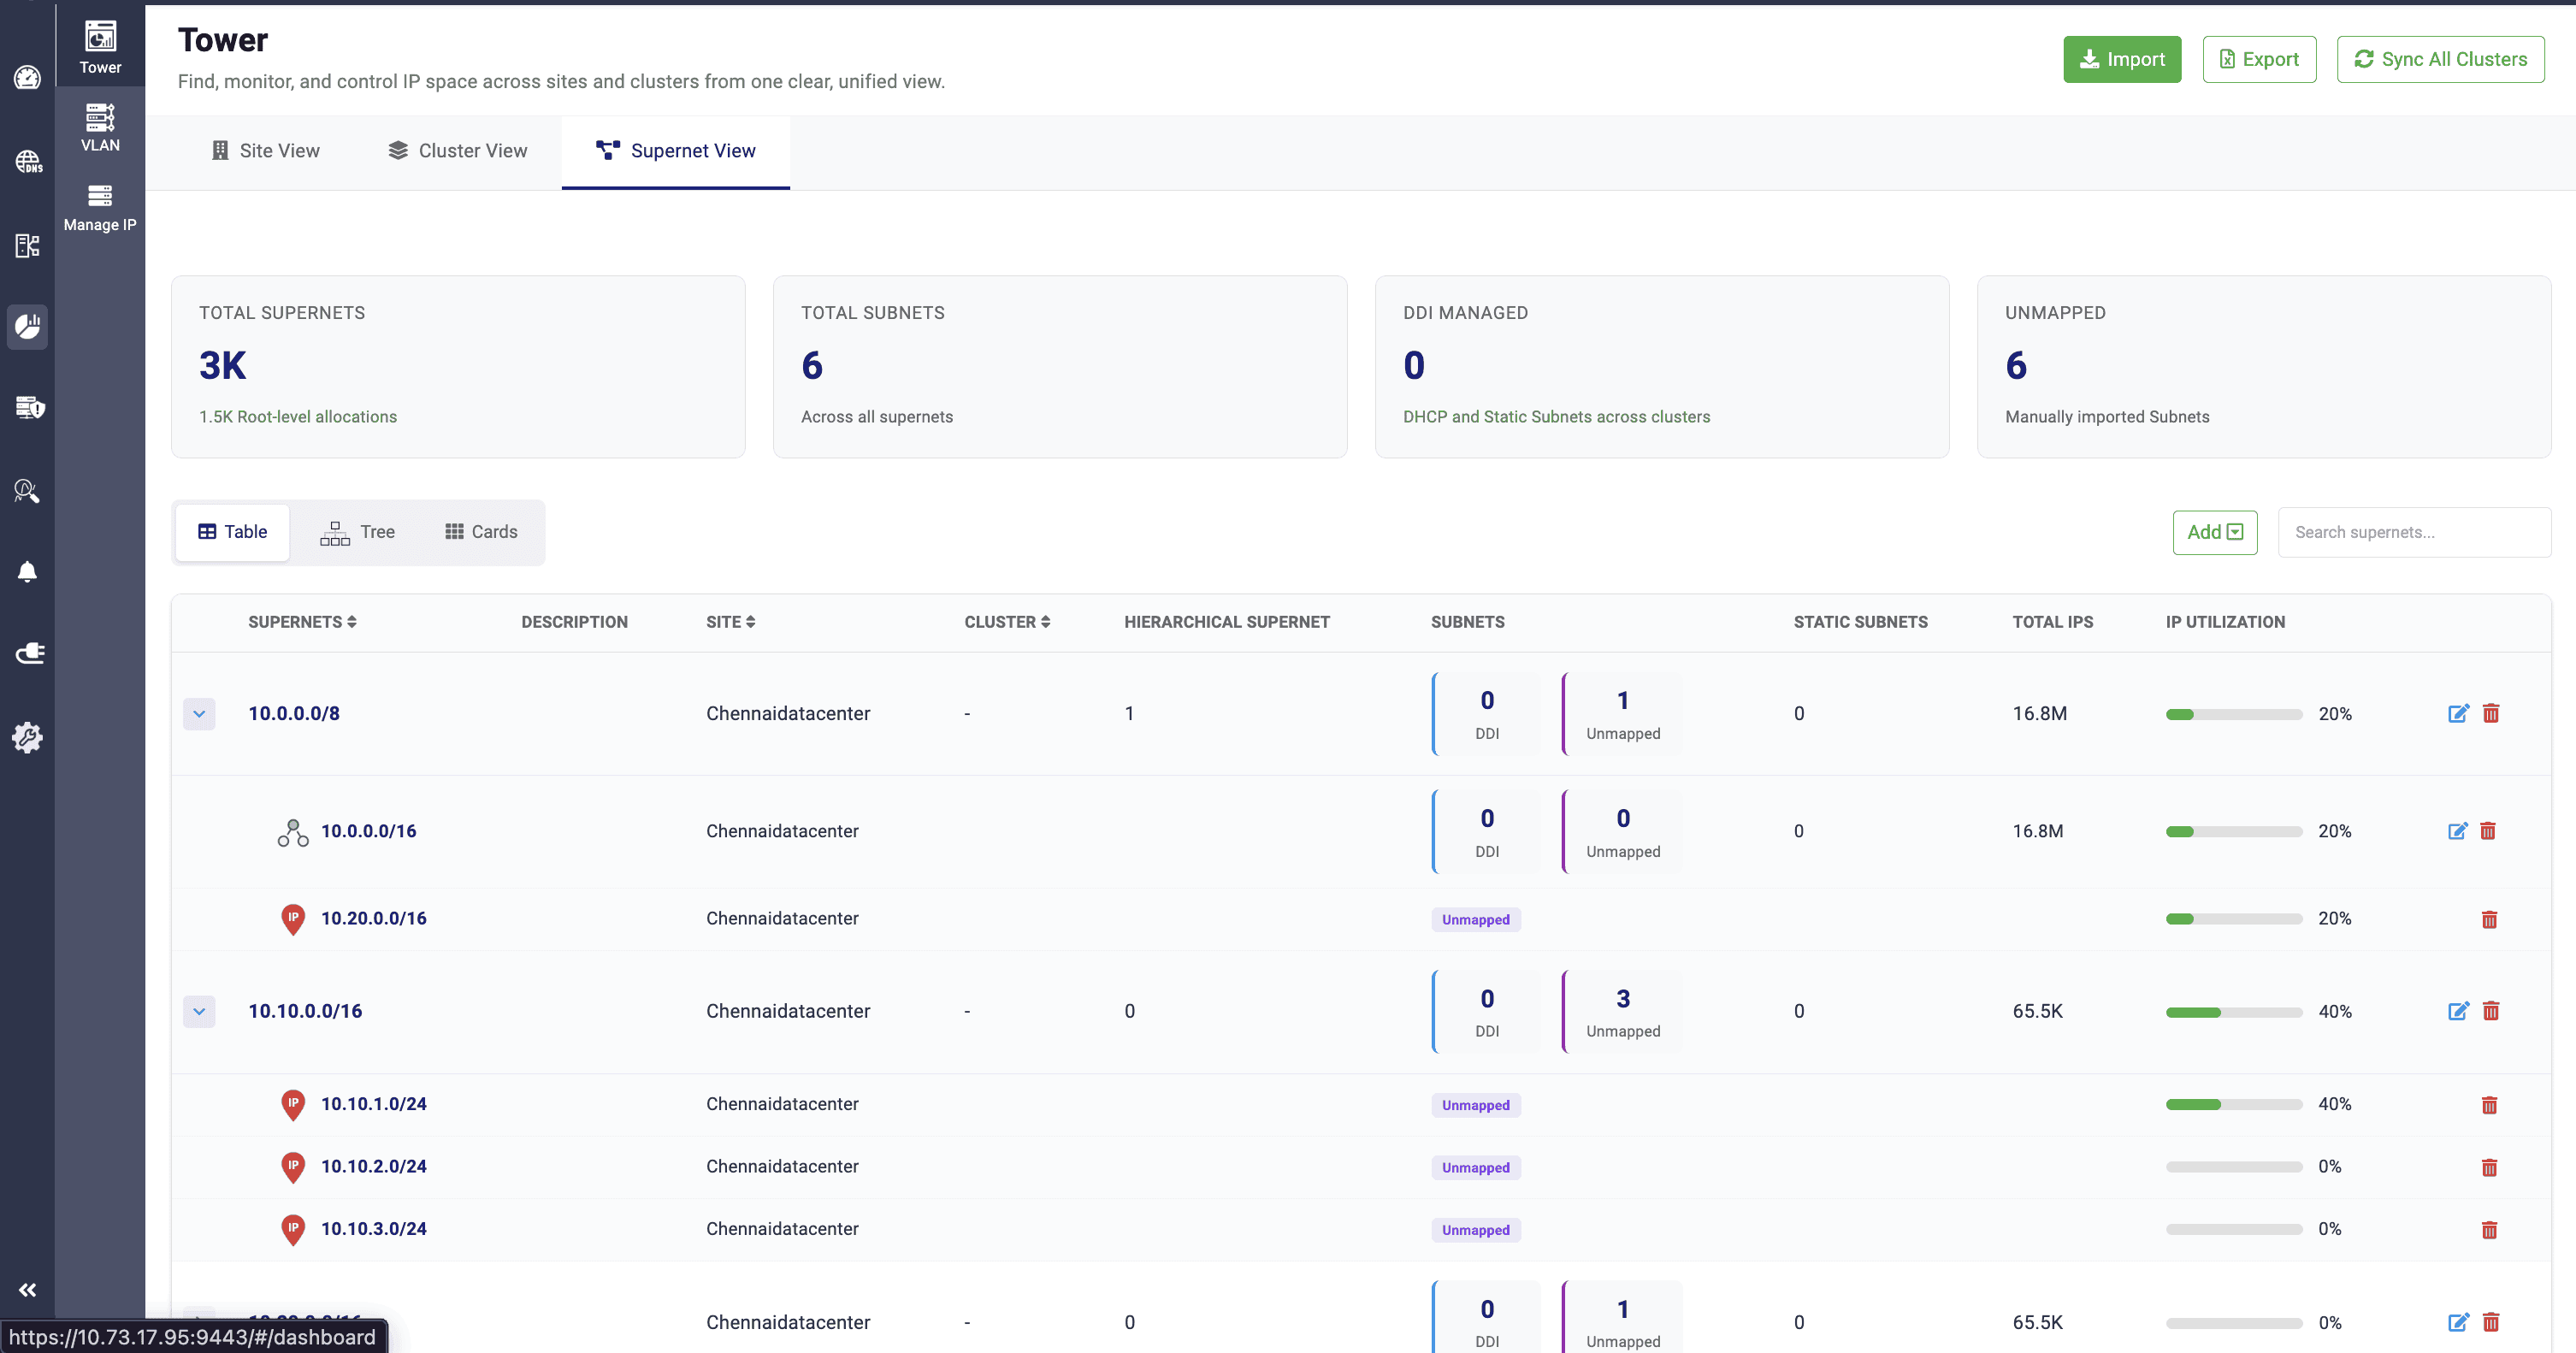
Supernet View shows how it's actually organized and carved, letting you start from a familiar parent block and drill down to the exact subnet, pool, or IP you need without losing that architectural context.
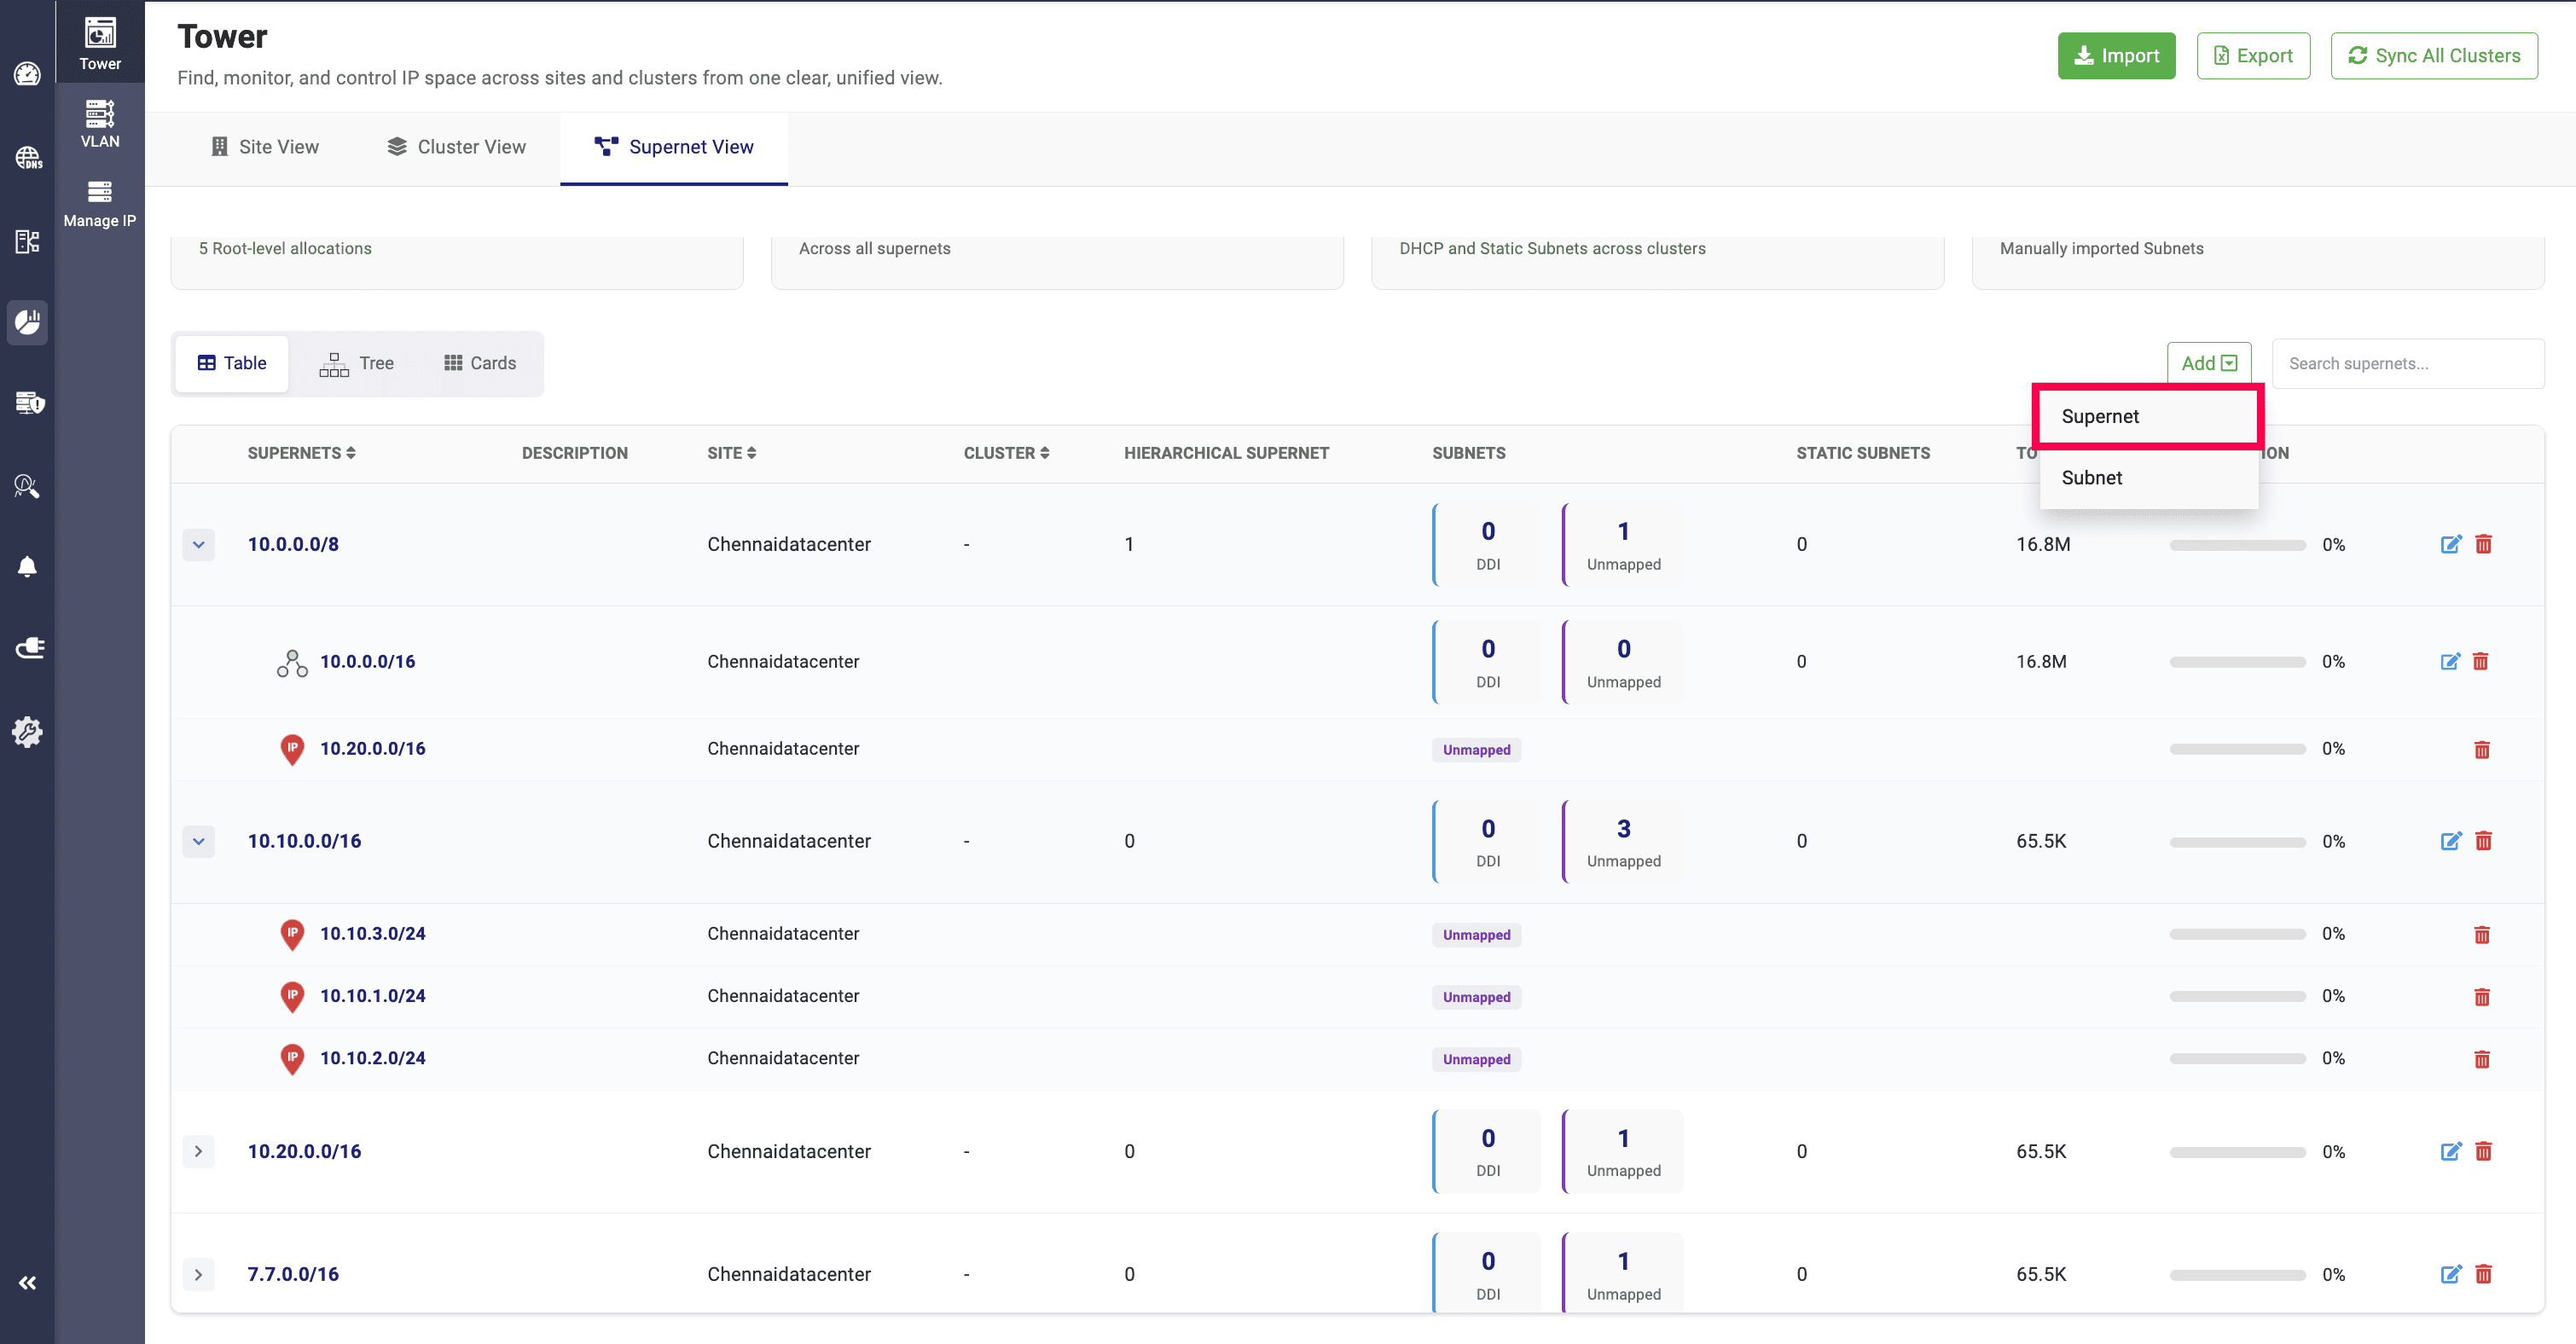
Add Supernet takes the IP address, prefix length, a description, the site to associate it with, and the clusters and DHCP/static/unmapped subnets to link under it.
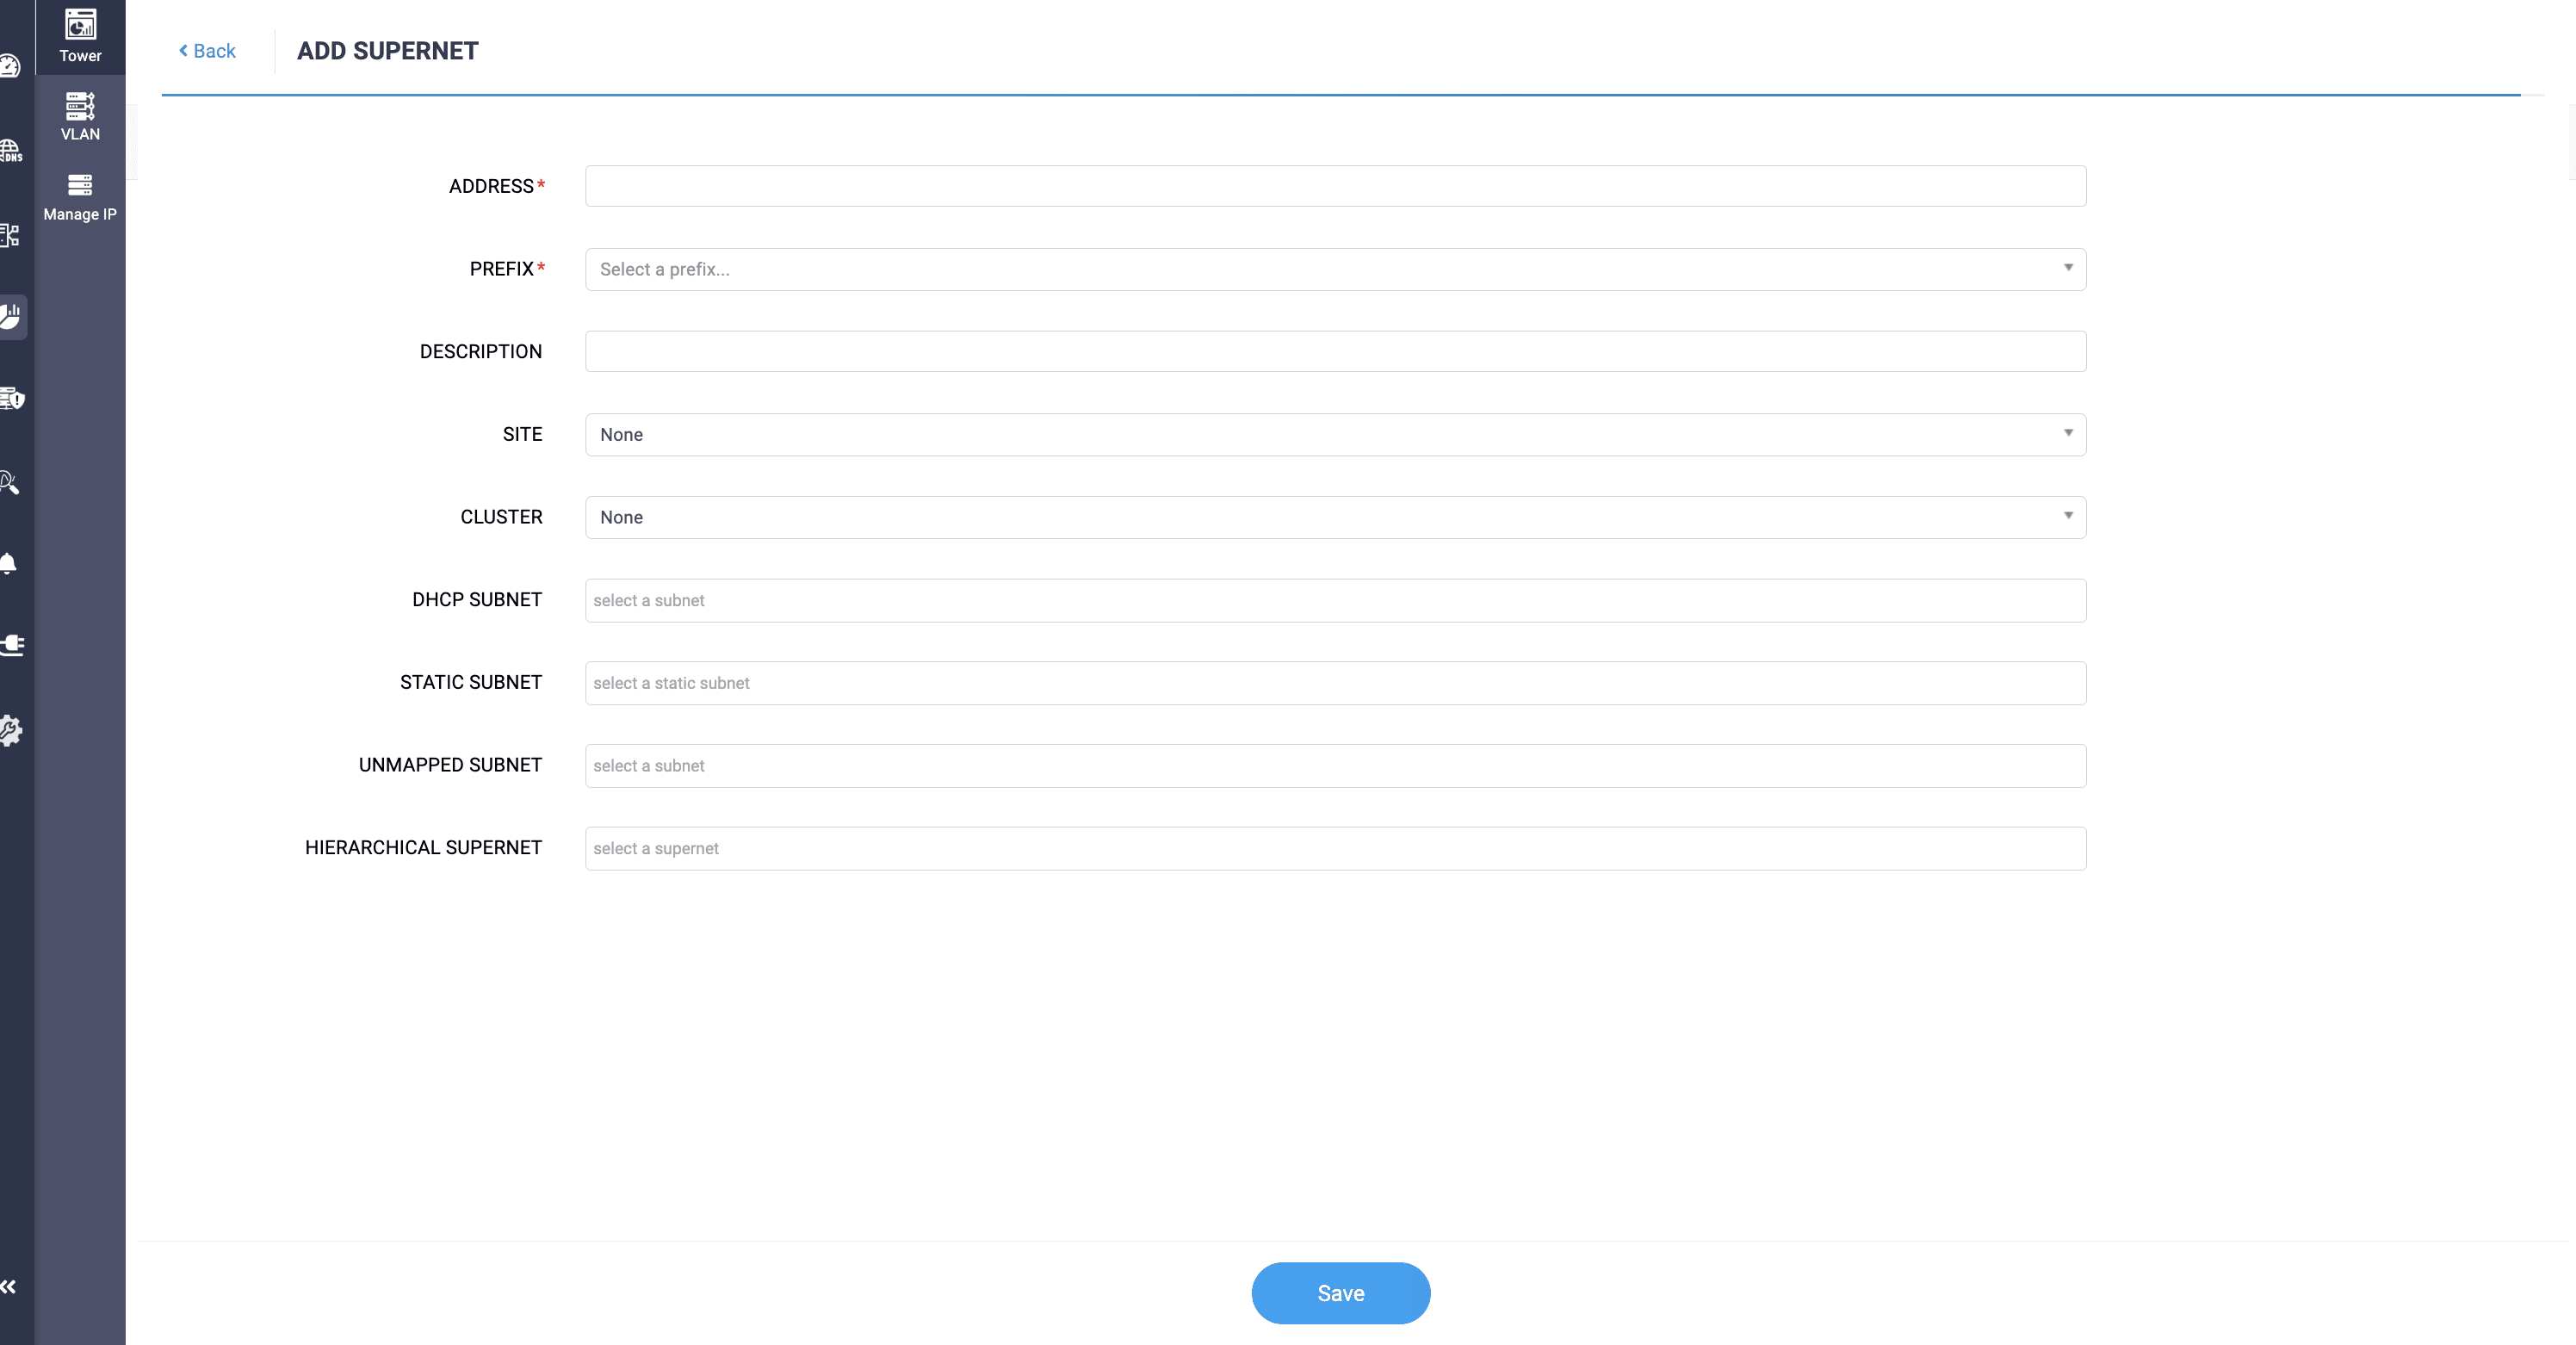
You can also nest it under an existing supernet via the Hierarchical Supernet field. One rule to know: A supernet can't exist unassigned; it needs a cluster or a site selected to be created.
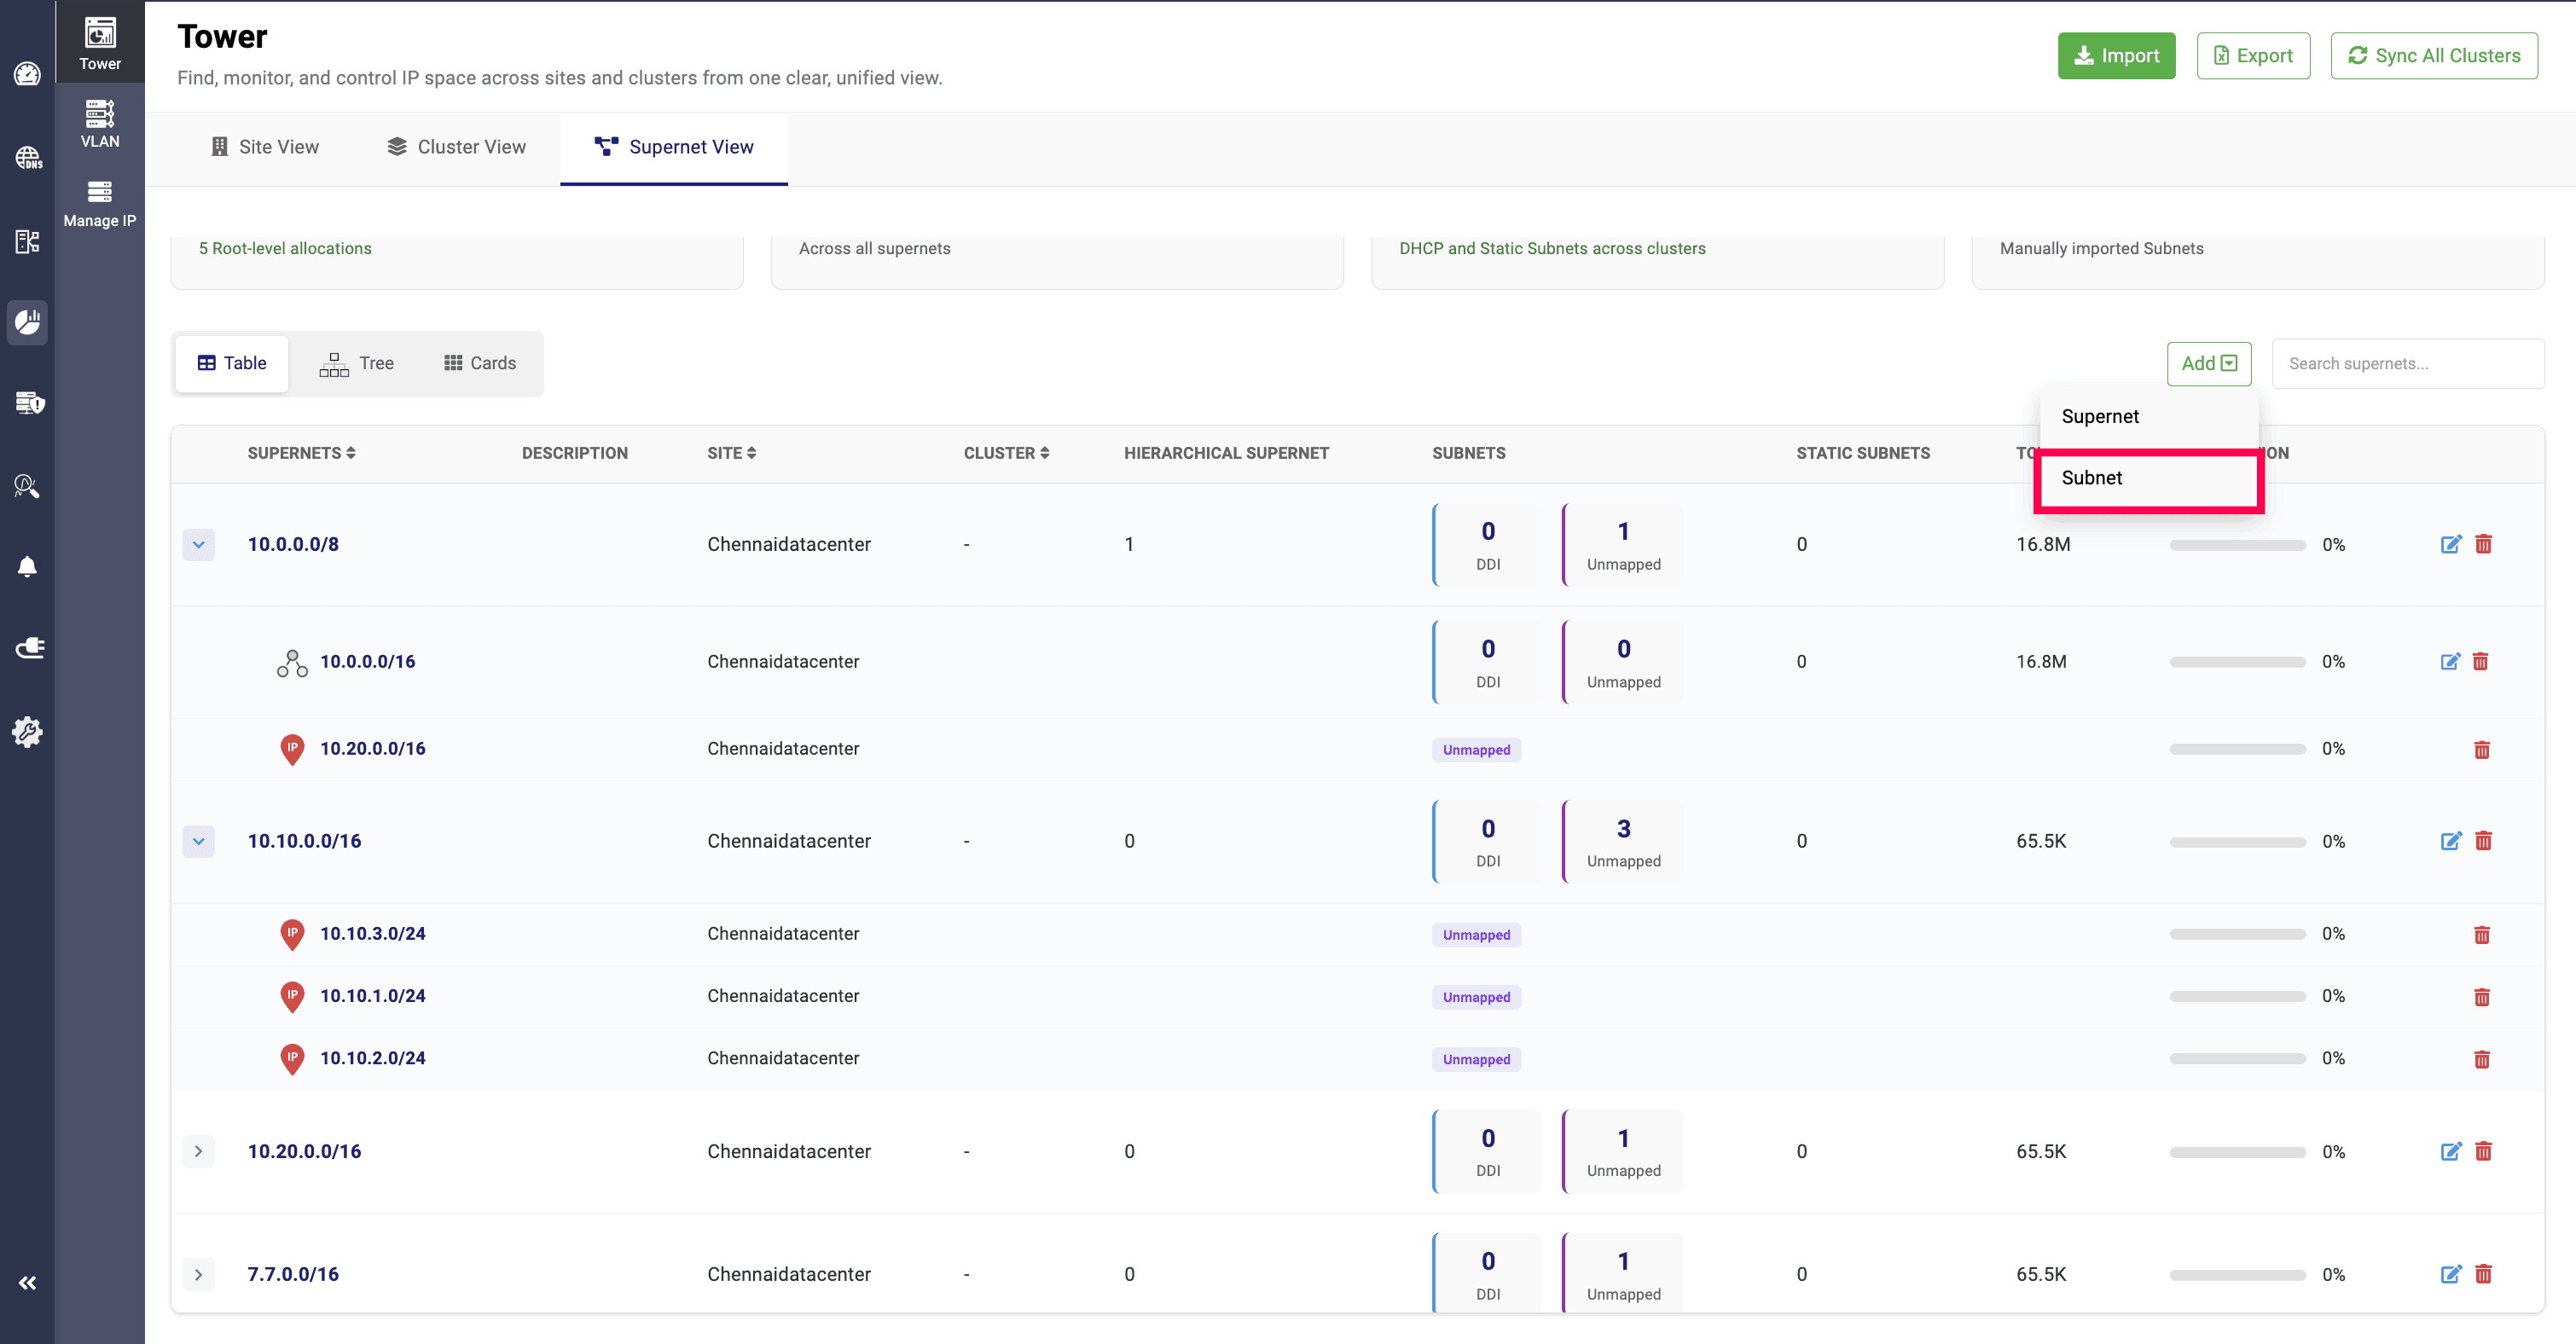
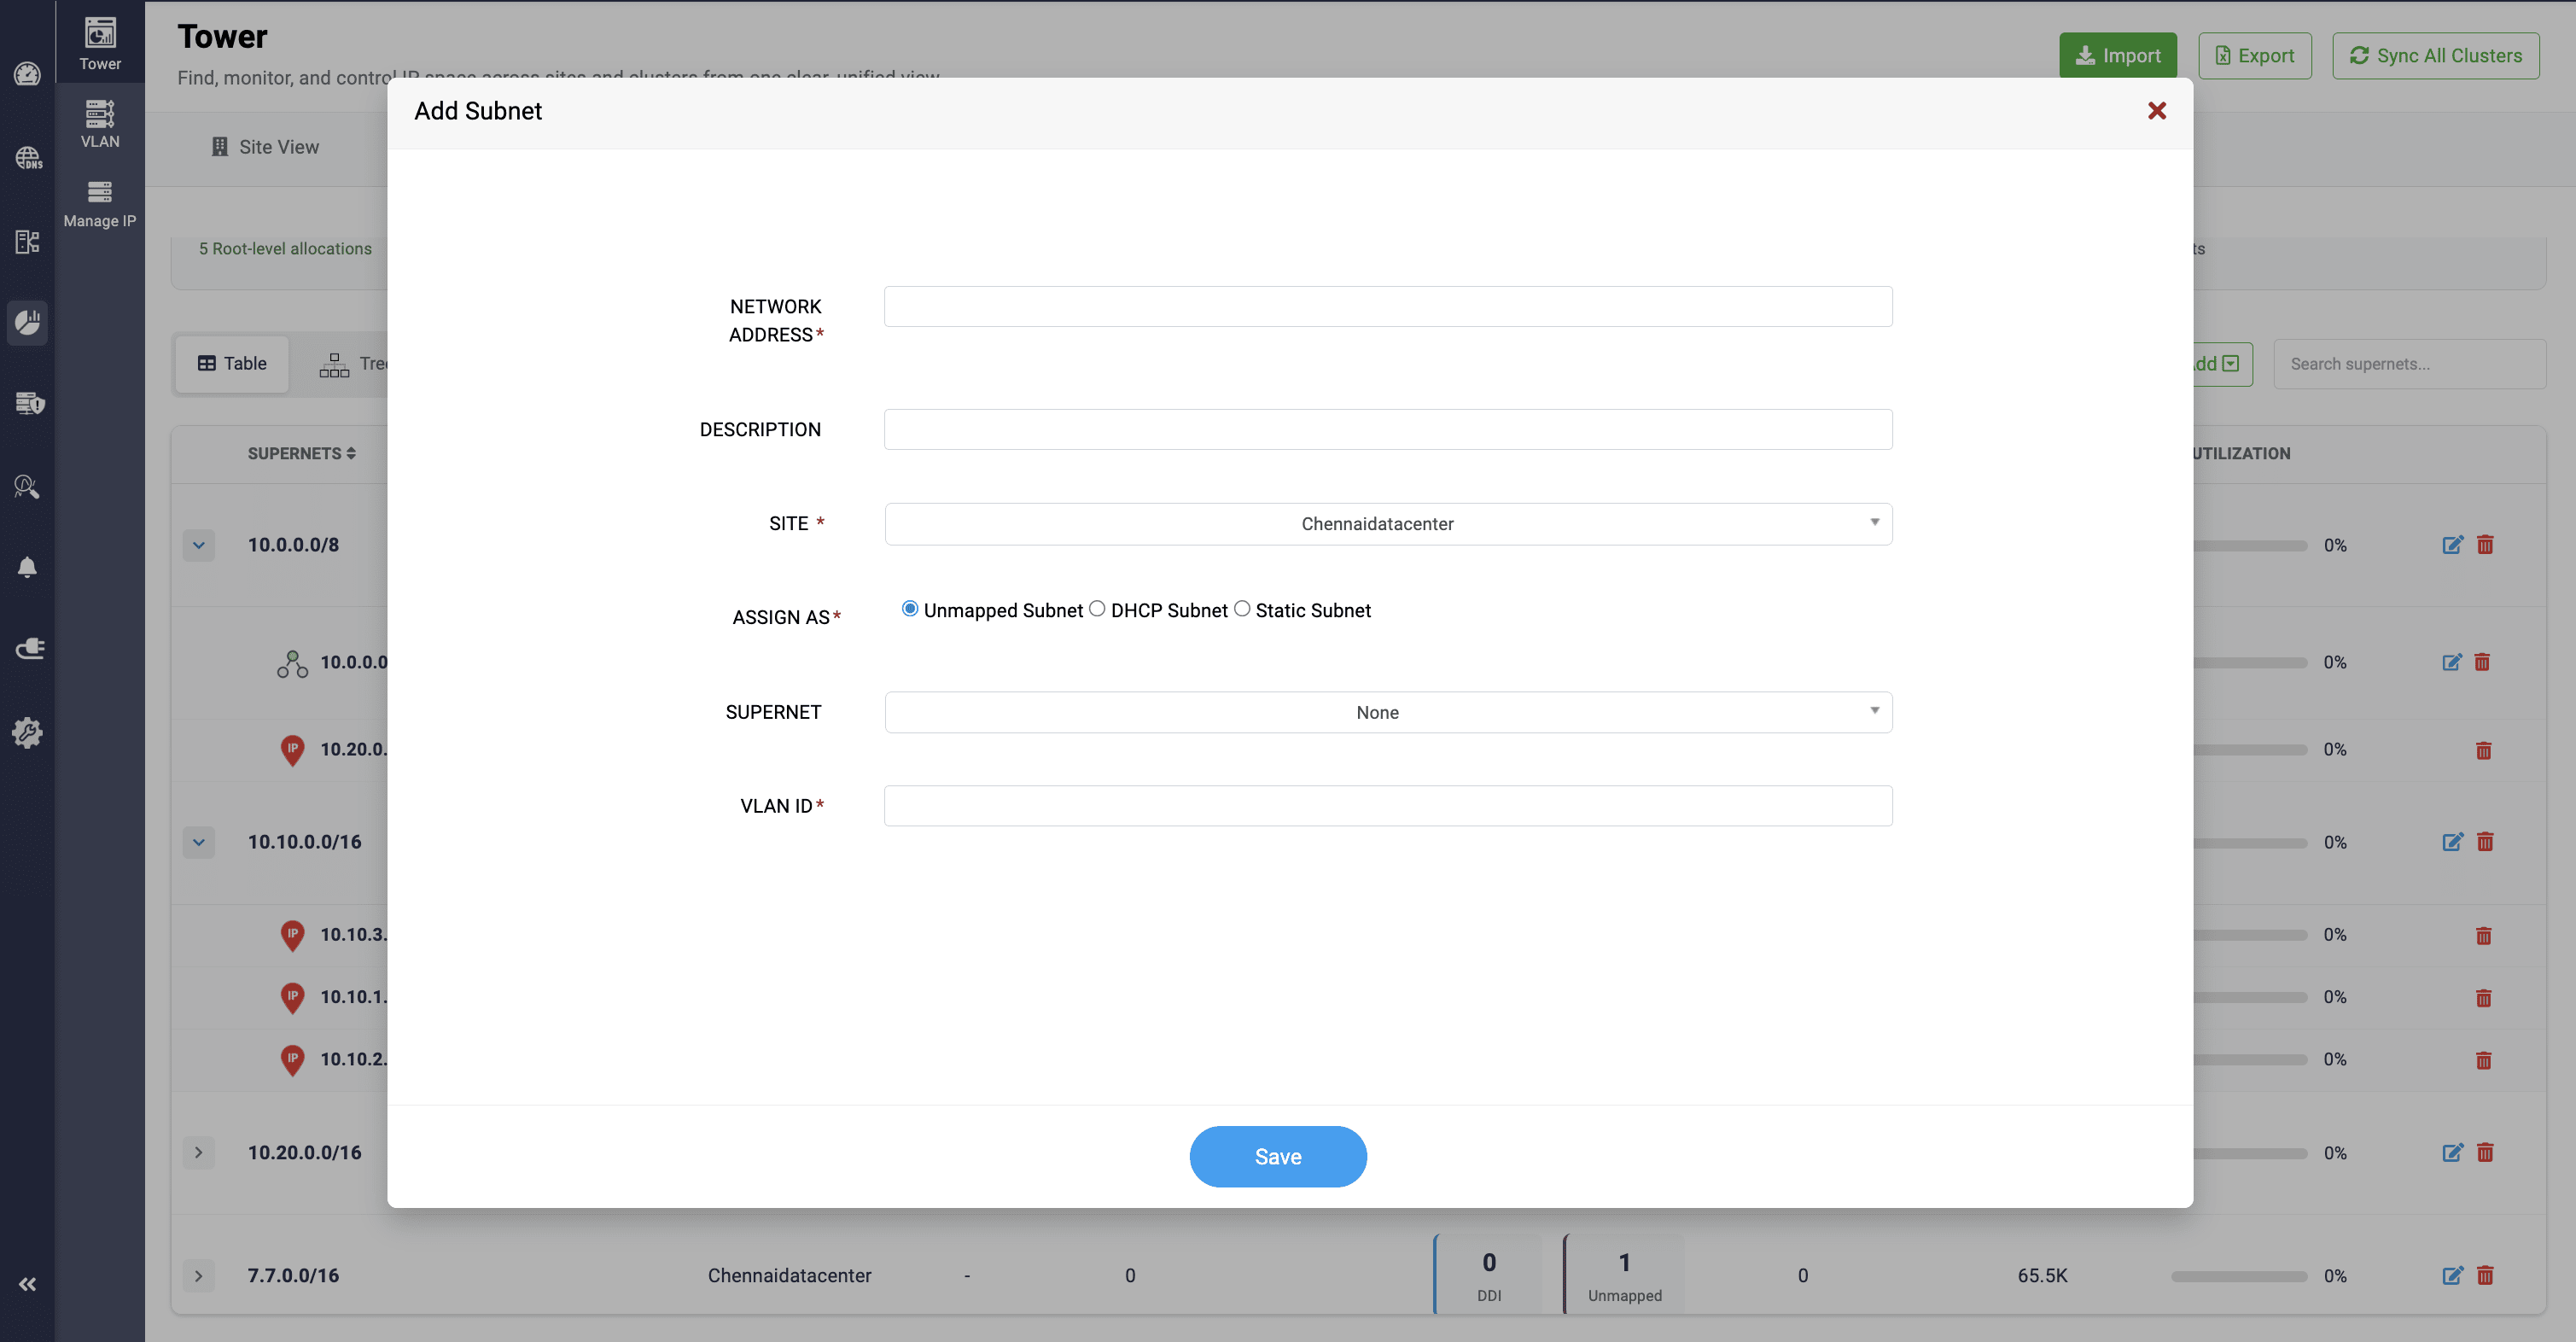
From there, Add Subnet works the same way it does in Site View, with one addition: Subnets created here can also be tagged with a VLAN ID, creating address space for the subnet for isolated DHCP allocations.
Table, Tree and Cards view types:
All three views—Site, Cluster, and Supernet—share the same three ways of looking at the data, so once you know one, you know all of them:
Table View gives a structured, sortable list of everything in that lens—names, associations, subnet/supernet counts, and live utilization percentages—is searchable and built for comparing entries side by side.
Tree View turns the same data into a hierarchical drilldown, letting you click down from the top-level grouping through supernets to individual subnets. Unmapped subnets get a one-click Ping to activate or deactivate service (on prefixes/16 and below) and an Assign to Cluster action that routes straight into subnet creation. This turns stray address space into managed inventory without leaving the view. Managed subnets get View IPs and View Leases, with full lease history.
Cards View gives a segmented, at-a-glance health snapshot—utilization, counts, and (in Supernet View) a Top Utilized Subnets panel—for a fast read without opening the table or tree.
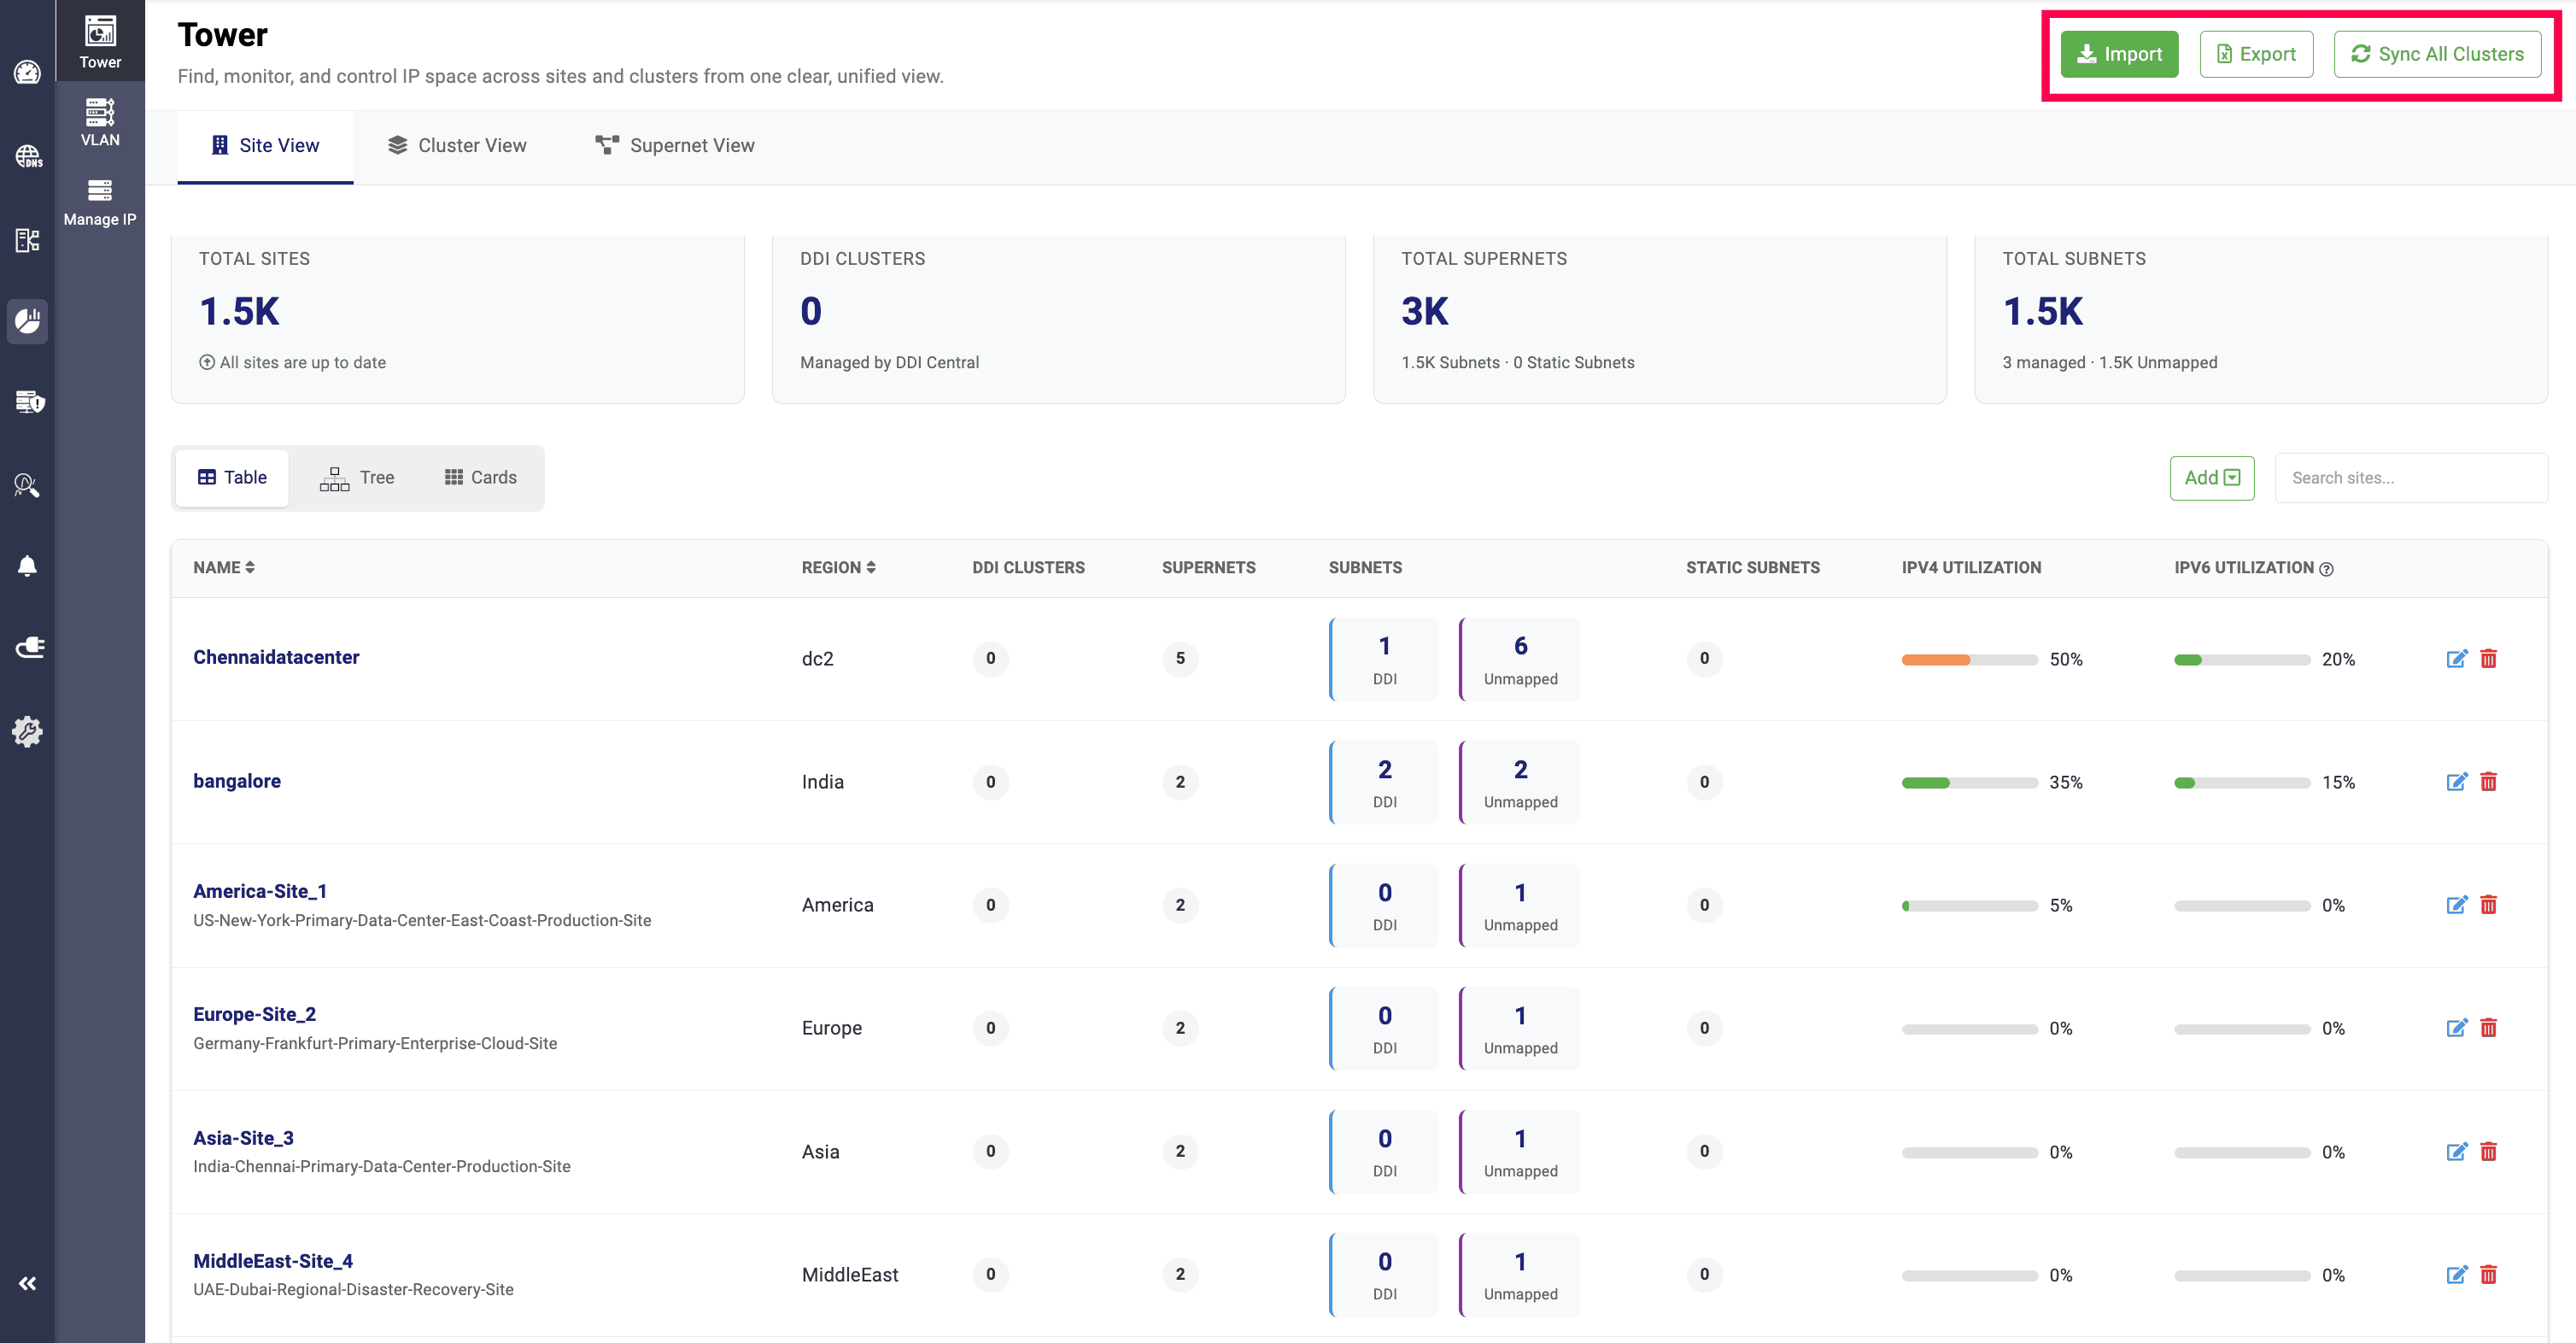
Across all three views, data supports bulk CSV/XLSX Import (single-sheet or multi-sheet, with region auto-detected from a City - Region naming convention), one-click Export option, and a Sync All Clusters action to refresh configuration everywhere at once.
Down to the address level
Zooming out tells you where your address space lives. Zooming in tells you what's actually happening to it, and that's where VLAN and Manage IP come in.
VLAN stats
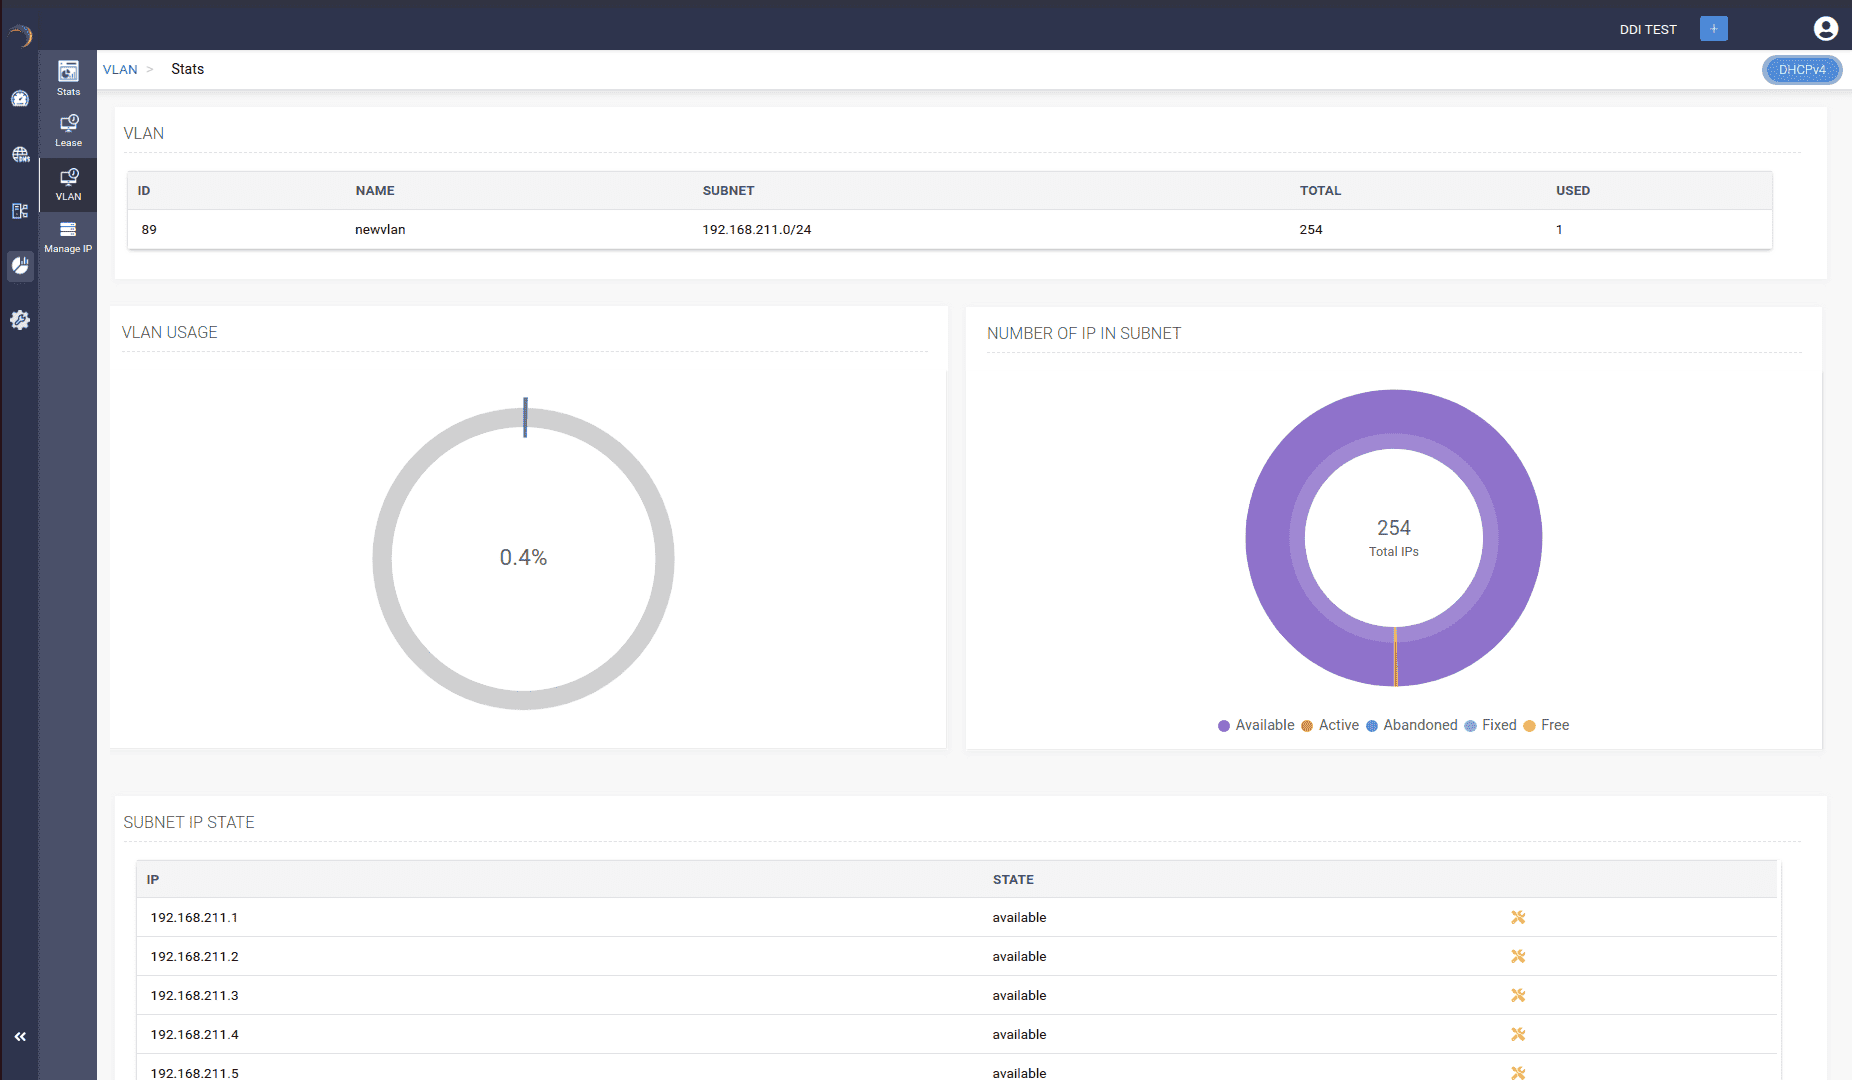
VLAN stats are available for every VLAN your DHCP server serves, breaks a VLAN's dedicated subnet down by IP state—Available, Active, Abandoned, Fixed, and Free—in a doughnut plot, next to an overall usage percentage.
Below that sits the full IP list for the VLAN, filterable and exportable to CSV. Spot a free address you need? Click it, and you're taken straight to host configuration; no separate lookup required.
Manage IP
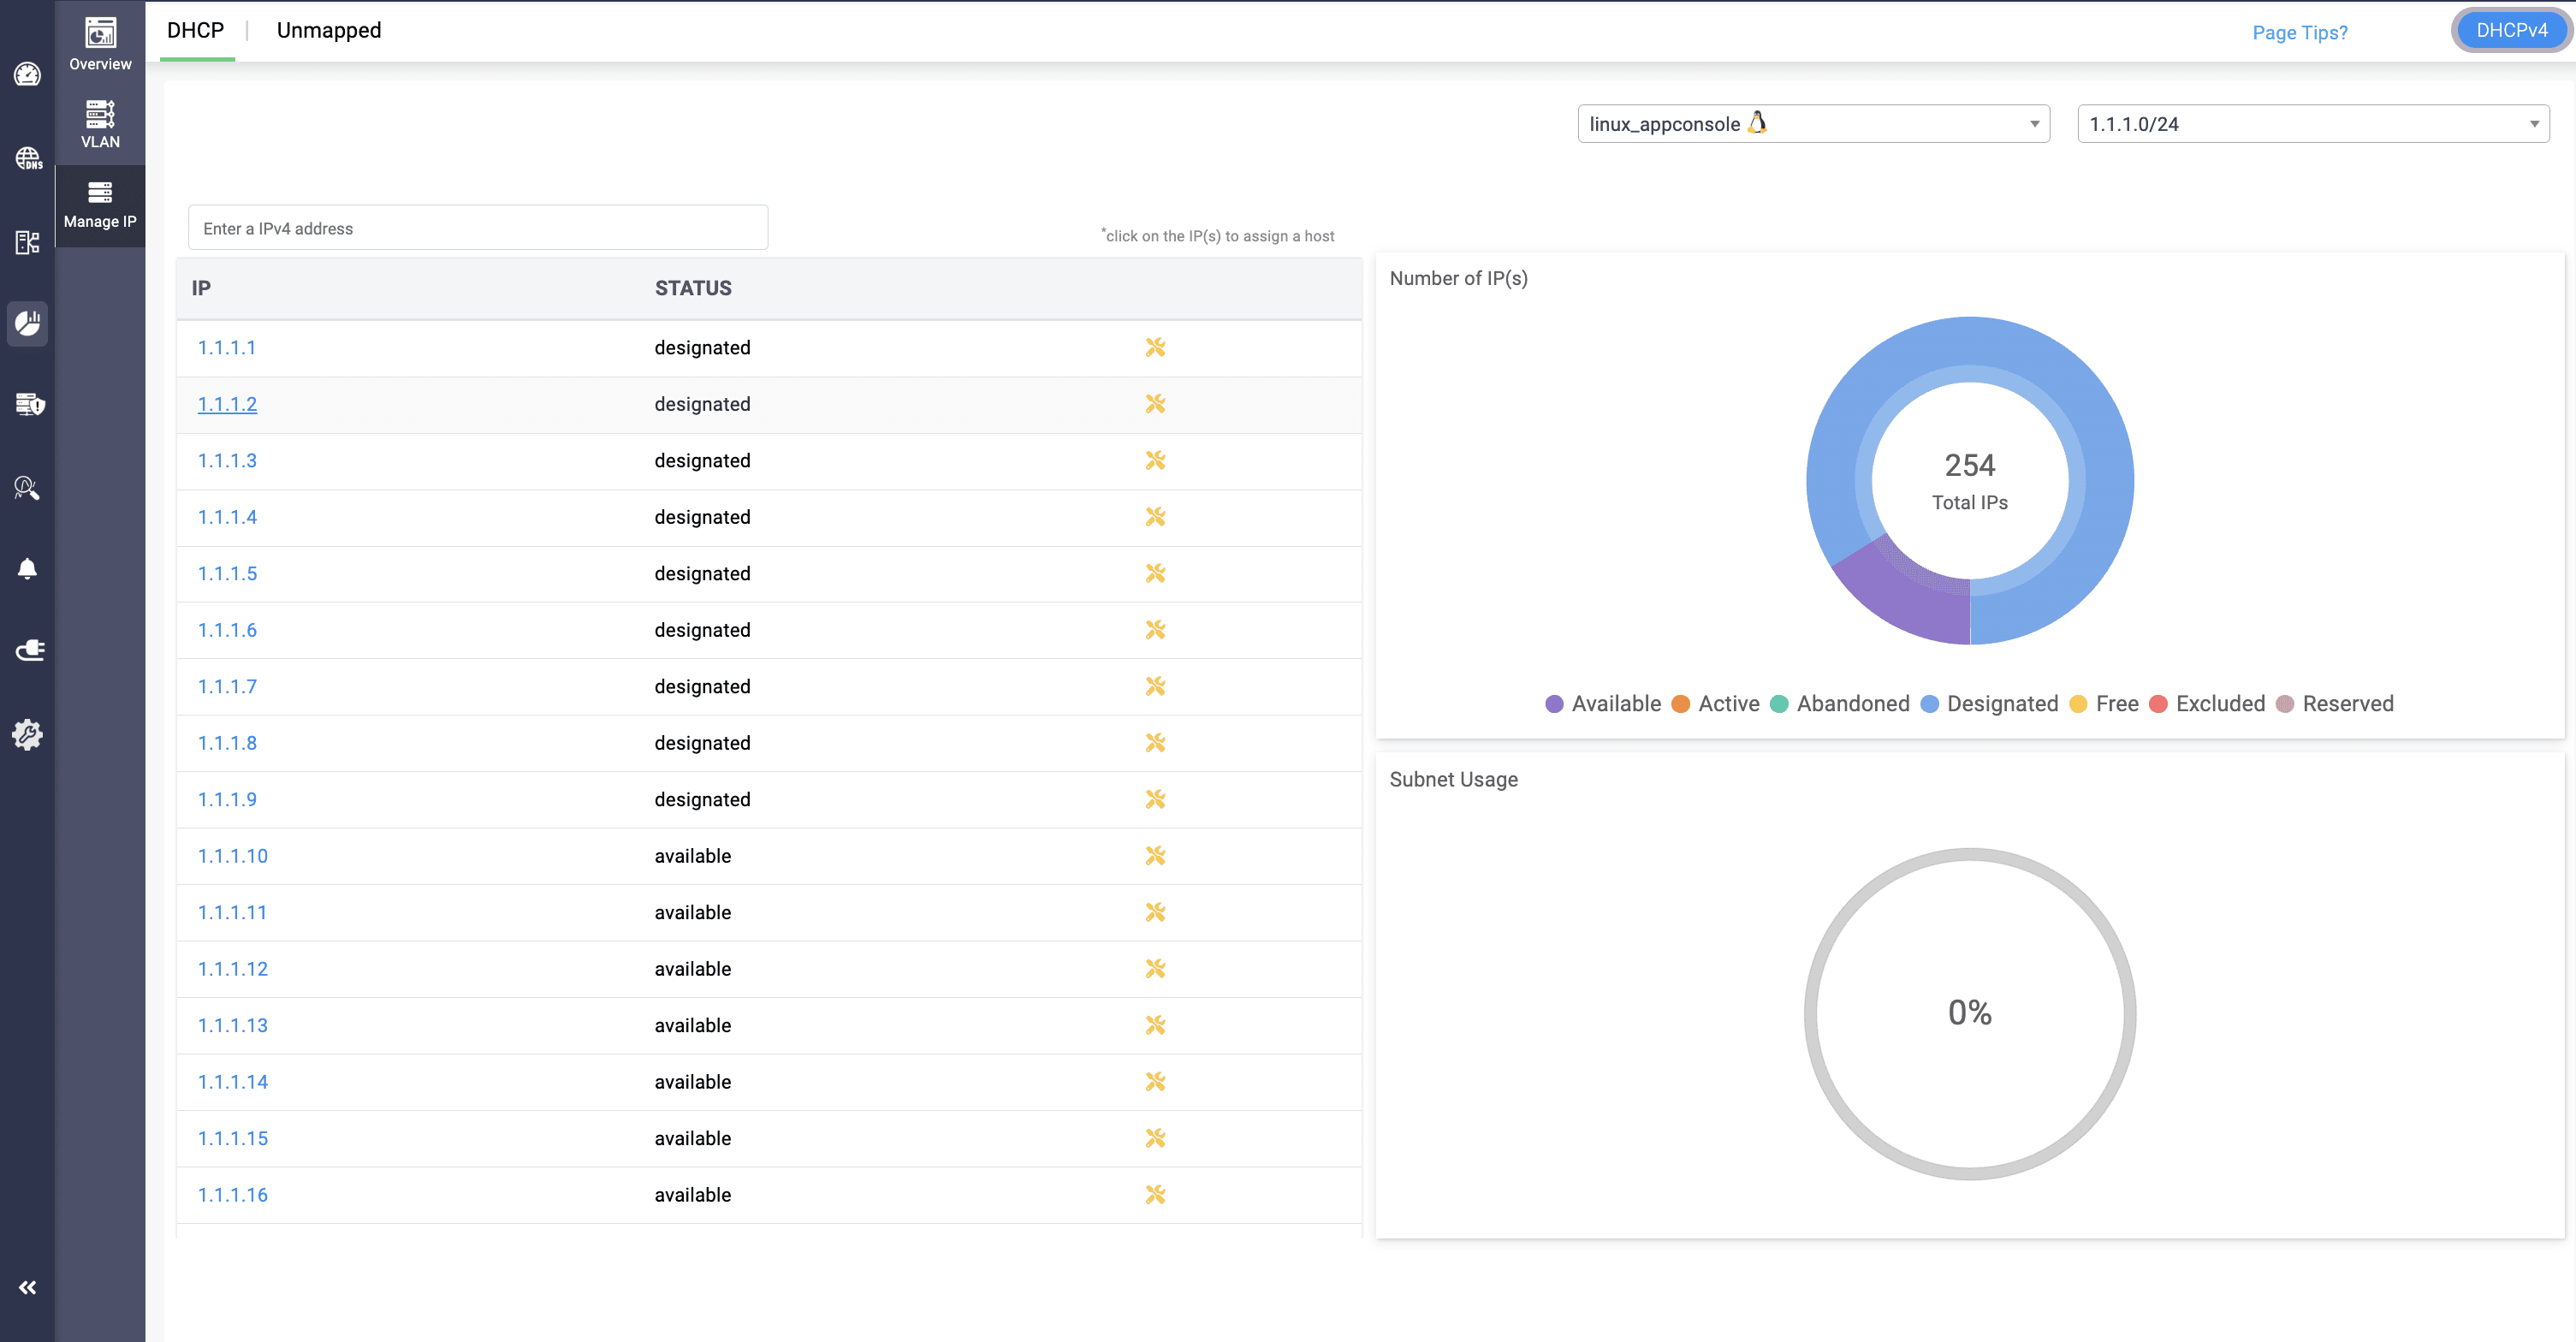
The Manage IP section is the deeper of the two. For any subnet, it shows the actual list of free, assignable addresses: Click one and you're dropped directly into the Host page to configure it.
Alongside that sits a doughnut breakdown of IP states, but the state list here is considerably richer than the VLAN view, including: Available, Active, Active Reservation, Inactive Reservation, Excluded, Declined, Designated, and Expired.
That's full life cycle visibility; enough to catch a reservation that never got claimed, a lease that expired but never got recycled, or a declined address before it causes a conflict, rather than finding out when a device fails to get an IP.
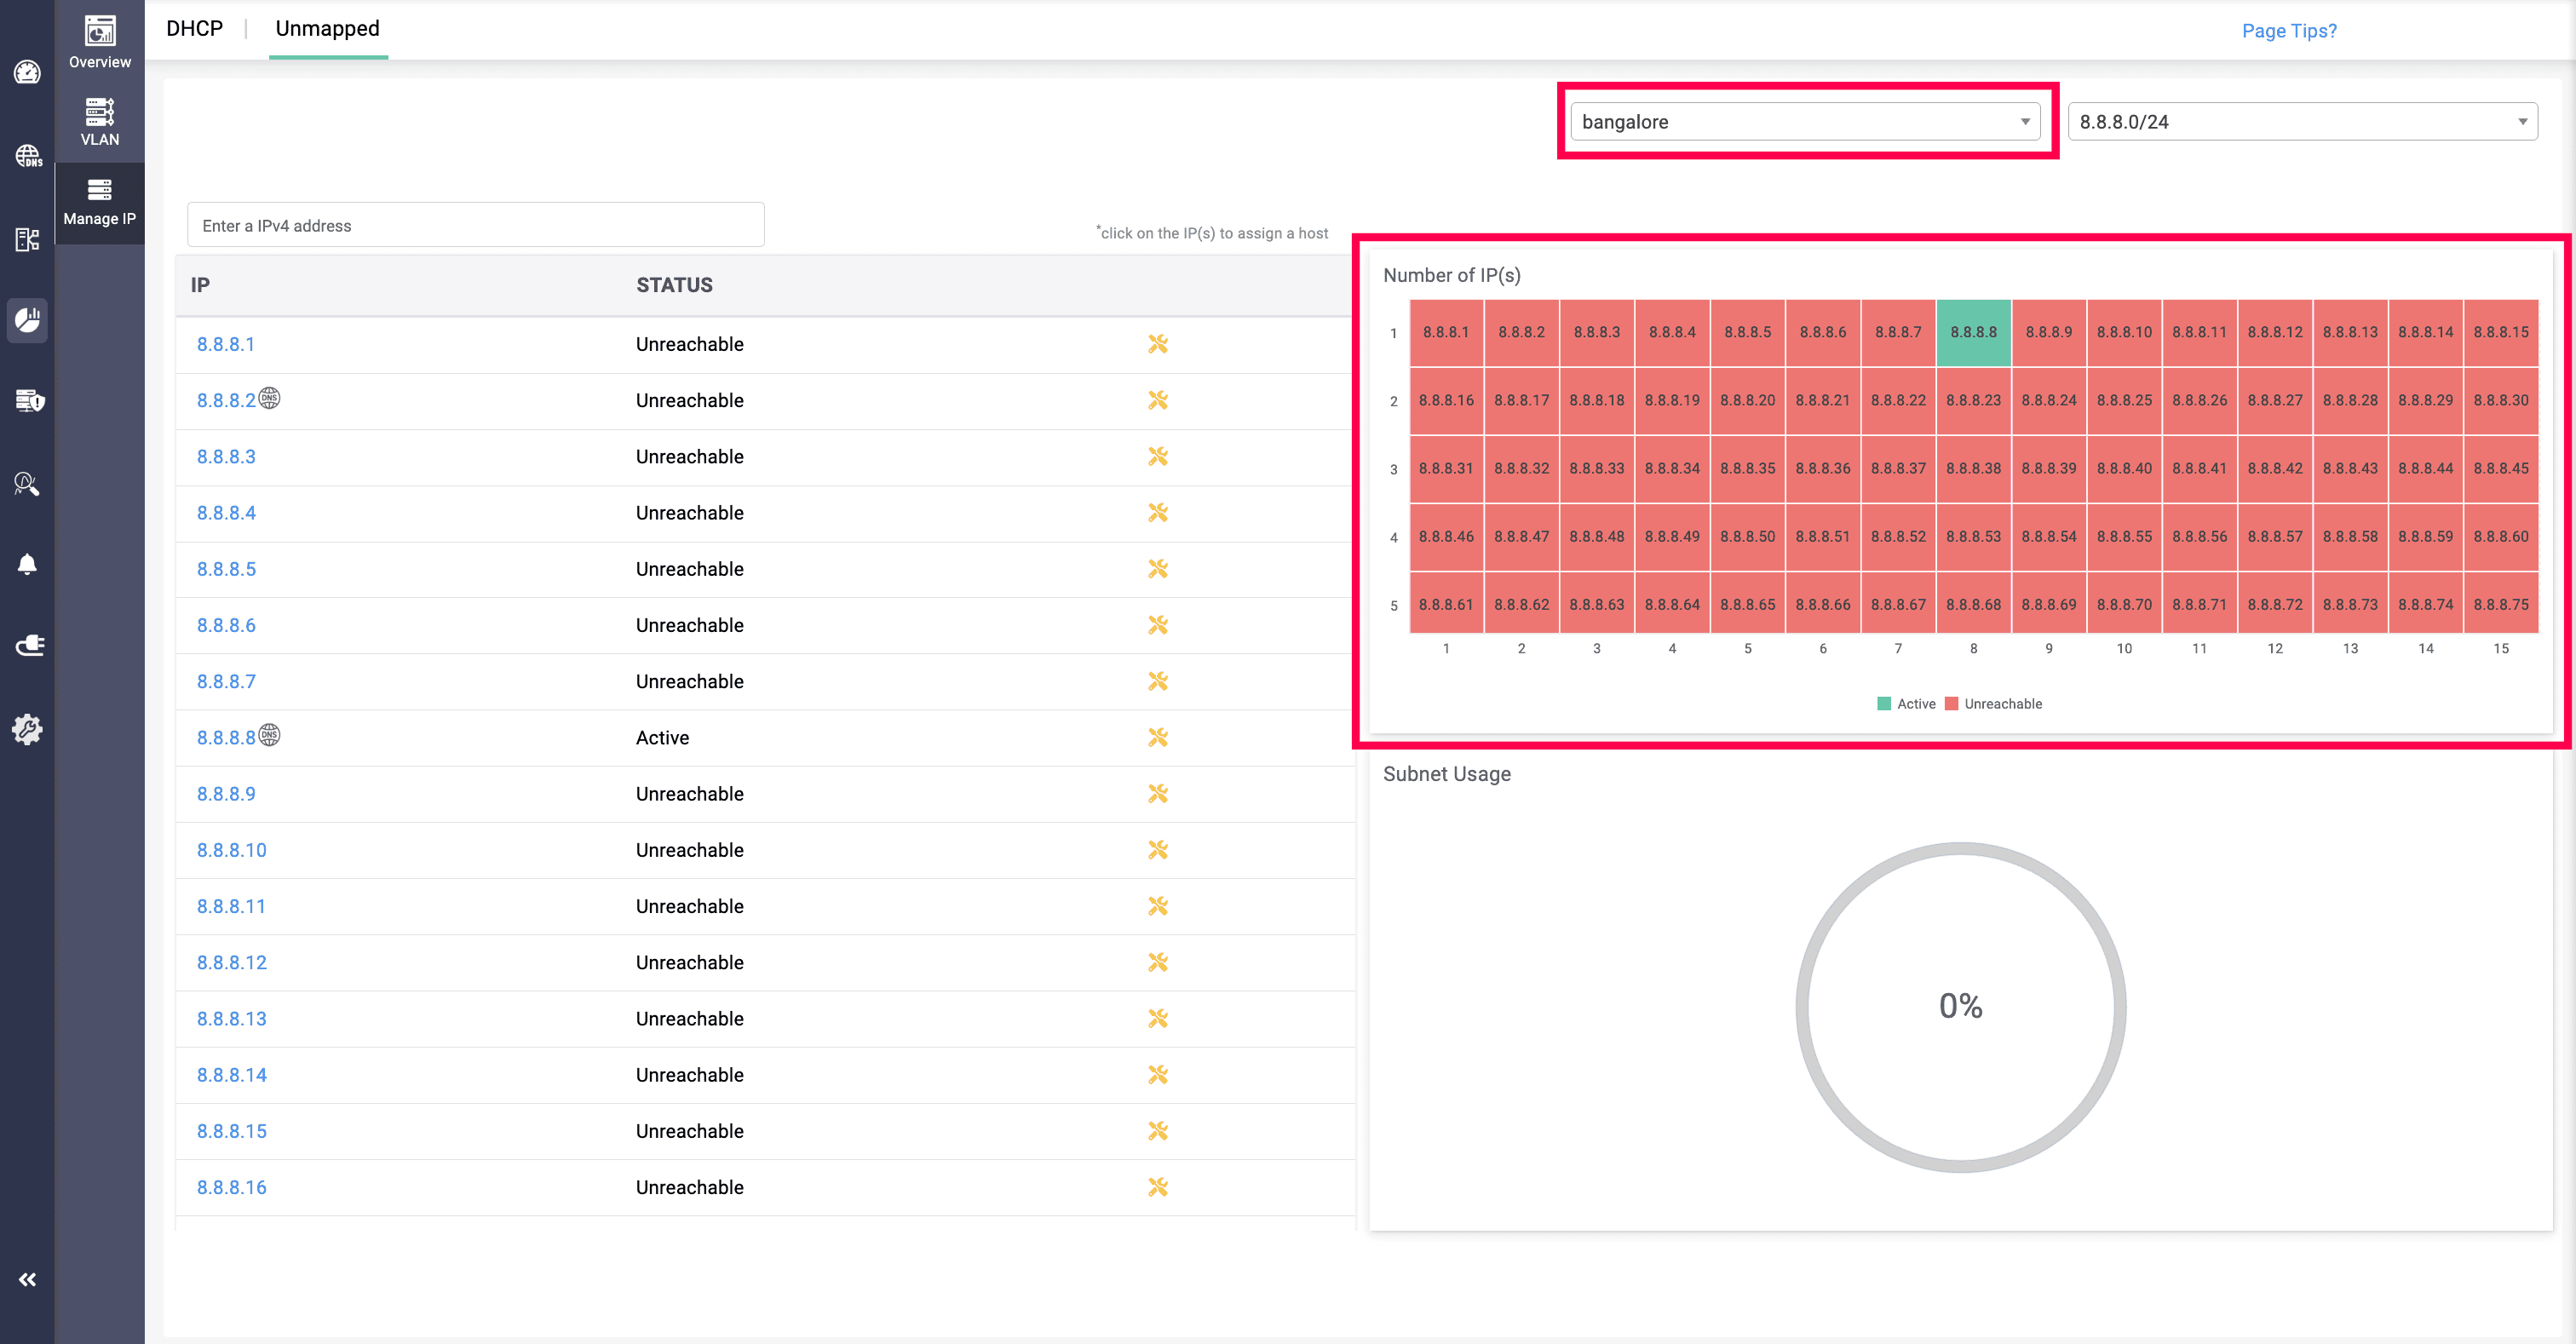
For subnets that exist on the network but were imported from outside DDI Central, the Unmapped tab adds a layer most spreadsheets can't touch: Inline Ping and Telnet checks per IP, plus a DNS relationship check, all rolled into a heat map showing active versus unreachable addresses at a glance.
Click a live-but-unmapped IP, and you're taken to Create Host to bind it to a device by MAC address formally. This turns shadow IT address space into managed inventory in a couple of clicks.
Closing the loop with DNS
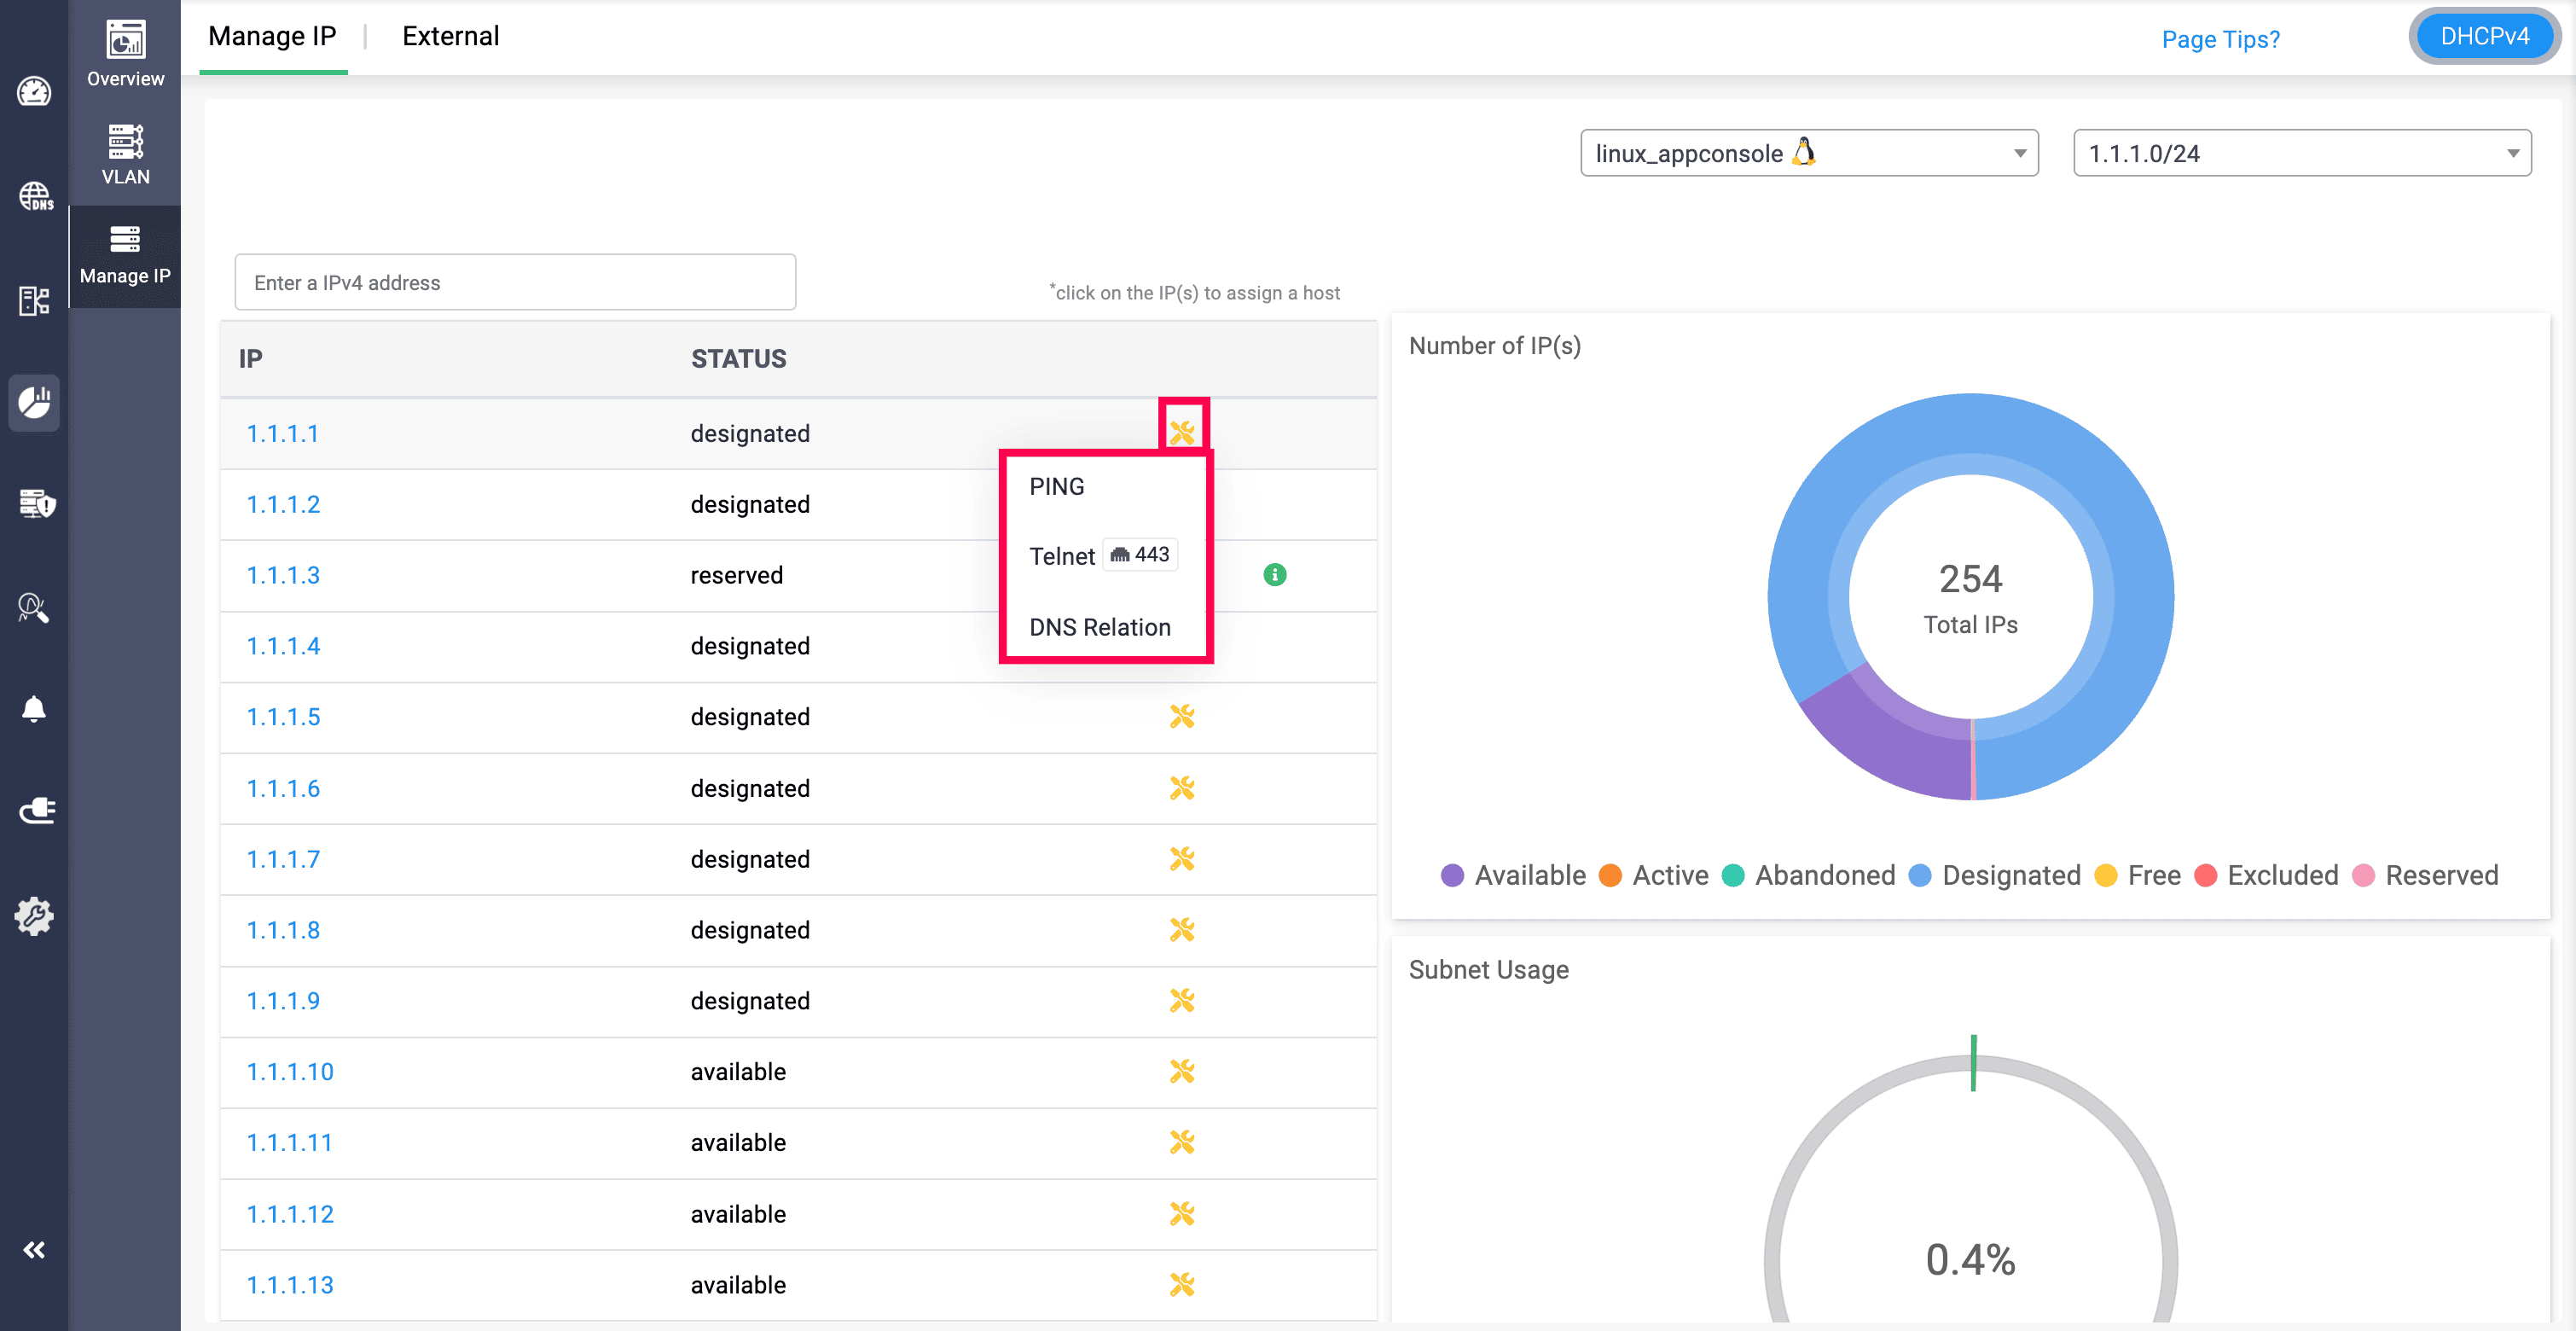
An IP address rarely means much on its own. It matters because of what it's attached to. In the Unmapped section of Manage IP, clicking an address's yellow icon opens Ping and Telnet checks alongside DNS Relation, which pulls up the IP/host's status, its associated domain, the record it's mapped to, and the DNS zone it belongs to, all in one table. No more manually cross-referencing an IP against your zones to confirm a PTR record exists.
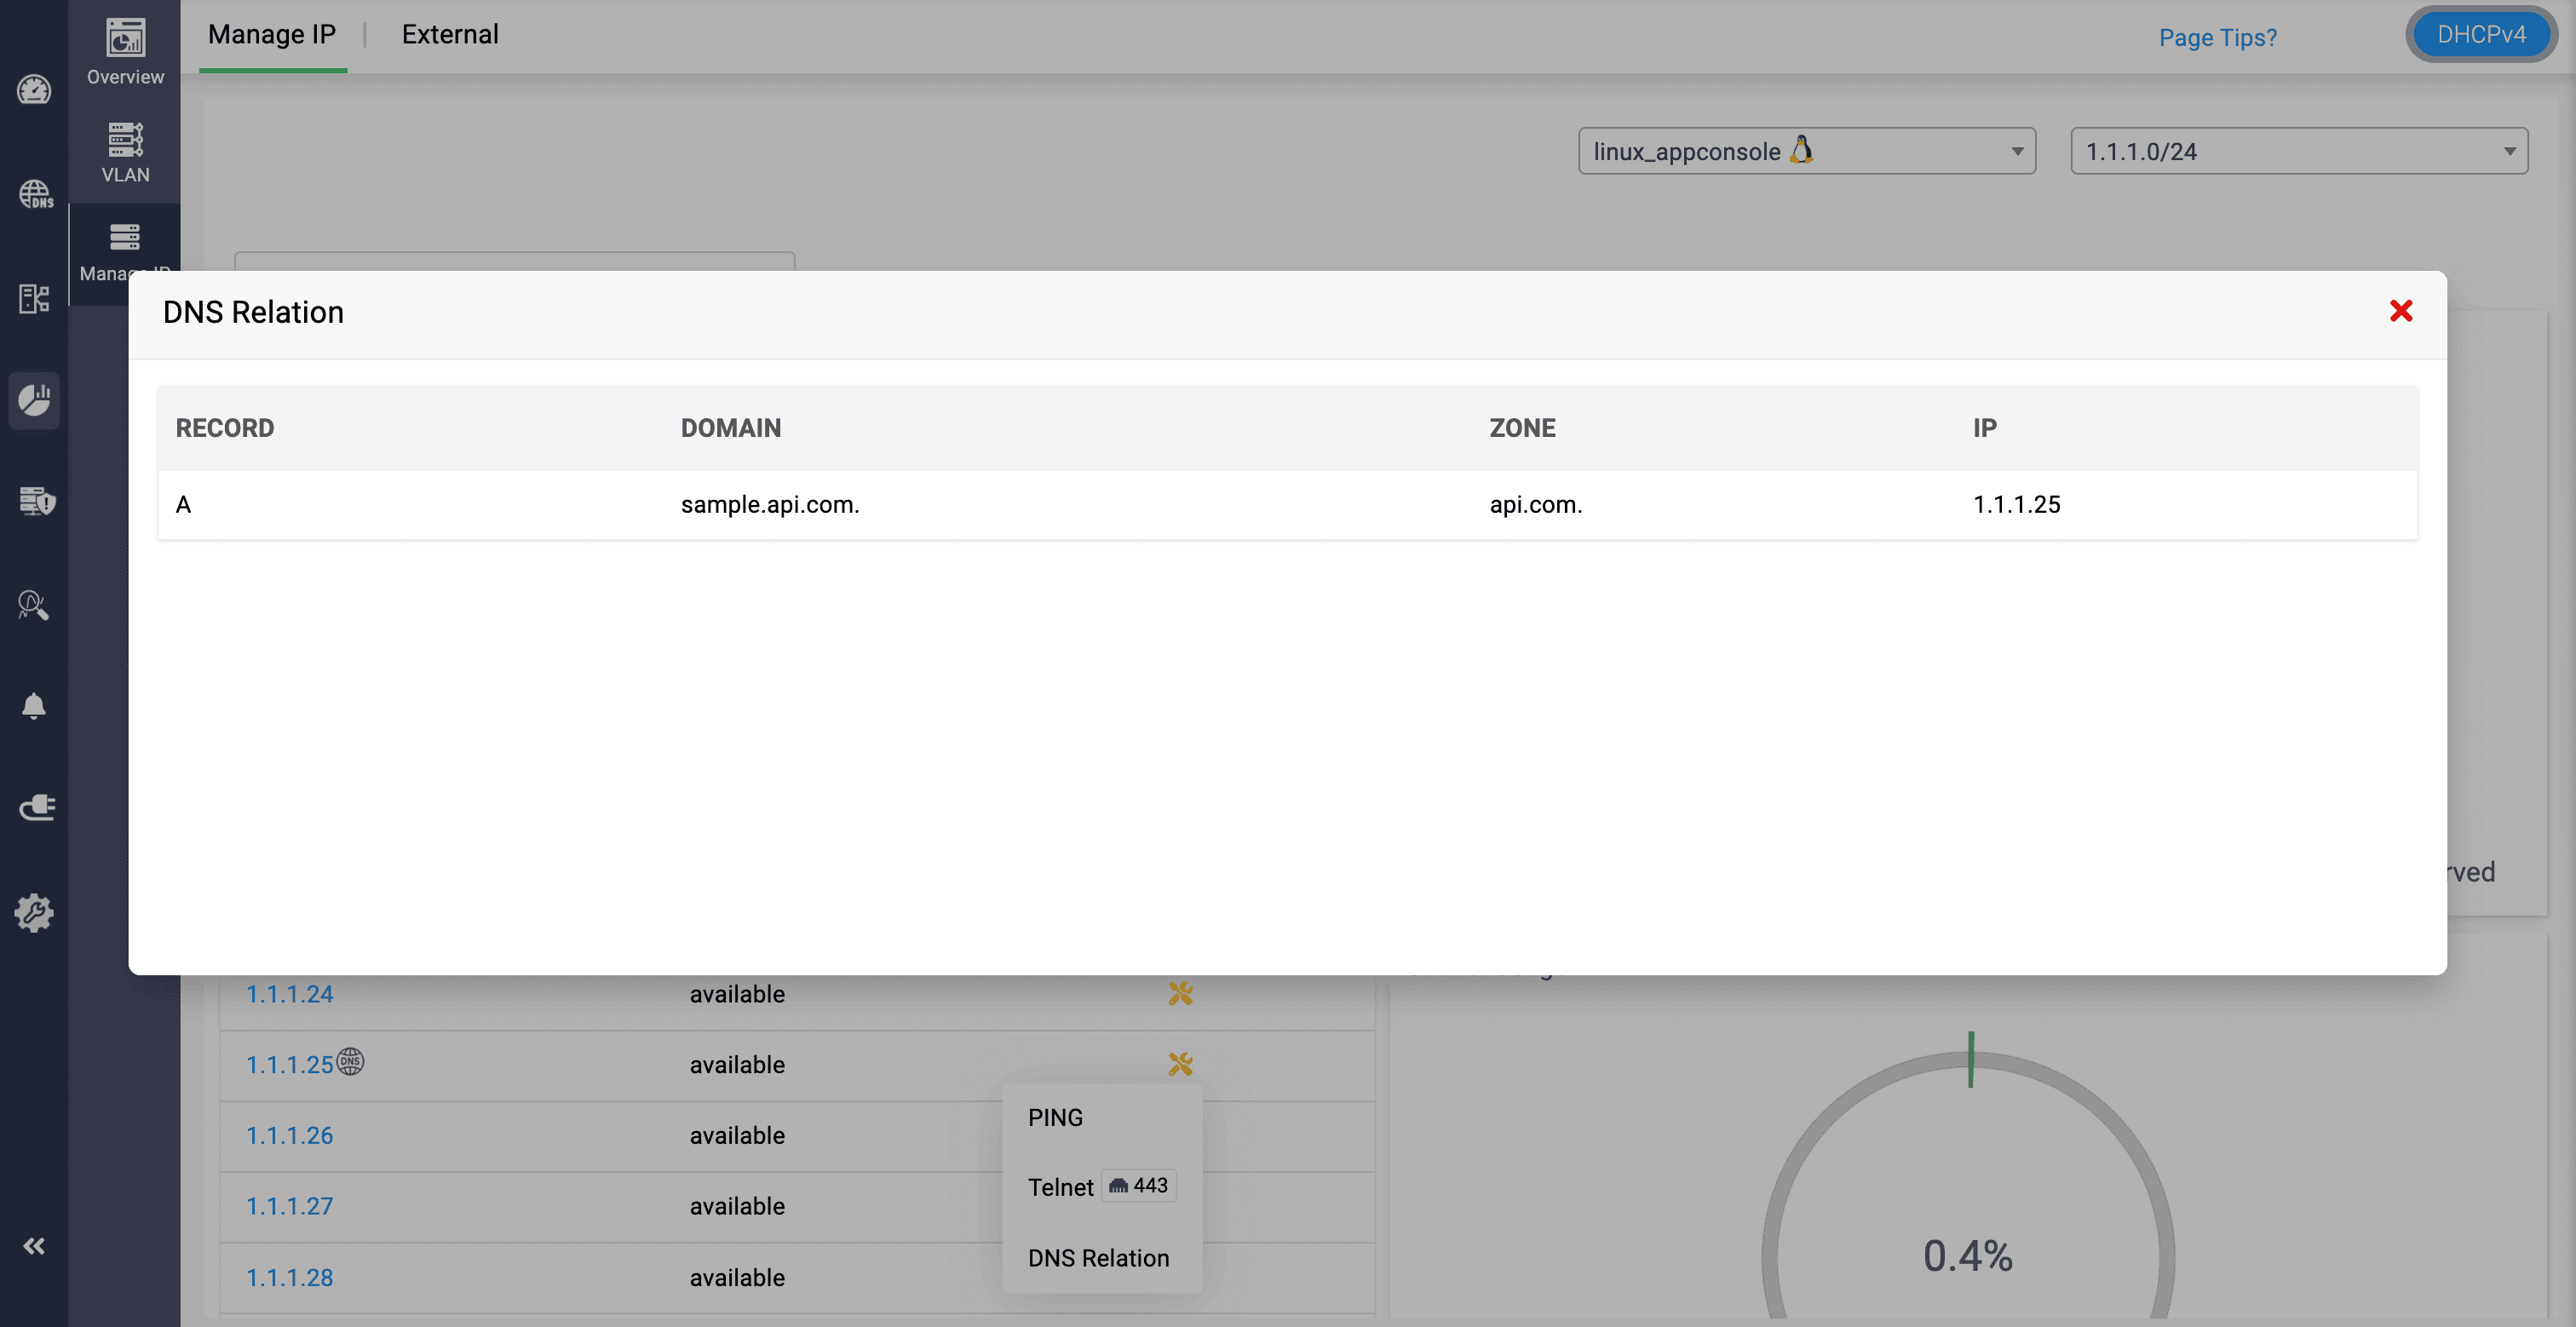
An entry only appears if a PTR record actually exists for that IP or host, and only zones from the IP's own cluster show up, even if it's also mapped in a zone elsewhere. Still, it's a small addition that turns IPAM from here's your inventory into here's how this address connects to the rest of your DNS infrastructure.
The bottom line
Most IP conflicts and outages don't come from a lack of effort; they come from a lack of visibility. DDI Central's IPAM turns a fragmented, spreadsheet-driven address plan into a single, navigable inventory: Zoom out to see the whole network by location, environment, or structure; zoom in to see exactly which address is doing what, and why.
Start your 30-day,free trial. or Book a personalized demo. and walk through DDI Central's IPAM to see how it fits your network.