Adding Resources
In PAM360, a resource is beyond just servers or applications. It represents any system, device, or service that holds accounts, credentials, or sensitive information requiring secure management. By consolidating all such resources into a single, encrypted repository, PAM360 enables administrators to centrally govern privileged accounts, enforce robust password policies, automate credential rotations, and provide controlled, audited access to critical assets.
Also, PAM360 is not limited to traditional IT infrastructure. Its capabilities extend to safeguarding a wide range of business-sensitive data, including:
- Digital certificates that secure communication channels
- Software license keys vital for compliance and audits
- Configuration files, executables, and operational documents containing business-critical details
- Scanned records or photocopies that must be preserved securely for the long term
Regardless of type, every item, whether it is a credential, certificate, or document, everything is treated as a resource within PAM360. Each resource is encrypted, controlled, and can be securely shared with authorized users or groups as needed.
To manage privileged account credentials and other sensitive data effectively, you begin by adding your endpoints as resources in PAM360 and associating the relevant accounts. By the end of this document, you will have a clear understanding of:
1. Adding a Resource
Caution
In PAM360, any resource you add is automatically visible to Super Administrators (if they are configured in your setup). For all other users, including administrators, the resource remains hidden until you explicitly share it with them.
Follow the below steps to add a resource manually in PAM360:
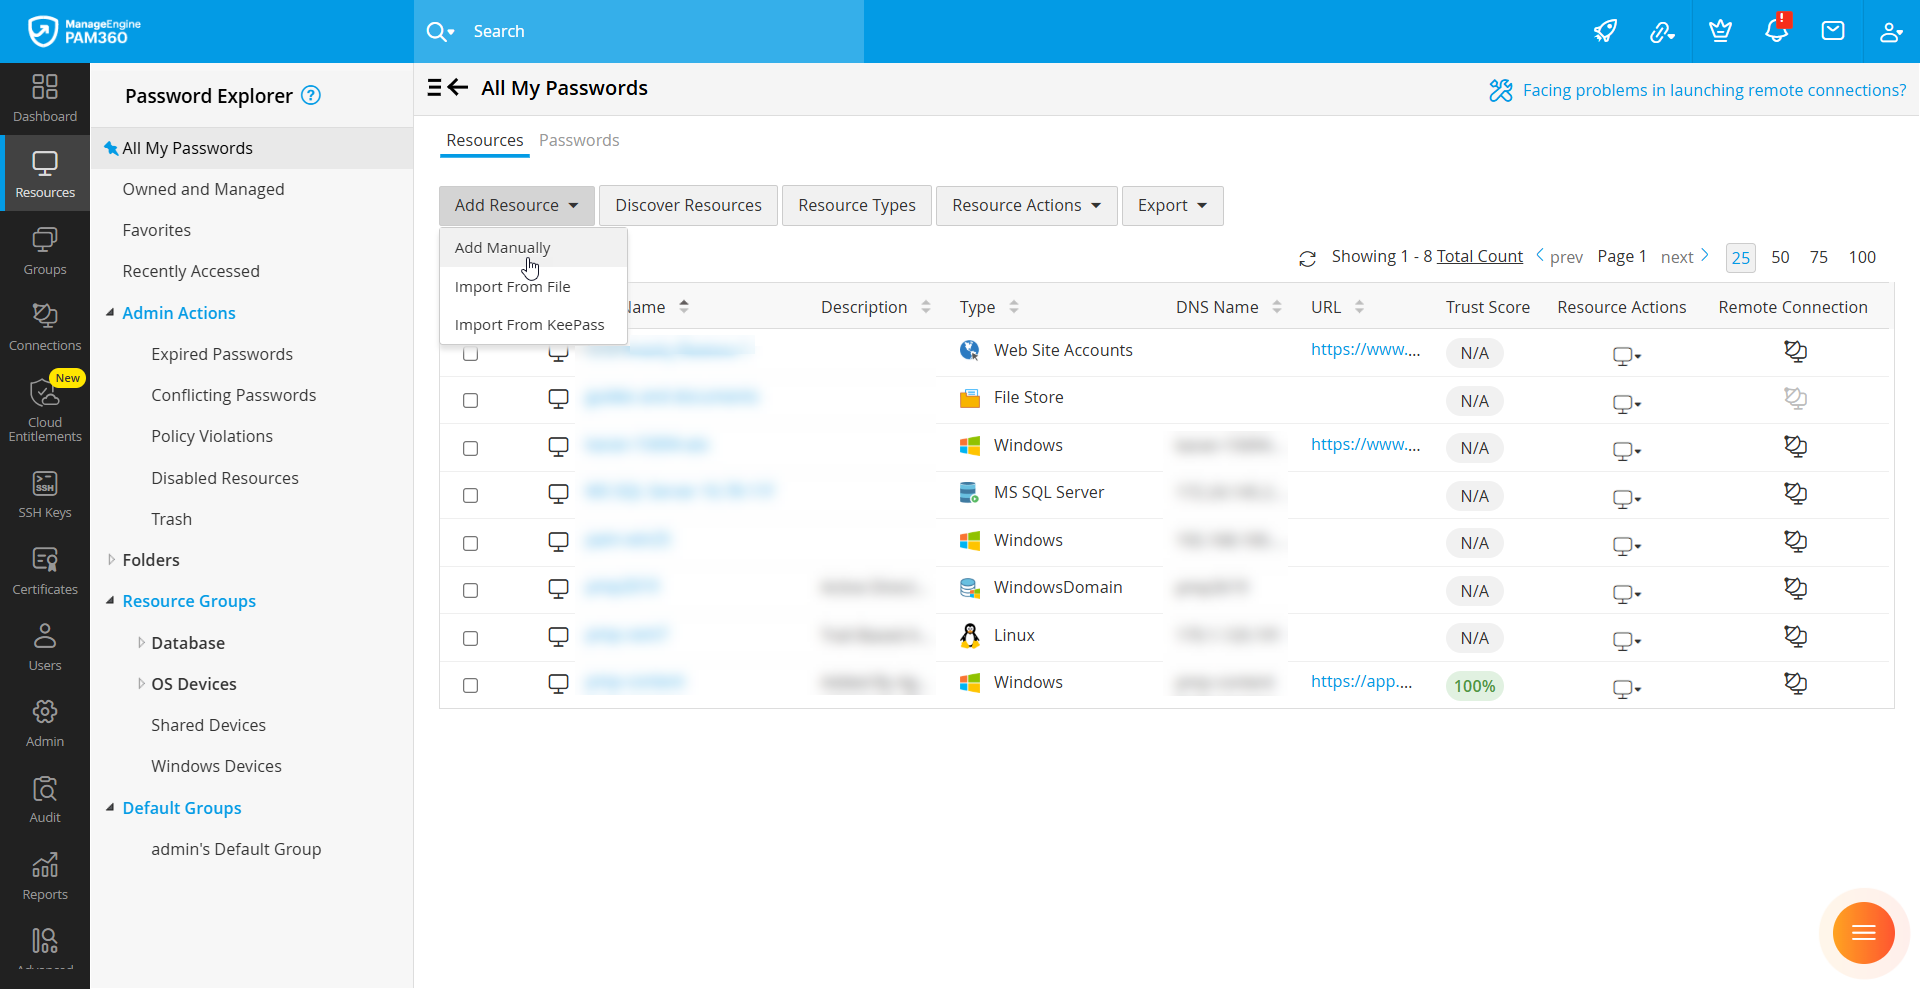
- Navigate to Resources >> Add Resource >> Add Manually.
- In the Add Resource window, fill in the required details:
- Resource Name: Enter a unique name that identifies the resource.
- DNS Name / IP Address: Specify the DNS name or IP address of the resource. This is mandatory to enable remote operations such as password reset, account discovery, and one-click login.
- Resource Type: Select the appropriate type of resource from the dropdown list. By default, Windows will be preselected. The fields displayed in the form will vary depending on the resource type you choose, since each type may require different details. If the required type is not listed, you can create a custom type (for example, a printer or an in-house application). To do this, click Add New, enter the name of the custom type, and save it. The newly created type will then appear in the dropdown for future use. For a complete list of supported resource types in PAM360 and their specific use cases, refer to the Resource Types Documentation.
- Application Gateway: If you wish to manage this resource via an Application Gateway, click the drop-down button beside the Application Gateway field and select the desired Application Gateway from the displayed list to which you wish to associate this resource.
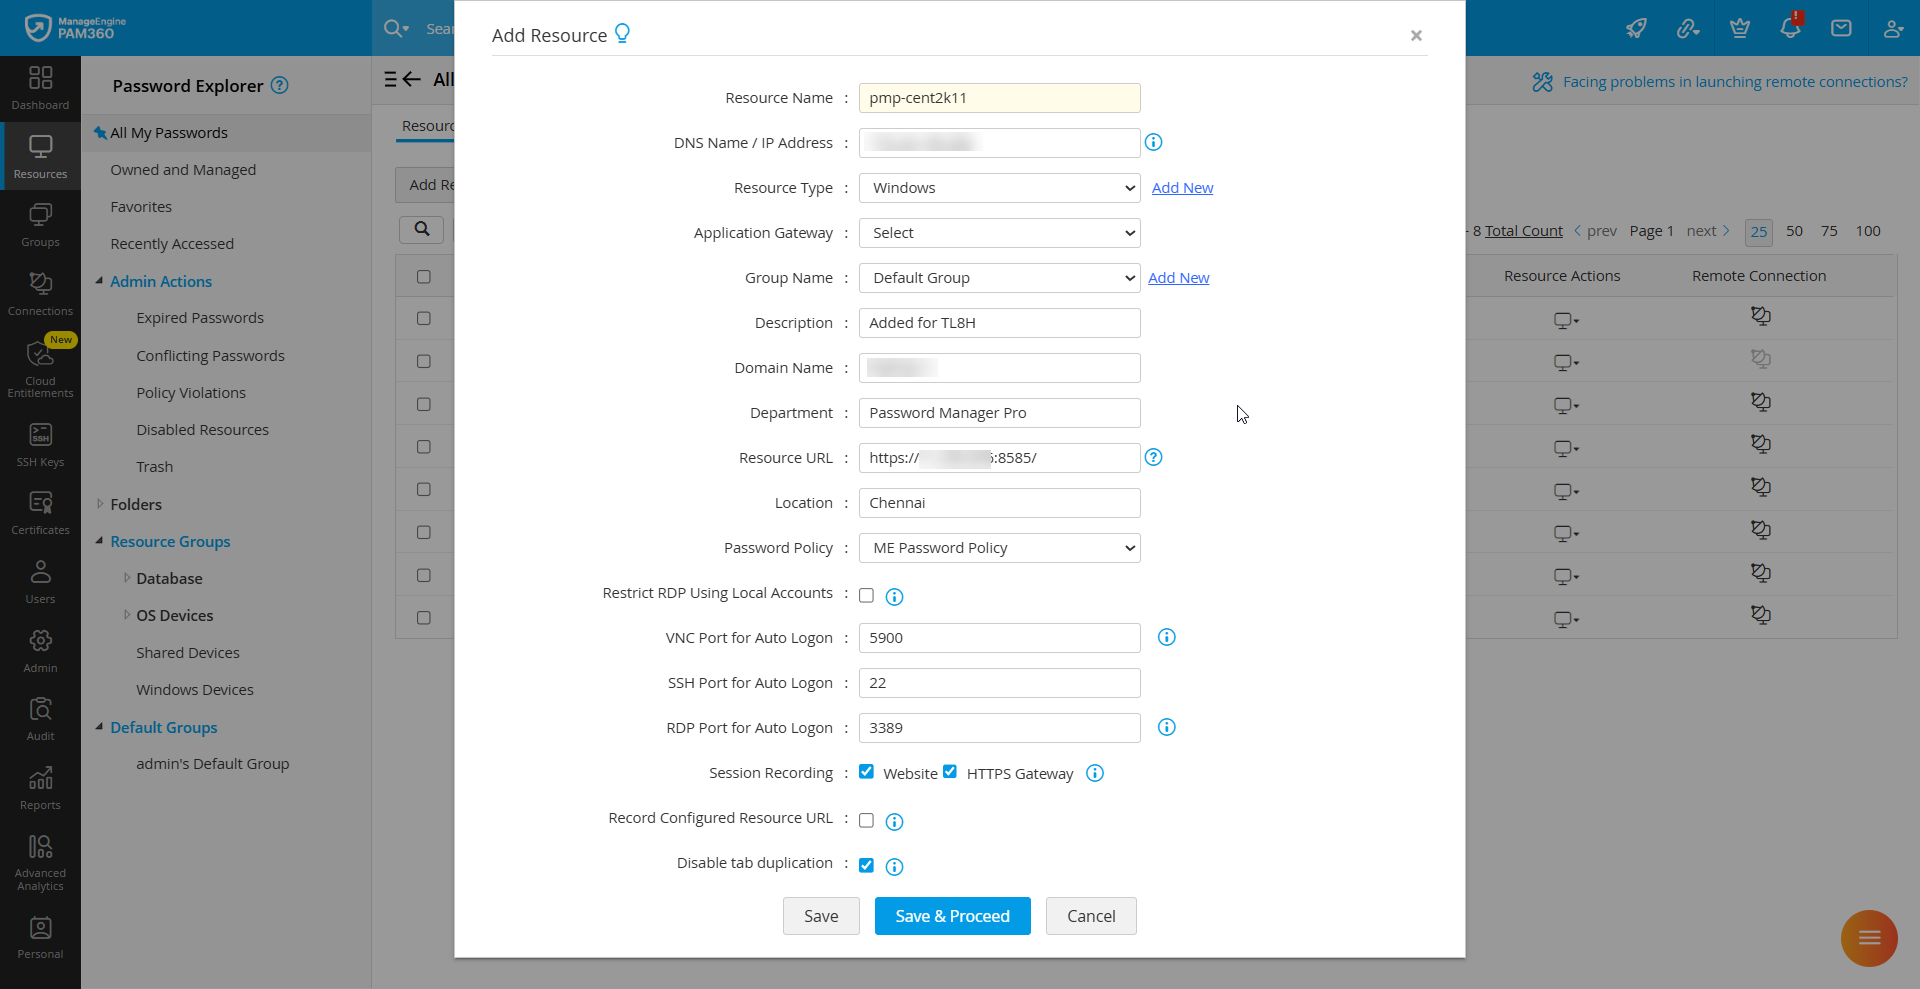
- Group Name: Add the resource to an existing resource group (e.g., Windows Servers, Linux Servers) or create a new one. If no group is specified, the resource will be added to the Default Group.
- Description, Department, and Location: These fields are optional, but filling them in with accurate values makes it easier to search, filter, and group resources later.
- Resource URL: If you are adding a web application or website, specify the full HTTPS URL (for example, https://sso.godaddy.com) and set the Resource Type as Web Site Accounts. This URL will be used by the PAM360 browser extensions (Chrome, Firefox, Edge) for the auto-fill and auto logon features.
Caution
For all resource types that support URLs, ensure you enter a valid HTTPS-based URL. This URL will also be used to establish connections via the HTTPS Gateway Connection method (if configured by the administrator).
- Password Policy: Select the required password policy from the dropdown. Any passwords randomly generated by PAM360 for accounts under this resource will automatically comply with the selected policy.
- Session Recording (Build 7400 and above): PAM360 provides options to record website sessions and HTTPS gateway sessions launched using configured resource URLs. To enable this, check the boxes next to Website and HTTPS Gateway under the Session Recording field.
Caution
Recording works only if the user has an active PAM360 browser extension installed and initiates the session using auto logon or auto-fill from the extension.
When connection recording is enabled, two additional options appear:- Disable Tab Duplication: Enable this option to prevent users from opening multiple tabs for the same configured URL (whether duplicated from an existing tab or launched separately). If this is not enabled, only the original session tab initiated from PAM360 will be recorded. Any duplicated tabs will not be recorded.
- Record Configured Resource URL: Enable this checkbox to record all the sessions launched using the configured URLs. The sessions include those launched without the PAM360 extension auto logon or auto-fill capability, duplicated sessions, and sessions launched directly in the browser without the PAM360 web console.
- Resource Name: Enter a unique name that identifies the resource.
- Once done, click Save to add the resource. To immediately proceed with adding an account, click Save & Proceed.
Additional Details
- When adding AWS Active Directory resources, select the Resource Type as WindowsDomain. To simplify management, you can also configure automatic discovery of Amazon WorkSpaces virtual machines. Click here for details.
- When adding a domain controller with the resource type Windows or WindowsDomain, enter the domain name in NETBIOS format in the Domain Name field (required for Windows Service Account Reset).
2. Adding an Account to a Resource
After creating a resource, you can manually add user accounts with it or discover accounts in it. Accounts may be added during resource creation or any time afterward using the Add Accounts option. Follow the below steps to add an account manually in a resource:
Additional Detail
The account discovery procedure is documented separately. Refer to this documentation for detailed instructions on discovering the privileged accounts in a resource.
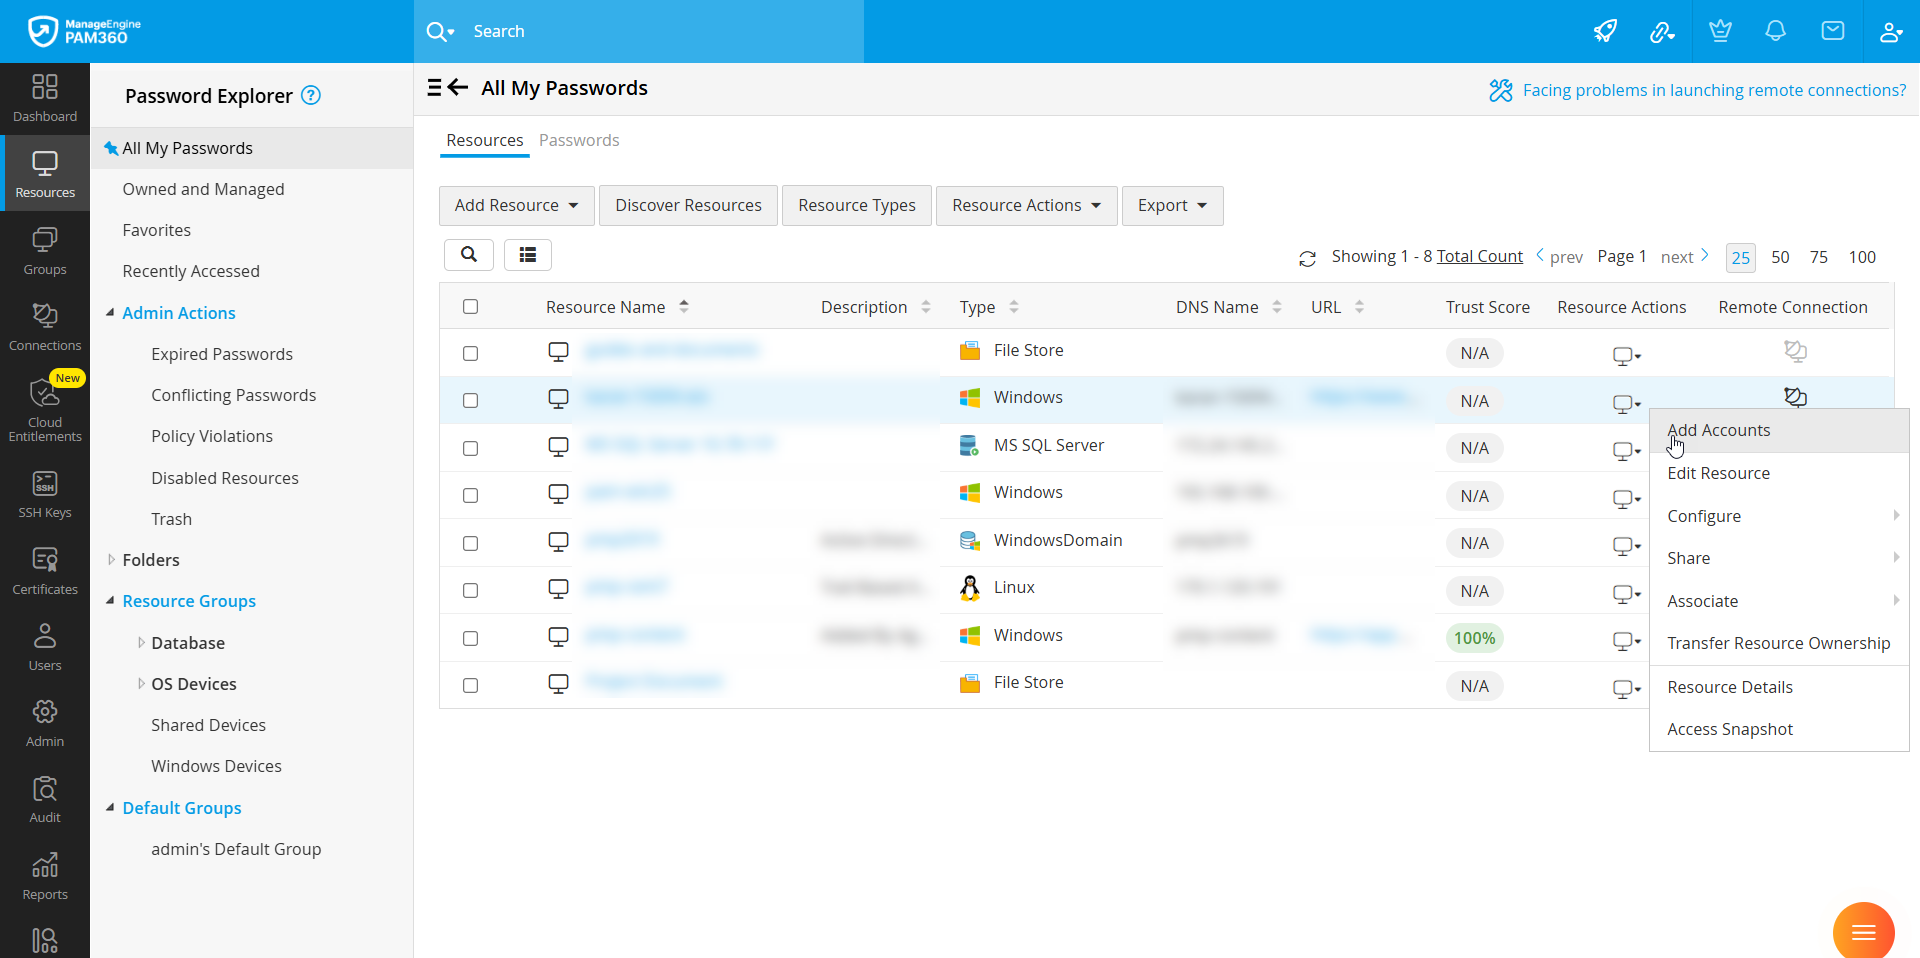
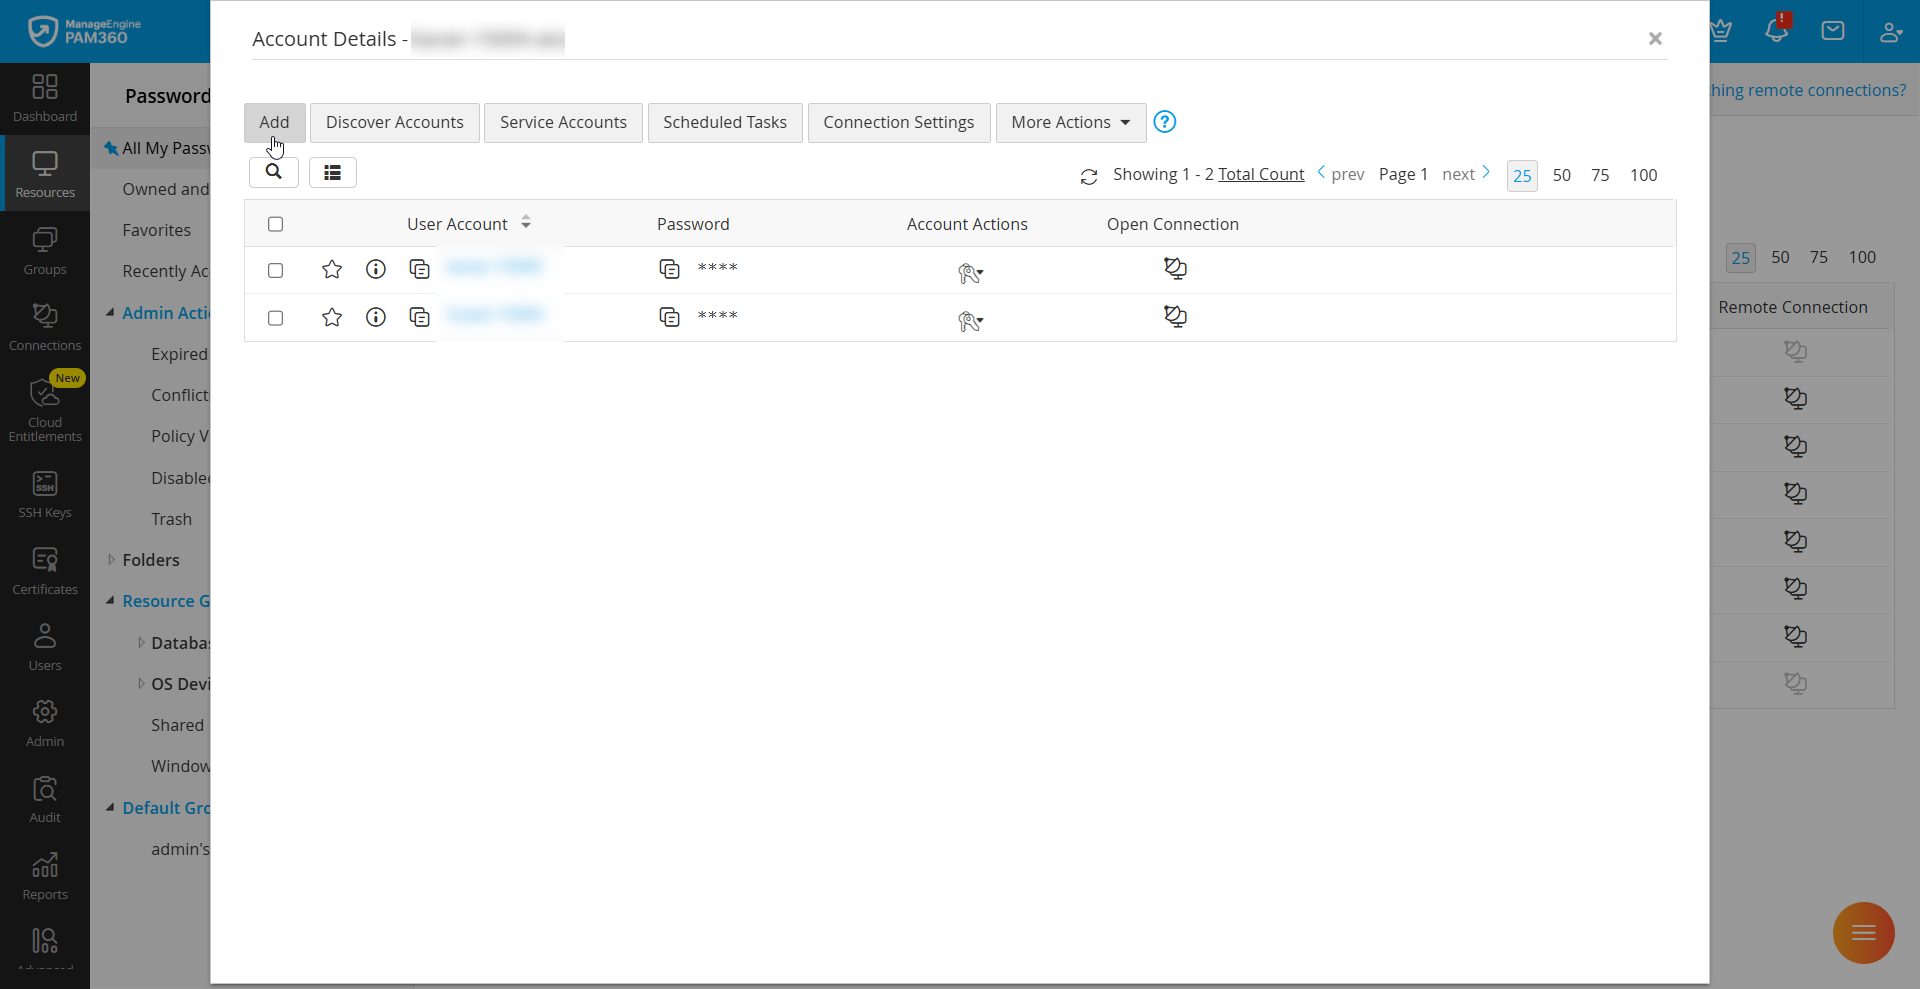
- From the Resources tab, select Add Accounts under Resource Actions next to the required resource. Alternatively, click the resource name and then use the Add button at the top of the Account Details window to add a new account.
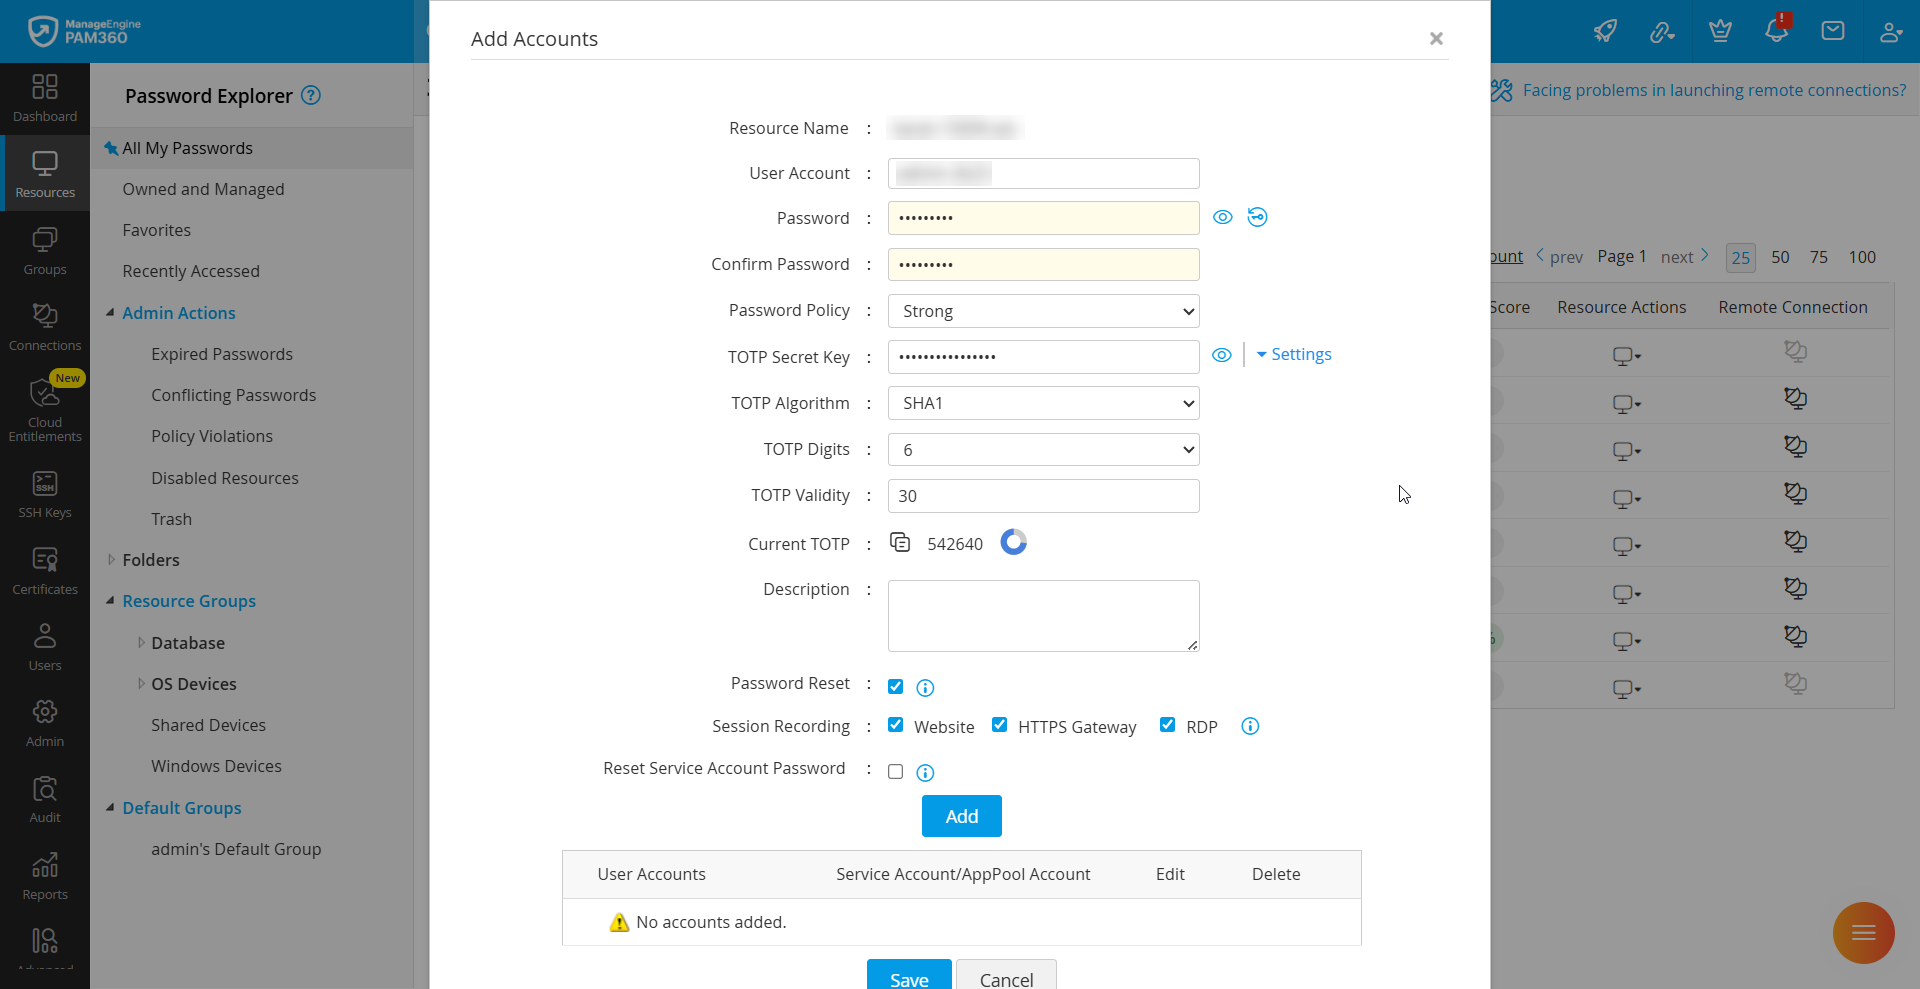
- On the Add Accounts form that apperas, specify the following information about the account:
- User Account: Enter the name of the account to be added and managed via PAM360.
- Password: Enter the password of the account manually if you know it, or generate a password using the Generate Password tool beside this field. If you are entering the password manually, it should be in compliance with the password policy that you had set for the resource.
Caution
To enable password reset in remote systems, ensure that the passwords you enter in this step and the ones in the actual target systems are the same. PAM360 uses these credentials to log in to the target systems for resetting the password, and if the passwords are wrong, the password reset will not happen. Also, the users will not be able to attain remote connections to the resources with an incorrect account password.
- Password Policy: Choose the required password policy for the account - Strong, Medium, or Low. The password policy is maintained at resource level and account level, and the account level policy can override the value of the resource level password policy. Click here to learn more about the default password policies and creating custom password policies.
- TOTP Secret Key: If the account (particularly web accounts) is enabled with TOTP as the Two-Factor Authentication (2FA), input the TOTP Secret Key. This allows the users to directly access the account through the PAM360 interface, streamlining the generation of TOTP one-time codes alongside with shared passwords.
By default, the account configured with TOTP as the 2FA supports the SHA1 Algorithm, 6-digit TOTP codes, and a validity of 30 seconds. If the account supports a different set of parameters for TOTP codes, please select the appropriate TOTP Algorithm and TOTP Digits and enter the TOTP Validity in seconds by clicking upon the Settings dropdown beside the TOTP Secret Key field.Caution
If the TOTP Algorithm, TOTP Digits, and TOTP validity differ between the account and the values entered here, the authentication mechanism will not work as expected due to the generation of incorrect one-time codes. Also, once configured, the TOTP secret key cannot be retrieved again for the account. Therefore, exercise caution to ensure that the values entered or selected here match those values supported by the account.
- Description: Include specific details about the account in thedescription field, as this field is also indexed by PAM360's search tool, making it easier to locate the account when you search for it.
- SSH Key: To import an SSH key and associate it with this account, click Browse and add a .key file. Enter the Private Key Name and Private Key Password in the next fields.
- Use Private Key for Login: Select this checkboxto authorize remote connections using SSH keys instead of account credentials. Click here to know more about remote connection using SSH keys.
- Map Private Key in PAM360: Select this checkbox to force map SSH keys to user accounts, even if the target systems are not reachable.
- Password Reset: Enable this checkbox to reset the password of the account in the remotly upon adding the account in PAM360.
- Connection Recording (Build 7400 and above): Enable the Website and HTTPS Gateway checkboxes beside to record all the website and HTTPS gateway sessions launched using the configured URL using this account's credential.
Additional Detail
The Website and HTTPS Gateway checkboxes will be available on the Add Accounts window only if the Resource URL field is configured with a valid URL.
- Click Save to add and list this account under the User Account column on the same page. You can add any number of accounts under a particular resource by following the above steps; all the accounts will be listed below the User Accounts table.
Performing the above steps will add the required user accounts and passwords to the resource. Users who are authorized to access the resource will be able to view the information.
3. Storing Files and Other Sensitive Data
As mentioned-above in the overview, apart from user accounts, PAM360 allows you to securely store other sensitive data in the repository, such as:
- Digital certificates
- Software license keys
- Executable or document files
- Images or photocopies
The resource type File Store is used for documents, images, executables, and other digital content, Key Store is used for software or encryption keys, and License Store is used for software license keys.
To securely store such data in PAM360, follow these steps:
- Navigate to Resources >> Add Resource >> Add Manually.
- Enter a Resource Name and select the Resource Type as File Store, Key Store, or License Store.
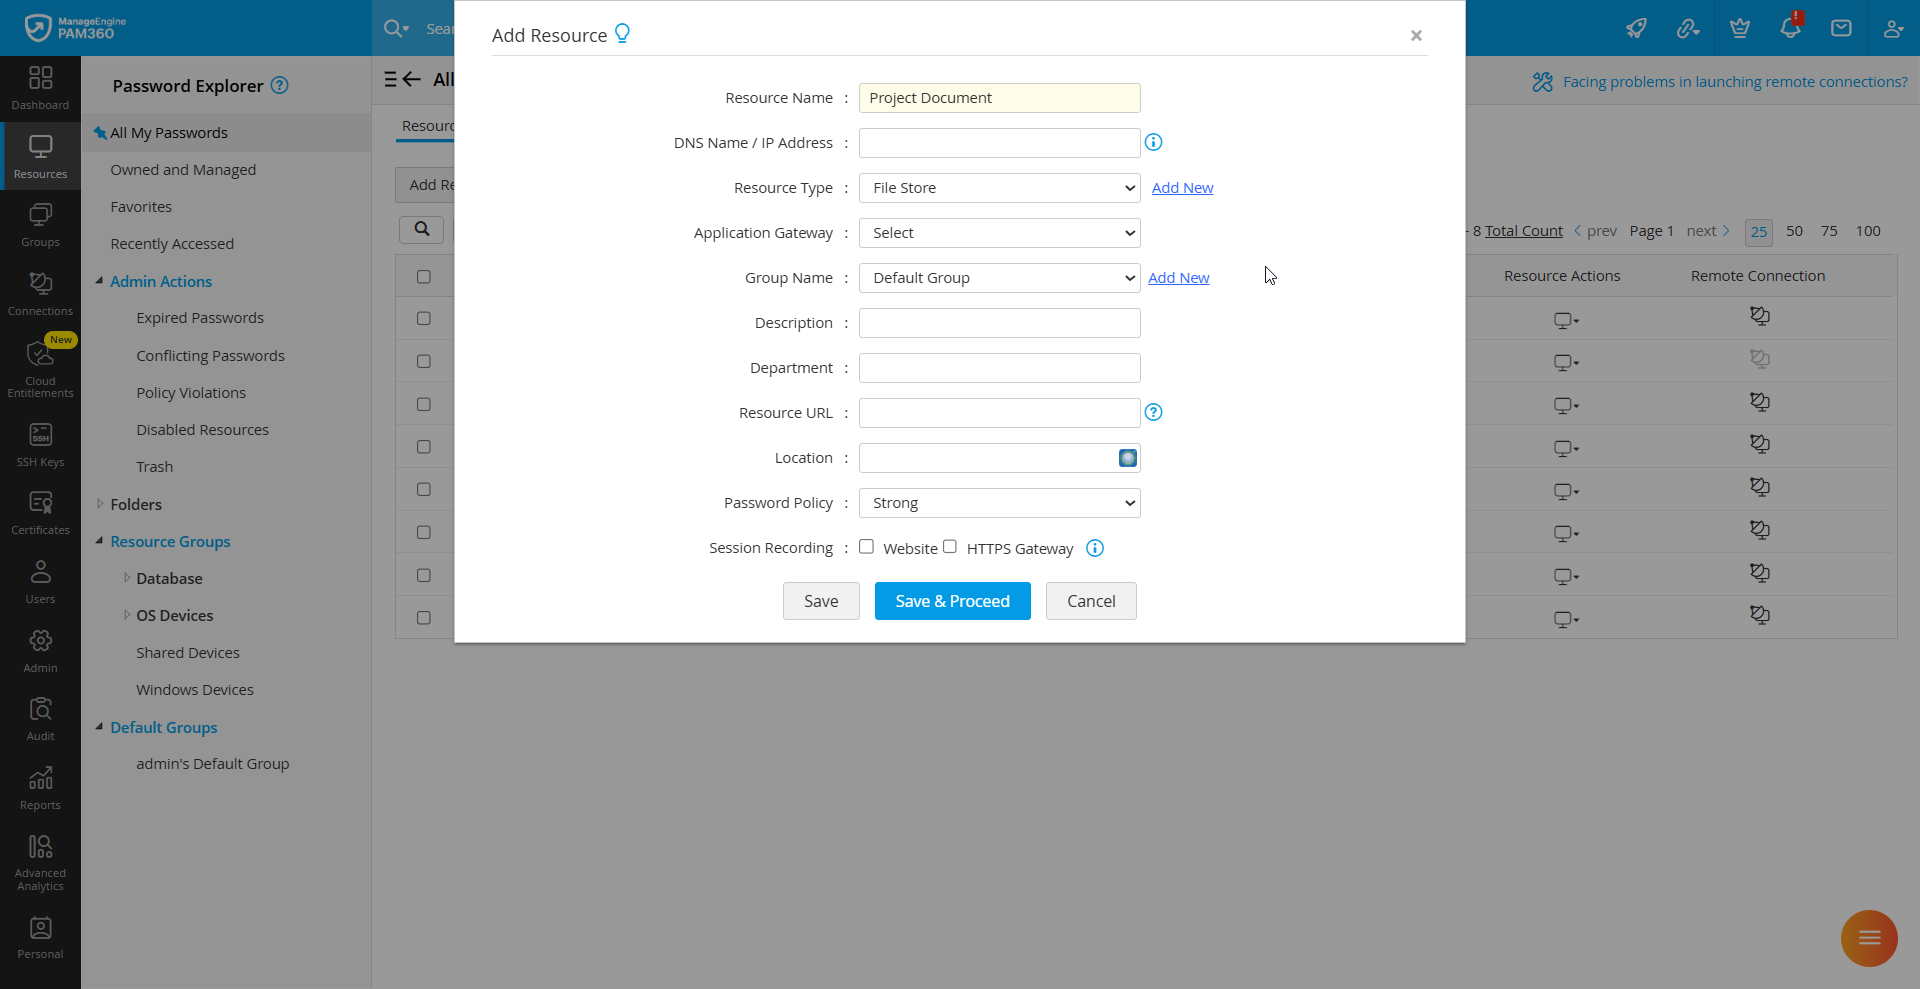
- Fill in fields such as Description, Department, and Location for better search and grouping.
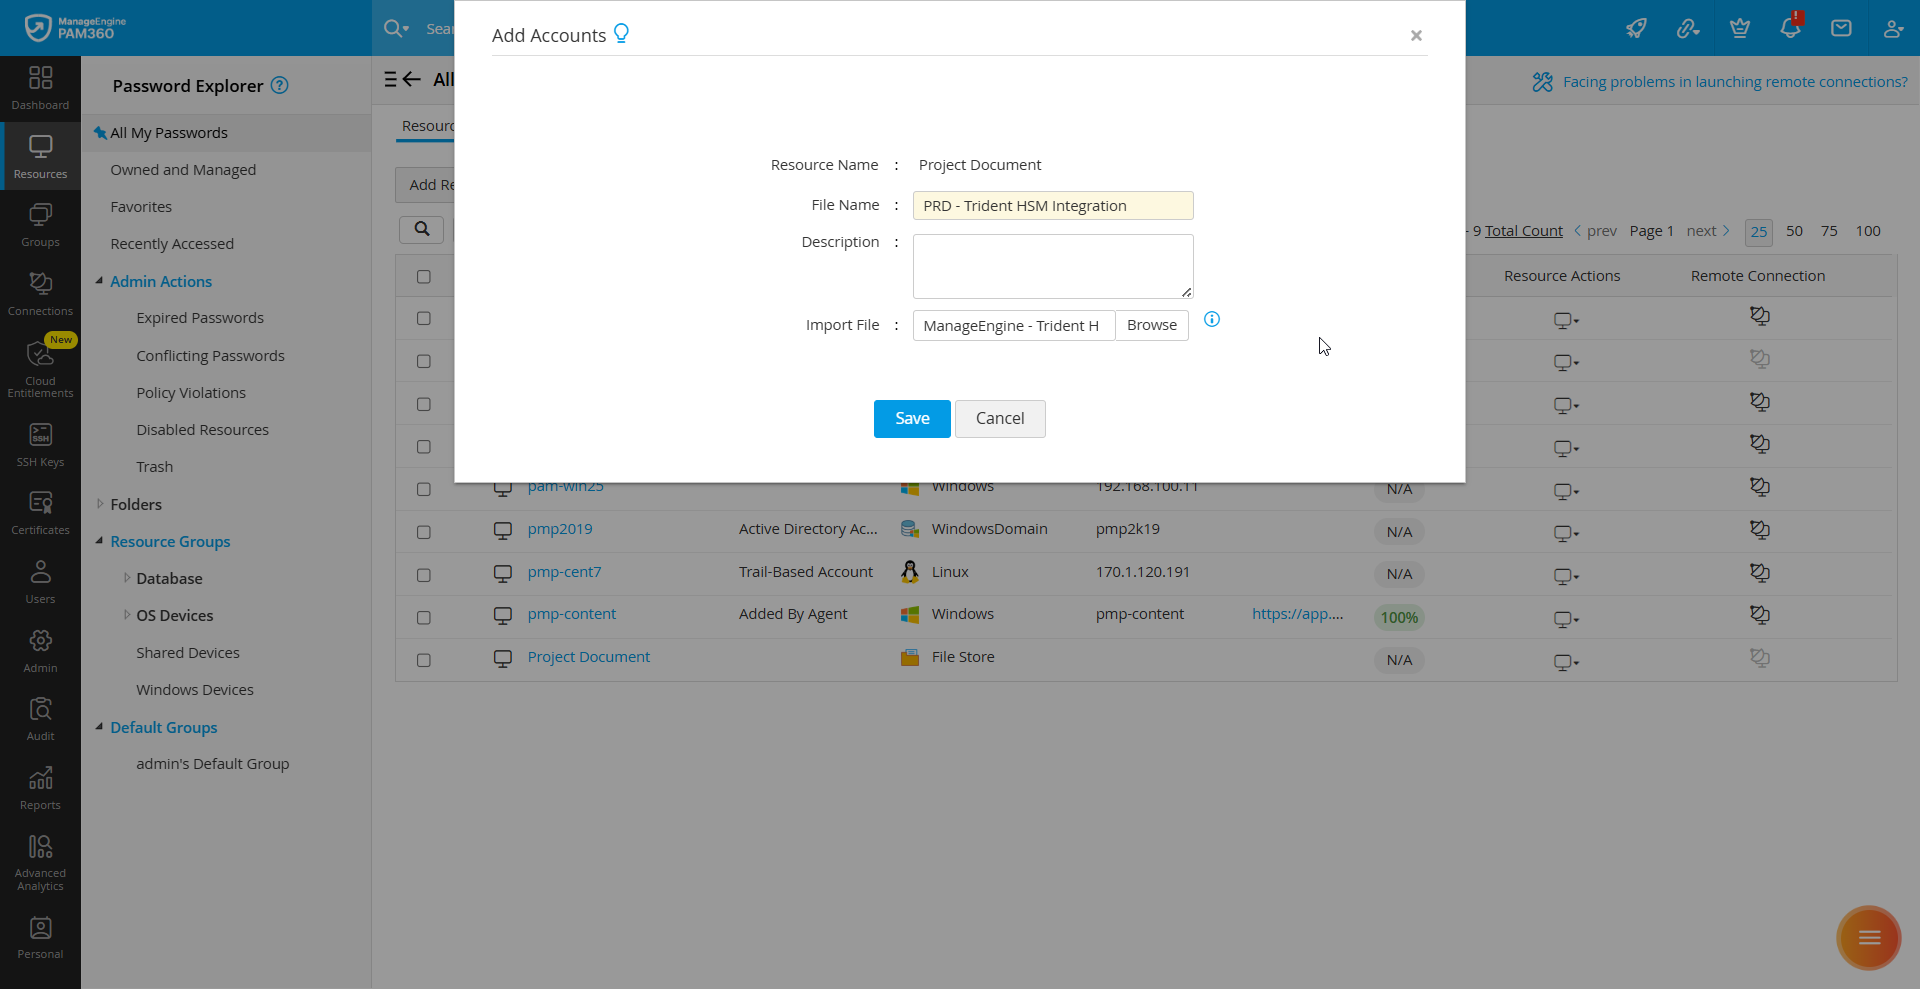
- Click Save to create the resource or Save & Proceed to immediately add the file/key/license. In the Add Accounts window that opens:
- Provide a Name (e.g., Key Name, File Name, or License Name).
- Click Browse and select the file/key/license to be uploaded.
- Enter a Description if needed and click Save. The item will now be securely stored under the specified resource.
Caution
File/Key/License resources are managed and shared in the same way as other resources. When retrieving such items, PAM360 provides a secure download link for saving the file locally.