Help Center
Quick Start
- Overview
- System requirements
- Minimum privileges required
- Default port configuration
- Installing DataSecurity Plus
- Uninstalling DataSecurity Plus
- Starting DataSecurity Plus
- Launching DataSecurity Plus
- Configuring your solution
- Licensing details
- Applying a license
File Auditing
- About File Auditing
- Domain configuration
- File server configuration
- Failover cluster configuration
- NetApp server configuration
- Nutanix server configuration
- EMC Isilon server configuration
- Workgroup configuration
- Amazon FSx configuration
Setting up File Audit
Dashboard
Reports
Alerts
Configuration
Storage Configuration
File Analysis
- About File Analysis
- Domain configuration
- File server configuration
- Workgroup configuration
- SMB File Server Configuration
- On-Demand Reports
Setting up File Analysis
Dashboard
Reports
Alerts
Configuration
Data Risk Assessment
- About Data risk assessment
Setting up Data risk assessment
Dashboard
Reports
Ownership analysis
Configuration
Endpoint DLP
- About Endpoint DLP
Setting up Endpoint DLP
Reports
Alerts
Prevention policies
Configuration
Cloud Protection
- About Cloud Protection
- Gateway Server Installation Steps
- Gateway Configuration in Endpoint
- Gateway Cluster Configuration
- Gateway Server Management
- Certificate Authority Configuration
- Two-way SSL configuration
- Manage Certificate Trust Store
- Threat Analytics Database
- Manage Banned Applications
- Manage Authorized Applications
- Regenerating gateway server access key
- Updating gateway server
- Gateway Server Failover
- Load Balancer Configuration
- Global Insight
- Application Insight
- User Insight
- Shadow Application Insight
- Banned Application Insight
- Cloud App Discovery
- Activity Overview
- File Transfer Insights
- Control Policies
- Application Insights
- Actor Insights
- Shadow App Discovery
- GenAI Insights
- Cyber Threat Analytics
- CIPA Compliance
Setting up Cloud Protection
Dashboard
Reports
Control Policies
Storage Configuration
Administrative settings
- Technician configuration
- Notification filters
- Manage agent
- Agent settings
- SIEM integration
- Business hours configuration
- Two-factor authentication
- Workgroup configuration
- Security policy
Email configuration
General settings
- Connection
- Personalize
- DataSecurity Plus Server
- Privacy Settings
- Disk utilization
- Schedule Retention Policy
Release notes
2026
2025
2024
2023
2022
2021
2020
2019
2018
2017
2016
2015
Troubleshooting
- HTTP communication failure
- Dormant DataEngine
- Secure Gateway server failure
- RPC communication failure
- Cloud Protection Gateway server failure
- Known issues and limitations
- Known errors and solutions
- Report discrepancy in File Analysis
Guides
- Agent document
- How to Migrate/Move DataSecurity Plus
- How to apply SSL certificate
- How to automate DataSecurity Plus database backup
- How to set alerts in DataSecurity Plus
- How to secure your DataSecurity Plus installation
Agent document
1. Overview of agent-based data collection
DataSecurity Plus uses a lightweight agent to audit users' file activities in real time. This agent is installed when every Windows file server, failover cluster, workgroup server, NetApp server, or workstation is configured.
- For Windows file auditing and endpoint DLP, the agent uses a Windows minifilter driver to collect file activities.
- For NetApp file auditing, the agent receives file events from the NetApp server and forwards them to DataSecurity Plus.
- For file analysis, the agent uses a master file table (MFT) reader to collect file metadata.
The collected event data is forwarded to the DataSecurity Plus server, where it is processed, analyzed, and presented in user-friendly reports and charts. This data is stored in the DataSecurity Plus server, and a notification is triggered when the criteria of the configured alert policies are met.
The agents can store up to 2GB of data on the machine where they are installed, allowing monitoring to continue even if contact is temporarily lost with the DataSecurity Plus server. Once the connection is re-established, the stored data is forwarded to the DataSecurity Plus server for analysis and reporting, ensuring a foolproof audit trail.
When the agent-server connection is broken for any reason, the software will attempt to reconnect at one minute intervals.
2. Installation prerequisites
To allow smooth installation and functioning of the agent within the target data sources, the below criteria must be met.
2.1 Software requirements
The DataSecurity Plus agent can only run on a Windows machine with .NET Framework version 4.5, and running any of the below OS versions:
- Windows 7 and above
- Windows Server 2008 R2 and above
2.2 Disk space requirements
A minimum of 4GB of free disk space is required to install the DataSecurity Plus agent.
2.3 Ports
Below are the ports that need to be open for the regular functioning of DataSecurity Plus.
2.3.1 Product ports
The table below lists the default ports used by DataSecurity Plus. These can be changed during or after installation.
| Port | Protocol | Purpose |
| 8800 | HTTP | Product web server and secondary port for agent to server communication |
| 9163 | HTTPS | Product web server and secondary port for agent to server communication |
| 8999 | HTTPS | Primary port for agent to server communication |
- To check which port is being used for HTTP/HTTPS communication, open the web console and navigate to Admin > General Settings > Connection.
- To change the default ports after installation, open the DataSecurity Plus web console and navigate to Admin Console > General Settings > Connection > Change port.
- Agent port 8999 and agent protocol HTTPS are used for agent data collection. In case of communication failure, the DataSecurity Plus server port and DataSecurity Plus server protocol are used after fallback.
The current fallback flow happens in a round-robin manner:
https://ServerName:8999
https://ServerFQDN:8999
https://ServerIP:8999
serverProtocol://ServerName:serverPort
serverProtocol://ServerFQDN:serverPort
serverProtocol://ServerIP:serverPort
2.3.2 System ports
The table below lists the ports on the destination computers that DataSecurity Plus uses. These ports can be opened in Windows or third-party firewalls.
| Port | Protocol | Destination | Service | Purpose | Direction |
| 135 | TCP | Monitored computers | RPC | Agent communication | Outbound |
| 137 | TCP and UDP | Monitored computers | RPC | Agent communication | Outbound |
| 138 | UDP | Monitored computers | RPC | Agent communication | Outbound |
| 139 | TCP | Monitored computers | RPC | Agent communication | Outbound |
| 445 | TCP and UDP | Monitored computers | RPC | For listing file shares | Outbound |
| 389 | TCP and UDP | Domain controllers | LDAP | For syncing AD objects with DataSecurity Plus | Outbound |
| 636 | TCP | Domain controllers | LDAP over SSL | For syncing AD objects with DataSecurity Plus | Outbound |
| 3268 | TCP | Domain controllers | Global catalog | For syncing AD objects with DataSecurity Plus | Outbound |
| 3269 | TCP | Domain controllers | Global catalog over SSL | For syncing AD objects with DataSecurity Plus | Outbound |
| 88 | TCP | Domain controllers | Kerberos | For syncing AD objects with DataSecurity Plus | Outbound |
| 25 | TCP | SMTP servers | SMTP | To send emails | Outbound |
| 465 | TCP | SMTP servers | SSL | To send emails | Outbound |
| 587 | TCP | SMTP servers | TLS | To send emails | Outbound |
| 49152 - 65535 |
TCP | Monitored computers | RPC randomly allocated high TCP ports | For agent communication and cluster configuration | Outbound |
- Remote registry and LanMan Server services are required to monitor agent status and must be running on all machines that have the DataSecurity Plus agent installed.
- If you are using Windows Firewall, you can open dynamic ports 49152 to 65535 on the monitored computers by enabling the outbound rules listed below.
Remote Event Log Management (NP-In)
Remote Event Log Management (RPC)
Remote Event Log Management (RPC-EPMAP)
To enable the above rules: Open Windows Defender Firewall with Advanced Security > Inbound Rules, and right-click the respective rules > Click Enable Rule.
2.4 Privileges
The DataSecurity Plus user (created while deploying the solution) should be a member of the Domain Admins group to perform the below tasks automatically:
- Install, uninstall, or update the agent
- Start or stop the agent service
- Sync properties across the server and the agent
However, if you do not wish to provide domain admin privileges, you can provide the user with the minimum privileges required and perform these tasks manually.
Note: For information on the minimum privileges required by the service account, refer to the Permissions and privileges guide.
2.5 Antivirus exclusions
Some antivirus solutions do not trust third-party applications like DataSecurity Plus and flag its files as threats. This impedes DataSecurity Plus' functioning. To prevent this, we recommend excluding the below files and folders from antivirus scans.
2.5.1 RemCom.exe and RemComSvc.exe
DataSecurity Plus uses RemCom.exe and RemComSvc.exe for installing and uninstalling the agent. Configure your active antivirus software to trust and allow RemCom.exe in the DataSecurity Plus server, and DSPRemComSvc.exe in the target machines where the agent is to be installed. This will ensure that the files are not deleted by your antivirus software, and the agent can be pushed from the admin console without any issues.
2.5.2 Installation directory
Certain files and folders in the DataSecurity Plus installation directory are sometimes flagged as threats—and even deleted—during antivirus scans. This prevents the software from working as intended. We recommend excluding the entire DataSecurity Plus installation directory from being scanned by your antivirus software.
2.6 Firewall exclusions
The HTTP port configured by you for communication between the agent and the server should be excluded from your firewall.
| Port | Protocol | Destination | Direction | Purpose |
| 8800 (This is the default HTTP port. If you are using a different port, exclude that port.) | HTTP | Target computers | Outbound | This default HTTP port is used by the DataSecurity Plus web server. |
| 8800 (This is the default HTTP port. If you are using a different port, exclude that port.) | HTTP | DataSecuriy Plus server | Inbound | This default HTTP port is used by the DataSecurity Plus web server. |
| 8999 (This is the default agent HTTPS port. If you are using a different port, exclude that port.) | HTTPS | Target computers | Outbound | This is the default HTTPS port used for agent data collection |
| 8999 (This is the default agent HTTPS port. If you are using a different port, exclude that port.) | HTTPS | DataSecurity Plus server | Inbound | This is the default HTTPS port used for agent data collection |
| 9163 (This is the default HTTPS port. If you are using a different port, exclude that port.) | HTTPS | Target computers | Outbound | This default HTTPS port is used by the DataSecurity Plus web server |
| 9163 (This is the default HTTPS port. If you are using a different port, exclude that port.) | HTTPS | DataSecurity Plus server | Inbound | This default HTTPS port is used by the DataSecurity Plus web server |
3. Installing the agent
Depending on your business requirements and the privileges granted to the DataSecurity Plus user, you can install agents in your environment using any of the below methods.
The agent can be installed either directly via the DataSecurity Plus user interface (if the service account has domain admin credentials) or indirectly (if only minimum privileges are provided to the service account).
Available agent installation methods:
3.1 Agent installation via the DataSecurity Plus user interface
The agent is automatically installed when the target machine is configured in the DataSecurity Plus console. It can then be managed from the Manage Agent page (Admin Console > Admin > Administrative Settings > Manage Agent > Click the Manage Agent link under the Agent column of the target server).
In case agent installation fails when attempted via the user interface, try implementing it by using any of the following methods.
3.2 Other agent installation methods
The agent can be installed manually by any of the four methods below:
- Agent installation via MSI file installation
- Agent installation via GPO
- Agent installation via Endpoint Central
- Agent installation via command line
3.2.1 Agent installation via MSI file installation
To install the agent via MSI file for domain or workgroup-based machines, follow the below steps:
- Log in to the DataSecurity Plus web console in the target machine.
- Download the agent MSI file by following these steps:
Log in to the DataSecurity Plus application and go to Admin Console > Admin > Administrative Settings > Manage Agent > Download Agent.
- If your target machine type is 32-bit, click 32-bit Download.
- If your target machine type is 64-bit, click 64-bit Download.
- Double-click the downloaded MSI file and in the DataSecurity Plus Agent wizard > Click Next, and enter the path in which you want to install the DataSecurity Plus Agent > Click Next. We recommend retaining the default path for agent installation.
- Under the DataSecurity Plus Server Details page, enter the below details:
- Server Name: The name of the server where DataSecurity Plus is hosted.
- IP Address: The IP address of the server where DataSecurity Plus is hosted.
- Port No.: The HTTP/HTTPS port number used to communicate with the DataSecurity Plus server.
- Protocol: The defined protocol for communicating with the DataSecurity Plus server, i.e., HTTP or HTTPS.
- Agent Installation Key: A unique identifier that is required to establish communication between the product and the agent.
- Click Next once again to install the agent and click Close to exit the wizard.
Note: You can find the values for the above parameters in this path in the DataSecurity Plus server: Admin Console > Admin > Administrative Settings > Manage Agent page > Click the Download Agent button at the top-right corner.
3.2.2 Agent installation via GPO
Step 1: Create an MST file
An MST file is used by the Microsoft Windows Installer—a component of the Windows OS that enables software installations. It is used to make changes to the MSI file provided by an application vendor during installation. An MST file needs to be created using the ORCA tool, which is available under Windows SDK Components for Windows Installer Developers.
To create an MST file, follow these steps in the target machine:
- Download the DataSecurity Plus Agent MSI file by following these steps:Log in to the DataSecurity Plus web console and go to Admin Console > Admin > Administrative Settings > Manage Agent > Download Agent.
- If your target machine type is 32-bit, click 32-bit Download.
- If your target machine type is 64-bit, click 64-bit Download.
- Open the ORCA tool > File > Open > Select the downloaded MSI file and click Open.
- Click Transform > New Transform > Navigate to the panel on the left and select Registry > Enter appropriate values for the below fields:
- Server Name: The name of the server where DataSecurity Plus is hosted.
- Server FQDN: The fully qualified domain name of the server where DataSecurity Plus is hosted.
- Server IP: The IP address of the server where DataSecurity Plus is hosted.
- Port: The HTTP/HTTPS port number used to communicate with the DataSecurity Plus server.
- Protocol: The defined protocol for communicating with the DataSecurity Plus server, i.e., HTTP or HTTPS.
- Agent Installation Key: The unique key that will be required to establish communication between the product and the agent during agent installation.
- IsEndpointAutoInstallRequired: Used for automatic configuration of the agent with default policies when the value is set to true. This is applicable for the Endpoint DLP module alone. For it to work as intended, ensure you add the target domain or workgroup.
- Click Transform > Generate Transform > Name the transformation file DSP.mst > Click Save.
- Copy both the MSI (DataSecurityPlusAgent-x86.msi or DataSecurityPlusAgent-x64.msi) and MST (DSP.mst) files to a new folder.
- Right-click the newly-created folder, go to Properties > Sharing > Share, type Domain Computers in the search box > Provide Read permission > Click Share.
Note: You can find the values of these parameters by clicking the Download Agent button at the top-right corner of the Manage Agent page as mentioned in section 3.2.
Step 2: Deploy the agent via GPO
- Log in with domain admin credentials to any machine (preferably a domain controller) in your network that has the Group Policy Management Console (GPMC).
- Type Server Manager in the search bar and click Enter > Tools > Group Policy Management.
- In the Group Policy Management window, expand the target forest > expand Domains > Select the target domain > Right-click Create a new Group Policy Object (GPO) and in the New GPO window, type DataSecurityPlusAgent > OK and link this GPO to the audited computers.
- Right-click the DataSecurityPlusAgent GPO and select Edit > Computer Configuration > Policies > Software Settings > Right-click Software Installation > New > Package. In the dialog box, type the full Universal Naming Convention (UNC) path of your DataSecurity Plus MSI file, select DataSecurityPlus_AgentX64 > Open.
- In the Deploy Software pop-up, select Advanced.
- In the DataSecurity Plus Agent Properties pop-up, select Modifications > Add... > Click the DataSecurity Plus MST file > Open.
- Type gpupdate/force in the command prompt in the domain controller.
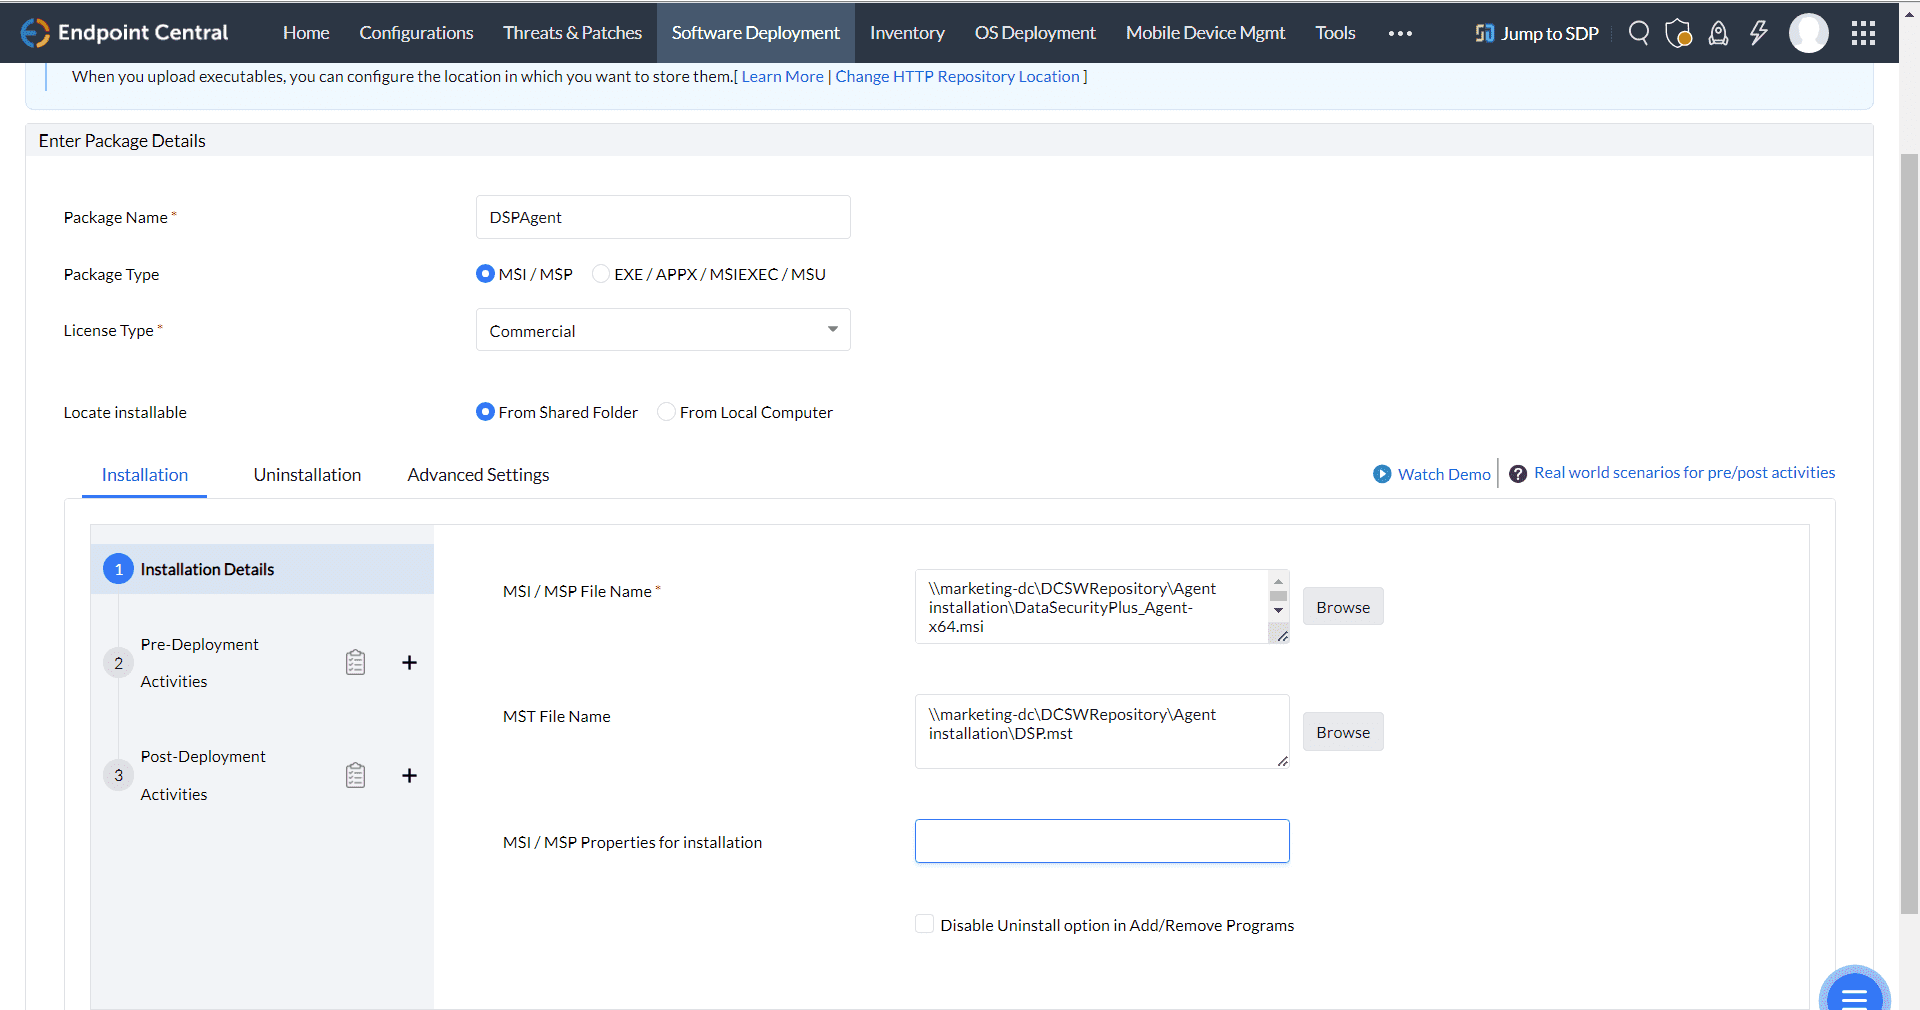
3.2.3 Agent installation via Endpoint Central
To install the DataSecurity Plus agent via Endpoint Central, follow the below steps:
Step 1: Creating an MSI package
- Log in to the Endpoint Central console as an administrator.
- Click Software Deployment > Package creation > Packages > Add Package > Select Windows from the drop-down.
- Provide the below details:
- Beside Package Name, enter DSP Agent or any other name of your choice.
- Beside Package Type, select MSI/MSP.
- Beside License Type, select Commercial from the drop-down.
- Beside Location installable, select From Shared Folder.
- Install the package by following either of the methods below:
- Install the package by using an MST file
An MST file is used by the Microsoft Windows Installer—a component of the Windows operating system that enables software installations. It is used to make changes to the MSI file provided by an application vendor during installation. An MST file needs to be created using the ORCA tool, which is available under Windows SDK Components for Windows Installer Developers.
- Log in to the DataSecurity Plus web console and download the agent MSI file by following these steps:
Go to Admin Console > Admin > Administrative Settings > Manage Agent > Download Agent.
- If your target machine type is 32-bit, click 32-bit Download.
- If your target machine type is 64-bit, click 64-bit Download.
- Open the ORCA tool > File > Open > Select the downloaded MSI file and click Open.
- Click the Transform > New Transform > Navigate to the panel on the left, select Registry > Enter appropriate values for the below fields:
- Server Name: The name of the server where DataSecurity Plus is hosted.
- Server FQDN: The FQDN of the server where DataSecurity Plus is hosted.
- Server IP: The IP address of the server where DataSecurity Plus is hosted.
- Build: The build number of your DataSecurity Plus installation (can be verified by login to DataSecurity Plus application and in the top-right corner of the window within License tab).
- Port: The HTTP/HTTPS port number used to communicate with the DataSecurity Plus server.
- Protocol: The defined protocol for communicating with the DataSecurity Plus server, i.e., HTTP or HTTPS.
- Agent Installation Key: The unique key which will be required to establish communication between the product and the agent during agent installation.
- IsEndpointAutoInstallRequired: Used for automatic configuration of the agent with default policies when the value is set to true. This is applicable for the Endpoint DLP module alone. For it to work as intended, ensure to add the domain or workgroup.
Note: You can find the values of these parameters by clicking the Download Agent button at the top-right corner of the Manage Agent page.
- Click the Transform tab > Select Generate Transform > Name the transformation file DSP.mst > Click Save.
- In the Endpoint Central console, click Browse > Select the MSI and MST files > Click Add Package.
- Log in to the DataSecurity Plus web console and download the agent MSI file by following these steps:
- Install the package by using installation properties
- To install the agent from Endpoint Central using installation properties, follow the below steps:
In the Endpoint Central console, click Browse > Select the MSI, and under Installation > Installation Details > MSI/MSP Properties for installation, type the following command:
SERVERNAME=<SERVER_NAME> PORT=<PORT> PROTOCOL=<PROTOCOL> SERVERFQDN="<SERVER_FQDN>" SERVERIP="<SERVER_IP>" AGENTINSTALLATIONKEY=<AGENTINSTALLATIONKEY>
- To install the agent from Endpoint Central using installation properties exclusively for endpoint module auto configuration, follow the below steps:
In the Endpoint Central console, click Browse > Select the MSI, and under Installation > Installation Details > MSI/MSP Properties for installation, type the following command:
SERVERNAME=<SERVER_NAME> PORT=<PORT> PROTOCOL=<PROTOCOL> SERVERFQDN=<SERVER_FQDN> SERVERIP=<SERVER_IP>
AGENTINSTALLATIONKEY=<AGENTINSTALLATIONKEY> ISENDPOINTAUTOINSTALLREQUIRED=True
- To install the agent from Endpoint Central using installation properties, follow the below steps:
- Install the package by using an MST file
Note: The IsEndpointAutoInstallRequired key is used to automatically configure the Endpoint Agent with default policies when the value is set to true. This is applicable for the Endpoint DLP module alone. For it to work as intended, ensure you add the target domain or workgroup.
Replace the correct values in place of the below parameters:
Server Name: The name of the server where DataSecurity Plus is hosted.
Port: The HTTP/HTTPS port number used to communicate with the DataSecurity Plus server.
Protocol: The defined protocol for communicating with the DataSecurity Plus server, i.e., HTTP or HTTPS.
Server FQDN: The FQDN of the server where DataSecurity Plus is hosted.
Server IP: The IP address of the server where DataSecurity Plus is hosted.
Agent Installation Key: The unique key which will be required to establish communication between the product and the agent during agent installation.
IsEndpointAutoInstallRequired: Used for automatic configuration of the agent with default policies when the value is set to true. This is applicable for the Endpoint DLP module alone. For it to work as intended, ensure you add the target domain or workgroup.
Note: You can find the values of these parameters by clicking the Download Agent button at the top-right corner of the Manage Agent page.
Step 2. Deploy the MSI package
- In the Endpoint Central console, click Software Deployment > Install/Uninstall Software > Windows > Computer Configuration.
- Provide the below details:
- Beside Name, enter DSP Agent or any other name of your choice.
- Beside Operation Type, click Install.
- Beside Package Name, select the correct MSI file from the drop-down.
- Beside Apply Deployment Policy under Deploy Settings, select Deploy anytime at the earliest.
- Under Define Target, select the Remote Office/Domain and specify the Computer.
- Click Deploy Immediately.

3.2.4 Agent installation via command line
To install the agent via Command Prompt, follow the below steps:
- Log in to the DataSecurity Plus web console in the target machine.
- Download the MSI file of the agent, by following these steps:
Go to Admin Console > Admin > Administrative Settings > Manage Agent > Download Agent.
- If your target machine type is 32-bit, click 32-bit Download.
- If your target machine type is 64-bit, click 64-bit Download.
- Open an elevated Command Prompt (right-click Command Prompt and select Run as administrator) and type the below command:
- The below command is applicable for the File Audit and File Analysis modules:
msiexec /i "MSI_FILE_LOCATION" PROTOCOL=<PROTOCOL_USED> PORT=<PORT_NUMBER> SERVERNAME=<SERVER_NAME> SERVERFQDN=<SERVER_FQDN> SERVERIP=<SERVER_IP> AGENTINSTALLATIONKEY=<AGENTINSTALLATIONKEY> /q
- The below command is applicable only for the Endpoint DLP module (auto-configuration):
msiexec /i "MSI_FILE_LOCATION" PROTOCOL=<PROTOCOL_USED> PORT=<PORT_NUMBER> SERVERNAME=<SERVER_NAME> FQDN=<SERVER_FQDN> SERVERIP=<SERVER_IP> AGENTINSTALLATIONKEY=<AGENTINSTALLATIONKEY> ISENDPOINTAUTOINSTALLREQUIRED=True /q
Note: The IsEndpointAutoInstallRequired key is used to automatically configure the Endpoint agent with default policies when the value is set to true. This is applicable for the Endpoint DLP module alone. For it to work as intended, ensure you add the target domain or workgroup.
Replace the correct values in place of the below parameters:
- Protocol: The defined protocol for communicating with the DataSecurity Plus server, i.e., HTTP or HTTPS.
- Port: The HTTP/HTTPS port number used to communicate with the DataSecurity Plus server.
- Server Name: The name of the server where DataSecurity Plus is hosted.
- Server FQDN: The FQDN of the server where DataSecurity Plus is hosted.
- Server IP: The IP address of the server where DataSecurity Plus is hosted.
- msi_file_location: This is the location where the msi is present.
- Agent Installation Key: The unique key which will be required to establish communication between the product and the agent during agent installation.
Notes:- You can find the values of these parameters by clicking the Download Agent button at the top-right corner of the Manage Agent page.
- If the target computer is running a 32-bit OS, provide the location of DataSecurityPlusAgent-x86.msi. If the target computer is running a 64-bit OS, provide the location of DataSecurityPlusAgent-x64.msi.
- The below command is applicable for the File Audit and File Analysis modules:
- Click Enter to execute the command.
4. Starting the agent
The installed DataSecurity Plus agent can be started via two different methods:
4.1 From the console
To start the agent from DataSecurity Plus' console:
- Open the DataSecurity Plus web console.
- Go to Admin Console > Admin > Administrative Settings > Manage Agent. Alternatively, select any of the configured modules, go to Configuration > Data Source > Select the server or workstation > Click the Manage Agent link.
- In the Service Status table, click the ellipsis menu icon (three dots) beside Agent Service > Select Start Agent.
4.2 From the Windows Services application on the target machine
- Type services in the search bar to open the application.
- Select ManageEngine DataSecurity Plus - Agent Service from Services (Local) > Click Start on the left pane.
5. Syncing agent configuration
DataSecurity Plus attempts to sync server-agent configuration changes via Remote Procedure Call (RPC) as soon as the changes are made.
File Audit: Once every 15 minutes.
File Analysis: Once every 15 minutes.
Endpoint DLP: Once every 3 hours.
If the initial configuration sync via RPC fails, the subsequent scheduled checks will attempt to sync the changes via HTTP/HTTPS.
If the data source is offline, or if the agent-server communication is affected for any reason, up to 2GB of audit data will be stored locally. This data will be pushed to the DataSecurity Plus server once connection is re-established.
DataSecurity Plus also checks the agent service status every 15 minutes and automatically installs and starts the agent service if it has stopped.
You can check the status of the agent and associated properties under Admin Console > Admin > Administrative Settings > Manage Agent > Click the Manage Agent link.
6. Updating the agent
If there is a new version of the agent available, the existing version will be upgraded automatically when DataSecurity Plus is updated, provided the service account is a member of the Domain Admins group.
If you have only provided minimum privileges, you will have to update the agent manually. To do this, uninstall the existing agent, then download the updated agent and install it by following the directions as indicated in section 3.
To check for product updates, please refer to the Release Notes.
7. Uninstalling the agent
DataSecurity Plus' agents can be uninstalled via the following methods:
- Agent uninstallation via the DataSecurity Plus user interface
- Agent uninstallation via group policy
- Agent uninstallation via command line
- Agent uninstallation via Endpoint Central
- Agent uninstallation via the Control Panel in the target computer
7.1. Agent uninstallation via the DataSecurity Plus user interface
To uninstall the DataSecurity Plus agent via the user interface, follow these steps:
- Log in to the DataSecurity Plus web console with admin credentials.
- In the Applications drop-down, select Admin Console.
- Under Admin > Administrative settings > Manage Agent, click the Manage Agent link next to the server in which you want to uninstall the agent.
- In the Agent Service table, click the ellipsis menu icon (three dots) > Click Uninstall Agent.
7.2. Agent uninstallation via Group Policy
To uninstall the DataSecurity Plus agent via Group Policy, follow these steps:
- Log in to your domain controller with Domain Admin credentials and open the Group Policy Management Console (GPMC).
- Expand your domain in the left pane of the GPMC.
- If the agent was deployed through a GPO, right-click the DataSecurityPlusAgent GPO.
- If the agent was deployed through any other means, create a new GPO and right-click it > Select Edit > Computer Configuration > Policies > Software Settings > Software Installation.
- Navigate to the right pane and right-click the software package > Click Remove.
- In the Remove Software dialog box, check Immediately uninstall the software from users and computers.
- Click OK.
- Restart the client computers to finish uninstalling the agent.
Agent uninstallation via command line
7.3. Agent uninstallation via command line
Log in to the target computer and open an elevated Command Prompt (right-click Command Prompt and select Run as administrator).
Depending on whether your system is of 32-bit or 64-bit architecture, execute the corresponding command:
- 32-bit: msiexec /x {8A2D7C1A-0E27-48C2-9837-8FED22F33B2B} /q
- 64-bit: msiexec /x {859C3CA2-0CD2-4A38-8993-07D53F581E40} /q
7.4. Agent uninstallation via Endpoint Central
Note: Refer to the steps shown in the create an MSI package via Endpoint Central section of this guide to uninstall the agent using package creation details.
To uninstall the agent, you need to create an MSI package using the below steps.
- Log in to your Endpoint Central console as an administrator and click Software Deployment.
- In the left pane, under Deployment, select Install/Uninstall software > Windows > Computer Configuration.
- Beside Name, enter DataSecurity Plus uninstallation or any other name of your choice.
- Under Install/Uninstall Windows Software > Package Settings, do the following:
- Beside Operation type, choose Uninstall.
- Beside Package Name, select the DSPAgent package.
- Under Define Target, select the name of the Domain that the target server belongs to.
- Click the filter icon beside the Remote Office/Domain field to include and/or exclude target computers based on your requirements.
- Click Deploy immediately to uninstall the agent.
7.5. Agent uninstallation via the Control Panel in the target computer
To uninstall the DataSecurity Plus agent locally:
- Go to Control Panel > Programs > Uninstall a program.
- Right-click DataSecurity Plus Agent.
- Select Uninstall.
8. Troubleshooting agent installation errors
Below are some errors that may arise while installing the agent, as well as the steps to resolve them.
8.1 'Remcom.exe' is not recognized as an internal or external command, operable program, or batch file
Cause: This error occurs when the RemCom.exe file, which is used to install the agent on the target computer, has been flagged and deleted by antivirus software.
Solution:
- Check the existence of Remcom.exe in the DataSecurity Plus Installation directory (<installation_directory>\bin) on the target computer. If the file is not present, verify if your antivirus software has flagged and removed the Remcom.exe file.
- Configure your antivirus software to trust the Remcom.exe file.
- If the issue persists, contact our support team at support@datasecurityplus.com for further assistance.
8.2 Initiating connection to remote service failed
Cause: This error occurs when the DataSecurity Plus Agent service cannot be created on the target computer.
Solution:
- Check if you are able to ping the target computer from the server where DataSecurity Plus has been installed.
- Verify if the Remote Registry service is running on the agent machine.
- Next, check if the admin$ share (\\Server_Name\admin$) is accessible by the service account. If not, provide the necessary permission to access the admin$ share on the target computer. If the issue persists, contact our support team at support@datasecurityplus.com.
8.3 [Domain] Couldn't copy DataSecurityPlus.msi / Access Denied: Failed to connect to ADMIN$ share
Causes:
- The service account does not have sufficient privileges to copy the MSI file to the admin$ share (\\Server_Name\admin$) on the target computer.
- The admin$ share access limit has been exceeded.
Solutions:
- Check if the service account has privileges to create files in the admin$ share. If not, provide the necessary permission to access the admin$ share on the target computer. Alternatively, you can use a different account with the necessary privileges by updating the Domain User Name and Domain Password found under the Admin drop-down > Admin > Administration > Domain Settings. In either case, ensure that the provided user account is valid and has not been locked out.
- Navigate to the Shared Folders Microsoft Management Console (MMC) snap-in > Shares > admin$ > Properties > Set an appropriate value for User limit.
8.4 [Workgroup] Couldn't copy DataSecurityPlus.msi / Access Denied: Failed to connect to ADMIN$ share in workgroup
Cause:
- The service account does not have sufficient default administrative privileges to access Admin$ and other administrative shares.
- Check if User Account Control (UAC) is enabled, as UAC remote restrictions can prevent non-default administrators from accessing Admin$ and other administrative shares.
Solution:
- It is recommended to access the Admin$ and other administrative shares over the network using the built-in administrator account, as User Account Control (UAC) remote restrictions does not apply to this account.
- Disabling UAC remote restrictions allows non default administrators to access admin$ and other administrative shares. Here's how you can disable it:
- Go to Start > Run, type regedit, and then click OK.
- Locate and then click the following registry subkey:
- HKEY_LOCAL_MACHINE\SOFTWARE\Microsoft\Windows\CurrentVersion\Policies\System
- If the LocalAccountTokenFilterPolicy registry entry doesn't exist, follow these steps:
- On the Edit menu, point to New, and then select DWORD Value.
- Type LocalAccountTokenFilterPolicy, and then press ENTER.
- Right-click LocalAccountTokenFilterPolicy, and then select Modify.
- In the Value data box, type 1, and then select OK.
- Exit Registry Editor.
- Alternatively, non-default administrators can gain access to the admin$ and other administrative shares by adjusting security settings through Group Policy. However, as this affects your system’s security configuration, it should be done with caution. Here’s how you can modify these security settings:
- Go to Start > Run, type gpedit.msc and click OK
- Go to Computer Configuration → Windows Settings → Security Settings → Local Policies → Security Options
- On the Security Options page, ensure that the following settings are configured as follows:
- User Account Control: Admin Approval Mode for the Built-in Administrator account → Enabled
- "User Account Control: Run all administrators in Admin Approval Mode" → Disabled
- "Network access: Sharing and security model for local accounts" → Classic – local users authenticate as themselves
Please refer to Microsoft's guide on UAC and remote restrictions for a better understanding.
We strongly recommend accessing network shares using a built-in administrator account for security purposes.
8.5 Could not connect to the machine
Cause:
- This error occurs when the target computer cannot be contacted.
Solution:
- Check if you are able to ping the target computer from the server where DataSecurity Plus has been installed. If you are unable to fix any underlying connectivity issues, contact our support team at support@datasecurityplus.com.
8.6 Logon failure - The target account name is incorrect
Cause: This error occurs when the service account used is locked, disabled, or its password has been changed.
Solution:
- Check if the admin$ share (\\Server_Name\admin$) is accessible by the service account. If not, provide the necessary permission to access the admin$ share on the target computer. Alternatively, you can use a different account with the necessary privileges by updating the Domain User Name and Domain Password found under the Admin drop-down > Admin > Administration > Domain Settings. In either case, ensure that the provided user account is valid and has not been locked out.
8.7 Logon failure - Unknown username or bad password
Cause:
- Admin$ share is not enabled.
- User account might not have domain admin privileges.
Solution:
- Check if the admin$ share (\\Server_Name\admin$) is accessible by the service account. If not, provide the necessary permission to access the admin$ share on the target computer. Alternatively, you can use a different account with the necessary privileges by updating the Domain User Name and Domain Password under the Admin drop-down > Admin > Administration > Domain Settings. In either case, ensure that the provided user account is valid and has not been locked out.
8.8 Couldn't start remote service - Overlapped I/O operation is in progress
Cause: This error occurs when the service account does not have the privileges to start the service on the target computer.
Solution:
- Check if the admin$ share (\\Server_Name\admin$) is accessible by the service account. If not, provide the necessary permission to access the admin$ share on the target computer. Alternatively, you can use a different account with the necessary privileges by updating the Domain User Name and Domain Password found under the Admin drop-down > Admin > Administration > Domain Settings. In either case, ensure that the provided user account is valid and has not been locked out.
8.9 Another version of this product is already installed (0x666)
Cause: This error occurs when another version of the agent is already installed on the target computer.
Solution:
- Uninstall the existing agent from the target computer by following the steps in section 7, and retry the current installation.
8.10 Another installation is already in progress (0x652)
Causes: This error occurs when the installation of the DataSecurity Plus Agent MSI file is already in progress on the target computer.
Solution
- Wait for the ongoing installation to complete before retrying the agent installation.
- If you have not initiated the installation of any software, you can also run the following command in Command Prompt: taskkill /f /im msiexec.exe to kill any MSI installation running on the target computer.
8.11 Network path not found - Configured user doesn't have the necessary privileges for copying agent to admin$ share
Causes
- The target computer cannot be contacted.
- The service account does not have sufficient privileges to access the admin$ share (\\Server_Name\admin$) on the target computer.
Solutions
- Ensure that the DataSecurity Plus server can contact the target computer.
- Check if the admin$ share is accessible by the service account. If not, provide the necessary permission to access the admin$ share on the target computer.
8.12 Couldn't copy DataSecurityPlusAgent.msi
Causes
- The service account does not have sufficient privileges to copy the MSI file to the admin$ share (\\Server_Name\admin$) on the target computer.
- The ADMIN$ share access limit has been exceeded.
Solutions
- Check if the service account has privileges to create files in the admin$ share. If not, provide the necessary permission to access the admin$ share on the target computer. Alternatively, you can use a different account with the necessary privileges by updating the Domain User Name and Domain Password found under the Admin drop-down > Admin > Administration > Domain Settings. In either case, ensure that the provided user account is valid and has not been locked out.
- Navigate to Shared Folders Microsoft Management Console (MMC) snap-in > Shares > ADMIN$ > Properties > Set an appropriate value for User limit.
8.13 The system cannot find the file specified (0x2)
Cause: This error occurs when the service account is unable to locate either the DataSecurityPlusAgent-x86.msi or DataSecurityPlusAgent-x64.msi files.
Solutions:
- Ensure that either the DataSecurityPlusAgent-x86.msi or DataSecurityPlusAgent-x64.msi file is present in SYSTEMDRIVE\Windows directory on the target computer.
- Check if the admin$ share (\\Server_Name\admin$) is accessible by the service account. If not, provide the necessary permission to access the admin$ share on the target computer. Alternatively, you can use a different account with the necessary privileges by updating the Domain User Name and Domain Password found under the Admin drop-down > Admin > Administration > Domain Settings. In either case, ensure that the provided user account is valid and has not been locked out.
8.14 Fatal error occurred (0x643)
Causes:
This error can occur due to multiple reasons:
- The drive that contains the folder you are trying to install the package to is accessed as a substitute drive.
- Windows Installer is attempting to install an app that is already installed on your PC.
- The SYSTEM account does not have Full Control permissions on the folder that you are trying to install the Windows Installer package to.
Solutions:
On the target computer, ensure that:
- .NET 4.5 framework is installed.
- DataSecurity Plus has not already been installed.
- Check if the admin$ share (\\Server_Name\admin$) is accessible by the service account. If not, provide the necessary permission to access the admin$ share on the target computer.
- Next, start and re-register Microsoft Installer Service on the target computer. To do this, press Windows + R, type msiexec /unregister, and hit Enter.
- If the issue persists, try to resolve it using the Program Install and Uninstall troubleshooter.
8.15 Couldn't install client software
Causes:
- This error occurs because of a network timeout while installing the agent.
- Agent installation might have been interrupted due to the target computer getting disconnected from the network while installation is in progress.
Solution: Ensure that the network connection is re-established and try to install the software again.
8.16 Product is uninstalled (0x64E)
Cause: This error occurs when the agent has already been uninstalled by some other method, such as manual uninstallation.
Solution: Install the agent by following the steps indicated in section 3, and try to uninstall the agent again.
8.17 No communication available from agent to the server (initial profile fetch not happening)
Cause: This error occurs when there is no communication from the agent to the server immediately after installation.
Solutions:
- On the target computer, check if you can access the web console via a browser. To do this, open any web browser and in the address bar, type: Protocol://ServerName:Port
- Here, Protocol refers to the protocol used for communication, i.e., HTTP or HTTPS. ServerName is the name (or IP address) of the server where DataSecurity Plus has been installed. Port refers to the port number over which DataSecurity Plus communicates. The default port number is 8800. If you are using a different port, please enter that value.
- If you can access the web console, contact our support team for further troubleshooting.
- If you cannot access the web console, check if the ports used by DataSecurity Plus are open. For more details on the ports used, refer to the ports configuration section of this guide.
8.18 Incorrect function
Causes:
If the installation process quits abruptly, it could be due to the following two reasons:
- Shutdown/log off of has been initiated in the target computer while the installation is in progress.
- There is insufficient space in the target computer to install the software.
Solution:
- Restart or increase the disk space in the target machine and then retry installing the agent.
8.19 The service cannot be started because it is disabled or has no enabled devices associated with it
Solution:
- Check if the ManageEngine DataSecurity Plus - Agent service is disabled. If so, enable it and then check if the above error is resolved.
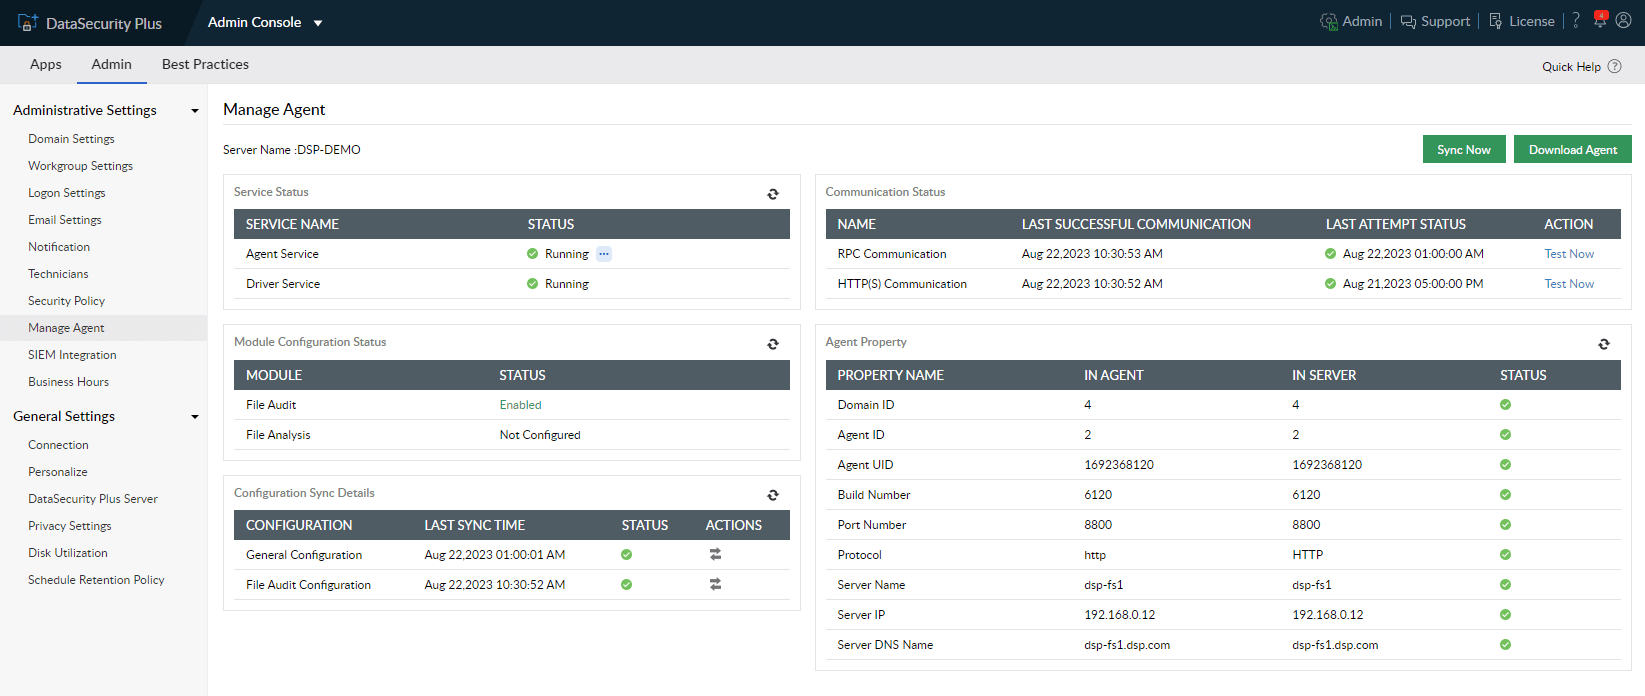
9. Troubleshooting the Agent Service
The agent service can be monitored and managed through the Manage Agent page. If an issue arises, a notification on the Manage Agent page will prompt the user with instructions on how to resolve the problem.
You can learn more about the agent service from the Manage Agent help page.
Essential checks to perform
While troubleshooting the agent service, perform the following checks:
1. Check if the agent service is installed and running on the desired computer
- Navigate to the Manage Agent page (Admin Console > Admin > Administrative Settings > Manage Agent and click the Manage Agent link beside the server whose agent you want to troubleshoot).
- Click the refresh icon at the top-right corner of the Service Status table to fetch the current status of the Agent Service.
- Check if the Agent Service has a green check in the Status column. If the service has stopped, start the service by opening the ellipsis menu (three dots) and clicking Start Agent.
Note: The DataSecurity Plus service account should be a member of the Domain Admins or Local Administrators group in order to get the service status.
2. Check if the agent is able to communicate with the DataSecurity Plus server
- Navigate to the Manage Agent page (Admin Console > Admin > Administrative Settings > Manage Agent and click the Manage Agent link beside the server whose agent you want to troubleshoot).
- Click the refresh icon at the top-right corner of the Agent Property table.
- Check if there are green checks in the Status column against every property.
- Agent-server communication and configuration syncs occur via RPC communication.
- The agent forwards event data to the DataSecurity Plus server via HTTP/HTTPS connection.
- Check the status of the RPC and HTTPS communication at the Communication Status table in the Manage Agent page.
- Click Test Now to ensure that communication is established.
Below are some common issues that can occur in the Agent service and the steps to resolve them:
9.1. Agent not installed/running
Solution:
- If you have provided domain admin privileges to the DataSecurity Plus user, the software will attempt auto-installation of the agent. If this fails, check if the user has the appropriate permissions to perform this task.
- However, if you have provided the minimum privileges, you will have to download the agent and install it manually by following the steps in section 3.2.
9.2. Driver service not installed/running
If the driver service is not installed or running, contact our support team at support@datasecurityplus.com, available 24/5.
9.3. RPC communication failure
Note: DataSecurity Plus uses RPC ports. For more information on the ports, refer to the Port configuration guide.
Cause:
Common causes for an RPC failure can be agent-server communication issues, network connectivity issues, interrupted RPC service, firewall issues, etc.
Solutions::
- Check if the RPC ports 135, 137, 138, 139, and 445 are open. If the ports are open, try following the steps in the RPC communication troubleshooting guide.
9.4. HTTP communication failure
Cause:
This error occurs when the agent is unable to forward data to the DataSecurity Plus server or when the agent properties do not match the corresponding server properties.
Solution:
Check if the configured HTTP/HTTPS port is available for use. If the ports are open, try following the steps in the HTTP communication troubleshooting guide.
9.5 Communication blocked: Agent to Server authentication failed
Cause:
This error is caused when there is a mismatch in the agent authentication key.
Solution:
- Reinstall the agent manually with the new agent installation key.
If the issue persists, contact our support team at support@datasecurityplus.com, available 24/5.
9.6. Unable to fetch any agent property details
Cause:
This error occurs when there is an issue with agent-server communication.
Solution:
- Ping the agent machine from the DataSecurity Plus server and check whether there is communication between the agent and the server.
- Verify if the Remote Registry service is running on the agent machine by following these steps:
- Go to Services, find the Remote Registry service, and double-click it.
- Make sure the Startup Type is set to Automatic and the Service status is set to Running.
9.7. Outdated agent installed
Cause:
This error sometimes occurs after a new service pack is installed or when a wrong version of the agent is installed during manual installation.
Solution:
- The outdated agent will be automatically updated within a few minutes. But if you want to update it immediately, reinstall the agent by following these steps:
- Navigate to the Manage Agent page (Admin Console > Admin > Administrative Settings > Manage Agent and click the Manage Agent link beside the server whose agent you want to troubleshoot).
- Click Reinstall Agent on the error notification message. If the agent is not reinstalled, uninstall and install the agent by opening the ellipsis menu (three dots) in the Agent Service table.
9.8. Incorrect server details provided during manual agent installation
Cause:
This error occurs if incorrect server information is provided or the server details are left empty during manual agent installation.
Solution:
- Reinstall the agent manually with proper server details. You can get the server details by going to the Manage Agent page and clicking the Download Agent button.
9.9 Agent property details missing / Communication property details mismatched
Cause:
These errors can occur due to several reasons, such as:
- When the Domain ID/AgentID/UID details are manually removed from the registry.
- When the IP/Server name/Server DNS name/Port/Protocol fields are modified in the server where DataSecurity Plus is installed.
Solution:
- Go to the Manage Agent page and click Sync Now. If the error is not resolved, reinstall the agent by following these steps:
- Navigate to the Manage Agent page (Admin Console > Admin > Administrative Settings > Manage Agent and click the Manage Agent link beside the server whose agent you want to troubleshoot).
- Click Reinstall Agent on the error notification message. If the agent is not reinstalled, uninstall and install the agent by opening the ellipsis menu (three dots) in the Agent Service table.
If the issue persists, contact our support team at support@datasecurityplus.com, available 24/5.
9.10. Agent property details mismatched
Cause:
This error occurs when the agent from a previously uninstalled instance of DataSecurity Plus is still present on the agent machine.
Solution:
- Reinstall the agent by following these steps:
- Navigate to the Manage Agent page (Admin Console > Admin > Administrative Settings > Manage Agent and click the Manage Agent link beside the server whose agent you want to troubleshoot).
- Click Reinstall Agent on the error notification message. If the agent is not reinstalled, uninstall and install the agent by opening the ellipsis menu (three dots) in the Agent Service table.
If the issue persists, contact our support team at support@datasecurityplus.com, available 24/5.
10. Limitation
To generate on-demand reports, Windows file servers should have communication with DataSecurity Plus.
10. Contacting the support team
For technical assistance, you can email us at support@datasecurityplus.com.
Kindly include the following details in your email to help us assist you better:
- Product edition (Free, Trial, or Standard).
- Product build number.
- A brief description of the problem.