Home » Adding Domains
 

Adding Domains

Active Directory

Active Directory (AD) is a directory service developed by Microsoft that provides centralized management of network resources such as users, computers, printers, and security groups within a domain-based network. It is designed to help IT administrators efficiently manage and secure an organization's network infrastructure by controlling user access, enforcing policies, and maintaining resource integrity.

At its core, AD acts as a centralized database where all information about network resources is stored, allowing administrators to organize access efficiently, and manage these resources through a single interface, streamlining IT operations across the enterprise.

Functionalities of Active Directory in Endpoint Central

Seamless Onboarding/Offboarding of Computers

With an AD integration, onboarding and offboarding of domain-based devices in UEMS becomes much easier. Once a domain is configured, you can import and manage all AD-linked devices from a centralized console. Also, UEMS can adjust its management scope automatically to reflect these changes as computers are added or removed from Active Directory.

Automatic Custom Group (CG) Creation

AD integration also supports automatic creation of custom groups (Logical Structure Groups) based on AD Organizational Units (OUs) or other criteria. This simplifies the process of categorizing and managing domain-based devices dynamically to deploy the tasks as well as to provide them as scope for technicians.

Active Directory based Technician Login

AD integration also supports AD user-based login to UEMS Server console. This allows the technicians to use a single password to access both AD resources and the UEMS server.

Active Directory-based Reports

AD integration also supports generating insights on AD components such as OU, Group, Domain, users, computers, and GPOs.

Task Deployment

The AD integration also allows technicians to use the same credentials to deploy tasks such as agent deployment, custom scripts, or software to the computers.

Pre-Requisites for Setup:

  • Administrative Rights: Ensure that the account used to add the domain has appropriate administrative rights across all client systems in the domain. This permission is required to use the credential for onboarding of computers and fetching all objects in AD (computers, users, containers, groups, GPO, and OUs).
  • Service Account Access: If using a service account, it must have view access (Read permission) to all objects in AD (computers, users, containers, groups, GPO, and OUs). Lack of view access will cause AD synchronization to fail. This account also should have access to install agent software in computers.
  • Access to Attributes: The service account should have access to important object attributes like whenChanged, whenCreated, objectGUID, Name, distinguishedName, etc. Additionally, for deleted object retrieval, ensure credentials have access to the AD recycle bin.
  • Data Collection via Command Prompt:
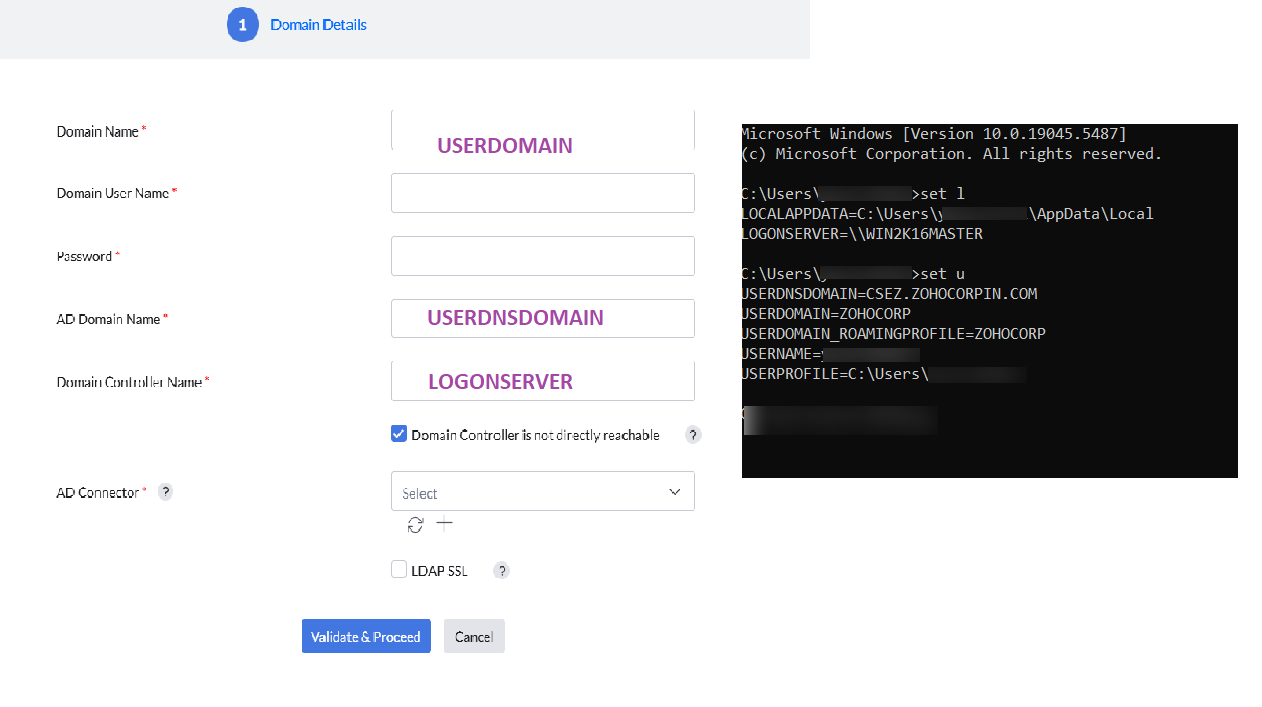
    • Run set L in Command Prompt to get the Domain Controller name (Logonserver = Domain Controller Name).
    • Run set U to retrieve the Domain Name and AD Domain Name (Userdomain = Domain Name, Userdnsdomain = AD Domain Name)

Steps to Add a Domain:

  1. Navigate to the Agent > Domain > Add Domain.
  2. Choose Active Directory from the drop down.
  3. Enter the details collected from the Command Prompt (from the set L and set U commands) in the appropriate fields.
  4. Note:
    1.If the Central Server cannot directly reach the Domain Controller, enable the Domain controller is not directly reachable option. Then, choose a Distribution Server—located close to the AD Domain Controller—as the AD connector. The AD connector should have reachability to both Central Server and AD Domain Controller.
    2. Distribution server must be configured for the remote office where the domain controller is located to configure AD connector.

  5. Select the AD connector from the drop down. AD Connector acts as a communicator between Central Server and Domain Controller to fetch the AD objects. Distribution Server configured for the location where Domain Controller present can be used as a AD Connector. To know more about it, click here. You can also refresh or add a new AD Connector
  6. domain-addition-in-endpoint-central
  7. Enable LDAP SSL to encrypt communication between Endpoint Central and Active Directory. This requires uploading an SSL certificate to the Active Directory. By default, LDAP SSL uses port 636, which can be modified based on your requirements.
  8. Click Validate and Proceed.

Configuring the Sync Options:

AD resource information is synced according to a pre-configured schedule. Changes in sync frequency will affect Domain, Auto Discovery - Active Directory Sync and Custom group functionalities.

Once the domain is validated, the sync frequency can be configured for that particular domain.

How to Configure Sync Frequency:

i. Sync Frequency

Users can choose how often the domain syncs with the server:
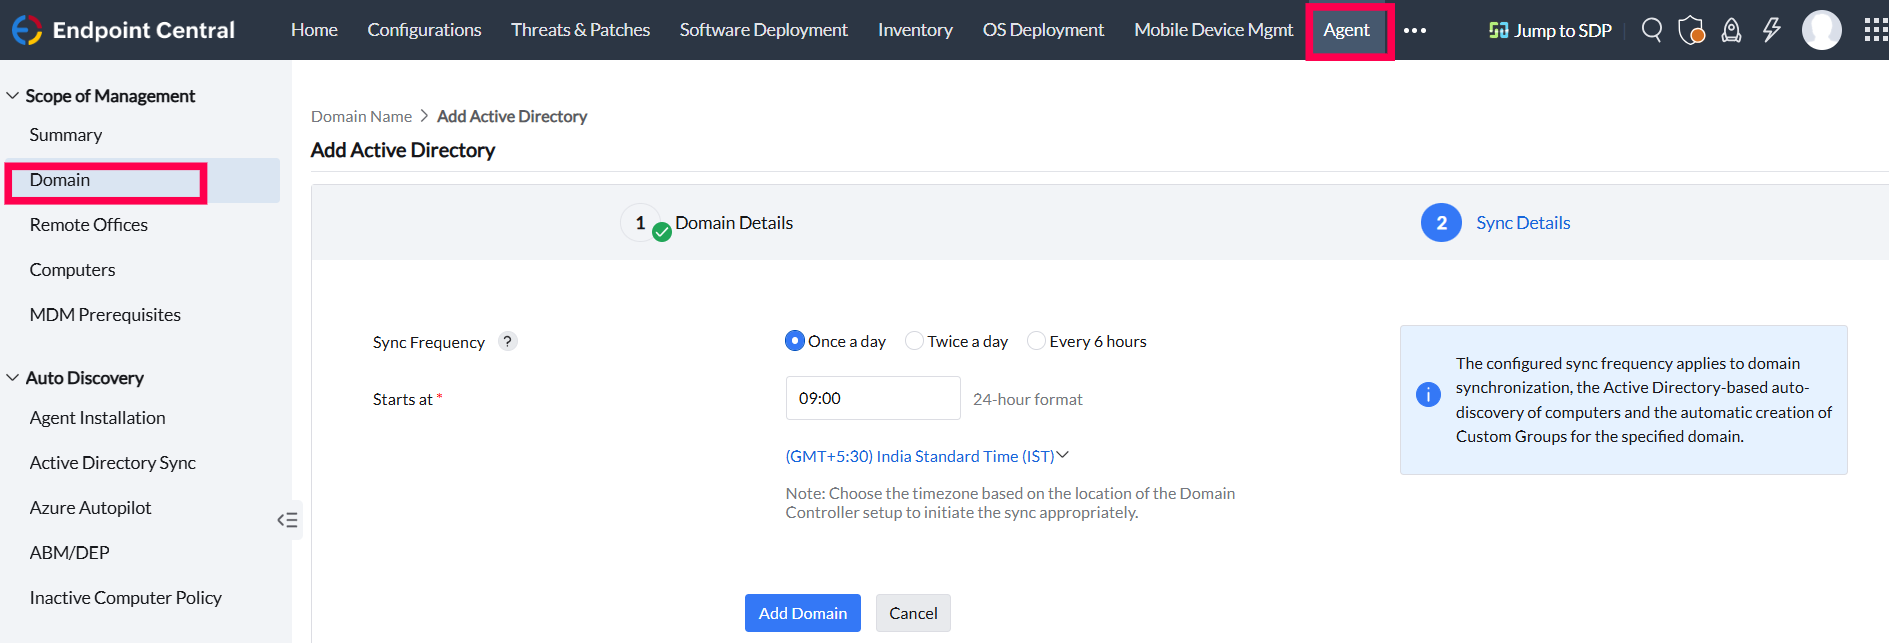
  • Once a day – Syncs the domain data once every 24 hours.
  • Twice a day – Syncs every 12 hours.
  • Every 6 hours – Syncs the domain data every 6 hours

ii. Start Time

  • Enter a time in 24 hour format to start the sync. Kindly note that the timezone has to be provided based on the location of the domain controller setup to initiate the sync. appropriately.
  • Note: Choose the timezone based on the location of the Domain Controller setup to initiate the sync appropriately.

  • Click Add Domain
  • Note: The configured sync frequency applies to domain synchronization, the Active Directory-based auto-discovery of computers, and the automatic creation of Custom Groups for the specified domain.

domain-addition-in-endpoint-central

Managing Domains in Endpoint Central:

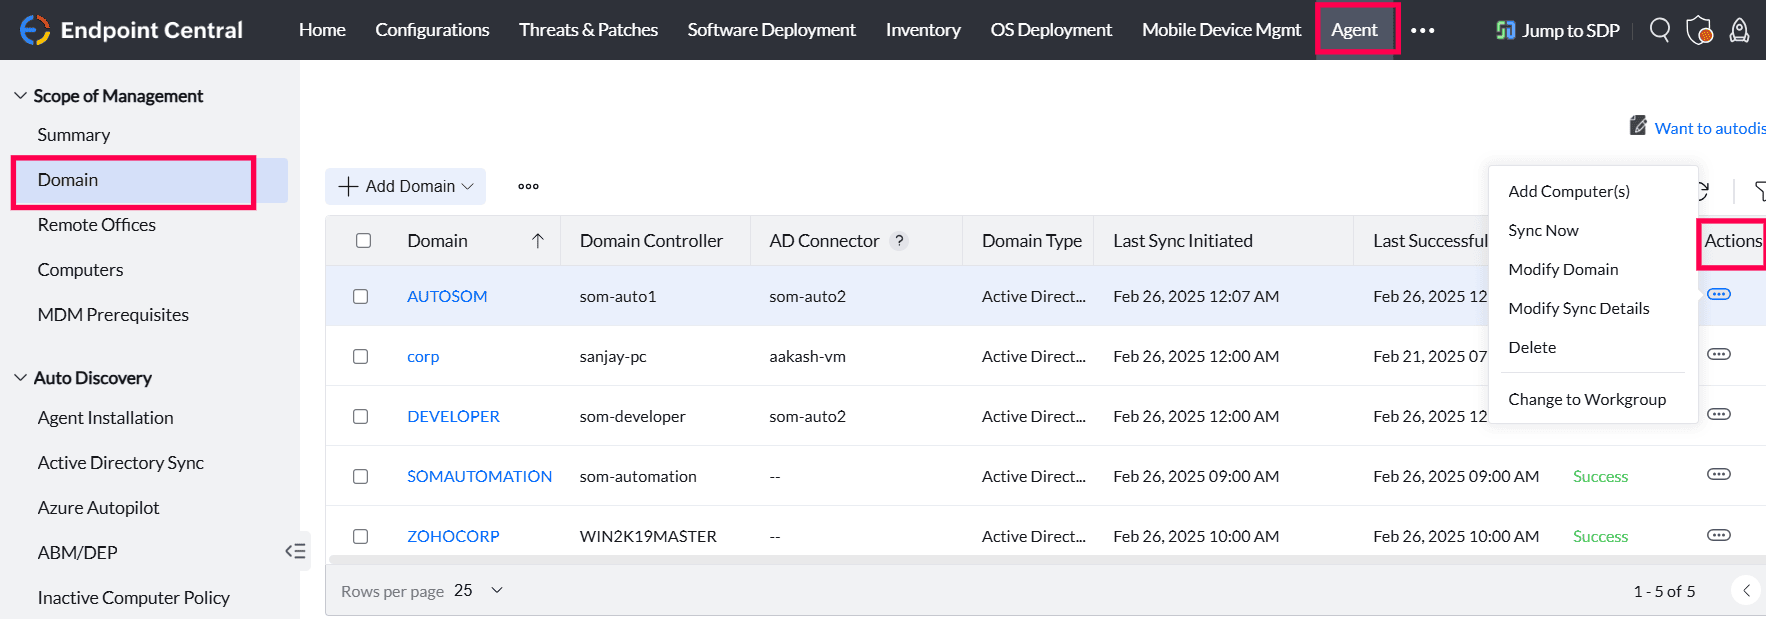
Once a domain is added, you can manage it through the Actions menu.
domain-addition-in-endpoint-central
  • Add Computer(s): To add AD computers, select the domain, navigate to Actions, and click Add Computers.
  • Sync Now:To initiate a domain sync immediately, navigate to the actions menu of the corresponding domain and click sync now.
  • Modify Domain: To edit domain details, such as domain controller or AD connector, Navigate to the actions menu of corresponding domain and click Modify Domain.
  • Modify Sync Details: To update sync frequency or start time, Navigate to the actions menu of the corresponding domain and click Modify Sync Details.
  • Delete: To delete a domain, navigate to Actions for the corresponding domain and click Delete. Kindly note that deleting the domain will erase the domain’s data and related Active Directory reports data. A domain cannot be deleted unless all the computers are removed from Scope of Management.
  • Change to Workgroup: To change a domain-based device to a workgroup, select the domain, click the corresponding action, and choose Change to Workgroup

Note: Changing the Domain type from Workgroup to AD will disable all other AD functionalities configured with this AD.

When changing the Active Directory to Workgroup, the DNS Suffix will be required. To find the DNS Suffix, enter ipconfig /all in the command prompt and locate the data corresponding to Primary DNS Suffix.

Troubleshooting Domain Configuration in Endpoint Central:

For any issues during domain setup or synchronization, review your administrative credentials, access rights, and AD object permissions. Ensure proper configuration of sync frequency and domain connectivity to avoid disruptions.

Related Articles: