User and Role Management
What is User Administration?
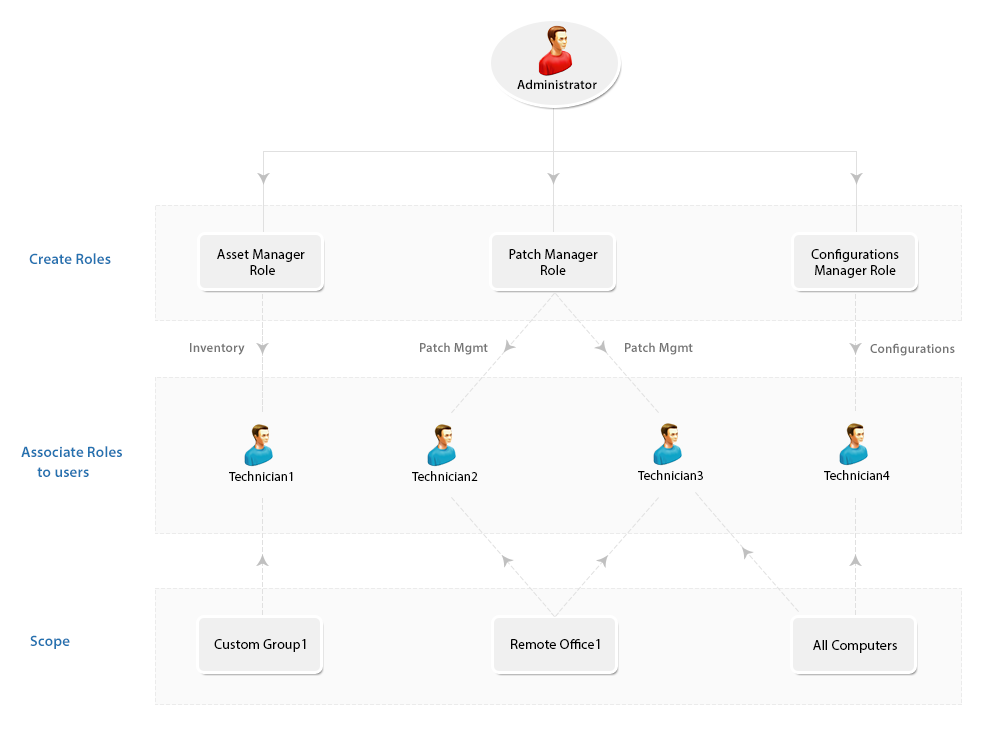
User administration refers to the process of managing user accounts within a system or application for better management. In the context of Endpoint Central, user administration involves tasks such as creating, modifying, and deleting user accounts. This includes defining user roles, assigning scopes (permissions), and ensuring that users have the appropriate access levels to perform their tasks.
Take a look at the features listed down under User Administration:
Users and Roles
User accounts are individual accounts created within Endpoint Central under a scope that provides them the access to endpoints, custom groups and remote offices. Roles, on the other hand, define a set of permissions that determine what actions a user can perform within the system. Each user is assigned a role, which governs and determines their level of access and authority.
Role Management
Some of the most commonly used Roles are specified under Pre-defined Roles. However, you also have the flexibility to define roles that best suit your requirements under the User-defined Roles and grant appropriate permissions. Here's a brief on the Pre-defined and User-defined roles respectively:
You can create roles, and customize them based on your personalized needs. These customized roles fall under the User-defined category. Follow the steps mentioned below to create a new User-defined role:
- Select the Admin tab, navigate to User AdministrationChoose Role This opens the User Administration page.
- Select the Role tab and click the Add Role button.
- Specify the Role Name and a small description about it.
- Define module-wise permission level for the Role in the Select Control Section. This includes options like Full Control, Write, Read, and No Access.
- Click Add button. This completes the process of creating a new role.
Note: Role deletion cannot be performed if that role is associated even with a single User. However you can modify the permission levels for all User-defined roles.
You will find the following roles in the Pre-defined category:
- Administrator Role: The Administrator role signifies the Super Admin who exercises full control, on all modules. The operations that are listed under the Admin tab include:
- Full control over all modules.
- Defining or modifying Scope of Management.
- Adding Inactive Users
- Changing mail server settings
- Scheduling vulnerability database update, and more
- Guest Role: The Guest Role retains the Read Only permission to all modules. A user who is associated to the Guest Role, will have the privileges to scan and view various information about different modules, although making changes is strictly prohibited. Guest Role also has Read Only permission for viewing, MDM inventory details, reports, profiles and Apps of the mobile devices.
- Read-only access to all modules.
- Privileges limited to viewing information without the ability to make changes.
- Viewing configurations, reports, etc.
- Auditor Role:The Auditor role will help you grant permissions to auditors view the details of software inventory, check for license compliance, etc. Users with "Auditor Role" can also have read permission for MDM Reports.
- Permissions tailored for auditing purposes
- Viewing software inventory details and license compliance checks.
- Mobile Device Manager Role: Write permission for Inventory, Reports, Profiles, and Apps in Mobile Device Management.
- Technician Role:The Technician Role has a well-defined set of permissions to do specific operations. Users under the Technician role are restricted from performing all the operations listed under the Admin tab. The operations that can be performed by users associated with the Technician Role include:
- Can define and deploy all types of configurations and collections.
- Can view all the configurations including those created by other users, reports, etc.
- Can suspend, modify, or re-deploy the configurations defined by them.
- Can update the Vulnerability Database.
- Can perform Scan operations on all modules.
- Has write permission for the following, Inventory, Reports, Profiles and Apps in Mobile Device Management.
- Remote Desktop Viewer: The Remote Desktop Viewer Role will allow the users associated with it to invoke a Remote desktop connection and view details of users who had connected to a particular system.
- IT Asset Manager: The IT Asset Manager has complete access to the Asset Management module and all the other features are inaccessible. IT Asset Manager can also view the Inventory details of all the Mobile Devices.
- Patch Manager: The Patch Manager role has complete access to Patch Management. Patch Manager will also have the privilege to access and use "Tools", like Wake On LAN, Remote Shutdown, System Manager and ability to schedule Patch Reports. All the other modules/features are inaccessible.
- Mobile Device Manager: Mobile Device Manager role has write permission for the following, Inventory, Reports, Profiles and Apps in Mobile Device Management.
- OS Deployer: The OS deployer role provides the associated user the privilege to capture images of Windows OS and deploy it across the network computers.
How to associate users with roles?
- Open the Endpoint Central web console → Navigate to Admin tab → User Administration
- Click User → Add User
- Select the Authentication type as Active Directory Authentication or Local Authentication. For Active Directory Authentication, select a Domain in Domain name.
Kindly note that Active Directory Authentication is available for on-premises environments only.
- Specify a User Name.
- Specify the Role from the drop -down list. This list will contain both pre-defined and user defined roles
- For Active Directory Authentication, the Email Address of the user will be fetched from Active Directory, if available. If not, specify the email address of the user manually. The Email Address should be manually entered for local authentication.
- If required, enter the phone number of the user
- Define the Scope for the user, you can specify the computers, which need to be managed by the user. You can choose to provide the user access to manage all computers, remote offices or specific unique custom groups. If you do not have a unique custom group, you can create one. If the custom group is not unique, it will not be listed here.
- You can also select the devices that need to be managed. You have the option to manage all devices or even selected groups.
- Click on Add User.
Secure Authentication
The Secure authentication feature under User Administration ensures additional security of the application by implementing various security measures. This makes sure that users who have authorised privileges can perform operations in Endpoint Central. There are three sub-features under Secure Authentication and they include:
- Two-factor authentication: The user will only be able to login after entering the username and password, followed by an OTP that they will receive via mail.
- User Account Policy :The user account policy refers to the set of rules and requirements that govern user accounts within the system. This policy often includes the action that must be taken against invalid login attempts like the number of invalid login attempts allowed and lockout duration for invalid attempts. It also includes the domain settings during login like rules for hiding the domain list and the default domain for authentication. With this policy, you can also set actions against account inactivity and session expiration time for users.
- Password Policy: The Password Policy allows admins to create a number of rules for users while they are setting up passwords. It allows to set a minimum password length, minimum number of special characters, the number of last passwords that the user can reuse and when they should enforce users to change their password.
Notifications
The Notification feature allows admins to get notified when the user performs a varied set of operations. For the admin to receive notifications, their e-mail ID addresses should be mentioned so that they get notified when the following changes are made:
- When a user resets the password
- When the user account gets locked or disabled due to invalid login attempts
- When the user account gets disabled due to inactivity
- When the disabled account is reactivated by the admin
- When the account is manually disabled by the admin
- When a new user account is created or deleted
SDP Users
The SDP Users listed down under this feature will not have access to Endpoint Central console and therefore cannot carry out any endpoint management related activities. To provide access to SDP Users to use the functionalities of Endpoint Central, you can just click Add to Endpoint Central icon under actions column corresponding to their names. This is only applicable when the Self Desk Portal is integrated with Endpoint Central. To know more about the other important features under Global settings, visit the following links:
- What are custom groups and how do you create them?
- How to add a domain in Endpoint Central?
- How to create remote offices in Endpoint Central?
- How to add computers under the scope of management of Endpoint Central?


