Related content
What are VPC Flow Logs?
VPC Flow Logs is a feature that allows you to monitor and record traffic that enters and exits the Amazon Virtual Private Cloud (VPC), subnet, or a network interface within Amazon Web Services (AWS). When a flow log is created for a VPC, it monitors every network interface within the VPC. The collected flow log data helps you address connectivity issues, detect intrusions, and diagnose overly restrictive and permissive security group rules.
These flow logs are collected in a different path from your network traffic, so it doesn't affect your network performance and throughput. The generated flow logs can be published in Amazon CloudWatch or Simple Storage Service (S3) so they can be viewed and analyzed effectively.
Let's dive deeper into publishing VPC flow logs to CloudWatch logs.
What is CloudWatch?
CloudWatch is a monitoring and management service by AWS that allows you to logs from your network resources in near real time. The flow log data from network interfaces, VPCs, and subnets can be published in a log group, a stream of logs that has same access control and retention setting, in CloudWatch. Each network interface has its log stream in the log group. The log stream contains the flow log records.
This section lists the steps to enable flow log generation for network interfaces, and the ways to publish them to CloudWatch.
Steps to generate flow logs for network interfaces and publish them to CloudWatch
- Open the Amazon EC2 console.
- In the navigation pane, select Network Interfaces.
- Select an interface or multiple interfaces whose traffic you need to log.
- Select Actions > Create flow log.
- Specify the type of IP traffic to log in Filter. Select Accepted to log only the traffic accepted by the network interface, and Rejected to log only rejected traffic. Select All to log both accepted and rejected traffic.
- Maximum aggregation interval is the time required to aggregate the logs before they are processed and published into one flow log record. It's also known as the capture window. Choose a maximum aggregation interval. By default, it is 10 minutes.
- Select the destination as Send to CloudWatch logs.
- Next, under Destination log group, specify the name of a log group in CloudWatch logs where the flow logs are to be published. If no such log group exists already, AWS will create a new log group for the name specified.
- For IAM role, enter the name of the IAM role that has permissions to publish logs to CloudWatch logs. To create an IAM role granting sufficient permissions to publish flow logs to the specified log group, follow the steps given below.
- In the AWS console, select IAM under the Services menu.
- Click Roles in the left navigation pane.
- Select Create role, then click EC2. Click Next: Permissions.
- Under the Attach permissions policies, select the permissions you want to grant to the IAM role. Click Next: Review.
- Enter the name and description of the IAM role, and click Create role.
- Once the policy is created, click the created policy in the Roles pane. Select Add inline policy from under the Permissions tab.
- In the JSON tab, enter the policy statement code. A sample code granting the IAM role the required permissions is given below.
{
"Version": "2012-10-17",
"Statement": [
{
"Action": [
"logs:CreateLogGroup",
"logs:CreateLogStream",
"logs:PutLogEvents",
"logs:DescribeLogGroups",
"logs:DescribeLogStreams"
],
"Effect": "Allow",
"Resource": "*"
}
]
} - Click Review policy.
- Enter a name for the policy, and click Create policy.
- Under the Trust relationships tab, click Edit trust relationship.
- Enter the code for establishing the trust relationship. A sample code is given below.
{
"Version": "2012-10-17",
"Statement": [
{
"Sid": "",
"Effect": "Allow",
"Principal": {
"Service": "vpc-flow-logs.amazonaws.com"
},
"Action": "sts:AssumeRole"
}
]
} - Enter the name of the IAM role that you have created. Click Create.
- AWS allows you to define the fields that you want to be included in the log records. This can be specified in the Format option. You can either use the default format by selecting AWS default format, or create a custom format by selecting Custom format. For Log format, select the fields that you want to include in the flow log record.
- You can also add tags to the flow logs in the Add Tag option.
- Click Create.

Steps to generate flow logs for VPCs or subnets and publish them to CloudWatch
- Open the Amazon VPC console.
- In the navigation pane, select Your VPCs or Subnets./li>
- Select one or more VPCs or subnets whose traffic you need to log.
- Select Actions > Create flow log.
- Specify the type of IP traffic to log in Filter. Select the option Accepted to log only the traffic accepted by the VPC, and Rejected to log only rejected traffic. Select All to log both accepted and rejected traffic.
- Maximum aggregation interval is the time required to aggregate the logs before they are processed and published in to one flow log record. It's also known as the capture window. Choose a maximum aggregation interval. By default, it is 10 minutes.
- Select the destination as Send to CloudWatch logs.
- Next, under Destination log group, specify the name of a log group in CloudWatch logs where the flow logs are to be published. If no such log group exists already, AWS will create a new log group for the name specified.
- For IAM role, enter the name of the IAM role that has permissions to publish logs to CloudWatch logs. To create an IAM role granting sufficient permissions to publish flow logs to the specified log group, follow the steps given below.
- In the AWS console, select IAM under the Services menu.
- Click Roles in the left navigation pane.
- Select Create role, then click EC2. Click Next: Permissions.
- Under the Attach permissions policies, select the permissions you want to grant to the IAM role. Click Next: Review.
- Enter the name and description of the IAM role, and click Create role.
- Once the policy is created, click the created policy in the Roles pane. Select Add inline policy from under the Permissions tab.
- In the JSON tab, enter the policy statement code. A sample code granting the IAM role the required permissions is given below.{
"Version": "2012-10-17",
"Statement": [
{
"Action": [
"logs:CreateLogGroup",
"logs:CreateLogStream",
"logs:PutLogEvents",
"logs:DescribeLogGroups",
"logs:DescribeLogStreams"
],
"Effect": "Allow",
"Resource": "*"
}
]
} -
- Click Review policy.
- Enter a name for the policy, and click Create policy.
- Under the Trust relationships tab, click Edit trust relationship.
- Enter the code for establishing the trust relationship. A sample code is given below.
- {
"Version": "2012-10-17",
"Statement": [
{
"Sid": "",
"Effect": "Allow",
"Principal": {
"Service": "vpc-flow-logs.amazonaws.com"
},
"Action": "sts:AssumeRole"
}
]
} - Enter the name of the IAM role that you have created. Click Create.
- AWS allows you to define the fields that you want to be included in the log records. This can be specified in the Format option. You can either use the default format by selecting AWS default format, or create a custom format by selecting Custom format. For Log format, select the fields that you want to include in the flow log record.
- You can also add tags to the flow logs in the Add Tag option.
- Click Create.
What is AWS S3?
S3 is a safe and secure object storage service offered by Amazon. It provides a simple web services interface that allows you to store and retrieve any amount of data, at any time. The flow log data is published to log file objects, which are entities that store data within an Amazon S3 bucket. Similar to CloudWatch logs, flow logs generated from network interfaces, VPCs, and subnets can be published to an S3 bucket. Once you have created and configured your Amazon S3 bucket, you can start publishing flow logs to the bucket.
Steps to generate flow logs for network interfaces and publish them to S3
- Open the Amazon EC2 console.
- In the navigation pane, select Network Interfaces.
- Select one interface or multiple interfaces whose traffic you need to log.
- Select Actions > Create flow log.
- Specify the type of IP traffic to log in Filter. Select Accepted to log only the traffic accepted by the network interface, and Rejected to log only rejected traffic. Select All to log both accepted and rejected traffic.
- Maximum aggregation interval is the time required to aggregate the logs before they are processed and published into one flow log record. It's also known as the capture window. Choose a maximum aggregation interval. By default, it is 10 minutes.
- Select the destination as Send to an Amazon S3 bucket.
- Next, under S3 bucket ARN, specify the Amazon Resource Name (ARN) of an existing Amazon S3 bucket where you want to publish the flow logs.
- AWS allows you to define the fields that you want to be included in the log records. This can be specified in the Format option. You can either use the default format by selecting AWS default format, or create a custom format by selecting Custom format. For log format, select the fields that you want to include in the flow log record.
- You can also add tags to the flow logs in the Add Tag option.
- Click Create.

Steps to generate flow logs for VPCs or subnets and publish them to S3
- Open the Amazon VPC console.
- In the navigation pane, select Your VPCs or Subnets.
- Select one or more VPCs or subnets whose traffic you need to log.
- Select Actions > Create flow log.
- Specify the type of IP traffic to log in Filter. Select Accepted to log only the traffic accepted by the VPC, and Rejected to log only rejected traffic. Select All to log both accepted and rejected traffic.
- Maximum aggregation interval is the time required to aggregate the logs before they are processed and published into one flow log record. It's also known as the capture window. Choose a maximum aggregation interval. By default, it is 10 minutes.
- Select the destination as Send to an Amazon S3 bucket.
- Next, under S3 bucket ARN, specify the Amazon Resource Name (ARN) of an existing Amazon S3 bucket where you want to publish the flow logs.
- AWS allows you to define the fields that you want to be included in the log records. This can be specified in the Format option. You can either use the default format by selecting AWS default format, or create a custom format by selecting Custom format. For Log format, select the fields that you want to include in the flow log record.
- You can also add tags to the flow logs in the Add Tag option.
- Click Create.
After you're done creating a flow log, the logs start publishing to the specified destination. If you don't require a flow log, you can delete it. This disables the flow log service, and no further log data is published to the destination. However, deleting a flow log does not affect the flow log records already captured and published to the destination.
Amazon S3 is predominantly a web-based data storage service, and it needs to integrate with other platforms such as Amazon Athena to work with the stored log data. With comprehensive reports, easy search mechanisms, and customizable alert profiles available in the AWS cloud monitoring module of Log360, you can track, analyze, and respond to events occurring in your cloud environments easily. Log360 facilitates the smooth functioning of your business by providing complete visibility into your AWS cloud infrastructure.
Some of the capabilities from Log360's AWS cloud monitoring module are:
- Monitoring and providing s3 traffic analysis reports.
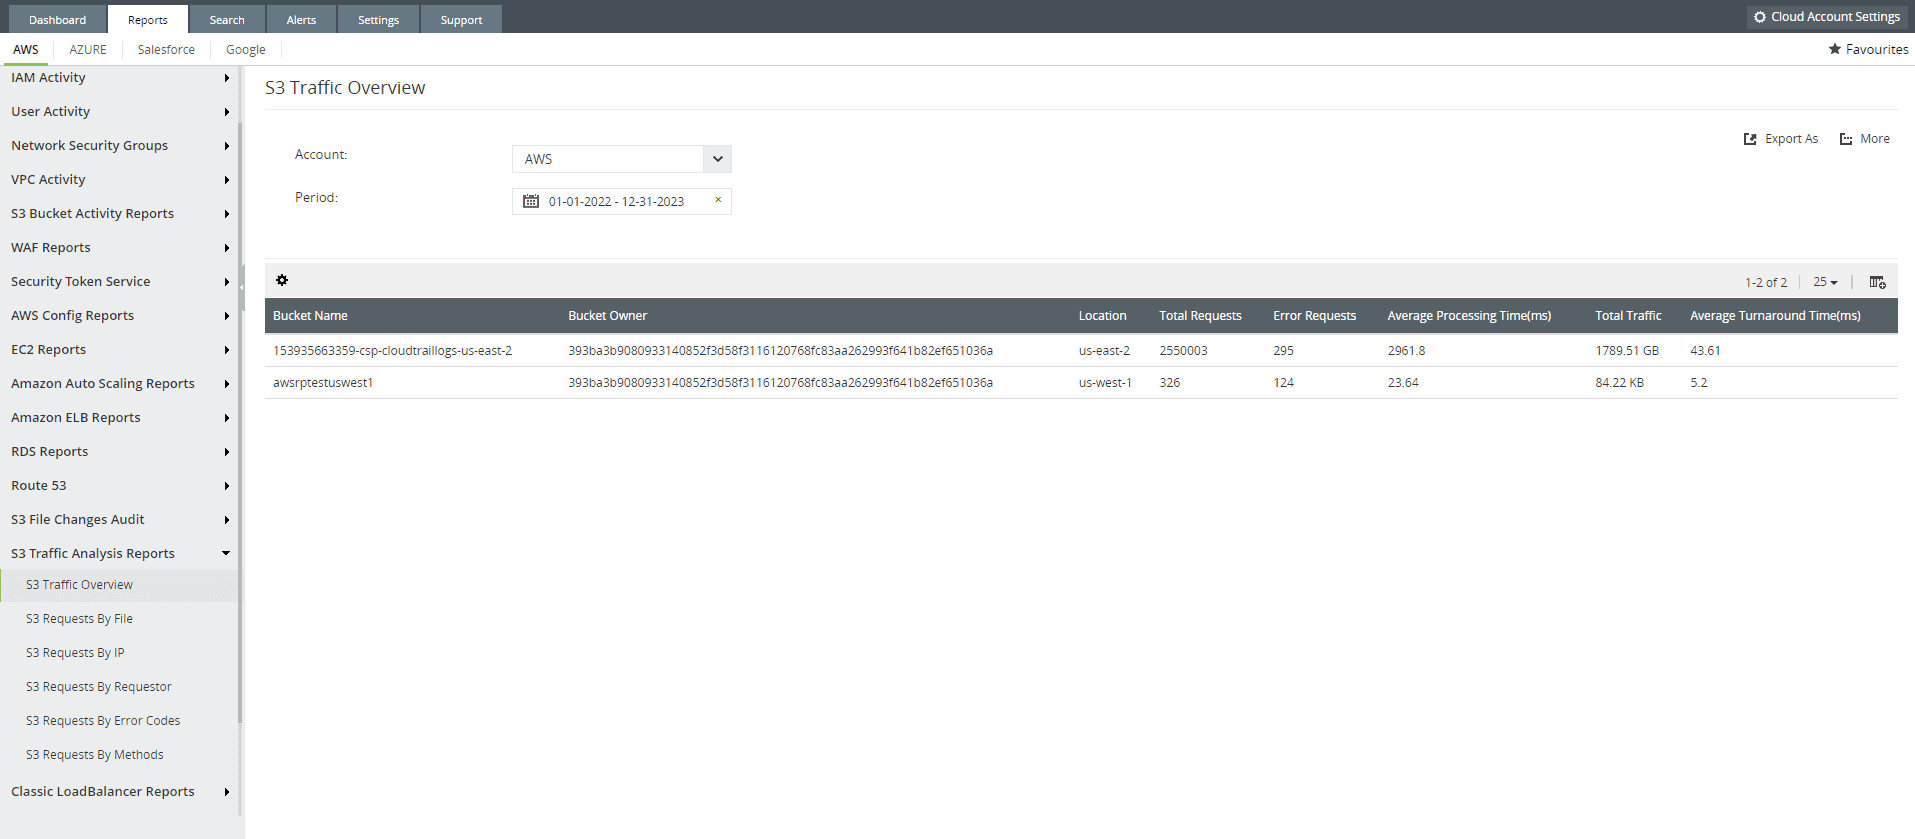
Figure 3: S3 traffic analysis report offered from the cloud monitoring module of Log360, Cloud Security Plus - Tracking and reporting s3 bucket activity.
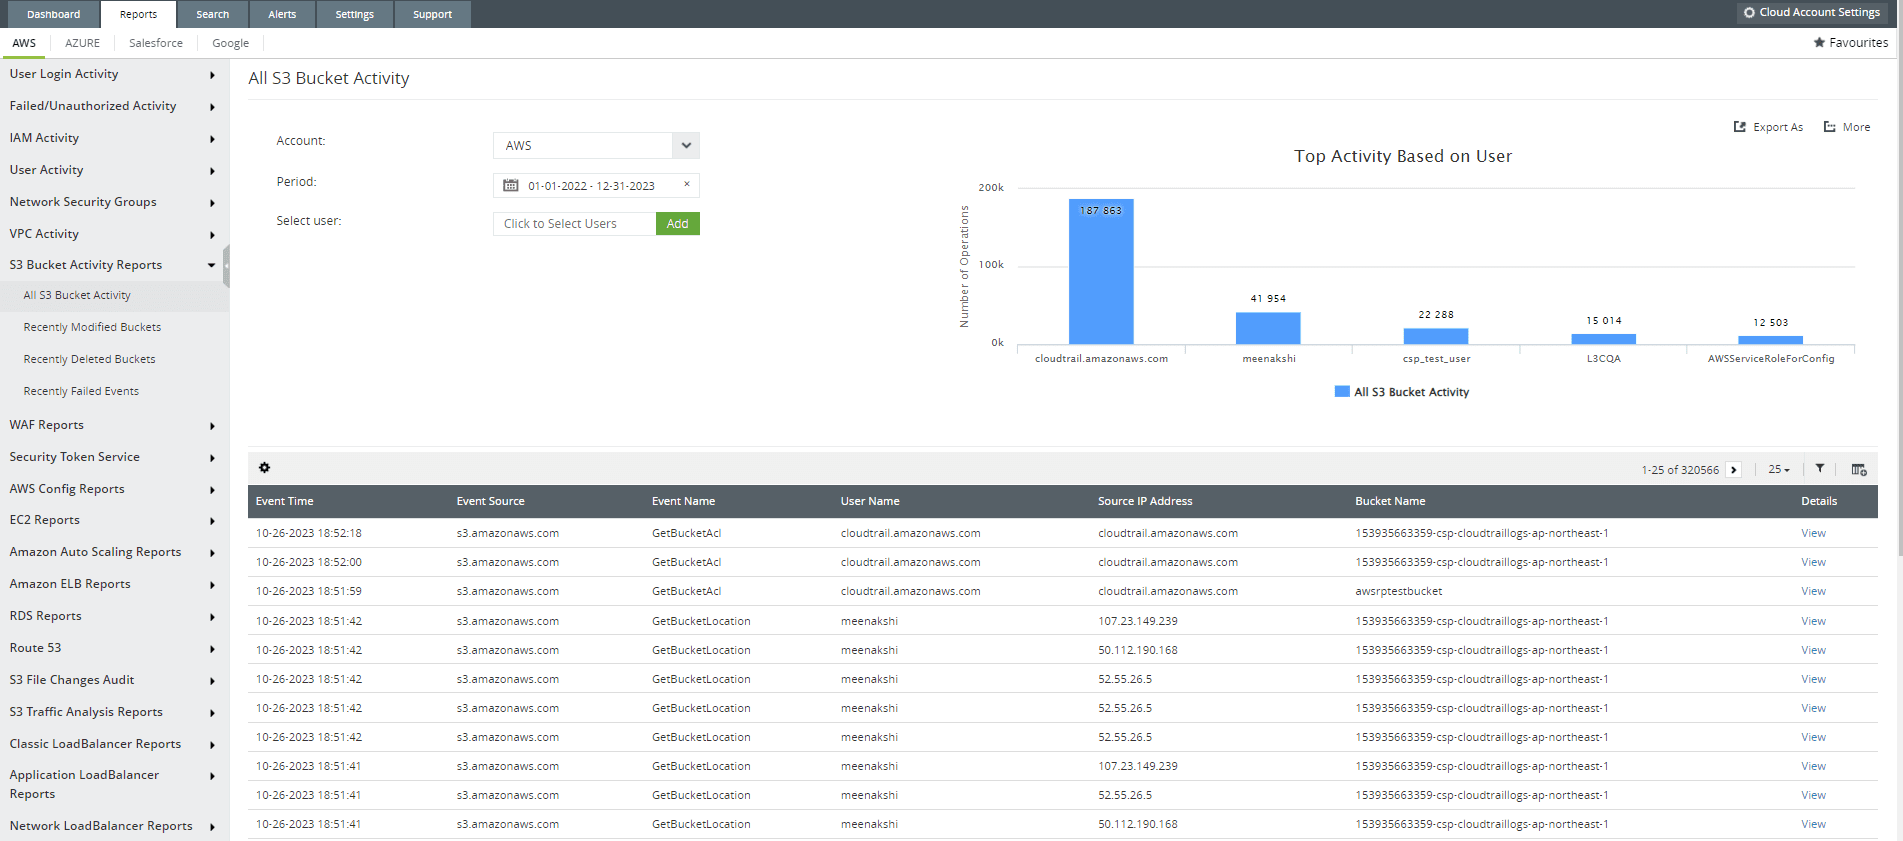
Figure 4: S3 bucket activity report offered from the cloud monitoring module of Log360, Cloud Security Plus - Recording all IAM activities.
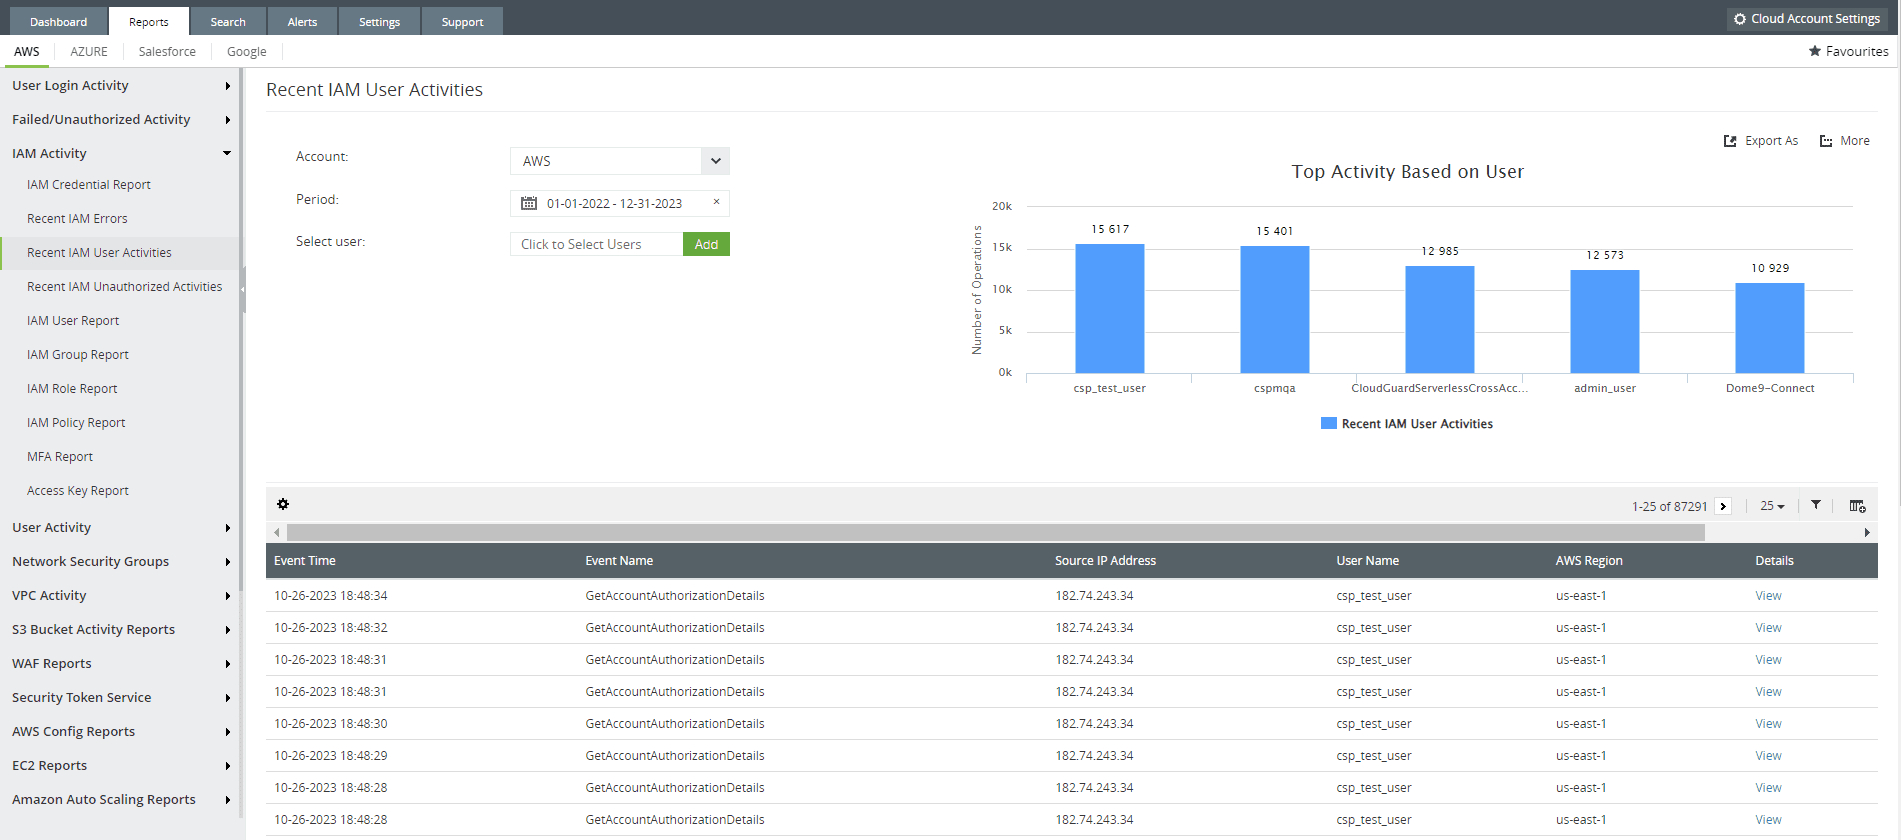
Figure 5: IAM user activity report offered from the cloud monitoring module of Log360, Cloud Security Plus - Auto - configuration of your AWS environment before CloudTrail log generation begins.
- Reports generated using CloudTrail logs and S3 server access logs
Figure 6: S3 requests by error code report offered from the cloud monitoring module of Log360, Cloud Security Plus - AWS security group change auditing
Figure 7: Security group configurations changesm report offered from the cloud monitoring module of Log360, Cloud Security Plus


To learn more about how Log360 can secure your AWS environment, read here.
- What are VPC Flow Logs?
- What is CloudWatch?
- Steps to generate flow logs for network interfaces and publish them to CloudWatch
- Steps to generate flow logs for VPCs or subnets and publish them to CloudWatch
- What is AWS S3?
- Steps to generate flow logs for network interfaces and publish them to S3
- Steps to generate flow logs for VPCs or subnets and publish them to S3